Transcript
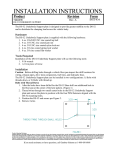
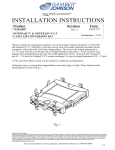
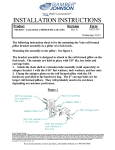
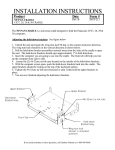
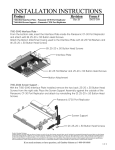
INSTALLATION INSTRUCTIONS
Product
Date
06/14/2006
DS-146
Vehicle base for International, Freightliner, & Sterling Trucks
Form #
INST-300
The instructions that follow describe the method of installation recommended by the manufacturer. This base
is designed for International, Freightliner, and Sterling trucks, but may also be used in other large trucks with
bench style seats. The DS-146 is designed to be bolted to the floor and to the top, front, rectangular rail of the
bench style seats found in some large trucks. In order to securely fasten this base, drilling into the vehicle will
be required.
WARNING: 1. FOLLOW ALL SAFETY PROCEDURES SUCH AS WEARING EYE PROTECTION
WHEN DRILLING. 2. BEFORE DOING ANY DRILLING, MAKE SURE TO CHECK UNDER,
AROUND, AND INSIDE THE VEHICLE TO ENSURE THAT THE THE HOLE PLACEMENT WILL
NOT DAMAGE ANY WIRING, TUBING, OR DEVICES.
1. Loosen the 3/8-16 fasteners
(carriage bolts and nuts, see FIG. 1).
Place the assembly in the vehicle and
find the desired position. Use this
position to adjust the height of the base
so that it will rest flat on the two points
of contact with the seat frame and the
floor (see FIG. 2).
2. Depending on the model of your
vehicle, there may be holes in the seat
frame already. It is recommended to use
the pre-existing holes in the seat frame.
If the seat frame has no existing holes,
place the base in the desired position,
mark the locations on the seat frame
where the mounting holes will need to
be drilled, remove assembly, and drill
holes using a 3/8" drill bit.
Mount
3/8-16 Fastener
Foot
FIG. 1
DS-146 Assembly
3/8-16 Fastener
Seat Frame
3. Loosely assemble the appropriate length fasteners (NOT
INCLUDED) and the base to the seat frame. With the Foot
(see FIG. 1) resting on the floor, mark the locations for the
holes, remove the assembly and drill completely through the
floor of the vehicle. Again, make sure that there are no
interfering components of the vehicle in the position
chosen for mounting.
4. With all of the holes drilled, place the base back into
position, loosely bolt the Mount to the seat frame. Loosen the
four 3/8-16 fasteners holding the assembly together. Loosely
fasten the Foot of the assembly to the floor. Adjust the
assembly so that it rests flat on the seat frame and the floor.
FIG. 2
DS-146 Installed
Floor
5. Finally, tighten all the hardware. This concludes the
installation of the DS-146.
Product Mounting Disclaimer
Gamber-Johnson is not liable under any theory of contract or tort law for any loss, damage, personal injury, special, incidental or consequential damages for personal injury or other damage
of any nature arising directly or indirectly as a result of the improper installation or use of its products in vehicle or any other application. In order to safely install and use Gamber-Johnson
products full consideration of vehicle occupants, vehicle systems (i.e., the location of fuel lines, brakes lines, electrical, drive train or other systems), air-bags and other safety equipment is
required. Gamber-Johnson specifically disclaims any responsibility for the improper use or installation of its products not consistent with the original vehicle manufactures specifications
and recommendations, Gamber-Johnson product instruction sheets, or workmanship standards as endorsed through the Gamber-Johnson Certified Installer Program.
If you need assistance or have questions, call Gamber-Johnson at 1-800-456-6868