1
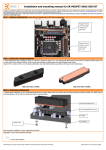
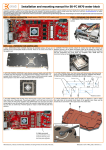
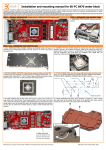
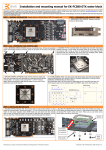
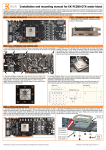
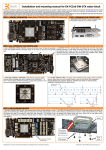
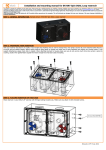
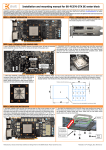
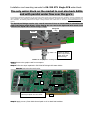
Installation and mounting manuals for EK-295 GTX Single PCB water block:
The only water block on the market to cool also back RAMs
and with parallel water flow over the gpu’s .
This product is intended for installation only by expert users. Please consult with a qualified technician for installation. Improper installation may
result in damage to your equipment. EK Water Blocks assumes no liability whatsoever, expressed or implied, for the use of these products, nor
their installation. The following instructions are subject to change without notice. Please visit our web site at www.ekwaterblocks.com for
updates.
HU
UH
The barb hose fittings require only a small amount of force to screw them in otherwise the
high flow fittings might break. These fittings do not need to be tightened with much force
because the liquid seal is made using o-rings.
Spacer
Fitting with
o-ring
O-ring
Please use spacer
with o-ring on both
sides (Front and
back and top).
Picture 1: Sample picture of fitting installation.
Step 1. Remove the graphic card from computer.
Step 2. Follow the steps explained in EK-FC295 GTX Single PCB water blocks.
Step 2a. Removing the stock cooler
Unscrew all 17 encircled screws,
including backplate and store them.
Step 3. Apply pre-cut 0,5mm thick thermal pads on all 14 back RAM modules.
14 pcs of
M2,5×20
screws
4 pcs of
M4×16
screws.
Use
enclosed
alen key.
2 pcs of
O-ring
POM Acetal LINK:
Make sure the
orintation of the part
is right. The hole in
the link has to be
connected with Front
blocks G1/4 thread in
copper.
Picture 3: Applying thermal pads on 295GTX single PCB back RAM modules. Total of 14 pieces. Thermal pad is 0,5mm
thick and pre-cut. Please do not forget to remove plastic foil from both sides of thermal pad.
Step 4. Place 2 O-rings in the channels on both side of the POM Acetal Link between the blocks. Then align
the Link part with the holes for M4×16mm screws. Use enclosed allen key to screw these screws.
Step 5. Place the graphic card on the inverted water block and attach it with enclosed screws as shown in
picture 3. For perfect thermal contact, the block does not use a spring mounting system.
To prevent warping of the card please block has integrated standoffs. When tightening the screws do not
use high force. When you feel back force of the screw stop applying additional force.
Step 6. Attach the liquid cooling tubes and connect the water-block(s) into the cooling circuit. With EKFC295 GTX series water blocks we recommend use of high flow fittings. To ensure that the tubes are
securely attached to the barb/fittings, please use hose clamps or an appropriate substitute. The use of an
algaecide is always recommended for any liquid cooling system.
VERY IMPORTANT NOTICE
While all efforts have been made to provide the most comprehensive tutorial possible, EKWB assumes no liability expressed or implied
for any consequential damage(s) occurring to your equipment as a result of using EKWB cooling products, either due to errors or
omissions on our part in the above instructions, or due to failure or defect in the EKWB cooling products.
WARRANTY:
Our products are warranted against defects in materials or workmanship for a period of 24 months beginning from the date of delivery
to the final user. During this period, products will be repaired or have parts replaced at our discretion provided that: (I) the product is
returned to the agent from whom it was purchased; (II) the product has been purchased by an end user and has not used for
commercial purposes; (III) the product has not been misused, handled carelessly, or used in a manner other than in accordance with
the instructions provided describing its installation and proper use. This warranty does not confer rights other than those expressly set
out above and does not cover any claims for consequential loss or damage. This warranty is offered as an extra benefit and does not
affect your statutory rights as a consumer. This warranty is voided if the product comes in contact with aggressive UV
additives.