1
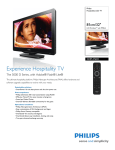
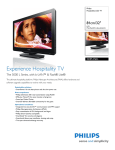
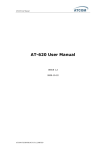
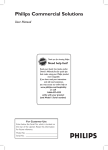
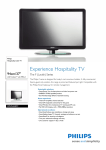
26HFL5561L/27
26HFL5561V/27
32HFL5561D/27
32HFL5561L/27
32HFL5561V/27
32HFL4441D/27
32HFL4461F/27
37HFL4481F/27
37HFL5581D/27
37HFL5581L/27
37HFL5581V/27
42HFL5581L/27
42HFL5581V/27
52HFL5581L/27
52HFL5581V/27
EN User manual
1 Notice
OSS declaration
2 Important
3
3
Product information
Safety
Screen care and sterilization
Environmental care
4
4
4
4
4
3 Your TV
5
Side controls and indicators
5
The guest remote control (optional)
6
The Philips Hospitality setup remote control (not included in box)
7
4 SmartInstall Software
8
5 TV setup: access setup menu
8
6 Select a language
9
7 Select mode of communication
10
10
10
8 Automatically install channels
11
11
11
9 Configure the channels
11
11
11
12
12
12
12
12
13
13
Select the communication protocol
Use Multi RC
Select a virtual or physical channel
Select a channel ring
Select the mode for signal reception
Select a program
Select a source of input
Select a logo for a channel
Map to a digital channel
Assign digital major and minor channels
Select a preferred list of channels
Name a channel
Mute a channel
10 View signal strength or configure content ratings,
closed caption and emergency alerts
Setup digital channels
Configure closed caption text
Enable or disable emergency alert
14
14
15
15
15
15
15
15
15
12 Configure the security settings
16
16
16
Select the security level
Enable or disable the TV controls
16
16
16
13 Configure different settings
17
17
19
14 Clone data (TV Setup Data)
20
20
20
15 Connect devices
21
21
21
16 Troubleshooting
22
22
22
22
17 Stand assembly
23
Configure the SmartFeatures
Configure the V-chip and closed caption settings
Download clone data from a USB device
Download clone data from an RF channel
Back connectors
Side connectors
TV power on/ off issues
No access to Philips Hospitality setup menu
Picture issues
13
13
13
14
11 Configure the switch-on settings
Set the welcome message
Preset the picture format
Select the switch-on channel
Select the switch-on volume
Enable or disable the volume indicator
Select channel display
Select the switch-on power mode
Configure the picture and sound settings
Enable or disable the remote control
Enable standalone mode (Decryption control)
Configure the control options
Eng lis h
Contents
EN
1
IMPORTANT SAFETY INSTRUCTIONS
Read before operating equipment
1.
2.
3.
4.
5.
6.
7.
Read these instructions.
Keep these instructions.
Heed all warnings.
Follow all instructions.
Do not use this apparatus near water.
Clean only with a dry cloth.
Do not block any of the ventilation openings. Install in accordance with
the manufacturers instructions.
8. Do not install near any heat sources such as radiators, heat registers,
stoves, or other apparatus (including amplifiers) that produce heat.
9. Do not defeat the safety purpose of the polarized or grounding-type plug.
A polarized plug has two blades with one wider than the other. A
grounding type plug has two blades and third grounding prong. The wide
blade or third prong are provided for your safety. When the provided
plug does not fit into your outlet, consult an electrician for replacement
of the obsolete outlet.
10. Protect the power cord from being walked on or pinched particularly at
plugs, convenience receptacles, and the point where they exit from the
apparatus.
11. Only use attachments/accessories specified by the manufacturer.
12.
Use only with a cart, stand, tripod, bracket, or table specified by
the manufacturer, or sold with the apparatus. When a cart is
used, use caution when moving the cart/apparatus combination
to avoid injury from tip-over.
13. Unplug this apparatus during lightning storms or when unused for long
periods of time.
14. Refer all servicing to qualified service personnel. Servicing is required
when the apparatus has been damaged in any way, such as power-supply
cord or plug is damaged, liquid has been spilled or objects have fallen
into apparatus, the apparatus has been exposed to rain or moisture,
does not operate normally, or has been dropped.
15. This product may contain lead or mercury. Disposal of these materials
may be regulated due to environmental considerations. For disposal or
recycling information, please contact your local authorities or the
Electronic Industries Alliance:www.eiae.org.
16. Damage Requiring Service - The appliance should be serviced by
qualified service personnel when:
A. The power supply cord or the plug has been damaged; or
B. Objects have fallen, or liquid has been spilled into the appliance; or
C. The appliance has been exposed to rain; or
D. The appliance does not appear to operate normally or exhibits a
marked change in performance; or
E. The appliance has been dropped, or the enclosure damaged.
17. Tilt/Stability - All televisions must comply with recommended
international global safety standards for tilt and stability properties of its
cabinets design.
• Do not compromise these design standards by applying excessive pull
force to the front, or top, of the cabinet which could ultimately
overturn the product.
• Also,do not endanger yourself, or children, by placing electronic
equipment/toys on the top of the cabinet. Such items could
unsuspectingly fall from the top of the set and cause product damage
and/or personal injury.
18. Wall or Ceiling Mounting - The appliance should be mounted to a
wall or ceiling only as recommended by the manufacturer.
19. Power Lines - An outdoor antenna should be located away from
power lines.
20. Outdoor Antenna Grounding - If an outside antenna is connected to
the receiver, be sure the antenna system is grounded so as to provide
some protection against voltage surges and built up static charges.
Section 810 of the National Electric Code, ANSI/NFPA No. 70-1984,
provides information with respect to proper grounding of the mats and
supporting structure grounding of the lead-in wire to an antennadischarge unit, size of grounding connectors, location of antennadischarge unit, connection to grounding electrodes and requirements for
the grounding electrode. See Figure below.
21. Objects and Liquid Entry - Care should be taken so that objects do
not fall and liquids are not spilled into the enclosure through openings.
a) Warning: To reduce the risk of fire or electric shock, this apparatus
should not be exposed to rain or moisture and objects filled with
liquids, such as vases should not be placed on this apparatus.
22. Battery Usage CAUTION - To prevent battery leakage that may
result in bodily injury, property damage, or damage to the unit:
• Install all batteries correctly, with + and - alignment as marked on the
unit.
• Do not mix batteries (old and new or carbon and alkaline, etc.)
• Remove batteries when the unit is not used for a long time.
EXAMPLE OF ANTENNA GROUNDING AS PER
NATIONAL ELECTRICAL CODE (NEC)
GROUND CLAMP
ANTENNA LEAD IN WIRE
ANTENNA DISCHARGE UNIT
(NEC SECTION 810-20)
GROUNDING CONDUCTORS
(NEC SECTION 810-21)
ELECTRIC SERVICE EQUIPMENT
GROUND CLAMPS
POWER SERVICE GROUNDING
ELECTRODE SYSTEM
(NEC ART 250, PART H)
Note to the CATV system installer: this reminder is provided to call the CATV system installer’s attention to Article 820-40 of
the NEC that provides guidelines for proper grounding and, in particular, specifies that the cable ground shall be connected to the
grounding system of the building, as close to the point of cable entry as practical.
2
EN
2010 © Koninklijke Philips Electronics N.V. All rights reserved.
Specifications are subject to change without notice. Trademarks are the
property of Koninklijke Philips Electronics N.V. or their respective owners.
Philips reserves the right to change products at any time without being
obliged to adjust earlier supplies accordingly.
The material in this manual is believed adequate for the intended use of the
system. If the product, or its individual modules or procedures, are used for
purposes other than those specified herein, confirmation of their validity
and suitability must be obtained. Philips warrants that the material itself does
not infringe any United States patents. No further warranty is expressed or
implied.
Philips cannot be held responsible neither for any errors in the content
of this document nor for any problems as a result of the content in this
document. Errors reported to Philips will be adapted and published on the
Philips support website as soon as possible.
Pixel characteristics
LCD products contain a high number of pixels and it is normal and
customary to have a limited number of bright or dark pixels. This is a
structural property of the display (within common industry standards and
specifications) and is not a malfunction.
Warranty
No components are user serviceable. Do not open or remove covers to
the inside of the product. Repairs may only be done by Philips Service
Centres and official repair shops. Failure to do so shall void any warranty,
stated or implied.
Any operation expressly prohibited in this manual, any adjustments, or
assembly procedures not recommended or authorised in this manual shall
void the warranty.
Federal Communications Commission Notice
This equipment has been tested and found to comply with the limits for
a Class B digital device, pursuant to part 15 of the FCC Rules. These limits
are designed to provide reasonable protection against harmful interference
in a residential installation. This equipment generates, uses, and can radiate
radio frequency energy and, if not installed and used in accordance with
the instructions, may cause harmful interference to radio communications.
However, there is no guarantee that interference will not occur in a
particular installation. If this equipment does cause harmful interference
to radio or television reception, which can be determined by turning
the equipment off and on, the user is encouraged to try to correct the
interference by one or more of the following measures:
• Reorient or relocate the receiving antenna.
• Increase the separation between the equipment and the
receiver.
• Connect the equipment into an outlet on a circuit different
from that to which the receiver is connected.
• Consult the dealer or an experienced radio or television
technician for help.
Modifications
The FCC requires the user to be notified that any changes or modifications
made to this device that are not expressly approved by <CompanyName_
Long> may void the user’s authority to operate the equipment.
Cables
Connections to this device must be made with shielded cables with metallic
RFI/EMI connector hoods to maintain compliance with FCC Rules and
Regulations.
Canadian notice
This Class B digital apparatus meets all requirements of the Canadian
Interference-Causing Equipment Regulations.
Copyright
All other registered and unregistered trademarks are the property of their
respective owners.
CLASS 1 WARNING
WARNING
THIS TELEVISION IS CONSIDERED TO BE A DEVICE WITH CLASS
1 CONSTRUCTION, AND IT MUST BE CONNECTED TO A MAINS
SOCKET WITH A PROTECTIVE EARTHING CONNECTION.
Eng lis h
1 Notice
Manufactured under license from Dolby Laboratories. ‘Dolby’ and the
double D symbol are trademarks of Dolby Laboratories.
VESA, FDMI and the VESA Mounting Compliant logo are trademarks of the
Video Electronics Standards Association.
Pro: Idiom® is a registered trademark of Zenith Electronics LLC.
®
Kensington and Micro Saver are registered US trademarks of ACCO
World corporation with issued registrations and pending applications in
other countries throughout the world.
Portions of this software are copyright © The FreeType Project (www.
freetype.org).
OSS declaration
Open source software
This television contains open source software. Philips BU Hospitality hereby
offers to deliver or make available, upon request, for a charge no more than
the cost of physically performing source distribution, a complete machinereadable copy of the corresponding source code on a medium customarily
used for software interchange.
To obtain the source code, write to:
Philips Singapore Pte Ltd.
Philips BU Hospitality
Software Development Manager
620A Lorong 1, Toa Payoh
Singapore 319762
This offer is valid for three years after the date of purchase of this product.
EN
3
2 Important
Registering your model with Philips makes you eligible for all of the valuable
benefits listed below, so don’t miss out.
Complete and return your Product Registration Card at once, or register
online at www.philips.com/welcome to ensure:
• Proof of Purchase
Returning the enclosed card guarantees that your date of
purchase is on file, so no additional paperwork is required from
you to obtain warranty service.
• Product Safety Notification
By registering your product you receive notification - directly
from the manufacturer - in the rare case of a product recall or
safety defect.
• Additional Benefits of Product Ownership
•
•
•
•
•
•
•
Product information
This TV consumes minimal energy in standby mode to minimize
environmental impact. The active power consumption is given on the type
plate at the back of the TV. The model and serial number of your TV can be
found on the TV as well as on the packaging.
•
•
•
•
•
•
•
•
•
•
4
EN
•
•
Safety
•
•
•
•
Risk of electric shock or fire!
Never expose the TV to rain or water. Never place liquid
containers, such as vases, near the TV. If liquids are spilt on
or into the TV, disconnect the TV from the power outlet
immediately. Contact Philips Consumer Care to have the TV
checked before use.
Never place the TV, remote control or batteries near naked
flames or other heat sources, including direct sunlight.
To prevent the spread of fire, keep candles or other flames
away from the TV, remote control and batteries at all times.
Never insert objects into the ventilation slots or other openings
on the TV.
When the TV is swiveled ensure that no strain is exerted
on the power cord. Strain on the power cord can loosen
connections and cause arcing.
Risk of short circuit or fire!
Never expose the remote control or batteries to rain, water or
excessive heat.
Avoid force coming onto power plugs. Loose power plugs can
cause arcing or fire.
Risk of injury or damage to the TV!
Two people are required to lift and carry a TV that weighs
more than 55 lbs.
When stand mounting the TV, use only the supplied stand.
Secure the stand to the TV tightly. Place the TV on a flat, level
surface that can support the combined weight of the TV and
the stand.
When wall mounting the TV, use only a wall mount that
can support the weight of the TV. Secure the wall mount
to a wall that can support the combined weight of the TV
and wall mount. Koninklijke Philips Electronics N.V. bears
no responsibility for improper wall mounting that results in
accident, injury or damage.
•
•
Risk of injury to children!Follow these precautions to prevent
the TV from toppling over and causing injury to children:
Never place the TV on a surface covered by a cloth or other
material that can be pulled away.
Ensure that no part of the TV hangs over the edge of the
surface.
Never place the TV on tall furniture (such as a bookcase)
without anchoring both the furniture and TV to the wall or a
suitable support.
Educate children about the dangers of climbing on furniture to
reach the TV.
Risk of overheating! Never install the TV in a confined space.
Always leave a space of at least 4 inches or 10 cm around the
TV for ventilation. Ensure curtains or other objects never cover
the ventilation slots on the TV.
Risk of damage to the TV! Before you connect the TV to the
power outlet, ensure that the power voltage matches the value
printed on the back of the TV. Never connect the TV to the
power outlet if the voltage is different.
Risk of injury, fire or power cord damage! Never place the TV
or any objects on the power cord.
To easily disconnect the TV power cord from the power outlet,
ensure that you have full access to the power cord at all times.
When you disconnect the power cord, always pull the plug,
never the cable.
Disconnect the TV from the power outlet and antenna before
lightning storms. During lightning storms, never touch any part
of the TV, power cord or antenna cable.
Risk of hearing damage! Avoid using earphones or headphones
at high volumes or for prolonged periods of time.
If the TV is transported in temperatures below 5°C, unpack
the TV and wait until the TV temperature matches room
temperature before connecting the TV to the power outlet.
Screen care and sterilization
Avoid stationary images as much as possible. Stationary images are images
that remain on-screen for extended periods of time. Examples include:
on-screen menus, black bars and time displays. If you must use stationary
images, reduce screen contrast and brightness to avoid screen damage.
Unplug the TV before cleaning.
• Use a damp (not wet) cloth with only non-aggressive cleaners
to wipe the TV. Use another damp (not wet) cloth to clean
off the cleaning agent residue from the surface of the TV.
Recommended cleaning agents include:
• Bleach solution (10:90 concentration of bleach to water).
• Denatured alcohol (comprising of 80%-90% ethanol, 10%-20%
methanol)
Risk of damage to the TV screen! Never touch, push, rub or strike the
screen with any object.
To avoid deformations and color fading, wipe off water drops as soon as
possible.
Environmental care
The packaging of this product is intended to be recycled. Contact your local
authorities for information about how to recycle the packaging.
End of life directives
Eng lis h
3 Your TV
Congratulations on your purchase, and welcome to Philips!
This set contains a lamp with mercury; please dispose of according to all
local, state and federal laws.
Philips pays a lot of attention to produce environment-friendly products
in green focal areas. Your new TV contains materials which can be recycled
and reused. At the end of its life, specialized companies can dismantle the
discarded TV to concentrate the reusable materials and to minimize the
amount of materials to be disposed of. Please ensure you dispose of your
old TV according to local regulations.
Disposal of used batteries
The batteries supplied do not contain the heavy metals mercury and
cadmium. Nevertheless, in many areas batteries may not be disposed of with
your household waste. Please ensure you dispose of batteries according to
local regulations.
Side controls and indicators
4
3
2
1
a
POWER: Switches the product on or off. The product is not
powered off completely unless it is physically unplugged.
b P/CH +/- : Switches to the next or previous channel.
c
SOURCE: Selects connected devices.
d VOLUME +/- : Increases or decreases volume.
These televisions are shipped in accordance with Energy Star
settings and as such the side buttons will not function in the
default settings.To enable these buttons refer to section on
LOW POWER STANDBY (see ‘Configure the SmartFeatures’
on page 17).
EN
5
The guest remote control (optional)
21
20
19
18
17
16
Selects a channel or setting.
m FORMAT
1
2
3
4
5
6
7
8
9
15
10
11
12
14
a
13
(Standby-On)
Switches the product on or off. The product is not powered off
completely unless it is physically unplugged.
b CH GUIDE
Accesses SmartGuide (see ‘Configure the control options’ on page
16), and/or list of channels.
c
PLAY*
Starts or resumes play.
d
REW*
Searches backward.
e
FF*
Searches forward.
f SMART PICTURE
Launches the picture menu.
g SLEEP
Sets a delay after which the TV switches to standby.
h OK
Confirms an entry or selection.
i Navigation buttons
Navigates menus.
j CH +/-
Switches to the next or previous channel.
k
Mutes or restores volume.
l 0-9 (Numeric buttons)
6
EN
Selects a picture format.
n A/CH
Toggles between the current channel and the last viewed channel.
o VOL +/-
Increases or decreases volume.
p MENU
Toggles the main menu on or off.
q SMART SOUND
Launches the sound menu.
r
(STOP)*
Stops playback.
s
(PAUSE)*
Pauses play.
t CC
Displays closed captions settings.
u SOURCE
Selects connected devices.
* This remote control is a unified DVD remote control, not a
universal remote control, and as such these buttons are for use with
Philips DVD players only,
The Philips Hospitality setup remote control
(not included in box)
h CH +/-
Eng lis h
Switches to the next or previous channel.
i
Mutes or restores volume.
j Miscellaneous buttons (Only E and A/V buttons are used.)
POWER
17
16
15
14
E confirms an entry or selection.
A/V displays the source list.
1
RECALL
TEXT
SMART
SLEEP
CC
GUEST
DCM
SETUP
13
1
2
3
4
5
6
7
8
12
Accesses the Philips Hospitality setup menu.
m RESET
Not used.
n GUEST/ DCM/ SETUP
GUEST - Functions as a guest remote control.
DCM - Not used.
SETUP - Allows access to the Philips Hospitality setup menu.
4
CH
A/CH
+
_
5
6
7
+
+
VOL
Increases or decreases volume.
l M
9
M
_
11
3
GUIDE
0
RESET
2
k VOL +/-
_
CH
o CC
Selects tasks or options.
p
TEXT
Toggles teletext on or off.
q RECALL
Accesses the Customer Service Menu (CSM).
8
9
A
a
B
C
E
F
CLOCK
A/V
D
G
10
(Standby-On)
Switches the product on or off. The product is not powered off
completely unless it is physically unplugged.
b SLEEP
Sets a delay after which the TV switches to standby.
c
SMART
Launches the picture menu.
d 0-9 (Numeric buttons)
Selects a channel or setting.
e CH GUIDE
Displays the list of channels.
f A/CH
Toggles between the current channel and the last viewed channel.
g Navigation buttons
Navigates menus.
EN
7
4 SmartInstall Software
5 TV setup: access setup menu
Philips TV can be completely configure quickly and easily using Philips
SmartInstall software, available free of charge from your sales representative
or from our website www.philips.com/hospitality. We recommend
recommend this method for the quickest setup.
SETUP
LANGUAGE
COMMUNICATION
CHANNEL INSTALL
AUTO INSTALL TV
CABLE TUNING
USE CHANNEL TABLE
CURRENT RING
DIGITAL SETUP
CONFIGURATION
SMARTCLONE
ENGLISH
>
>
>
YES
YES
RING2
>
>
>
Press M on a Philips setup remote control with the slider set to SETUP or
enter 3-1-9-7-5-3 followed by MUTE (all within 10 seconds) on the guest
remote control.
When the security level is HIGH, you must use the Philips setup remote
control to access the Philips Hospitality setup menu (see ‘Select the security
level’ on page 16).
To navigate through the Philips Hospitality setup menu,
Press
on the remote control to select a menu.
Press to configure or modify the settings of the selected function.
Press M on the Philips setup remote control or MENU on the guest
remote control to return to the previous menu.
1
2
3
Access the Philips Hospitality setup menu with guest remote
control
1
2
8
EN
Switch on the TV and select a TV channel.
Press 3-1-9-7-5-3 followed by Mute within 10 seconds.
»» The Philips Hospitality setup menu is displayed.
POWER
RECALL
TEXT
SMART
SLEEP
CC
SETUP
SETUP
1
2
3
4
5
6
7
8
Note
9
CH
M
A/CH
_
+
1
2
3
Enter the Philips Hospitality setup menu.
Press
to select a language.
»» The setup and guest menus will now be displayed in the selected
language.
GUIDE
0
RESET
M
1
2
•• You can choose English, Español or Français as your preferred language.
GUEST
DCM
6 Select a language
Eng lis h
Access the Philips Hospitality setup menu with Philips setup
remote control
+
+
Switch on the TV and select a TV channel.
Set the switch at the side of the remote control to SETUP.
Press M to display the Philips Hospitality setup menu.
»» The Philips Hospitality setup menu is displayed.
EN
9
7 Select mode of communication
1
2
3
Enter the Philips Hospitality setup menu.
Press to select COMMUNICATION.
Press
to select one of the following options :
• COMMUNICATION: To select the communication protocol
between the TV and the external device connected to the TV.
• STORE: To store the settings that are modified using the
COMMUNICATION menu.
• PENDANT: To enable or disable the healthcare
pendant control. This is available only when you select
COMMUNICATION > OFF.
Select the communication protocol
1
2
Enter the Philips Hospitality setup menu.
Press to select COMMUNICATION > COMMUNICATION.
COMMUNICATION
COMMUNICATION
STORE
3
4
OFF
>
Press
to select the communication protocol between the TV
and the set-top box :
• SP-SPI: Most commonly used connection.
• SP-I2C: When the set-top box supports this protocol. When
SP-SPI or SP-I2C are selected, there are sub menu items for
DCM TYPE and CP.
• SERIAL XPRESS: When the set-top box supports this protocol.
When SERIAL XPRESS is selected, the speed must be set.
• MULTI RC: To use Multi RC. See next section.
• SMART RC: To access PayTV channels using Smoovie remote
control.
• OFF: To turn off the communication between the TV and the
set-top box.
Press
to select Store.
Note
•• For SP-SPI and SP-I2C connections, if the set-top box requires a source
switch, select DCM TYPE > GENERIC.
Use Multi RC
Multi RC enables control of multiple TVs in a room without any interference
from each other’s remote control.
To enable Multi RC, each remote control is set to one of the four colors blue, green, yellow or red. Each TV in the room is separately programmed to
a remote control of one of those colors.
10
EN
In this way, each TV responds to only one RC that is set to the same color
as the TV itself. This prevents interference from each other’s remote control
when you watch multiple TVs in a room.
Note
•• Multi RC supports a maximum of four TVs in one room and requires the
use of special remote controls. For more details, contact your local Philips
hospitality representative.
Set the TV to a particular RC
1
2
3
4
5
6
Press
to select COMMUNICATION > MULTI RC.
Press to select REMOTE COLOR.
Press to toggle through the four colors and select one.
Press
to select STORE.
»» The TV is configured to respond to the RC that is set to the same
color.
Press MENU and the color button (same color as above) on the
guest RC simultaneously.
»» The guest RC is set to the selected color.
Press OK for five seconds while pointing to the TV.
»» The TV displays the RC color and the TV color on the screen. If
they do not match, program the TV and the RC again.
1
2
3
4
5
6
Enter the Philips Hospitality setup menu.
Press
to select CABLE TUNING.
Press to select one of the following:
• YES: To receive TV signals from a cable.
• NO: To receive TV signals from an antenna.
Press
to select AUTO INSTALL TV > START.
Press to start the automatic installation of channels.
Press any key on the remote control to stop the automatic
installation of channels.
Note
9 Configure the channels
What the guest or the user actually access are program numbers. The TV has program numbers 1 - 250 available. Any channel, or external input,
analog or digital can be mapped to any program number, giving the hotel
complete flexibility of channel mapping. For example, local channels could
be mapped to programs 1 - 9; News channels could be mapped to the
teens, Sports channels to the 20s etc.
Select the mode for signal reception
1
2
3
•• This option is available only when you select CHANNEL INSTALL >
CHANNEL > INPUT > TUNER.
Select a virtual or physical channel
It is always recommended physical channels by setting USE CHANNEL
TABLE to NO.
Enter the Philips Hospitality setup menu.
Press
to select USE CHANNEL TABLE.
1
2
SETUP
LANGUAGE
COMMUNICATION
CHANNEL INSTALL
AUTO INSTALL TV
CABLE TUNING
USE CHANNEL TABLE
CURRENT RING
DIGITAL SETUP
CONFIGURATION
SMARTCLONE
Enter the Philips Hospitality setup menu.
Press
to select CABLE TUNING.
Press to select one of the following:
• YES: To receive TV signals from a cable.
• NO: To receive TV signals from an antenna.
Note
•• This option is available only when you select CHANNEL INSTALL >
CHANNEL > INPUT > TUNER.
This section explains how to assign program numbers to be the same as the
program numbers that the guest can assess on the remote control.
Enter the Philips Hospitality setup menu.
Press to select CHANNEL INSTALL.
Press to configure the channel settings.
1
2
3
ENGLISH
>
>
>
YES
NO
RING2
>
>
>
CHANNEL INSTALL
TV 2
TUNER
>
NO
2
CHANNEL
INPUT
CHANNEL LOGO
DIGITAL
RF CHANNEL NUMBER
RINGS
LABEL
MUTE
(
>
) >
NONE
Note
•• This option is available only when you select CHANNEL INSTALL >
CHANNEL > INPUT > TUNER.
Select a channel ring
Channels are organized in rings in Philips commercial televisions. To make
the channels visible to the guest, they must be assigned to the same ring that
the television is set to display as the current ring.
Enter the Philips Hospitality setup menu.
Press
to select CURRENT RING.
Press to select a list of channels to watch.
1
2
3
Note
•• If you select COMMUNICATION > SMART RC, RING4 is not available
(see ‘Select the communication protocol’ on page 10).
4
Press M on the Philips setup remote control or MENU on the guest
remote control to return to the main menu.
Select a program
1
2
3
Enter the Philips Hospitality setup menu.
Press
to select CHANNEL INSTALL > CHANNEL.
Press 0-9 (Numeric buttons) to enter a program number.
• For cable mode, select a number between 01 - 250.
• For antenna mode, select a number between 02 - 250.
Note
•• To select a three digit program number, configure the TV using the
control options.
EN
11
Eng lis h
8 Automatically install channels
Select a source of input
1
2
3
CHANNEL INSTALL
Enter the Philips Hospitality setup menu.
Press
to select CHANNEL INSTALL > INPUT.
Press to select a source of input.
CHANNEL
INPUT
CHANNEL LOGO
DIGITAL
DIGITAL CH SCROLL
RF CHANNEL NUMBER
MPEG PROGRAM NUMBER
RINGS
LABEL
MUTE
Note
•• External inputs can also be assigned to a program number.
Select a logo for a channel
1
2
3
4
5
Enter the Philips Hospitality setup menu.
Press
to select CHANNEL INSTALL > CHANNEL LOGO.
Press to enter a page containing logos.
Press
to select a logo for the channel.
Press “0” to save the logo and exit the menu.
Map to a digital channel
1
2
3
Enter the Philips Hospitality setup menu.
Press
to select CHANNEL INSTALL > DIGITAL.
Press to select YES.
TV 2
TUNER
>
(
YES
>
2
8
>
) >
NONE
Assign digital major and minor channels
1
2
3
Enter the Philips Hospitality setup menu.
Press
to select CHANNEL INSTALL > DIGITAL > YES.
Press to select DIGITAL MAJOR CHANNEL/ RF CHANNEL
NUMBER.
Press 0-9 (Numeric buttons) to enter a channel number between 1
and 999.
Press to select DIGITAL MINOR CHANNEL/ MPEG PROGRAM
NUMBER.
Press 0-9 (Numeric buttons) to enter a channel number between 0
and 32768.
4
5
CHANNEL INSTALL
CHANNEL
INPUT
CHANNEL LOGO
DIGITAL
DIGITAL CH SCROLL
RF CHANNEL NUMBER
MPEG PROGRAM NUMBER
RINGS
LABEL
MUTE
4
5
TV 2
TUNER
>
(
YES
>
80
2
>
) >
NONE
6
Select a preferred list of channels
1
2
3
CHANNEL INSTALL
CHANNEL
INPUT
CHANNEL LOGO
DIGITAL
DIGITAL CH SCROLL
RF CHANNEL NUMBER
MPEG PROGRAM NUMBER
RINGS
LABEL
MUTE
Press to select DIGITAL CH SCROLL.
»» Digital channel scroll works only for digital channels that have
already been installed ie by Automatic channel install - see section
8.
Press
Enter the Philips Hospitality setup menu.
Press
to select CHANNEL INSTALL > RINGS.
Press
to select a ring number.
»» A flashing red dash appears next to the selected ring.
to toggle between the available digital channels.
Note
•• Select CHANNEL INSTALL > DIGITAL > NO, if the channel is an analog
channel.
•• DIGITAL CH SCROLL, DIGITAL MAJOR CH, and DIGITAL MINOR
CH do not apply to analog channels.
•• When you select USE CHANNEL TABLE > NO to use physical channel
numbers instead of virtual channel numbers, DIGITAL MAJOR CH is
replaced by RF CHANNEL NUMBER and DIGITAL MINOR CH is
replaced by MPEG PROGRAM NUMBER on your TV screen.
12
EN
4
Press
to select or deselect a list.
»» The selected list is marked by an “X”.
TV 2
TUNER
>
(
YES
>
2
8
>
) >
NONE
CHANNEL RINGS
HIGH DEFINITION
SPORTS
NEWS
KIDS
MOVIES
NETWORK
EDUCATION
LIFESTYLE
HOSPITAL
5
6
(1X)(2 )(3 )(4 )
YES
NO
YES
YES
YES
YES
YES
YES
NO
1
2
Enter the Philips Hospitality setup menu.
Press
to select DIGITAL SETUP.
»» Digital setup menu is displayed on your screen. You can configure
the content ratings, closed caption and emergency alert settings.
SIGNAL STRENGTH displays the signal strength of the selected
channel in percentage.
DIGITAL SETUP
CHANNEL SETUP
DIGITAL CC SETUP
EMERGENCY ALERT
SIGNAL STRENGTH
Press
to save or remove a channel from the ring.
»» The ring is marked by an ‘X’ when the channel is saved in it.
Press
to select a category option (HIGH DEFINITION,
SPORTS, NEWS, etc) to save the channel.
Press
to select YES to save the channel to this category or NO
to remove the channel.
>
>
ALWAYS
63%
7
Name a channel
1
2
3
4
Enter the Philips Hospitality setup menu.
Press
to select CHANNEL INSTALL > LABEL.
Press
to select a slot to enter a character.
»» A flashing red mark underlines the selected slot.
Press
to select a character.
Note
•• Philips recommends a signal strength of 80% or higher. If you see a value
below this level you may experience signal dropout issues, pixelization,
picture freeze etc. To address low signal strength, you should contact
your installer.
CHANNEL INSTALL
CHANNEL
INPUT
CHANNEL LOGO
DIGITAL
DIGITAL CH SCROLL
DIGITAL MAJOR CH
DIGITAL MINOR CH
RINGS
LABEL
MUTE
5
TV 2
TUNER
>
YES
>
2
8
>
( CNN_ _ _ _ _ ) >
NONE
1
2
Repeat steps 3 and 4 until you finish naming the channel.
Mute a channel
1
2
3
Setup digital channels
Enter the Philips Hospitality setup menu.
Press
to select CHANNEL INSTALL > MUTE.
Press
to select one of the following:
• AUDIO: To mute the audio in the channel.
• VIDEO: To mute the video in the channel.
• NONE: To enable audio and video in the channel.
Enter the Philips Hospitality setup menu.
Press
to select DIGITAL SETUP > CHANNEL SETUP.
Select one of the following options:
• V-CHIP DIGITAL RATING: To enable or disable the content
ratings for movies, TV programs and data as per the VCHIP
standard. For more information, visit www.fcc.gov/vchip.
• CLEAR ALL RATINGS: To clear all the ratings.
• US MOVIE RATING: To enable or disable the movie ratings.
• US TV RATING: To enable or disable the TV ratings.
• D. RATING: To configure the downloadable (RRT-5) rating.
• FACTORY CH RESET: To clear the digital channel map.
Note
•• If you select FACTORY CH RESET, you need to re-install the channels.
Configure closed caption text
1
2
Enter the Philips Hospitality setup menu.
Press
to select DIGITAL SETUP > DIGITAL CC SETUP >
CAPTION TEXT.
Press
to select and configure options such as CAPTION
SIZE, CAPTION STYLE, TEXT COLOR, BG COLOR, etc.
3
EN
13
Eng lis h
RINGS
10 View signal strength or configure
content ratings, closed caption
and emergency alerts
Enable or disable emergency alert
1
2
3
Enter the Philips Hospitality setup menu.
Press
to select DIGITAL SETUP > EMERGENCY ALERT.
Press to select one of the following options:
• ALWAYS: To enable emergency alerts at all times.
• SKIP LOW PRIORITY: To skip the emergency alerts of low
priority.
• SKIP MEDIUM LOW PRIORITY: To skip the emergency alerts
of medium and low priorities.
11 Configure the switch-on settings
1
2
Enter the Philips Hospitality setup menu.
Press
to select CONFIGURATION > SWITCH ON / OSD.
SWITCH ON / OSD
WELCOME MESSAGE
SWITCH ON CHANNEL
SWITCH ON SMARTGUIDE
SWITCH ON VOLUME
SWITCH ON PIC FMT
POWER ON
VOLUME INDICATOR
CHANNEL DISPLAY
Note
•• Emergency alerts of high priority cannot be disabled for safety reasons.
3
>
TV 2
YES
30
WIDESCREEN
LAST STATUS
YES
ALL
Press to select one of the available options:
• WELCOME MESSAGE: To set or clear a welcome message.
• SWITCH ON CHANNEL: To select a channel that is displayed
when the TV is turned on. SWITCH ON CHANNEL must be
installed and in the active channel ring. Otherwise Locked will
be displayed.
• SWITCH ON SMARTGUIDE: When set to Yes the Smart
guide will be displayed whenever the TV is powered on.
• SWITCH ON VOLUME: To set the volume that is used each
time the TV is turned on.
• SWITCH ON PIC FMT: To configure the picture format that is
used for display when the TV is turned on.
• POWER ON: To configure the power condition that will be
restored after an AC power interruption.
• VOLUME INDICATOR: To enable or disable the display of
volume indicator.
• CHANNEL DISPLAY: To enable or disable the display of
channel number and channel name on the screen.
Set the welcome message
1
2
Enter the Philips Hospitality setup menu.
Press
to select CONFIGURATION > SWITCH ON / OSD >
WELCOME MESSAGE.
Press
to select one of the following options:
• DISPLAY: Select YES to display the welcome message. Select
NO to prevent the display of the welcome message.
• LINE 1: To enter the first line of welcome message. Press
to select a character slot and
to select an alphanumeric
character.
• LINE 2: To enter the second line of welcome message. Press
to select a character slot and
to select an alphanumeric
character.
• CLEAR: To clear the welcome message.
3
Note
•• You can have a maximum of 20 alphanumeric characters in each line of
your welcome message.
14
EN
Configure the picture and sound settings
1
2
1
2
Enter the Philips Hospitality setup menu.
Press
to select CONFIGURATION > SWITCH ON / OSD >
SWITCH ON PIC FMT.
Press to select one of the available picture formats:
»» The selected picture format is used to display pictures when the
TV is turned on.
Eng lis h
Preset the picture format
Enter the Philips Hospitality setup menu.
Press
to select CONFIGURATION > PICTURE / SOUND.
3
PICTURE / SOUND
BRIGHTNESS
COLOR
CONTRAST
SHARPNESS
TINT
ACTIVE CONTROL
TREBLE
BASS
BALANCE
AVL
Select the switch-on channel
1
2
Enter the Philips Hospitality setup menu.
Press
to select CONFIGURATION > SWITCH ON / OSD >
SWITCH ON CHANNEL.
Press to display the selected channel when the TV is turned on.
3
Select the switch-on volume
1
2
Enter the Philips Hospitality setup menu.
Press
to select CONFIGURATION > SWITCH ON / OSD >
SWITCH ON VOLUME.
Press to set a volume that is used each time the TV is turned on.
3
Enable or disable the volume indicator
1
2
Enter the Philips Hospitality setup menu.
Press
to select CONFIGURATION > SWITCH ON / OSD >
VOLUME INDICATOR.
Press to select one of the following:
• YES: To display the volume indicator.
• NO: To hide the volume indicator.
3
Select channel display
1
2
3
45
38
70
50
36
YES
52
55
0
ON
Press
to select one of the following options:
• BRIGHTNESS: To adjust the black level of the image.
• COLOR: To adjust the color.
• CONTRAST: To adjust the peak bright areas of the image.
• SHARPNESS: To adjust the image sharpness.
• TINT: To adjust the color balance in an image.
• ACTIVE CONTROL: Select ON to fine-tune the received
signals according to the lighting conditions of the room.
• TREBLE: To adjust the treble level.
• BASS: To adjust the bass level.
• BALANCE: To adjust the balance of the speakers.
• AVL: Select ON to reduce the fluctuations in volume when the
commercials are aired or when you switch channels. Otherwise,
select OFF.
Enter the Philips Hospitality setup menu.
Press
to select CONFIGURATION > SWITCH ON / OSD >
CHANNEL DISPLAY.
Press to select one of the following:
• NUMBER: To display the channel number on the screen.
• LABEL: To display the channel name on the screen.
• ALL: To display channel number, name and logo on the screen.
• NONE: To prevent the display of channel information.
3
Select the switch-on power mode
1
2
Enter the Philips Hospitality setup menu.
Press
to select CONFIGURATION > SWITCH ON / OSD >
POWER ON.
Press to select the power mode that will be restored after an AC
power interruption.
• LAST STATUS: When AC power is restored, this will return
the TV to the same power status that it was in when AC power
was removed.
• ON: When AC power is restored, the TV will always come
up in the “on” state. The button on the TV and the guest
remote control are enabled.
• STANDBY: When AC power is restored, the TV will always
come up in the “Standby” state.
• FORCED ON: When AC power is restored, the TV will always
come up in the “on” state. The button on the TV and the
guest remote control are disabled (The TV cannot be turned
off.)
3
EN
15
12 Configure the security settings
Enable standalone mode (Decryption control)
1
2
The premium HD content received by a satellite or cable is encrypted,
using a digital rights management system (DRM) called Pro:Idiom®, to avoid
piracy. The technology is embedded in the TV and prevents guests from
pirating the content.
To decrypt the content, follow the following steps:
Enter the Philips Hospitality setup menu.
Press
to select CONFIGURATION > SECURITY >
DECRYPTION CONTROL.
Enter the Philips Hospitality setup menu.
Press
to select CONFIGURATION > SECURITY.
SECURITY
SECURITY
KEYBOARD LOCK
REMOTE CONTROL LOCK
DECRYPTION CONTROL
STANDARD
NO
NO
>
1
2
DECRYPTION CONTROL
MODEL #
SERIAL #
CURRENT MODE
STANDALONE
PASSWORD
CONVERT
3
Press
to select one of the following:
• SECURITY: To specify the security level.
• KEYBOARD LOCK: To enable or disable local TV controls.
• REMOTE CONTROL LOCK: To enable or disable the guest
remote control keys.
• DECRYPTION CONTROL: To convert the TV from Pay-PerView mode to standalone protected mode.
3
Select the security level
1
2
3
Enter the Philips Hospitality setup menu.
Press
to select CONFIGURATION > SECURITY > SECURITY.
Press to select one of the following settings:
• STANDARD: To access the Philips Hospitality setup menu
using the guest remote control or the Philips Hospitality setup
remote control.
• HIGH: To access the Philips Hospitality setup menu using the
Philips Hospitality remote control only.
Enable or disable the TV controls
1
2
Enter the Philips Hospitality setup menu.
Press
to select CONFIGURATION > SECURITY >
KEYBOARD LOCK.
Press to select one of the following settings:
• ALL:To lock all control keys on the TV including the key.
• YES: To lock all control keys on the TV excluding the key.
• NO: To unlock all control keys on the TV.
3
Enable or disable the remote control
1
2
Enter the Philips Hospitality setup menu.
Press
to select CONFIGURATION > SECURITY > REMOTE
CONTROL LOCK.
Press to select one of the following settings:
• NO: To enable all standard remote control functions.
• YES: To disable all standard remote control functions.
3
16
EN
32HF5860D/27
SV1A07071000012
PPV
>
_ _ _ __ _ _ _ _
>
Press
to select one of the following settings:
• PASSWORD: To enter the password.
• CONVERT: To decrypt the encrypted digital signal received
from a satellite or Pay-Per-View service.
Note
•• If the password is entered incorrectly n times, the convert line will show
“LOCKED”. This can be cleared by unplugging and replugging the AC
power to the TV.
•• The other options in DECRYPTION CONTROL menu are displayed only
for your information and cannot be modified.
•• For detailed instructions on decryption control, refer to the Pro:Idiom®
certificate.
Configure the control options
1
2
Enter the Philips Hospitality setup menu.
Press
to select CONFIGURATION > CONTROL.
CONTROL
ESP
DIGIT TIMEOUT
3 DIGIT ENTRY
SOURCE MENU ITEM
PIC FMT MENU ITEM
SMART WINDOW MENU ITEM
SMART GUIDE
MIN VOLUME
MAX VOLUME
LODGENET CARD
OFF
3.0
NO
NO
NO
NO
NO
0
99
NO
Press
to select one of the following options:
• ESP (Energy saving programmability): Set a time from 1 - 99
hours to enable ESP. If the TV does not receive any command
for this time period, it enters the standby mode to save energy.
Select OFF to disable ESP.
• DIGIT TIMEOUT: Set a time between 1 - 9.9 seconds. When
you press a key on your RC, the TV will wait for the specified
time before assuming that you are finished entering digits, and
switching to the entered channel. The default time is three
seconds. If you want to key in two-digit or three-digit channel
numbers, do not select the time to be too short.
• 3 DIGIT ENTRY: Select YES to enable the selection of three
digit channel number (channel numbers 1 - 250 for cable
mode and 2-250 for antenna mode). Select NO to enable the
selection of only two-digit channel numbers (channel numbers
1 - 99 for cable mode and 2-99 for antenna mode).
• SOURCE MENU ITEM: Select YES to allow the guest to select
a source from the guest menu using the guest RC. Otherwise,
select NO.
• PIC FMT MENU ITEM: Select YES to allow the guest to select
a picture format from the guest menu using using the guest RC.
Otherwise, select NO.
• SMART WINDOW MENU ITEM: Select YES to allow
the guests to watch inputs from a PC and an RF channel
simultaneously, on a split screen. Otherwise, select NO.
• SMART GUIDE: Select YES to display the on-screen channel
guide. The channel guide is not used with Pay-Per-View systems
and should be set to NO.
• MIN VOLUME: Set the minimum volume.
• MAX VOLUME: Set the maximum volume.
• LODGENET CARD: Select YES to allow the use of Lodgenet.
13 Configure different settings
1
2
Eng lis h
3
Enter the Philips Hospitality setup menu.
Press
to select CONFIGURATION.
CONFIGURATION
SWITCH ON / OSD
PICTURE / SOUND
SECURITY
CONTROL
SMARTFEATURES
AUDIO FEATURES
CC / V-CHIP
HOTEL INFORMATION
HDMI CEC
3
Note
•• The SMART GUIDE will show only those programs that have been
assigned to one (or more) categories.
>
>
>
>
>
>
>
>
>
Press
to select one of the available options to configure the
settings:
• SWITCH ON / OSD: To configure settings such as volume,
channel, picture format, power mode, etc that are used as
default when the TV is switched on.
• PICTURE / SOUND: To configure picture and sound settings
such as brightness, color, sharpness, tint, bass, balance, AVL, etc.
• SECURITY: To set the level of security. To enable keyboard and
RC lock, Pro: Idiom decryption and SmartSecure.
• CONTROL: To configure settings for channels, minimum and
maximum volume, ESP, etc.
• SMARTFEATURES: To configure the SmartPower, USB
break-in, SmartGuide Category, SmartUpdate, and software
download settings.
• AUDIO FEATURES: To configure the correct audio source.
• CC/ V-CHIP: To configure closed caption and V-Chip settings.
• HOTEL INFORMATION: To configure the hotel information
including hotel name and room number (required information
when SmartSecure is enabled).
Configure the SmartFeatures
1
2
Enter the Philips Hospitality setup menu.
Press
to select CONFIGURATION > SMARTFEATURES.
SMARTFEATURES
SMARTPOWER
LOW POWER STANDBY
SMARTCP
SMARTSECURE
SMARTGUIDE CATEGORIES
USB BREAK-IN
SMARTUPDATE
SMARTUPDATE CHANNEL
SW DOWNLOAD
OFF
NO
YES
>
>
NO
YES
87
>
EN
17
3
Press
to select one of the following options:
• SMARTPOWER: To enable or disable the power saving mode.
Select HIGH for maximum power savings.
• LOW POWER STANDBY: To use minimum power when the
TV is in standby mode.
• SMARTCP: Select YES to enable the autosensing feature to
switch to source where a video signal is plugged to a side I/O.
Select NO to disable the autosensing feature and to you have
to select the video source manually.
• SMARTSECURE: See details in the note below.
• SMARTGUIDE CATEGORIES: To determine which function
is called on the first press of the CH guide button and which
categories will be available.
• USB BREAK-IN: Select YES to enable the automatic switchover
to the USB root menu when a USB device is plugged in. USB
Break-in allows guests to view .jpg images or listen to .mp3
music files. Select NO to disable automatic switchover.
• SMARTUPDATE: Select YES to update information on a
channel. An option SMARTUPDATE CHANNEL will appear
below on the screen to enable you to select a channel to
update.
• SW DOWNLOAD: To enable software download and cloning
through a USB device or an RF channel. Available only in certain
models. Select USB or RF as the source of software download.
Philips US-PSG-1000 device supports streaming of software
downloads and SmartClone update files.
Note
•• If LOW POWER STANDBY is set to YES,
•• the TV can only be switched on with a remote control. Please ensure the
remote control is always available. The control buttons at the side of the
TV will not be able to switch on the TV.
•• If LOW POWER STANDBY is set to YES, the TV will be configured to
the optimal energy saving mode whenever the TV is switched to standby
mode. As a result, the TV will take a little longer to switch on again. If you
need a fast switch on time, select NO.
•• SMARTSECURE is a feature in the new range of commercial TVs from
Philips. This feature requires a Philips Smart Gateway (PSG) as part of
the installed system. The PSG must be configured to broadcast a security
key. Then, when SMARTSECURE is enabled in the TV, the TV will not
operate from a “cold start” unless it first “sees” this security key being
broadcast.
3
Press
to select one of the following options:
• SOURCE: Select RF as the source for software download.
• DIRECTION: Select DOWNLOAD to download the software
from the RF channel.
• CABLE TUNING: Select YES to use channels 1 - 135 for
software update. Select NO to use channels 2 - 69 for software
update. You must select cable tuning as YES for use with PSG.
• RF CHANNEL NUMBER: Select the RF channel number for
software update.
• SW TYPE: Select one of the following types of software for
download:
• SSB NVM: To download SSB NVM software.
• SSB FIRMWARE: To download the main TV software.
STANDBY FIRMWARE: To download the main TV startup data.
•
IBOARD NVM: To download the TV settings.
•
IBOARD FIRMWARE: To update iboard software.
•
ALL: To download all the software upgrades.
• SW VERSION CHECK: Select YES to check the software
version for download. This will download a newer version.
• START: To start the software download.
»» The TV will restart automatically upon the completion of software
download. There will be multiple download and restart cycles
when download ALL is selected.
Note
•• Software download from an RF source is available in only certain models.
•• The STANDBY FIRMWARE is rarely updated and is not included when
SW TYPE > ALL is selected. To update the STANDBY FIRMWARE, the
SW TYPE > STANDBY FIRMWARE must be uniquely selected.
Download software from a USB device
1
2
Enter the Philips Hospitality setup menu.
Press
to select CONFIGURATION > SMARTFEATURES >
SW DOWNLOAD.
SW DOWNLOAD
Download software from an RF channel
1
2
SOURCE
DIRECTION
SW TYPE
START
Enter the Philips Hospitality setup menu.
Press
to select CONFIGURATION > SMARTFEATURES >
SW DOWNLOAD.
USB
TV TO USB
IBOARD NVM
>
SW DOWNLOAD
SOURCE
DIRECTION
CABLE TUNING
RF CHANNEL
RF TO TV
18
EN
RF
RF TO TV
YES
87
>
3
Press
to select one of the following options:
• SOURCE: Select USB as the source for software download or
upload.
• DIRECTION: Select USB TO TV to download the software
from the USB device. Select TV TO USB to upload the
software to the USB device.
• SW TYPE: Select one of the following to upload or download a
particular type of software.
• SSB NVM: To download SSB NVM software.
• SSB FIRMWARE: To download the main TV software.
14 Clone data (TV Setup Data)
1
2
3
Eng lis h
• STANDBY FIRMWARE: To download the TV startup data from the USB device. Only used in software download.
• IBOARD NVM: To download the TV settings from the USB device.
• IBOARD FIRMWARE: To update iboard software from the USB device. Only used in software download.
• ALL: To download all the software upgrades from the USB device.
• START: To start the software download.
»» The TV will restart automatically upon the completion of software
download. There will be multiple downloads and restart cycles
when download ALL is selected.
Enter the Philips Hospitality setup menu.
Press
to select SMARTCLONE > SOURCE.
Press to select one of the following options:
• USB: To download clone data (TV setup data) from a USB
device to a TV or a TV to a USB device.
• RF: To download clone data (TV setup data) from an RF
channel to a TV.
SMARTCLONE
Note
SOURCE
CABLE TUNING
RF CHANNEL NUMBER
RF TO TV
•• “Firmwares” cannot be copied from the TV to USB. (only NVMs may be
copied from the TV.)
•• The STANDBY FIRMWARE is rarely updated and is not included when
SW TYPE > ALL is selected. To update the STANDBY FIRMWARE, the
SW TYPE > STANDBY FIRMWARE must be uniquely selected.
RF
YES
87
>
Configure the V-chip and closed caption settings
1
2
Enter the Philips Hospitality setup menu.
Press
to select CONFIGURATION > CC/ V-CHIP.
CC / V-CHIP
SAVE CC
CC
DIGITAL CC MODE
ANALOG CC MODE
V-CHIP MENU ITEM
SAVED V-CHIP
V-CHIP SETUP
YES
ON
CS1
CC1
NO
NO
>
Download clone data from a USB device
1
2
3
Enter the Philips Hospitality setup menu.
Press
to select smartclone SOURCE.
Press to select USB.
SW DOWNLOAD
3
Press
to select one of the following options:
• SAVE CC: Select YES to use the last used CC mode. Select NO
to use the CC mode defined in the next option.
• CC: Select a CC mode that is used when the TV is turned on.
If you select CONFIGURATION > CC/ V-CHIP > CC > ON,
the following options appear:
• DIGITAL CC MODE: Allows you to select your digital CC
options. Select an option from CS1 to CS6. If this option is not
available for the current digital channel, the TV will switch to
ANALOG CC MODE.
• ANALOG CC MODE: Allows you to set your analog CC
options. Select an option from CC1 to CC4 and TXT1 to
TXT4.
• V-CHIP MENU ITEM: Select YES to allow the guest to change
the V-CHIP settings. Otherwise, select NO.
• SAVED V-CHIP: Select YES to save all the V-chip settings.
Otherwise, select NO.
• V-CHIP SETUP: Select one of the available options to change
the V-CHIP settings:
• CLEAR ALL RATINGS: To clear all the ratings.
• US MOVIE RATING: To enable or disable the movie ratings.
• US TV RATING: To enable or disable the TV ratings.
• D. RATING: To configure the downloadable (RRT-5) rating.
SOURCE
DIRECTION
SW TYPE
START
4
USB
TV TO USB
IBOARD NVM
>
Press
to select one of the following options:
• USB TO TV: To download clone data (TV setup data) from a
USB device to TV.
• TV TO USB: To upload clone data (TV setup data) from a TV
to a USB device.
Download clone data from an RF channel
1
2
3
Enter the Philips Hospitality setup menu.
Press
to select smartclone SOURCE.
Press to select RF.
EN
19
15 Connect devices
SW DOWNLOAD
SOURCE
DIRECTION
CABLE TUNING
RF CHANNEL
RF TO TV
RF
RF TO TV
YES
87
>
This section describes how to connect various devices with different
connectors and supplements examples provided in the Quick Start.
Note
•• Different types of connectors may be used to connect a device to
your TV, depending on availability and your needs. A comprehensive
interactive guide to help you connect your product is available at www.
connectivityguide.philips.com.
Back connectors
4
Press
to select one of the following options:
• SOURCE: Select RF as the source for software download.
• DIRECTION: Select RF TO TV to download the software
from the RF channel.
• CABLE TUNING: Select YES (PSG always uses cable tuning).
• RF CHANNEL: Set to the same channel as PSG (87 is the
default for both). Select another channel if channel 87 is already
occupied.
• RF TO TV: Press to start the download.
PENDANT
a TV ANTENNA
Signal input from an antenna, cable or satellite.
b CVI (Y Pb Pr and AUDIO L/R)
Analog audio and video input from analog or digital devices such as
DVD players or game consoles.
Audio input from devices that require a separate audio connection,
such as a computer.
c RS 232
Serial Xpress communication with external connected devices. You
must select [COMMUNICATION] > [SERIAL XPRESS] to use this
connector.
d
PENDANT
1/8 inch mini-jack connection to a bathroom speaker or a healthcare
pendant control (also known as pillow speaker).
e HDMI 3
Digital audio and video input from high-definition digital devices such
as Blu-ray players.
f HDMI 2
Digital audio and video input from high-definition digital devices such
as Blu-ray players.
g HDMI 1
Digital audio and video input from high-definition digital devices such
as Blu-ray players.
h SERVICE
For serial communication and use by service personnel.
i VGA
Video input from a computer.
j SPDIF OUT
Digital audio output to home theaters and other digital audio
systems.
k AV 1
Analog audio and video input from analog or digital devices such as
DVD players, satellite receivers and VCRs.
l DATA 1 / SPI (SmartPort interface)
20
EN
Side connectors
1
USB
2
3
VIDEO
4
S-VIDEO
5
16 Troubleshooting
This section describes commonly encountered issues and accompanying
solutions.
TV power on/ off issues
The TV does not power on:
•• Ensure that the TV is connected to the AC mains power outlet. If it
does not power on, pull the plug out of the power outlet, wait for
60 seconds, plug it back and turn the TV on again.
The TV does not switch on:
•• Check that the TV controls are not locked. Use Philips Hospitality
setup remote control to access the Philips Hospitality setup menu
and select CONFIGURATION > SECURITY > KEYBOARDLOCK
> NO to unlock all TV control keys (see ‘Enable or disable the TV
controls’ on page 16).
•• Check that the remote control is not locked. Use Philips Hospitality
setup remote control to access the Philips Hospitality setup
menu and select CONFIGURATION > SECURITY > REMOTE
CONTROL > LOCK > YES to enable the guest remote control
(see ‘Enable or disable the remote control’ on page 16).
Note
a USB
For software update, cloning and media player.
b
If LOW POWER STANDBY is set to YES, the TV can only be switched on
with a remote control. Please ensure the remote control is always available.
The control buttons at the side of the TV will not be able to switch on the
TV.
Stereo audio output to headphones or earphones.
c AUDIO L/R
Audio input from analog devices connected to VIDEO.
d VIDEO
Composite video input from analog devices such as VCRs.
e S-VIDEO
Eng lis h
Pay-Per-View terminal connection.
••
Ensure that the TV is connected to the AC mains power outlet. If it
does not power on, pull the plug out of the power outlet, wait for
60 seconds and turn on the TV again.
The TV turns off by itself:
S-Video (side) to be used with Audio L/R connectors for camcorder,
game console, etc. When you use the S-Video (side) for video
signals, do not use the Composite video (side) input for video signals.
EN
21
••
Check the ESP setting and increase the time if you want the TV to
stay on for longer duration (see ‘Configure the control options’ on
page 16).
The TV cannot be turned off:
•• Check if the power mode has been set to FORCED ON. If it is,
change selection to any other setting.
No access to Philips Hospitality setup menu
The Philips Hospitality setup mode cannot be accessed using the guest
remote control:
•• Check that the high-security mode has been turned off. Use the
Philips Hospitality setup remote control to access the Philips
Hospitality setup menu and select CONFIGURATION >
SECURITY > SECURITY > STANDARD to allow the use of guest
remote control (see ‘Select the security level’ on page 16).
The Philips Hospitality setup mode cannot be accessed using the Philips
Hospitality setup remote control:
•• Check that the switch at the side of the Philips Hospitality setup
remote control is set to the SETUP position (see ‘Access the Philips
Hospitality setup menu with Philips setup remote control’ on page
9).
Picture issues
The TV is on, but there is no picture:
•• Check that the antenna or the cable is connected properly to the
TV.
•• Check that source device and communication protocols are selected
correctly.
•• Check that the channel(s) are installed and in the current ring.
•• If the video is muted, select CHANNEL INSTALL > MUTE >
NONE or CHANNEL INSTALL > MUTE > AUDIO to unmute the
video (see ‘Mute a channel’ on page 12).
The TV is on, but picture quality is not good:
•• Check the antenna, cable or set-top box connections to the TV and
ensure that they are properly connected.
•• Check that the picture settings are correct for your TV and the
source device
22
EN
17 Stand assembly
Eng lis h
1
2
3
4
5
x4
EN
23
© 2010 Koninklijke Philips Electronics N.V.
All rights reserved.