1
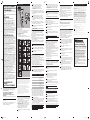
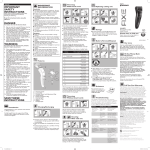
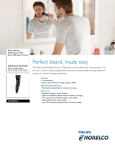
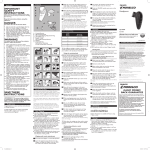
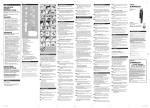
ENGLISH
Features
IMPORTANT
SAFETY
INSTRUCTIONS
When using an electrical appliance, basic safety
wAfter the Trimmer has been charged for
the first time, do not recharge the Trimmer
between trimming sessions. Continue using it
until the battery is completely empty.
wDo not charge for more than 24 hours.
wDo not keep cord permanently plugged in.
wDischarge/run down the battery completely twice a year by letting the motor run until it stops.
wIf the Trimmer hasn’t been used for a long period of time, it must be recharged for a
full 10 hours.
A
B
precautions should always be followed, including
the following:
Read all instructions before using this
appliance.
H
DANGER
To reduce the risk of electric shock:
1.Do not reach for a corded Trimmer that has
fallen into water. Unplug immediately.
2.Use Trimmer only in a dry condition. Do not
use while bathing or in a shower.
3.Do not place or store Trimmer where it can
fall or be pulled into a tub or sink. Do not
place in or drop into water or other liquid.
4.Always unplug this Trimmer from the electrical outlet immediately after (re)charging.
5.Unplug and remove power supply cord from
Trimmer before cleaning.
6.When discarding Trimmer, unplug trimmer
before removing rechargeable battery. See
Battery Removal instructions.
WARNING
To reduce the risk of burns, fire, electric
shock or injury to persons:
1.Close supervision is necessary when
this appliance is used by, on, or near children
or invalids.
2.Use this Trimmer for its intended household
use as described in this manual. Do not use
attachments not recommended by Philips
Electronics North America Corporation.
3.Never operate this Trimmer if it has a
damaged cord or plug, if it is not working
properly, if it has been dropped, damaged, or
dropped into water. For assistance call
1-800-243-3050.
4.Keep the Trimmer, cord and any attachments
away from heated surfaces.
5.Never drop or insert any object into any
opening.
6.Do not operate, charge, clean or plug in
Trimmer outdoors or where aerosol (spray)
products are being used or where oxygen is
being administered.
7.Always check cutters, cutting unit and comb
before using the Trimmer. Do not use the
Trimmer if cutters, cutting unit and comb are
damaged, as injury may occur.
8.Always attach plug to Trimmer first, then to
outlet. To disconnect, turn on/off switch to
“OFF” position, then remove plug from
outlet.
9.To prevent possible damage to the cord, do
not wrap cord around the Trimmer.
10.Never put Trimmer in direct sunlight or store
at a temperature above 140°F.
11.Never immerse the Trimmer in water or
rinse under the tap.
12.This Trimmer is for use on human hair only.
Do not use this Trimmer for any other
purpose.
13.Always store your Trimmer, attachments and
power plug in a moisture-free area. Make
sure the cord is disconnected from the
Trimmer.
14.Only use the power plug and other
accessories supplied with the appliance.
SAVE THESE
INSTRUCTIONS
IMPORTANT: The power plug contains
a transformer. Do not cut off the power
plug to replace it with another plug as this
will cause a hazardous condition.
IMPORTANT: YOUR Trimmer
CONTAINS A NICKEL METAL HYDRIDE
RECHARGEABLE BATTERY.
See Battery Removal Instructions.
Registration
Congratulations on your purchase and welcome
to Philips Norelco!
To fully benefit from the support that Philips
Norelco offers, register your product at
www.norelco.com/register
Put It To The Test
Like many new products, your Philips Norelco
Beard Trimmer may take a little getting used to. If
you are using an electric Trimmer for the first time,
or if you’ve been using a different brand, take the
time to acquaint yourself with your new Trimmer.
Your Beard Trimmer features a unique stubble look
setting combined with an adjustable Zoom Lock
to make beard trimming goof proof.
Throw your scissors away and put your new
Trimmer to the test. We guarantee precise,
professional results or Philips Norelco will refund
you the full purchase price as long as the request
is received within 45 days of purchase.
12_QT4000.indd 1
Optimize the working life of the battery
C
G
Cordless Trimming
D
1 Charge according to directions. Unplug
Trimmer from outlet and remove cord.
F
2 Slide ON/OFF switch ON to begin trimming.
3 When finished, turn Trimmer OFF.
E
Trimming
A Trimming Comb
B Cutting Unit
C Precision Zoom Lock Adjustment Ring
D On/Off Switch
E Socket for Appliance Plug
F Cleaning Brush
G Appliance Plug
HAdapter
Full Two-Year Warranty
45-Day Money-Back Guarantee
1
use as described in this manual.
wAlways comb the beard and/or moustache with
a fine comb before you start trimming.
wIf you are trimming for the first time, be careful. Do not move the Trimmer too fast. Make
smooth and gentle movements.
wMake sure that the Trimmer is fully charged before you start trimming.
2
3
4
4
wUse this Trimmer for its intended household •
3
•
5
2
•
10
13
8
11
14
9
12
15
16
To Charge/Recharge
wFully charge Trimmer before using for the first time or after non-use for a long period of time.
wCharging, recharging or using Trimmer at
temperatures below 40˚F or higher than 95˚F
adversely affects lifespan of the battery.
wIf the Trimmer is subjected to a major change
in temperature, pressure or humidity, let the
Trimmer acclimatize for 30 minutes before
using.
wContinuously recharging Trimmer will reduce
lifespan of battery.
Hair Length after Trimming
2mm
1
5/64 in
3/64 in/1mm
2
5/64 in/2mm
3
1/8 in/3mm
4
5/32 in/4mm
5
3/16 in/5mm
6
1/4 in/6mm
7
9/32 in/7mm
8
5/16 in/8mm
9
3/8 in/9mm
10
13/32 in/10mm
wIf you are trimming for the first time, start
by using the comb at the maximum trimming
length setting (#10) to prevent accidentally
trimming hairs too short. As you become
familiar with the settings, adjust Zoom Lock to
desired trimming length. Zoom Lock will “click”
into position at each setting.
2 Switch the Trimmer ON.
3 T
o trim in the most effective way, move the
Trimmer against the direction of hair growth.
Make sure the surface of the comb always
stays in contact with the skin (fig. 4).
NOTE: Since all hairs do not grow in the same
direction, you may want to try different trimming
positions (i.e., upwards, downwards, or across).
Practice is best for optimum results.
4 If cut hairs have accumulated in the comb,
turn Trimmer off, remove the comb and blow
and/or shake the hair out of the comb (fig. 5).
The selected trimming length setting will not
change when you do this.
Trimming For 'Stubble' Look
2 Connect appliance plug directly into the
Trimmer (fig. 2) and plug adapter into any
120V AC outlet. Use only the cord provided.
wAn adaptor plug may be necessary for cord
Remove comb if you are:
wIt will take approximately 10 hours to fully charge the Trimmer for a cordless trimming time of up to 35 minutes.
During Use:
wIf cut hairs have accumulated in the comb area,
turn Trimmer off, pull the comb off Trimmer
and remove hairs by shaking, blowing or using
cleaning brush provided.
After Each Use:
1 Make sure the Trimmer is switched OFF and disconnected from the electrical outlet.
1Turn the Zoom Lock to the desired trimming length setting (see table). The setting is
indicated in the center of the adjustment ring
(fig. 3).
1 Be certain Trimmer is OFF (fig. 1).
3The Charging Light on the adaptor lights up
green to indicate the Trimmer is charging.
After fully charging, the Charging Light will
remain lit.
power supply cord from Trimmer before
cleaning.
wNever immerse the Trimmer in water or rinse
under the tap (fig. 9).
wDo not use abrasive cleaning agents, scourers
or aggressive liquids such as alcohol, gasoline,
or acetone to clean the Trimmer and
attachments.
wNever clean, replace or remove Trimmer comb
with motor ON.
wDo not apply pressure to cutters.
wDo not touch cutters with hard objects as this may damage them.
wUse a soft, dry cloth to clean Trimmer handle.
3
Remove the cutting unit by pushing against
the teeth of the cutting unit (fig. 10) and rinse
under warm tap water (fig. 11) or use the brush supplied.
Allow to air dry thoroughly.
use the Zoom Lock.
1Be certain Beard Trimming Comb is on
Trimmer and use setting 1 (3/64in/1mm) to
result in a 'stubble' look (fig. 6).
usage in some foreign countries. Use an attachment plug adaptor of the proper configuration
for power outlet.
wClean the Trimmer after each use.
wAlways switch Trimmer OFF, unplug and remove
2
Remove the Trimming Comb and clean with
the brush.
Setting
7
Cleaning
wBeard Trimming Comb must be on Trimmer to
1
6
Trimming with the Beard
Trimming Comb
4 Make well-controlled movements. Touch the
hair/skin lightly with the Trimmer (fig. 8).
Be careful when you are trimming without the
comb as when the Trimmer is turned on it will
trim every hair it touches.
Trimming Without the Beard
Trimming Comb
wDefining hair lines
wTrimming nape of neck
wRemoving single, unwanted hairs
1 Be certain the Trimmer is in the OFF position.
2Remove the Beard Trimming Comb by pulling
it off the Trimmer (fig. 7).
3 Switch the Trimmer ON.
4
Place the cutting unit back by inserting the
notch of the cutting unit into the guiding slot
(fig. 12).
5 Push the cutting unit back into place on the
Trimmer until you hear a click (fig. 13).
NOTE: The appliance does not need any lubrication (oil).
Replacing The Cutting Unit
If your cutters become damaged or worn,
do not continue using the Trimmer. Replace
cutters immediately.
1 Open the cutting unit.
1 Unplug electrical cord from outlet and Trimmer before dismantling Trimmer.
2 Allow the Trimmer to run until the
battery is completely empty/depleted. Turn Trimmer off.
3 Remove the comb and cutting unit
from Trimmer.
Beard
Trimmer
4Insert a screwdriver in the hair chamber to
separate the housing part (fig. 15).
5Cut the wires close to the battery with
scissors (fig. 16).
6 Remove the rechargeable battery.
7 Do not attempt to replace battery. Insulate battery ends by covering with tape and
or place battery in a small plastic bag. 8Discard your Trimmer. Do not attempt to
plug electrical cord into outlet or recharge
the Trimmer after the battery has been
removed.
9Contact your local town or city officials
for battery disposal information or call
1-800-8-BATTERY or www.rbrc.com for
battery drop-off locations.
QT4000
Rechargeable
Cordless
Always here to help you
Question?
Contact
Philips
Norelco
Register your product and get support at
www.norelco.com/register
4222 002 8307 1
Full Two-Year Warranty
Philips Electronics North America Corporation warrants each new Philips
Norelco product, Model QT4000 (except cutters and comb) against
defects in materials or workmanship for a period of two years from the
date of purchase, and agrees to repair or replace any defective product
without charge.
IMPORTANT: This warranty does not cover damage resulting from
accident, misuse or abuse, lack of reasonable care, the affixing of any
attachment not provided with the product or loss of parts or subjecting
the product to any but the specified voltage.* Use of unauthorized
replacement parts will void this warranty.
PHILIPS ELECTRONICS NORTH AMERICA CORPORATION
WILL NOT PAY FOR WARRANTY SERVICE PERFORMED BY
A NON-AUTHORIZED REPAIR SERVICE AND WILL NOT
REIMBURSE THE CONSUMER FOR DAMAGE RESULTING FROM
WARRANTY SERVICE PERFORMED BY A NON-AUTHORIZED
REPAIR SERVICE.
NO RESPONSIBILITY IS ASSUMED FOR ANY SPECIAL,
INCIDENTAL OR CONSEQUENTIAL DAMAGES.
In order to obtain warranty service, simply go to www.philips.com/
norelco or call 1-800-243-3050 for assistance. It is suggested that for
your protection you return shipments of product by insured mail,
insurance prepaid. Damage occurring during shipment is not covered by
this warranty. NOTE: No other warranty, written or oral, is authorized
by Philips Electronics North America Corporation. This warranty gives
you specific legal rights, and you may also have other rights which vary
from state to state. Some states do not allow the exclusion or limitation
of incidental or consequential damages, so the above exclusion and
limitations may not apply to you.
*Read enclosed instructions carefully.
Manufactured for:
Philips Consumer Lifestyle
A Division of Philips Electronics North America Corporation
P.O. Box 10313, Stamford, CT 06904
This symbol on the product’s nameplate means it is
listed by Underwriters’ Laboratories, Inc.
Norelco is a Registered Trademark of Philips Electronics
North America Corporation.
PHILIPS is a Registered Trademark of Koninklijke Philips Electronics N.V.
© 2012 Philips Electronics North America Corporation. All Rights Reserved.
2
Remove the old cutting unit by pushing
against the teeth of the cutting unit (fig. 10).
3 Insert the notch of the new cutting unit into
the guiding slot (fig. 12).
4 Push the cutting unit back onto the Trimmer until you hear a ‘click’ (fig. 13).
This Trimmer has no other user-serviceable parts.
For assistance call 1-800-243-3050.
Storage
wBe sure Trimmer is turned OFF. Remove cord from outlet and Trimmer before storing in a safe, dry location where it will not be crushed, banged, or subject to damage.
wDo not wrap cord around Trimmer when
storing.
wStore cord in a safe location where it will not be cut or damaged.
wDo not place or store Trimmer where it can fall or be pulled into a tub or sink, water or other liquid.
Assistance
45-DAY MONEYBACK GUARANTEE
If you are not fully satisfied with your Philips Norelco
Trimmer send the product back and we’ll refund you
the full purchase price.
The Trimmer must be shipped prepaid by
insured mail, insurance prepaid, have the
original sales receipt, indicating purchase price
and date of purchase, and the money-back
guarantee return authorization form enclosed.
We cannot be responsible for lost mail.
The Trimmer must be postmarked no later
than 45 days after the date of purchase.
Philips Norelco reserves the right to verify
the purchase price of the product and limit
refunds not to exceed suggested retail price.
To obtain money-back guarantee return
authorization form, call 1-800-243-3050 for
assistance.
Delivery of refund check will occur 6–8 weeks
AFTER receipt of returned product.
For assistance, visit our website:
www.philips.com/support
or call toll free 1-800-243-3050
Online information is available 24 hours a day,
7 days a week.
Battery Removal
wThis Philips Norelco Trimmer contains a
rechargeable Nickel Metal Hydride battery,
which must be disposed of properly (fig. 14).
wBattery may only be removed when Trimmer is
to be discarded.
wFor assistance, visit our website,
www.philips.com/support or call toll free
1-800-243-3050.
4 Disconnect the cord and unplug from
electrical outlet.
9/25/12 10:18 AM
ESPAÑOL
2
Características
INSTRUCCIONES
IMPORTANTES DE
SEGURIDAD
Cuando utilice un artefacto eléctrico siempre
A
B
wEn algunos países puede ser necesario el uso
tome medidas de seguridad básicas, entre las que
se incluyen:
Lea las instrucciones antes de utilizar este
producto.
C
eléctrica:
ADVERTENCIA
Para reducir el riesgo de quemaduras,
incendios, descargas eléctricas o lesiones:
1.Es necesaria una estricta supervisión cuando
el artefacto sea utilizado por niños o
personas con discapacidad o en su cercanía.
2. Utilice esta cortadora para el uso doméstico
al cual está destinada según se describe
en este manual. No use accesorios no
recomendados por Philips Electronics North
America Corporation.
3. Nunca use esta cortadora si el cable
o el conector está dañado, si no funciona
correctamente, si se cayó, está dañada o si
se sumergió en agua. Para solicitar asistencia,
comuníquese al 1-800-243-3050.
4. Mantenga esta cortadora, el cable de
alimentación y todos los accesorios lejos de
superficies que irradien calor.
5. No deje caer ni introduzca ningún objeto en
las aberturas.
6. No utilice, cargue, limpie ni enchufe la unidad
al aire libre o en lugares donde se utilicen
aerosoles (spray) o se administre oxígeno.
7. Antes de usar la cortadora, compruebe
siempre el estado de las cuchillas, la unidad
de corte y el peine. No utilice la cortadora
si cualquiera de estas partes está dañada, ya
que podría lesionarse.
8. Siempre enchufe el conector primero en la
cortadora y luego en la toma de corriente.
Para desconectar la cortadora, coloque el
interruptor de encendido/apagado en la
posición "OFF" y, a continuación, extraiga el
conector de la toma de corriente.
9. Para evitar dañar el cable de red, no lo
enrolle alrededor de la cortadora.
10.Nunca exponga la cortadora a la luz solar
directa ni la guarde en lugares con
temperaturas superiores a 140 °F.
11.Nunca sumerja la cortadora en agua ni la
enjuague con agua del grifo.
12.Esta cortadora está indicada exclusivamente
para uso en personas. No lo utilice para
otros fines.
13.Siempre almacene la cortadora, los
accesorios y el conector de alimentación en
un lugar sin humedad. Asegúrese de que el
cable esté desconectado de la cortadora.
14.Utilice únicamente el conector de
alimentación y los accesorios suministrados
con el artefacto.
NO DESECHE
ESTAS
INSTRUCCIONES
IMPORTANTE: el conector de
alimentación contiene un transformador.
Para evitar situaciones de riesgo, no lo
sustituya por otro.
IMPORTANTE: SU CORTADORA
CONTIENE UNA BATERÍA
RECARGABLE DE NÍQUEL METAL
HIDRURO.
Consulte las Instrucciones para quitar la batería
Registro
Bienvenido a Philips Norelco. Felicitaciones por
su compra.
Para acceder a todos los beneficios que ofrece
Philips Norelco, registre su producto en
www.norelco.com/register
de un adaptador para el cable de alimentación.
Utilice un adaptador apropiado para el tipo de
tomacorriente.
H
PELIGRO
Para reducir el riesgo de descarga
1.No toque una cortadora que haya caído al
agua. Desenchúfelo inmediatamente.
2. Utilice una cortadora solo en seco. No la
utilice mientras se baña o se ducha.
3. No coloque ni guarde la cortadora en un
lugar donde pueda caerse en la bañera o el
lavabo. No sumerja la cortadora ni la deje
caer al agua u otros líquidos.
4. Siempre desenchufe la cortadora de la toma eléctrica inmediatamente después de cargarla.
5. Antes de limpiarla, desenchufe y retire el cable de alimentación de la cortadora.
6. Cuando desche una cortadora, desenchúfela
antes de extaer la batería recargable.
Consulte las instrucciones de Extracción
de la batería.
Inserte el conector del artefacto
directamente a la Cortadora (fig. 2) y
conecte el adaptador a cualquier
tomacorriente de 120V CA. Use
únicamente el cable de alimentación
proporcionado.
3La luz indicadora de carga se enciende
en verde para indicar que la cortadora
se está cargando. Luego de que se cargue
por completo, la luz de carga permanecerá
encendida.
G
D
F
wTarda aproximadamente 10 horas en cargar
completamente la cortadora para un tiempo de
uso sin cable de hasta 35 minutos.
4 Desconecte el cable y desenchúfelo de la
toma eléctrica.
E
A Peine de recorte
B Unidad de corte
C Zoom Lock para precisión Anillo de ajuste
D Interruptor de encendido/apagado
F Toma para el conector del artefacto
F Cepillo de limpieza
G Conector del artefacto
HAdaptador
Garantía total durante dos años
Garantía de devolución del importe de 45 días
1
2
3
4
•
3
•
2
•
Cómo aprovechar al máximo la vida
útil de la batería
wDespués de cargar la cortadora por primera
vez, no cargue la cortadora entre sesiones.
Utilícela hasta que la batería se descargue
completamente.
wNo cargue la batería durante más de 24 horas.
wNo deje el cable continuamente conectado al
tomacorriente.
wDescargue o agote totalmente la batería dos
veces al año dejando que el motor funcione hasta que se detenga.
wSi no ha utilizado la cortadora por un periodo
largo, debe cargarla por 10 horas completas.
1
Recorte sin cables
4
6
5
1 Cargue según las instrucciones. Desenchufe la
cortadora del tomacorriente y saque el cable.
2 Mueva el interruptor de encendido/apaga
do a la posición ON para comenzar a cortar.
7
8
9
3 Al terminar, mueva el interruptor a la
posición OFF.
Recorte
wUtilice esta cortadora para el uso doméstico
10
13
11
14
12
15
que se describe en este manual.
wAntes de comenzar a recortar, peine siempre
la barba o el bigote con un peine fino.
wSi va a recortar por primera vez, tenga cuidado.
No mueva la cortadora demasiado rápido. Haga
movimientos suaves y lentos.
wVerifique que la cortadora tenga carga
suficiente antes de comenzar.
Cortar con el peine de recorte
wEl peine de recorte debe estar en la cortadora
para utilizar el Zoom Lock.
16
1Gire el Zoom Lock a la longitud de recorte
deseada (ver tabla). El ajuste está indicado en
el centro del anillo de ajuste (fig. 3).
Posición de longitud
1
Longitud del pelo
después corte
3/64 in/1mm
2
5/64 in/2mm
Como otros muchos productos nuevos, la
Cortadora Philips Norelco requiere de tiempo
para acostumbrarse a su uso. Si es la primera vez
que utiliza una cortadora eléctrica o si ha estado
utilizando uno de otra marca, tómese su tiempo
para familiarizarse con su nueva cortadora.
3
1/8 in/3mm
4
5/32 in/4mm
5
3/16 in/5mm
6
1/4 in/6mm
7
9/32 in/7mm
Su Cortadora cuenta con una exclusiva
configuración de barba incipiente que junto a
un Zoom Lock ajustable logran que el uso de la
cortadora sea a prueba de fallas.
8
5/16 in/8mm
Compruébelo usted misma
Olvídese de las tijeras y pruebe su nueva
cortadora. Le aseguramos resultados precisos
y profesionales, de lo contrario, Philips Norelco
le devolverá su dinero dentro de los 45 días
posteriores a la compra.
Carga y recarga
wCargue totalmente la cortadora antes de usarla
por primera vez o si no la ha utilizado durante
un period prolongado.
wLa carga, la recarga o el uso de la cortadora
a temperaturas inferiores a los 40˚F o
superiores a los 95˚F afecta negativamente la vida útil de la batería.
wSi la cortadora queda expuesta a un cambio
radical de temperatura, presión o humedad,
espere 30 minutos antes de utilizarla.
wRecargar continuamente la cortadora,
disminuirá la vida útil de la batería.
9
3/8 in/9mm
10
13/32 in/10mm
wSi va a usar el aparato por primera vez,
comience con la posición de longitud de corte
máxima (#10) para evitar cortes accidentales
demasiado cortos. A medida que se vaya familiarizando con las posiciones, ajuste el Zoom
Lock a la longitud de corte deseada. El Zoom
Lock encajará con un "clic" en cada posición.
2 Encienda la cortadora.
3 P
ara recortar la barba de la forma más eficaz,
mueva el barbero en sentido contrario al de
crecimiento del pelo. Asegúrese de que la
superficie del peine permanezca siempre en
contacto con la piel (fig. 4).
NOTA: ya que no todo el vello crece en la misma
dirección, puede probar diferentes direcciones
de corte (es decir, hacia arriba, hacia abajo o en
diagonal). La práctica es la mejor manera para
obtener buenos resultados.
4 S i se acumulan vellos cortados en el peine,
apague la cortadora, quite el peine y sóplelo
o agítelo para sacar el vello del peine (fig. 5).
La longitud de corte no cambiará cuando
realice esta limpieza.
Corte con la posición barba incipiente
1Verifique que el peine de recorte esté en
la cortadora y use el ajuste 1 (3/64in/1mm)
para obtener un aspecto de barba incipiente
(fig. 6).
Corte de barba sin el peine cortador
Almacenamiento
wLa cortadora debe estar apagada. Desenchufe el
cable del tomacorriente y de la cortadora antes de guardarla en un lugar seguro y seco, donde no se aplaste, golpee ni pueda sufrir daños.
wAl guardar la cortadora no enrolle el cable
alrededor de la misma.
wGuarde el cable en un lugar seguro donde no
sufra cortes ni daños.
wNo coloque ni guarde la cortadora en un lugar
desde donde pueda caerse a la bañera, el lavabo, al agua u otro líquido.
Retire el peine para:
wDefinir líneas de vello
wRecortar la parte trasera del cuello
wEliminar vellos no deseados
1 Verifique que la cortadora está en la posición
de apagado (OFF).
2 Quite el peine tirando de él y sacándolo de la
cortadora (fig. 7).
3 Encienda la cortadora.
4 Realice movimientos controlados. Toque el vello o la piel ligeramente con la recortadora
(fig. 8).
Tenga cuidado al cortar sin el peine, ya que la
cortadora, al estar encendida, cortará todo el vello
que toque.
Limpieza
wLimpie siempre la cortadora después de cada
uso.
wSiempre apague la cortadora, desenchufe y
quite el cable de alimentación de la cortadora antes de limpiarla.
wNunca sumerja la cortadora en agua ni la
enjuague con agua del grifo (fig. 9).
wNo use agentes de limpieza abrasivos o líquidos
agresivos como alcohol, gasolina o acetona para
limpiar la cortadora.
wNunca limpie, reemplace o quite el peine de la
cortadora con el motor encendido.
wNo presione las cuchillas.
wNo toque las cuchillas con objetos duros, ya
que podría dañarlas.
wPara limpiar el mango de la cortadora, utilice un paño seco y suave.
Ayuda
Para obtener asistencia, ingrese en nuestro sitio
web:
www.philips.com/support o llame al
número gratuito: 1-800-243-3050
La información en línea está disponible las 24
horas, los 7 días de la semana.
Extracción de las baterías
wEsta cortadora Philips Norelco contiene una
batería recargable de níquel metal hidruro que
debe ser desechada correctamente (fig. 14).
wSolo debe extraer la batería cuando vaya a
desechar la cortadora.
wPara recibir asistencia, visite nuestro sitio web
www.philips.com/support o comuníquese
gratuitamente al 1-800-243-3050.
2 Permita que la cortadora funcione hasta que
la batería esté completamente descargada.
Luego apague la cortadora.
3 Quite el peine y la unidad de corte de
la cortadora.
4 Introduzca un destornillador en la cámara de
recogida del pelo para separar la pieza de la
carcasa (fig. 15).
5 Con una tijera, corte los cables muy cerca de
la batería (fig. 16).
6 Extraiga la batería recargable.
wSi se acumula vello en el área del peine, apague
No intente reemplazar la batería. Para aislar los extremos de la batería, cúbralos con cinta
aislante o coloque la batería en una bolsa de
plástico pequeña.
8
Deseche la cortadora. No enchufe el cable
a la toma de corriente ni recargue la
cortadora después de haber extraído la
batería.
9
Para obtener información sobre cómo
desechar la batería, póngase en contacto
con la administración local, llame al número
1-800-8-BATTERY o visite www.rbrc.com.
Durante el uso:
la cortadora, quite el saque el peine y sacúdalo,
sóplelo o utilice el cepillo de limpieza suministrado para quitar el vello.
Después de cada uso:
1 Asegúrese de que la cortadora está apagada
y desenchúfela de la toma de corriente
eléctrica.
2 Quite el peine de recorte y límpielo con
el cepillo.
PHILIPS ELECTRONICS NORTH AMERICA CORPORATION
NO PAGARÁ LAS REPARACIONES REALIZADAS POR UN
SERVICIO TÉCNICO NO AUTORIZADO NI REEMBOLSARÁ
AL CONSUMIDOR POR LOS DAÑOS DERIVADOS DE TALES
REPARACIONES.
LA EMPRESA NO SE ASUME RESPONSABILIDAD ALGUNA POR
NINGÚN DAÑO ESPECIAL, ACCIDENTAL NI EMERGENTE.
Para obtener el servicio de garantía, simplemente ingrese en www.philips.
com/norelco o comuníquese al 1-800-243-3050 para solicitar asistencia.
Para su protección, se recomienda enviar el producto por correo
asegurado y seguro prepago. La garantía no cubrirá los daños que ocurran
durante el envío. NOTA: Philips Electronics North America Corporation
no autoriza ninguna otra garantía escrita o verbal. Esta garantía le
otorga derechos legales específicos sin perjuicio de la existencia de
otros derechos que pueden variar de un estado a otro. Algunos estados
prohíben la exclusión o limitación de daños incidentales o emergentes,
por lo que las limitaciones y exclusiones anteriores pueden quedar sin
efecto.
*Lea atentamente las instrucciones adjuntas.
Fabricado para:
Philips Consumer Lifestyle
Una división de Philips Electronics North America Corporation
P.O. Box 10313, Stamford, CT 06904
Este símbolo en la placa del nombre del producto indica que
está registrado en Underwriters Laboratories, Inc.
Norelco es una marca comercial registrada de Philips Electronics
North America Corporation.
PHILIPS es una marca registrada de Koninklijke Philips Electronics N.V.
© 2012 Philips Electronics North America Corporation. Todos los derechos
reservados
1 Antes de desmontar el aparato, desenchufe el
cable de la toma de corriente y del barbero.
7
Garantía total durante dos años
Philips Electronics North America Corporation garantiza cada nuevo
producto Philips Norelco, modelo QT4000 (excepto cuchillas y peines)
contra defectos de materiales o de fabricación durante un período de dos
años desde la fecha de compra, y se compromete a reparar o sustituir sin
cargo cualquier producto defectuoso.
IMPORTANTE: esta garantía no cubre los daños provocados por
accidentes, uso inapropiado o maltrato, falta de mantenimiento razonable,
uso de accesorios no suministrados con el producto, pérdida de piezas
o uso del artefacto con un voltaje distinto del especificado.* El uso de
piezas de repuesto no autorizadas anulará esta garantía.
GARANTÍA DE
DEVOLUCIÓN DE
DINERO POR 45 DÍAS.
Si no está totalmente satisfecho con la cortadora Philips
Norelco, devuelva el producto y le reembolsaremos el
precio total de la compra.
La cortadora debe enviarse por despacho
prepagado a través de correo certificado, pagado
por adelantado. Se debe adjuntar la boleta de
ventas original y el formulario de autorización
de devolución de dinero garantizada. No nos
hacemos responsable por correos perdidos.
La fecha de envío de la cortadora no debe
superar los 45 días posteriores a la compra.
Philips Norelco se reserva el derecho de verificar
el precio de compra del producto y limitar
los reembolsos para que no superen el precio
minorista sugerido.
Para obtener el formulario de autorización de
garantía de devolución del importe, comuníquese
al 1-800-243-3050.
La entrega del cheque con el reembolso se realizará
de 6 a 8 semanas DESPUÉS del recibo del producto
devuelto.
3 Quite la unidad de corte al presionar los
dientes de la unidad (fig. 10) y enjuáguela
con agua corriente tibia (fig. 11) o use el
cepillo suministrado.
Deje secar al aire completamente.
4 Vuelva a colocar la unidad de corte en la
ranura guía (fig. 12).
5 Presione la unidad de corte de regreso en la
cortadora hasta que escuche un clic (fig. 13).
NOTA: el artefacto no necesita lubricación
(aceite).
Sustitución de la unidad de corte
Si las cuchillas se dañan o se desgastan, deje
de usar la cortadora y reemplace las cuchillas
inmediatamente.
1 Abra la unidad de corte.
2 Quite la unidad de corte usada al presionar
los dientes de la unidad (fig. 10).
3 Inserte las muescas de la nueva unidad de
corte en la ranura guía (fig. 12).
4 Presione la unidad de corte de regreso en la
cortadora hasta que escuche un clic (fig. 13).
Esta cortadora no contiene ninguna otra pieza que
pueda ser reparada por el usuario. Para solicitar
asistencia, comuníquese al 1-800-243-3050.
1 Asegúrese de que la cortadora está apagada
(fig. 1).
12_QT4000.indd 2
9/25/12 10:18 AM