1
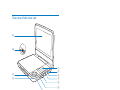
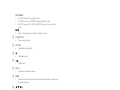
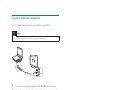
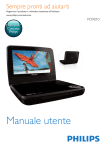
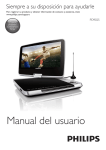
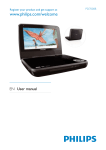
Always there to help you Register your product and get support at www.philips.com/welcome PD9010 Question? Contact Philips User manual Contents 1 Important 3 Safety and notice 3 Safety 3 Compliance 4 Care of the environment 5 Copyright 6 Warranty 7 2 Your portable DVD player 8 Introduction 8 What's in the box 8 Overview of the main unit 9 3 Get started 11 Prepare 11 Mount the player in your car (for in-car use) 13 Switch on/off 15 Select OSD language 16 4 Play music or movies 17 Play discs 17 Connect additional equipment 20 Play from USB 20 EN 1 5 Set the main unit 22 6 Product information 23 7 Troubleshooting 25 2 EN 1 Important Safety and notice Read and understand all instructions before you use this product. If damage is caused by failure to follow the instructions, the warranty does not apply. Safety Use only power supplies listed in the user manual. The product shall not be exposed to dripping or splashing. lighted candles). Batteries (battery pack or batteries installed) shall not be exposed to excessive Danger of explosion if battery is incorrectly replaced. Replace only with the same or equivalent type. Where the plug of the Direct Plug-in Adapter is used as the disconnect device, the disconnect device shall remain readily operable. other unsafe operation. EN 3 Warning ! ! ! ! ! ! ! Never remove the casing of this product. Never lubricate any part of this product. Never place this product on other electrical equipment. " # $ Never look into the laser beam inside this product. Ensure that you always have easy access to the power cord, plug or adaptor to disconnect the product from the power. Where the MAINS plug or an appliance coupler is used as the disconnect device, the disconnect device shall remain readily operable. Hearing safety A pleine puissance, l’écoute prolongée du baladeur peut endommager l’oreille de l’utilisateur. Warning ! To prevent possible hearing damage, do not listen at high volume levels for long periods. The maximum output voltage of the player is not greater than 150 mV. Compliance 4 EN This product complies with the radio interference requirements of the European Community. This apparatus includes this label: Note ! The type plate is located on the bottom of the product. Care of the environment Environmental information All unnecessary packaging has been omitted. We have tried to make the packaging easy to separate into three materials: cardboard (box), polystyrene foam (buffer) and polyethylene (bags, protective foam sheet.) Your system consists of materials which can be recycled and reused if disassembled by a specialized company. Please observe the local regulations regarding the disposal of packaging materials, and old equipment. Your product is designed and manufactured with high quality materials and components, which can be recycled and reused. When this crossed-out wheeled bin symbol is attached to a product it means that the product is covered by the European Directive 2002/96/EC. EN 5 Please inform yourself about the local separate collection system for electrical and electronic products. Please act according to your local rules and do not dispose of your old products with your normal household waste. Correct disposal of your old product helps to prevent potential negative consequences for the environment and human health. Your product contains batteries covered by the European Directive 2006/66/EC, which cannot be disposed with normal household waste.Please inform yourself about the local rules on separate collection of batteries because correct disposal helps to prevent negative consequences for the environmental and human health. Always bring your product to a professional to remove the built-in battery. Copyright This item incorporates copy protection technology that is protected by U.S. patents and other intellectual property rights of Rovi Corporation. Reverse engineering and disassembly are prohibited. 6 EN % #& "*+;<=#*= # supplies accordingly. Manufactured under license from Dolby Laboratories. Dolby and the double-D symbol are trademarks of Dolby Laboratories. >?@&F<G<F+H=GJ = =GF K=Q & =GQJ= =G=<=V # = =G= >?@&F<G<F+X;X+Z>;H&=GQJ= =G<XX <[= & =G<= setup menu. Go to vod.divx.com for more information on how to complete your registration. Warranty ! ! ! ! ;= damage to the product and will void your warranty. Use the product and accessories only as intended by the manufacturer. The caution sign printed on the back of the product indicates risk of electric shock. Never remove the cover of the product. Always contact Philips Customer Support for service or repairs. > V assembly procedures not recommended or authorized in this manual shall void the warranty. EN 7 2 Your portable DVD player Q #*]& the support that Philips offers, register your product at www.philips.com/welcome. Introduction < #QXK QXK^%[<Q<_K <_K^[H ! <X< ! <Q ! Audio CD ! MP3 CD ! Divx ! #`*+j What's in the box Check and identify the contents of your package: ! * < ! AC power adaptor, AY5808/12 or DSA-9PFB-09 FEU090100 ! Car adaptor ! Car mounting bracket ! Short user manual ! Safety and warranty sheet 8 EN Overview of the main unit k j a b i c d h e f g a ! &< SOURCE ! Switches between DISC and USB. SETUP ! Accesses or exits the setup menu. OPTIONS ! Accesses options relating to the current activity or selection. ! Accesses or exits the setup menu. STOP ! Stops play. EN 9 DISC MENU ! |< V ! |<Q*?Q* Q[ ! |<Q=}~%<Q#*?Q menu. , ! Skips to the previous or next title, chapter, or track. b 9-12V DC IN ! Power supply socket. c AV OUT ! >= d ! ! USB socket. e f VOL +/! Increases or decreases volume. g RESET ! When the player hangs up, press it with a ball-point pen or similar tool to reset the player. h , , , ! Navigates menus. , ! Searches backward/forward at different speeds. /OK ! Q ! Starts, pauses or resumes disc play. i CHR/IR/ ! Charging indicator/Remote control sensor/Power indicator. j OPEN ! Opens the disc compartment. k Display panel 10 EN 3 Get started Caution ! Use the controls only as stated in this user manual. ! Always follow the instructions in this chapter in sequence. If you contact Philips, you will be asked for the model and serial number of your player. The model number and serial number are on the bottom of your player. Write the numbers here: Model No. __________________________ Serial No. ___________________________ Prepare Charge power Charge through the AC adaptor Caution ! Risk of product damage. Ensure that the power supply voltage corresponds to the voltage printed on the bottom of the player. ! Use only the supplied adaptors to charge the battery. Note ! The type plate is located on the bottom of the player. To fast charge the battery, 1 Press and hold to switch off the player. EN 11 Power 2 Connect the supplied AC adaptor to the player and to the AC outlet. » The CHR indicator turns on (red). » When the battery is fully charged, the CHR indicator turns off. Tip ! You can also charge the battery during play. ! To maximize battery life, recharge the battery immediately once the battery is fully discharged. If you do not use the player for a long time, recharge the battery once every two months. Charge through the car adaptor Connect the supplied car adaptor to the player and car cigarette lighter. 12 EN Mount the player in your car (for in-car use) Use the car mounting kit to mount the player onto the seat headrest in your car. A B C D >| #< ?>=# C. Buckle release button D. Headrest mount bracket Warning ! K= < #< To mount the DVD player onto the headrest 1 Fix the headrest mount bracket on to the front seat headrest. EN 13 a Position the bracket on the bars of the headrest. b 2 |V< < H a Aim the fastening screw of the bracket to the screw nut on the back of the DVD player. b Screw tight the bracket onto the DVD player. There are three holes on the bracket. Use any one as you like. 3 F < 14 EN ! 4 ?< >=# a Release the adjustment node. b Adjust the viewing angle as desired. c Fasten the node. To release the DVD player from the headrest ! Press the release button Switch on/off 1 Press to switch on the player. » The power indicator turns on (green). EN 15 Power 2 To switch off the player, press and hold » The power indicator turns off. . Select OSD language You can choose a different language for the on-screen display text. 1 2 3 4 5 16 Press SETUP. » The setup menu is displayed. Go to [General] > [Language]. Press Press / to select a language option. /OK Press SETUP to exit. EN 4 Play music or movies Play discs 1 2 3 Slide OPEN on the player. Insert the disc with label side facing up. Push down to close the disc compartment. » Play starts automatically. If not, press ! ! ! ! ! /OK. If a menu is displayed, select an item, then press /OK to start play. To pause, press /OK. Press again to resume play. To stop, press STOP twice. To select the previous/next item, press or . To start search within video/audio, press or once or more. Play options Select a subtitle language < 1 Press OPTIONS. » The option menu is displayed. 2 3 4 5 Select [Subtitles], then press Press / Press /OK. to select a subtitle. /OK Press OPTIONS to exit. Select an audio language <=G 1 Press OPTIONS. » The setup menu is displayed. 2 3 4 Select [Audio language], then press Press Press / /OK. to select a language. /OK EN 17 Select an audio mode ^ <Q 1 2 3 Press OPTIONS. » The option menu is displayed. Select [ Audio], then press Press / /OK. to select audio channel: [Stereo], [Left-mono] or [Right-mono]. Repeat During play, you can select different repeat options. 1 Press OPTIONS. » The option menu is displayed. 2 Select [Repeat] and press /OK. » The repeat options are displayed. |< ! [Repeat A]: the start of the section to repeat ! [Repeat B]: the end of the section to repeat ! [Repeat Chapter]: repeat the current chapter ! [Repeat Title]: repeat the current title or track ! [Repeat all]: repeat all titles on the disc ! [Repeat Off]: switch off the repeat mode |<Q ! [Repeat A]: the start of the section to repeat ! [Repeat B]: the end of the section to repeat ! [Repeat 1]: repeat the current track ! [Repeat all]: repeat all tracks on the disc ! [Repeat Off]: switch off the repeat mode |Z*Q=G ! [Repeat 1]: repeat the current track ! [Repeat Folder]: repeat all the tracks in current folder ! [Off]: switch off the repeat mode 3 Select an option, then press /OK Tip ! #*?Q<Q%<Q 18 EN Random play You can play all tracks in random order on CDs or MP3 CDs. 1 2 3 4 Press OPTIONS. » The option menu is displayed. Select !"#$ and press /OK. Select [On] or [Off]. Press /OK Zoom = <<Q`*+j CDs. 1 2 3 4 Press OPTIONS. » The option menu is displayed. Select [Zoom & Pan] and press Press /OK. /OK repeatedly to zoom in and out. When the video image or picture is enlarged, press , , , to pan through it. Display play information =# <<Q 1 Press OPTIONS. » The option menu is displayed. 2 Select [Display] and press /OK » |< |<Q Rotate pictures For JPEG CDs only. While the JPEG is displayed: ! Press $# ! Press $ EN 19 Connect additional equipment &< < Caution ! Turn off your player before you connect it to any additional equipment. R L VIDEO IN not supplied 1 2 Q>< [AV OUT Z >< [# &<H ! # #= ! # # Play from USB =G<?Z*`*+j @%? device. 1 Connect the USB device to the player. » The content menu is displayed. 20 EN 2 3 4 Press SOURCE to switch to USB mode. % » Play starts. . To stop play, press STOP. EN 21 5 Set the main unit To maximize your play experience, use SETUP 1 Press SETUP. » The setup menu is displayed. 2 Use navigation keys to select an option and press [General] [Language] [PBC settings] [Power save] [DivX (VOD)] [DivX subtitles] [Parental(DVD)] [Set password] [Factory settings] [Video] [LCD Display] [TV standard] [Brightness] [Contrast] [ Audio] [Dolby] [Version] 3 4 Press 22 EN /OK Select on-screen display language Set playback control function on/off. Set power saving mode. j=G %=G Select parental options. Change existing password (3308 by default). Restore factory settings. Set screen display aspect ratio. %= &< > > Set Dolby output. Check the version information. to go back to the previous menu. Press SETUP to exit. 6 Product information Note ! * # Dimensions Weight AC power adaptor Power supply Power consumption Operating temperature range Laser wavelength < Format Output level Load impedance Audio line out Audio out (analog audio) Load impedance Audio distortion + noise Frequency response Signal/noise ratio 239 x 39 x 178 mm 1.1 kg UK: AY5808/05 or DSA-9PFB-09 FEU090100 EU: AY5808/12 or DSA-9PFB-09 FEU090100 FH~~X}~<~~ HQ< 1.0A 11.5 W 0-45°C 650 nm PAL & NTSC <X_}~ 75 =H}<_~ 10 K -80 (1KHz) }~ X}~" _? 80 dB Channel separation 80 dB Dynamic range 80 dB Playable media EN 23 Disc <<X<<Q%<Q>Q <KK^<XKXK^<KXK (Dual Layer) QXKQXK^Z* `*+j File format < Audio Picture USB Compatibility Class support File system Support USB HDD (Hard Disc Drive) 24 EN .avi, .divx, .mp4, xvid .mp3 Hi-Speed USB (2.0) USB Mass Storage Class (UMS) FAT16, FAT32 an external power source may be needed 7 Troubleshooting Warning ! Risk of electric shock. Never remove the casing of the player. To keep the warranty valid, never try to repair the system yourself. If you encounter problems when using the player, check the following points before requesting service. If the problem remains unsolved, register your player and get support at www.philips.com/support. When you contact Philips, ensure that your apparatus is nearby and the model number and serial number are available. No power % Ensure that both plugs of the mains cord are properly connected. % Ensure that there is power at the AC outlet. % Check if the built-in battery is drained. No sound ! + >< Distorted picture % Clean the disc. With a clean, soft, lint-free cloth, wipe the disc outwards from the center. % Z = #&< % Q = &< % The LCD is manufactured using high precision technology. You may, however, see tiny black points and/or bright points(red, blue, green) that continuously appear on the LCD. This is a normal result of the manufacturing process and does not indicate a malfunction. Cannot play disc % Ensure the disc label is upwards. % Clean the disc. With a clean, soft, lint-free cloth, wipe the disc outwards from the center. % Check if the disc is defective by trying another disc. EN 25 No response to the remote control % Ensure that the path between the remote control and the player is clear from obstacles. % From a close distance, point the remote control directly at the player. % Replace the remote control batteries. % The function does not work for this disc. Refer to the disc instructions. * % Press RESET with a ball-point pen or similar tool to switch off the player, and press to restart. The player feels warm ! When the player is in use for a long period of time, its surface will be heated. This is normal. 26 EN Specifications are subject to change without notice © 2013 Koninklijke Philips Electronics N.V. All rights reserved. PD9010_12_UM_V1.0