1
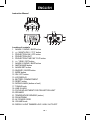
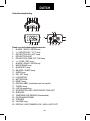
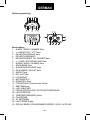
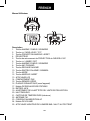
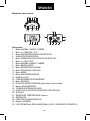
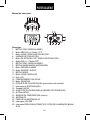
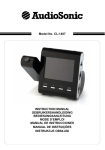
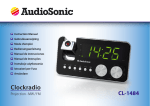
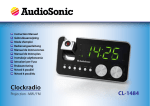
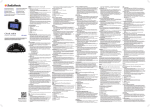
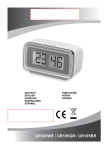
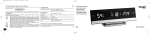
Model No. CL-1486
INSTRUCTION MANUAL
GEBRUIKERSHANDLEIDING
BEDIENUNGSANLEITUNG
MODE D’EMPLOI
MANUAL DE INSTRUCCIONES
MANUAL DE INSTRUÇÕES
ENGLISH
Instruction Manual
Location of controls
1. ALARM 1 RADIO / BUZZ button
2. << / MONTH-DAY / °C/°F button
3. PROJECTION ON / OFF button
4. PROJECTION UNIT
5. PROJECTION TIME 180° FLIP button
6. >> / YEAR / DST button
7. ALARM 2 RADIO / BUZZ button
8. AM/FM BAND button
9. ALARM SET button
10. SNOOZE / SLEEP button
11. MODE button
12. ON / OFF button
13. LCD DISPLAY
14. BATTERY COMPARTMENT
15. RESET button
16. RATING LABEL (bottom of unit)
17. TUNING knob
18. LINE IN JACK
19. FOCUS ADJUSTMENT FOR PROJECTION UNIT
20. SPEAKER
21. TEMPERATURE SENSOR (indoor)
22. FM ANTENNA
23. AC POWER CORD
24. VOLUME knob
25. DISPLAY LIGHT DIMMER LOW / HIGH / AUTO OFF
GB-1
Power connection
Plug the AC POWER CORD (23) to a household outlet AC source. This unit is
equipped with a battery backup system, it requires a 3V CR2032 (flat) lithium
battery (not included). Insert the battery in the BATTERY COMPARTMENT (14),
making certain that the positive and negative (+ and -) battery terminals are
attached to the corresponding terminals on the plate in the battery compartment.
If an AC power failure occurs, the clock automatically switches to the battery
power supply, the clock and timer memory continue running. When the AC power
resumes, the clock switches back to AC again.
Time, calendar and alarm settings
A. Setting time and calendar
Press MODE button (11) in normal mode and keep depress over 2 seconds
to enter time set mode, after enter the setting mode, press MODE button (11)
to change the mode cycle as follows:
Normal mode → Year → Month → Day → 12/24 H → RTC Hour → RTC Min →
Normal mode
Action (during data adjustment):
Press << / MONTH-DAY / °C/°F button (2) to adjust data backward.
Press >> / YEAR / DST button (6) to adjust data forward.
Keep depress << / MONTH-DAY / °C/°F button (2) or >> / YEAR / DST button
(6) button for 2 seconds to enable auto backward/forward.
B. Setting alarm 1 and alarm 2
Press ALARM SET button (9) during normal mode and keep depress over 2
seconds to enter the alarm set mode, after entering the setting mode, press
the ALARM SET button (9) to change the mode cycle as follows:
-
Normal mode → AL.1 Hour → AL.1 Min → AL.1 Weekday Alarm → AL.2 Hour
→ AL.2 Min → AL.2 Weekday alarm → Normal mode
Select alarm weekday mode as follows
1-5 Monday to Friday
1-7 Whole week
6-7 Saturday and Sunday
1-1 One day of the week
GB-2
-
Action (during data adjustment):
Press << / MONTH-DAY / °C/°F button (2) to adjust data backward.
Press >> / YEAR / DST button (6) to adjust data forward.
Keep depress << / MONTH-DAY / °C/°F button (2) or >> / YEAR / DST button
(6) button for 2 seconds to enable auto backward/forward.
Setting alarm output and switching alarm on/off
- Press the ALARM 1RADIO / BUZZ button (1) / ALARM 2 RADIO / BUZZ
button (7) to music
position to select wake up by radio, set to buzzer
position to select wake up by buzzer, set to alarm off position to disable the
alarm.
- Set the DISPLAY LIGHT DIMMER LOW / HIGH / AUTO OFF switch (25) to
the AUTO OFF position (the display will switch off automatically in 15
seconds). When the alarm sounds, the display will automatically switch on
again.
Alarm duration and snooze function
A. Alarm duration
Buzzer alarm or Radio alarm will continue output for 30 minutes if no key’s
are pressed, then it will stop automatically and wait for same alarm time on
the next day.
B. Snooze function
- During alarming, press SNOOZE / SLEEP button (10) will enable snooze
function, buzzer alarm or radio alarm will stop.
- Snooze interval is 9 minutes
- Snooze will continue unless the ON / OFF button (12) is pressed to end the
radio- or buzzer alarm. The alarm will stop automatically after 30 minutes.
- Set the DISPLAY LIGHT DIMMER LOW / HIGH / AUTO OFF switch (25) to
the AUTO OFF position (the display will switch off automatically in 15
seconds). When the alarm sounds, the display will automatically switch on
again. Press the SNOOZE / SLEEP button (10) to enable the snooze
function, stopping the alarm and turning off the display.
Change display content
Press the << / MONTH-DAY / °C/°F button (2) to switch to display the Month/Day,
after 5 seconds timeout the display will switch back to time automatically.
Press the >> / YEAR / DST button (6) to switch to display the Year, after 5
seconds timeout the display will switch back to time automatically.
GB-3
Sleep function
When the radio is turned on, press the SNOOZE / SLEEP button (10) to turn on
the sleep mode. The sleep time will keep flashing for 5 seconds, during that time
press the SNOOZE / SLEEP button (10) again to change the duration from 90 to
15 minutes. Press the ON/OFF button (12) to cancel the sleep function.
Display light dimmer
When the radio is turned off, set the DISPLAY LIGHT DIMMER LOW / HIGH /
AUTO OFF (25) to the AUTO OFF mode, the LCD display will automatically turn
off in 15 seconds.
- Press any key button to turn the display on.
DST – Daylight Saving Time (summer- and wintertime)
Press the >> / DST button (6) and hold it for 3 seconds to toggle between the
summer- en wintertime.
Radio operation
- Press the ON / OFF button (12) to turn the radio on.
- Press the AM/FM BAND button (8) to choose the desired waveband.
- Select the station by using the TUNING knob (17).
- Turn the VOLUME knob (24) to adjust volume as required.
- Press the ON / OFF button (12) again to turn the radio off.
-
Notes:
The AM band uses an internal directional aerial, rotate the radio for best
reception.
Ensure that the FM ANTENNA (22) is completely unrolled and extended for
best FM reception.
Line in jack
The LINE IN JACK (18) can be used to playback alternate audio signal sources
on the unit speakers. This LINE IN JACK (18) requires a 3.5mm audio cable for
an input signal (3.5mm audio cable is not included).
Specifications
Frequency :
AM 540 – 1600 kHz
FM 88 – 108 MHz
Battery backup : 1 x 3V CR2032 (flat) lithium battery (not included)
Power source : AC230V ~ 50Hz, 5W
GB-4
Reset
The RESET button (15) is located on the back of the unit. Use a ballpoint pen to
press the RESET button (15) whenever you change the batteries, or when the
unit is not performing as expected. This will return all settings to the default value,
you will lose any stored data (alarm and clock settings).
Projection unit
- Focus setting: to adjust the brightness / focus of the PROJECTION UNIT (4)
use the FOCUS ADJUSTMENT FOR PROJECTION UNIT (19) until the
projected time is clearly shown on the ceiling or wall.
- To flip the projected image by 180°, press the PROJECTION TIME 180° FLIP
button (5).
Notes:
- Projects time image on the ceiling or wall of a darkened room.
- Ideal projection distance is 3-9 feet/1-3 meters.
Remark: Temperature range for indoor: 0 to +50°C or 32 to 122°F
GB-5
WARNING
1. No flame sources, such as lighted candles, should be placed on the
apparatus.
2. Do not place the product in closed bookcases or racks without proper
ventilation.
3. The mains plug is used as the disconnect device, the disconnect device shall
remain readily operable.
4. The ventilation should not be impeded by covering the ventilation openings
with items, such as newspapers, table-cloths, curtains, etc.
5. It shall not be exposed to dripping or splashing and that no objects filled with
liquids, such as vases, shall be placed on the apparatus.
6. Do not connect FM antenna to outside antenna.
7. The unit should not be exposed to direct sunlight, very high or low
temperature, moisture, vibrations or placed in dusty environment.
8. Do not use abrasive, benzene, thinner or other solvents to clean the surface
of the unit. To clean, wipe it will mild non-abrasive detergent solution and
clean soft cloth.
9. Never attempt to insert wires, pins or other such objects into the vents or
opening of the unit.
Do not dispose of the device with the household waste. This product must be
disposed of according to EU directive 2002/96/EC-WEEE (Waste Electrical
and Electronic equipment). Return the device to a collection point. Observe the
applicable regulations. Contact your municipality, if in doubt.
CAUTION
Danger of explosion if battery is incorrectly replaced.
Replace only with the same or equivalent type of battery.
Batteries shall not be exposed to excessive heat such as sunshine, fire or the
like.
Attention should be drawn to the environmental aspects of battery disposal.
GB-6
DUTCH
Gebruikershandleiding
Plaats van de bedieningsinstrumenten
1. ALARM 1 RADIO / BUZZ knop
2. << / MONTH-DAY / °C/°F knop
3. PROJECTION ON / OFF knop
4. PROJECTION UNIT
5. PROJECTION TIME 180° FLIP knop
6. >> / YEAR / DST knop
7. ALARM 2 RADIO / BUZZ knop
8. AM/FM BAND knop
9. ALARM SET knop
10. SNOOZE / SLEEP knop
11. MODE knop
12. ON / OFF knop
13. LCD DISPLAY
14. BATTERIJVAK
15. RESET knop
16. RATING LABEL (onderkant van het toestel)
17. TUNING knop
18. LINE IN aansluiting
19. SCHERPSTELLING VOOR PROJECTION UNIT
20. SPEAKER
21. TEMPERATUUR SENSOR (binnenshuis)
22. FM DRAADANTENNE
23. STEKKER
24. VOLUME knop
25. DISPLAY LIGHT DIMMER LOW / HIGH / AUTO OFF
NL-1
Stroomaansluiting
Stop de STEKKER (23) in het stopcontact. Dit apparaat is uitgerust met
een batterij back-up systeem, welke een 3V CR2032 (platte) lithium batterij
vereist (niet inbegrepen). Plaats de batterij in het BATTERIJVAK (14) en zorg
ervoor dat de positieve en negatieve (+ en -) accupolen worden bevestigd
aan de overeenkomstige accupolen op de plaat in het batterijvak. Als er
een stroomstoring optreedt, zal de klok automatisch overschakelen naar de
batterij back-up, het geheugen van de klok en de timer blijft draaien. Wanneer
de stroomtoevoer wordt hervat, schakelt de klok automatisch weer terug op
netstroom.
Tijd-, kalender- en alarminstellingen
A. Tijd en kalender instellen
Druk op de MODE knop (11), in de normale modus, en houd deze twee
seconden ingedrukt om in de tijdinstelling modus te komen. Eenmaal in de
tijdinstelling modus, druk op de MODE knop (11) om de tijd en kalender in de
onderstaande volgorde in te stellen:
Normale modus → Jaar → Maand → Dag → 12/24 H → Uur → Minuut →
Normale modus
Actie (tijdens het instellen):
Druk op de << / MONTH-DAY / °C/°F knop (2) om terug te gaan
Druk op de >> / YEAR / DST knop (6) om vooruit te gaan
Druk op de << / MONTH-DAY / °C/°F knop (2) of de >> / YEAR / DST knop
(6) en houd deze ingedrukt om de auto backward/forward te gebruiken
B. Alarm 1 en alarm 2 instellen
Druk op de ALARM SET knop (9), in de normale modus, en houd deze twee
seconden ingedrukt om in de alarminstelling modus te komen. Eenmaal in
de alarminstelling modus, druk op de ALARM SET knop (9) om het alarm in
de onderstaande volgorde in te stellen:
-
Normale modus → AL.1 Uur → AL.1 Minuut → AL.1 Weekalarm → AL.2 Uur →
AL.2 Minuut → AL 2 Weekalarm → Normale modus
Maak bij het instellen van het weekalarm een keuze uit de volgende opties
1-5 Maandag tot vrijdag
1-7 Hele week
6-7 Zaterdag en zondag
1-1 Een dag van de week
NL-2
-
Actie (tijdens het instellen):
Druk op de << / MONTH-DAY / °C/°F knop (2) om terug te gaan
Druk op de >> / YEAR / DST knop (6) om vooruit te gaan
Druk op de << / MONTH-DAY / °C/°F knop (2) of de >> / YEAR / DST knop
(6) en houd deze ingedrukt om de auto backward/forward te gebruiken
Alarm output instellingen en schakelen tussen alarm on/off
Druk de ALARM 1 RADIO / BUZZ knop (1) / ALARM 2 RADIO / BUZZ
(7) knop naar de muziekpositie om gewekt te worden met de radio, naar de
buzzer
positie om wakker te worden met de buzzer of naar de alarm off
positie om het alarm uit te schakelen.
Schakel de DISPLAY LIGHT DIMMER LOW / HIGH / AUTO OFF (25) in
op de AUTO OFF positie (het display wordt uitgeschakeld). Wanneer het
alarm afgaat, zal de display automatisch weer inschakelen.
1. Duur van het alarm en snooze functie
A. Duur van het alarm
Wanneer er niet op de daarvoor bestemde knoppen wordt gedrukt, zal
het radio- of buzzeralarm voor 30 minuten afgaan, daarna zal het
automatisch stoppen en de volgende dag weer op de dezelfde tijd afgaan.
B. Snooze function
Wanneer het alarm afgaat, druk op de SNOOZE / SLEEP knop (10) en het
radio- of buzzeralarm zal stoppen.
Snooze interval is 9 minuten
De snooze functie zal actief blijven totdat de ON/OFF knop (12) wordt
gebruikt om het radio- of buzzeralarm te stoppen. Het alarm stopt na 30
minuten automatisch.
Schakel de DISPLAY LIGHT DIMMER LOW / HIGH / AUTO OFF (25) in op
de AUTO OFF positie (het display schakelt na 15 seconden automatisch uit).
Wanneer het alarm afgaat, zal het display automatisch weer inschakelen.
Druk op de SNOOZE / SLEEP knop (10) om de snooze functie in te
schakelen, het alarm en de display worden weer uitgeschakeld.
Inhoud display aanpassen
Druk op de << / MONTH-DAY / °C/°F knop (2) om te schakelen naar maand- en
dagweergave, na 5 seconden zal het display automatisch terug gaan naar de
tijdsweergave.
Druk op de >> / YEAR / DST knop (6) om te schakelen naar jaarweergave, na 5
seconden zal het display automatisch terug gaan naar de tijdsweergave.
NL-3
Sleep functie
Wanneer de radio in gebruik is, druk op de SNOOZE / SLEEP knop (10) om de
SLEEP modus in te schakelen. De “sleep” tijd zal 10 seconden knipperen, in die
tijd kan de duur van de “sleep”tijd worden ingesteld van 90 tot 15 minuten door
nogmaals op de SNOOZE / SLEEP knop (10) te drukken. Druk op de ON / OFF
knop (12) om de sleep functie te annuleren.
Display light dimmer
Wanneer de radio niet in gebruik is, schakel de DISPLAY LIGHT DIMMER LOW
/ HIGH / AUTO OFF (25) in op de AUTO OFF positie (het display schakelt na 15
seconden automatisch uit).
Druk op een willekeurige knop om de display weer in te schakelen.
DST - Daylight Saving Time (schakelen tussen zomer- en wintertijd)
Druk op de >> / DST knop (6) en houd deze 3 seconden ingedrukt om te
schakelen tussen de zomer- en wintertijd.
Radiobediening
Druk op de ON / OFF knop (12) om de radio aan te zetten.
Druk op AM/FM BAND knop (8) om de gewenste band (FM/AM) te kiezen.
Om gewenste zender te selecteren, draai aan de TUNING knop (17).
Om het gewenste volumeniveau in te stellen, draai aan de VOLUME knop
(24)
Druk nogmaals op de ON / OFF knop (12) om de radio uit te zetten.
-
Opmerkingen:
De AM-band gebruikt een interne richtantenne, draai de radio voor de beste
ontvangst.
Zorg ervoor dat de FM DRAADANTENNE (22) helemaal uitgerold is, voor
het verkrijgen van de beste FM-ontvangst.
Line in aansluiting
De LINE IN aansluiting (18) kan worden gebruikt om alternatieve audio signalen
af te spelen via de speakers van het apparaat. Deze LINE IN aansluiting (18)
vereist een 3.5mm audiokabel (3.5mm audiokabel is niet inbegrepen).
Specificaties
Frequentiebereik: AM 540 – 1600 kHz
FM 88 – 108 MHz
Batterij back-up: 1 x 3V CR2032 (platte) lithium batterij (niet inbegrepen)
Voeding:
AC 230V ~ 50 Hz, 5 Watt
NL-4
Reset
De RESET knop (15) is terug te vinden aan de achterkant van het apparaat.
Gebruik een balpen om de RESET knop (15) in te drukken wanneer de batterijen
worden vervangen of wanneer het apparaat niet naar behoren functioneert. Alle
instellingen worden teruggezet naar de standaardwaarden, alle opgeslagen
gegevens (alarm- en klokinstellingen) gaan verloren.
Projection unit
Focus instelling: om de helderheid / focus van de PROJECTION UNIT (4)
aan te passen, gebruik de SCHERPSTELLING VOOR PROJECTION UNIT
(19) totdat de geprojecteerde tijd duidelijk wordt weergegeven op het plafond
of de muur.
Om het geprojecteerde beeld 180° te draaien, druk op de PROJECTION
TIME 180° FLIP knop (5).
-
Opmerkingen:
Projecteert de tijd op het plafond of de muur van een donkere kamer.
De ideale projectieafstand is 1 tot 3 meter.
Opmerking: temperatuurbereik voor binnenshuis: 0 tot +50°C of 32 tot 122°F
NL-5
WAARSCHUWING
1.
2.
3.
4.
5.
6.
7.
8.
9.
Er mogen geen voorwerpen met een open vlam, zoals aangestoken kaarsen,
op het apparaat worden geplaatst.
Plaats het product niet in gesloten boekenkasten of rekken zonder voldoende
ventilatie.
Als de stekker wordt gebruikt om het apparaat uit te zetten, moet de stekker
goed bereikbaar zijn.
De ventilatie mag niet worden gehinderd door het afsluiten van de
ventilatieopeningen met voorwerpen, zoals kranten, tafelkleden, gordijnen
enz.
Het apparaat mag niet worden blootgesteld aan spatwater en er mogen geen
voorwerpen met vloeistoffen, zoals vazen, op het apparaat geplaatst worden.
Sluit de antenne niet aan op een buitenantenne.
Het apparaat mag niet worden blootgesteld aan direct zonlicht, zeer hoge
of zeer lage temperaturen, vocht, vibraties of in een stoffige omgeving
worden geplaatst.
Gebruik geen schoonmaakmiddelen die alcohol, spiritus, ammonia of
schuurmiddel bevatten want die kunnen het apparaat beschadigen. U kunt
het apparaat schoonmaken met een licht bevochtigde zeemlap.
Probeer nooit draden, pinnen of andere soortgelijke voorwerpen in de
ventilatiegleuven of openingen van het apparaat te steken.
Gooi het apparaat niet weg met het gewone huishoudelijke afval. Dit product
moet worden weggegooid volgens EU-ricthlijn 2002/96/EC-WEEE (Waste
Electrical and Electronic equipment). Breng het apparaat naar een inzamelpunt.
Let op de geldende voorschriften. Neem contact op met uw gemeente, in geval
van twijfel.
LET OP
-
Explosiegevaar indien batterij verkeerd wordt geplaatst.
Vervang alleen door identiek of gelijksoortig type batterij.
Batterijen mogen niet worden blootgesteld aan extreme hitte zoals zonlicht,
vuur of andere soortgelijke bronnen.
Houdt u steeds aan de milieuvoorschriften wanneer u gebruikte batterijen
wegdoet.
NL-6
GERMAN
Bedienungsanleitung
Beschreibung
1. ALARM 1 RADIO / SUMMER Taste
2. << / MONAT-TAG / °C/°F Taste
3. PROJEKTION EIN/AUS Taste
4. PROJEKTIONSEINHEIT
5. PROJEKTIONSZEIT 180° DREHEN Taste
6. >> / JAHR / ZEITUMSTELLUNG Taste
7. ALARM 2 RADIO / SUMMER Taste
8. AM/FM BAND Taste
9. ALARM EINSTELLUNGS-Taste
10. SCHLUMMER / SCHLAF Taste
11. MODUS Taste
12. EIN / AUS Taste
13. LCD DISPLAY
14. BATTERIEFACH
15. RÜCKSTELL-Taste
16. TYPENSCHILD (Unterseite des Geräts)
17. ABSTIMM-Knopf
18. LINE- IN BUCHSE
19. FOKUS-EINSTELLUNG FÜR PROJEKTIONSEINHEIT
20. LAUTSPRECHER
21. TEMPERATURSENSOR (Innen)
22. FM ANTENNE
23. AC NETZKABEL
24. LAUTSTÄRKE-Regler
25. DISPLAY BELEUCHTUNGSDIMMER NIEDRIG / HOCH / AUTO AUS
DE-1
Netzanschluss
Das AC NETZKABEL (23) mit einer AC Steckdose verbinden. Dieses Gerät
ist mit einem Batterie-Reservesystem ausgestattet, dazu ist eine 3 V CR2032
(flache) Lithiumbatterie (nicht im Lieferumfang enthalten) erforderlich. Die
Batterie in das BATTERIEFACH (14) einlegen und sicherstellen, dass die Plusund Minuspole (+ und -) der Batterie mit den entsprechenden Polen auf der
Platte im Batteriefach übereinstimmen. Bei einem AC Stromausfall schaltet der
Wecker automatisch auf Batteriestromversorgung, Uhr- und Timereinstellungen
bleiben gespeichert. Sobald die AC Stromversorgung wieder funktioniert, schaltet
der Wecker wieder zurück auf AC.
Zeit, Kalender und Alarmeinstellungen
A. Zeit und Kalender einstellen
Im Normalmodus die MODUS Taste (11) drücken und mehr als 2 Sekunden
gedrückt halten, um den Zeiteinstellungsmodus aufzurufen, nach Aufrufen
des Einstellungsmodus die MODUS Taste (11) drücken, um den
Moduszyklus folgendermaßen zu ändern:
Normalmodus → Jahr → Monat → Tag →12/24 Std → RTC Stunde → RTC
Min → Normalmodus
Aktion (während der Dateneinstellung):
Die << / MONAT-TAG / °C/°F Taste (2) drücken, um die Daten rückwärts zu
verstellen.
Die >> / JAHR / ZEITUMSTELLUNG Taste (6) drücken, um die Daten
vorwärts zu verstellen.
Die << / MONAT-TAG / °C/°F Taste (2) oder >> / JAHR / ZEITUMSTELLUNG
Taste (6) 2 Sekunden gedrückt halten, um automatisches Rückwärts/
Vorwärts zu aktivieren.
B. Alarm 1 und Alarm 2 einstellen
Im Normalmodus die ALARM EINSTELLUNG Taste (9) drücken und mehr
als 2 Sekunden gedrückt halten, um den Alarmeinstellungsmodus
aufzurufen, nach Aufrufen des Einstellungsmodus die ALARM
EINSTELLUNG Taste (9) drücken, um den Moduszyklus folgendermaßen zu
ändern:
-
Normalmodus → AL.1 Stunde → AL.1 Min → AL.1 Wochentag Alarm → AL.2
Stunde → AL.2 Min → AL.2 Wochentag Alarm → Normalmodus
DE-2
Den Wochentag Alarmmodus folgendermaßen auswählen:
1-5
Montag bis Freitag
1-7
Gesamte Woche
6-7
Samstag und Sonntag
1-1
Ein Tag der Woche
-
Aktion (während der Dateneinstellung):
Die << / MONAT-TAG / °C/°F Taste (2) drücken, um die Daten rückwärts zu
verstellen.
Die >> / JAHR / ZEITUMSTELLUNG Taste (6) drücken, um die Daten
vorwärts zu verstellen.
Die << / MONAT-TAG / °C/°F Taste (2) oder >> / JAHR / ZEITUMSTELLUNG
Taste (6) 2 Sekunden gedrückt halten, um automatisches Rückwärts/
Vorwärts zu aktivieren.
Alarmausgabe einstellen und Alarm ein/ausschalten
Die ALARM 1 RADIO / SUMMER Taste (1) / ALARM 2 RADIO / SUMMER
Taste (7) auf Musik stellen, um Wecken mit Radio auszuwählen, auf
Summer
stellen, um Wecken mit Summer auszuwählen, auf Alarm Aus
stellen, um den Alarm zu deaktivieren.
Den DISPLAY BELEUCHTUNGSDIMMER NIEDRIG / HOCH / AUTO AUS
Schalter (25) auf AUTO AUS stellen (das Display schaltet nach 15 Sekunden
automatisch ab). Sobald der Alarm ertönt, schaltet sich das Display
automatisch wieder ein.
Alarmdauer und Schlummerfunktion
A. Alarmdauer
Der Summer- oder Radioalarm wird 30 Minuten ertönen, wenn keine Tasten
gedrückt werden, dann wird er automatisch angehalten und am nächsten
Tag um die gleiche Zeit wieder aktiviert.
B. Schlummerfunktion
Beim Drücken der SCHLUMMER / SCHLAF Taste (10) während des Alarms
wird die Schlummerfunktion aktiviert, Summer- oder Radioalarm wird
gestoppt.
Das Schlummerintervall beträgt 9 Minuten.
Die Schlummerfunktion wird beibehalten, bis die EIN/AUS Taste (12)
gedrückt wird und den Radio- oder Summeralarm beendet. Der Alarm wird
nach 30 Minuten automatisch gestoppt.
DE-3
-
Den DISPLAY BELEUCHTUNGSDIMMER NIEDRIG / HOCH / AUTO
AUS Schalter (25) auf AUTO AUS stellen (das Display schaltet nach 15
Sekunden automatisch ab). Sobald der Alarm ertönt, schaltet sich das
Display automatisch wieder ein. Die SCHLUMMER / SCHLAF Taste (10)
drücken, um die Schlummerfunktion zu aktivieren, den Alarm zu stoppen und
das Display abzuschalten.
Displayinhalt ändern
Die << / MONAT-TAG / °C/°F Taste (2) drücken, um den Monat/Tag anzuzeigen,
nach 5 Sekunden schaltet das Display automatisch wieder auf Zeit um.
Die >> / JAHR / ZEITUMSTELLUNG Taste (6) drücken, um das Jahr anzuzeigen,
nach 5 Sekunden schaltet das Display automatisch wieder auf Zeit um.
Schlaffunktion
Bei eingeschaltetem Radio die SCHLUMMER / SCHLAF Taste (10) drücken,
um den Schlafmodus einzuschalten. Die Schlafzeit blinkt 5 Sekunden,
währenddessen die SCHLUMMER / SCHLAF Taste (10) erneut drücken, um die
Dauer von 90 bis 15 Minuten zu ändern. Die EIN/AUS Taste (12) drücken, um die
Schlaffunktion abzubrechen.
Display Beleuchtungsdimmer
Bei eingeschaltetem Radio DISPLAY BELEUCHTUNGSDIMMER NIEDRIG /
HOCH / AUTO AUS (25) auf AUTO AUS Modus stellen, das LCD Display schaltet
nach 15 Sekunden automatisch ab.
Eine beliebige Taste drücken, um das Display wieder einzuschalten.
ZEITUMSTELLUNG - Zeitumstellung (Sommer- und Winterzeit)
Die >> / ZEITUMSTELLUNG Taste (6) drücken und 3 Sekunden gedrückt halten,
um zwischen Sommer- und Winterzeit umzuschalten.
Radiobetrieb
Die EIN / AUS Taste (12) drücken, um das Radio einzuschalten.
Die AM/FM BAND Taste (8) drücken, um das gewünschte Wellenband
auszuwählen.
Den Sender mit dem ABSTIMM-Knopf (17) auswählen.
Den LAUTSTÄRKE-Regler (24) drehen, um die erforderliche Lautstärke
einzustellen.
Die EIN / AUS Taste (12) erneut drücken, um das Radio auszuschalten.
DE-4
-
Hinweise:
Das AM Band funktioniert mit einer internen Richtantenne, für optimalen
Empfang das Radio drehen.
Sicherstellen, dass die FM Antenne (22) für optimalen Empfang vollständig
abgerollt und ausgezogen ist.
Line-In Buchse
Die Line-In Buchse (18) kann für die Wiedergabe alternativer Audiosignalquellen
aus den Lautsprechern des Geräts verwendet werden. Für diese Line-In Buchse
(18) ist ein 3.5 mm Audiokabel für ein Eingangssignal erforderlich (3.5 mm
Audiokabel ist nicht im Lieferumfang enthalten).
Technische Daten
Frequenz:
AM 540 – 1600 kHz
FM 88 – 108 MHz
Batteriereserve: 1 x 3 V CR2032 (flache) Lithiumbatterie
(nicht im Lieferumfang enthalten)
Stromversorgung: AC 230 V ~ 50 Hz, 5 W
Zurückstellen
Die RÜCKSTELL Taste (15) befindet sich auf der Rückseite des Geräts. Mit
einem Kugelschreiber auf die RÜCKSTELL Taste (15) drücken, wenn die
Batterien gewechselt werden oder wenn das Gerät nicht erwartungsgemäß
funktioniert. Dadurch werden alle Einstellungen auf Werkseinstellung
zurückgesetzt, alle gespeicherten Daten gehen verloren (Alarm- und
Uhreinstellungen).
Projektionseinheit
Fokuseinstellung: zum Einstellen der Helligkeit / Fokus
der PROJEKTIONSEINHEIT (4) FOKUS EINSTELLUNG FÜR PROJEKTIONSEINHEIT (19) verwenden, bis die projizierte Zeit deutlich auf
Decke oder Wand sichtbar ist.
Um das projizierte Bild um 180° zu drehen, die PROJEKTIONSZEIT 180°
DREHEN Taste (5) drücken.
-
Hinweise:
Projiziert Zeitabbild auf Decke oder Wand in einem abgedunkelten Raum.
deale Projektionsdistanz beträgt 3-9 Fuß/1-3 m.
Hinweis: Temperaturbereich für Innen: 0 bis +50°C oder 32 bis 122°F
DE-5
WARNUNG
1.
2.
3.
4.
5.
6.
7.
8.
9.
Auf das Gerät dürfen keine offenen Flammen, wie z.B. angezündete Kerzen,
gestellt werden.
Das Produkt nicht in geschlossene Bücherschränke oder Regale ohne
einwandfreie Belüftung stellen.
Der Netzstecker dient als Abschaltvorrichtung, die Abschaltvorrichtung muss
immer betriebsbereit sein.
Die Belüftung darf nicht durch Abdecken der Lüftungsöffnungen mit
Gegenständen, wie z.B. Zeitungen, Tischdecken, Vorhängen, etc. behindert
werden.
Das Gerät darf keinen Tropfen oder Spritzern ausgesetzt werden und es
dürfen keine mit Flüssigkeiten gefüllten Gegenstände, wie z.B Vasen, auf
das Gerät gestellt werden.
Die FM Antenne nicht mit einer Außenantenne verbinden.
Das Gerät darf keiner direkten Sonneneinstrahlung, sehr hohen oder
niedrigen Temperaturen, Feuchtigkeit und Vibrationen ausgesetzt oder in
einer staubiger Umgebung aufgestellt werden.
Die Oberfläche des Geräts nicht mit Scheuermitteln, Benzol, Verdünnern
oder sonstigen Lösungsmitteln reinigen. Zum Reinigen mit einer milden,
nicht scheuernden Reinigungslösung und einem sauberen, weichen Tuch
abwischen.
Niemals Drähte, Nadeln oder sonstige derartige Gegenstände in die
Lüftungsschlitze oder Öffnungen des Geräts stecken.
Das Gerät nicht im Hausmüll entsorgen. Dieses Produkt muss nach der EU
Richtlinie 2002/96/EC-WEEE (Elektro- und Elektronikaltgeräte) entsorgt werden.
Geben Sie das Gerät an einer Sammelstelle ab. Beachten Sie die geltenden
Vorschriften. Kontaktieren Sie im Zweifelsfalle Ihre Kommune.
DE-6
VORSICHT
-
Explosionsgefahr, wenn die Batterie nicht korrekt gewechselt wird.
Nur durch den selben oder gleichwertigen Batterietyp ersetzen.
Batterien dürfen keiner übermäßigen Hitze, wie z.B. Sonnenschein, Feuer
oder ähnlichem ausgesetzt werden.
Der Umweltschutz sollte bei der Batterieentsorgung besonders beachtet
werden.
DE-7
FRENCH
Manuel Utilisateur
Description
1. Touche ALARME 1 RADIO / SONNERIE
2. Touche << / MOIS-JOUR / °C/°F
3. Touche PROJECTION MARCHE / ARRET
4. PROJECTEUR
5. Touche de retournement de PROJECTION de l’HEURE A 180°
6. Touche >> / ANNEE / DST
7. Touche ALARME 2 RADIO / SONNERIE
8. Touche AM / FM BAND
9. Touche REGLAGE ALARME
10. Touche RAPPEL D’ALARME / SOMMEIL
11. Touche MODE
12. Touche MARCHE / ARRET
13. AFFICHAGE LCD
14. COMPARTIMENT PILE
15. Touche REMISE À ZERO
16. PLAQUE SIGNALETIQUE (sous l’appareil)
17. Molette DE REGLAGE DES STATIONS
18. ENTREE JACK
19. AJUSTEMENT DE LA NETTETE DE L’UNITE DE PROJECTION
20. HAUT PARLEUR
21. CAPTEUR DE TEMPERATURE (intérieure)
22. ANTENNE FM
23. CORDON D’ALIMENTATION AC
24. Molette DE VOLUME
25. AFFICHAGE VARIATEUR DE LUMIERE BAS / HAUT / AUTO ETEINT
FR-1
Connexion électrique
Brancher le CORDON ALIMENTATION CA (23) dans une prise électrique. Cet
appareil est équipé d’un système de secours qui fonctionne avec une pile lithium
3V CR2032 (plate) (non incluse). Insérer la pile dans le COMPARTIMENT PILE
(14), en vous assurant que les polarités (+ et -) de la pile soient reliées aux
réceptacles correspondants de la plaque du compartiment de la pile. En cas de
coupure d’électricité, le réveil passe automatiquement sur l’alimentation par pile
et l’heure et les réglages du réveil sont ainsi conservés. Lorsque l’alimentation
électrique revient, le réveil s’alimente à nouveau par cette source.
Réglages de l’heure, du calendrier et de l’alarme
A. Réglage de l’heure et du calendrier
Appuyer sur la touche MODE (11) en mode normal et garder cette touche
appuyée pendant environ 2 secondes pour accéder au mode réglage de
l’heure. Une fois en mode réglage, appuyer sur la touche MODE (11) pour
accéder alternativement aux modes suivants :
Mode normal → Année → Mois → Jour →12 / 24 H → Heure HTR→ Minutes
HTR → Mode Normal
Action (pendant le réglage):
Appuyer sur la touche << / MOIS-JOUR / °C/°F (2) pour ajuster les réglages
en arrière.
Appuyer sur la touche >> / ANNEE / DST (6) pour ajuster les réglages en
avant.
Maintenir les touches << / MOIS-JOUR / °C/°F (2) ou >> / ANNEE / DST (6)
enfoncées pendant 2 secondes pour activer avance / retour automatique.
B. Réglage alarme 1 et alarme 2
Appuyer sur la touche REGLAGE ALARME (9) en mode normal et gardez-la
enfoncée pendant 2 secondes pour passer en mode réglage alarme. Une
fois dans ce mode, appuyer sur la touche REGLAGE ALARME (9) pour
accéder alternativement aux modes suivants :
-
Mode Normal → AL.1 Heure → AL.1 Minutes → AL.1 Jour d’alarme → AL.2
Heure → AL.2 Minutes → AL.2 Jours d’alarme → Mode Normal
Sélectionner les jours comme suit
1-5 Lundi à Vendredi
1-7 Semaine entière
6-7 Samedi et Dimanche
1-1 Un jour de la semaine
FR-2
-
Action (pendant le réglage):
Appuyer sur la touche << / MOIS-JOUR / °C/°F (2) pour ajuster le réglage
vers l’arrière.
Appuyer sur la touche >> / ANNEE / DST (6) pour ajuster le réglage vers
l’avant.
Garder les touches << / ANNEE-MOIS-JOUR (3) ou >> / DST (4) enfoncées
pendant 2 secondes pour activer avance / retour automatique.
Réglage du type d’alarme et mise en / hors fonction de l’alarme
Mettre les touches ALARME 1 RADIO / SONNERIE (1) / ALARME 2 RADIO /
SONNERIE (7) en position musique pour être réveillé par la radio et en
position sonnerie pour être réveillé par la sonnerie, la position alarme
éteinte servant à éteindre celle-ci.
Régler le commutateur AFFICHAGE VARIATEUR DE LUMIERE BAS
/ HAUT / AUTO ETEINT (25) sur la position AUTO OFF (l’affichage s’éteint
automatiquement après 15 secondes). Lorsque l’alarme sonne (quelque soit
le mode), l’affichage s’allume à nouveau automatiquement.
Durée de l’alarme et fonction répétition
A. Durée de l’alarme
La sonnerie ou la radio retentissent pendant 30 minutes si aucune touche
n’est pressée puis s’arrête automatiquement jusqu’au lendemain.
B. Fonction répétition
Pendant l’alarme, appuyer sur la touche REPETITION / SOMMEIL (10) pour
mettre la fonction répétition en marche et la sonnerie ou la radio s’arrêtera.
La durée de silence avant répétition est de 9 minutes
La répétition continuera à moins que la touche MARCHE / ARRET
(12) ne soit activée pour mettre fin à l’alarme. Sans cela l’alarme s’arrête
automatiquement après 30 minutes.
Mettre le commutateur AFFICHAGE LUMINEUX FAIBLE / FORT / ARRÊT
AUTO(25) en position ARRÊT AUTO (l’affichage s’éteint automatiquement
après 15 secondes). Lorsque l’alarme se déclenche, l’affichage s’allume
automatiquement. Appuyer sur la touche REPETITION / SOMMEIL (10) pour
mettre la fonction répétition en marche, arrêter l’alarme et éteindre
l’affichage.
Changer l’affichage
Appuyer sur la touche << / MOIS-JOUR / °C/°F (2) pour afficher les Mois / Jour,
après 5 secondes sans autre action, l’affichage montre automatiquement l’heure
à nouveau.
FR-3
Appuyer sur la touche >> / ANNEE / DST (6) pour afficher l’Année, après 5
secondes sans autre action, l’affichage montre automatiquement l’heure à
nouveau.
Fonction sommeil
Lorsque la radio est allumée, appuyer sur la touche REPETITION / SOMMEIL
(10) pour passer en mode sommeil. La durée du mode sommeil va clignoter
pendant 5 secondes. Durant ce laps de temps, appuyer à nouveau sur la touche
REPETITION / SOMMEIL (10) pour faire varier la durée de 90 à 15 minutes.
Appuyer sur la touche MARCHE / ARRET (12) pour annuler cette fonction
sommeil.
Variateur de luminosité d’affichage
Lorsque la radio est éteinte, régler le mode AFFICHAGE LUMINEUX FAIBLE /
FORT / ARRÊT AUTO(25) sur ARRÊT AUTO, l’affichage LCD s’éteindra alors
automatiquement après 15 secondes.
Appuyer sur n’importe quelle touche et il s’allumera à nouveau.
DST – Heure d’été (heure d’été et d’hiver)
Appuyer sur la touche >> / DST (6) et la maintenir enfoncée pendant 3 secondes
pour passer en heure d’été ou en heure d’hiver.
Utilisation de la radio
Appuyer sur la touche MARCHE / ARRET (12) pour allumer la radio.
Régler le commutateur BANDE AM / FM (11) sur le type de fréquences
souhaité.
Choisir la station à l’aide de la molette de réglage de fréquence (17).
Tourner la molette de réglage de VOLUME (24) pour ajuster le volume au
niveau souhaité.
Appuyer à nouveau sur la touche MARCHE / ARRET (12) pour éteindre la
radio.
Notes :
La bande AM utilise une antenne interne, faire pivoter la radio pour obtenir
une meilleure réception.
S’assurer que l’antenne FM (22) soit entièrement déroulée et étendue pour
une meilleure réception FM.
FR-4
Entrée Jack
L’entrée ENTREE JACK (18) peut être utilisée pour relier une source audio
externe aux hauts parleurs de l’appareil. Cette entrée ENTREE JACK (18)
requiert un câble audio de 3.5mm (non inclus).
Spécifications
Fréquence:
AM 540 – 1600 kHz
FM 88 – 108 MHz
Pile:
1 x 3V CR2032 (plate) pile lithium (non incluse)
Source d’alimentation: CA230V ~ 50Hz, 5W
Remise à zéro
La touche de REMISE à ZERO (15) est située à l’arrière de l’appareil. Utiliser
un stylo à bille pour appuyer sur la touche REMISE à ZERO (15) lorsque vous
changez les piles ou lorsque l’appareil ne fonctionne pas comme il le devrait.
Cela aura pour effet de réinitialiser les paramètres à leurs réglages d’usine et
entrainera la perte de toute donnée sauvegardée (réglages d’alarme et d’heure).
Projecteur
Réglage de la netteté : pour régler la luminosité / netteté du PROJECTEUR
(4) utiliser la touche REGLAGE NETTETE DU PROJECTEUR (19) jusqu’à
ce que l’heure projetée soit affichée nettement sur le mur ou le plafond.
Pour faire pivoter l’image projetée à 180°, appuyer sur la touche
RENVERSEMENT 180° DE L’HEURE PROJETEE (5).
Notes :
Projeter l’heure sur le plafond ou le mur d’une pièce sombre.
Distance idéale de projection 3-9 pieds / 1-3 mètres.
Remarque: Plage de température pour l’utilisation intérieure : 0 à +50°C ou 32
à 122°F
FR-5
AVERTISSEMENT
1.
2.
3.
4.
5.
6.
7.
8.
9.
Ne placer aucune source de flammes, telles que des bougies allumées sur
cet appareil.
Ne pas placer ce produit dans une bibliothèque ou une étagère fermées
sans ventilation adéquate.
La prise de courant est la seule source de déconnexion électrique et doit de
ce fait rester accessible constamment.
La ventilation ne doit pas être obstruée par quelque objet que ce soit
(journaux, rideaux, linge de maison etc.)
L’appareil ne doit pas être exposé à des éclaboussures ou à des gouttes
d’eau. Aucun objet contenant du liquide (vases…) ne doit être placé sur
l’appareil.
Ne pas relier l’antenne FM à une antenne extérieure.
Cet appareil ne doit pas être directement exposé à la lumière du soleil, à des
températures élevées ou basses, à l’humidité ou placé dans un
environnement poussiéreux.
Ne pas utiliser de produits abrasifs, de benzène, dissolvant ou toute autre
substance chimique pour le nettoyer. N’utiliser que des solutions douces et
non abrasives et un linge propre et sec.
Ne jamais essayer d’insérer câbles, aiguilles ou quelque objet que ce soit
dans les ouvertures de l’appareil.
Ne pas jeter cet appareil avec les déchets ménagers ordinaires. Ce produit
doit être recyclé conformément à la directive EU 2002/96/EC-WEEE (Déchets
d’équipements électriques et électroniques). Rapporter l’appareil à un point de
collecte. Suivre la réglementation en vigueur. En cas de doute, prendre contact
avec sa municipalité.
ATTENTION
-
Danger d’explosion si la pile est mal remplacée.
Ne remplacer qu’avec le même type de pile.
Les piles ne doivent pas être exposées à des sources de chaleur comme les
rayons du soleil, le feu ou autres sources du même genre.
Nous vous demandons de prêter attention aux aspects environnementaux du
recyclage des piles.
FR-6
SPANISH
Manual de instrucciones
Descripción
1. Botón ALARMA 1 RADIO / TIMBRE
2. Botón << / MES-DÍA / ºC/ºF
3. Botón ENCENDER/APAGAR PROYECCIÓN
4. UNIDAD DE PROYECCIÓN
5. Botón TIEMPO DE PROYECCIÓN VOLTEAR 180º
6. Botón >> / AÑO / DST
7. Botón ALARMA 2 RADIO / TIMBRE
8. Botón BANDA AM/FM
9. Botón ESTABLECER ALARMA
10. Botón DESCANSO / REPOSO
11. Botón MODO
12. Botón ENCENDER/APAGAR
13. PANTALLA LCD
14. COMPARTIMIENTO DE BATERÍAS
15. Botón REINICIO
16. ETIQUETA IDENTIFICADORA (parte inferior de la unidad)
17. Mando SINTONIZACIÓN
18. TOMA DE ENTRADA DE LÍNEA
19. AJUSTE DE FOCO PARA UNIDAD DE PROYECCIÓN
20. ALTAVOZ
21. SENSOR DE TEMPERATURA (interior)
22. ANTENA FM
23. CABLE DE ALIMENTACIÓN CA
24. Mando VOLUMEN
25. LUZ DE PANTALLA REGULADOR BAJO / ALTO / APAGADO AUTOMÁTICO
ES-1
Conexión de corriente
Conecte el CABLE DE ALIMENTACIÓN (23) a una toma de corriente CA. Esta
unidad está equipada con un sistema de reserva de batería, que requiere una
batería de litio CR2032 (plana) de 3V (no incluida). Introduzca la batería en el
COMPARTIMENTO DE LA BATERÍA (14), asegurándose de que los terminales
positivo y negativo (+ y -) de la batería se correspondan con los terminales
indicados en la placa del compartimento. Si se produce un fallo de corriente, el
reloj pasa automáticamente a alimentarse con la toma de corriente de la batería,
de manera que el reloj y la memoria del temporizador siguen contando. Cuando
se reanuda la corriente, el reloj vuelve a alimentarse con la corriente de CA.
Configuración de la hora, el calendario y la alarma
A. Configuración de la hora y el calendario
Pulse el botón MODO (11) en modo normal y manténgalo pulsado
durante más de 2 segundos para acceder al modo de configuración de hora.
Seguidamente, pulse el botón MODE (11) para cambiar el ciclo de modo,
como se indica a continuación:
Modo normal → Año → Mes → Día →12/24 H → Hora RTC → Min. RTC →
Modo normal
Acción (durante el ajuste de la fecha):
Pulse el botón << / AÑO-MES-DÍA (3) para ajustar los datos hacia atrás.
Pulse el botón >>/DST (4) para ajustar los datos hacia adelante.
Mantenga pulsado << / AÑO-MES-DÍA (3) o >> / DST (4) durante 2
segundos para activar el retroceso/avance automático.
B. Configuración de la alarma 1 y la alarma 2
Pulse el botón CONFIGURACIÓN DE ALARMA (9) en modo normal y
manténgalo pulsado durante más de 2 segundos para acceder al modo de
configuración de alarma. Seguidamente, pulse el botón CONFIGURACIÓN
DE ALARMA (9) para cambiar el ciclo de modo, como se indica a
continuación:
-
Modo normal → Hora AL.1 → Min. AL.1 → Alarma días de diario AL.1 → Hora
AL.2 → Min. AL.2 → Alarma días de diario AL.2 → Modo normal
ES-2
Seleccione el modo de alarma en días de diario como se indica a
continuación
1-5 De lunes a viernes
1-7 Toda la semana
6-7 Sábado y domingo
1-1 Un día de la semana
-
Acción (durante el ajuste de la fecha):
Pulse el botón << / MES-DÍA / ºC/ºF (2) para ajustar los datos hacia atrás.
Pulse el botón >>/ AÑO / DST (6) para ajustar los datos hacia adelante.
Mantenga pulsado << / MES-DÍA / ºC/ºF (2) o >> / AÑO / DST (6) durante 2
segundos para activar el retroceso/avance automático.
Configuración de la salida de alarma y activar/desactivar la alarma
Pulse el botón ALARMA 1 RADIO/TIMBRE (1) / ALARMA 2 RADIO / TIMBRE
(7) a posición música
para seleccionar despertar con la radio, y a timbre
para seleccionar despertar con timbre; ponga la posición de alarma
desactivada para desactivar la alarma.
Ponga el interruptor LUZ DE PANTALLA REGULADOR BAJO / ALTO /
APAGADO AUTOMÁTICO (25) en posición APAGADO AUTOMÁTICO
(la pantalla se apagará automáticamente en 15 segundos). Cuando suene la
alarma, la pantalla se encenderá automáticamente de nuevo.
Duración de la alarma y función de repetición de alarma
A. Duración de la alarma
La alarma por Zumbador o Radio seguirá sonando durante 30 minutos si
no se pulsa ninguna tecla. Pasado ese tiempo, se detendrá
automáticamente y volverá a sonar a la misma hora el día siguiente.
B. Función de repetición de alarma
Cuando esté sonando la alarma, pulse el botón REPETICIÓN DE ALARMA
/ APAGADO AUTOMÁTICO (10) activará la función de repetición de alarma,
y la alarma por zumbador o por radio se detendrá momentáneamente.
El intervalo de repetición de alarma es de 9 minutos
La repetición de alarma continuará a menos que se pulse el botón
ENCENDER/APAGAR (12) para apagar la alarma por radio o zumbador. La
alarma se detendrá automáticamente después de 30 minutos.
Ponga el interruptor REGULADOR DE LUZ DE PANTALLA BAJO / ALTO
/ APAGADO AUTOMÁTICO (25) en la posición REGULADOR DE LUZ DE
PANTALLA BAJO / ALTO / APAGADO AUTOMÁTICO (la pantalla se apagará
automáticamente en 15 segundos). Cuando la alarma suene, la pantalla se
volverá a encender automáticamente. Pulse el botón REPETICIÓN DE
ALARMA / APAGADO AUTOMÁTICO (10) para activar la función de
repetición de alarma; la alarma se detendrá y se apagará la pantalla.
ES-3
Cambiar el contenido de la pantalla
Pulse el botón << / MES-DÍA / ºC/ºF (2) para cambiar a mostrar el mes/día;
pasados 5 segundos la pantalla volverá automáticamente a la hora.
Pulse el botón >> / AÑO / DST (6) para cambiar a mostrar el año; pasados 5
segundos la pantalla volverá automáticamente a la hora.
Función de apagado automático
Al encender la radio, pulse el botón REPETICIÓN DE ALARMA / APAGADO
AUTOMÁTICO (10) para activar el modo de apagado automático. La hora de
apagado automático parpadeará durante 5 segundos; durante ese tiempo, pulse
el botón REPETICIÓN DE ALARMA / APAGADO AUTOMÁTICO (10) de nuevo
para cambiar la duración de 90 a 15 minutos. Pulse el botón ENCENDER/
APAGAR (12) para desactivar esta función.
Atenuador de la luz de la pantalla
Con la radio apagada, ponga el interruptor REGULADOR DE LUZ DE
PANTALLA BAJO / ALTO / APAGADO AUTOMÁTICO (25) en el modo APAGADO
AUTOMÁTICO; la pantalla LCD se apagará automáticamente en 15 segundos.
Pulse cualquier botón para encender la pantalla.
DST – Horario de verano (verano e invierno)
Pulse el botón >> / DST (6) y manténgalo pulsado durante 3 para cambiar entre
horario de verano y de invierno.
Funcionamiento de la radio
Pulse el botón ENCENDER/APAGAR (12) para encender la radio.
Pulse el botón BANDA AM/FM (8) para elegir la longitud de onda deseada.
Seleccione la emisora mediante la rueda de SINTONIZACIÓN (17).
Gire la rueda de VOLUMEN (24) para ajustar el volumen a su gusto.
Pulse el botón ENCENDER/APAGAR (12) de nuevo para apagar la radio.
-
Notas:
La banda AM utiliza una antena direccional interna. Gire la radio para
obtener una mejor recepción.
Asegúrese de que la antena FM (22) esté completamente desenrollada y
extendida para obtener una mejor recepción de radio FM.
Toma de entrada auxiliar
Puede utilizar la toma de ENTRADA AUXILIAR (18) para reproducir fuentes
de señales de audio alternativas en los altavoces de la unidad. Esta toma de
ENTRADA AUXILIAR (18) requiere un cable de audio de 3,5 mm para obtener
una señal de entrada (el cable de audio de 3,5 mm no está incluido).
ES-4
Especificaciones
Frecuencia:
AM 540 – 1600 kHz
FM 88 – 108 MHz
Reserva de batería:
1 batería de litio CR2032 (plana) de 3V (no incluida)
Fuente de alimentación: AC230V ~ 50Hz, 5W
Reinicio
El botón REINICIO (15) está ubicado en la parte posterior de la unidad. Utilice
un bolígrafo con punta redonda para presionar el botón REINICIO (15) cuando
desee cambiar las baterías, o cuando la unidad no funcione del modo esperado.
Se recuperarán todos los valores predeterminados, y se perderán todos los
datos guardados (configuración de la alarma y el reloj).
Unidad de proyección
Ajuste del foco: para ajustar el brillo / foco de la UNIDAD DE PROYECCIÓN
(4), utilice el AJUSTE DEL FOCO PARA LA UNIDAD DE PROYECCIÓN (19)
hasta que la hora proyectada se vea de manera clara en el techo o la pared.
Para girar la imagen proyectada 180°, pulse el botón GIRO DE 180° EN
PROYECCIÓN (5).
-
Notas:
Proyecte la imagen de la hora en el techo o la pared de una habitación a
oscuras.
La distancia de proyección ideal es 1-3 metros.
Observación: Temperaturas para interior: 0 a +50ºC o 32 a 122 ºF.
ES-5
ADVERTENCIA
1.
2.
3.
4.
5.
6.
7.
8.
9.
No coloque encima del aparato objetos que emitan llamas (por ej.: velas
encendidas).
No coloque el aparato en librerías o estanterías cerradas sin una ventilación
adecuada.
Si se utiliza el enchufe de corriente como dispositivo de desconexión, este
dispositivo debe estar siempre listo para usarse.
Para garantizar una ventilación adecuada, deje libre una distancia mínima
alrededor del aparato. No cubra las aberturas de ventilación con objetos
como periódicos, manteles, cortinas, etc.
No exponga el aparato a gotas ni salpicaduras ni coloque encima objetos
que contengan líquidos (por Ej.: vasos).
No conecte la antena FM a la antena externa.
No exponga el aparato a la luz solar directa, a temperaturas altas o bajas,
humedades, vibraciones o entornos con polvo.
No utilice materiales abrasivos para limpiar la superficie de la unidad. Para
ello, utilice una solución de detergente suave no abrasiva y un trapo suave y
limpio.
No trate nunca de insertar cables, alfileres u otros objetos similares en las
rendijas o las aperturas del aparato.
No deseche el dispositivo en la basura normal de casa. Este producto debe
desecharse de acuerdo con la directiva de la UE 2002/96/EC-WEEE (Residuos
de Aparatos Eléctricos y Electrónicos). Deje el dispositivo en un punto de
recogida. Respete las normativas aplicables. Contacte con el organismo
correspondiente de su municipio en caso de duda.
PRECAUCIÓN
-
Existe peligro de explosión si la batería se sustituye de manera incorrecta.
Sustitúyala únicamente con una batería igual o de tipo equivalente.
Las pilas no deben quedar expuestas a un calor excesivo como luz solar
directa, fuego o similares.
Cuando deseche la batería, preste atención a los aspectos
medioambientales.
ES-6
PORTUGUESE
Manual de instruções
Descrição
1. BOTÃO SOM / RÁDIO ALARME 1
2. Botão MÊS-DIA << / Botão °C/°F
3. Botão LIGAR / DESLIGAR PROJECÇÃO
4. UNIDADE DE PROJECÇÃO
5. Botão DE ROTAÇÃO 180° TEMPO DE PROJECÇÃO
6. Botão ANO >> / / Botão DST
7. BOTÃO SOM / RÁDIO ALARME 2
8. BOTÃO BANDA AM/FM (AM/FM BAND)
9. Botão DEFINIR ALARME
10. Botão SNOOZE / SLEEP
11. BOTÃO MODO
12. Botão LIGAR / DESLIGAR
13. Ecrã LCD
14. COMPARTIMENTO DA PILHA
15. Botão REINICIAR
16. ETIQUETA DE CLASSIFICAÇÃO (parte inferior da unidade)
17. Interruptor de SINTONIZAÇÃO
18. Tomada LINE IN
19. AJUSTE DE FOCAGEM PARA A UNIDADE DE PROJECÇÃO
20. ALTIFALANTES
21. SENSOR DA TEMPERATURA (interior)
22. ANTENA FM
23. CABO DE ALIMENTAÇÃO AC
24. Interruptor VOLUME
25. Interruptor DESLIGAR AUTOMÁTICO / ECRÃ DE ILUMINAÇÃO BAIXA /
ALTA
PT-1
Ligação da alimentação
Insira a ficha do CABO DE ALIMENTAÇÃO AC (23) numa tomada AC do
electrodoméstico. A unidade está equipada com um sistema de pilha de reserva
e necessita de uma pilha de lítio (normal) de 3V CR2032 (não incluída). Insira
a pilha no COMPARTIMENTO DA PILHA (14), certificando-se de que os pólos
da pilha positivo e negativo (+ e -) estão ligados aos pólos correspondentes
indicados na placa do compartimento da pilha. Se ocorrer uma falha de
alimentação AC, o relógio muda automaticamente para a fonte de alimentação e
o relógio e o temporizador continuam a funcionar. Quando a alimentação AC for
reposta, o relógio muda de novo para AC.
Definições da hora, do calendário e do alarme
A. Definição da hora e do calendário
Pressione o botão MODO (11) no modo normal e mantenha-o pressionado
durante 2 segundos para entrar no modo de definição da hora e depois de
entrar no modo de definição, pressione o botão MODO (11) para alterar o
ciclo do modo como o seguinte:
Modo normal → Ano → Mês → Dia →12/24 H →RTC Hora → RTC Minuto →
Modo normal
-
Acção (durante o ajuste dos dados):
Pressione o botão << / MÊS-DIA / Botão °C/°F (2) para ajustar os dados
para uma data anterior.
Pressione o botão ANO >> / botão DST (6) para ajustar os dados para uma
data posterior.
Mantenha pressionado o botão MÊS-DIA << / Botão °C/°F ou >> / o botão
ANO >> / botão DST (6) durante 2 segundos para activar avançar/retroceder
automático.
B. Definição do alarme 1 e do alarme 2
Pressione o botão DEFINIR ALARME (9) no modo normal e mantenha-o
pressionado durante 2 segundos para entrar no modo de definição do
alarme e depois de entrar no modo de definição, pressione o botão DEFINIR
ALARME (9) para alterar o ciclo do modo como o seguinte:
Modo normal → AL.1 Hora → AL.1 Minuto → AL.1 Alarme dia da semana →
AL.2 Hora → AL.2 Minuto → AL.2 Alarme dia da semana → Modo normal
PT-2
Seleccione o modo de alarme do dia da semana como o seguinte:
1-5 Segunda-feira a sexta-feira
1-7 Toda a semana
6-7 Sábado e domingo
1-1 Um dia da semana
Acção (durante o ajuste dos dados):
Pressione o botão << / MÊS-DIA / Botão °C/°F (2) para ajustar os dados
para uma data anterior.
Pressione o botão ANO >> / botão DST (6) para ajustar os dados para uma
data posterior.
Mantenha pressionado o botão MÊS-DIA << / Botão °C/°F ou >> / o botão
ANO >> / botão DST (6) durante 2 segundos para activar avançar/retroceder
automático.
Definição da saída do alarme e ligar / desligar o alarme
Pressione o botão ALARME 1 RÁDIO / SOM (1) / botão ALARME 2 RÁDIO
/ SOM (7) para música
para seleccionar despertar com rádio, definir para
som
para seleccionar despertar com som e definir o alarme para a
posição desligar para desactivar o alarme.
Defina o Interruptor DESLIGAR AUTOMÁTICO / ECRÃ DE ILUMINAÇÃO
BAIXA / ALTA (25) para a posição DESLIGAR AUTOMÀTICO (o ecrã
desligará automaticamente em 15 segundos). Quando o alarme tocar,o ecrã
ligará automaticamente de novo.
Duração do alarme e função snooze
A. Duração do alarme
O alarme com som ou o alarme com rádio continuarão a tocar durante 30
minutos se nenhuma tecla for pressionada, depois parará automaticamente
e aguardará pela hora do alarme no dia seguinte.
B. Função snooze
Durante o alarme, ao pressionar o botão SNOOZE / SLEEP (10) activará a
função snooze e o alarme com som ou o alarme com rádio pararão.
O intervalo de som é de 9 minutos
A função snooze continuará a não ser que o botão LIGAR/DESLIGAR (12)
seja pressionado para terminar o alarme do rádio ou o alarme com som. O
alarme parará automaticamente após 30 minutos.
Defina o Interruptor DESLIGAR AUTOMÁTICO / ECRÃ DE ILUMINAÇÃO
BAIXA / ALTA (25) para a posição DESLIGAR AUTOMÁTICO (o ecrã
desligará automaticamente em 15 segundos). Quando o alarme tocar, o ecrã
ligará automaticamente de novo. Pressione o botão SNOOZE / SLEEP (10)
para activar a função snooze, parar o alarme e desligar o ecrã.
PT-3
Alterar o conteúdo do ecrã
Pressione o botão MÊS-DIA << / botão °C/°F para apresentar no ecrã Mês/Dia,
após 5 segundos decorridos o ecrã muda automaticamente para a hora.
Pressione o botão ANO >> / botão DST para apresentar no ecrã Ano, após 5
segundos decorridos o ecrã muda automaticamente para a hora.
Função Sleep
Quando ligar o rádio, pressione o botão SNOOZE / SLEEP (10) para ligar o
modo sleep. A hora de descanso continuará a piscar durante 5 segundos,
durante essa hora pressione o botão SNOOZE / SLEEP (10) de novo para
mudar a duração da hora de 90 para 15 minutos. Pressione o botão LIGAR
/DESLIGAR (12) para cancelar a função sleep.
Iluminação do ecrã
Quando desligar o rádio, defina o interruptor DESLIGAR AUTOMÁTICO / ECRÃ
DE ILUMINAÇÃO BAIXA / ALTA (25) para a posição DESLIGAR AUTOMÁTICO
e o ecrã LCD desligará automaticamente em 15 segundos.
Pressione qualquer tecla para ligar o ecrã.
DST - Daylight Saving Time (horário de Verão e Inverno)
Pressione o botão DST >> / (6) e mantenha-o pressionado durante 3 segundos
para alternar entre os horários de Verão e Inverno.
Funcionamento do rádio
Pressione o botão LIGAR /DESLIGAR (12) para ligar o rádio.
Defina o botão DE BANDAS AM/FM (8) para a banda de rádio que deseja.
Seleccione a estação utilizando o interruptor de SINTONIZAÇÃO (17).
Rode o interruptor VOLUME (24) para ajustar o volume conforme deseja.
Pressione o botão LIGAR /DESLIGAR (12) de novo para desligar o rádio.
-
Notas:
A banda AM utiliza uma antena direccional interna, movimente o rádio para
uma melhor recepção.
Assegure-se que a antena FM (22) está completamente desenrolada e
esticada para uma melhor recepção FM.
Tomada LINE IN
A tomada LINE IN (18) pode ser utilizada reproduzir fontes de sinal de áudio
alternadas nos altifalantes da unidade. Esta tomada LINE IN (18) necessita de
um cabo de áudio de 3,5 mm para um sinal de entrada (o cabo de áudio de 3,5
mm não está incluído).
PT-4
Especificações
Frequência:
AM 540 – 1600 kHz
FM 88 – 108 MHz
Pilha de reserva:
Uma pilha de lítio de 3V CR2032 (plana) (não incluída)
Fonte de alimentação: AC230V ~ 50Hz, 5W
Reiniciar
O botão REINICIAR (15) está situado na parte de trás da unidade. Utilize uma
caneta para pressionar o botão REINICIAR (15) sempre que queira trocar as
pilhas, ou quando a unidade não estiver a funcionar conforme o esperado. Isto
irá repor todas as definições para os valores predefinidos, perderá quaisquer
dados guardados (definições do alarme e relógio).
Unidade de projecção
Definição de focagem: Para ajustar o brilho / focagem da UNIDADE DE
PROJECÇÃO (4) utilize o AJUSTE DE FOCAGEM PARA A UNIDADE DE
PROJECÇÃO (19) até o tempo projectado ser claramente mostrado no tecto
ou na parede.
Para rodar a imagem projectada para 180°, pressione o botão de ROTAÇÃO
180 º do TEMPO DE PROJECÇÃO (5).
Notas:
Projecta imagem das horas no tecto ou na parede de uma sala escura.
A distância de projecção ideal é de 3-9 pés/1-3 metros.
Observação: Intervalo de temperature para interior: 0 a +50°C ou 32 a 122°F
PT-5
AVISO
1.
2.
3.
4.
5.
6.
7.
8.
9.
Não devem ser colocadas sobre o aparelho fontes de chama aberta, como
por exemplo, velas acesas.
Não coloque o produto estantes ou prateleiras fechadas sem uma ventilação
correcta.
A tomada de alimentação é utilizada como aparelho para desligar, este deve
permanecer em funcionamento prontamente.
A ventilação não deve ser impedida por objectos que cubram as aberturas
de ventilação, como por exemplo, jornais, toalhas de mesa, cortinas, etc.
O aparelho não deve ser exposto a pingos ou salpicos e não deve ter
colocado sobre ele nenhum objecto com líquidos, como por exemplo, vasos.
Não ligue a antena FM como antena exterior.
A unidade não deve ser exposta a luz solar directa, temperaturas muito altas
ou baixas, humidade, vibrações ou colocada num ambiente onde se
acumule pó.
Não utilize produtos abrasivos, benzina, diluente ou outros solventes para
limpar a superfície da unidade. Para limpar, utilize uma solução de
detergente suave e não abrasiva e um pano limpo e macio.
Nunca tente inserir fios, alfinetes ou outros objectos nas ventilações ou
aberturas da unidade.
Não elimine o aparelho com o lixo doméstico. Este produto deve ser eliminado
em conformidade com a Directiva da UE 2002/96/EC-REEE (Resíduos Eléctricos
e Equipamento Electrónico). Deposite o aparelho num ponto de recolha. Cumpra
com as regulamentações aplicáveis. Contacte a Câmara Municipal da sua área
de residência, no caso de dúvida.
AVISO
-
Perigo de explosão se a pilha for substituída incorrectamente.
Substitua-a por uma equivalente ou do mesmo tipo.
A pilha não deve ser exposta a fontes de calor excessivo, como por
exemplo, luz solar, fogo, ou fontes de calor semelhantes.
Deve tomar atenção aos aspectos sobre o ambiente quando deitar fora a
pilha.
PT-6
POLISH
PL-1
PL-2
PL-3
PL-4
PL-5
PL-6