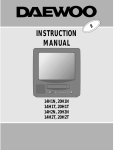
1
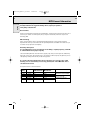
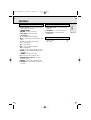
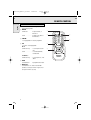
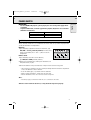
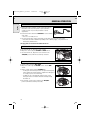
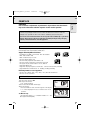
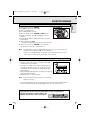
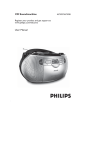
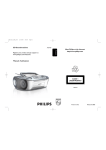
P001-022_AZ1217_61-Kor
2008.6.4
17:06
Page 1
MP3 CD Soundmachine
Register your product and get support at
www.philips.com/welcome
User Manual
AZ1217
P001-022_AZ1217_61-Kor
2008.6.4
17:06
Page 2
2
P001-022_AZ1217_61-Kor
2008.6.4
17:06
Page 3
7
1217
1
2
3
4
5
6
8
9
0
!
@
#
$
3
P001-022_AZ1217_61-Kor
4
2008.6.4
17:06
Page 4
2008.6.4
17:06
Page 5
INDEX
MP3 General Information..............6
Controls .........................................7
Remote Controls.........................7-8
Power Supply ...........................9-10
General Operation / Radio ..........10
CD/MP3-CD
...............................................11–17
Cassette recorder..................18–19
Maintenance ..........................19-20
Troubleshooting ...........................21
English
P001-022_AZ1217_61-Kor
5
P001-022_AZ1217_61-Kor
2008.6.4
17:06
Page 6
MP3 General Information
English
Congratulations on your purchase and welcome to Philips!
To fully benefit from the support that Philips offers, register your product at
www.philips.com/welcome.
Dear Customer,
Thank you for buying the Philips MP3-CD Soundmachine. Your great new acquisition will allow you to
listen to up to 10 hours of CD-like quality music, using the revolutionary new music compression
technology MP3.
MP3 technology
MP3 is short for MPEG1 Layer-3 encoding and decoding technology, a very powerful encoding
algorithm with which you can shrink down the orginal digital audio sound data with a factor of up to
10 without losing significant sound quality.
Recording and Playback
It is recommended to set your recording bit rate to 128kbps, sampling frequency at 44.1kHz
to achieve CD-like music playback quality.
Since downloading MP3 files from the Internet, ripping songs from your own legal CD’s and burning
MP3 songs onto a CD-R, are a delicate process, the quality of a MP3 song may vary by these process.
Subsequently, making a MP3-CD may not be entirely perfect.
As a result of the above imperfection, you may experience an occasional “skip” while
listening, or an occasional delay in accessing “previous/next” title to MP3-CD’s. This is
considered to be normal.
A comparison chart is enclosed as below:
Sound
Quality
MW radio
FM radio
Near-CD
CD-like
CD
CD
6
Bit Rate
32 kbps
64 kbps
96 kbps
128 kbps
256 kbps
320 kbps
Approximate
Reduction Ratio
40 : 1
20 : 1
15 : 1
10 : 1
5:1
3:1
Approximate total
MP3-CD time
40 hrs
20 hrs
15 hrs
10 hrs
5 hrs
3 hrs
Comment
Sound quality significantly
affected-not recommended.
Balanced sound quality
compression rate.
Compression rate low
suggest to play CDs instead.
P001-022_AZ1217_61-Kor
2008.6.4
17:06
Page 7
CONTROLS
1 Source selector - power on/off switch and to
select source of sound source:
CD/MW/FM/TAPE.
2 VOLUME - to adjust volume level.
3 LIFT - OPEN - to open the CD door.
4 Cassette keys:
; - to interrupt recording or playback.
9 / - to stop the tape and to open the cassette
holder.
5 / 6 - to fast wind/rewind the tape.
1 - to start playback.
0 - to start recording.
5 2; - to start or interrupt CD playback.
9 - to stop playback
∞ / § - to skip or search a passage or a track
6 REPEAT - to repeat a track/programme/entire
CD playback
7 TUNING - to tune to radio stations
8 iR - infrared sensor for remote control
9 DBB (Dynamic Bass Boost) - for a more
vivid bass response.
0 SHUFFLE - to play all tracks in random order
! LCD Display - to show the MP3 functions and
disc status.
BACK PANEL
English
TOP AND FRONT PANEL
@ Telescopic aerial - to improve FM radio
reception
# AC MAINS ~ - socket for mains lead
$ Battery door - to open the battery
compartment
SUPPLIED ACCESSORIES
Remote Control . . . . . . . . . . . . . . . . . . . .1 pc
Mains Cord . . . . . . . . . . . . . . . . . . . . . . .1 pc
7
P001-022_AZ1217_61-Kor
2008.6.4
17:06
Page 8
REMOTE CONTROL
REMOTE CONTROL
English
1 SHUFFLE - When in CD mode, press to start or
stop shuffle play mode.
2 REPEAT
for MP3-CD
to repeat a track, or
whole disc.
for CD . . . . . . . . . . . .to repeat a disc track or
the whole disc.
3 STOP 9
- to stop playback or to clear a programme.
4 2;
- to start or interrupt playback.
¡ ™
for MP3-CD only . . . . to select previous/next
title.
for CD . . . . . . . . . . . . to search backward/
forward track.
ALBUM+/-
for MP3-CD only . . . . to select previous / next
album
5 PROG
for CD/MP3-CD
to programme disc tracks.
6 DIGITS 0 - 9
for CD/MP3-CD - to select a track number.
(numbers consisting more than 2 figures must
be keyed in within 2 seconds)
8
1
2
5
6
3
4
P001-022_AZ1217_61-Kor
2008.6.4
17:06
Page 9
POWER SUPPLY
IMPORTANT!
•
For best CD/MP3-CD playback, please plug in your set to an AC power supply where
convenient.
If operated in DC mode, see below approximate playtime. (Playtime is also varied from
different brand batteries) :
Battery type
Alkaline
Zinc Cartonate
•
English
•
Playtime
approximate 9 hrs
approximate 45 minutes
BATTERIES (NOT SUPPLIED)
Whenever convenient, use the mains supply if you want to conserve battery life. The battery supply
will be switched off when the set is connected to the mains. Make sure you remove the plug from the
set and wall outlet before inserting batteries.
Batteries
1. Open the battery compartment and insert six batteries, type
R14, UM2 or C-cells, (preferably alkaline) with the correct
polarity as indicated by the "+" and "-" symbols inside the
compartment.
6 x 1.5V R14/ UM2/ C CELL
Remote control
1. Open the battery door and insert two batteries,
type AAA, R03 or UM4 (preferably alkaline).
2. Replace the compartment door, making sure the batteries are
firmly and correctly in place.
3. Remove the batteries if they are exhausted or if they will not be used for a long period.
– The incorrect use of batteries can cause electrolyte leakage and will corrode the compartment
or cause the batteries to burst. Therefore:
– Do not mix battery types, e.g. alkaline with zinc carbonate.
– When inserting new batteries, replace all at the same time.
– Remove the batteries if the set is not to be used for a long time.
Note :
– The battery supply is switched off when the set is connected to the mains.
Batteries contain chemical substances, so they should be disposed of properly.
9
P001-022_AZ1217_61-Kor
2008.6.4
17:06
Page 10
GENERAL OPERATION
MAINS
English
1. Check if the mains voltage as shown on the type plate (on
the bottom of the set) corresponds to your local mains
voltage. If it does not, consult your dealer or service
organization.
2. Connect the mains lead to the AC MAINS ~ socket and the
wall socket.
™ The set is now ready for use.
3. To switch off the mains supply completely, pull the mains plug out of the wall socket.
™ Disconnect the mains lead when you change over to battery supply, or to protect the set
during heavy thunderstorms.
The type plate is located on the bottom of the set.
GENERAL OPERATION
1. To switch on the set, adjust the source selector.
2. Adjust the sound using the VOLUME and DBB controls.
3 To switch off the set, adjust the source selector to the
TAPE/OFF position, with the cassette keys released.
RADIO RECEPTION
1 Set the source selector to FM or MW.
2. Adjust the sound using the VOLUME controls and the DBB
switch.
3. Tune to a radio station using the TUNING knob.
– For FM, pull out the telescopic aerial. To improve FM-reception,
incline and turn the aerial. Reduce its length if the FM-signal is
too strong (very close to a transmitter).
– For MW, the set is provided with a built-in aerial, so the
telescopic aerial is not needed. Direct the aerial by turning
the whole set.
4. To switch off, set the source selector to the TAPE/OFF
position (with the cassette keys released).
10
P001-022_AZ1217_61-Kor
2008.6.4
17:06
Page 11
CD/MP3-CD
CAUTION
English
Use of controls or adjustments or performance of procedures other than herein
may result in hazardous radiation exposure or other unsafe operation.
Environmental information
All unnecessary packaging material has been omitted. We have done our utmost to make the
packaging easily separable into three mono materials: cardboard, polystyrene and plastic.
Your set consists of materials which can be recycled if disassembled by a specialized
company. Please observe the local regulations regarding the disposal of packaging
materials, exhausted batteries and old equipment.
DISCS FOR PLAYBACK
This set can play all digital audio CD, finalised digital audio CD-Recordable (CDR) discs and
finalised digital audio CD-Rewritable (CDRW) discs.
Support following MP3-CD formats:
•
•
•
•
•
•
•
•
•
•
ISO 9660 or ISO 9660 + Joliet format - Max. 30 characters
Max. Track number is 400
Max. nested directory is 8 levels
The max. album number is 99
The max. MP3 programme track number is 20
The max. length of each track is 99 minutes 59 seconds
The player can play mixed mode disc of CD / MP3-CD
Supported VBR bit-rate
Supported sampling frequencies for MP3 disc : 8 kHz to 48 kHz (44.1kHz preferably)
Supported bit-rates of MP3 disc are: 32 - 320 kbps (128 kbps preferably)
Following formats are not supported
• The files like *.WMA, *AAC, *.DLF, *.M3U, *.PLS, MP3 PRO and JPEG CD
• The non-session closed discs
LOADING A DISC
1. Set the source selector to CD.
2. Lift to open the CD door.
™"OP" will be displayed
3. Insert a disc with the label side facing up.
4. Close the CD door.
™ The total number of tracks of the disc appear on the display.
™ "no" will be displayed if no disc is inserted or error in CD
operation
MP3
L R
For MP3-CD only
™The total track number "XXX" and album number “AXX" will
be displayed interchangeably.
11
P001-022_AZ1217_61-Kor
2008.6.4
17:06
Page 12
CD/MP3-CD
English
Notes : - To ensure good system performance, wait until the disc completely reads before
proceeding.
- For MP3-CD, the disc reading time may exceed 1 minute due to the large number of
songs compiled into one disc.
PLAYING A NORMAL DISC
1. Press 2; to start playback.
™ The track number of the current track and 2 appear on the
display.
• To interrupt playback, press 2;.
™ 2 will disappear and the current track number will start flashing.
• To resume playback, press 2; again.
2. To stop playback, press 9.
MP3
VCD
L R
SELECTING A DESIRED TRACK/PASSAGE
To select a desired track
• Press ∞ or § on the set repeatedly (or use digits 0 - 9 buttons on the remote control) until the
desired track appears on the display.
• If playback is stopped, press 2; to start playback.
To search for a particular passage during playback
1. Press and hold ∞ or § on the set.
™ During searching, the volume will be muted.
2. When you recognize the passage you want, release the ∞ or § button.
™ Normal playback resumes.
For MP3-CD only
To select a desired album
• On the remote control, press ALBUM+ or ALBUM- until the desired album number appears on
the display.
™ "AXX" will be displayed.
To select a desired track
• Press ∞ or § on the set repeatedly (¡ or ™ on the remote control) to select a desired track from
the current album.
™ "XXX" will be displayed.
• Use the digital keys on the remote control to select the track under current album directly.
To select and playback another track during playback mode
1. Press ∞ or § repeatedly to select another track.
™ The new selected track will show on the display screen and play back continuously.
12
P001-022_AZ1217_61-Kor
2008.6.4
17:06
Page 13
CD/MP3-CD
Programming tracks of disc is possible only when playback is stopped. Up to 20 tracks can be
stored in the memory in any order.
For CD only
1. In stop mode, press PROG (on remote control) to enter programme setting.
™ PROG will flash on the display.
2. Press digits 0 - 9 on the remote control or ∞ / § to select the desired track.
3. Press PROG to store the selected track. The number “XXX” represents the track no.
• Repeat steps 1 to 3 to store other tracks.
4. Press 9 to end programme setting.
™ PROG will remain on the display.
• Press PROG (on remote control) in stop mode to review the programme sequence.
5. Press 2; to play the programmed tracks.
• If you press REPEAT during programme playback, the current track or all programmed tracks will
be played repeatedly.
™ REPEAT/REPEAT ALL icon and PROG will appear on the display.
6. Press 9 in stop mode to clear the programme.
™ PROG will disappear from the display.
Notes : -The programming is automatically cleared as soon as the CD compartment is opened.
- The function of programme setting is disabled in PLAY/PAUSE mode.
For MP3-CD only
1. In stop mode, press PROG on the remote control to enter programme setting.
™ PROG will start flashing and "P01" will be displayed.
2. Press digits 0 - 9 on the remote control or ALBUM+/- to select the desired album.
3. Press PROG to store the selected album. The number “AXX” represents the album no.
4. Press ∞ / § repeatedly (or digits 0 - 9 on the remote control) to select the desired TRACK for
programming.
5. Press PROG to store the selected track.
™ PROG will remain flashing on the display.
• Repeat steps 1 to 5 to store other desired album and track.
6. Press 9 to end programme setting.
• To review programme, press PROG repeatedly in stop mode.
™ PXX indicates a programme sequence. AXX indicates an album number. XXX indicates a
programme.
7. Press 2; to start programme playback. You can press ∞ / § to select the programmed track to
play.
8. Press 9 once to stop programme playback, or twice to clear the programme.
13
English
PROGRAMMING TRACKS
P001-022_AZ1217_61-Kor
2008.6.4
17:06
Page 14
CD/MP3-CD
SHUFFLE
English
You can play all the tracks in random order.
1. During playing, pause or stop mode, press SHUFFLE to enable SHUFFLE play mode.
™ SHUFFLE will appear on the display.
2. To exit shuffle mode, press SHUFFLE again or 9.
™ SHUFFLE will disappear from the display.
Note : - If the Shuffle function is enabled, then the Repeat function is set on, it will disable the
Shuffle play mode.
- The shuffle function is not available in the programme playback.
REPEAT
You can play the current track or the whole disc repeatedly.
1. During CD/ MP3-CD playing or pause mode, press REPEAT on the remote control or on the set.
™ REPEAT icon
- to repeat the current track.
™ REPEAT ALL icon
all- to repeat the whole disc.
2. To exit the repeat mode, press REPEAT until the REPEAT/REPEAT ALL icon disappears from
the display.
Notes : - If the Repeat function is enabled, then the Shuffle function is set on, it will disable all
the Repeat play modes.
- If the Repeat function is enabled, then the Stop button is pressed, it will disable all the
Repeat play modes.
14
P001-022_AZ1217_61-Kor
2008.6.4
17:06
Page 15
CASSETTE RECORDER
English
CASSETTE PLAYBACK
1. Set the source selector to TAPE/OFF.
2. Press 9 / to open the cassette holder.
3. Insert a recorded cassette.
4. Press 1 and playback will start.
5. Adjust the sound using the VOLUME and DBB controls.
6. For brief interruptions, press ;. Press ; again to resume
playback.
7. By pressing 5 or 6,fast winding of the tape is possible in
both directions.
8. To stop playback, press 9 /
™ The keys are automatically released at the end of the tape.
9. Set the source selector to TAPE/OFF position (with the
cassette keys are released) to switch off the set.
Note : - During playback, the keys are automatically released at the end of a tape and the set is
switched off (unless PAUSE mode ; has been activated.)
- During fast forwarding/rewinding, the keys will not be released at the end of a tape. To
switch off the set, make sure the cassette keys are also released.
CASSETTE RECORDING
General information on cassette recording
• Recording is permissible insofar as copyright or other rights
of third parties are not infringed.
• This deck is not suitable for recording on CHROME (IEC II)
or METAL (IEC IV) type cassettes. For recording you should
use NORMAL type cassettes (IEC I) on which the tabs have
not been broken.
• Check and tighten slack tape before use with a pencil to avoid
jamming the deck machanism.
• The recording level is set automatically.
1
Note : - No recording will take place during the 7 seconds in the
beginning of the tape.
• To prevent the accidental erasure of a recording, keep the cassette side to be safeguarded in
front of you and break out the left tab. Recording on this side is no longer possible.
The making of unauthorized copies of copy-protected material, including computer
programmes, files, broadcasts and sound recordings, may be an infringement of
copyrights and constitute a criminal offence. This
equipment should not be used for such purposes.
15
P001-022_AZ1217_61-Kor
2008.6.4
17:06
Page 16
CASSETTE RECORDER
RECORDING FROM THE RADIO
English
1. Set the source selector to FM or MW.
2. Tune to the desired radio station using the TUNING knob.
3. Press 9 / to open the cassette holder.
4. Insert a blank tape.
5. Press 0 to start recording.
6. For brief interruptions, press ;. To resume recording,
press ; again.
7. To stop recording, press 9 /.
SYNCHRO START CD RECORDING
1. Set the source selector to CD.
2. Insert a CD and if desired, programme track numbers.
3. Press 9 / to open the cassette holder.
4. Insert a blank cassette.
5. Press 0 to start recording.
™ Playing of the CD programme starts automatically from the
beginning of the programme.
6. For brief interruptions, press ;. To resume recording,
press ; again.
7. To stop recording press 9 /
To select and record a particular passage within a track
1. Press and hold ∞ or § on the set to select a passage.
2. Put the CD player in ; position at the selected passage.
™ Recording will start from this exact point when you press 0.
3. Press 2; to start recording.
TAPE DECK MAINTENANCE
To ensure a good recording and playback of the tape deck, clean
parts A,B and C show in the diagram below, after approx. 50 hours of
operation, or on average once a month. Use a cotton bud slightly
moistened with alcohol or a special head cleaning fluid to clean the deck.
• Open the cassette holder by pressing 9 /.
• Press 1 and clean the rubber pressure rollers C.
• Press ; and clean the magnetic heads A and also the capstans B.
• After cleaning, press 9 /.
C B A
Cleaning of the heads can also be done by playing a cleaning cassette through once.
16
A
P001-022_AZ1217_61-Kor
2008.6.4
17:06
Page 17
MAINTENANCE
English
PRECAUTIONS & GENERAL MAINTENANCE
• Place the set on a hard, flat surface so that the system does not tilt.
• Where the MAINS plug or an appliance coupler is used as the
disconnect device, the disconnect device shall remain readily operable.
• Always shut the CD door to keep the CD compartment dust-free. To
clean the dusted compartment with a soft dry cloth.
• The mechanical parts of the set contain self-lubricating bearings and
must not be oiled or lubricated.
• To clean the set, use a soft, slightly dampened chamois leather. Do not
use any cleaning agents containing alcohol, ammonia, benzene or
abrasives as these may harm the housing.
• Do not expose the system, batteries or discs to humidity, rain,
sand or excessive heat (caused by heating equipment or direct
sunlight). Always keep the disc tray closed to avoid dust on the
lens.
• No objects filled with liquids, such as vases, shall be placed on the apparatus.
• The apparatus shall not be exposed to dripping or splashing.
• Adequate ventilation with a minimum gap of 15 cm between the ventilation holes and surrounding
surfaces is necessary to prevent heat build-up.
• The ventilation should not be impeded by covering the ventilation openings with items, such as
newspapers, table-cloths, curtains, etc.
• No naked flame sources, such as lighted candles, should be placed on the apparatus.
CD PLAYER AND CD HANDLING
• The lens of the CD player should never be touched.
• Sudden changes in the surrounding temperature can cause
condensation to form and the lens of your CD player to cloud over. Playing a CD is then not possible. Do
not attempt to clean the lens but leave the set in a warm environment until the moisture evaporates.
• Use only Digital Audio CDs.
• To take a CD out of its box, press the centre spindle while lifting the CD. Always pick up the CD by the
edge and replace the CD back in its box after use to avoid scratching and dust.
• To clean the CD, wipe in a straight line from the centre towards the
edge using a soft, lint-free cloth. Do not use cleaning agents as they
may damage the disc.
• Never write on a CD or attach stickers to it.
X
17
P001-022_AZ1217_61-Kor
2008.6.4
17:06
Page 18
TROUBLESHOOTING
English
If a fault occurs, first check the points listed below before taking the set for repair.
If you are unable to remedy a problem by following these hints, consult your dealer or service centre.
WARNING: Do not open the set as there is a risk of electric shock. Under no
circumstances should you try to repair the set yourself, as this will
invalidate the guarantee.
Problem
CD OPERATION
"NO DISC" is displayed
RADIO RECEPTION
Radio reception is poor
TAPE OPERATION/RECORDING
Recording or playback cannot be made
GENERAL
The system does not react when buttons
pressed/set does not work/no display on
LCD.
Solution
– Insert a disc.
– Check if the disc is inserted upside down.
– Wait until the moisture condensation at the lens has
cleared.
– Replace or clean the disc, see "Maintenance"
– Use a readable disc or correct recorded format
MP3-CD.
– If the signal is too weak, adjust the antenna
for better reception.
– Increase the distance between the Receiver
and your TV or VCR.
– Clean deck parts, see "Maintenance".
– Use only NORMAL (IEC I) tape.
– Apply a piece of adhesive tape over the missing
tab space.
– Slide the source sector to TAPE/OFF. Remove and
reconnect the AC power plug for 30 seconds and
switch on the set again.
Sound cannot be heard or is of poor
quality
– Adjust the volume.
– Make sure the MP3-CD was recorded within
32-320 kbps (128kbps preferably) with sampling
frequencies at 8 - 48 kHz (44.1kHz preferably).
The remote control does not function
properly
– Reduce the distance between the remote control
and the system.
– Insert the batteries with their polarities (+/- signs)
aligned as indicated.
– Replace the batteries.
– Point the remote control in the direction of the
system's IR sensor.
18
2008.6.4
17:06
Page 19
Meet Philips at the Internet
http://www.philips.com
English
P001-022_AZ1217_61-Kor
W
AZ1217
CLASS 1
LASER PRODUCT
Printed in China
PDCC-LL-0820