1
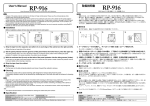
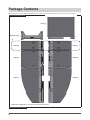
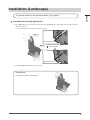
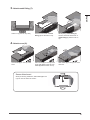
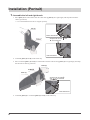
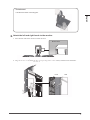
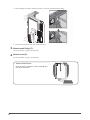
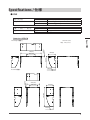
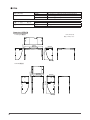
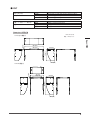
English
<Landscape>
<Portrait>
Thank you very much for choosing an EIZO product.
Please read this User’s Manual carefully to familiarize you with safe and effective usage procedures.
Please retain this manual for future reference.
PRECAUTIONS
To ensure personal safety and proper maintenance, please read this section.
CAUTION
Do not carry the monitor with the hood attached.
While carrying the monitor, the hood may fall or slip off, which may result in injury or
equipment damage.
Do not place any objects on the hood.
If the hood falls or slips off or the monitor falls over, it may result in injury or equipment
damage.
Attach only to specified EIZO LCD monitors.
Attach only to specified EIZO LCD monitors. Attaching to other monitors may cause the
hood to drop, which may result in injury or equipment damage. For the specified monitors,
please visit our website at http://www.eizo.com.
The monitor hood assembling procedure is available from our video site.
[Video site’s URL]
[QR code]
http://www.eizo.com/i/hood/
1
Package Contents
Please contact your local EIZO representative for assistance if any of the listed items are missing or damaged.
Hood components (8 pcs.)
Cover (8)
Metal fitting (7)
*
Plate (3)
Plate (6)
Plate (2)
Plate (5)
Plate (1)
Plate (4)
* Plate (3) and plate (6) are not used in the landscape position.
User’s Manual (this manual)
2
Installation (Landscape)
English
To use the monitor in the portrait position, go to page 6.
1. Assemble the left and right hoods.
1. Place plate(2) on a flat surface such as a desk. Set up plate(1) at a right angle, and snap the tab until it
clicks (2 positions).
* It is recommended that the tabs are snapped separately.
Plate (1)
Before attachment
Plate (2)
Snap the tab so that
are connected.
and
After attachment
2. Assemble plate(4) and (5) in the same way.
Detachment
Fold the hood at the connecting part.
3
2. Attach the left and right hoods to the monitor.
1. Face the back side of the monitor toward the front.
Monitor hole
2. Align the hooks on the hood with the corresponding holes in the monitor, and then insert the hooks.
Hook
3. While holding the monitor from the bottom, press down the hood to fix it firmly.
4. Attach the hood on the other side in the same way.
4
Hole
3. Attach metal fitting (7).
English
Holes on top (monitor top view)
Insert the front hook of metal
fitting (7) into the hole on top.
While pulling metal fitting (7)
forward, insert the back hook of
metal fitting (7) into the hole on
top.
Place cover (8) on the top of the
hood while aligning the catch on
cover (8) with the notch on top.
Slide cover (8) to the right to close
the hood.
4. Attach cover (8).
Hook cover (8) on the top of the
hood.
Sensor Attachment
When performing calibration, slide cover (8) to the
right in order to attach the sensor.
5
Installation (Portrait)
1. Assemble the left and right hoods.
1. Place plate(2) on a flat surface such as a desk. Set up plate(1) at a right angle, and snap the tab until it
clicks (2 positions).
* It is recommended that the tabs are snapped separately.
Plate (1)
Before attachment
Snap the tab so that
are connected.
Plate (2)
and
After attachment
2. Assemble plate(4) and (5) in the same way.
3. Place connected plate(1) and (2) on a flat surface such as a desk. Set up plate(3) at a right angle, and snap
the tab until it clicks (2 positions).
Plate (3)
Plate (2)
Plate (1)
Snap the tab so that
and
are connected.
After attachment
4. Assemble plate(6) to connected plate(4) and (5) in the same way.
6
Detachment
Fold the hood at the connecting part.
English
2. Attach the left and right hoods to the monitor.
1. Face the back side of the monitor toward the front.
Monitor hole
2. Align the hooks on the hood with the corresponding holes in the monitor, and then insert the hooks.
Hook
Hole
7
3. While holding the monitor from the bottom, press down the hood to fix it firmly.
4. Attach the hood on the other side in the same way.
3. Attach metal fitting (7).
Use the procedure on page 5 for reference.
4. Attach cover (8).
Use the procedure on page 5 for reference.
Sensor Attachment
When performing calibration, remove cover (8) and
then attach the sensor.
8
Specifications / 仕様
● CH5
Dimensions
(W) x (H) x (D)
Weight
Landscape
Portrait
Landscape
Portrait
653mm (25.7) × 373 mm (14.7) x 225.5 mm (8.9)
410.5mm (16.2) × 635.5mm (25.0) x 225.5mm (8.9)
Approx. 940g (2.07 lbs)
Approx. 1180g (2.6 lbs)
寸法
(幅)×(高さ)×(奥行き)
質量
横置き
縦置き
横置き
縦置き
653mm×373mm×225.5mm
410.5mm×635.5mm× 225.5mm
約940g
約1180g
Dimensions/外形寸法
Spec/ 仕様
Landscape/横置き
Unit: mm (inch)
225.5 (8.9)
373 (14.7)
653 (25.7)
264.5 (10.4)
(4.6)(0.18)
単位:mm(インチ)
109.4 (4.3)
410.5 (16.2)
264.5 (10.4)
225.5 (8.9)
635.5 (25.0)
(4.6)(0.18)
Portrait/縦置き
109.4 (4.3)
1
● CH6
Dimensions
(W) x (H) x (D)
Weight
Landscape
Portrait
Landscape
Portrait
552mm (21.7) × 373 mm (14.7) x 225.5 mm (8.9)
361 mm (14.2) × 555 mm (21.9) x 225.5 mm (8.9)
Approx. 840g (1.85 lbs)
Approx. 960g (2.12 lbs)
寸法
(幅)×(高さ)×(奥行き)
質量
横置き
縦置き
横置き
縦置き
552mm×373mm×225.5mm
361mm×555mm× 225.5mm
約840g
約960g
Dimensions/外形寸法
Landscape/横置き
Unit: mm (inch)
単位:mm(インチ)
225.5 (8.9)
373 (14.7)
4.6 (0.18)
552 (21.7)
264.5 (10.4)
109.4 (4.3)
361 (14.2)
264.5 (10.4)
225.5 (8.9)
555 (21.9)
4.6 (0.18)
Portrait/縦置き
109.4 (4.3)
2
● CH7
Dimensions
(W) x (H) x (D)
Weight
Landscape
Portrait
Landscape
Portrait
582.5mm (22.9) × 373 mm (14.7) x 225.5 mm (8.9)
406 mm (16.0) × 555 mm (21.9) x 225.5 mm (8.9)
Approx. 840g (1.85 lbs)
Approx. 960g (2.12 lbs)
寸法
(幅)×(高さ)×(奥行き)
質量
横置き
縦置き
横置き
縦置き
582.5mm×373mm×225.5mm
406mm×555mm×225.5mm
約840g
約960g
Dimensions/外形寸法
Landscape/横置き
Unit: mm (inch)
582.5 (22.9)
264.5 (10.4)
Spec/ 仕様
4.6 (0.18)
単位:mm(インチ)
373 (14.7)
225.5 (8.9)
109.4 (4.3)
406 (16.0)
264.5 (10.4)
225.5 (8.9)
555 (21.9)
4.6 (0.18)
Portrait/縦置き
109.4 (4.3)
3
For Japanese Market Only
お客様ご相談窓口のご案内
■ 製品に関するお問い合わせ
EIZO コンタクトセンターでは、製品のお取り扱いや機能説明、ご購入に関するお問い合わせ、ご相談を受け付けております。
EIZO コンタクトセンター 0120-956-812
受付時間:月~金 9:30~17:30(祝日、当社休業日を除く)
■ 故障/修理に関するお問い合わせ
製品の不具合、修理に関しては、EIZO サポート北陸にお問い合わせください。
修理を依頼される際は、故障症状を具体的にご連絡ください。
●問い合わせ受付 TEL:0767-52-7700(代)FAX:0767-52-0202 月曜日~金曜日 9:30 ~ 17:30(祝日、当社休業日を除く)
廃棄について
自治体の指示に従って廃棄してください。
153 Shimokashiwano, Hakusan, Ishikawa 924-8566 Japan
Phone: +81 76 277 6792 Fax: +81 76 277 6793
Helmut-Grashoff-Strasse 18, 41179 Mönchengladbach, Germany
Phone: +49 2161 8210210 Fax: +49 2161 8210150
〒924-8566 石川県白山市下柏野町 153 番地
http://www.eizo.com
http://www.eizo.co.jp
Copyright © 2012-2013 EIZO Corporation All rights reserved.
4th Edition-June, 2013
Printed in Japan.
03V24051D1
(U.M-CH6)


![NB_16P_2009_1-4 [更新済み]](http://vs1.manualzilla.com/store/data/006547407_4-f1b040c01a6fe54b7ac90aea61b84f76-150x150.png)