1
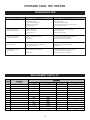
PROPANE TANK TOP HEATER USER’S MANUAL AND OPERATING INSTRUCTIONS MODELS: TT-15S, TT-15PS TT-30, TT-30P World Marketing of America, Inc. PO Box 192, 12256 William Penn Hwy. Mill Creek PA 17060-0192 (Tel) 1-800-776-9425 www.worldmkting.com GENERAL HAZARD WARNING Failure to comply with the precautions and instructions provided with this heater, can result in death, serious bodily injury and property loss, or damage from the hazards of fire, explosion, burn. asphyxiation, carbon monoxide poisoning, and/or electrical shock. Only persons who can understand and follow the instructions should use or service this heater. If you need assistance or heater information such as an instruction manual, labels, etcetera, contact the manufacturer. CONSUMER: Retain this manual for future reference. 20005209 Printed in South Korea Rev. 6/10 TABLE OF CONTENTS General Safety Information .............................................................................. 3 - 4 Specifications .............................................................................................................. 3 Product Features ..................................................................................................... 4 Heater Assembly ....................................................................................................... 5 Propane Safety ........................................................................................................... 6 Refilling The Propane Gas Tank ............................................................................. 6 Connecting Heater to Gas Supply ............................................................................. 7 - 8 Checking For Leaks .................................................................................................... Lighting & Shutdown Instructions ....................................................................... 9 9 – 13 Storage of Heater ...................................................................................................... 13 Maintenance ............................................................................................................... 13 Troubleshooting .............................................................................................................. 14 Replacements Parts List ............................................................................................. 14 Exploded Parts Drawing ............................................................................................ 15 Warranty ........................................................................................................................ 17 WARNING : FIRE, BURN, INHALATION, AND EXPLOSION HAZARD, KEEP SOLID COMBUSTIBLES, SUCH AS BUILDING MATERIALS, PAPER OR CARDBOARD, A SAFE DISTANCE AWAY FROM THE HEATER AS RECOMMENDED BY THE INSTRUCTIONS. NEVER USE THE HEATER IN SPACES WHICH DO OR MAY CONTAIN VOLATILE OR AIRBORNE COMBUSTIBLES, OR PRODUCTS SUCH AS GASOLINE, SOLVENTS, PAINT THINNERS, DUST PARTICLES OR UNKNOWN CHEMICALS. CALIFORNIA PROPOSITION 65 WARNING: This product contains chemicals, including lead and lead compounds, a chemical known to the state of California to cause birth defects or other reproductive harm. Wash hands after handling. WARNING! NOT FOR HOME OR RECREATIONAL VEHICLE USE. 2 PROPANE TANK TOP HEATER Propane Tank Top Heaters It is hard to anticipate every use which may be made of this heater. CHECK WITH YOUR LOCAL FIRE SAFETY AUTHORITY IF YOU HAVE QUESTIONS ABOUT APPLICATIONS. Other standards govern the use of fuel gases and heat producing products in specific applications. Your local authority can advise you about these. IMPORTANT: Read this user’s manual carefully and completely before trying to operate or service this heater. Improper use of this heater can cause serious injury or death from fire, explosion and carbon monoxide poisoning. This is a direct-fired tank top heater for outdoor use only. All the products of combustion generated by the heater are forced through the heater and released into the area being heated. This heater operates at approximately 98%+ combustion efficiency but still produces a small amount of carbon monoxide. Humans can tolerate small amounts of carbon monoxide for short periods. Carbon monoxide can build up in a heated space and failure to provide adequate ventilation could result in poisoning or death. SPECIFICATIONS Model BTU OUTPUT IGNITION TYPE OPERATING TIME (20 lb. cylinder) TT-‐15S TT-‐15PS TT-‐30 TT-‐30P 15,000 15,000 30,000 30,000 Match Piezo Match Piezo 28 Hrs. (high) 14 Hrs. (high) 28 Hrs. (high) 14 Hrs. (high) PRODUCT 2.07 lbs / 0.94 kg 2.17 lbs / 0.98 kg 4.76 lbs / 2.16 kg 4.96 lbs / 2.25 kg ” 6.3cm 6 1 33.4” 84.8cm 29” 73.7cm 12” 30.5cm 15.5” 39.4cm 8.4” 21.3cm 17.5” 44.5cm WEIGHT 7.4” 18.8cm 3 PACKAGED 3.03 lbs / 1.37 kg 3.13 lbs / 1.42 kg 6.84 lbs / 3.10 kg 7.03 lbs / 3.19 kg PROPANE TANK TOP HEATER general safety instructions Accidents are always tragic especially because so many of them could have been prevented with little care and judgment. There are some basic good practices, we hope you will follow for safe use of your heater. IMPORTANT SAFETY INFORMATION • Children should be carefully supervised, when they are in the area. • Always maintain proper clearance from combustible materials. Minimum clearance from combustibles. Side & Rear: 36” (91cm); Top: 36” (91cm); Front: 60” (152cm); Floor: 0” when installed on 20lb cylinder. • Heater must be placed on level and stable surface. • Never place anything including clothes or other flammable items on the heater. • The appliance area shall be kept clear and free from combustible materials, gasoline and other flammable vapours and liquids. • Do not modify or operate a heater which has been modified. • Adequate clearance for accessibility and for combustion & ventilation air supply must be maintained at all times when the heater is operating. • Service and repair should be done by a qualified service person. The heater should be inspected before each use and at least annually by a qualified person. More frequent cleaning may be required as necessary. Do not service while hot or operating. • Never connect heater to an unregulated gas supply. • The heater is shipped from the factory for LP(Propane) gas. This heater is for use with propane gas only, do not convert heater to any other gas. Installation must conform to local codes or, in the absence, with the standard for the Storage and Handling of Liquefied Petroleum Gases ANSI/NFPA NFPA 58 and the Natural Gas and Propane Installation Code CSA B149.1 • The minimum and maximum inlet pressures to the regulator from the gas tank are 17.5 psi and bottle pressure, respectively. Use only the regulator & hose assembly provided with the heater. Inspect the regulator/hose assembly prior to each use of the heater. If there is excessive abrasion or wear, or hose is cut, replace with regulator/hose assembly listed on the parts list prior to using this heater. • Gas supply connections should be checked using a 50/50 solution of liquid dish soap and never use a flame to check for gas leaks. • Do not restrict inlet or outlet by any means. The flow of combustion and ventilation air is not to be obstructed. • This heater should not be directed toward any propane or gas container within 20 feet of the exit nozzle. The heater should also be located at least 6 feet away from any propane gas container (regulations in Canada are 10 feet). • The propane cylinder supply system must be arranged to provide for vapour withdrawal from the operating cylinder. Product Features • Portable & Stable • 100% Safety Shutoff System • Wind Resistant & Rain Protected • Adjustable Input Ratings • Match or Piezo Electric Spark Ignition 4 PROPANE TANK TOP HEATER HEATER ASSEMBLY Tools Required: Phillips head screwdriver Dual burner models only The tank collar bracket must be assembled before the heaters can be attached to the propane tank. 1. Align bolt holes in tank collar bracket and piezo bracket with bolt holes in center plate on manifold. 2. Drive-in two machine screws (supplied) into the bolt holes attaching tank collar bracket to center plate on manifold. (Fig. 1) FIGURE 1 Spark Plug Spark Cable Piezo ( NOTE: some models only) Fuel Connecting Nut (Handle) Heat Regulator Knob Manifold Machine Screw Tank Collar Bracket Mounting Bolt Knob Dual Burner Model 5 PROPANE TANK TOP HEATER Propane Supply This heater requires a 20 lb propane cylinder for operation. (Not included). The propane (LP) gas tank must also be equipped with the following: • A collar to protect the propane gas valve. • A shutoff valve terminating a Propane gas cylinder valve outlet as specified in the American National Standard for Compressed Gas Cylinder Valve Outlet and Inlet Connections. • A safety relief valve having direct communications with the vapor space of the tank. • An arrangement of vapor withdrawal. The propane (LP) gas pressure regulator and hose assembly of 30K BTU models supplied with the heater must be used without alteration. The hose assembly shall be visually inspected prior to each use of the heater. If it is evident that there is excessive abrasion or wear, or the hose is cut, it must be replaced prior to the heater being put into operation. The replacement hose assembly shall be that specified by the manufacturer. Refilling The Propane Gas Tank ALL NEW CYLINDERS MUST BE PURGED BEFORE THE FIRST FILLING. • Turn heater gas valve knob and gas tank valve to OFF position. • Propane tank valve equipped with the old style fitting has LEFT HANDED THREADS. Turn POL fitting CLOCKWISE to loosen. Protect POL fitting when disconnected from tank. • Have tank filled by your local Propane gas supplier. • Some propane tanks have a bleed-off valve. This valve should be inspected for leaks after each filling of the tank. Turn clockwise to close the valve. • Fasten full Propane tank and connect POL fitting to tank valve by turning COUNTERCLOCKWISE. • With heater gas valve knob still in the OFF position, turn ON tank valve and check for leaks with soap solution. Propane is safe to use when properly handled. Careless handling of the Propane gas tank could result in fire and/or an explosion. Therefore: • Always keep tank/cylinder securely fastened in an upright position. • Avoid tipping tank on its side when connected to a regulator since this may cause damage to diaphragm in regulator. • Handle valves with care. • Never connect an unregulated Propane tank to heater. • Do not subject Propane tank to excessive heat. • Tightly close the gas shutoff valve on the Propane tank after each use. • The POL fitting must be protected when disconnected from the propane tank. • Never store a Propane gas tank inside a building or in the vicinity of any gas burning appliance. THE DISCONNECTED TANK MUST NEVER BE STORED IN A BUILDING, GARAGE OR ANY OTHER ENCLOSED AREA. 6 PROPANE TANK TOP HEATER Connecting Heater to Propane Tank Read and understand all safety information before connecting heater to propane tank. 1. (Applies to dual burner models only). Place heater onto tank with tank collar bracket over tank collar (Fig. 1) Mounting bolt knob should be positioned to the outside of tank collar. 2. (Applies to dual burner models only). Firmly secure to tank by hand-tightening mountingbolt knob. Do not overtighten mounting bolt knob. 3. Make sure heater regulator knob is in the OFF position. 4. For single burner models: insert regulator’s connector into tank’s valve outlet fitting and turn left (counterclock-wise) until fully tightened. For dual burner models: insert regulator’s connector into tank’s valve and turn left (counterclock-wise) with hand as much as possible. Then, with a wrench, continue turning in same direction until assembly is fully tightened.Threads are left-handed. NOTE: Some models have a hand wheel that can be used to tighten the fitting to the cylinder. 5. Open propane tank valve slowly. 6. Check all fittings for leaks. Apply a 50/50 mixture of liquid soap and water to all joints. Bubbles forming show a leak. Correct all leaks at once. WARNING: Never use an open flame to check for leaks. 7. Always remove propane tank from heater after each use. Do not store heater while attached to propane tank. 7 PROPANE TANK TOP HEATER Connecting Heater to Propane Tank FIGURE 2 Spark Plug TT30 Series Piezo (NOTE: some models only) Inlet Connector Propane Tank Valve Mounting Bolt Knob Heat Regulator Knob FIGURE 3 Spark Plug TT15 Series Ignition Hole Piezo (NOTE: some models only) Wing Bolt Safety Shut-off valve Heat Regluator Knob 8 PROPANE TANK TOP HEATER Checking for Leaks Check all gas connections with a 50/50 soap and water solution to be sure they are tight and leak proof. The formation of bubbles indicate a gas leak. Correct all leaks before using the heater. • The installation of your heater must meet all local codes and/or gas utility requirements or, in the absence of local codes, with the Storage and Handling of Liquefied Petroleum Gases, ANSI/NFPA 58 and the Natural and Propane Installation Code, CSA B149.1. • The minimum clearances to combustible: Side and Rear- 36” (91cm); Top - 36” (91cm); Front - 60” (150cm); Floor - combustible, must be maintained at all times. • The hose assembly should be visually inspected prior to each use of the heater. If it is evident that there is excessive abrasion or wear, or the hose is cut, it must be replaced prior to the heater being put into operation. • The replacement hose assembly shall be that specified by the manufacturer. WARNING: Never use an open flame to check for leaks. Operation - Lighting Instructions When Using Match Read and understand all safety information before operating heater. WARNING: Burner and Burner Guard should always face away from propane tank shut-off and regulator. WARNING: Improper installation, alteration, service or maintenance can cause property damage, injury or death.Read the installation, operating and maintenance instructions thoroughly before installing or servicing this equipment. WARNING: Do not cover air inlet holes in mixing tube. WARNING: Make sure there is no open flame in the area. Fully open the propane tank valve. 9 PROPANE TANK TOP HEATER Lighting Instructions When Using Match (Continued) FIGURE 4 1. Open Cylinder valve by turning . counterclockwise Burner Front 2. Turn heater regulator knob to the counterclockwise “High” position. (Fig. 4) Spark Plug WARNING: Stand to the side of unit while lighting. Do not stand or have any part of your body over or in front of heater while lighting. 3. Do not attempt to light one burner off of the other. Use one match per burner. Locate ignition hole in side of burner. (Fig. 5) Insert a lit match through ignition hole. Ignition Hole Piezo Wing Bolt Safety Shut-off Valve Heat Regulator Knob CAUTION: Do not insert match into air inlet holes in mixing tube. TT15 Series WARNING: Do not push in safety shut-off FIGURE 5 valve plunger before inserting lit match. 5. Burner should light. Mesh screen on burner glows red when lit. After burner is lit, continue holding in safety shut-off valve plunger (about 10 to 30 seconds) until heater stays lit. 6. If the burner does not light within 10 seconds, turn regulator knob to the OFF position. Wait at least five (5) minutes for the gas to dissipate before relighting. 7. If heater will not light after repeated tries, do not attempt to repair heater. Return heater to nearest authorized service center or to the address on back of this manual, freight prepaid. Ignition Hole Air Inlet Hole Safety Shut-off Valve TT30 Series Place lit match through ignition hole. 8. After burner lights, turn the heater regulator knob to the desired heat setting (LOW, MED, or HI) 9. For dual burner models only : Light both burners when maximum heat is needed. Use one burner to conserve fuel. Repeat steps to light second burner. 10 PROPANE TANK TOP HEATER Turning Off The Heater 1. Tightly close propane tank valve by turning clockwise . 2. Turn the heater regulator knob to the OFF position. Wait at least 30 minutes for the heater to cool before handling heater. 3. Always remove the heater from the propane tank after each use. Do not store heater while attached to propane tank. Do not store propane cylinders in a building, garage or any other enclosed area. VENTILATION Always be sure to supply proper ventilation while operating this heater. Provide a minimum of 1/2 square foot opening for fresh air supply for 15,000 BTU’s of heat and one square foot opening for 30,000 BTU’s of heat. Operation - Lighting Instructions for Piezo Ignition Models Read and understand all safety information before operating heater. WARNING:Burner and Burner Guard should always face away from propane tank shut-off and regulator. WARNING: Improper installation, alteration, service or maintenance can cause property damage, injury or death.Read the installation, operating and maintenance instructions thoroughly before installing or servicing this equipment. WARNING: Do not cover air inlet holes in mixing tube. WARNING: Make sure there is no open flame in the area. Fully open the propane tank valve. 11 PROPANE TANK TOP HEATER Lighting Instructions for Piezo Ignition Models (Continued) 1. Stop! Read all safety information first. 2. Open cylinder valve by turning counterclockwise . WARNING: Stand to the side of unit while lighting. Do not stand or have any part of your body over or in front of heater while lighting. 3. Turn heater regulator knob clockwise to OFF position. 4. Wait five (5) minutes to clear out any gas. Then smell for gas, including near the floor. If you smell gas, STOP! Follow the safety information on the tag attached to the heater. If you do not smell gas, go to the next step. 5. Turn heater regulator knob counterclockwise for ten (10) seconds. (Fig. 5) to High position. Press in safety shut-off valve plunger 6. With safety shut-off valve plunger pressed in, immediately push down and release piezo ignitor button repeatedly. This will light the burner. 7. Keep safety shut-off valve plunger pressed in for thirty (30) seconds after lighting. After 30 seconds, release safety shut-off valve plunger. 8. If burner goes out, repeat steps 5 through 7 or use a match. If heater will not light after repeated attempts do not attempt to repair heater. 9. When burner is lit, turn heater regulator knob to desired heat setting (LO, MED, HI). 10. On dual burner models light both burners when maximum heat is needed. Use one burner to conserve fuel. Turning Off The Heater 1. Tightly close propane tank valve by turning clockwise . 2. Turn the heater regulator knob to the OFF position. Wait at least 30 minutes for the heater to cool before handling heater. 3. Always remove the heater from the propane tank after each use. Do not store heater while attached to propane tank. Do not store propane cylinders in a building, garage or any other enclosed area. VENTILATION Always be sure to supply proper ventilation while operating this heater. Provide a minimum of 1/2 square foot opening for fresh air supply for 15,000 BTU’s of heat and one square foot opening for 30,000 BTU’s of heat. 12 PROPANE TANK TOP HEATER Lighting Under Wind Conditions When using this heater outdoors on a windy day, it will be necessary to use a match or long stem butane lighter to ignite the burner. It may be difficult to keep the match lit long enough under windy conditions. Follow the “Lighting instructions when Using a Match” procedure after doing the following: 1. Position the heater and cylinder such that the burner faces away from the wind. 2. Position your body behind the heater such that your body blocks the wind while you are following the instructions for lighting with a match. Storage Never store a Propane gas tank inside a building or in the vicinity of any gas or oil burning appliance. When the Propane tank is not disconnected from the outdoor heater, the gas tank and heater must be stored outdoors in a well ventilated area, out of the reach of children. If for any reason the heater is to be stored indoors, the tank must be disconnected and stored outdoors in a well ventilated area out of reach of children, in accordance with the standard for the the Storage and Handling of Liquefied Petroleum Gases, ANSI / NFPA 58 and CSA B149.1, Natural Gas and Propane Installation Code. The plastic tank valve plug supplied with your tank must be tightly installed when the tank is disconnected from the heater. Maintenance Instructions 1. Turn unit off, allow heater to fully cool and disconnect propane hose before performing any Maintenance functions. 2. Keep unit clean and keep the inside of the unit debris free. 3. Have unit checked by a qualified technician at least once a year, preferably prior to the heating season. 13 PROPANE TANK TOP HEATER Troubleshooting PROBLEM POSSIBLE CAUSE CORRECTIVE ACTION 1. Unit will not light. 1. 2. 3. 4. 5. Valve on propane cylinder not open. Propane cylinder empty Regulator not in "High" position Excess flow device triggered. Defective Regulator. 1. 2. 3. 4. 5. 2. Burner will not stay lit when gas valve plunger released. 1. Wiring of thermocouple 2. Defective thermocouple 3. Defective gas valve 1. Check wiring connections are properly engaged. 2. Replace thermocouple. 3. Replace gas valve assembly. 3. Excessive flames coming out of burner, not glowing red. 1. Debris or spider webs in mixing tube or burner. 2. Clogged orifice 1. Clean burner tube with bottle brush, rinse in water and drain thoroughly before reintsalling. 2. Remove and clean using compressed air. 4. Piezo won't spark. (Some models only) 1. Defective piezo 2. Ignitor misaligned with Thermocouple shield 3. Wire frayed or damaged. 1. Repalce Piezo 2. Realign ignitor with thermocouple shield. 3. Repalce wire. 5. Flames flashback/burn inside the mixing tube 1. Debris or spider webs in mixing tube. 1. Clean burner tube with bottle brush, rinse in water and drain thoroughly before reintsalling. 2. Remove and clean using compressed air. 2. Clogged orifice Open cylinder valve by turning counterclockwise. Have cylinder refilled. Turn regulator to "High" position. Close cylider valve, wait 5 minutes and reopen slowly. Replace Regulator assembly. Replacement Parts List Description Item Part Number TT-15PS TT-15S TT-30P TT-30 1 Regulator Assembly TR0002XA TR0002XA TR0002XB TR0002XB 2 Burner Assembly TR0004XX TR0004XX TR0004XX TR0004XX 3 Thermocouple Assembly ODS004XC ODS004XC ODS004XC ODS004XC 4 Guard Assembly TT0014XX TT0014XX TT0014XX TT0014XX 5 Rear Guard Assembly TT0011XX TT0011XX TT0011XX TT0011XX 6 Safety Shut-off Valve TV0002XX TV0002XX TV0002XX TV0002XX 7 Manifold 2TT0002 2TT0002 8 Piezo Assembly 9 Tank Collar Bracket TT0026XX TT0026XX 10 Mounting Bolt Knob TT0027XX TT0027XX 11 Gas Hose TT0025XX TT0025XX 12 Regulator Handle TR0027XX TR0027XX TR0027XX 13 Spark Plug TT0057XX TT0033XA TT0033XA TR0027XX TT0057XX 14 PROPANE TANK TOP HEATER Replacement Parts Illustration TT15 Series 15 THIS PAGE INTENTIONALLY LEFT BLANK. 16 WARRANTY LIMITED WARRANTY: This limited warranty is extended to the original retail purchaser of this Duraheat Forced Air/Convection/Radiant Heater and warrants against any defect in materials and workmanship for a period of one (1) year from the date of retail sale. World Marketing of America, Inc., at it’s option, will either provide replacement parts or replace or repair the unit, when properly returned to the retailer where purchased or one of our service centers as directed by World Marketing, within one (1) year of retail purchase. (Shipping costs, labour costs, etc. are the responsibility of the purchaser.) DUTIES OF THE OWNER: This heating appliance must be operated in accordance with the written instructions furnished with this heater. This warranty shall not excuse the owner from properly maintaining this heater in accordance with the written instructions furnished with this heater. A bill of sale, canceled check or payment record must be kept to verify purchase date and establish warranty period. Original carton should be kept in case of warranty return of unit. WHAT IS NOT COVERED: 1. Damage resulting from use of improper fuel. 2. Damage caused by misuse or use contrary to the owners manual and safety guidelines. 3. Damage caused by a lack of normal maintenance. 4. Fuses 5. Use of non-standard parts or accessories. 6. Damage caused in transit. Freight charges on warranty parts or heaters to and from the factory shall be the responsibility of the owner. This warranty does not imply or assume any responsibility for consequential damages that may result from the use, misuse, or the lack of routine maintenance of this heating appliance. A cleaning fee and the cost of parts may be charged for appliance failures resulting from lack of maintenance. This warranty does not cover claims which do not involve defective workmanship or materials. FAILURE TO PERFORM GENERAL MAINTENANCE (INCLUDING CLEANING) WILL VOID THIS WARRANTY. THIS LIMITED WARRANTY IS GIVEN TO THE PURCHASER IN LIEU OF ALL OTHER WARRANTIES, EXPRESSED OR IMPLIED, INCLUDING BUT NOT LIMITED TO THE WARRANTIES OF MERCHANTABILITY OF FITNESS FOR A PARTICULAR PURPOSE. THE REMEDY PROVIDED IN THIS WARRANTY IS EXCLUSIVE AND IS GRANTED IN LIEU OF ALL OTHER REMEDIES. IN NO EVENT WILL WORLD MARKETING OF AMERICA BE LIABLE FOR INCIDENTAL OR CONSEQUENTIAL DAMAGES. Some states do not allow limitations on how long an implied warranty lasts, so the above limitation may not apply to you. Some states do not allow the exclusion or limitation of incidental or consequential damages so the above limitation or exclusion may not apply to you. CLAIMS HANDLED AS FOLLOWS: 1. Contact your retailer and explain the problem. 2. If the retailer is unable to resolve the problem, contact our Consumer Warranty Dept. detailing the heater model, the problem, and proof of date of purchase. 3. A representative will contact you. DO NOT RETURN THE HEATER TO WORLD MARKETING OF AMERICA, INC. unless instructed by our Representative. This warranty gives you specific legal rights and you may also have other rights which vary from state to state. TO REGISTER THE WARRANTY ON YOUR HEATER, PLEASE FILL OUT THIS CARD COMPLETELY AND MAIL WITHIN 14 DAYS FROM DATE OF PURCHASE OR REGISTER ON-LINE AT www.worldmkting.com NAME: ______________________________________ PHONE: ( ) __________________ EMAIL: ____________________________ ADDRESS: _________________________________ CITY: ______________________________ STATE: __________ ZIP: ____________ MODEL: ____________________ SERIAL #: _______________________________________ DATE PURCHASED: __________________ DEALER PURCHASED FROM: ____________________________________________ TYPE OF STORE: __________________________ CITY & STATE WHERE PURCHASED: ______________________________________________ PRICE PAID: _______________________ Please Take a Minute To Give Us Your Answers To The Following Questions. All Responses Are Used Solely For Market Research And Are Held In Strict Confidence. Male Female 18-24 25-39 40-59 60 and over Who primarily decided this purchase? Purpose of Purchase? _______________________________________________________________________________________________ Do you own any other portable heaters? Yes No If yes, type____________________________brand_____________________ How do you intend to use your new heater? Construction Site Farm Warehouse/Commercial Garage/Outbuilding Other How did you become aware of this heater? In-Store Display Newspaper Ad Magazine Ad Friend/Relative £TV Commercial £Store Salesperson Other ___________________________ What made you select this heater? Style Size/Portability Price Package Brand Other ___________________ Do you: own rent Would you recommend this heater to a friend? Yes No Please give us your comments:________________________________________________________________________________________ THANK YOU FOR COMPLETING THIS FORM! Information will be held confidential. Part No. 09LPWTY 17 WARRANTY REGISTRATION IMPORTANT: We urge you to fill out your warranty registration card within fourteen (14) days of date of purchase. You can also register your warranty on the internet at www.worldmkting.com. Complete the entire serial number. Retain this portion of the card for your records. World Marketing of America, Inc. PO Box 192, 12256 William Penn Hwy. Mill Creek PA 17060-0192 Tel) 1-800-776-9425 www.worldmkting.com SAVE THIS CARD! Place Postage Stamp Here World Marketing of America, Inc. PO Box 192, 12256 William Penn Hwy. Mill Creek PA 17060-0192