1
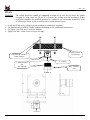
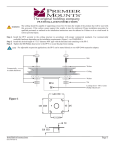
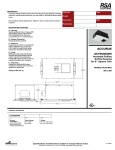
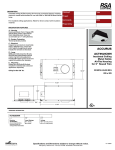
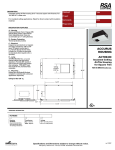
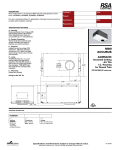
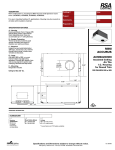
PP-6, -6A
PP-6 and PP-6A Assembly Instructions
PP-6
NOTE:
The ceiling should be capable of supporting a weight of at least five times the projector or
monitor weight. If it cannot, the ceiling must be reinforced. Proper installation procedure by
qualified personnel as outlined in the installation instructions must be adhered to. Failure to do so
could result in serious personal injury.
1.
Install the PP-6 securely to the ceiling structure in accordance with proper commercial standards. Use
suitable hardware depending on the installation requirements (Figure 1).
2.
Install the desired length of 2” diameter NTP pipe with threaded ends for the PP-6.
3.
Tighten the ¼” x 20 x 1/2” locking screw to the PP-6 to secure the pipe so it will not swivel.
Locking Screw
Figure 1
Installation Instructions
Page - 1 -
PP-6, -6A
PP-6A
WARNING:
1.
2.
3.
4.
The ceiling should be capable of supporting a weight of at least five (5) times the weight
intended to hang from the PP-6A, if it cannot, the ceiling must be reinforced. Proper
installation procedure by qualified personnel as outlined in the installation instructions must
be adhered to. Failure to do so could result in serious personal injury.
Install the PP-6A to the ceiling structure according to commercial standards.
Use (commercially available) suitable hardware depending on the installation requirements.
See Figure 2 for cable access and 360º rotation.
Tighten the M6 x 12mm screws to secure the pipe.
Ceiling structure
(See warning)
(Commercially available)
suitable hardware
Cable Access
2” coupling
2” (NTP) Threaded
pipe
(Not supplied)
M6 x 12 Phillips
screws
Figure 2
Page - 2 -
Installation Instructions