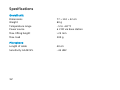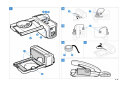
1
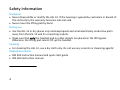
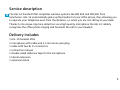
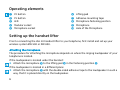
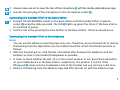
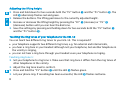
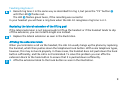
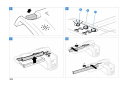
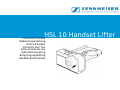
HSL 10 Handset Lifter
Instruction Manual
Bedienungsanleitung
Notice d’emploi
Istruzioni per l’uso
Instrucciones de uso
Gebruiksaanwijzing
Betjeningsvejledning
Handhavande Manual
English ...................................................
Deutsch .................................................
Français .................................................
Italiano ..................................................
Español ..................................................
Nederlands ............................................
Dansk ....................................................
Svenska .................................................
3
15
HSL 10 handset lifter instruction manual
Safety information....................................... 4
Related documents......................................... 4
Service description ....................................... 5
Delivery includes .......................................... 5
Operating elements ..................................... 6
Setting up the handset lifter ...................... 6
Attaching the microphone ......................... 6
Connecting the handset lifter to the base
station............................................................... 7
Connecting the handset lifter to the
telephone ......................................................... 7
Adjusting the lifting height ..........................8
Teaching the ring tones of your telephone
to the HSL 10....................................................8
Replacing the lateral extension of the
lifting pad .........................................................9
Affixing the extension block .........................9
If problems occur…..................................... 10
Further information................................... 11
Accessories.................................................. 11
Specifications ............................................. 12
We have designed this product to give you reliable operation over many years. Over half a
century of accumulated expertise in the design and manufacture of high-quality electroacoustic equipment have made Sennheiser a world-leading company in this field.
Please take a few moments to read these instructions carefully, as we want you to enjoy your
new Sennheiser product quickly and to the fullest.
3
Safety information
Disclaimer
• Never disassemble or modify the HSL 10. If the housing is opened by customers in breach of
this instruction, the warranty becomes null and void.
• Never move the lifting pad by hand.
During use
• Use the HSL 10 in dry places only and keep liquids and small electrically conductive parts
away from the HSL 10 and its connecting sockets.
• Make sure that only the handset and no other objects are placed on the lifting pad.
Otherwise, the lifting pad cannot lift up the handset.
Cleaning
• For cleaning the HSL 10, use a dry cloth only. Do not use any solvents or cleansing agents!
Related documents
• BW 900 instruction manual and quick start guide
• DW 800 instruction manual
4
Service description
4 The HSL 10 handset lifter completes wireless systems like BW 900 and DW 800 from
Sennheiser. HSL 10 automatically picks up the handset of your office phone, thus allowing you
to operate your telephone even from the distance, i.e. when you are not sitting at your desk.
Thanks to its unique ring tone detection via a high quality microphone the HSL 10 reliably
recognizes the office phone ringing and forwards the call to your headset.
Delivery includes
1 HSL 10 handset lifter
1 microphone with cable and 2.5 mm mono jack plug
1 cable with two RJ 11 connectors
1 instruction manual
1 double-sided adhesive tape for the microphone
1 lateral extension
1 extension block
5
Operating elements
1 P2 button
P1 button
LED
Modular socket
Microphone socket
Lifting pad
Adhesive mounting tape
Microphone fastening position
Microphone
Hole of the Microphone
Setting up the handset lifter
Prior to connecting the HSL 10 handset lifter to your telephone, first install and set up your
wireless system BW 900 or DW 800.
Attaching the microphone
The procedure for attaching the microphone depends on where the ringing loudspeaker of your
telephone is located.
If the loudspeaker is located under the handset:
Attach the microphone to the lifting pad in the fastening position .
2a
If the loudspeaker is located in a different place:
Attach the microphone with the double-sided adhesive tape to the loudspeaker in such a
2b
way, that it is placed directly on the loudspeaker.
6
2c
3
Always make sure not to cover the hole of the microphone with the double-sided adhesive tape.
Connect the jack plug of the microphone to the microphone socket .
Connecting the handset lifter to the base station
1
Connect the ACCESSORIES socket on the base station with the handset lifter’s modular
socket using the cable provided. The LED lights up green five times, if the base station
is connected to power.
Test the HSL 10 by pressing the hook button on the base station. The lever should move.
Connecting the handset lifter to the telephone
Note!
You can use the adhesive mounting tape only once. Therefore, we recommend not to remove
the backing from the tape before you have determined the correct attachment position as
follows:
With the handset put on, hold the HSL 10 handset lifter between the telephone and the
handset, as close to the handset loudspeaker as possible.
In order to check whether the HSL 10 is in the correct position or not, press the hook button
on your mobile device or the base station, respectively. The position is correct, if the
lifting pad raises only the loudspeaker side of the handset and you can hear a dial tone.
Remove the backing from the adhesive tape and affix the HSL 10 with the adhesive tape.
7
Adjusting the lifting height
Press and hold down for two seconds both the “P2” button and the “P1” button . The
LED alternately flashes red and green.
Release the buttons. The lifting pad raises to the currently adjusted height.
Increase or decrease the lifting height by pressing the “P2” (increase) or “P1” (decrease) button until you can hear the dial tone.
Save the settings by pressing and holding down for two seconds both the “P2” button and the “P1” button .
6
7
6
Teaching the ring tones of your telephone to the HSL 10
You can teach two different ring tones to your HSL 10. This is required if
• your telephone supports two different ring tones, e.g. for external and internal calls,
• you hear a ring tone in your headset although not your telephone, but another telephone in
the vicinity is ringing,
• you can not hear a ring tone through your headset even your telephone is ringing.
Teaching ring tone 1:
Set your telephone to ring tone 1. Make sure that ring tone 1 differs from the ring tones of
other telephones in the vicinity.
Adjust the ring tone level to comfort.
Press and hold the “P1” button until the LED flashes green.
6
Let your phone ring. If recording has been successful, the LED flashes red twice.
8
6
Teaching ring tone 2:
Record ring tone 2 in the same way as described for ring 1, but press the “P2” button until the LED flashes red.
The LED flashes green twice, if the recording was succesful.
In your headset you will hear a ring tone when the HSL 10 recognizes ring tone 1 or 2.
Replacing the lateral extension of the lifting pad
If the lateral extension is not long enough to lift up the handset or if the handset tends to slip
off the extension, you can install a longer one instead.
Replace the lateral extension as seen in the illustration.
8
Affixing the extension block
When you terminate a call via the headset, the HSL 10 usually hangs up the phone by replacing
the handset, which then pushes down the telephones hook button. With some telephone types,
however, this may not work properly. In these cases, the handset does not push down the hook
button sufficiently, and the call is not terminated. To solve this problem you can affix the
extension block to the hook button to ensure that it is pushed down sufficiently.
Affix the extension block to the hook button as seen in the illustration.
5
9
If problems occur…
Problem
Possible reason
When pressing the hook
The lifting height is not
button on the mobile
sufficient.
device or base station, you
do not hear a dial tone in
your headset.
Remedial measures
Adjust the lifting height (see page 8).
Although your phone is
ringing, you cannot hear
the ring tone in your
headset.
The HSL 10 microphone hole Re-position the HSL 10 so that the microphone
hole faces the phone loudspeaker.
does not face the phone
loudspeaker.
HSL 10 does not recognize
the ring tone.
Teach the ring tones of your phone to the HSL 10
(see page 8).
You hear a ring tone in
your headset when
another phone is ringing.
The HSL 10 is not adjusted
to the ring tone of your
phone.
Teach the ring tones of your phone to the HSL 10
(see page 8).
The phone handset slips
off the lifting pad.
The lateral extension of the
lifting pad is too short.
You terminate the call on
your headset, but your
phone is not hung up.
There is not contact
5 Affix the foam block to the phone hook
between the phone handset
button, so that the phone handset pushes
and the phone hook button. down the phone hook button (see page 9, picture
5). If the foam block is too big for the phone hook
button, cut the foam block smaller.
10
8
Replace the lateral extension of the lifting
pad (see page 9).
Further information
In case of further questions, please contact your vendor or, alternatively, your local Sennheiser
representative. For more information e.g. regarding problem solutions, warranty conditions, etc.
please also see our website www.sennheisercommunications.com under “FAQ” (frequently
asked questions) or “Products”, “Wireless solutions“ and “HSL 10”.
Accessories
Accessory
Attachment parts
Extension
Cable with two modular plugs (RJ 11, 6/6), length: 30 cm
Microphone cable
Part No.
000000
000000
000000
000000
11
Specifications
Overall unit:
Dimensions
Weight
Temperature range
Power source
Max. lifting height
Max. load
77 × 110 × 42 cm
80 g
−5 to +40 °C
6 V DC via base station
>25 mm
200 g
Microphone
Length of cable
Sensitivity 94 dB SPL
12
40 cm
−43 dBV
13
14