1
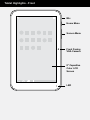
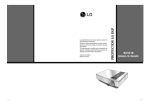
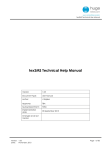
CINEPAD
8” Multi-Touch Capacitive Tablet
with Android 4.0
Quick Start Guide
aluratek.com
AT108F
mnl M10251
Copyright © 2012 Aluratek, Inc. All Rights Reserved.
Tablet Highlights - Front
Mic
Home Menu
Screen Menu
Front Facing
VGA Camera
8” Capacitive
Color LCD
Screen
LED
Tablet Highlights - Back and Bottom Side
Camera
Speaker
Speaker
Mini USB 2.0 Port
Mini HDMI Port
Power Adapter Port
SD Card Port
Headphone Jack
Quick Settings
To view and control the most common settings for your tablet, as
well as accessing the complete Settings application, open the Quick
Settings.
Touch the Time in the System bar. Then touch again within the popup menu.The Quick Settings pop-up displays.
The Quick Settings are:
• Wi-Fi: Touch to enable or disable Wi-Fi.
• Auto rotation: Touch to enable or disable automatic rotation. When
disabled, the screen does not rotate when you turn the tablet.
• Brightness: Touch and drag the slider to set the brightness.
• Notifications: Touch to enable or disable system and application
notifications.
• Settings: Touch to open the Settings application.
4
Wireless and Networks
WiFi Settings
Your device supports Wi-Fi b/g/n. To control your device’s wireless
connections, use Wi-Fi settings to manage your device’s Wi-Fi connections.
Turning Wi-Fi On or Off
Turn your device’s Wi-Fi service on or off. When you turn Wi-Fi
service on, your device automatically searches for available, in range
Wireless Access Points (WAPs).
1. From a Home screen, touch Apps > Settings > Wireless and
networks.
2. Touch Wi-Fi to turn Wi-Fi On or Off. When on, a check appears in
the checkbox.
Add Wi-Fi Network
To open a dialog where you can add a Wi-Fi network by entering
its Network SSID (the name it broadcasts), security type, and other
properties:
1. From a Home screen, touch Apps > Settings > Wireless and
networks
2. Touch Wi-Fi settings, then touch Add Network
3. Use the keyboard to enter Network SSID
4. Touch the Security field and then touch a security type
5. Use the keyboard to enter the Password
6. Touch Save
Scan
The tablet scans for available Wi-Fi networks and displays the
names of those it finds. Secured networks are indicated with a Lock
icon. If the tablet finds a network that you connected to previously, it
connects to it.
5
Wireless and Networks
Advanced Settings
Network Notification:
Have your device alert you to new Wireless Access Points (WAPs).
1
PLACE IN ANY ROOM IN YOUR HOME
1. From a Home screen, touch Apps > Settings > Wireless and
networks
2. Touch Menu, then touch Network notification to turn notifications
On or Off. When on, a check appears in the checkbox
Wi-Fi Sleep Policy:
Specify when to disconnect from Wi-Fi.
1. From a Home screen, touch Apps > Settings > Wireless and
networks
2. Touch Menu, then touch Keep Wi-Fi on during sleep
3. Touch Always, Only when plugged in, or Never
MAC address: View your device’s MAC address, required when connecting to some secured networks (not configurable).
IP address: View your device’s IP address.
Adding a VPN
Before you add a VPN you must determine which VPN protocol to
use: PPTP (Point-to-Point Tunneling Protocol), L2TP (Layer 2 Tunneling Protocol), L2TP/IPSec PSK (Preshared key based L2TP/IPSec), or L2TP/IPSec CRT (Certificate based L2TP/IPSec)
1. From a Home screen, touch Apps > Settings > Wireless and
networks > VPN settings
2. Touch Add VPN
6
Wireless and Networks
3. To establish a PPTP (Point-to-Point Tunneling Protocol):
• Touch Add PPTP VPN
• Touch VPN name, add a name for this connection using the key
pad, then touch OK
• Touch Set VPN server, add a name using the keypad, then touch OK
• Touch Enable Encryption to make a check mark (if desired)
• Touch DNS search domains, add a name for DNS search using
the keypad, then touch OK
4. To establish a L2TP (Layer 2 Tunneling Protocol):
• Touch Add L2TP VPN
• Touch VPN name, add a name for this connection using the
keypad, then touch OK
• Touch Set VPN server, add a name using the keypad, then touch OK
• Touch Enable L2TP secret to make a check mark (if desired)
• Touch Set L2TP secret and enter a password (if desired), then
touch OK
• Touch DNS search domains, add a name for DNS search using
the keypad, then touch OK
5. To establish a L2TP/IPSec PSK (Pre-shared key based L2TP/IPSec):
• Touch Add L2TP/IPSec PSK VPN
• Touch VPN name, add a name for this connection using the
keypad, then touch OK
• Touch Set VPN server, add a name using the keypad, then touch OK
• Touch Set IPsec pre-shared key, enter a key and touch OK
• Touch Enable L2TP secret to make a check mark (if desired)
• Touch Set L2TP secret and enter a password (if desired), then
touch OK
• Touch DNS search domains, add a name for DNS search using
the keypad, then touch OK
Wi
Wireless and Networks
7
Wireless and Networks
6. To establish a L2TP/IPSec CRT (Certificate based L2TP/IPSec):
• Touch Add L2TP/IPSec CRT VPN
• Touch VPN name, add a name for this connection using the keypad, then touch OK
• Touch Set VPN server, add a name using the keypad, then touch OK
• Touch Enable L2TP secret to make a check mark (if desired)
• Touch Set L2TP secret and enter a password (if desired), then
touch OK
• Touch Set user certificate, then touch OK
• Touch Set CA certificate, then touch OK
• Touch DNS search domains, add a name for DNS search using
the keypad, then touch OK
8
Device Settings
Sound
Set the volume level for all types of sounds. Note: You can only set
volume when Silent Mode is disabled.
1. From Home screen, touch Apps > Settings > Sound > Volume
2. Touch and drag the sliders to set the volume for
• Music, video, games, & other media: Sounds for media and so on
• Ringtone & notifications: Sounds for notificaiotns, and so on
• Alarm: Notifications for alarms set in the Alarm app
Tip: You can also set System volume from the Home screen by
pressing the Volume Key
3. Touch OK to save your setting
Notification Ringtone
Select a default ringtone for message, alarm, and other notifications
1. From Home screen, touch Apps > Settings > Sound > Default
notification
2. Touch a ringtone to hear a sample and select it
3. Touch OK to save the setting
Audible Selection
When enabled, tones play when you touch screen items.
1. From Home screen, touch Apps > Settings > Sound
2. Touch Audible selection to enable or disable tones. When enabled,
a check mark appears in the check box
Screen Lock Sounds
When enabled, tones play when unlocking and locking the screen
1. From Home screen, touch Apps > Settings > Sound
2. Touch Screen lock sounds to enable or disable tones. When e
abled, a check mark appears in the check box.
9
Device Settings
Display Brightness
Set the default screen brightness.
1. From Home screen, touch Apps > Settings > Display > Brightness
2. Touch and drag the slider to set the brightness
3. Touch OK to save the setting
Display Font Style
Set the font for screen displays.
1. From Home screen, touch Apps > Settings > Display > Font size
2. Touch Font size to select Small, Normal, Large, Huge
3. Touch OK to save the setting
Set the Home screen and Lock Screen Wallpaper
1. From Home screen, touch Apps > Settings > Display > Wallpaper
Then Select wallpaper from pop-up displays. Live Wallpapers, or
Wallpapers.
Touch Wallpaper gallery to select a wallpaper or touch Gallery to
select one of your photos. Touch the album to display the photos.
Touch a photo to select it, then crop and resize the picture, if desired.
Touch Ok to save the picture as wallpaper. Touch X to cancel.
Auto-Rotate Screen
When this option is checked, the screen orientation changes when
you rotate the device. When this option is not checked, the screen
orientation locks in the current orientation (landscape or portrait) and
the orientation does not change when you rotate the device.
1. From Home screen, touch Apps > Settings > Display
2. Touch Auto-rotate screen to enable or disable the auto-rotate
feature.
10
Device Settings
Sleep
Set the length of delay between the last key press or screen touch
and the automatic screen timeout (dim and lock).
1. From Home screen, touch Apps > Settings > Display > Sleep
2. Touch a setting to select it
Storage
Use this option to view device memory usage. From Home screen,
touch Apps > Settings > Storage
Total device memory, memory used for applications, downloads, pictures, videos, audio, and miscellaneous files, and available memory
are displayed.
Battery
See how the battery is being used by device activities.
1. From Home screen, touch Apps > Settings > Battery
2. Touch Battery use to view how the display, the Android system,
and Wi-Fi are affecting battery use.
11
App Settings
1. From Home screen, touch Apps > Settings > Apps
2. Touch an application to view and update information about the
application, including memory usage, default settings, and
permissions.
Running Services
View and control services running on your device. Warning!: Not all
services can be stopped. Stopping services may have undesirable
consequences on the application or Android System.
From Home screen, touch Apps > Settings > Apps > Running
To stop a service:
1. Touch the service
2. Touch Stop. The Stop system service pop-up displays.
3. Touch OK.
Memory Usage
See how memory is being used by Downloaded, All, or Running
applications.
1. From Home screen, touch Apps > Settings > Apps
2. Touch Running to display memory usage for that category of
applications.
Uninstalling an App
Apps come pre-installed on your device and you can download additional apps from GetJar. If you decide to, you can uninstall apps you
downloaded from GetJar and other sources.
There are several ways to uninstall an app:
1. From a Home screen, touch Apps > Settings > Apps
2. Touch the Downloaded tab
3. Touch the app you want to uninstall
4. Touch the Uninstall button
5. Touch OK to confirm you want to uninstall the app
12
Security
Location Services
You value your privacy. To use Location-Based Services, you must
first enable location services on your device.
Use Wireless Networks:
Before you use applications such as Google Maps and find your
location or search for places of interest, you must enable the Use
wireless networks option or enable the GPS satellites.
1. From Home screen, touch Apps > Settings > Location services
2. Touch Google’s location service to enable location information
using the wireless network.
Use Location for Google Search:
1. From Home screen, touch Apps > Settings > Location services
2. Touch Location & Google search to use your location to improve
Google Search results and other Google services.
Lock Screen
To configure lock screen, choose settings for unlocking your screen.
1. From Home screen, touch Apps > Settings > Securiy
2. Touch Screen lock for these settings:
• None: Never lock the screen
• Slide: Enable the lock screen, but no pattern, PIN, or password
is required.
• Pattern: A screen unlock pattern is a touch gesture you create
and use to unlock your device. Follow the prompts to create or
change your screen unlock pattern
• PIN: Select a PIN to use for unlocking the screen
• Password: Create a password for unlocking the screen
13
Security
Encryption
To require a numeric PIN or password to decrypt your tablet each
time you power it on.
1. From Home screen, touch Apps > Settings > Security
2. Touch Encrypt tablet.
Tip: Make sure your battery is full charged. Encryption takes an hour
or more.
Passwords
When enabled, password characters display briefly as you touch
them while entering passwords.
1. From Home screen, touch Apps > Settings > Security
2. Touch Make passwords visible to enable or disable brief displays
of password characters. When enabled, a check mark appears in
the check box.
Unknown Sources
Enable or disable installation of non-Market applications.
1. From Home screen, touch Apps > Settings > Security
2. Touch Unknown sources and touch OK to allow installation of nonMarket applications
Warning!: Enabling this option causes your tablet and personal data to
be more vulnerable to attack by applications from unknown sources
Device Administration
Add or remove device administrators.
1. From Home screen, touch Apps > Settings > Security
2. Touch Device administrators
14
Security
Backup & Reset
Use factory data reset to return your device to its factory defaults.
This setting erases all data from the device, including Google or
other email account settings, system and application data and settings, and downloaded applications, as well as your music, photos,
videos, and other files. If you reset the tablet in this way, the next
time you turn on your tablet you are prompted to reenter the same
kind of information as when you first started.
1. From Home screen, touch Apps > Settings > Backup & reset
2. Touch Factory data reset, then follow the prompts to perform the
reset
15
Language and Input
Select Language
Set the language used by your device.
1. From Home screen, touch Apps > Settings > Language and input
> Language
2. Touch a language/locale from the list
Text-to-Speech Settings
Voice output provides audible readout of text, for example, the contents of email messages.
1. From Home screen, touch Apps > Settings > Language and input
> Text-to-speech output to configure:
• Listen to example: Play a sample of speech synthesis (available if
voice data is installed)
When Always use my settings is enabled, these settings override the
application’s default settings.
• Default engine: Choose the default text-to-speech engine application
• Install voice data: Download and install the speech synthesis data
needed to activate Text-to-speech from Android Market (free)
• Speech rate: Set the speed at which the text is spoken
• Language: Set the language voice for spoken text
Keyboard Settings
Configure text entry options to your preferences. Choose the default
text entry method.
1. From Home screen, touch Apps > Settings > Language and input
> Keyboard & Input Methods
2. Touch English (US) Keyboard, keyboard to set the default
16
Language and Input
Install from SD card:
Install encrypted certificates from a SD card
1. From Home screen, touch Apps > Settings > Security
2. Touch Install from SD card, then choose a certificate and follow
the prompts to install.
Clear credentials:
Clear stored credentials and reset the password. Note: This setting
only appears if you have installed encrypted certificates.
1. From Home screen, touch Apps > Settings > Security
2. Touch Clear storage to clear stored credentials and reset the
password
17
System Preferences
Date and Time
By default, your device receives date and time information from the
wireless network. When you are outside network coverage, you may
want to set date and time information manually using the Date & time
settings.
1. From Home screen, touch Apps > Settings > Date and time
2. Touch a setting to configure:
• Set date: Enter the current date (only available when the Automatic setting is disabled).
• Set time: Enter the current time (only available when the Automatic setting is disabled).
• Select time zone: Choose your local time zone (only available
when the Automatic setting is disabled).
• Use 24-hour format: Set the format for time displays.
• Select date format: Set the format for date displays.
Accessibility
Touch Screen Controls. Use this option to set the delay time for
touch and hold.
1. From Home screen, touch Apps > Settings > Accessibility
2. Touch Tap and hold delay and then select from Short, Medium, or
Long.
Developer Options
USB Debugging. When enabled, allows debugging when the device
is attached to a PC by a USB cable. Note: This setting is used for
development purposes.
1. From Home screen, touch Apps > Settings > Developer options
2. Touch USB debugging to enable or disable the setting
When enabled, a check mark appears in the check box.
18
System Preferences
Stay Awake
When enabled, the screen does not go to sleep (lock) while connected to a PC with a USB cable. This can be useful when using some
applications because the device disconnects a Wi-Fi connection
when the screen locks Note: This setting is used for development
purposes.
1. From Home screen, touch Apps > Settings > Developer options
2. Touch Stay awake to enable or disable the setting.
When enabled, a check mark appears in the check box.
Allow Mock Locations
This setting is used by developers when developing location based
applications. Note: This setting is used for development purposes.
1. From Home screen, touch Apps > Settings > Developer options
2. Touch Allow mock locations to enable or disable the setting.
When enabled, a check mark appears in the box.
About Tablet
View information about your device, including status, legal information, hardware and software versions, and battery use.
1. From Home screen, touch Apps > Settings > About tablet
2. Touch items to view details:
• System update: Connect to the network and download new
software
• Status: View Battery status, Battery level, IP address, Wi-Fi MAC
address, Serial number, and Up time
• Legal Information: Display Open source licenses and Google
legal information
• Model number: Display your device’s model number
• Android version: Display the firmware version of your device
• Kernel version: Display the kernel version of your device
19
System Preferences
Alarm Settings
To configure general alarm settings:
1. From Home screen, touch Apps > Clock > Set alarm
The following options display:
• Set alarm time: the time for the alarm to be active
• Repeat: Indicate the days that you want the alarm to be active
• Set default ringtone: Choose a ringtone to play as a default, if the
Ringtone is not defined for an alarm. Touch the button next to the
ringtone you want to set and touch OK.
• Label: name/note to easily remember what the alarm is for
Alarm volume can also be set by using the Settings app.
1. From Home screen, touch Apps > Settings > Sound > Volumes
2. Touch and drag the slider to set Alarm volume.
20
Included Apps
Browser
Your device includes a full HTML Browser, to access the internet.
From Home screen, touch Apps > Browser
Calculator
The calculator provides the basic arithmetic functions to solve simple
arithmetic problems and advanced operators to solve more complex
problems.
1. From Home screen, touch Apps > Calculator
2. Enter the first number using the numeric keys
3. Enter the operation for your calculation by touching the + (add), (subtract), x (multiply), or / (divide) key
4. Enter the next number
5. To view the result, touch the = (equals) key
6. Repeat steps 3 through 5 as many times as required
7. Touch CLR to clear the result
9. Touch and hold the Calculator’s display to copy the contents shown
The Calculator functions similarly in landscape or portrait mode.
Calendar
Record events and appointments to manage your schedule
The first time you open the Calendar application on your tablet, it
displays any existing calendar events from your Google Account on
the web.
1. From Home screen, touch Apps > Calendar
2. Touch a tab to choose a calendar view:
• Day: Display today’s schedule and scroll to other days
• Week: Display the current week and scroll to other weeks
• Month: Display the current month and scroll to other months
• Agenda: Display only event names and dates for a selected year
3. Swipe left or right across the screen to view other days or other
weeks. Swipe up or down the screen to view other months or
events list
21
Included Apps
4. Touch Today to return to the current date
5. Touch Menu > Search to find an event. Use the on-screen keypad
to enter a search term. Touch on the keypad to search your calendar
6. Touch New “+” event to add a new event to your calendar
Creating a Calendar Event:
1. From Home screen, touch Apps > Calendar
2. Touch and hold the date for which you want to enter an event or
Touch the date for which you want to enter an event, then touch “+”
3. Enter the event information in the Calendar event screen, then
touch Done
Managing Calendar Events:
You can view and add events in Google Calendar on your mobile
device, but, to delete existing events, you must access Google Calendar on a computer. To delete a non-Google event:
1. From Home screen, touch Apps > Calendar
2. Touch an event. A pop-up displays event information
3. Touch to display the following options:System Preferences
• Touch Delete and then touch OK to delete the event
• Touch Share and then touch Bluetooth or Email to share the event
• Touch Edit to update the event details
Customizing the Calendar:
To add additional accounts and set up Calendar preferences:
1. From Home screen, touch Apps > Calendar
2. Touch Menu > Settings
3. Touch Add account to display the Add account option. Touch an
account type and enter your account information
4. Touch the following for additional settings
Calendar view settings:
• Calendars: Enable calendars for your various accounts
• Synchronize calendars: Displays the General sync settings
22
Included Apps
• First day of week: Choose a day to begin each week
• Hide declined events: Enable or disable display of events
• Hide contacts anniversary events: Enable or disable display of
contact anniversary events
• Show week number: Show the week number to the left of each
week in the Month view and the inset calendar in the Day view
• Lock time zone: Allows you to lock event times and dates based
on your selected time zone, which is defined by the following field
• Select time zone: If Lock time zone is enabled, used this option
to select a time zone to lock event times and dates
• Clear search history: Remove all searches you have performed
Reminder settings:
• Notifications: Touch to select, which allows you to set the Select
ringtone and Pop-up notification options
• Select ringtone: Choose a tone for calendar notifications
• Pop-up notification: Set a pop-up notification as a calendar event
notification
• Default reminder time: Set the default time for a notification
before an event is to occur
5. Touch About calendar for additional Calendar informationSystem
Preferences
Camera
Take photos and record video with your device’s built in Camera.
From Home screen, touch Apps > Camera
23
Technical Support
If you need further assistance, please contact Aluratek support department
prior to returning this device.
E-mail: [email protected]
Web: www.aluratek.com/support
Local (Tustin, CA): 714-586-8734
Toll free: 1-866-580-1978
24
Radio and TV Interference Statement
WARNING!!! This equipment has been tested and found to comply
with the limits of a Class B digital device, pursuant to part 15 of the
FCC rules. These limits are designed to provide reasonable protection
against harmful interference in a residential installation
This equipment generates, uses and can radiate radio frequency energy
and, if not installed and used in accordance with the instruction, may
cause harmful interference to radio communications. However, there is
no guarantee that interference will not occur in a particular installation.
If this equipment does cause harmful interference to radio or television
reception, which can be determined by turning the equipment off and
on, the user is encouraged to try to correct the interference by whatever
measures may be required to correct the interference.
25
Warranty
Aluratek warrants this product against defect in material or workmanship
for 1 Year from the date of purchase.
This warranty becomes invalid if the factory-supplied serial number or
“warranty void” sticker has been removed or altered on the product.
This warranty does not cover:
A) Cosmetic damage or damage due to acts of God
B) Accident, misuse, abuse, negligence or modification of any part of the product.
C) Damage due to improper operation or maintenance, connection to improper
equipment, or attempted repair by anyone other than Aluratek.
D) Products sold AS IS or WITH FAULTS.
IN NO EVENT SHALL ALURATEK’S LIABILITY EXCEED THE PRICE
PAID FOR THE PRODUCT FROM DIRECT, INDIRECT, SPECIAL, INCIDENTAL, OR CONSEQUENTIAL DAMAGES RESULTING FROM THE
USE OF THE PRODUCT, IT’S ACCOMPANYING SOFTWARE, OR IT’S
DOCUMENTATION.
Aluratek makes no warranty or representation, expressed, implied, or
statutory, with respect to it’s products, contents or use of this documentation and all accompanying software, and specifically disclaims it’s quality, performance, merchantability, or fitness for any particular purpose.
Aluratek reserves the right to revise or update it’s product, software or
documentation without obligation to notify any individual or entity.
26
27
Aluratek, Inc. 14831 Myford Rd. Tustin, CA 92780
[email protected]
714.586.8730 • office
714.586.8789 • fax