1
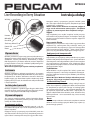
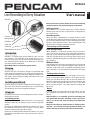
PENCAM
Live Recording in Every Situation
MT4032
User’s manual
ON/OFF
Note! If no action is taken within 30 sec from switching
mode the device will automatically go to off mode.
Taking pictures
When device is in snapshot mode press shortly ON/OFF
button. Every time you press it the device is saving picture
on microSD card.
Camera
Microphone
USB Port
Card slot
Indicator
Reset button
Introduction
MT4032 is a cutting-edge camera built-in a pen. You can
take pictures, save video files with sound, use it as a webcam in Skype. Files are stored on microSD flashcard, you
can download them directly from flashcard or through
pen connected by USB cable.
Note! Before first use fully charge the device.
Charging
Unscrew the pen in half of its length. Use included USB
cable to plug it to USB port in PC computer. During charging red LED is blinking, when fully charged red LED is on
constantly. After charging unplug USB cable and screw
together both parts.
Installing microSD card
Unscrew the pen in half of its length. Put microSD into card
slot, note that flashcard connection pins should facing
mini USB port. Now screw together both parts.
Using pen
To make notes twist on silver ending of pen, after use twist
off to hide pen inside.
Switching modes
Press and hold ON/OFF button for about 2 sec, green LED
indicator will be on constantly. Device is now in snapshot
mode.
Next press and hold ON/OFF button for about 2 sec, green
LED indicator will blink 3 times. Device is now in video
mode and will record video file instantly.
Next press and hold ON/OFF button for about 2 sec, green
LED indicator will blink once and go off. Device is now in
off mode.
Recording video
When you have switched from snapshot mode to video
mode the device will record video instantly. To stop record
press shortly ON/OFF button. To start recording next video
file press again ON/OFF button - green LED indicator will
blink 3 times to confirm recording next file.
Connecting to PC computer
Data storage mode
When MT4032 is in off mode unscrew the pen and connect it to the PC computer using USB cable included in
package. System will automatically install the device as an
USB mass storage device. You can copy all files from pen to
windows desktop. During data transfer green LED indicator is blinking.
Webcam mode
Turn
into
oninto
mode
and plugged
to PC
InsertMT4032
software
disk
CD-ROM
drive and
runusing
driverUSB
incable.
Windows
install
new
capture
video
device.and
In
stallation.
When will
finished
turn
MT4032
into
on mode
webcam
mode
only video
is enabled,
microphone
plugged to
PC using
USB cable.
Windows
will installfuncnew
tion
is disabled
– use external
input
audioonly
device
forisskype
capture
video device.
In webcam
mode
video
enacalls.
bled, microphone function is disabled – use external input
audio
device
for and
skypetime
calls.
Setting
data
Setting
data card
and into
timedevice and plug it to PC comInstall
microSD
To set via
actual
andWhen
time you
need
file “time.txt”
puter
USBdate
cable.
device
is to
setcopy
to “data
storage”
to rootyou
folder
of fiMT4032
in datafistorage
“time.
mode
will
nd “time.txt”
le in themode.
root Copy
folder.
Use
txt” from notepad
softwareto
disc
desktop
edit
in windows
date and
Windows
edittothis
file andand
enter
valid
notepad.
contains
lineand
as below:
time.
SaveFile
file,
unplugonly
USBone
cable
wait 1 min. Now
2009.01.01
12:01:01
power
on device
again – new date and time settings will
Modify
this line to actual date and time, save it, and then
be
stored.
copy into root folder of MT4032 in data storage mode.
Reset
Next unplug USB cable and wait until LED indicator goes
If
encounter
strange behavior
of the
device
offyou
. Now
turn on MT4032
– new time
settings
willyou
be can
apput
plied.straighten paper clip into “reset hole” to restart the
device.
Reset
Note! If there is no available space for recording red
If you encounter strange behavior of the device you can
and green LED indicator will flash at the same time.
put straighten paper clip into “reset hole” to restart the
After 5 sec device will stop recording and switch into
device.
off mode.
Note! If there is no available space for recording red
Note! If red and green LED indicator is blinking alterand green LED indicator will flash at the same time.
natively – you need to recharge the device. After 5 sec
After 5 sec device will stop recording and switch into
device will stop recording and switch into off mode.
off mode.
Note! If red and green LED indicator is blinking alternatively – you need to recharge the device. After 5 sec
device will stop recording and switch into off mode.
EN
PENCAM
Live Recording in Every Situation
MT4032
Instrukcja obsługi
Wł./Wył.
Następnie wciśnij i przytrzymaj przycisk ON/OFF przez
ok.2 sek, zielona dioda LED zgaśnie. Urządzenie jest teraz
w trybie “off “ - wyłączone.
Ważne! Jeżeli żadne działanie nie zostanie podjęte w
ciągu 30 sek od momentu zmiany trybu – urządzenie
wyłączy się automatycznie dla oszczędności energii.
Zdjęcia
Kamera
Mikrofon
Port USB
Slot karty Micro SD
Dioda LED
Reset
Wprowadzenie
MT4032 jest kamerą najnowszej generacji zabudowaną w
długopisie. Możesz robić zdjęcia, zapisywać pliki wideo z
dźwiękiem, używać jako kamery internetowej w Skype.
Pliki zapisywane są na karcie microSD, możesz skopiować
je bezpośrednio z karty lub z MT4032 podłączonego kablem USB do komputera PC.
Ważne! Przed pierwszym użyciem naładuj urządzenie.
Ładowanie
Rozkręć urządzenie w połowie jego długości. Za pomocą
dołączonego kabla USB podłącz MT4032 do portu USB w
komputerze PC. Podczas ładowania czerwona dioda LED
będzie migać, gdy akumulator będzie naładowany dioda
będzie palić się na stałe. Po naładowaniu odłącz kabel USB
i skręć urządzenie.
Instalacja karty microSD
Rozkręć urządzenie w połowie jego długości. Włóż kartę
microSD do slotu, zwróć uwagę aby piny karty były skierowane w stronę złącza miniUSB. Skręć urządzenie.
Używanie długopisu
Aby zapisać notatkę przekręć srebrną końcówkę długopisu, przekręć w kierunku przeciwnym aby schować końcówkę do środka obudowy.
Przełączanie trybów
Wciśnij i przytrzymaj przycisk ON/OFF przez ok. 2 sek, zielona dioda LED zapali się na stałe. Urządzenie jest teraz w
trybie “snapshot”.
Następnie wciśnij i przytrzymaj przycisk ON/OFF przez ok.2
sek, zielona dioda LED mrugnie 3 razy. Urządzenie jest teraz w
trybie “video” i automatycznie zaczyna nagrywać film video.
Gdy urządzenie jest w trybie “snapshot” wciśnij raz przycisk ON/OFF aby wykonać zdjęcie. Za każdym razem gdy
wciśniesz przycisk ON/OFF zostanie zapisane zdjęcie na
karcie microSD.
Nagrywanie filmów
Gdy przełączysz urządzenie w tryb “video” nagrywanie filmu
rozpocznie się automatycznie. Aby zakończyć wciśnij raz
przycisk ON/OFF. Aby rozpocząć nagrywanie nowego filmu
wciśnij ponownie przycisk ON/OFF – zielona dioda LED mignie 3 razy aby potwierdzić rozpoczęcie nowego nagrania.
Podłączanie do komputera PC
Tryb Data Storage
Gdy MT4032 jest wyłączony, rozkręć obudowę i za pomocą kabla USB podłącz do komputera PC. System Windows
automatycznie zainstaluje MT4032 jako masowe urządzenie magazynujące USB. Możesz teraz skopiować pliki z
karty microSD na pulpit. Podczas transferu danych zielona
dioda LED będzie migać.
Tryb Webcam
Włącz MT4023 w tryb “snapshot” lub “video”, system automatycznie rozpozna i zainstaluje urządzenie obrazujące .
W trybie “Webcam” możesz używać MT4032 jako kamery
internetowej.
Ważne! W trybie “Webcam” funkcja mikrofonu jest niedostępna, użyj innego urządzenia wejściowego audio.
Ustawianie daty i czasu
Aby ustawić aktualną datę i czas należy włożyć kartę microSD do urządzenia i podłączyć kablem do komputera
PC. Urządzenie w trybie „data storage” w katalogu głównym zawiera plik „time.txt” – użyj notatnika Windows aby
go edytować, wprowadź aktualne dane i zapisz plik, następnie odłącz kabel USB i odczekaj 1min. Uruchom urządzenie ponownie – nowe ustawienia daty i czasu zostaną
zastosowane.
Reset
Jeżeli zauważysz dziwne zachowanie urządzenia możesz
dokonać resetu wciskając przycisk RESET przy użyciu wyprostowanego spinacza.
PL