1
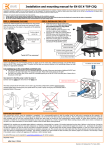
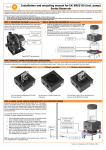
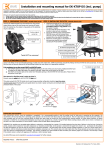
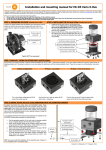
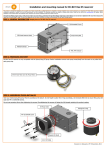
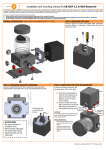
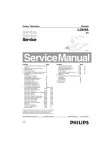
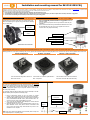
Installation and mounting manual for EK-D5 X-RES CSQ
This product is intended for installation only by expert users. Please consult with a qualified technician for installation. Improper installation may result in damage to your equipment. EK Water Blocks assumes no liability
whatsoever, expressed or implied, for the use of these products, nor their installation. The following instructions are subject to change without notice. Please visit our web site at www.ekwb.com for updates. Before
installation of this product please read important notice, disclosure and warranty conditions printed on the back of the box.
Before you start using this product please follow these basic guidelines:
1. Please carefully read the manual before through before beginning with the installation process!
2. The EK High Flow and EK-PSC type fittings require only a small amount of force to screw them firmly in place since the liquid seal is ensured by the rubber o-ring gaskets.
3. The use of corrosion inhibiting coolants is always recommended for any liquid cooling system.
STEP 1: PREPARING THE PUMP
STEP 2: INSTALLING THE D5 X-RES
Unscrew the ribbed threaded ring that attaches the Laing pump’s
original factory top and the main pump core housing with motor.
Store the original top, the original o-ring gasket and the attaching
ring in a safe place.
Factory original
pump top
1. Install the EK-D5 X-RES on to the pump main motor housing. Make
sure you install EK provided 61x3mm o-ring gasket! Reseat the
gasket if needed.
You can rotate the pump and use it in any direction to best suit your
installation.
2. Secure the EK-D5 X-RES using enclosed M4x16 DIN7380 screws with
the enclosed Allen (hex) key. Do not over tighten the screws as
excessive force may strip the threading.
D5 pump body with
motor
EK-D5 X-RES CSQ
D5 pump body with motor
61x3mm sealing gasket (OR)
Screw M4x16 ISO7380
Twist LEFT to unscrew!
STEP 3 (optional): USING POLYETHER ANTI-VORTEX FOAM:
EK-D5 X-RES CSQ series pump top / reservoir comes preinstalled with EK-D5 X-RES – Anticyclone by default. In case your system suffers from excessive vortex issues, air
bleeding problems or if the pump is sucking in air you may replace the anticyclone with the enclosed polyether foam. There are two ways to use the polyether anti-vortex foam:
Default configuration
PE foam – use whole
PE foam – trim to fit recess
This is the default configuration of EK-D5 XRES series reservoir.
Use the foam as a whole to replace EK-D5 XRES – Anticyclone.
Trim the foam to size to fit into the desired
inlet recess on the EK-D5 X-RES main body.
STEP 4: MOUNT THE EK-D5 X-RES RESERVOIR INTO THE COMPUTER CHASSIS
By default the EK-D5 X-RES ships with EK-D5/DDC Holder. These holders
are meant to be installed directly on the computer chassis. User may need
to drill 2 (two) Φ4mm holes through chassis metal using electric power drill
if there are no appropriate mounting holes available. EK recommends users
to find an appropriate position in your computer chassis to install the EKD5 X-RES pump assembly.
To sucessfully install the EK-D5 X-RES pump/reservoir assembly to the EKD5/DDC Holder please complete the following steps:
1. Find an appropriate position for the unit inside (or perhaps
outside) of your computer chassis; drill mounting holes if needed.
2. Attach the EK-D5/DDC Holder to the computer chassis metal frame
using enclosed M4x6 ISO7380 screws, metal washers and a nut.
Secure the screws using enclosed Allen key 2.5mm.
3. Screw in the four M4 threaded rubber dampers in to base of EK-D5
X-RES pump/reservoir combo unit.
4. Attach the EK-D5 X-RES to the EK-D5/DDC Holder using four (4)
M4x6 DIN7380 screws with plastic washers underneath each
screw. Secure the screws using enclosed Allen key 2.5mm. Your
installation is now complete.
TIP: Some users might find installation of the assembly easier if steps 3 &
4 are completed prior to completing step 2.
Computer chassis
metal plate
M4 rubber damper
M4 nut +
washer
EK-D5/DDC Holder
Screw M4x6
Revision 1.0. Released on 18st of October, 2012.
STEP 5: ATTACHING FITTINGS
EK-D5 X-RES CSQ series reservoir pump combo featured 3 (three) G1/4 threaded opening on the main body of which 2 (two) are inlets and one is outlet (clearly marked with
‘OUT’). EKWB recommends using EK-PSC fittings with the EK-D5 X-RES CSQ series reservoir pump combo units. To ensure that the tubes are securely attached to the
barb/fittings, please use hose clamps or an appropriate substitute.
It is mandatory to use the correct INLET and OUTLET ports:
1. The OUTLET port (pressure port) is the only port that is not recessed into the plastic
housing of the EK-D5 X-RES.
2. The INLET port(s) (suction port) are the two recessed ports with G1/4 threading on the
EK-D5 X-RES front face plane. You may use any of these two ports as an INLET port. It is
necessary to use the enclosed EK-Extender G1/4 underneath the INLET fitting! Please
refer to the picture on the right! Do not forget to close off the unused INLET port
using EK-Plug G1/4!
3. Make sure not to use fittings or barbs with G1/4 thread longer than 5mm! All EK-PSC and
High Flow fittings are compatible!
EK-Plug G1/4
EK-PSC Fitting
TIP: Port on reservoir’s top part is not intended to be used as inlet port. The
aforementioned port should should only be used for connecting this reservoir with
external fill port!
EK-Extender G1/4
IMPORTANT DISCLOSURES:
VERY IMPORTANT NOTICE: Once the installation is completed, it is a recommended practice to test the cooling circuit for leaks prior to powering up the computer. We
recommend a 24 hour leak test prior to powering up the computer. Do not test the water block using tap water pressure. This will rupture the top of the housing and render the
block unusable (and will void your warranty). While all efforts have been made to provide the most comprehensive tutorial possible, EK Water Blocks assumes no liability
expressed or implied for any consequential damage(s) occurring to your equipment as a result of using EK Water Blocks cooling products, either due to errors or omissions on
our part in the above instructions, or due to failure or defect in the EK Water Blocks cooling products.
WARRANTY:Our products are warranted against defects in materials or workmanship for a period of 24 months beginning from the date of delivery to the final user. During this
period, products will be repaired or have parts replaced at our discretion provided that: (I) the product is returned to the agent from whom it was purchased; (II) the product
has been purchased by an end user and has not used for commercial purposes; (III) the product has not been misused, handled carelessly, or used in a manner other than in
accordance with the instructions provided describing its installation and proper use. This warranty does not confer rights other than those expressly set out above and does not
cover any claims for consequential loss or damage. This warranty is offered as an extra benefit and does not affect your statutory rights as a consumer. This warranty is voided
if the product comes in contact with aggressive additives or other improper liquids.
Any other RMA issues can be reported to http://www.ekwb.com/support for further analysis.
(this paragraph is intentionally left blank)
REQUIRED TOOLS
power drill with 4mm drill bit or equivalent (optional)
Revision 1.0. Released on 18st of October, 2012.