1
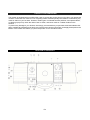
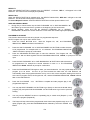
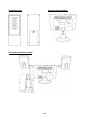
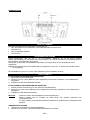
MCU-5301
PLEASE READ THIS USER MANUAL COMPLETELY BEFORE
OPERATING THIS UNIT AND RETAIN THIS BOOKLET FOR
FUTURE REFERENCE.
BITTE LESEN SIE DIE BEDIENUNGSANLEITUNG VOR INBETRIEBNAHME
VOLLSTÄNDIG DURCH UND BEWAHREN SIE SIE FÜR SPÄTERES
NACHSCHLAGEN AUF.
WARNING
TO PREVENT FIRE OR SHOCK HAZARD, DO NOT USE THIS PLUG WITH AN
EXTENSION CORD, RECEPTACLE OR OTHER OUTLET UNLESS THE BLADES CAN BE
FULLY INSERTED TO PREVENT BLADE EXPOSURE. TO PREVENT FIRE OR SHOCK
HAZARD, DO NOT EXPOSE THIS APPLIANCE TO RAIN OR MOISTURE.
The lightning flash with arrowhead symbol, within
an equilateral triangle is intended to alert the user
to the presence of uninsulated dangerous voltage
within the product is endosure that may be of
sufficient magnitude to constitute a risk of electric
shock to persons.
CAUTION:
TO REDUCE THE RISK OF
ELECTRICSHOCK, DO NOT REMOVE COVER
( OR BACK ) . NO USER-SERVICEABLE PARTS
INSIDE. REFERSERVICING TO QUALIFIED
SERVICE PERSONEL.
The exclamation point within an Equilateral
triangel is intended to Alert the user to the
presence of Importand operating and
Maintenance(servicing) instructions In the
literature accomanying the Appliance.
The Caution Marking is located at the back enclosure of the apparatus.
The Rating plate is located at the back enclosure of the apparatus
IMPORTANT SAFETY INSTRUCTIONS
1.
2.
3.
4.
5.
6.
7.
8.
9.
10.
11.
12.
13.
Read these instructions.
Keep these instructions.
Heed all warnings.
Follow all instructions.
Do not use this apparatus near water.
Cleaning-Unplug this product from the wall outlet before cleaning. Do not use liquid cleaners
or aerosol cleaners. Clean only with dry cloth.
Do not block any ventilation openings. Install in accordance with the manufacturer’s
instructions.
Do not place this product on an unstable cart, stand, tripod, bracket, or
table. The product may fall, causing serious injury to a child or adult,
and serious damage to the product. Use only with a cart, stand, tripod,
bracket, or table recommended by the manufacturer, or sold with the
product. Any mounting of the product should follow the manufacturer’s
instructions, and should use a mounting accessory recommended by
the manufacturer. A product and cart combination should be moved with care-quick stops,
excessive force and uneven surfaces may cause the product and cart combination to
overturn.
Do not install near any heat sources such as radiators, heat registers, stoves, or other
apparatus (including amplifiers) that product heat.
Do not defeat the safety purpose of the polarized or grounding-type plug. A polarized plug
has two blades with one wider than the other. A grounding type plug has two blades and a
third grounding prong. The wide blade or the third prong is provided for your safety. If the
provided plug does not fit into your outlet, consult an electrician for replacement of the
obsolete outlet.
Protect the power cord from being walked on or pinched particularly at plugs, convenience
receptacles, and the point where they exit from the apparatus.
Only use attachments/accessories specified by the manufacturer.
Unplug this apparatus during lightening storms or when unused for a long periods of time.
E-1
14.
15.
16.
17.
18.
19.
20.
21.
22.
23.
24.
25.
Refer all servicing to qualified service personnel. Servicing is required when the apparatus
has been damaged in any way, such as power-supply cord or plug is damaged, liquid has
been spilled or objects have fallen into the apparatus, the apparatus has been exposed to
rain or moisture, does not operate normally, or has been dropped.
This appliance shall not be exposed to dripping or splashing water and that no object filled
with liquids such as vases shall be placed on the apparatus.
Do not overload wall outlet. Use only power source as indicated.
Use replacement part as specified by the manufacturer.
The product may be mounted to a wall only if recommended by the manufacturer.
Upon completion of any service or repairs to this product, ask the service technician to
perform safety checks.
Power Sources - This product should be operated only from the type of power source
indicated on the marking label. If you are not sure of the type of power supply to your home,
consult your product dealer or local power company. For products intended to operate from
battery power, or other sources, refer to the operating instruction.
Object and Liquid Entry - Never push objects of any kind into this product through openings
as they may touch dangerous voltage points or short-out parts that could result in a fire or
electric shock. Never spill liquid of any kind on the product.
Damage Requiring Service - Unplug this product from the wall outlet and refer servicing to
qualified service personnel under the following conditions:
a) When the power-supply cord or plug is damaged,
b) If liquid has been spilled, or objects have fallen into the product,
c) If the product has been exposed to rain or water,
d) If the product does not operate normally by following the operating instructions. Adjust
only those controls that are covered by the operating instructions as an improper
adjustment of other controls may result in damage and will often require extensive work
by a qualified technician to restore the product to its normal operation.
e) If the product has been dropped or damaged in any way, and
f) When the product exhibits a distinct change in performance - this indicates a need for
service.
Main plug is used as disconnect device and it should remain readily operable during intended
use. In order to disconnect the apparatus from the mains completely, the mains plug should
be disconnected form the mains socket outlet completely.
Battery shall not be exposed to excessive heat such as sunshine, fire or the like.
Excessive sound pressure from earphones and headphone can cause hearing loss.
CAUTION:
TO PREVENT ELECTRIC SHOCK,
MATCH WIDE BLADE OF AC PLUG TO WIDE SLOT.
FULLY INSERT.
SAVE THESE INSTRUCTIONS
E-2
CAUTION
Follow the advice below for safe operations.
ON PROTECTION AGAINST LASER ENERGY EXPOSURE
•
•
•
•
•
•
As the laser beam used in this compact disc player is harmful to the eyes, do not attempt to disassemble
the casing.
Stop operation immediately if any liquid or solid object should fall into the cabinet.
Do not touch the lens or poke at it. If you do, you may damage the lens and the player may not operate
properly.
Do not put anything in the safety slot. If you do, the laser diode will be ON when the CD door is still open.
If the unit is not to be used for a long period of time, make sure that all power sources are disconnected
from the unit. Remove all batteries from the battery compartment.
This unit employs a laser. The use of controls or adjustment or performance of procedures other than
those specified here may result in exposure to hazardous radiation.
Should any trouble occur, remove the power source and refer servicing to qualified personnel.
COMPLIANCE WITH FCC REGULATIONS
This equipment has been tested and found to comply with the limits for a Class B Digital Device, pursuant to
Part 15 of the FCC Rules. These limits are designed to provide reasonable protection against harmful
interference in a residential installation. This equipment generates, uses and can radiate radio frequency
energy and, if not installed and used in accordance with the instructions, may cause harmful interference to
radio communications. However, there is no guarantee that interference will not occur in a particular
installation. If this equipment does cause harmful interference to radio or television reception, which can be
determined by turning the equipment off and on, the user is encouraged to try to correct the interference by
one or more of the following measures:
- Reorient or relocate the receiving antenna.
- Increase the separation between the equipment and receiver.
- Connect the equipment into an outlet on a circuit different from that to which the receiver is connected.
- Consult the dealer or an experienced radio/TV technician for help.
WARNING
Changes or modifications to this unit not expressly approved by the party responsible for
compliance could void the user's authority to operate the equipment.
E-3
PROTECT YOUR FURNITURE!!
This system is equipped with non-skid rubber ‘feet’ to prevent the product from moving when you operate the
controls. These ‘feet’ are made from non-migrating rubber material specially formulated to avoid leaving any
marks or stains on your furniture. However certain types of oil based furniture polishes, wood preservatives,
or cleaning sprays may cause the rubber ‘feet’ to soften, and leave marks or a rubber residue on the
furniture.
To prevent any damage to your furniture we strongly recommend that you purchase small self-adhesive felt
pads, available at hardware stores and home improvement centers everywhere, and apply these pads to the
bottom of the rubber ‘feet’ before you place the product on fine wooden furniture.
LOCATION OF CONTROLS
E-4
1.
2.
3.
4.
5.
6.
7.
8.
9.
10.
11.
12.
13.
14.
TUNING CONTROL
BAND SELECTOR (AM/FM/FM STEREO)
FUNCTION SELECTOR (AUX/RADIO/CD/ALARM)
CD DOOR (OPEN/CLOSE)
LCD DISPLAY
VOLUME CONTROL (-) BUTTON
VOLUME CONTROL (+) BUTTON
POWER ON/OFF BUTTON
TIME BUTTON
ALARM SET BUTTON
HOUR BUTTON
ALARM ON/OFF
MIN.(MINUTE) BUTTON
STEREO HEADPHONE JACK
18. SKIP/SEARCH FORWARD BUTTON
19. STOP BUTTON
20. SKIP/SEARCH BACKWARD BUTTON
21. REPEAT/PROG(PROGRAM) BUTTON
22. REMOTE SENSOR
23. ALBUM BUTTON
24 SPEAKERS
25 HANGER HOLES
26 FOLD OUT SPEAKER STANDS
27 BATTERY COMPARTMENT DOOR
28 FM ANTENNA
29 STAND
30 SPEAKER HANGER TABS
31 CD/USB/SD SHIFT
15. AUX IN JACK
32 USB SLOT
16. DOOR
33 SD CARD SLOT
17. PLAY/PAUSE BUTTON
INSTALLING THE STAND
REMOTE CONTROL UNIT
E-5
INSTALLING THE SPEAKERS
WALL MOUNTING
IMPORTANT NOTES
E-6
Avoid installing the unit in locations described below:
• Places exposed to direct sunlight or close to heat radiating appliances such as electric heaters.
• Dusty places.
• Places subject to constant vibration.
• Humid or moist places.
POWER SOURCES
This Music System operates on 220V~ 50Hz. Do not attempt to operate the radio on any other power source.
You could cause damage to the unit and void your warranty.
Please be sure the power outlet you plug this unit into is working and receives constant (unswitched) power.
The System is also equipped with a battery back-up system for the clock that is powered by 2 pieces of “AA”
(UM-3) size batteries (Not included).
Note: The batteries may be installed as a backup option to maintain the clock time if electrical power fails. In
the event of power outage, the clock time will not be displayed, however the clock will continue to
operate so current time will be maintained.
The remote control unit it is designed to operate on 2 x “AAA” (UM-4) size batteries (Not included).
GETTING STARTED
A. INSTALLING BACK UP BATTERIES INTO THE SYSTEM
1. Remove the BATTERY DOOR.
2. Install 2 x “AA” (UM-3) batteries (not included) according to the polarity diagram inside the battery
compartment.
3. Close the BATTERY DOOR.
B. INSTALLING BATTERIES INTO THE REMOTE CONTROL
1. Turn over the remote control, and remove the battery door.
2. Install 2 x “AAA” (UM-4) size batteries (not included) according to the polarity diagram inside the battery
compartment.
3. Close the battery door.
IMPORTANT:
Be sure that the batteries are installed correctly.
Wrong polarity may damage the unit and void the warranty.
For best performance and longer operating time, we recommend the use of good quality
alkaline-type batteries.
BATTERY CARE
I.
Do not mix old and new batteries.
II. Do not mix alkaline, standard (carbon-zinc) or rechargeable (nickel-cadmium) batteries.
III. If the unit is not to be used for an extended period of time, remove the battery. Old or leaking battery can
cause damage to the unit and may void the warranty.
IV. Do not dispose of batteries in fire, batteries may explode or leak.
1.
2.
3.
AC OPERATION
Plug the AC POWER CORD into a 110V AC ~ 60Hz outlet.
Press the POWER BUTTON to turn the unit on. The LCD DISPLAY will light up.
To turn off the unit press the POWER BUTTON again. The LCD DISPLAY will go “Off”.
USING THE REMOTE CONTROL CORRECTLY
Note: The Remote Control is only for operating the CD Player.
z
Point the Remote Control at the Infrared SENSOR (IR) (#22) located on the front of the System.
z
The functions of the remote buttons are the same as the corresponding controls on the main unit.
z
The performance of the Infrared SENSOR may be degraded causing unreliable operation if there is
strong ambient light source in the same room.
z
The recommended effective distance for remote operation is about 10-15 feet.
E-7
SETTING THE CLOCK
The clock has to be set before using the system for the first time. When you connect the System to the AC
outlet for the first time the clock display will show "12:00" and will need to be set. For example set the clock
time at 7:30 AM.
1. Press and hold the TIME button and repeatedly press the HOUR button to set the correct Hour.
2. Press and hold the TIME button and repeatedly press the MIN button to set the correct Minute.
NOTE
There is a PM INDICATOR located on the left-hand side of the clock display. Be sure to
observe the PM indicator when setting the time to make sure the time is set correctly for AM
or PM. If the PM indicator appears, the time displayed is "PM". If the PM indicator is not
shown, the time displayed is "AM ".
1.
2.
3.
4.
5.
6.
RADIO OPERATION
To turn the radio on, press the POWER BUTTON once. The LCD DISPLAY lights up.
Slide the FUNCTION SELECTOR to the “RADIO” position.
Slide the BAND SELECTOR to your desired band (AM, FM or FM ST.).
Turn the TUNING CONTROL to your desired radio station. The radio frequency appears in the LCD
DISPLAY.
Adjust the sound level by pressing the VOLUME buttons (+/-).
To turn off the radio, press the POWER BUTTON again. The LCD DISPLAY will go
“off”.
FM STEREO RECEPTION
With the BAND SELECTOR in the “FM ST” position, the FM Stereo Indicator “ST” will light
up when listening to a strong station that is broadcasting in “Stereo”.
Slide the BAND SELECTOR to the FM position when the FM stereo reception is weak. The
reception may be improved, but the sound is monaural (MONO).
TIPS FOR BEST RECEPTION
AM – The AM antenna is located inside the cabinet of the main unit. If AM reception is weak, change the
position of cabinet until the internal antenna picks up the strongest signal,
FM – During FM reception, always keep the FM Wire Antenna fully extended. If FM reception is weak try
repositioning the FM Wire Antenna until you find the strongest signal.
CD PLAYER OPERATION
NOTE: This unit not only plays commercial compact discs but also self-compiled CD-RW discs.
• Because of non-standardized format definition/production of CD-R/RW, playback quality &
performance is not guaranteed.
• Manufacturer is not responsible for the playability of CD-R/RW due to recording conditions such as
PC performance, writing software, media properties etc.
• Do not attach a label or seal to either side of the CD-R/RW disc. It may cause a malfunction.
PLAY MODE
1. Turn on the Music System by pressing the POWER BUTTON. The LCD DISPLAY goes “On”.
2. Slide the FUNCTION SELECTOR to the “CD” position. Flashing “- -” will be displayed in the LCD
3.
4.
5.
6.
DISPLAY while the Player is reading the table of contents (TOC) on the CD. “no” will be displayed if no
disc is loaded.
Open the CD DOOR by pressing the CD DOOR at the “OPEN/CLOSE” mark located on the CD door,
load a CD with the label side facing upward and then close the CD door.
Playback will start from track 1 once the Player has finished reading the TOC. The PLAY/PAUSE
INDICATOR “f” will appear steadily on the LCD DISPLAY.
While playing, press the PLAY/PAUSE BUTTON to pause, the PLAY/PAUSE INDICATOR “f” will
flash. Press the PLAY/PAUSE BUTTON again to resume playing.
Adjust the VOLUME BUTTONS (+/-) to the desired volume level.
REPEAT MODE
E-8
REPEAT 1
When the REPEAT BUTTON is pressed once, the REPEAT 1 Indicator, ‘REP 1’, will appear in the LCD
DISPLAY. The current track will be played repeatedly
REPEAT ALL
When the REPEAT BUTTON is pressed twice, the REPEAT INDICATOR, “REP ALL” will light in the LCD
DISPLAY. The whole disc will be played continuously.
To Cancel Repeat Function: Press the REPEAT BUTTON until the repeat indicator is off.
SKIP AND SEARCH MODE
1. During Play or Pause mode, tap the SKIP FORWARD "" or SKIP BACKWARD ""
BUTTON to go to the next track or go back to the beginning of the current track.
2. During playback, press and hold the SEARCH FORWARD "" or SEARCH
BACKWARD "" Buttons to search within the current track with audible high speed playback.
PROGRAM PLAY MODE
This function allows music tracks to be played in a programmed sequence.
NOTE: Program can only be set in STOP mode.
1.
Press the PROG BUTTON once. Both the Program No, “01”, and PROGRAM
INDICATOR, “PROG” will flash in the DISPLAY.
2.
3.
Press the SKIP FORWARD "" or SKIP BACKWARD "" BUTTON to select the track
to be programmed. For example track no. 5 is selected. The PROGRAM INDICATOR
“PROG” will flash to prompt for confirmation.
Press the PROGRAM BUTTON again to store the selection. The Program No. will
advance to “02” and flash together with the PROGRAM INDICATOR, “PROG”, to prompt for the next
input.
4.
Press the SKIP FORWARD "" or SKIP BACKWARD "" BUTTON to select the track to
be programmed. For example the second selection is track no. 8. The PROGRAM
INDICATOR “PROG” will flash to prompt for confirmation.
5.
Press the PROGRAM BUTTON again to store your second selection. You may repeat steps #2 to #4 to
program up to 20 tracks. As soon as you have entered the 20th track, the LCD DISPLAY will
automatically show the programmed tracks one by one in their correct sequence starting from the first.
At the end of program review, the Program No.,“01”, and the PROGRAM INDICATOR, “PROG” will both
flash in the LCD DISPLAY.
6.
Press the PLAY/PAUSE programmed sequence.
7.
You may tap SKIP FORWARD "" BUTTON to go directly to other tracks ahead during
program play and press SKIP BACKWARD "" BUTTON twice to go back to previous
track(s).
8.
You may use the REPEAT function to repeatedly play a certain track (Repeat 1) or all
tracks in the program (Repeat All).
9.
The Player will stop when all the programmed tracks have been played through once. To
replay program play, press the PROGGRAM Button followed by the PLAY/ PAUSE Button.
BUTTON to complete and start program play in the
E-9
10.
11.
12.
To cancel program play, press the STOP BUTTON twice while program play is running or open the
CD DOOR in stop mode.
Press ALBUM Bottom to choose the album. Press CD/USB/SD SHIFT BOTTM to change the sound
source.
To turn the Player off, press the POWER BUTTON. The LCD DISPLAY backlight will go “off”.
AUXILIARY (AUX) OPERATION
You can play other music sources (iPod, MP3 player or other digital audio player) through the speakers of this
System by connecting the AUX IN Jack to your external player’s LINE OUT jack or headphone jack.
1. The AUX IN and PHONES JACKS are covered by the DOOR (#16). Slide the DOOR downwards
2. Plug one end of an audio cable into the AUX IN Jack and the other end of the cable to the line out or
headphone jack of your digital audio player.
3. Set the FUNCTION SELECTOR to the “AUX” position.
4. Press the POWER BUTTON to turn on the System. The LCD DISPLAY goes “On”.
5. Play your digital audio player.
6. Adjust the VOLUME on the external audio player and the System until you reach a comfortable listening
level.
7. Turn the System and your audio player off when you have finished listening and then unplug the audio cable.
USING HEADPHONES (NOT INCLUDED)
Inserting the plug of your headphones into the System’s PHONES JACK will enable you to listen to the CD,
radio or other music sources in private. When using headphones, the speakers will be automatically
disconnected.
ALARM OPERATION
SETTING THE WAKE UP TIME
1. Press and hold the AL SET BUTTON and repeatedly press the HOUR BUTTON to set the correct wake
up Hour.
2. Press and hold the AL SET BUTTON and repeatedly press the MINUTE BUTTON to set the correct
wake up Minute.
NOTE
There is a PM INDICATOR located in the left-hand side of the clock display. Be sure to observe the PM
indicator when setting the alarm to make sure the alarm time is set correctly for AM or PM. If the PM
indicator appears in LCD DISPLAY, the alarm will be "PM". If not, the alarm time will be "AM".
TURNING ALARM FUNCTION ON/OFF
1. Press the AL.ON/OFF Button once to turn the alarm function on. The ALARM INDICATOR, “ ” will
appear in the DISPLAY.
2. Press the AL.ON/OFF Button again to turn the alarm function off. The ALARM INDICATOR, “ ” will
disappear in the DISPLAY.
CHECKING THE WAKE UP TIME
Whenever you want to check the wake up time, simply press the AL SET BUTTON. The display will change
from current time to wake up time. Release the AL SET BUTTON to return to current time.
WAKE TO RADIO
1. Press the POWER BUTTON to turn on the System. The LCD DISPLAY lights up.
2. Press the AL.ON/OFF Button once to turn on the alarm function. The ALARM
INDICATOR, , will light up.
E-10
3. Slide the FUNCTION SELECTOR to “RADIO” and the BAND SELECTOR to AM, FM or FM ST as
desired.
4. Tune to your desired station, and adjust the volume level that you wish to hear when the wake up time is
reached then press the POWER BUTTON again to turn off the System. Reconfirm the wake up time
setting by tapping the AL SET BUTTON.
5. At the selected wake up time the radio will turn 'On' and remain ‘On’ until it is turned off.
6. If you do not want the alarm to turn the radio on the following day, press the AL.ON/OFF Button again to
turn off the alarm function. The ALARM INDICATOR, , goes off.
WAKE TO CD
1. Press the POWER BUTTON to turn on the System. The LCD DISPLAY lights up.
2. Press the AL.ON/OFF Button once to turn on the alarm function. The ALARM INDICATOR will light up.
3. Slide the FUNCTION SELECTOR to “CD” to start playback.
4. Adjust the volume level that you wish to hear when the wake up time is reached then press the POWER
BUTTON again to turn off the System.
5. At the selected wake up time the radio will turn 'On' and remain ‘On’ until it is turned off.
6. If you do not want the alarm to turn the System on the following day, press the AL.ON/OFF Button again
to turn off the alarm function. The ALARM INDICATOR, , goes off.
WAKE TO ALARM
1. Set the FUNCTION SELECTOR to the “ALARM” position.
2. At the selected wake up time the alarm will sound for 3 minutes and turn off automatically.
3. If you do not want the alarm to turn on the following day, press the AL.ON/OFF Button again to turn off
the alarm function. The ALARM INDICATOR, , will go off.
CARE AND MAINTENANCE
1.
2.
3.
4.
Clean your unit with a damp (never wet) cloth. Solvent or detergent should never be used.
Avoid leaving your unit in direct sunlight or in hot, humid or dusty places.
Keep your unit away from heating appliances and sources of electrical noise such as fluorescent lamps
or motors.
If drop-outs or interruptions occur in the music during CD play, or if the CD
fails to play at all, its bottom surface may require cleaning. Before playing,
wipe the disc from the center outwards with a good soft cleaning cloth.
TROUBLESHOOTING GUIDE
If you experience difficulties in the use of this music system please check the following or call
1 800 777 5331 for Customer Service and Support.
Symptom
Noise or sound distorted
on AM or FM broadcast
AM or FM no sound
CD player will not play
Possible Cause
- Station not tuned properly for AM or
FM.
- FM: FM Wire antenna is not
extended.
- AM: The bar antenna is not positioned
correctly
- Unit not in “RADIO” function mode.
- Volume set at minimum
- Unit not in CD function mode.
- CD is not loaded properly.
- If the CD is self-compiled, the media
used may not be compatible with the
player.
E-11
Solution
- Retune the AM or FM broadcast
station.
- FM: Extend the FM Wire antenna.
- AM: Reposition the unit until the best
reception is obtained.
- Slide FUNCTION SELECTOR to
“RADIO” position.
- Increase Volume.
- Select CD function mode.
- Load CD with label side up.
- Use better quality blank media and
retest.
CD skips while playing
- Disc is dirty or scratched.
Intermittent sound from
CD player
- Dirty or defective disc
- Dirty pick up lens
Sound appears
distorted at high volume
levels
No Alarm
- Player is subject to excessive shock
or vibration
- Volume control is set to maximum.
- Wipe CD with clean cloth or use
another disc.
- Clean or replace the defective disc.
- Use a CD lens cleaning disc to clean
the lens.
- Relocate the player away from
shock or vibration.
- Adjust Volume Control to a lower
comfortable level.
Check that Alarm indicator “ ” appears in
the Display.
Make sure AM or PM is set correctly.
Alarm is not activated
Incorrect Alarm time
Electric and electronic equipment contains materials, components and
substances that can be hazardous to your health and the environment, if
the waste material (discarded electric and electronic equipment) is not
handled correctly.
Electric and electronic equipment is marked with the crossed out trash
can symbol, seen below. This symbol signifies that electric and electronic
equipment should not be disposed of with other household waste, but
should be disposed of separately.
All cities have established collection points, where electric and electronic
equipment can either be submitted free of charge at recycling stations
and other collection sites, or be collected from the households. Additional
information is available at the technical department of your city.
ALL RIGHTS RESERVED
COPYRIGHT DENVER ELECTRONICS A/S
WWW.DENVER-ELECTRONICS.COM
Imported by:
Inter Sales A/S
Stavneagervej 22
8250 Egaa
Denmark
E-12
WARNUNG
ZUR VERMEIDUNG VON FEUER UND STROMSCHLAG SCHLIEßEN SIE DAS
GERÄT NUR AN EINER GEERDETEN STECKDOSE AN. ZUR VERMEIDUNG
VON FEUER UND STROMSCHLAG SETZEN SIE DAS GERÄT NICHT REGEN
ODER FEUCHTIGKEIT AUS.
VORSICHT
Der Blitz im gleichseitigen
Dreieck weist auf gefährliche
Hochspannung im Gerät hin.
STROMSCHLAGGEFAHR
NICHT ÖFFNEN
WARNUNG: ZUR
VERMEIDUNG VON
STROMSCHLAG ÖFFNEN SIE
DAS GERÄTEGEHÄUSE
NICHT. ES BEFINDEN SICH
KEINE VOM VERBRAUCHER
WARTBAREN KOMPONENTEN
IM GERÄT. WENDEN SIE SICH
STETS AN EINEN
AUTORISIERTEN
KUNDENDIENST.
Das Ausrufungszeichen im
gleichseitigen Dreieck weist auf
wichtige Informationen hin.
Die Hinweise befinden sich auf der Geräterückseite.
Das Typenschild befindet sich auf der Geräterückseite.
WICHTIGE SICHERHEITSHINWEISE
1.
2.
3.
4.
5.
6.
7.
8.
9.
10.
11.
12.
13.
14.
Lesen Sie alle Anleitungen.
Bewahren Sie diese Anleitungen.
Lesen Sie alle Warnhinweise.
Befolgen Sie alle Anleitungen.
Benutzen Sie das Gerät nicht in unmittelbarer Nähe von Wasser.
Reinigung – Ziehen Sie vor dem Reinigen des Geräts den Netzstecker. Benutzen Sie keine
Flüssig- oder Sprühreiniger. Reinigen Sie das Gerät nur mit einem trockenen Tuch.
Blockieren Sie keine Lüftungsschlitze. Installieren Sie das Gerät entsprechend der
Anleitungen des Herstellers.
Stellen Sie das Gerät nicht auf einen unstabilen Wagen, Aufsteller,
Tisch, eine Halterung oder ein Stativ. Das Produkt kann herunterfallen
und Personen verletzen oder beschädigt werden. Benutzen Sie das
Gerät nur mit einem Wagen, Aufsteller, Tisch, einer Halterung oder
einem Stativ, wie vom Hersteller empfohlen oder mit dem Gerät
verkauft. Zur Installation befolgen Sie unbedingt die Hinweise des
Herstellers. Bewegen Sie einen Wagen mit dem Gerät vorsichtig.
Installieren Sie das Gerät nicht in unmittelbarer Nähe von Wärmequellen wie Heizungen,
Heizkörpern, Öfen oder sonstigen Wärme erzeugenden Geräten (einschließlich Verstärker).
Schließen Sie das Gerät nur an einer geerdeten Steckdose an.
Schützen Sie das Netzkabel, damit nicht darauf getreten wird und es nicht eingeklemmt wird,
insbesondere am Netzstecker und am Austritt des Kabels am Gerät.
Benutzen Sie nur vom Hersteller empfohlenes Zubehör.
Ziehen Sie während eines Gewitters und bei längerer Nichtbenutzung den Netzstecker.
Wenden Sie sich mit Reparaturen stets an den autorisierten Kundendienst. Eine Wartung ist
erforderlich, wenn Gerät, Netzkabel oder Stecker beschädigt wurden, Flüssigkeiten oder
DE-1
15.
16.
17.
18.
19.
20.
21.
22.
23.
24.
25.
Fremdkörper in das Gerät eingedrungen sind, das Gerät Regen oder Feuchtigkeit ausgesetzt
war, nicht wie gewöhnlich funktioniert oder fallen gelassen wurde.
Setzen Sie das Gerät nicht Spritzwasser oder Tropfwasser aus und stellen Sie keine mit
Wasser gefüllten Gegenstände auf dem Gerät ab.
Überlasten Sie Steckdosen nicht. Benutzen Sie nur die spezifizierte Spannungsversorgung.
Benutzen Sie ausschließlich vom Hersteller spezifizierte Ersatzteile.
Bei Wandmontage beachten Sie bitte die Anleitungen des Herstellers.
Lassen Sie vom Kundendienst nach einer Reparatur stets eine Sicherheitsüberprüfung
durchführen.
Spannungsversorgung – Schließen Sie das Gerät nur an einer Spannungsversorgung an,
wie auf dem Typenschild angegeben. Wenden Sie sich im Zweifel an Ihren Fachhändler oder
Ihr Versorgungsunternehmen. Für batteriebetriebene Geräte beachten Sie bitte die Angaben
in der Bedienungsanleitung.
Flüssigkeiten und Fremdkörper im Gerät – Führen Sie keine Fremdkörper in das Gerät ein,
das kann zu Feuer oder Stromschlag führen. Verschütten Sie keine Flüssigkeiten auf dem
Gerät.
Schäden, die eine Reparatur verlangen – Ziehen Sie den Netzstecker und wenden Sie sich
unter nachstehenden Bedingungen an den Kundendienst:
a) Das Netzkabel oder der Stecker ist beschädigt;
b) Flüssigkeiten wurden auf dem Gerät verschüttet oder Fremdkörper sind eingedrungen;
c) Das Gerät war Regen oder Feuchtigkeit ausgesetzt;
d) Das Gerät lässt sich nicht entsprechend der Bedienungsanleitung betreiben;
e) Das Gerät wurde fallen gelassen oder ist beschädigt;
f) Das Gerät funktioniert nicht wie gewöhnlich.
Der Netzstecker dient dem vollständigen Abtrennen des Geräts vom Stromnetz und muss
jederzeit frei zugänglich sein.
Setzen Sie Batterien nicht direkter Sonneneinstrahlung, Hitze oder Feuer aus.
Überhöhter Schalldruck von Kopfhörern kann zu Hörschäden führen.
VORSICHT:
ZUR VERMEIDUNG VON STROMSCHLAG MUSS DER
NETZSTECKER VOLLSTÄNDIG IN DER STECKDOSE STECKEN.
AC Outlet
AC Plug
Steckdose
Netzstecker
DE-2
BEWAHREN SIE DIE BEDIENUNGSANLEITUNG AUF
VORSICHT
KLASSE 1 LASERPRODUKT
VORSICHT
UNSICHTBARE LASERSTRAHLUNG,
WENN GERÄT GEÖFFNET UND
SICHERHEITSMECHANISMEN
UMGANGEN.
NICHT IN DEN LASERSTRAHL
BLICKEN.
Dieses Gerät enthält einen Laser mit geringer Leistung.
CLASS 1 LASER PRODUCT
APPAREIL LASER DE CLASSE 1
PRODUCTO LASER DE CLASE 1
Beachten Sie alle Sicherheitshinweise.
HINWEISE ZUM SCHUTZ VOR LASERSTRAHLUNG
•
•
•
•
•
•
Die Laserstrahlung in diesem CD-Player ist schädlich für die Augen, öffnen Sie das Gerätegehäuse nicht.
Ziehen Sie den Netzstecker, wenn Flüssigkeiten oder Fremdkörper in das Gerät eingedrungen sind.
Berühren Sie nicht die Laserlinse, das kann zu Fehlfunktionen führen.
Umgehen Sie den Sicherheitsmechanismus nicht. Dadurch bleibt der Laser eingeschaltet, obwohl das
Gerät geöffnet ist.
Überbeanspruchen Sie das Gerät nicht, ziehen Sie nach Gebrauch stets den Netzstecker und
entnehmen Sie die Batterien.
Dieses Gerät arbeitet mit einem Laser. Benutzen Sie die Bedienelemente nur, wie in dieser
Bedienungsanleitung beschrieben und nehmen Sie keine weitergehenden Einstellungen vor, um sich vor
gefährlicher Strahlung zu schützen.
Bei Problemen ziehen Sie bitte den Netzstecker und wenden Sie sich an den autorisierten Kundendienst.
FCC-HINWEISE
Dieses Gerät wurde gemäß Teil 15 der FCC-Bestimmungen getestet und entspricht den Grenzwerten für ein
Digitalgerät der Klasse B. Die FCC-Grenzwerte der Klasse B sollen einen angemessenen Schutz vor
schädlichen Störungen bei Aufstellung in einer Wohngegend gewährleisten. Dieses Gerät erzeugt und
verwendet Hochfrequenzenergie und kann diese abstrahlen. Wird es nicht gemäß den Angaben des
Herstellers installiert und betrieben, kann es sich störend auf den Rundfunk- und Fernsehempfang auswirken.
Es besteht jedoch keine Gewähr, dass bei einer bestimmten Installation keine Störungen auftreten. Sollte
dieses Gerät Störungen des Radio- und Fernsehempfangs verursachen (was durch Ein- und Ausschalten
des Geräts feststellbar ist), wird der Benutzer aufgefordert, die Störungen durch eine oder mehrere der
folgenden Maßnahmen zu beheben:
-
Richten Sie die Empfangsantenne neu aus, oder stellen Sie sie an einem anderen Ort auf.
Vergrößern Sie den Abstand zwischen Gerät und Empfänger.
Schließen Sie das Gerät an eine andere Steckdose an, so dass das Gerät und der Empfänger an
verschiedene Stromkreise angeschlossen sind.
Wenden Sie sich für weitere Vorschläge an Ihre Verkaufsstelle oder einen Kundendienstvertreter.
WARNUNG
Nicht genehmigte Änderungen oder Modifikationen an diesem Gerät können die Berechtigung des
Benutzers zum Betrieb dieses Geräts ungültig machen.
SCHÜTZEN SIE IHRE MÖBEL
Dieses System ist mit rutschfesten Gummifüßen ausgestattet. Sie sind aus einem Material, das keine
Verfärbungen Ihrer Möbel verursacht. Bestimmte Sorten ölbasierter Möbelpolituren, Holzschutzmittel und
Reinigungssprays können jedoch zum Aufweichen des Materials führen, was dann Rückstände auf den
Möbeln hinterlässt.
Zur Vermeidung von Schäden an Ihren Möbeln empfehlen wir, kleine selbstklebende Filzplättchen zu
benutzen, die Sie in jedem Baumarkt erwerben können.
DE-3
BEDIENELEMENTE UND FUNKTIONEN
1.
2.
3.
4.
5.
6.
7.
8.
9.
10.
11.
12.
13.
14.
15.
16.
SENDERWAHL
BANDUMSCHALTER (AM/FM/FM
STEREO)
FUNKTIONSUMSCHALTER
(AUX/RADIO/CD/ALARM)
CD-LAUFWERK (ÖFFNEN/SCHLIEßEN)
LCD-DISPLAY
LAUTSTÄRKE (-)
LAUTSTÄRKE (+)
EIN/AUS
UHRZEIT
ALARM EINSTELLEN
STUNDEN EINSTELLEN
ALARM EIN/AUS
MINUTEN EINSTELLEN
STEREO-KOPFHÖRERBUCHSE
AUX-IN BUCHSE
KLAPPE
17.
18.
19.
20.
21.
22.
23.
24
25
26
27
28
29
30
31
32
33
DE-4
WIEDERGABE/PAUSE
SKIP/SUCHE VORWÄRTS
STOPP
SKIP/ SUCHE RÜCKWÄRTS
WIEDERHOLUNG/PROGRAMM
SENSOR FERNBEDIENUNG
ALBUM
LAUTSPRECHER
WANDAUFHÄNGUNG
AUSKLAPPBARE AUFSTELLER
BATTERIEFACH
UKW-WURFANTENNE
AUFSTELLER
BEFESTIGUNG LAUTSPRECHER
CD/USB/SD UMSCHALTUNG
USB-PORT
SD-KARTENLESER
AUFSTELLER MONTIEREN
FERNBEDIENUNG
LAUTSPRECHER INSTALLIEREN
DE-5
WANDMONTAGE
WICHTIGE HINWEISE
Stellen Sie das Gerät nicht in folgenden Umgebungen auf:
• Orte, die direkter Sonneneinstrahlung oder Wärmequellen ausgesetzt sind.
• Staubige Orte.
• Orte mit ständiger Vibration.
• Feuchte Orte.
SPANNUNGSVERSORGUNG
Dieses Musiksystem wird mit 220 V~ 50 Hz betrieben. Betreiben Sie es mit keiner anderen
Spannungsversorgung, um das Gerät nicht zu beschädigen; Sie verlieren außerdem Ihre Garantieansprüche.
Die Steckdose muss dauerhaft versorgt sein.
Das System ist ebenfalls mit zwei Batterien (AA/UM3) zur Gangreserve der Uhr ausgestattet (nicht
mitgeliefert).
Hinweis: Die Batterien dienen bei Netzausfall als Gangreserve für die Uhr. In diesem Fall wird die Uhrzeit
nicht angezeigt.
Die Fernbedienung wird von 2 x AAA (UM-4) Batterien (nicht mitgeliefert) versorgt.
ERSTE SCHRITTE
A. BATTERIEN ZUR GANGRESERVE EINSETZEN
1. Öffnen Sie das BATTERIEFACH.
2. Setzen Sie 2 x AA (UM-3) Batterien (nicht mitgeliefert) mit korrekter Polarität ein, wie im Batteriefach
angegeben.
3. Schließen Sie das BATTERIEFACH wieder.
B. BATTERIEN IN DIE FERNBEDIENUNG EINSETZEN
1. Drehen Sie die Fernbedienung um und öffnen Sie das Batteriefach.
2. Setzen Sie 2 x AAA (UM-4) Batterien (nicht mitgeliefert) mit korrekter Polarität ein, wie im Batteriefach
angegeben.
3. Schließen Sie das Batteriefach wieder.
WICHTIG:
Achten Sie darauf, dass die Batterien korrekt eingesetzt sind.
Falsche Polarität kann zu Schäden am Gerät führen; Sie verlieren außerdem Ihre
Garantieansprüche
Für beste Leistung und lange Nutzungsdauer empfehlen wir die Benutzung hochwertiger AlkaliBatterien.
HINWEISE ZU BATTERIEN
I.
Mischen Sie nicht frische und erschöpfte Batterien.
II. Mischen Sie nicht Alkali- und Standard (Zink/Kohle) Batterien und Akkus.
DE-6
III. Bei längerer Nichtbenutzung entnehmen Sie bitte die Batterien. Alte Batterien können auslaufen und das
Gerät beschädigen; Sie verlieren außerdem Ihre Garantieansprüche.
IV. Verbrennen Sie Batterien nicht, sie können explodieren.
1.
2.
3.
NETZBETRIEB
Schließen Sie das NETZTEIL an einer 110 V AC~ 60 Hz Steckdose an..
Drücken Sie EIN/AUS, um das Gerät einzuschalten. Das LCD-DISPLAY leuchtet auf.
Zum Ausschalten des Geräts drücken Sie erneut EIN/AUS. Das LCD-DISPLAY erlischt.
BENUTZUNG DER FERNBEDIENUNG
Hinweis: Die Fernbedienung steuert nur den CD-Player.
Richten Sie die Fernbedienung auf den IR-SENSOR (22) vorn auf dem System aus.
Die Funktionen der Fernbedienung entsprechen den Tasten auf dem Gerät.
Die Leistung des IR-SENSORS lässt bei starkem Lichteinfall nach.
Die Reichweite der Fernbedienung beträgt 3 bis 5 m.
UHRZEIT EINSTELLEN
Stellen Sie die Uhrzeit ein, bevor Sie das System in Betrieb nehmen. Bei erstem Anschluss wird „12:00“ als
Uhrzeit angezeigt. Zum Einstellen (beispielsweise 7:30) gehen Sie wie folgt vor.
1. Halten Sie TIME gedrückt und drücken Sie mehrfach HOUR, um die Stunden der
Uhrzeit einzustellen.
2. Halten Sie TIME gedrückt und drücken Sie mehrfach MIN, um die Minuten der Uhrzeit
einzustellen.
HINWEIS
Auf der linken Seite der Uhrzeitanzeige haben Sie die PM-ANZEIGE. Sie leuchtet für die 12-Stundenanzeige
nachmittags, für die Vormittagsstunden ist sie erloschen.
1.
2.
3.
4.
5.
6.
RADIO
Zum Einschalten des Radios drücken Sie einmal EIN/AUS. Das LCD-DISPLAY leuchtet auf.
Schieben Sie den FUNKTIONSUMSCHALTER auf „RADIO“.
Schieben Sie den Bandumschalter auf das gewünschte Frequenzband (AM, FM (UKW)
oder FM ST. (UKW Stereo)).
Drehen Sie die SENDERWAHL, bis Sie den gewünschten Radiosender gefunden
haben. Die Frequenz wird im LCD-DISPLAY angezeigt.
Drücken Sie VOLUME (+/-) zum Einstellen der Lautstärke.
Zum Ausschalten des Radios drücken Sie wieder EIN/AUS. Das LCD-DISPLAY erlischt.
UKW STEREO
Mit dem BANDUMSCHALTER auf „FM ST“ leuchtet die UKW-Stereoanzeige „ST“, wenn der eingestellte
Sender stark genug in Stereo empfangen wird.
Schieben Sie den BANDUMSCHALTER auf „FM“, wenn der Empfang schwach ist. Sie empfangen den
Sender dann in Mono.
TIPPS FÜR BESTEN EMPFANG
MW – Die MW-Antenne ist im Gerät eingebaut. Bei schwachem Empfang richten Sie bitte das Gerät aus.
UKW – Wickeln Sie die UKW-Wurfantenne vollständig ab. Bei schwachem Empfang richten Sie die Antenne
neu aus.
CD-PLAYER
HINWEIS: Dieses Gerät kann neben gekauften CDs auch selbstgebrannte CD-RWs wiedergeben.
• Aufgrund unterschiedlicher Formate bei CD-R/RW kann die Wiedergabe nicht garantiert werden.
• Der Hersteller ist nicht verantwortlich, wenn CD-R/RW aufgrund der Aufnahmebedingungen wie PCLeistung, Brennersoftware, Medieneigenschaften usw. nicht abgespielt werden können.
• Bringen Sie keine Aufkleber auf CD-R/RWs an, das kann zu Fehlfunktionen führen.
WIEDERGABE
1. Drücken Sie EIN/AUS, um das Musiksystem einzuschalten. Das LCD-DISPLAY leuchtet auf.
DE-7
2. Schieben Sie den FUNKTIONSUMSCHALTER auf „CD“. „- -“ blinkt im LCD-DISPLAY, während der
Player die Inhalte der CD liest. „no“ wird während des Ladens angezeigt.
3. Öffnen Sie das CD-LAUFWERK, indem Sie auf das CD-LAUFWERK im Bereich
„OPEN/CLOSE“ drücken, laden Sie eine CD mit dem Aufdruck nach oben und schließen Sie das CDLaufwerk wieder.
4. Die Wiedergabe beginnt ab Track 1. Die ANZEIGE WIEDERGABE/PAUSE leuchtet im LCD-DISPLAY.
, um die Wiedergabe zu
5. Während der Wiedergabe drücken Sie WIEDERGABE/PAUSE
blinkt.
Drücken
Sie
erneut
unterbrechen,
die
ANZEIGE
WIEDERGABE/PAUSE
, um die Wiedergabe von gleicher Stelle aus fortzusetzen.
WIEDERGABE/PAUSE
6. Mit VOLUME (+/-) stellen Sie die Lautstärke ein.
WIEDERHOLUNG
1 WIEDERHOLEN
Drücken Sie einmal REPEAT, die Anzeige „REP 1“ leuchtet im LCD-DISPLAY. Der aktuelle Track wird
ständig wiederholt.
ALLE WIEDERHOLEN
Drücken Sie zweimal REPEAT, die Anzeige „REP ALL“ leuchtet im LCD-DISPLAY. Nun wird
die gesamte Disc wiederholt.
Wiederholung beenden: Drücken Sie REPEAT, bis die Wiederholungsanzeige erlischt.
SKIP UND SUCHE
oder SKIP RÜCKWÄRTS , um
1. Im Wiedergabe- oder Pausemodus drücken Sie SKIP VORWÄRTS
zum nächsten oder vorherigen Track zu springen.
oder SUCHE RÜCKWÄRTS
gedrückt, um innerhalb des
2. Halten Sie SUCHE VORWÄRTS
aktuellen Tracks nach einer bestimmten Stelle zu suchen.
ZUFALLSWIEDERGABE
Mit dieser Funktion geben Sie die Tracks auf der Disc in zufälliger Reihenfolge wieder.
, um die Zufallswiedergabe zu
1. Im Wiedergabe- oder Stoppmodus drücken Sie einmal
starten. Die ZUFALLSANZEIGE „RAND“ erscheint im LCD-DISPLAY.
, die ZUFALLSANZEIGE
2. Zur Beendigung der Zufallswiedergabe drücken Sie erneut
„RAND“ erlischt im LCD-DISPLAY.
PROGRAMMWIEDERGABE
Mit dieser Funktion programmieren Sie die Reihenfolge der Tracks.
HINWEIS: Die Programmfunktion kann nur im STOPP-Modus gestartet werden.
1.
Drücken Sie einmal PROG. Die Programmnummer „01“ und „PROG“ blinken im DISPLAY.
2.
oder SKIP RÜCKWÄRTS
zur Auswahl des zu
Drücken Sie SKIP VORWÄRTS
programmierenden Tracks, beispielsweise Track 5. „PROG“ blinkt zur Bestätigung.
3.
Drücken Sie erneut die PROGRAMMTASTE, um Ihre Auswahl zu speichern. Die
Programmnummer geht einen Schritt weiter zu „02“ und blinkt gemeinsam mit „PROG“, der
nächste Track kann nun programmiert werden.
4.
Drücken Sie SKIP VORWÄRTS
oder SKIP RÜCKWÄRTS
zur Auswahl des
nächsten zu programmierenden Tracks, beispielsweise Track 8. „PROG“ blinkt zur
Bestätigung.
5.
Drücken Sie erneut die PROGRAMMTASTE, um den Track zu speichern. Wiederholen Sie
die Schritte 2 bis 4 zur Programmierung von bis zu 20 Tracks. Nach der Eingabe des 20.
Tracks zeigt das LCD-DISPLAY automatisch die programmierten Tracks nacheinander an.
DE-8
Am Ende der Programmvorschau blinken die Programmnummer „01“ und „PROG“ im LCD-DISPLAY.
, um das Programm in der gespeicherten Reihenfolge
6.
Drücken Sie WIEDERGABE/PAUSE
wiederzugeben.
7.
Mit SKIP VORWÄRTS
GEHEN Sie zur nächsten Programmnummer, mit zweifachem
Tastendruck auf SKIP RÜCKWÄRTS
gehen Sie zum vorherigen Track.
8.
Mit REPEAT wiederholen Sie einen bestimmten Track (1 wiederholen) oder alle Tracks im
Programm (Alle wiederholen).
9.
Nach einmaliger Wiedergabe des Programms stoppt der Player. Zur Wiederholung des
Programms drücken Sie die PROGRAMMTASTE gefolgt von WIEDERGABE/PAUSE
.
10.
Zur Beendigung des Programms drücken Sie zweimal STOPP
im Stoppmodus.
11.
Drücken Sie ALBUM, um ein Album zu wählen. Drücken Sie CD/USB/SD UMSCHALTUNG, um die
Musikquelle umzuschalten.
12.
Zum Ausschalten des Players drücken Sie EIN/AUS. Das LCD-DISPLAY erlischt.
oder öffnen Sie das CD-LAUFWERK
AUX-IN
Sie können ebenfalls externe Musikquellen wiedergeben (iPod, MP3-Player oder andere digitale Audioplayer),
indem Sie dieses Gerät an der AUX-IN Buchse des Players und an der LINE OUT- oder Kopfhörerbuchse des
externen Geräts anschließen.
1. Die Anschlüsse AUX-IN und die KOPFHÖRERBUCHSE liegen hinter der KLAPPE (16). Schieben Sie die
KLAPPE nach unten.
2. Schließen Sie das Audiokabel an der Buchse AUX-IN und an LINE OUT oder der Kopfhörerbuchse des
externen digitalen Audioplayers an..
3. Stellen Sie den FUNKTIONSUMSCHALTER auf „AUX“.
4. Drücken Sie EIN/AUS, um das System einzuschalten. Das LCD-DISPLAY leuchtet auf.
5. Geben Sie die Musik von Ihrem digitalen Audioplayer wieder.
6. Stellen Sie die Lautstärke auf dem externen Audioplayer und auf dem System ein.
7. Schalten Sie anschließend System und Audioplayer wieder aus und ziehen Sie das Audiokabel ab.
KOPFHÖRER (NICHT MITGELIEFERT)
Schließen Sie Ihre Kopfhörer an der KOPFHÖRERBUCHSE des Systems an, um CDs, Radio oder andere
Musikquellen zu hören. Bei Anschluss der Kopfhörer werden die Lautsprecher automatisch stummgeschaltet.
ALARM
WECKZEIT EINSTELLEN
1. Halten Sie AL SET gedrückt und drücken Sie mehrfach HOUR, um die Stunden der Weckzeit
einzustellen.
2. Halten Sie AL SET gedrückt und drücken Sie mehrfach MIN, um die Minuten der Weckzeit einzustellen.
HINWEIS
Auf der linken Seite der Uhrzeitanzeige haben Sie die PM-ANZEIGE. Sie leuchtet für die 12-Stundenanzeige
nachmittags, für die Vormittagsstunden ist sie erloschen.
ALARMFUNKTION EIN- UND AUSSCHALTEN
1. Drücken Sie einmal AL.ON/OFF, um die Alarmfunktion zu aktivieren. Die ALARMANZEIGE
im DISPLAY.
DE-9
leuchtet
2. Drücken Sie erneut AL.ON/OFF, um die Alarmfunktion zu deaktivieren. Die ALARMANZEIGE
im DISPLAY.
erlischt
WECKZEIT ÜBERPRÜFEN
Zum Überprüfen der Weckzeit drücken Sie AL SET. Das Display schaltet von der Uhrzeit zur eingestellten
Weckzeit um. Beim Loslassen der Taste AL SET kehrt das Display zur Uhrzeit zurück.
WECKEN MIT RADIO
1. Drücken Sie EIN/AUS, um das System einzuschalten. Das LCD-DISPLAY leuchtet auf.
2. Drücken Sie einmal AL.ON/OFF, um die Alarmfunktion zu aktivieren. Die
ALARMANZEIGE leuchtet im DISPLAY.
3. Schieben Sie den FUNKTIONSUMSCHALTER auf „RADIO“ und den
BANDUMSCHALTER auf AM, FM oder FM ST.
4. Stellen Sie den gewünschten Sender und die Lautstärke ein, dann drücken Sie erneut
EIN/AUS, um das System wieder auszuschalten. Mit AL SET überprüfen Sie die eingestellte Weckzeit.
5. Zur eingestellten Weckzeit schaltet sich das Radio ein und bleibt eingeschaltet, bis Sie es wieder
ausschalten.
6. Möchten Sie am darauffolgenden Tag nicht geweckt werden, so drücken Sie erneut AL.ON/OFF, um die
Alarmfunktion zu deaktivieren. Die ALARMANZEIGE erlischt.
WECKEN MIT CD
1. Drücken Sie EIN/AUS, um das Musiksystem einzuschalten. Das LCD-DISPLAY leuchtet auf.
2. Drücken Sie einmal AL.ON/OFF, um die Alarmfunktion zu aktivieren. Die ALARMANZEIGE leuchtet
im DISPLAY.
3. Schieben Sie den FUNKTIONSUMSCHALTER auf „CD“, um die Wiedergabe zu starten.
4. Stellen Sie die Lautstärke ein, dann drücken Sie erneut EIN/AUS, um das System wieder auszuschalten.
5. Zur eingestellten Weckzeit schaltet sich der Player ein und bleibt eingeschaltet, bis Sie ihn wieder
ausschalten.
6. Möchten Sie am darauffolgenden Tag nicht geweckt werden, so drücken Sie erneut AL.ON/OFF, um die
Alarmfunktion zu deaktivieren. Die ALARMANZEIGE erlischt.
WECKEN MIT ALARMSUMMER
1. Stellen Sie den FUNKTIONSUMSCHALTER auf „ALARM“.
2. Zur eingestellten Weckzeit schaltet sich der Alarm für 3 Minuten ein.
3. Möchten Sie am darauffolgenden Tag nicht geweckt werden, so drücken Sie erneut AL.ON/OFF, um die
Alarmfunktion zu deaktivieren. Die ALARMANZEIGE erlischt.
1.
2.
3.
4.
WARTUNG UND PFLEGE
Reinigen Sie das Gerät mit einem feuchten (keinesfalls nassen) Tuch. Benutzen Sie keine
Lösungsmittel oder aggressive Scheuermittel.
Setzen Sie das Gerät nicht direkter Sonneneinstrahlung, Hitze, Feuchtigkeit oder Staub aus.
Schützen Sie das Gerät vor Wärme abgebenden Geräten und vor elektrischen
Störquellen (wie Neonlampen und Motoren).
Springt die CD während der Wiedergabe, so muss sie möglicherweise gereinigt
werden. Wischen Sie sie mit einem weichen Tuch von innen nach außen ab.
STÖRUNGSERKENNUNG
Bei Problemen mit dem Musiksystem wenden Sie sich bitte an unseren Kundendienst unter 1 800 777 5331.
Problem
Störungen oder verzerrter
Klang auf MW oder UKW.
Kein Ton auf MW oder
UKW.
Mögliche Ursache
Lösungsvorschlag
- UKW- oder MW-Sender nicht
korrekt eingestellt.
- UKW: Wurfantenne nicht
abgewickelt.
- MW: Gerät nicht ausgerichtet.
- UKW: Wurfantenne abwickeln.
- Funktionsumschalter nicht auf
„RADIO“ eingestellt.
- Funktionsumschalter auf
„RADIO“ stellen.
DE-10
- Stellen Sie den Sender neu ein.
- MW: Gerät neu ausrichten.
Problem
CD-Player funktioniert nicht.
Mögliche Ursache
Lösungsvorschlag
- Lautstärke zu niedrig.
- Lautstärke erhöhen.
- Funktionsumschalter nicht auf
„CD“ eingestellt.
- CD nicht richtig geladen.
- Funktionsumschalter auf
„CD“ stellen.
- CD mit Aufdruck nach oben
einlegen.
- Bessere Medien benutzen.
- Selbstgebrannte CD nicht mit
Player kompatibel.
CD springt.
- Disc verschmutzt oder
verkratzt.
- CD reinigen oder andere CD benutzen.
Ton vom CD-Player
unterbrochen.
- Disc verschmutzt oder
verkratzt.
- Laserlinse verschmutzt.
- Player ist Stößen oder
Vibration ausgesetzt.
- CD reinigen oder andere CD benutzen.
- Laserlinse vorsichtig reinigen.
- Player stoß- und vibrationsfrei
aufstellen.
Klang bei höherer
Lautstärke verzerrt.
- Lautstärke zu hoch eingestellt.
- Lautstärke herunterregeln.
Kein Alarm.
Alarm nicht aktiviert.
Vergewissern Sie sich, dass die
Alarmanzeige im Display erscheint.
Weckzeit falsch eingestellt.
Achten Sie auf AM/PM für vormittags und
nachmittags.
Elektrische und elektronische Geräte enthalten Materialien,
Komponenten und Substanzen, welche für Sie und Ihre Umwelt
schädlich sein können, sofern die Abfallmaterialien (entsorgte elektrische
und elektronische Altgeräte) nicht korrekt gehandhabt werden.
Elektrische und elektronische Geräte sind mit der durchgestrichenen
Mülltonne, wie unten abgebildet, kenntlich gemacht. Dieses Symbol
bedeutet, dass elektrische und elektronische Altgeräte nicht mit dem
Hausmüll entsorgt werden dürfen, sie müssen separat entsorgt werden.
Städte und Gemeinden haben Sammelstellen eingerichtet, an denen
elektrische und elektronische Altgeräte kostenfrei zum Recycling
abgegeben werden können, alternativ erfolgt auch Abholung. Weitere
Informationen erhalten Sie bei der Umweltbehörde Ihrer Gemeinde.
ALLE RECHTE VORBEHALTEN
URHEBERRECHTE DENVER ELECTRONICS A/S
WWW.DENVER-ELECTRONICS.COM
Imported by:
Inter Sales A/S
Stavneagervej 22
8250 Egaa
Denmark
DE-11