1
For product support, visit
Para obtener asistencia técnica, visite
Pour en savoir plus sur l’assistance sur les produits,
visitez le site
www.hd.philips.com
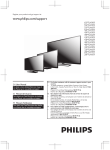
User Manual
HMP2000
EN: For further assistance, call the customer support service in your
country.
7o obtain assistance in tKe U6$, &anada, Puerto 5ico, or tKe U6 9irJin
Islands, contact
PKilips &ustoPer &are &enter at 00
7o obtain assistance in Me[ico, contact PKilips &ustoPer &are &enter
at 0 00 0 2 00
FR: Pour obtenir de l’aide supplementaire, communiquez avec le centre
de service a la clientele de votre pays.
Pour obtenir de l’aide au[ (tatsUnis, au &anada, a Puerto 5ico ou au[
Iles 9ierJes aPericaines, coPPuniTuez avec le centre de service a la
clientele PKilips au 00
Pour obtenir l’aide au Me[iTue, entrez en contact avec le centre de soin
de client de PKilips a 0 00 0 2 00
ES: Para obtener mas informacion, llame al servicio de soporte al
cliente de su pais.
Para obtener asistencia en los (stados Unidos, en &anada, Puerto 5ico
o en las Islas 9irJenes de los (stados Unidos, coPuniTuese con &entro
de atencion al cliente de PKilips al 00
6olo para Me[ico &(1752 '( $7(1&I21 $ &/I(17(6 /$'$ 0
00 0 2 00 6olo Para Me[ico
For Product rec\clinJ inIorPation, please visit www.recycle.philips.com
Para obtener inIorPaciyn de productos de reciclaMe, por Iavor visite www.
recycle.philips.com
Pour tout renseiJnePent sur le rec\claJe des produits, veuillez visiter www.
recycle.philips.com
202 P F U6$, Inc
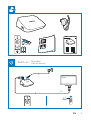
Switch on
Encendido
Mise en marche
HDMI
HDMI IN
SOURCE
TV
EN
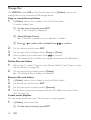
Setup:
Connect to Wi-Fi
ConÀguraciyn: conectar a Wi-Fi
ConÀguration : conne[ion Wi-Fi
Initial Setup
Menu Language
Wireless
HDMI
WWW
Please select the Wi-Fi configuration
EN
If you select 3%&, add HMP2000
to the router: for e[ample, press
and hold the PBC button on the
router (consult the user manual of
your router for information). On
HMP2000, a message is displayed
when the connection is complete.
ES
Si selecciona 3%&, agregue
HMP2000 al router: por ejemplo,
mantenga presionado el botyn
PBC del router (para obtener
informaciyn, consulte el manual del
usuario de su router). En HMP2000,
se muestra un mensaje cuando se
completa la cone[iyn.
FR
Si vous sélectionnez 3%&, ajoutez
HMP2000 au routeur. Par e[emple, maintenez le bouton PBC
enfoncé sur le routeur (consultez
le manuel d’utilisation du routeur
pour en savoir plus). Sur le modèle
HMP2000, un message s’afÀche une
fois la conne[ion établie.
Scan Wi-Fi (Recommended)
:36
Manual
(Advanced)
PINPBCStandard
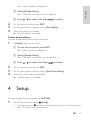
EN
Setup:
Connect to Wi-Fi
ConÀguraciyn: conectar a Wi-Fi
ConÀguration : conne[ion Wi-Fi
EN
If you select 6WDQGDUG, enter
your password. On the remote
control, press
to select an
input mode. To enter te[t, press
to select a key on
the onscreen keyboard. To complete te[t entry, select 2. on the
onscreen keyboard.
ES
Si selecciona 6WDQGDUG, ingrese su
contraseña. En el control remoto,
presione
para seleccionar un
modo de entrada. Para ingresar
te[to, presione
para
seleccionar una tecla del teclado
en pantalla. Para terminar de
escribir el te[to, seleccione 2. en
el teclado en pantalla.
FR
Si vous sélectionnez 6WDQGDUG,
entrez votre mot de passe. Appuyez sur les touches
de la
télécommande pour sélectionner
un mode d’entrée. Pour entrer du
te[te, appuyez sur
pour sélectionner une touche du
clavier à l’écran. Lorsque vous avez
terminé la saisie, sélectionnez 2.
sur le clavier à l’écran.
PINPBCStandard
OK
$%& DEF (#
EN
Navigate
Navegar
Navigation
TM
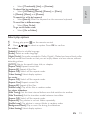
HD Movies
3
TM
HD Movies
EN
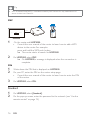
1DYLJDWHRQWKH+RPHVFUHHQ
Press to go to the Home screen. Press , and then, or
to select a functional menu. To select an option in the menu,
press , and then, or .
ES
1DYHJDFLyQSRUOD3DQWDOODGHLQLFLR
Presione para ir a la Pantalla de inicio. Presione y, a
continuaciyn, o para seleccionar un menú funcional. Para
seleccionar una opciyn en el menú, presione y, a continuaciyn, o .
FR
1DYLJDWLRQjO·pFUDQG·DFFXHLO
Appuyez sur la touche pour afÀcher l’écran d’accueil. Appuyez sur les touches , puis ou pour sélectionner un
menu. Pour sélectionner une option du menu, appuyez sur
, puis sur ou .
EN
Reproducciyn
Lecture
Play
EN
ES
FR
Play from online
services
Reproducciyn desde
servicios en línea
Lecture dans les
services en ligne
TM
HD Movies
HDMI
WWW
EN
ES
FR
Play from a USB
device
Reproducciyn de un
dispositivo USB
Lecture à partir d’un
périphérique USB
86%
HDMI
EN
7
Trademark notice
H'MI, and H'MI logo and High-'eÀnition Multimedia Interface are trademarks or
registered trademarks of H'MI licensing LLC in the United States and other countries.
Manufactured under license from 'olby Laboratories.
´'olbyµ and the double-' symbol are trademarks of 'olby Laboratories.
EN
Trademark notice
1 Basics
0
0
0
2
2 First-time setup
3 Play
7
7
4 Setup
System
Audio
9ideo
Network
2
22
22
22
2
5 EasyLink
2
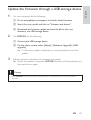
8SGDWHWKHÀUPZDUHRI+03
2
2
2
7 Troubleshooting
2
6SHFLÀFDWLRQ
27
Connect
Switch on or off
Navigate on the Home screen
Use the remote control
Connect to the Internet through Wi-Fi
Play from online services
Play from a USB mass storage device
Update the Àrmware through the Internet
Update the Àrmware through a USB storage device
EN
Eng lis h
Contents
1
Basics
Connect
HDMI
HDMI IN
b
a
a
+'0,FRQQHFWRUIRUDXGLRYLGHRRXWSXW
Connects to a high-deÀnition T9 (H'T9) through an H'MI cable
b
Power connector
Connects to power supply through the AC'C adapter
Switch on or off
1
On +03, press on the remote control to switch on.
» The power indicator lights up white.
2
On the T9, switch to the input channel of +03:
On the remote control of your T9, use the source button to select the
input channel of +03.
0
EN
Eng lis h
HDMI
SOURCE
TV
3
To switch +03 to standby mode, press
» The power indicator lights up red.
again on the remote control.
Auto standby
From the Home screen, switch on [Automatic Standby]in[Setup] > [System].
If there is no button press or media play on +03for minutes, +03
switches to standby mode automatically e[cept when:
<ou enter te[t on the onscreen keyboard.
Screen saver
From the Home screen, go to[Setup] > [System] to switch on [Screen Saver
'HOD\@.
If there is no button press or media play on +03 for a selected time
duration, the screen saver is activated. To e[it the screen saver, press any button on
the remote control.
1DYLJDWHRQWKH+RPHVFUHHQ
TM
HD Movies
3
TM
HD Movies
EN
1
On the remote control, press to go to the Home screen.
» On the Home screen, you can Ànd the following menus:
: Online services
: Connected storage devices, such as a USB storage device
: Setup menu
2
Select a menu:
a ,IQHFHVVDU\SUHVV .
» Current menu is highlighted.
b On the remote control, press or to select a menu.
» Options in the menu are displayed.
3
Select an option in the menu:
a Press .
» Current option is highlighted.
b Press
or
and OK.
Use the remote control
Function
%XWWRQV
Actions
6ZLWFK+03RQRUWRVWDQGE\PRGH
Navigate between screens or through options
Return to the Home screen
Navigate through options
ConÀrm the option
Back one level or e[it
9LHZRSWLRQVPHQXIRUPHGLDSOD\RUÀOHQDYLJDWLRQ
Connect toVudu (online video service)
Connect to1(7)/,; (online video service)
2
EN
OK
Eng lis h
%XWWRQV
Actions
Function
Control the play
Start, pause, or resume the play
Stop the play
Skip to the previous ne[t media Àle
Search backwards or forwards within current Àle
Select a search speed
Rotate a photo
'isplay the information about current Àle during play
Remove the connected USB device safely
0DQDJHÀOHVIROGHUVXQGHU[Folder]on the connected storage
devices
Press
repeatedly.
Press and
hold and
select the
option.
(',7
Enter text
With the onscreen keyboard, use the remote control to enter te[t.
OK
$%& DEF (#
Select input modes
Press on the remote control.
» On the onscreen keyboard, current input mode is highlighted.
: English input in upper case
EN
: English input in low case
: symbols
Enter text
1
2
3
2
On the remote control, press
select the letter or symbol.
to move to a key, press OK to
On the onscreen keyboard, select the input options by using the remote
control:
: Move the cursor to the left or right.
: 'elete the entry before the cursor.
When the te[t entry is complete, select OK on the onscreen keyboard to e[it.
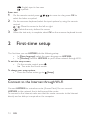
First-time setup
The Àrst time you use +03, do the following setup:
In >0HQX/DQJXDJH@, select the menu language on +03;
In [Wireless], connect +03 to your home network through Wi-Fi.
To exit the setup screen,
On the remote control, press .
» <ou enter the Home screen.
To change your setup options,
From the Home screen, go to
[Setup].
&RQQHFWWRWKH,QWHUQHWWKURXJK:L)L
Connect +03 to a wireless router (Access Point). <ou can connect
+03 to the network that is built around the router.
To connect to the Internet, make sure that the router connects to the Internet
directly and no dial-up is required on the computer.
EN
Initial Setup
Menu Language
Wireless
Eng lis h
HDMI
WWW
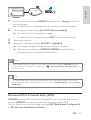
1
2
3
4
The Àrst time you connect +03 to power, select [Setup] on the Àrsttime setup page.
» A pop-up screen is displayed for you to select connection options.
On the pop-up screen, select [Scan Wi-Fi (Recommended)].
» <ou can Ànd a list of networks in range.
To refresh the list of networks, press (',7 on the remote control.
Select your network.
Select your connection option: 3,1, PBC, or [Standard].
» A message is displayed when the connection is complete.
» Ne[t time you switch on +03, +03 connects to the
previously connected network automatically.
Note
If MAC address Àltering is enabled on your router, add the MAC address of +03 to the list
of allowed devices. To Ànd the MAC address, go to
the Home screen.
> [Wireless (WiFi)]> >1HWZRUN,QIR@ from
Tip
If you have disabled SSI' broadcasting or hidden the Service Set IdentiÀer (SSI') of the router,
manually enter the SSI' and password of the network. Go to [Wireless (WiFi)] andselect >0DQXDO
(Advanced)].
One-touch Wi-Fi Protected Setup (WPS)
+03supports Wi-Fi Protected Setup(WPS). <ou can quickly and securely
connect +03to a wireless router that also supports the WPS.
<ou can select one of the two setup methods: 3%& 3XVK%XWWRQ&RQÀJXUDWLRQ ,
or3,1 3HUVRQDO,GHQWLÀFDWLRQ1XPEHU .
EN
Tip
Wi-Fi Protected Setup(WPS) is a standard created by Wi-Fi Alliance for easy establishment of
secure wireless home network.
PBC
HDMI
PINPBCStandard
1
On the router, add +03:
Consult the user manual of the router to learn how to add a WPS
device to the router. For e[ample:
press and hold the WPS push button.
» The router starts to search for +03.
2
On +03, select PBC.
» On +03, a message is displayed when the connection is
complete.
PIN
1
2
3
Write down the PIN that is displayed on +03.
On your PC, enter the PIN on the router setup page:
Consult the user manual of the router to learn how to enter the PIN
of the router.
On +03, select 3,1.
Standard
1
2
On +03, select [Standard].
EN
On the pop-up screen, enter the password to the network (see Use the
remote control on page 2).
Play
Eng lis h
3
On the H'T9, enjoy media play from
the online service, 1(7)/,;, YouTube or Vudu; or
a USB mass storage device.
Play from online services
Connect +03to the Internet. <ou can enjoy online services on the H'T9.
Note
.oninklijke Philips Electronics N.9. bears no responsibility for content provided by Net T9 service
providers.
TM
HD Movies
HDMI
WWW
1
On the Home screen, select an online service (see ´Navigate on the Home
screenµ on page ):
a 2QWKH+RPHVFUHHQVHOHFW
, and then, press
.
b 6HOHFW1(7)/,;<RX7XEHRU9XGX
2
Use the remote control to select your options and control play:
To select an option, press
and OK.
To go back one level, press .
To stop play, press .
EN
7
Play from a USB mass storage device
Through the H'T9, play media from the USB mass storage device that you
connect to +03.
86%
HDMI
86%
Folder
1
Movies
Music
Photos
On the Home screen, select the USB source:
a 2QWKH+RPHVFUHHQVHOHFW , and then, press
.
b Select USB.
» Media Àles are sorted as follows:
[Folder]: 'isplay all the Àles folders.
>0RYLHV@: 'isplay movie Àles.
>0XVLF@: 'isplay music Àles.
[Photos]: 'isplay photo Àles.
2
3
Select a Àle to start play.
Use the remote control to control play (see Use the remote control on
page 2).
6HDUFKIRUPHGLDÀOHV
In the list of Àles or folders, press
In [Folder]:
7RGLVSOD\ÀOHVLQGLIIHUHQWYLHZV
EN
to select your options:
Eng lis h
Select [Thumbnails], [List], or [Preview].
7RVKRZÀOHVE\PHGLDW\SH
Select >$OO0HGLD@, >0RYLHV@, [Photos], or >0XVLF@.
In >0RYLHV@, >0XVLF@, and [Photos]:
7RVHDUFKIRUDÀOHE\NH\ZRUG
Select[Search]. Enter the keyword on the onscreen keyboard.
7RVRUWÀOHVLQGLIIHUHQWZD\V
Select [Sort Order].
To go to the folder view,
Select [Go to Folder].
Select play options
1
2
'uring play, press
on the remote control.
Press
to select an option. Press OK to conÀrm.
For videos,
[Subtitle]: Select a subtitle language
[Audio]: Select an audio language
>1LJKW0RGH@: (for audio encoded in 'olby 'igital ): Makes loud sound level softer
and soft sound level louder so that you can enjoy videos at a low volume, without
disturbing others.
[GOTO]: Skip to the speciÀc time, title, or chapter.
[Repeat Title]: Repeat current title.
[Repeat All]: Repeat all the Áies.
[Repeat Off]: Switch off the repeat mode.
[Video Setting]: Select display options.
For music,
[Repeat Off]: Switch off the repeat mode.
[Repeat One]: Repeat current Àle.
[Repeat All]: Repeat all the Áies.
>6KXIÁH/RRS@: Play all the Àles in random order.
For photo slideshow,
[Slide Timing]: Set the time interval before one slide switches to another.
[Slide Transition]: Set the transition mode between two slides.
[Repeat Off]: Switch off the repeat mode.
[Repeat All]: Play photos in current folder repeatedly.
>6KXIÁH/RRS@: Play photos in current folder in random order.
>%DFNJURXQG0XVLF@: Play a music Àle during the slideshow.
[Video Setting]: Select display options.
EN
0DQDJHÀOHV
On +03, select USB on the Home screen. Go to [Folder], and you can
manage Àles on the connected USB storage device.
CRS\ RU PRYH ÀOHV DQG IROGHUV
1
In [Folder], select a Àle or folder in the list of Àles folders.
To select multiple Àles,
a 2QWKHUHPRWHFRQWUROSUHVV(',7
» A list of options is displayed.
b 6HOHFW>0XOWLSOH6HOHFW@
» A Àle list is created for you to add Àles or folders.
c Press
2
3
4
WRVHOHFWDÀOHRUIROGHU3UHVV
WRFRQÀUP
On the remote control, press (',7.
On the pop-up list of options, select [Copy] or >0RYH@.
Select a folder as the destination. Press
to conÀrm.
» The selected Àles or folders are copied or moved to the destination.
'HOHWH ÀOHV DQG IROGHUV
1
2
Follow Step - under Copy or move Àles and folders (see Copy or move
Àles and folders on page 20).
On the pop-up list of options, select >'HOHWH@.
» The selected Àles or folders are deleted.
RHQDPH ÀOHV DQG IROGHUV
1
2
3
4
In [Folder], select a Àle or folder in the list of Àles folders.
1
In [Folder], select music Àles.
On the remote control, press (',7.
On the pop-up list of options, select [Rename].
On the pop-up onscreen keyboard, edit the Àle folder name (see Enter
te[t on page ).
CUHDWH PXVLF SOD\OLVWV
<ou can create playlists for music Àles you want to play together.
a 2QWKHUHPRWHFRQWUROSUHVV(',7
20
EN
» A list of options is displayed.
c Press
2
3
4
WRVHOHFWDÀOH3UHVV
Eng lis h
b 6HOHFW>0XOWLSOH6HOHFW@
» A Àle list is created for you to add Àles.
WRFRQÀUP
On the remote control, press (',7.
On the pop-up list of options, select [Save Playlist].
Name the playlist as needed.
» A music playlist is created.
CUHDWH SKRWR DOEXPV
<ou can create photo albums for picture Àles.
1
In [Folder], select picture Àles.
a 2QWKHUHPRWHFRQWUROSUHVV(',7
» A list of options is displayed.
b 6HOHFW>0XOWLSOH6HOHFW@
» A Àle list is created for you to add Àles.
c Press
2
3
4
4
WRVHOHFWDÀOH3UHVV
WRFRQÀUP
On the remote control, press (',7.
On the pop-up list of options, select [Save Photo Album].
Name the photo album as needed.
» A photo album is created.
Setup
<ou can change the setup options of +03.
1
On the Home screen, select [Setup].
If necessary, press on the remote control to go to the Home screen.
» The setup menu is displayed.
EN
2
2
Press
Press
to select an option. Press OK to conÀrm the option.
to return to the upper-level menu.
System
>0HQX/DQJXDJH@: Select the language for onscreen menus.
[Subtitle]: Select the subtitle language for videos.
>6FUHHQ6DYHU'HOD\@: Enable the screen saver when +03 is in the idle
mode for a selected time span, for e[ample, in pause or stop mode. To e[it
the screen saver mode, press any key.
[Automatic Standby]: Switch +03to standby mode when there is no
button press or media play on +03for minutes.
[Request to Resume Play]: Allow you to select whether to resume video
play from the last stop position.
>1HWÁL['HDFWLYDWH@: 'eactivate the NetÁi[ service.
>98'8'HDFWLYDWH@: 'eactivate the 9U'U service.
>5HVHW)DFWRU\'HIDXOWV@: Restore fac tory settings.
Audio
>+'0,$XGLR0RGH@: Select audio output for the H'MI connector.
[Lip Sync]: Synchronize audio with video play.
Video
[Aspect Ratio]: Select display aspect ratio.
[TV System]: Select the video resolution that your T9 supports. See your T9
manual for details.
*>3+]@: Use 00p 2 Hz for video output, where 00p 2 Hz
denotes the resolution and frame rate.
>'HHS&RORU@: 'isplay colors with more shades and hues when the video
content is recorded in 'eep Color mode and the T9 supports this feature.
22
EN
Note
Eng lis h
*If the video resolution is incompatible with your T9, you can see a blank screen. To recover the
display, wait for 0 seconds.
Network
[Wireless (WiFi)]: Connect to a Wi-Fi network.
>1HWZRUN,QIR@: 'isplay current network status, such as the MAC address,
and current IP address and subnet mask.
5
EasyLink
+03supports Philips EasyLink which uses the H'MI CEC (Consumer
Electronics Control) protocol. <ou can use a single remote control to control
EasyLink compliant devices that are connected through H'MI.
1
2
3
4
Through H'MI, connect +03 to a T9 compliant with the H'MI CEC
protocol.
On the T9, switch on the functions to allow H'MI CEC operations (Consult
the user manual of the T9).
On +03, switch on [Easy Link].
On the Home screen, select [Setup] > [Easy Link]. Select [On].
In [Easy Link], you can select the following options:
[One Touch Play]
When you start play on +03, the T9 switches to the H'MI input channel
automatically.
[One Touch Standby]
When you switch the T9 to the standby mode, +03 switches to the
standby mode automatically.
EN
2
[Auto Power On From TV]
When you switch to the input channel of +03on the T9,+03 can
switch on automatically from the standby mode.
Note
Philips does not guarantee 00 interoperability with all H'MI CEC devices.
6
Update the firmware of
+03
Switch on [Auto Upgrade Reminder]in [Setup] > [Software Upgrade]. <ou can
receive a reminder when Àrmware updates are available and you have connected
+03to the Internet.
Before you update the Àrmware, check current the Àrmware version of +03.
7RFKHFNWKHÀUPZDUHYHUVLRQ
On the Home screen, go to [Setup]> [Software Upgrade] >
>9HUVLRQ,QIR@.
8SGDWHWKHÀUPZDUHWKURXJKWKH,QWHUQHW
1
2
3
2
Connect +03 to the Internet.
On the Home screen of +03, select [Setup] > [Software Upgrade] >
[Check for Online Upgrades].
» If a Àrmware update is detected, you are prompted to start the update.
Follow onscreen instructions to complete the update.
» When the update is complete, +03 switches off automatically, and
then switches on again.
EN
1
On your computer, do the following:
a Go to ZZZSKLOLSVFRPVXSSRUWWRÀQGWKHODWHVWÀUPZDUH
b Search for your model and click on "Software and drivers".
c 'RZQORDGWKHÀUPZDUHXSGDWHDQGVDYHWKHÀOHWRWKHURRW
directory of a USB storage device.
2
On +03, do the following:
a Connect the USB storage device.
b 2QWKH+RPHVFUHHQVHOHFW>6HWXS@!>6RIWZDUH8SJUDGH@!>86%
upgrade].
» If a Àrmware update is detected, you are prompted to start the
update.
3
Follow onscreen instructions to complete the update.
» When the update is complete, +03switches off automatically, and
then switches on again.
Caution
Keep +03powered on and the storage device mounted before the Àrmware update is
complete.
EN
2
Eng lis h
8SGDWHWKHÀUPZDUHWKURXJKD86%VWRUDJHGHYLFH
7
Troubleshooting
If you contact Philips, you will be asked for the model and serial number of this
player. The model number and serial number are at the bottom of this player.
Write the numbers here:
Model No. BBBBBBBBBBBBBBBBBBBBBBBBBB
Serial No. BBBBBBBBBBBBBBBBBBBBBBBBBBB
No picture.
Refer to the T9 user manual for how to select the correct video input
channel
The contents of the USB storage device cannot be read.
The format of this USB storage device is not supported.
The supported memory size is TB ma[imum.
Make sure that this player supports these Àles. (Refer to SpeciÀcations >
Playable media) .
2
EN
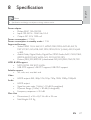
Specification
Eng lis h
8
Note
SpeciÀcation and design are subject to change without notice.
Power adapter
Philips ASUC 2A-000
Input: 00-20 9a 00 Hz, 0. A
Output: 'C .0 9, 00 mA
Power consumption 7. W
Power consumption in standby mode W
Supported formats:
9ideo: MPEG 2, H.2, 9C-, WM9, MK9, MPG, A9CH', A9I, TS,
M2TS, TP, IFO, ISO, 9OB, 'AT, MP, MPEG, MO9 (H.2), ASF, FL9(0
[ 0)
Audio: 'olby 'igital, 'olby 'igital Plus, MPEG Audio, AAC, OGG, MKA,
IMPMS A'PCM, AC, WMA (9), PCM, LPCM, MP
Picture: -PEG, -PG, BMP, GIF (unanimated GIF), H'--PEG, PNG, TIF, TIFF
+'' 86%VXSSRUW
NTFS, FAT2, FAT, E;T-, HFS
USB MTP support, USB PTP support, USB MSC support
Subtitle support
.srt, .sub, .smi, .ssa, id[.sub
Video
H'MI output: 0i, 0p, 7i, 7p, 720p, 00i, 00p, 00p2
Audio
H'MI output
Signal to noise ratio ( kHz): > 0 dB (A-weighted)
'ynamic Range ( kHz): > 0 dB (A-weighted)
Frequency response: -0.2 dB
0DLQ8QLW
'imensions (L [ W [ H): [ [ 2 mm
Net Weight: 0. Kg
EN
27
127,&(
62)7:$5((1'86(5/,&(16($*5((0(17
THIS SOFTWARE EN' USER LICENSE AGREEMENT (´THIS AGREEMENTµ) IS A
LEGAL AN' BIN'ING AGREEMENT BETWEEN <OU (EITHER AN IN'I9I'UAL OR
ENTIT<) AN' PHILIPS CONSUMER LIFEST<LE B.9. A 'UTCH LIMITE' LIABILIT<
COMPAN<, WITH ITS PRINCIPAL OFFICE AT HIGH TECH C AMPUS 7, AE
EIN'HO9EN, THE NETHERLAN'S AN' ITS SUBSI'IAR< COMPANIES (IN'I9I'UALL<
AN' COLLECTI9EL< ´PHILIPSµ). THIS AGREEMENT GI9ES <OU THE RIGHT TO USE
CERTAIN SOFTWARE (THE ´SOFTWAREµ) INCLU'ING USER 'OCUMENTATION IN
ELECTRONIC FORM WHICH MA< HA9E BEEN PRO9I'E' SEPARATEL< OR TOGETHER
WITH A PHILIPS PRO'UCT (THE ´'E9ICEµ) OR A PC . B< 'OWNLOA'ING,
INSTALLING OR OTHERWISE USING THE SOFTWARE, <OU ACCEPT AN' AGREE
TO BE BOUN' B< ALL OF THE TERMS AN' CON'ITIONS OF THIS AGREEMENT. IF
<OU 'O NOT AGREE TO THESE TERMS AN' CON'ITIONS, 'O NOT 'OWNLOA',
INSTALL OR OTHERWISE USE THE SOFTWARE. IF <OU ACQUIRE' THE SOFTWARE IN
TANGIBLE ME'IA E.G. C' WITHOUT THE OPPORTUNIT< TO RE9IEW THIS LICENSE
AN' 'O NOT ACCEPT THESE TERMS, <OU MA< RECEI9E A FULL REFUN' OF
THE AMOUNT, IF AN<, THAT <OU PAI' FOR THE SOFTWARE IF <OU RETURN THE
SOFTWARE UNUSE' WITH PROOF OF PA<MENT WITHIN 0 'A<S FROM THE 'ATE
OF PURCHASE.
1.
Grant of License. This Agreement grants you a non-e[clusive, nontransferable, non-sub
licensable license to install and use, on the 'evice or a PC, as applicable, one () copy
of the speciÀed version of the Software in object code format as set out in the user
documentation solely for your personal use. The Software is ´in useµ when it is loaded
into the temporary or permanent memory (i.e. RAM, hard disk, etc.) of the PC or the
'evice.
2.
Ownership. The Software is licensed and not sold to you. This Agreement grants you
only the right to use the Software, but you do not acquire any rights, e[press or implied,
in the Software other than those speciÀed in this Agreement. Philips and its licensors
retain all right, title, and interest in and to the Software, including all patents, copyrights,
trade secrets, and other intellectual property rights incorporated therein. The Software
is protected by copyright laws, international treaty provisions, and other intellectual
property laws. Therefore, other than as e[pressly set forth herein, you may not copy the
Software without prior written authorization of Philips, e[cept that you may make one
() copy of the Software for your back-up purposes only. <ou may not copy any printed
materials accompanying the Software, nor print more than one () copy of any user
documentation provided in electronic form, e[cept that you may make one () copy of
such printed materials for your back-up purposes only.
3.
License Restrictions. E[cept as provided otherwise herein, you shall not rent, lease,
sublicense, sell, assign, loan, or otherwise transfer the Software. <ou shall not, and you
shall not permit any third par ty, to reverse engineer, decompile, or disassemble the
Software, e[cept to the e[tent that applicable law e[pressly prohibits the foregoing
2
EN
4.
Termination of certain functionality. The Software may contain components of
cer tain licensed software including software licensed from Microsoft Corporation
(´Microsoftµ) which implements Microsoft’s digital rights management technology for
Windows Media. Content providers are using the digital rights management technology
for Windows Media (´WM-'RMµ) to protect the integrity of their content (´Secure
Contentµ) so that their intellectual proper ty, including copyright, in such content is
not misappropriated. <our 'evice may also use WM-'RM software to transfer or play
Secure Content (´WM-'RM Softwareµ). If the security of such WM-'RM Software
is compromised, Microsoft may revoke (either on its own or upon the request of the
owners of Secure Content (´Secure Content Ownersµ)) the WM-'RM Software’s
right to acquire new licenses to copy, store, transfer, display andor play Secure Content.
Revocation does not alter the WM-'RM Software’s ability to play unprotected content.
A list of revoked WM-'RM Software is sent to your PC andor your 'evice whenever
you download a license for Secure Content. Microsoft may, in conjunction with such
license, also download revocation lists onto your 'evice on behalf of Secure Content
Owners, which may disable your 'evice’s ability to copy, store, display, transfer, andor
play Secure Content. Secure Content Owners may also require you to upgrade some
of the WM-'RM components distributed with this Software (´WM-'RM Upgradesµ)
before accessing their content. When you attempt to play Secure Content, WM-'RM
Software built by Microsoft will notify you that a WM-'RM Upgrade is required and
then ask for your consent before the WM-'RM Upgrade is downloaded. WM-'RM
Software built by Philips may do the same. If you decline the upgrade, you will not be
able to access Secure Content that requires the WM-'RM Upgrade; however, you will
still be able to access unprotected content and Secure Content that does not require
the upgrade. WM-'RM features that access the Internet, such as acquiring new licenses
andor performing a required WM-'RM Upgrade, can be switched off. When these
features are switched off, you will still be able to play Secure Content if you have a
valid license for such content already stored on your 'evice. However, you will not
be able to use certain of the WM-'RM Software features that require Internet access
such as the ability to download content that requires the WM-'RM Upgrade. All title
and intellectual property rights in and to the Secure Content is the property of the
respective Secure Content owners and may be protected by applicable copyright or
other intellectual property laws and treaties. This Agreement grants you no rights to
use such Secure Content. 7R VXPPDUL]H LI WKH 6RIWZDUH FRQWDLQV 0LFURVRIW:0
'50 FRPSRQHQWV ² 6HFXUH &RQWHQW \RX GHVLUH WR GRZQORDG FRS\ VWRUH GLVSOD\
WUDQVIHU DQGRU SOD\ LV SURWHFWHG E\ WKH 0LFURVRIW:0'50 FRPSRQHQWV RI WKH
6RIWZDUH 0LFURVRIW 6HFXUH &RQWHQW 2ZQHUV RU 6HFXUH &RQWHQW GLVWULEXWRUV PD\
deny you access, or restrict your access, to Secure Content even after you have paid
IRUDQGRUREWDLQHGLW1HLWKHU\RXUFRQVHQWQRUWKHFRQVHQWRUDSSURYDORI3KLOLSV
is necessary for any of them to deny, withhold or otherwise restrict your access to
EN
2
Eng lis h
restriction. <ou may not remove or destroy any product identiÀcation, copyright notices,
or other proprietary markings or restrictions from the Software. All titles, trademarks,
and copyright and restricted rights notices shall be reproduced on your back up copy
of the Software. <ou may not modify or adapt the Software, merge the Software into
another program or create derivative works based upon the Software.
Secure Content. Philips does not guaranty that you will be able to download, copy,
VWRUHGLVSOD\WUDQVIHUDQGRUSOD\6HFXUH&RQWHQW
5.
Open Source Software. (a) This software may contain components that are subject
to open-source terms, as stated in the documentation accompanying the 'evice. This
Agreement does not apply to this software as such. (b) <our license rights under this
Agreement do not include any right or license to use, distribute or create derivative
works of the Software in any manner that would subject the Software to Open Source
Terms. ´Open Source Termsµ means the terms of any license that directly or indirectly
() create, or purport to create, obligations for Philips with respect to the Software
andor derivative works thereof; or (2) grant, or purport to grant, to any third party any
rights or immunities under intellectual property or proprietary rights in the Software or
derivative works thereof.
6.
Termination. This Agreement shall be effective upon installation or first use of the
Software and shall terminate (i) at the discretion of Philips, due to your failure to
comply with any term of this Agreement; or (ii) upon destruction of all copies of the
Software and related materials provided to you by Philips hereunder. Philips’s rights and
your obligations shall survive the termination of this Agreement.
7.
Upgrades. Philips may, at its sole option, make upgrades to the Software available by
general posting on a website or by any other means or methods. Such upgrades may be
made available pursuant to the terms of this Agreement or the release of such upgrades
to you may be subject to your acceptance of another agreement.
8.
Support Services. Philips is not obligated to provide technical or other suppor t
(´Support Servicesµ) for the Software. If Philips does provide you with Support Services,
these will be governed by separate terms to be agreed between you and Philips.
9.
Limited Software Warranty. Philips provides the Software ¶as is’ and without any
warranty e[cept that the Software will perform substantially in accordance with the
documentation accompanying the Software for a period of one year after your Àrst
download, installation or use of the Software, whichever occurs first. Philips’ entire
liability and your e[clusive remedy for breach of this warranty shall be, at Philips’ option,
either (i) return of the price paid by you for the Software (if any); or (b) repair or
replacement of the Software that does not meet the warranty set forth herein and
that is returned to Philips with a copy of your receipt. This limited warranty shall be
void if failure of the Software has resulted from any accident, abuse, misuse or wrongful
application. Any replacement Software will be warranted for the remainder of the
original warranty period or thirty (0) days, whichever is longer. This limited warranty
shall not apply to you if the Software was provided to you free of charge on an
evaluation only basis.
12 27+(5:$55$17,(6 E;CEPT AS SET FORTH ABO9E, PHILIPS AN' ITS
LICENSORS 'O NOT WARRANT THAT THE SOFTWARE WILL OPERATE ERROR
FREE OR UNINTERRUPTE', OR WILL MEET <OUR REQUIREMENTS. <OU ASSUME
ALL RESPONSIBILITIES FOR SELECTION OF THE SOFTWARE TO ACHIE9E <OUR
INTEN'E' RESULTS, AN' FOR THE INSTALLATION OF, USE OF, AN' RESULTS
OBTAINE' FROM THE SOFTWARE. TO THE MA;IMUM E;TENT PERMITTE' B<
0
EN
/,0,7$7,21 2) /,$%,/,7< UN'ER NO CIRCUMSTANCES WILL PHILIPS OR
ITS LICENSORS BE LIABLE FOR AN< CONSEQUENTIAL, SPECIAL, IN'IRECT,
INCI'ENTAL OR PUNITI9E 'AMAGES WHATSOE9ER, INCLU'ING, WITHOUT
LIMITATION, 'AMAGES FOR LOSS OF PROFITS OR RE9ENUES, BUSINESS
INTERRUPTION, LOSS OF BUSINESS INFORMATION, LOSS OF 'ATA, LOSS OF
USE OR OTHER PECUNIAR< LOSS, E9EN IF PHILIPS OR ITS LICENSORS HA9E
BEEN A'9ISE' OF THE POSSIBILIT< OF SUCH 'AMAGES. IN NO E9ENT SHALL
PHILIPS’ OR ITS LICENSORS’ AGGREGATE LIABILIT< FOR 'AMAGES ARISING OUT
OF THIS AGREEMENT E;CEE' THE GREATER OF THE PRICE ACTUALL< PAI' B<
<OU FOR THE SOFTWARE OR FI9E POUN'S STERLING (.00).
12. Trademarks. Cer tain of the product and Philips names used in this Agreement, the
Software, and the printed user documentation may constitute trademarks of the Philips,
its licensors or other third parties. <ou are not authorized to use any such trademarks.
13. Export Administration. <ou agree that you will not directly or indirectly, e[port or ree[port the Software to any country for which the United States E[port Administration
Act, or any similar United States law or regulation requires an e[port license or other U.S.
Government approval, unless the appropriate e[port license or approval has Àrst been
obtained. By downloading or installing the Software you agree to abide by this E[port
provision.
14. Governing law. This Agreement is governed by the laws of your country of residence ,
without reference to its conÁict of laws principles. Any dispute between you and Philips
regarding this Agreement shall be subject to the non-e[clusive jurisdiction of the courts
of your country of residence.
15. General. This Agreement contains the entire agreement between you and Philips
and supersedes any prior representation, under taking or other communication or
advertising with respect to the Software and user documentation. If any part of this
Agreement is held invalid, the remainder of this Agreement will continue in full force
and effect. This Agreement shall not prejudice the statutory rights of any party dealing
as a consumer.
EULA-English (UK)
September 20
EN
Eng lis h
APPLICABLE LAW, PHILIPS AN' ITS LICENSORS 'ISCLAIM ALL WARRANTIES
AN' CON'ITIONS, WHETHER E;PRESS OR IMPLIE', INCLU'ING BUT NOT
LIMITE' TO THE IMPLIE' WARRANTIES OF MERCHANTABILIT<, FITNESS FOR A
PARTICULAR PURPOSE, AN' ACCURAC< OR COMPLETENESS OF RESULTS WITH
RESPECT TO THE SOFTWARE AN' THE ACCOMPAN<ING MATERIALS. THERE IS
NO WARRANT< AGAINST INFRINGEMENT. PHILIPS 'OES NOT WARRANT THAT
<OU WILL BE ABLE TO 'OWNLOA', COP<, STORE, 'ISPLA<, TRANSFER, AN'OR
PLA< SECURE CONTENT.
2
EN
3 )86$,QF
32%R[$OSKDUHWWD*$
6SHFLILFDWLRQVDUHVXEMHFWWRFKDQJHZLWKRXWQRWLFH
.RQLQNOLMNH3KLOLSV(OHFWURQLFV19
$OOULJKWVUHVHUYHG
+03BB80B9ZN