1
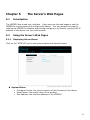
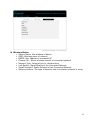
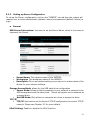
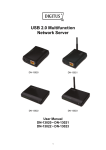
Wireless-N Multifunction USB Device Server website www.hawkingtech.com e-mail [email protected] © COPYRIGHT 2012 HAWKING TECHNOLOGIES,INC. ALL RIGHTS RESERVED. HMPS2U USER’S MANUAL COPYRIGHT Copyright ©2012 by Hawking Technologies, Inc. All rights reserved. No part of this publication may be reproduced, transmitted, transcribed, stored in a retrieval system, or translated into any language or computer language, in any form or by any means, electronic, mechanical, magnetic, optical, chemical, manual or otherwise, without the prior written permission of this company LIMITED WARRANTY Hawking Technology guarantees that every HMPS2U Wireless-N Multifunction USB Server is free from physical defects in material and workmanship under normal use for one (1) year from the date of purchase. If the product proves defective during this one-year warranty period, call Hawking Customer Service in order to obtain a Return Authorization number. Warranty is for repair or replacement only. Hawking Technology does not issue any refunds. BE SURE TO HAVE YOUR PROOF OF PURCHASE. RETURN REQUESTS CAN NOT BE PROCESSED WITHOUT PROOF OF PURCHASE. When returning a product, mark the Return Authorization number clearly on the outside of the package and include your original proof of purchase. IN NO EVENT SHALL HAWKING TECHNOLOGY’S LIABILTY EXCEED THE PRICE PAID FOR THE PRODUCT FROM DIRECT, INDIRECT, SPECIAL, INCIDENTAL OR CONSEQUENTIAL DAMAGES RESULTING FROM THE USE OF THE PRODUCT, ITS ACCOMPANYING SOFTWARE OR ITS DOCUMENTATION. Hawking Technology makes no warranty or representation, expressed, implied or statutory, with respect to its products or the contents or use of this documentation and all accompanying software, and specifically disclaims its quality, performance, merchantability, or fitness for any particular purpose. Hawking Technology reserves the right to revise or updates its products, software, or documentation without obligation to notify any individual or entity. Please direct all inquiries to: [email protected] 1 Federal Communication Commission Interference Statement FCC Part 15 This equipment has been tested and found to comply with the limits for a Class B digital device, pursuant to Part 15 of FCC Rules. These limits are designed to provide reasonable protection against harmful interference in a residential installation. This equipment generates, uses, and can radiate radio frequency energy and, if not installed and used in accordance with the instructions, may cause harmful interference to radio communications. However, there is no guarantee that interference will not occur in a particular installation. If this equipment does cause harmful interference to radio or television reception, which can be determined by turning the equipment off and on, the user is encouraged to try to correct the interference by one or more of the following measures: 1. Reorient or relocate the receiving antenna. 2. Increase the separation between the equipment and receiver. 3. Connect the equipment into an outlet on a circuit different from that to which the receiver is connected. 4. Consult the dealer or an experienced radio technician for help. FCC Caution This equipment must be installed and operated in accordance with provided instructions and a minimum 20 cm spacing must be provided between computer mounted antenna and person’s body (excluding extremities of hands, wrist and feet) during wireless modes of operation. This device complies with Part 15 of the FCC Rules. Operation is subject to the following two conditions: (1) this device may not cause harmful interference, and (2) this device must accept any interference received, including interference that may cause undesired operation. Any changes or modifications not expressly approved by the party responsible for compliance could void the authority to operate equipment. Federal Communication Commission (FCC) Radiation Exposure Statement This equipment complies with FCC radiation exposure set forth for an uncontrolled environment. In order to avoid the possibility of exceeding the FCC radio frequency exposure limits, human proximity to the antenna shall not be less than 20cm (8 inches) during normal operation. The antenna(s) used for this transmitter must not be co-located or operating in conjunction with any other antenna or transmitter. 2 R&TTE Compliance Statement This equipment complies with all the requirements of DIRECTIVE 1999/5/EC OF THE EUROPEAN PARLIAMENT AND THE COUNCIL of March 9, 1999 on radio equipment and telecommunication terminal Equipment and the mutual recognition of their conformity (R&TTE). The R&TTE Directive repeals and replaces in the directive 98/13/EEC (Telecommunications Terminal Equipment and Satellite Earth Station Equipment) As of April 8, 2000. Safety This equipment is designed with the utmost care for the safety of those who install and use it. However, special attention must be paid to the dangers of electric shock and static electricity when working with electrical equipment. All guidelines of this and of the computer manufacture must therefore be allowed at all times to ensure the safe use of the equipment. EU Countries Intended for Use The ETSI version of this device is intended for home and office use in Austria, Belgium, Denmark, Finland, France, Germany, Greece, Ireland, Italy, Luxembourg, the Netherlands, Portugal, Spain, Sweden, and the United Kingdom. The ETSI version of this device is also authorized for use in EFTA member states: Iceland, Liechtenstein, Norway, and Switzerland. 3 Table of Contents CHAPTER 1 INTRODUCTION ..........................................................6 1.1 1.2 What is described in this Manual ......................................6 Customer Support ..........................................................6 CHAPTER 2 2.1 2.2 2.2.1 2.3 2.4 Package Contents ..........................................................7 Product CD ....................................................................7 Start-up Procedures .......................................................7 Physical Description .......................................................7 Supported USB Devices ..................................................8 CHAPTER 3 3.1 3.2 3.2.1 3.2.2 3.2.3 3.2.4 3.2.5 3.2.6 THE SERVER’S WEB PAGES ......................................26 Introduction ................................................................ 26 Using the Server’s Web Pages ....................................... 26 Displaying Server Status ............................................... 26 Setting up Server Configuration ..................................... 29 CHAPTER 6 6.1 6.2 USING THE HMPS2U ................................................13 Introduction ................................................................ 13 Connect & Disconnect ................................................... 13 Subnet Issue ............................................................... 13 Installation of a USB Device .......................................... 14 Auto-Connect Printer .................................................... 16 Network Scanner ......................................................... 18 USB Storage................................................................ 20 Request to Connect ...................................................... 21 Quitting the HMPS2U Setup Software ............................. 22 Limitations .................................................................. 22 Apple Airplay ............................................................. 23 CHAPTER 5 5.1 5.2 5.2.1 5.2.2 BASIC INSTALLATION ...............................................9 Connecting the Hardware ................................................9 Assigning an IP Address to the Server ..............................9 Preliminary....................................................................9 IP Address ....................................................................9 Methods for Setting the IP Address ..................................9 Server Names and Server Name Rules............................ 10 Setting the IP Address Using DHCP ................................ 10 Setting the IP Address Using the HMPS2U Software.......... 10 CHAPTER 4 4.1 4.2 4.3 4.4 4.5 4.6 4.7 4.8 4.9 4.10 4.11 PRODUCT OVERVIEW .................................................7 TROUBLESHOOTING ................................................35 LED Indicators ............................................................. 35 Firewall ....................................................................... 35 4 CHAPTER 7 7.1 7.2 7.3 RESTORE FACTORY DEFAULTS .................................36 Using the Server’s Web Pages ....................................... 36 Using Init Button.......................................................... 36 Default Parameters List ................................................ 36 CHAPTER 8 UPGRADE FIRMWARE ..............................................38 CHAPTER 9 THE INIT BUTTON ....................................................39 5 Chapter 1 Introduction Thank you for purchasing the HMPS2U Wireless-N Multifunction USB Device Server (in the following referred to as “Server”). This Server is designed to connect your Printers, Multifunction Printers, Speakers, Scanners, Fax, and USB hard drives, allowing all network users’ access to these shared USB devices. 1.1 What is described in this Manual This manual provides introductory information as well as detailed instructions on how to set up and manage the HMPS2U in various network environments. To fully benefit from this document, you should be familiar with basic networking principles. The instructions described in this manual are based on the settings in a new Server. To reload the Factory Parameters, you can reset this Server back to Factory Default, which will restore most of the settings. For details, please refer to the chapter “Restore Factory Defaults”. 1.2 Customer Support Should you require any technical assistance, please contact your product reseller. Or you can visit our website at http://www.hawkingtech.com for latest product information. 6 Chapter 2 2.1 Product Overview Package Contents Verify that nothing is missing from the package by using the checking list below. Please contact your dealer if anything is missing or damaged. All packing materials are recyclable. Please confirm the items in the package below: This Server (HMPS2U) CD (Hawking Wireless-N Multifunction USB Device Server setup software, User’s Manual and Quick Installation Guide) Power Adaptor (12V/1.5A) 2.2 Product CD This CD provides easy-to-use multifunction print server software, User’s Manual and Quick Installation Guide. 2.2.1 Start-up Procedures If your computer is configured to auto start CDs, this CD will start automatically when inserted. You can also navigate to the CD and start the autorun.exe file from within the Windows file manager. On Mac, just go into the software folder on the CD and double click on the Control Center dmg file. 2.3 Physical Description 1. 2. 3. 4. Power Adaptor Connector: for DC IN 12V/1.5A power adaptor Init Button: for restoring the parameters to the default values Ethernet Connector: connected to a twisted pair category 5 cable Four USB Host Ports: USB 1.1/2.0 low, full, and Hi-Speed compliant 5. Indicators Power Indicator is lit while power is applied. If it is not lit, or if it blinks, there is a problem with this Server or power adapter. WLAN is lit when the unit is in wireless mode. If it is not lit, it indicates that the device is not wireless or not connected to any wireless network. LAN is lit while network is applied. If it is not lit, it indicates that this server does not connect to the network or is in wireless mode. 7 2.4 USB Indicator is lit when a USB device connects to a USB Port of this Server. Supported USB Devices The HMPS2U supports the following types of USB devices. USB USB USB USB USB Printer multifunction printer (MFP/AIO) scanner storage (like USB external HD, flash disk, and digital camera) Speakers 8 Chapter 3 3.1 Basic Installation Connecting the Hardware 1. Make sure that your USB devices are switched off and that the Server’s Power Adapter is disconnected. 2. Connect the USB devices to the USB ports with the USB cables. 3. Connect the Server to the network with a twisted-pair category 5 cable, 10baseT or 100baseTX. 4. Turn on the USB devices and make sure they are ready for use. 5. Connect the Power Adapter to the Server. The power indicator will light up and the USB indicator will flash in turn. When the Link indicator lights up, the Server is correctly connected to the network. When the USB indicator stops flashing, the Server starts to work normally. 3.2 Assigning an IP Address to the Server 3.2.1 Preliminary 3.2.2 If you have a DHCP server on your network, your Server will receive an IP address automatically. The IP address will then appear on the setup software when it detects your print server. If your DHCP server does not give an IP address to the Server, the Server will use the automatic private IP addressing IP: 169.254.0.0. ~ 169.254.255.255 If you are not working in a DHCP network, you need to manually set the Server’s IP address. IP Address Unless you are assigning an IP address using DHCP, you must obtain an unused IP address from your network administrator. 3.2.3 Methods for Setting the IP Address You can set the IP address of your Server using one of the following methods, depending on your network operating environment: Automatic IP Address Assignment Manual IP Address Assignment 9 3.2.4 Server Names and Server Name Rules The default server name of the Server is “HMPS2U”. If you put two or more Servers in your local area network, to avoid using the same server names you have to change the server names by using the setup software or the server’s web pages. If your server name is longer than 15 characters, the server uses only the first 15 characters. 3.2.5 Setting the IP Address Using DHCP Follow the instructions below to get an IP address using DHCP: 1. Edit or create a scope in the DHCP manager of the DHCP daemon. The entries included in this scope should contain the following parameters: range of IP addresses subnet mask default router IP address DNS server IP address lease duration 2. Activate the scope. The Server automatically gets the DHCP parameters. If you are using DNS, you may include at least one DNS server IP address in the DHCP scope or manually set the DNS server IP address using Server’s web pages or the HMPS2U’s setup software. 3.2.6 Setting the IP Address Using the HMPS2U Software 1. Install the Setup Software. The Setup Software is available on the Product CD. 2. Start the Hawking Print Server software window will appear. On Windows, it will appear until Start, Programs, Hawking, Control Center On Mac, it will appear in your dock 3. If the tool finds multiple Servers in your local area network, you will have to select one Server from the Server List. 10 4. Double click the highlighted server (or click the “Configure Server” button. This will open a web browser showing the web interface of the HMPS2U. Click the “CONFIG” button. 5. Login with administrator ID (default: admin) and its password (default: admin). 11 6. Click the button corresponding to your choice of IP setting methods (static or dynamic using DHCP). When assigning a static IP address you also have to define Subnet Mask. The default IP of the HMPS2U is 192.168.1.100 7. Click Submit to save your settings. And the Server will reboot. You have now finished the procedure of setting the IP address. 12 Chapter 4 4.1 Using the HMPS2U Introduction The goal of this product is to provide network support for USB devices. We developed a new technology called “NetUSB” to achieve this goal. Basically, the “NetUSB” is a “USB over IP” technology that transparently redirects all USB packets to a TCP/IP network channel. “NetUSB” allows you to use USB devices as if they were connected directly to your PC although they are actually remotely connected to the HMPS2U. 4.2 Connect & Disconnect “NetUSB” allows you to use USB devices as if they were connected directly to your PC although they are actually remotely connected to the HMPS2U. The “connect” operation is a software operation that simulates an actual USB device plug-in. That is to say, when you do a “connect” operation in the HMPS2U setup software, the PC can then detect a USB device’s plug-in, even though you did not physically plug in a USB device to your computer. Similarly, the “disconnect” operation is a software operation that simulates the disconnection of the USB device. Once the connect operation is successful, the operations to use that USB device are just the same as if the USB device is directly connected to the PC. If a USB device is “connected” by a PC, we say that PC has the ownership of the USB device. Only one PC can get the ownership of a USB device at the same time. Therefore, if a USB device is connected by one PC, no other PC can connect this USB device until this USB device is disconnected. 4.3 Subnet Issue Before using the NetUSB technology, you must first make sure that your PC can access the HMPS2U via TCP/IP. The simplest way to do this is using HMPS2U’s setup software to search for the HMPS2U server on the network and change its IP address to be the same subnet as your PC. If the server and your PC are not in the same TCP/IP subnet, the HMPS2U’s setup software will show the server in red, as shown in the following figure. You must change the IP address (or use DHCP) of the server so that the server and your PC are in the same subnet. The HMPS2U setup software will show these servers in blue, meaning you can access these servers by the NetUSB technology. 13 4.4 Installation of a USB Device Some USB devices, like printers or MFPs (multifunction printers), require you to install manufacturer provided driver (usually included on the printer’s CDROM). A. B. C. D. E. Insert the device’s CDROM into the CD drive and run the “install program”. Follow the instructions of the installation program to install driver. When the installation program asks you to plug-in the USB device, run the “Hawking Control Center” software. In the Control Center software, select the HMPS2U that has the desired USB device attached. Click the desired USB device as the following figure. Note: On Mac, the “Connect” button is denoted by F. Click the “Connect” button. Then the message “Manually your_computer_name” will be shown, as the following figure. Connected by 14 G. H. Now, the installation program will detect the USB device and continue to install driver. After the installation is completed, click the USB device in the HMPS2U Software and then click the “Disconnect” button to disconnect the USB device. Note: On Mac, the “Disconnect” button is denoted by: Now the driver of your USB device is installed. 15 4.5 Auto-Connect Printer The method described in section 4.4 is called manual-connect, which means users must manually connect the USB printer before using that device, and must manually disconnect the USB printer device after using the device, otherwise no one else can connect. However, for printers and scanners (and MFPs), the HMPS2U supports auto-connect so users don’t need to manually connect/disconnect. This sections show you how to do this. After the driver is installed as described in section 4.4, you can see a newly created printer in the setup software’s “Printers and Faxes”. Follow the steps below to do a NetUSB auto-connect printing. *Note: This method only supports printers. Other USB devices such as Hard Drives, Speakers, Cameras, cannot use this method. They must use the standard Manual Connect. A. In the HMPS2U software, click the USB device server that has the desired printer (or MFP) attached. B. Click the desired printer (or MFP). C. Click the “Auto Connect Printer” button and choose “Set Auto-Connect Printer”. Note on Mac, the “Auto Connect Printer” is denoted by The following figure will appear. 16 D. Choose the desired printer. The desired printer must be the Windows printer (this is a logical printer) that matches the printer attached on the USB device server (this is a physical printer). Then click the “Apply” button. E. The printer will then be marked as an “Auto-Connected Printer” in red. If you choose “Auto-Connected Printer List” in the “Tools” menu, you can see a newly created item that describes the association between the Windows printer and the physical printer on the server. 17 F. Try to issue a print job to the desired printer. You will see the HMPS2U will automatically do a connect operation and allow you to print. G. Even you already properly setup an auto-connected printer, the HMPS2U software must be running (in the background) while a print job is issued. This means you should have the HMPS2U software run every time after you login into your computer. In order to skip this manual operation, you can make the HMPS2U run automatically after you login to your computer. To do this, choose the “Configuration” item in the “Tools” menu. The following window will appear. Click on the check box and then on the “OK” button. This feature is enabled by default. If you would like to break the association between the Windows printer and the physical printer, just click on the association and click the “Delete” button in the “Auto-Connected Printer List”. 4.6 Network Scanner For NetUSB scanning, we recommend you use Network Scanner as the following steps. A. In the HMPS2U software, click the HMPS2U that has the desired MFP (or scanner) attached. B. Click the desired MFP (or scanner). 18 C. Click the “Network Scanner” button. Note: On Mac, the “Network Scanner” button is denoted by You should see that the HMPS2U will automatically do a “connect” operation. The following window will appear. D. Choose one of TWAIN or WIA item. Click “OK”. The following window will appear. 19 E. F. Follow the usual steps to do scanning. After the scanning, close the “Auto-Connect Scanner” window. 4.7 USB Storage You must use “manually connect” for USB storage. If the USB storage is a flash drive, the new disk is a “removable disk”. 20 Select the Mass Storage device and after Windows installs a driver, you should see the storage icon in the system tray. On Mac, the disk will appear on your desktop. You can now use the new disk as a general disk. After you finish the disk operations, click the storage icon in the system tray and choose “Eject USB Mass Storage Device” to remove the USB storage, as the following figure. On Mac, be sure to drag the disk to your trashcan to properly eject the USB drive. Then, in the HMPS2U software, click the USB storage device and click the “Disconnect” button to disconnect the USB storage device. 4.8 Request to Connect If a USB device is manually connected by another user on the network, you cannot use the device until they disconnect. We offer a mechanism to notify the other user. It is called “Request to Connect”. Note: On Mac, the “Request to Connect” button is denoted by The user on one computer can click the “Request to Connect” button in the HMPS2U software. The following window appears. 21 At this moment, the user on the other computer currently connected to the HMPS2U will see the following window: The user will choose to accept or reject. If accepted, the HMPS2U user will automatically disconnect and the other user will automatically connect. 4.9 Quitting the HMPS2U Setup Software The HMPS2U setup software doesn’t really quit if you click the “X” box (close box) at the top right corner of the window. Instead, it just minimizes itself to the system tray. There are two ways to really close the software. The first way is choosing “Exit” item in the “File” menu in the software. The second way is right-clicking the icon of the software in the system tray and choosing the “Exit” item. 4.10 Limitations There are some limitations to use the NetUSB technology. A. Only supports Windows 2000/XP/2003/Vista/7 and Mac OS. Windows 98/ME are not supported. 22 B. Only one PC can get the ownership of the same USB device at the same time. 4.11 Apple Airplay™ Enjoy music from your iTunes library with the HMPS2U anywhere in your home. Requirements: USB Speakers attached to the HMPS2U Mac or Windows PC with iTunes 10+ iPad or iPhone or iPod Touch (iOS 4.3+) Play Music from iTunes™ 1. Install iTunes™ 10, or later, on a Mac or PC or use an iPAD or iPhone (iOS 4.3+) that is connected to the same network as your HMPS2U. 2. Launch iTunes™ and click the AirPlay™ icon window and select your HMPS2U from the list. displayed in the lower right of the 3. Choose a song and click play in iTunes™. The music will stream to your HMPS2U Multiple Speakers You can easily stream music from iTunes™ to multiple speakers in your home. 1. Click AirPlay™ icon and select “Multiple Speakers” from the list 2. Check the speakers you want to use. 23 Streaming music stored in iPhone, iPod touch, or iPad directly to the HMPS2U If you update your “iPhone/iPod touch/iPad” to iOS 4.3 or later, you can stream music stored in your “iPhone/iPod touch/iPad” directly to your HMPS2U 1. Open the Music Player 2. Tap the AirPlay™ icon 3. Select the speaker you want to use [Example] When shAir Music Server is connected. 24 25 Chapter 5 5.1 The Server’s Web Pages Introduction The HMPS2U has a web user interface. Users may use the web pages to see the HMPS2U’s system status and configure the device. You may access this page by running the HMPS2U’s software and clicking configure or by directly typing in the IP address of the device into your web browser. 5.2 Using the Server’s Web Pages 5.2.1 Displaying Server Status Click on the “STATUS” icon to see system status and network status. System Status Firmware Version: the current version of the firmware of the device Model Name: the model name of the product Mac Address: the machine address of the HMPS2U 26 Network Status Server Name: the network name of the HMPS2U Storage Access Mode: which storage mode the HMPS2U is in IP Address: the current IP address of the HMPS2U Subnet Mask: the current subnet mask of the HMPS2U DHCP Server: the gateway of the HMPS2U Lease time: if using DHCP, how long the IP address has been assigned. 27 Wireless Status Station Name: Mac address of device SSID: Wireless name of network BSSID: Mac Address of connected AP Channel No.: Which wireless channel of connected network Network Type: Using ad-hoc or infrastructure Link Quality: Signal Quality of the Connected Network Signal Strength: Signal Strength of the Connected Network Security System: The type of security that the wireless network is using 28 5.2.2 Setting up Server Configuration To set up the Server configuration, click on the “CONFIG” icon ad then the system will request user to enter administrator (default: admin) and password (default: admin) to login. General USB Server Information: You have to set the Server Name, which is the name to represent the Server. Server Name: The network name of the HMPS2U. Workgroup: The workgroup name of the HMPS2U Description: This is an optional setting so you can put in a description of the device for your network settings. Storage Access Mode: allows for the USB hard drive configuration Server Mode: Allows multiple computers in your network to connect to the USB storage device at the same time. Device will appear on the network as a shared drive. NetUSB Mode: Only allows on computer at a time to access the drive. TCP/IP TCP/IP: You have to set the Server’s TCP/IP configuration to connect TCP/IP network. Please see Chapter 3.2 for more details. UPnP Setting: Enable or disable the UPnP function. 29 Wireless: You can make your wireless settings for the HMPS2U here. Basic: Choose you wireless network type, infrastructure (if connected to a WiFi router/access point) or ad-hoc (if connected directly to another WiFI device). SSID is the name of the WiFi network you plan to connect to Security: If your WiFI network is secure, please type in your WiFi password. Please make sure the type of security matches exactly with the network. Site Survey Setting: Click here to scan for available wireless networks to connect to. Select your network and click “Set” or click “Rescan” to refresh the list. 30 WPS: You can click the WPS button for quick connect if your wireless network supports it. Press enter to go into the settings. PBC is for push button WPS. Press the WPS button on your wireless router/access point and then press the “Trigger” button on this page within 120 seconds. The devices will automatically link up and connect wirelessly PIN is to input a pin number. If you know the PIN # on your WPS settings on your Wireless router/access point, input in the fields 31 Administrator: You can change administrator name and password. If you forgot administrator name and password, you must perform Restore Factory Default action by plugging in the power adaptor while pressing the Init button. Please refer to the chapter “Restore Factory Defaults”. Administrator: enter your desired administrator name. New Password: enter your desired password. Re-type Password: re-confirm the password. 32 You can also setup user accounts for your USB hard drives/flash drives. Type in a username and password and set the permission to read, read/write. Click add to add the user or select a previous user and click delete to remove them. Maintenance If you want to restore factory default values of the Server or upgrade new firmware, you can use the Maintenance tool. Restart: click this button to restart (reboot) the Server. Factory Default: click this button, the Server will restore factory default values. Download Net Firmware: This will open a web browser and take you to www.hawkingtech.com where you can search for the newest firmware if available. Firmware Upgrade: click Browse to find the firmware file to be upgraded. Click Upload to upload the firmware into the Server. 33 34 Chapter 6 Troubleshooting This chapter provides useful information to help you resolve difficulties that you may experience with your Server. Fault symptoms, possible causes, and remedial actions are provided within a quick reference table. This Server’s USB ports only support MFPs, printers, scanners, and USB mass storage. 6.1 LED Indicators Indicators Power Behavior On Off Description Power On Power off/System error WLAN On Off LAN On Wireless connection connected No Wireless connection to network or wireless isn’t being used Network connected Off USB 1-4 6.2 On Blinking Off No physical connection to network or wired connection isn’t being used USB device connected Connected USB device error No physical connection to USB device Firewall If firewall software has been installed on your PC, it may block the communication between the PC and the HMPS2U so that the HMPS2U cannot work properly. To solve this problem, either disable the firewall or configure the firewall to allow the following TCP and UDP ports: 7303, 7305, 20005, 30201, 30202, 30203 35 Chapter 7 Restore Factory Defaults You may restore the HMPS2U default parameters by one of the following methods. 7.1 Using the Server’s Web Pages 1. Go to the Server’s web page and click CONFIG 2. Enter administrator (default: admin) and password (default: admin). 3. Click Maintenance. 4. Click Factory Default. 5. Click Yes to confirm 7.2 Using Init Button Plug in the power adaptor while pressing the Init button until the USB indicators blink. After that, plug off the power adaptor and then plug in the power adapter again to restart the Server. Finally, the Server will operate using the Factory Default values. 7.3 Default Parameters List 36 General Information Server Name: HMPS2U TCP/IP Automatically get IP by DHCP: Enabled Static IP: Disabled - IP Address: 192.168.1.100 - Subnet Mask: 255.255.255.0 User Accounts Administrator: admin Password: admin 37 Chapter 8 Upgrade Firmware This chapter describes how to upgrade firmware. Please follow one of the following Procedures: Procedure A: Using the HMPS2U Software 1. Download the firmware from www.hawkingtech.com. Save the firmware to your desktop. 2. Open the HMPS2U setup software. It will automatically search the existing Servers and display their statuses. 3. Select the Server that you want to upgrade the firmware. Double click the selected Server to get into the HMPS2U’s web page. Check the system status page to make sure you need an upgrade. 4. Click CONFIG icon. 5. Login the Server with Administrator (default: admin) and Password (default: admin). 6. Click Maintenance. 7. Click Upgrade Firmware. 8. Click Browse button to choose the file of new firmware. 9. Click Upload button to start firmware upgrade. 10.Wait for 20 seconds for system reboot. 38 Chapter 9 The Init Button The Init button is used for maintenance: Simultaneously press Init button and turn on (by plugging in the power adaptor) the HMPS2U until the USB LED indicator simultaneously blink. After that, the HMPS2U will do the following tasks: A. Perform a Factory Default restoration of the HMPS2U, which will restore most of the parameters and settings to factory default values. B. Perform a TFTP server. You can upgrade new firmware using any TFTP client tool. Note: After performing the tasks mentioned above, you have unplug and then plug in the HMPS2U so it will complete the task. 39