1
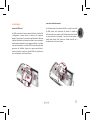
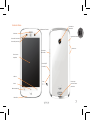
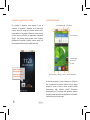
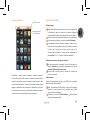
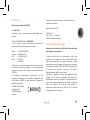
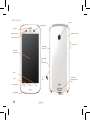
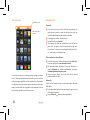
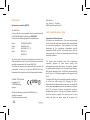
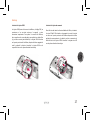
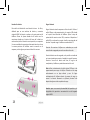
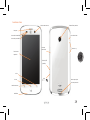
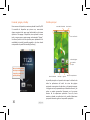
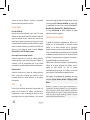
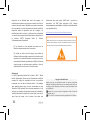
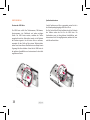
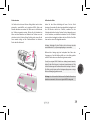
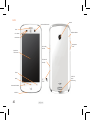
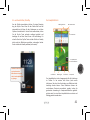
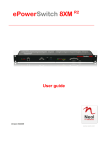
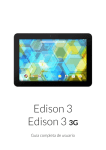
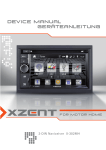
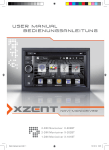
Guida rapida - Italiano...........4
Quick guide - English...........15
Guía rápida - Español...........26
Kurzanleitung - Deutsch......37
Guida rapida - Italiano
4
Assemblaggio
Inserire la scheda di memoria
Inserire le USIM card
Per sfruttare tutte le funzionalità di Winn, inserire la micro-SD
da 8GB inclusa nella confezione di vendita: la scheda va
collocata nella parte posteriore del telefono dopo aver rimosso
la cover posteriore e la batteria; il suo slot si trova accanto a
quello della scheda USIM. Inserite la scheda micro-SD con i
contatti dorati rivolti verso il basso.
La USIM card contiene il vostro numero telefonico, il codice PIN,
i collegamenti ai servizi esterni, la rubrica e altri importanti
dettagli. Per rimuovere la cover dal corpo del telefono, fate leva
a partire dalla fessura in basso per scalzare la cover posteriore,
eventualmente aiutandovi con un oggetto sottile (es. un’unghia
o una carta telefonica). La scheda USIM va collocata nella parte
posteriore del telefono, dopo aver spento quest’ultimo e
rimosso la batteria. Inserite la scheda USIM nel rispettivo slot
con i contatti dorati rivolti verso il basso.
5
Inserire la batteria
Caricare la batteria
Il vostro apparecchio è fornito con una batteria a ioni di litio ed
è progettato per l’uso esclusivo di batterie e accessori originali
NGM. La batteria va collocata nella parte posteriore del
telefono. Allineate i contatti della batteria con i connettori
all’interno dell’alloggiamento della batteria stessa, quindi
inserirla in posizione, vedi schema. Una volta concluse le
operazioni fin qui descritte, ripristinate la cover posteriore del
telefono come mostrato nello schema ed esercitate leggere
pressioni lungo tutto il perimetro della cover.
Caricate la batteria prima di iniziare ad utilizzare l’apparecchio.
Utilizzate il cavo USB in dotazione ed il connettore USB posto
sul lato del telefono. Rimuovete il tappo di protezione del
connettore micro USB e connettete il dispositivo al cavo USB,
quindi connettete il cavo ad una presa della rete elettrica. Si
può caricare il telefono anche collegandolo con il PC.
Attenzione: Non collegate il telefono ad un computer che si sta
accendendo o spegnendo per evitare sbalzi di tensione.
Quando la batteria è in carica, un’icona animata sullo schermo
mostra lo stato di avanzamento del processo. Una volta che
l’icona della batteria è riempita, la carica è completata e il
telefono può essere disconnesso dalla rete.
Note: utilizzate esclusivamente il cavo originale USB in
dotazione per ricaricare il telefono. Procedete alla ricarica
esclusivamente al coperto e in luoghi asciutti. Un leggero
riscaldamento del telefono durante il processo di ricarica è del
tutto normale. La batteria raggiungerà la sua piena efficienza
funzionale solo dopo alcuni cicli completi di ricarica.
Attenzione: Per preservare la corretta funzionalità del prodotto e
l'integrità della garanzia si raccomanda l'utilizzo di caricabatterie
originali NGM.
Funzio
Ricev
Sensore di
Sensore di
Touch
capaci
Indie
Hom
Menu con
Micr
6
Funzioni chiave
Videocamera frontale
Fotocamera
posteriore
Ricevitore
Ingresso auricolare
Sensore di luminosità
Sensore di prossimità
Connettore
Micro USB
Volume + e -
Touch screen
capacitivo
Tasto On/Off
e Standby
Indietro
Home
Tasto
Fessura per
scalzare la cover
posteriore
Menu contestuale
Microfono
7
Accensione, spegnimento e standby
Lo schermo principale
Per accendere il dispositivo, tenete premuto il tasto di
accensione. Se accendete il dispositivo per la prima volta,
troverete alcuni utili consigli per prendere familiarità con il
sistema operativo. Per spegnere il dispositivo, tenete premuto
lo stesso tasto e confermate lo spegnimento selezionando
“Spegni”. Una pressione breve permette invece di passare
rapidamente alla modalità di standby (schermo spento) o di
tornare da questa allo schermo di standby (vedi sotto).
Intensità segnale USIM
Livello batteria
Pannello di notifica
Indicatore pagine
dello schermo
principale
Spostare il lucchetto a
destra per sbloccare lo
schermo e giungere nello
schermo principale.
Menu di chiamata
Messaggi
Rubrica
Menu delle Applicazioni
La schermata principale è il punto di partenza per l'utilizzo di
tutte le applicazioni del telefono cellulare. Altre due pagine
principali si trovano a destra e sinistra da quella centrale
(rappresentate dagli indicatori bianchi), liberamente
personalizzabili con le scorciatoie delle applicazioni preferite
tenendole premute nella schermata Applicazioni e collocandole
a piacimento sugli schermi principali.
8
i notifica
Il menu principale
Pannello di notifica
Indicatore pagine del
menu di applicazioni
pagine
rmo
zioni
zzo di
pagine
ntrale
mente
eferite
andole
Gestire una chiamata
Chiamate vocali
Dalla schermata principale, toccare l’icona che rappresenta
il telefono per aprire lo schermo di chiamata. Digitare il
numero telefonico da chiamare usando la tastiera virtuale.
Avviare la chiamata premendo il tasto con la cornetta verde.
Per terminare la chiamata, toccare l’icona Fine Chiamata.
Per rispondere ad una chiamata trascinare la barra con le
frecce verso l’icona verde a sinistra; per rifiutarla, trascinare
la barra con le frecce verso l’icona rossa a destra. Per
silenziare una chiamata in arrivo, toccare brevemente il
tasto Volume “+” o “–“ (sul lato sinistro del telefono).
Richiamare un numero dal registro chiamate
Controllate il touch screen toccandolo, tenendo premuto o
trascinando un dito sullo schermo. Selezionate un’applicazione
dal menu principale o scorrete a destra/sinistra fino ad un’altra
schermata di applicazioni. Il numero di indicatori mostra quante
pagine di applicazioni sono installate sul dispositivo. Premete il
tasto indietro per tornare alla schermata precedente; premere
il tasto Home per tornare alla schermata principale.
Dal menu principale, selezionare il menu di chiamata e la
cartella Chiamate per accedere rapidamente alle ultime
chiamate effettuate/ricevute e perse.
Cliccare sulla cornetta verde a destra del numero per
avviare la chiamata.
Videochiamata
Grazie alla videocamera frontale, con NGM Winn è possibile
effettuare delle videochiamate.
Dalla lista chiamate o dalla rubrica, cliccare sull’immagine
contatto (o icona generica se al contatto non è stata
associata alcuna immagine).
Selezionare l’icona della Videochiamata
dalla lista del
popup (seconda da sinistra).
9
Gestire contatti
Aggiungere un nuovo contatto
Dallo schermo o dal menu principale, selezionare Rubrica.
Scegliere l’icona rossa della rubrica con “+”.
Inserire Nome, Numero ed eventuali altri dettagli (solo se si
salva su Telefono) del contatto.
Confermare il salvataggio.
Aggiungere un nuovo contatto dal registro chiamate
Dal menu principale, selezionare Chiamate.
Premere prolungatamente sul numero che si intende
salvare tra le chiamate perse, effettuate o ricevute.
Scegliere Aggiungi a contatti e confermare se si vuole
aggiungere il numero ad un contatto esistente o crearne
uno nuovo.
Dopo aver aggiunto nome ed eventuali altre informazioni,
confermare con salva.
Impostare le suonerie
Selezionare una suoneria
Dal menu principale, selezionare Impostazioni > Audio.
In Chiamate in arrivo, selezionare Suoneria telefono oppure
Suoneria videochiamata.
Scegliere la suoneria desiderata dall’elenco.
Se si desidera impostare una suoneria personalizzata, da
Musica selezionare il brano audio desiderato, quindi Usa come
suoneria premendo il menu contestuale. A questo punto il file
audio sarà inserito nell’elenco delle suonerie disponibili.
Note: è possibile utilizzare come suonerie dei file nei formati
*mid,*wav o *mp3.
10
Blocco schermo e scorciatoie
Dal menu principale, selezionare Impostazioni > Posizione e
protezione > Imposta blocco schermo. Selezionare la modalità
desiderata per sbloccare lo schermo (Nessuna, Sequenza, PIN
oppure Password) e confermare. Per bloccare rapidamente lo
brevemente
sul
tasto
di
schermo,
premere
accensione/spegnimento del telefono. Per sbloccare lo
schermo, seguire le indicazioni a schermo.
Attivare o disattivare rapidamente la vibrazione
Per disattivare velocemente la suoneria per le chiamate e i
messaggi è possibile tenere premuto il tasto volume “–“
dalla schermata principale. Una volta raggiunto il volume
minimo, il telefono entrerà in modalità vibrazione.
Dal pannello di notifica, selezionare l’opzione “vibrazione”.
Deselezionarlo per tornare alla modalità precedente.
Premere prolungatamente il tasto * nella tastiera virtuale.
Premere di nuovo prolungatamente il medesimo tasto per
ripristinare la modalità precedente.
Navigare nel web
Connettersi a Internet
Dalla schermata o dal menu principale, scegliere Browser.
Digitare l’URL nella barra degli indirizzi per avviare la
navigazione.
Email
Configurare un account nell’applicazione Email nel Menu
principale, seguendo le indicazioni.
one e
odalità
a, PIN
nte lo
di
re lo
ate e i
me “–“
olume
ione”.
tuale.
to per
owser.
re la
Menu
Inviare e leggere messaggi
Inviare SMS e MMS
Dalla pagina o dal menu principale, scegliere Messaggi >
Nuovo messaggio per accedere alla schermata di
inserimento testo.
Digitare le prime lettere di un nome nel campo destinatario
per ricercare un contatto e selezionare il contatto dall’elenco
a popup, oppure inserire direttamente il numero del
destinatario.
Inserire il testo nell’apposito spazio con la tastiera virtuale.
Aprire il menu contestuale e selezionare Allega per includere
allegati multimediali (il messaggio sarà convertito in MMS).
Premere l’icona Invia.
Connettività
Il sistema operativo richiede una connessione dati attiva. Se
non previsto in abbonamento, il traffico dati implica dei costi, si
consiglia quindi di configurare l’accesso ad internet tramite
WiFi. Per abilitare il traffico dati sulla USIM, andare in
Impostazioni > Wireless e Reti > Connessione dati oppure
utilizzate il pulsante rapido di abilitazione/disabilitazione sul
pannello di notifica.
Connettersi a Internet con la funzione Wi-Fi
Potete collegarvi alla rete wireless utilizzando la funzione Wi-Fi.
Per attivarla, dal menu principale scegliere Impostazioni >
Wireless e reti > Wi-Fi. Per configurare il Wi-Fi e gestire i punti
di accesso wireless, servirsi della funzione Impostazioni Wi-Fi.
Per una rapida abilitazione/disabilitazione utilizzate il pulsante
rapido WiFi di sul pannello di notifica.
Attenetevi a tutte le avvertenze e le indicazioni specificate dal
personale autorizzato quando vi trovate in aree in cui l’uso dei
dispositivi wireless è limitato, come sugli aeroplani e negli
ospedali. Passate alla Modalità offline quando dovete utilizzare
solo i servizi che non richiedono l’accesso alla rete.
Connettersi a un dispositivo Bluetooth
Accendere il dispositivo Bluetooth™ al quale si desidera
collegarsi. Riferirsi anche alla documentazione del
dispositivo.
Dal menu principale, scegliere Impostazioni > Wireless e reti
> Bluetooth per attivare il Bluetooth. Per una rapida
abilitazione/disabilitazione utilizzate il pulsante rapido
Bluetooth di sul pannello di notifica.
Scegliere Impostazioni Bluetooth > Cerca dispositivi per
avviare automaticamente la ricerca di dispositivi Bluetooth.
Tra i dispositivi rilevati, selezionare il nome del dispositivo
da associare. Il telefono tenterà di associarsi al dispositivo,
eventualmente verrà richiesto un codice di associazione.
Geolocalizzazione GPS
Il Global Positioning System (GPS) è un sistema di
posizionamento su base satellitare, a copertura globale e
continua. Per accedere alla funzione GPS, selezionare
Impostazioni > Posizione e protezione > Utilizza satelliti GPS.
All’interno dello stesso menu potete anche attivare Usa reti
wireless che si appoggia a reti mobili. Quando la funzione GPS è
attivata, il telefono inizia a raccogliere dati dai satelliti
disponibili e stabilisce la sua posizione corrente. Per limitare il
consumo di risorse (batteria e memoria) si raccomanda di
disattivare questa funzione quando non serve.
11
Scelte rapide
Pannello di notifica
Per aprire il pannello di notifica, toccate l'area delle icone nella
parte alta dello schermo e trascinate il dito in basso. Per
nascondere il pannello, trascinate in alto la parte inferiore
dell'elenco. Quando vi trovate all’interno dei menu principali
del telefono, dal pannello di notifica è possibile accedere ad un
elenco di notifiche provenienti dalla USIM o dal sistema e nella
parte alta, ai 6 widget di gestione. In sequenza: Vibrazione,
Bluetooth, Wi-Fi, Dati 3G, GPS, Blocco rotazione.
Accesso rapido alle applicazioni recenti
Quando vi trovate all’interno di una qualsiasi applicazione,
mantenete premuto il tasto Home per qualche secondo: verrà
visualizzato l’elenco delle applicazioni a cui avete effettuato
l'accesso di recente, selezionabili direttamente.
Menu contestuale
Quando vi trovate all’interno di una qualsiasi applicazione,
premete il tasto Menu contestuale per visualizzare un menu
contestuale riferito all’applicazione stessa con le relative
funzioni.
delle modalità di risparmio delle risorse preimpostate:
Modalità Sleep, Modalità Cinema e Modalità Conferenza.
Se si sceglie Personalizzato, si potranno impostare le proprie
preferenze di risparmio energetico.
Inserire testo con SwiftKey
Il metodo di inserimento impostato per default nel telefono è
quello della tastiera SwiftKey. Il metodo di scrittura SwiftKey è
un sistema avanzato per l'inserimento predittivo di testo;
quando si scrivono messaggi SMS, MMS o E-mail, tale modalità
prevede la parola che si sta digitando, cambiandola ad ogni
pressione dei tasti. Durante il primo utilizzo, il programma
suggerirà con dei popup le innovazioni e le peculiarità di questo
sistema di scrittura.
SwiftKey ha un Dizionario “intelligente” che trae vocaboli anche
dalle varie applicazioni del telefono, quali la rubrica, i social
network, ecc. Per il corretto funzionamento del dizionario, nel
telefono deve essere installata la micro-SD fornita nella
confezione di vendita.
Per cambiare i parametri di inserimento del testo, selezionare
Impostazioni > Lingua e tastiera > SwiftKey for NGM-Mobile.
Tasto
Il tasto Eco è una funzione che permette l’accesso rapido alla
gestione delle periferiche del telefono. Azionando il tasto
apposito, si apre una schermata che mostra in alto le
percentuali di utilizzo della scheda di memoria, memoria
interna e la carica della batteria. Nella parte inferiore, aprendo
il menu a tendina di Seleziona modalità, si possono scegliere
12
Avvertenza: il produttore non assume alcuna responsabilità per qualsiasi
inadempienza delle linee di condotta sopra stabilite o per ogni uso improprio del
telefono cellulare. Il produttore si riserva il diritto di modificare senza preavviso
le informazioni contenute in questa guida. Il contenuto di questo manuale
potrebbe differire dal contenuto effettivamente mostrato nel telefono cellulare.
In tale caso, il secondo prevale.
Certificazioni
Documentazione tecnica conservata presso NGM Italia S.r.l.
Disponibile su richiesta.
Dichiarazione di conformità (R&TTE)
Noi, NGM Italia
Dichiariamo sotto la nostra esclusiva responsabilità che il
prodotto:
Cellulare GSM/WCDMA/Wi-Fi: NGM WINN
a cui si riferisce il presente documento, è conforme alle
seguenti norme e/o ad altri documenti normativi.
Salute
Sicurezza
EMC
Radio
EN 50360, EN 62209-1
EN 60950-1+A11
EN 301 489-1/-7/-17
EN 301 511
EN 300 328
Si dichiara con il presente documento che tutte le serie di test
radio essenziali sono state eseguite e che il summenzionato
prodotto è conforme a tutti i requisiti essenziali della Direttiva
1999/5/EC.
La procedura di dichiarazione di conformità a cui si fa
riferimento nell’Articolo 10 e dettagliata nell’Appendice [IV]
della Direttiva 1999/5/EC è stata seguita con l’apporto dei
seguenti Enti notificati:
PHOENIX TESTLAB GmbH
Königswinkel 10,
D-32825 Blomberg,
Germany
0700
(Rappresentante nell’UE)
NGM Italia S.r.l.
Via L. Da Vinci, 7 – Ponticelli
56020 Santa Maria a Monte (Pi)
S.A.R. (Specific Absorption Rate)
Informazioni sulla certificazione SAR (Specific Absorption Rate,
tasso specifico di assorbimento)
I telefoni cellulari sono dei ricetrasmettitori radio. Sono
progettati per non superare i limiti di esposizione alle onde
radio raccomandati dalle linee guida internazionali. Queste
linee guida sono state sviluppate da organizzazioni scientifiche
internazionali indipendenti ICNIRP ed IEEE ed includono margini
di sicurezza per assicurare protezione alle persone,
indipendentemente dalla loro età e salute.
Il dispositivo in oggetto è conforme agli standard dell’Unione
Europea (UE) che limitano l’esposizione delle persone alla
radiofrequenze emesse da dispositivi di telecomunicazione e
radio. Questi standard impediscono la vendita di dispositivi
mobili che eccedono un livello di tasso specifico di
assorbimento (denominato anche SAR) pari a 2,0 watt per
chilogrammo di tessuto corporeo.
13
Durante il test, il livello SAR più elevato registrato è stato pari a
0,497 watt per chilogrammo [1,2]. Durante l’uso normale, il
livello SAR effettivo potrebbe risultare molto inferiore, poiché il
dispositivo è stato progettato per emettere solo l’energia a
radiofrequenza necessaria che serve per trasmettere il segnale
alla stazione base più vicina. Attraverso la gestione automatica
della trasmissione a livelli di potenza inferiori laddove è
possibile, il dispositivo riduce l’esposizione complessiva
all’energia a radiofrequenza dei soggetti. La dichiarazione di
conformità presente sul taglio in questione, dimostra la
conformità di questo dispositivo alla direttiva R&TTE (European
Radio & Terminal Telecommunications Equipment).
[1] I controlli sono stati effettuati in conformità alle direttive
internazionali sui controlli.
ad esempio riducendo la durata delle chiamate, o utilizzando
auricolari e dispositivi “viva voce” per tenere il telefono
cellulare lontano dal corpo e dalla testa. Per ulteriori
informazioni su questo argomento, NGM invita a consultare il
documento
dell’OMS
(Promemoria
n.193,
campi
elettromagnetici e salute pubblica, I telefoni mobili e le loro
stazioni radio base) disponibile al seguente indirizzo:
http://www.who.int/peh-emf/publications/facts/fs193_italian_2010.pdf
NGM consiglia di usare con moderazione qualsiasi dispositivo mobile di
qualsiasi marca e modello ed, eventualmente, tenerlo ad una distanza
minima dal corpo di 1,5 cm oppure usare auricolari o dispositivi vivavoce.
[2] Per l’utilizzo vicino al corpo, questo modello di telefono è
stato controllato ed è risultato conforme alle direttive per
l’esposizione alle onde elettromagnetiche utilizzando accessori
forniti o approvati da NGM e progettati per questo prodotto,
oppure utilizzando accessori non contenenti parti metalliche e
che posizionano l’unità portatile ad un minimo di 1,5 cm dal
corpo.
Copyright © 2012 NGM Italia
Avvertenze
L’OMS (Organizzazione Mondiale della Sanità, o WHO – World
Health Organization) conferma che le attuali informazioni
scientifiche non indicano la necessità di precauzioni particolari
per l’uso dei telefoni cellulari. Tuttavia, per tutti gli utilizzatori
non adeguatamente confortati da queste risultanze, NGM
consiglia di limitare la propria esposizione o quella dei loro figli,
Nessuna parte di questo manuale può essere riprodotta, distribuita,
tradotta trasmessa in alcuna forma o tramite alcun mezzo, elettronico o
meccanico, compresi fotocopie, registrazione o salvataggio in qualsiasi
archivio di informazioni o sistema di recupero, senza previa autorizzazione
scritta da parte di NGM Italia.
Bluetooth® è un marchio commerciale registrato in tutto il mondo della
Bluetooth SIG, Inc.
Wi-Fi® e il logo Wi-Fi sono marchi commerciali registrati di Wi-Fi
Alliance.
14
zando
efono
teriori
tare il
campi
e loro
Quick Guide - English
10.pdf
di
za
oce.
ribuita,
onico o
ualsiasi
zazione
o della
i Wi-Fi
15
Set up
Installing the Memory card
Installing the USIM card
In order to correctly use all functions, the 8 GB micro-SD card
contained in the selling package must be correctly installed. It
must be inserted in the back side of the phone, after powering
it off and removing the battery. A dedicated slot fort the
memory card is placed beside SIM-slot. Slide in the memory
card with the gold contacts facing downwards.
The USIM card stores information as your personal phone
number, PIN code, carrier services numbers, contacts and other
important details. First, remove the back cover from the phone
by sliding a thin small object such as the corner of a credit card
or a fingernail into the slit at the base of the cover to dislodge it
from the chassis.
The USIM card must be inserted into the slot placed on the back
side of the phone, with the gold contacts facing downwards
after removing the battery.
16
Inserting the battery
Charging the battery
Your device is provided with a lithium-ion battery and is
designed to be used exclusively with original NGM batteries and
chargers. The battery must be inserted into the backside of the
phone (see illustration below). Align the battery contacts with
the phone connector inside the battery tray, and let it slide
down in position. When done, put the hind cover of the phone
back and make slight pressures along the cover rim, as shown
with the arrows.
Please charge the battery completely before starting to use the
device. Use the provided USB cable, connecting one end to the
USB connector placed on the side of the phone (first remove
the protection cover) and the other end to the provided wall
socket adaptor. While the battery is charging, an animation on
screen will show the charging progress. Once charge is
completed, the phone can be disconnected from the grid. The
phone can also be charged by connecting it to a PC USB port.
Warning: Do not connect the phone to a booting-up or running
down PC to avoid voltage jumps.
While the battery is charging, an animated icon on screen will
show the charging progress. Once that the battery icon is full,
the phone can be disconnected from the grid.
Note: use only the provided USB cable for recharging the device.
Please charge the battery indoors, in a dry and favorable
environment. It’s normal for the battery to get slightly warm
during the charging process. The battery will reach the full
capacity when cycled several times.
Warning: in order to preserve the correct functioning of the
device and in order not to compromise warranty, the sole use of
original NGM battery chargers and accessories are
recommended.
17
Main functions
Camera
Frontal camera
Receiver
Earpiece connector
Brightness sensor
Proximity sensor
Micro USB
connector
Volume + and -
Capacitive
touch screen
Pover On/Off
key
and standby
Back
Home
Contextual key
Microphone
18
key
Slit that helps
removing the back
cover
Turn on, turn off and standby
The main screen
USIM signal intensity
Press and hold the Power key to turn the phone on. Follow the
instructions on screen on the first start. Press and hold the
same key to turn off the phone. A quick pressure sets the phone
on standby-mode (screen off) or to go back to the standby
screen (see below).
Slide the lock to the right
in order to unlock the
screen and get into the
main screen.
battery level
Notifications panel
Main screen
pages indicator
Call menu
Messaging
Phonebook
Applications menu
The main screen is the starting point for the use of all
applications of the phone. Three main screens are available, as
indicated by the white spots. These pages can be freely
personalized with one’s favorite applications, shortcuts and
widgets. Just keep pressed the icon of the wished function in
the application menu and then place the icon on the preferred
main screen.
19
The main menu
Notifications panel
Main menu pages
indicator
Managing calls
Voice calls
From the main screen, touch the icon representing the
green phone in order to open the calling screen. Use the
virtual keypad to digit the desired phone number.
Press the green receiver to start the call.
To end the call, press End call.
To answer a call, slide the arrowed bar to the left on the
green icon. To reject it, slide the same bar to the right onto
the red icon. To silence an incoming call, briefly press the +
or – volume keys on the phone side.
Call a number from the call history
Use the touch screen by touching, pressing, sliding your finger
over it. Select an application from the main menu or scroll the
main menu pages right/left to find the desired one. The number
of indicators show your position and the number of main menu
pages. Press the back key to get back to the previous screen or
press Home to get back into the main screen.
20
From the main menu, select call menu and the Calls folder
to access rapidly all last sent and received calls.
Dal menu principale, selezionare il menu di chiamata e la
cartella Chiamate per accedere rapidamente alle ultime
chiamate effettuate/ricevute e perse.
Select the green phone icon to the right of the desired
number in order to call it.
Video calls
Thanks to the frontal camera, you can make video calls with
NGM Winn.
In the phonebook, select the contact image (or generic icon)
of the desired contact.
Select Video call
from the opening popup list.
Managing contacts
Add a new contact
From the main screen/menu, select the Phonebook icon.
Select the icon with the “+” on the upper left side.
Insert Name, Number and eventual other details (if saving
on the phone memory).
Confirm by selecting Save.
Add a new contact from the call logs
From the main menu, select Call menu and the Calls folder.
Keep the desired number pressed until a popup with
various options appears.
Select Add to phonebook and confirm if you want to add
the number to an existing contact or if you want to create a
new one.
After having inserted name and eventual other information,
select Save.
Note: you can use *mid,*wav or *mp3 files as ringtones.
Screen lock and shortcuts
From the main menu, select Settings > Position and Security >
Set screen lock. Select the desired unlocking mode (None,
Sequence, PIN or Password) and confirm. In order to quickly
lock the screen, briefly press on the power on/off key of the
phone. To unlock it, follow the instructions on the screen.
Rapid activation of vibration mode
Rapidly disable ringtones and message alerts by pressing
Volume “-“ from the main screen until it gets to minimum
and then switches to Silent mode.
From the notifications panel, select the “vibration” option.
Select it again to go back to the previous mode.
From the virtual keyboard, keep the #-key pressed. Press it
again to go back to the previous mode.
Set ringtones
Navigate the Web
Select a ringtone
From the main menu, select Settings > Audio.
In incoming calls, select Voice call ringtone or Video call
ringtone.
Select the desired ringtone from the list.
If you wish to set a personalized ringtone, from Music you can
select a song and by pressing the contextual menu, choose Set
as ringtone. After, the song will be available in the list of
selectable ringtones.
Connect to the Internet
From the main screen or the main menu, select Browser. Write
the URL into the address bar to start navigation.
Email
Configurare un account nell’applicazione Email nel Menu
principale, seguendo le indicazioni.
21
Send and receive messages
Send SMS and MMS
From the main screen or menu, select Messaging > New
message to access the text input screen.
Write the first few letters of a contact name into the
recipients bar and select the desired contact from the popup
contact list that will appear, or directly insert the recipients
number.
Write the text into the dedicated space using the virtual
keyboard.
Open the contextual menu and Attach to insert multimedia
files (the message will automatically be converted into
MMS).
Press Send.
Connectivity
The operation system requires an active data connection. If
data traffic is not included in your phone contract, it could
imply extra costs. In that case it is advisable to configure the
internet access through WiFi. The activation/deactivation of the
data traffic on the USIM is in Settings > Wireless and Nets >
Data Connection or in the rapid access key of the notification
panel.
Connect to the Internet using Wi-Fi
Connect to the wireless net using the Wi-Fi function. In order to
activate it, from the main menu choose Settings > Wireless and
Nets > Wi-Fi. Configure Wi-Fi and manage the access points
with the Wi-Fi Options. Rapid activation/deactivation is
possible on the notification panel with the dedicated key.
22
Please follow all warnings and indications concerning the use of
wireless devices in areas where the use of such functions is
restricted (airplanes, hospitals, etc.). Switch to Offline mode
when you have to use only the functions that do not need
Network access.
Connect to a Bluetooth device
Switch on the other Bluetooth™ device. Refer to the
documentation of the device.
From the main menu, select Settings > Wireless and
Networks > Bluetooth to activate Bluetooth. For a rapid
activation/deactivation use the dedicated key on the
notification panel.
Select Bluetooth settings > Search device to start a search
for Bluetooth devices.
Between the found devices, select the name of the device
that you want to pair. The phone will try to pair the device,
eventually asking for a pairing code.
GPS geolocalization
The Global Positioning System (GPS) is a system based on the
satellite-related position determination, with global and
continuous covering. In order to access the function, select
Settings > Position and Security > use GPS satellites. Inside the
same menu you can also activate Use Wireless Networks, that
contributes in the position finding using the available Wireless
Networks. When the GPS function is active, the phone begins to
collect data from the available satellites and determines the
current position. Limit the use of battery and memory by
switching off this function when you don’t use it.
Rapid access
Insert text with SwiftKey
Notification panel
Open the notification panel by touching the upper area
containing the battery and signal-intensity icons and drag it
downwards. To hide the panel, push it up again starting from
the bottom. From the panel you have rapid access to a list of
notifications from the USIM or the System and in the upper
part, to 6 management widgets: Vibration, Bluetooth, Wi-Fi, 3G
Data, GPS, Block rotation.
The default text input method is the SwiftKey keyboard.
SwiftKey is an advanced predictive text input system; when
writing SMS, MMS or E-mails, this mode predicts the word
while you are writing it, changing it at every key pressure.
During the first use, the program will suggest with popups the
innovations and peculiarities of this writing system.
SwiftKey has an “intelligent” Dictionary that retrieves words
also from other applications in the phone, such as the
phonebook or the social networks etc. For the correct use of
this function, the micro-SD contained in the selling package has
to be installed into the phone.
Rapid access to recent applications
When you are inside any application, press and hold the Home
key: a list of the most recent applications that have been
opened will be shown and can be directly selected.
Contextual menu
Inside every application, press the menu key to visualize a
contextual menu, that refers to the application with related
functions.
To change the text input parameters, select Settings >
Language and Keyboard > SwiftKey for NGM-Mobile
key
The Eco key is a function that permits rapid access to the
management of the phone functions. By activating the key, a
screen will open, showing in the upper part the percentages of
memory use of the memory card, the phone memory and the
battery charge. In the lower part, after selecting Personalize
mode you can set the energy saving modes you prefer or you
can select between the pre-set energy saving modes: Sleep
mode, Cinema mode and Meeting mode.
Warning: NGM Italia will not bear responsibility for any incompliance with the
above guidelines or improper use of the mobile phone. The company reserves the
right to modify any of the content in this user guide without previous public
announcement. The content of this manual may vary from the actual content
displayed in the mobile phone. In such case, the latter shall govern.
23
Certifications
NGM Italia S.r.l.
Via L. Da Vinci, 7 – Ponticelli
56020 Santa Maria a Monte (Pi)
Declaration of conformity (R&TTE)
We, NGM Italia
Declare under our sole responsibility that the product identified
as GSM/WCDMA/Wi-Fi Mobile Phone: NGM WINN
Conforms to the following standards and specifications:
Health
Safety
EMC
Radio
EN 50360, EN 62209-1
EN 60950-1+A11
EN 301 489-1/-7/-17
EN 301 511
EN 300 328
We declare that all the series of fundamental radio test have
been conducted and that the aforesaid product meets all the
essential requirements of the Directive 1999/5/EC.
The conformity assessment procedure referred to in Article 10
and detailed in Annex IV of Directive 1999/5/EC has been
followed with the involvement of the following notified bodies:
PHOENIX TESTLAB GmbH
Königswinkel 10,
D-32825 Blomberg,
Germany
0700
All technical documents conserved at NGM Italia S.r.l.
Available on request.
(UE Authorized Representative)
24
S.A.R. (Specific Absorption Rate)
Information on SAR certifications
Cell phones are radio transceivers. They have been projected
not to exceed the radio wave exposition limits recommended
by international guidelines. These guidelines have been
determined by the international independent scientific
organizations ICNRP and IEEE and include security limits to
ensure protection to all persons, independently from their age
and health conditions.
This phone meets European Union (EU) requirements
concerning exposure to radio waves coming from
telecommunication and radio devices. The exposure standard
for mobile phones employs a unit of measurement known as
SAR (Specific Absorption Rate). The SAR limit recommended by
the EU Council is 2.0 W/kg averaged over ten grams of body
tissue.
The highest SAR value for this model phone when tested for use
at the ear was 0,497 watt/kg [1,2]. Although the SAR is
determined at the highest certified power level, the actual SAR
of the phone while operating can be well below the maximum
value. This is because the phone is designed to operate at
multiple power levels so as to use only the power required to
reach the network. In general, the closer you are to a base
station, the lower the power output of the phone. The
Declara
designa
require
Directiv
Equipm
[1] T
inter
[2] F
been
expo
acces
conta
at lea
Warnin
WHO (
scientif
particu
Neverth
NGM a
for inst
or hand
the bod
For mo
the WH
Electro
followin
Declaration of Conformity here above proves that the
designated product is in compliance with the essential
requirements and other relevant provisions of the R&TTE Directive (European Radio & Terminal Telecommunications
Equipment)1999/5/EC
[1] These controls have been
international guidelines on controls.
made
according
http://www.who.int/mediacentre/factsheets/fs193/en/index.html
NGM advises to use mobile devices of any brand or model with
moderation and to keep them at a minimum distance of 1,5cm
from the body or to use earpieces or other hands-free devices.
to
[2] For the use next to the body, this telephone model has
been controlled and is conform to the directives for the
exposition to electromagnetic radiation, when used with
accessories provided by or approved by NGM and not
containing metallic parts and that position the mobile phone
at least at 1,5 cm distance from the body.
Warnings
WHO (World Health Organization) confirms that the actual
scientific information does not indicate the necessity to adapt
particular precautions for the use of cell phones.
Nevertheless, for all those users not comforted by these data,
NGM advises to limit their own and their children’s exposure,
for instance by reducing the calling time, or by using earpieces
or hands-free devices to keep the mobile phone distant from
the body and the head.
For more information on the argument, NGM invites to consult
the WHO document (Fact sheet N°193, June 2011) entitled
Electromagnetic fields and public health: mobile phones at the
following web address:
Copyright © 2012 NGM Italia
No part of this manual may be reproduced, distributed, translated, or
transmitted in any form or by any means, electronic or mechanical,
including photocopying, recording, or storing in any information storage
and retrieval system, without the prior written permission of NGM Italia.
Bluetooth® is a registered trademark of the Bluetooth SIG, Inc.
worldwide.
Wi-Fi® and the Wi-Fi logo are registered trademarks of the Wi-Fi
Alliance.
25
Guía rápida - Español
26
Montaje
Introducir la tarjeta USIM
Introducir la tarjeta de memoria
La tarjeta USIM posee el número de teléfono, el código PIN, las
conexiones a los servicios externos, la agenda y otros
elementos importantes. Para quitar la carcasa del teléfono,
hacer presión en la ranura de abajo con ayuda de un objeto fino
(ej. una uña o una tarjeta telefónica). La tarjeta USIM se coloca
en la parte posterior del teléfono, después de haber apagado el
móvil y quitado la batería. Introducir la tarjeta USIM en el
respectivo slot con las placas doradas hacia abajo.
Para disfrutar de todas las funcionalidades del Winn, introducir
la micro-SD de 8 GB incluida en el paquete de venta: la tarjeta
se coloca en la parte posterior del teléfono después de haber
quitado la carcasa posterior y la batería; su slot se encuentra al
lado del slot de la tarjeta USIM. Introducir la tarjeta micro-SD
con las placas doradas hacia abajo.
27
Introducir la batería
Cargar la batería
Este móvil está dotado de una batería de iones de litio y
diseñado para un uso exclusivo de batería y accesorios
originales NGM. La batería se coloca en la parte posterior del
teléfono. Alinear las placas doradas de la batería con los
conectores situados en el interior del hueco de la batería, a
continuación, deslizar la batería en esta posición, ver esquema.
Una vez concluidas las operaciones hasta aquí descritas, colocar
la carcasa posterior del teléfono como se muestra en el
esquema y realizar ligeras presiones alredor de la carcasa.
Cargar la batería antes de empezar a utilizar el móvil. Utilizar el
cable USB que se ha proporcionado, y el conector USB situado
en la parte lateral derecha del teléfono. Quitar la tapa de
protección del conector micro USB y conectar el dispositivo al
cable USB, a continuación, conectar el cable a una toma de red
eléctrica. Se puede cargar el teléfono conectándolo al PC.
Atención: No conectar el teléfono a un ordenador que se está
encendiendo o apagando para evitar cambios de tensión.
Cuando la batería se está cargando, en la pantalla se visualizará
un icono animado que muestra el estado de carga del proceso.
Cuando el icono de la batería está lleno, la carga se ha
completado y el teléfono se puede desconectar de la red.
Nota: utilizar exclusivamente el cable original USB que se ha
proporcionado para cargar el teléfono. Proceder con la carga
exclusivamente en un lugar abierto y seco. Un ligero
calentamiento del teléfono durante el proceso de carga es
normal. La batería alcanzará su eficiencia funcional sólo
después de algunos ciclos completos de carga.
Atención: para una correcta funcionalidad del producto y la
integridad de la garantía se recomienda el uso del cargador
original NGM.
28
izar el
tuado
pa de
tivo al
de red
Funciones clave
Cámara vídeo frontal
Sensor de luminosidad
se ha
carga
ligero
ga es
sólo
Entrada auricular
Sensor de proximidad
e está
alizará
oceso.
se ha
Cámara fotos posterior
Receptor
Touch screen
capacitivo
Conector
Micro USB
Volumen + y -
Tecla On/Off
y Standby
Atrás
Home
Tecla
Ranura para quitar
la carcasa posterior
Menú contextual
o y la
gador
Micrófono
29
Encender, apagar y standby
El men
Pantalla principal
Para encencer el dispositivo, mantener pulsada la tecla On/Off.
Si encendéis el dispositivo por primera vez, encontraréis
algunos consejos útiles para coger familiaridad con el sistema
operativo. Para apagar el dispositivo, tener pulsada la misma
tecla y asegurar que se quiere apagar seleccionando “Apagar”.
Una breve presión de la tecla permite pasar rápidamente a la
modalidad de standby (pantalla apagada) o de volver desde
esta pantalla a la pantalla de standby (ver abajo).
Intensidad señal USIM
Nivel batería
Panel notificación
Indicador páginas
de la pantalla
principal
Mover el candado hacia la
derecha para desbloquear
la pantalla y acceder a la
pantalla principal.
30
Menú de llamada
Mensajes
Agenda
Menú de las aplicaciones
La pantalla principal es el punto de inicio para la utilización de
todas las aplicaciones del móvil. Las otras dos páginas
principales se encuentran a la derecha y a la izquierda respecto
a la página central (representadas por indicadores blancos), las
cuales se pueden personalizar libremente con los accesos
directos de las aplicaciones preferidas. Para ello, basta
mantener pulsada una aplicación de la pantalla Aplicaciones
para poder colocarla a gusto en las pantallas principales.
Control
arrastra
del men
otra pa
cuántas
disposit
anterio
El menú principal
Panel notificación
Indicador páginas de
la pantalla principal
ficación
páginas
alla
ciones
ón de
áginas
specto
s), las
ccesos
basta
ciones
Controlar el touch screen tocándolo, teniéndolo pulsado o
arrastrando el dedo en la pantalla. Seleccionar una aplicación
del menú principal o desplazarse de izquierda a derecha hasta
otra pantalla de aplicaciones. El número de indicadores muestra
cuántas páginas de aplicaciones están instaladas en el
dispositivo. Pulsar la tecla Atrás para volver a la pantalla
anterior; pulsar la tecla Home para volver a la pantalla principal.
Gestionar una llamada
Llamada vocal
Desde la pantalla principal, tocar el icono que representa el
teléfono para abrir la pantalla de llamada. Digitar el número
telefónico a llamar usando el teclado virtual.
Iniciar la llamada pulsando la tecla con el teléfono verde.
Para terminar la llamada, pulsar el icono Fin Llamada.
Para responder a una llamada arrastrar la barra con las
flechas hacia el icono verde situado a la izquierda; para
rechazarla, arrastrar la barra con las flechas hacia el icono
rojo situado a la derecha. Para silenciar una llamada
recibida, tocar brevemente la tecla Volumen “-” o “+”
(situada en la parte izquierda del teléfono).
Rellamar a un número desde el registro llamadas
Desde el menú principal, seleccionar el menú de llamadas y
la carpeta Registro para acceder rápidamente a las últimas
llamadas realizadas, recibidas y perdidas.
Clicar sobre el icono verde situado a la derecha para iniciar
la llamada.
Videollamada
Gracias a la cámara de vídeo frontal, con NGM Winn es posible
realizar una videollamada.
Desde la lista llamadas o desde la agenda, clicar en la
imagen del contacto (o en el icono general si al contacto no
se le ha asociado ninguna imagen).
Seleccionar el icono Videollamada
de la lista del popup
(el segundo desde la izquierda).
31
Gestionar contactos
Añadir un nuevo contacto
Desde la pantalla o desde el menú principal, seleccionar
Agenda.
Clicar en el icono agenda con el símbolo “+”.
Introducir Nombre, Número y otros datos (sólo si se guarda
en el Teléfono) del contacto.
Confirmar que se quiere guardar.
Añadir un nuevo contacto del registro llamadas
Desde el menú principal, seleccionar Registro.
Pulsar prolongadamente sobre el número que se quiere
guardar entre las llamadas perdidas, realizadas o recibidas.
Elegir Añadir a contactos y confirmar que se quiere añadir
el número a un contacto existente o crear uno nuevo.
Después de haber añadido nombre y otros datos, confirmar
con guardar.
Configurar las melodías
Seleccionar una melodía
Desde el menú principal, seleccionar Ajustes > Sonido.
En llamadas entrantes, seleccionar Tono del teléfono o
Melodía videollamada.
Elegir la melodía deseada de la lista.
Si se desea configurar una melodía personalizada, desde
Música seleccionar la canción deseada, y por lo tanto, Usar
como melodía utilizando el menú contextual. A este punto el
archivo será introducido en la lista de las melodías disponibles.
Nota: es posible utilizar el archivo de melodías en formato
*mid,*wav o *mp3.
32
Bloqueo pantalla y accesos directos
Desde el menú principal, seleccionar Ajustes > Ubicación y
seguridad > Bloqueo pantalla. Seleccionar la modalidad
deseada para bloquear la pantalla (Ninguno, Patrón, PIN o
Contraseña) y confirmar. Para bloquear la pantalla, pulsar
rápidamente la tecla On/Off del teléfono. Para desbloquear la
pantalla, seguir las indicaciones de la pantalla.
Activar o desactivar rápidamente la vibración
Para desactivar rápidamente la melodía de las llamadas y
los mensajes pulsar la tecla Volumen “-”. Una vez que se ha
llegado al volumen mínimo, el teléfono entrará en
modalidad vibración.
Desde el panel de notificación, seleccionar la opción
“vibración”. Desactivarlo para volver a la modalidad
anterior.
Pulsar prolongadamente la tecla * en el teclado virtual.
Pulsar de nuevo prolongadamente la misma tecla para
volver a la modalidad anterior.
Navegar por Internet
Conectarse a Internet
Desde la pantalla o desde el menú principal, elegir Navegador.
Digitar el URL en la barra de direcciones para iniciar la
navegación.
Email
Configurar una cuenta en la aplicación Email en el Menú
principal siguiendo las indicaciones.
ción y
alidad
PIN o
pulsar
ear la
adas y
se ha
á en
opción
alidad
irtual.
para
gador.
iar la
Menú
Enviar y leer mensajes
Enviar SMS y MMS
Desde la página o del menú principal, elegir Mensajes >
Mensaje nuevo para acceder a la pantalla de introducción
texto.
Digitar las primeras letras de un nombre en la sección
destinatario para buscar un contacto y seleccionar el
contacto de la lista a popup, o introducir directamente el
número del destinatario.
Introducir el texto en el espacio con el teclado virtual.
Abrir el menú contextual y seleccionar Adjuntar para incluir
adjuntos multimediales (el mensaje se convertirá en MMS).
Pulsar el icono Enviar.
Conectividad
El sistema operativo requiere una conexión de datos activa. Si
no se ha realizado un contrato, el tráfico datos implicará gastos,
se recomienda, en este caso, configurar el acceso a Internet
trámite WiFi. Para activar el tráfico datos en la USIM, ir a
Ajustes > Conexiones inalámbricas > Conexión datos o utilizar
la tecla rápida de activar/desactivar en el panel de notificación.
Conectarse a Internet con la función Wi-Fi
Podéis conectaros a la red wireless utilizando la función Wi-Fi.
Para activarla, desde el menú principal elegir Ajustes >
Conexiones inalámbricas > Wi-Fi. Para configurar el Wi-Fi y
gestionar los puntos de acceso wireless, utilizar la función
Ajustes de Wi-Fi. Para activar/desactivar rápidamente el WiFi
utilizar la tecla que se encuentra en el panel de notificación.
Prestar atención a todas las advertencias e indicaciones
específicas del personal autorizado cuando os encontráis en
áreas en donde el uso de los dispositivos wireless está limitado,
como en el avión y en los hospitales. Pasar a la Modalidad
offline cuando se utilizan sólo los servicios que no necesitan
acceso a la red.
Conectarse a un dispositivo Bluetooth
Encender el dispositivo Bluetooth™ al que se quiere
conectar. Consultar la documentación del dispositivo.
Desde el menú principal, elegir Ajustes > Conexiones
inalámbricas
para
activar
el
Bluetooth.
Para
activar/desactivar el Bluetooth utilizar la tecla que se
encuentra en el panel de notificación.
Elegir Ajustes de Bluetooth > Buscar dispositivos para iniciar
automáticamente la búsqueda de los dispositivos Bluetooth.
Entre los dispositivos detectados, seleccionar el nombre del
dispositivo con el que se quiere asociar. El teléfono
intentará asociarse con el dispositivo, a continuación se
pedirá un código de asociación.
Geolocalización GPS
El Global Positioning System (GPS) es un sistema de
posicionamiento por satélite, con cobertura global y contínua.
Para acceder a la función GPS, seleccionar Ajustes > Ubicación y
seguridad > Utilizar satélites GPS. En el interior del mismo
menú se puede también activar Usar redes inalámbricas que se
se apoya en las redes móviles. Cuando la función GPS está
activada, el teléfono comienza a recopilar datos de los satélites
disponibles y establece la posición actual. Para limitar el
33
consumo de recursos (batería y memoria) se recomienda
desactivar esta función cuando no se utiliza.
Elección rápida
Panel de notificación
Para abrir el panel de notificación, tocar el área de los iconos
situados en la parte alta de la pantalla y arrastrar el dedo hacia
abajo. Para esconder el panel, arrastrar hacia arriba la parte
baja del panel. Cuando os encontráis en el interior de los menús
principales del teléfono, desde el panel de notificación se puede
acceder a la lista de notificaciones procedentes de la USIM o del
sistema y a los 6 widgets de gestión. En orden: Vibración,
Bluetooth, Wi-Fi, Datos 3G, Bloqueo rotación.
Acceso rápido a las aplicaciones recientes
Cuando os encontráis en el interior de cualquier aplicación,
mantener pulsado la tecla Home durante unos segundo: se
visualizará la lista de las aplicaciones que se han utilizado
recientemente, las cuales se pueden seleccionar directamente.
Menú contextual
Cuando os encontráis en el interior de cualquier aplicación,
pulsar la tecla Menú contextual para visualizar el menú
contextual referido a la misma aplicación con las relativas
informaciones.
Tecla
La tecla Eco es una función que permite el acceso rápido a la
gestión de las funciones del teléfono. Seleccionando la
respectiva tecla, se abre una pantalla que muestra en alto el
porcentaje de uso de la tarjeta de memoria, de la memoria
34
interna y de la carga de la batería. En la parte inferior, abriendo
el menú desplegable Seleccionar modalidad, se pueden elegir
las modalidades de ahorro de los recursos preconfigurados:
Modalidad Sleep, Modalidad Cine y Modalidad Conferencia.
Si se elige Personalizado, se podrán configurar las propias
preferencias de ahorro energético.
Introducir texto con SwiftKey
El método de introducción configurado por defecto en el
teléfono es el del teclado SwiftKey. El método de escritura
SwiftKey es un sistema avanzado para la introducción
predectiva de texto; cuando se escriben mensajes SMS, MMS o
E-mail, esta modalidad prevé la palabra que se está digitando
cambiándola por cada presión de las teclas. Durante la primera
utilización, el programa sugiere con popups las innovaciones y
las peculiaridades de este sistema de escritura.
SwiftKey tiene un Diccionario “inteligente” que extrae palabras,
además, de las varias aplicaciones del teléfono, como la
agenda, las redes sociales, etc. Para un correcto
funcionamiento del diccionario, en el teléfono se tiene que
instalar la micro-SD suministrada en el paquete de venta.
Para cambiar los parámetros de introducción del texto,
seleccionar, Ajustes> Idioma y teclado > SwiftKey for NGMMobile.
Advertencia: El fabricante no asume ninguna responsabilidad por el
incumplimiento de las directrices establecidas o por un uso inapropiado del
teléfono. El fabricante se reserva el derecho de modificar sin previo aviso la
información contenida en este manual. El contenido de este manual podría
cambiar con respecto al contenido mostrado por el teléfono. En este caso,
prevalece el contenido mostrado por el teléfono.
Certificaciones
Documentación técnica conservada en la NGM Italia S.r.l.
Disponible a petición.
Declaración de conformidad (R&TTE)
Nosotros, NGM Italia
Declaramos bajo nuestra exclusiva responsabilidad que el
producto:
Teléfono GSM/WCDMA/Wi-Fi: NGM WINN
Al que se refiere el presente documento, y conforme a las
siguientes normas y/o otros documentos normativos.
Salud
Seguridad
EMC
Radio
EN 50360, EN 62209-1
EN 60950-1+A11
EN 301 489-1/-7/-17
EN 301 511
EN 300 328
S.A.R. (Specific Absorption Rate)
Información sobre la certificación SAR (Specific Absorption
Rate, Coeficiente de Absorción Específica)
Se declara con el presente documento que toda la serie de tests
radio esenciales han sido realizados y que el citado producto
cumple con todos los requisitos esenciales de la Directiva
1999/5/EC.
El procedimento de declaración de conformidad al que se hace
referencia en el Artículo 10 y detallado en el Apéndice [IV] de la
Directiva 1999/5/EC ha sido realizado con la participación de las
siguientes Entidades notificadas:
PHOENIX TESTLAB GmbH
Königswinkel 10,
D-32825 Blomberg,
Germany
(Representante en la UE)
NGM Italia S.r.l.
Via L. Da Vinci, 7 – Ponticelli
56020 Santa Maria a Monte (Pi)
0700
Los teléfonos móviles son transmisores de radiofrecuencias de
baja potencia. Están diseñados para no superar las directrices
sobre los límites de exposición de las ondas de radio. Estas
directrices han sido elaboradas por dos entidades
internacionales, ICNIRP y IEEE, que incluyen los márgenes de
seguridad para asegurar la protección de la persona
independientemente de su edad y salud
El dispositivo en cuestión cumple con el estándar de la Unión
Europea (UE) que limita la exposición de la persona a la
radiofrecuencia
emitida
por
los
dispositivos
de
telecomunicaciones y radio. Este estándar impide la venta de
dispositivos móviles que alcanzan un coeficiente de absorción
específico (denominado SAR) de 2,0 watt por kilogramo de
tejido corporal.
Durante el test, el nivel SAR registrado más elevado ha sido de
0,497 watt por kilogramo [1,2]. Durante un uso normal, el nivel
SAR efectivo puede llegar a ser muy inferior, debido a que el
35
dispositivo se ha diseñado para emitir sólo energía a la
radiofrecuencia necesaria que sirve para transmitir la señal a la
estación base más cercana. Mediante una gestión automática
de la transmisión a un nivel de potencia lo más bajo posible, el
dispositivo reduce la exposición total de la energía a la
radiofrecuencia de los sujetos. La declaración de conformidad
en cuestión, demuestra la conformidad de este dispositivo con
la directiva R&TTE (European Radio & Terminal
Telecommunications Equipment).
[1] Los controles se han realizado de acuerdo con las
directivas internacionales sobre los controles.
información sobre este asunto, NGM invita a consultar el
documento
del OMS (Nota descriptiva n.193, Campos
electromagnéticos y salud pública: teléfonos móviles) disponible
en el siguiente enlace:
http://www.who.int/mediacentre/factsheets/fs193/es/index.html
NGM aconseja utilizar con moderación cualquier dispositivo móvil de
cualquier marca y modelo y, tenerlo a una distancia mínima de 1,5 cm del
cuerpo o utilizar auriculares o utilizar dispositivos “manos libres”.
[2] Cuando se utiliza cerca del cuerpo, este modelo de
teléfono ha sido controlado y cumple con las directivas de la
exposición a las ondas utilizando los accesorios que se han
suministrado, diseñado y aprobado por la NGM, o utilizando
accesorios que no contienen partes metálicas y sitúan la
unidad pórtatil a un mínimo de 1,5 cm del cuerpo.
Advertencia
La OMS (Organización Mundial de la Salud, o WHO – World
Health Organization) afirma que las informaciones científicas
actuales nos indican la necesidad de tener una particular
precaución en el uso de los teléfonos móviles. Sin embargo,
para aquellos usuarios que no estén convencidos con esta
afirmación, NGM aconseja limitar la propia exposición o la de
sus hijos; por ejemplo, reduciendo la duración de la llamada, o
utilizando auriculares y dispositivos “manos libres” para tener el
móvil lejos del cuerpo y de la cabeza. Para saber más
36
Copyright © 2012 NGM Italia
Ninguna parte de esta publicación puede ser extraída, reproducida,
traducida o utilizada de cualquier forma o en cualquier medio, electrónico
o mecánico, incluido fotocopias y microfilm, sin previa autorización escrita
por la NGM Italia.
Bluetooth® es una marca comercial registrada en todo el mundo del
Bluetooth SIG, Inc.
Wi-Fi® y el Wi-Fi son marcas comerciales registradas de Wi-Fi Alliance.
Kurzanleitung - Deutsch
37
Inbetriebnahme
Speicherkarte einsetzen
Einsetzen der USIM Karte
Um alle Funktionen von Winn zu verwenden, setzen Sie die in
der Verkaufspackung beigelegte 8GB Micro-SD ein.
Der Slot für die MicroSD Karte befindet sich auf der Rückseite
des Telefons neben den Slot für die USIM Karte. Die
Speicherkarte muss mit den goldenen Kontaktflächen nach
unten weisend in ihr Slot eingefügt werden, nachdem Sie Cover
und Akku entfernt haben.
Die USIM Karte enthält Ihre Telefonnummer, PIN-Nummer,
Servicenummern, das Telefonbuch und andere wichtigen
Details. Die USIM Karten werden, nachdem das Telefon
ausgeschaltet und der Akku entfernt wurde, in die Rückseite
des Gerätes eingesetzt. Um die hintere Cover zu entfernen,
verwenden Sie den Schlitz auf der unteren Telefonrückseite,
indem Sie mit einer dünnen Oberfläche wie zum Beispiel einem
Fingernagel die Cover abheben. Setzen Sie die USIM Karte mit
der goldenen Kontaktfläche nach unten weisend in den dafür
vorgesehenen Slot ein.
38
die in
kseite
. Die
nach
Cover
Akku einsetzen
Aufladen des Akkus
Ihr Gerät wird mit einem Lithium Akku geliefert und ist dazu
entworfen, ausschließlich mit originalem NGM Akkus und
Zubehör betrieben zu werden. Der Akku muss in die Rückseite
des Telefons eingesetzt werden. Richten Sie die Kontakte des
Akkus mit den Kontakten im Akkufach des Telefons aus und
schieben sie ihn in Position. Wenn Sie fertig sind, setzen Sie die
Cover wieder richtig auf die Telefonrückseite mit leichtem
Druck auf allen Seiten auf.
Laden Sie den Akku vollständig auf bevor Sie das Gerät
benutzen. Verwenden Sie dazu das mitgelieferte Ladegerät und
die USB Buchse seitlich des Telefons, nachdem Sie den
Schutzdeckel entfernt haben. Stecken Sie das Ladegerät vorerst
in die Steckdose, anschließend verbinden Sie das USB-Kabel
zuerst mit dem Ladegerät und dann mit dem Telefon. Der Akku
kann auch an einem PC aufgeladen werden.
Achtung: Verbinden Sie das Telefon nicht mit einem ein-oder
ausschaltenden PC, um Spannungssprünge zu vermeiden.
Während der Ladung zeigt das Ladesymbol den Status des
Vorganges an. Sind alle Balken gefüllt, so ist der Akku geladen
und das Telefon kann vom Stromnetz getrennt werden.
Es darf nur original NGM Zubehör zur Ladung benutzt werden.
Laden Sie das Gerät immer in trockenen Innenräumen auf. Eine
leichte Erwärmung des Gerätes während der Ladung ist normal.
Der Akku erreicht seinen vollen Leistungsumfang wenn es einige
Male vollständig aufgeladen wurde.
Achtung: Um die korrekte Funktion und die Produkt-Garantie zu
bewahren verwenden Sie immer originale NGM Ladegeräte.
39
Hörer
Display
SIM1 Anruftaste
SIM2 Anruftaste
Standard Tastatur
Profil
Kamera
Vordere Videokamera
Hörer
Kopfhörer Buchse
Licht Sensor
Nähe Sensor
Micro USB
Buchse
Lautsprecher
+ und -
Kapazitives
Touch screen
Ein/Aus und
Standby
Zurück
Home
Taste
Kontextuelles Menü
Mikrofon
40
Schlitz für
Cover
Entfernung
Ein- und ausschalten, Standby
Der Hauptbildschirm
Um das Telefon einzuschalten, drücken Sie einige Sekunden
lang die Ein/Aus Taste. Wenn Sie das Telefon das Erste Mal
eingeschaltet wird, folgen Sie den Anleitungen um mit dem
System zu familiarisieren. Um das Gerät auszuschalten, halten
Sie die Ein-Aus Taste nochmals verlängert gedrückt und
bestätigen Sie auf dem Touch Screen die Ausschaltung. Ein
schneller Druck der Ein/Aus Taste wird das Telefon in Standby
stellen und den Bildschirm ausschalten; nochmaliger leichter
Druck wird das das Standby aufheben (siehe unten).
USIM Signalstärke
Akku Ladezustand
Hinweistafel
Hauptbildschirm
Seitenindikatoren
Schieben Sie den Schloss
nach rechts um den
Bildschirm zu entsperren
und in den Hauptbildschirm
zu gelangen
Anruf Menü
Mitteilungen
Telefonbuch
Hauptmenü
Der Hauptbildschirm ist der Ausgangspunkt für alle Funktionen
im Telefon. Es hat weitere zwei Seiten (siehe weiße
Indikatoren), die durch das Verschieben vom Bildschirm direkt
besichtigt werden können. Diese Bildschirme können mit
verschiedenen Shortcuts personalisiert werden, indem die
gewünschte Anwendung im Hauptmenü-Bildschirm gedrückt
gehalten wird, bis sie auf dem Hauptbildschirtm erscheint und
beliebig geordnet werden kann.
41
Das Hauptmenü
Hinweistafel
Hauptmenü
Seitenindikatoren
Tasten und Icons im Touch Screen können mit dem Finger
gedrück, verschoben und gedrückt gehalten werden. Wählen
Sie eine Anwendung aus den Hauptmenü oder browsen Sie es
links oder rechts, es sind soviele Anwendungsbildschirme
vorhanden wie weiße Indikatoren oben angezeigt werden. Mit
der Zurück-Taste gelangen Sie in das vorherige Bildschirm
zurück, die Home-Taste bringt Sie in den Hauptbildschirm
zurück.
42
Anrufen
Sprachanrufe
Aus dem Hauptbildschirm wählen Sie das Anrufmenü-Icon,
somit erscheint die Virtuelle Tastatur auf der ersten Kartei.
Geben Sie Ihre gewünschte Rufnummer ein.
Drücken Sie die grüne Anruftaste.
Um einen Anruf zu beenden, drücken Sie auf die EndeTaste.
Um einen eingehenden Anruf zu antworten, schieben Sie die
mittlere Barre nach links auf die grüne Taste; um sie zu
verweigern, schieben Sie die Barre auf die rote Taste rechts.
Um einen eingehenden Anruf stumm zu stellen, drücken Sie
kurz auf eine der Lautstärke-Tasten.
Eine Nummer aus den Anrufprotokollen zurückrufen
Aus dem Hauptmenü, wählen Sie das Anrufmenü-Icon und
die Anrufe-Kartei um die zuletzt eingewählten,
empfangenen und verpassten Anrufe aufzulisten.
Drücken Sie auf das grüne Telefonicon rechts von der
Nummer um die Nummer direkt anzurufen.
Videoanruf
Dank der vorderen Videokamera, können Sie mit NGM Winn
Videoanrufe tätigen.
Aus den Anrufprotokollen oder Telefonbuch, klicken Sie auf
das Kontaktbild (oder allgemeines Icon wenn kein
Kontaktbild eingestellt wurde).
Klicken Sie auf das Videoanruf icon
dalla lista del popup
(seconda da sinistra).
Kontakte verwalten
Einen neuen Kontakt einspeichern
Im Hauptmenü wählen Sie Telefonbuch.
Wählen Sie das rote Telefonbuch-Icon mit dem „+“.
Geben Sie Namen und Nummer und eventuelle andere
Details ein (wenn Sie auf Telefon speichern).
Bestätigen Sie die Speicherung.
Neuen Kontakt aus den Anrufprotokollen hinzufügen
Im Hauptmenü wählen Sie das Anrufmenü Icon.
Wählen Sie die Nummer die Sie speichern wollen (unter den
angenommenen, eingewählten und verpassten Anrufen
oder Alle).
Halten Sie die Nummer verlängert gedrückt und Zu
Kontakten hinzufügen und wählen Sie ob Sie die Nummer zu
einem bestehenden Kontakt hinzufügen wollen oder ob ein
neuer Kontakt erstellt werden soll.
Nachdem Sie Namen und eventuelle andere Infos
hinzugefügt haben, bestätigen Sie mit Speichern.
Klingeltöne einstellen
Klingelton Auswahl
Im Hauptmenü wählen Sie Einstellungen > Audio.
Wählen Sie Anruf Klingelton oder Videoanruf Klingelton
und wählen Sie den gewünschten Klingelton aus der Liste
aus.
Wenn Sie einen personalisierten Klingelton möchten, öffnen Sie
in Musik ein gewünschtes Stück aus und berühren Sie das
Kontextuelle Menü-Icon; anschließend wählen Sie Als
Klingelton einstellen.
Anmerkung: Es können Klingeltöne in den Formaten *mid,*wav
und *Mp3 verwendet werden.
Displaysperre und Schnelltasten
Displaysperre: Aus dem Hauptmenü, wählen Sie Einstellungen
> Position und Sicherheit > Display-Sperre einrichten. Wählen
Sie die gewünschte Sperre (Keine – Muster – PIN - Passwort).
Eine schnelle Aktivierung der Display-Sperre wird durch den
schnellen Druck der Ein/Aus Taste auf der Telefonseite
erhalten. Um den Bildschirm wieder zu aktivieren, folgen Sie die
Anleitungen.
Schnelle Aktivierung der Vibration
Aus dem Hauptbildschirm aus drücken Sie so lange auf die
Lautstärke „-“ Taste (seitlich auf dem Telefon), bis das
Telefon auf das Vibrations-Profil gestellt wird.
Aus der Hinweistafel, Wählen Sie das “Vibration” Icon.
Wählen Sie es erneut um aus dem Vibrationsprofil
auszutreten.
Drücken Sie verlängert auf die *-Taste in der virtuellen
Tastatur um den Vibrations-Modus zu aktivieren.
Nochmaliger verlängerter Druck wird das vorherige Audio
Profil wieder herstellen.
Web-Zugang
Aus dem Hauptmenü, wählen Sie Browser. Wählen Sie die URL
in die Adressenbarre ein um die Navigation zu beginnen.
E-Mail
Konfigurieren Sie ein E-Mail Konto in der E-Mail Anwendung im
Hauptmenü, folgen Sie den Anleitungen.
43
Mitteilungen senden und lesen
SMS und MMS senden
Aus dem Hauptmenü heraus wählen Sie Mitteilungen >
Neue
Nachricht
schreiben
um
in
den
Texteinfügungsbildschirm zu gelangen.
Wählen Sie direkt die Empfängernummer ein oder berühren
Sie das Kontakte-Icon um den Empfänger aus den
Kontakten zu wählen.
Geben Sie den Text in das dedizierte Rechteck ein.
Wenn Sie eine MMS versenden wollen, wählen Sie mit der
Kontextuellen Menü Taste „Anhängen“.
Drücken Sie die Senden-Taste.
Konnektivität
Das Betriebssystem benötigt eine aktive Datenverbindung. Falls
Ihr Telefonvertrag eine Datenverbindung nicht beinhaltet,
könnten zusätzliche Kosten auftreten. Wenn Sie eine
Datenverbindung auf Ihrer USIM Karte erlauben wollen, wählen
Sie Einstellungen > Drahtlos & Netzwerke > Datenverbindung
oder aktivieren/desaktivieren Sie das dedizierte Icon in der
Hinweistafel. Es ist ratsam auch eine Wi-Fi Verbindung für den
Internetanschluss zu konfigurieren.
Internetverbindung mit WiFi
Um Wi-Fi zu aktivieren, wählen Sie Einstellungen > Drahtlos &
Netzwerke > WLAN oder aktivieren/desaktivieren Sie das
dedizierte Icon in der Hinweistafel. Im WLAN Menü finden Sie
auch WLAN-Einstellungen, wo alle Parameter festgelegt werden
können. Folgen Sie immer allen Hinweisen und Warnungen
wenn Sie sich in solchen Bereichen befinden, in denen der
44
Gebrauch von Wireless Geräten verboten ist, sowie zum
Beispiel auf Flugzeugen oder in Krankenhäusern. Stellen Sie das
WLAN in diesen Bereichen aus.
Bluetooth
Sich an ein Bluetooth Gerät verbinden
Schalten Sie das andere Bluetoothgerät ein. Folgen Sie
eventuell die Anleitungen des Gerätes.
Aus dem Menü wählen Sie Einstellungen > Drahtlos &
Netzwerke > Bluetooth damit schalten Sie es Ein.
Wählen Sie Bluetooth Einstellungen dann Scan nach Gerät
um die Suche nach neuen Bluetoothgeräten zu starten.
Wählen Sie das Gerät aus und wählen Sie „Koppeln“. Das
Telefon wird versuchen, sich zu verbinden, eventuell wird
ein Kopplungscode verlangt.
GPS Geolokalisierung
Das Global Positioning System (GPS) ist ein weltweit
verbreitetes, kontinuierliches Lokalisierungssystem. Um es
einzuschalten, wählen Sie Einstellungen > Position und
Sicherheit > GPS Satelliten. Wenn die GPS Funktion
eingeschaltet ist, fängt das Telefon an, Daten von den Satelliten
einzusammeln um die aktuelle Position zu bestimmen. Um
Ressourcen zu sparen (Akku und Speicher), ist es ratsam, diese
Funktion auszuschalten wenn sie nicht nötig ist.
Abkürzungen
Hinweistafel
Um die Hinweistafel zu öffnen, berühren Sie die schwarze
Hinweisbarre auf der oberen Seite des Bildschirmes und ziehen
Sie sie nach unten. Wenn nicht mehr nötig, schieben Sie sie
wieder nach oben. Wenn Sie diese Operation aus einem
Telefon-Menü
machen,
haben
Sie
durch
diesen
Hinweisbildschirm Zugang zu Benachrichtigungen von der USIM
Karte und Sie können zu den Verwaltungs-Widgets von
Vibration, Bluetooth, Wi-Fi, 3G Daten, GPS und DisplayRotation.
Schneller Zugriff auf kürzlich verwendete Anwendungen
Aus jedem Bildschirm können Sie die Home-Taste einige
Sekunden lang berühren; eine Liste der zuletzt verwendeten
Anwendungen wird angezeigt, direkt auswählbar.
Kontextuelles Menü
Innerhalb jeder Anwendung oder Menüs, können Sie durch
berühren des „Kontextuellen Menu“-Icons ein kontextuelles
Menü hervorrufen, von der offenen Anwendung abhängig.
Taste
Die Eco Taste öffnet das Interface durch die Sie schnellen
Zugang zur Verwaltung der wichtigsten Telefonfunktionen
haben. Wenn Sie die Taste aktivieren, öffnen Sie ein Bildschirm
das auf der oberen Seite die Prozentzahl des Speichergebrauchs
der Speicherkarte und des Telefonspeichers anzeigt und die
Prozentzahl des Akku Ladezustandes. Auf der unteren Seite
befindet sich ein Menü in dem Sie einige voreingestellte
Energiespar-Konfigurationen wählen können (Sleep, Kino,
Konferenz) oder Personalisierbar, so dass Sie alle einzelnen
Optionen beliebig einstellen können.
Mit SwiftKey Text einfügen
Die SwiftKey Tastatur ist ein erweitertes Eingabesystem für
Texte und ist im Telefon Default eingestellt. Beim Schreiben des
Textes für eine SMS, MMS oder E-Mail, antizipiert das System
das Wort, das eingetippt werden soll. Beim Ersten Gebrauch
wird das System Hinweise und Vorschläge auf dem Bildschirm
anzeigen.
SwiftKey hat ein “intelligentes” Wörterbuch, das Vokabeln auch
aus anderen Telefonanwendungen ergreift, wie zum Beispiel
das Telefonbuch oder die Sozialnetzwerke.
Um korrekt zu funktionieren, muss die in der Verkaufspackung
beigelegte Micro-SD Speicherkarte korrekt im Telefon installiert
werden.
Um die Texteinfügungsparameter zu ändern, wählen Sie
Einstellungen > Sprache und Tastatur > SwiftKey for NGMMobile
Warnung: Der Hersteller übernimmt keine Verantwortung für die NichtEinhaltung der angegebenen Richtlinien oder den nicht ordnungsgemäßen
Gebrauch des Mobiltelefons. Unsere Firma behält sich das Recht vor, Änderungen
am Inhalt dieser Bedienungsanleitung auch ohne öffentliche Bekanntgabe
vorzunehmen. Der Inhalt dieser Anleitung kann vom tatsächlichen, im
Mobiltelefon angezeigten, Inhalt abweichen. In diesem Fall gilt das, was im
Mobiltelefon angezeigt ist.
45
Zertifikate
Konformitätserklärung (R&TTE)
Wir, NGM Italia, erklären in alleiniger Verantwortung, dass das
Produkt, bezeichnet als:
GSM/WCDMA/Wi-Fi Mobiltelefon: NGM WINN
Mit den folgenden Standards und Vorschriften übereinstimmt:
Gesundheit
Sicherheit
Elektromagnetische
Verträglichkeit
Radio
EN 50360, EN 62209-1
EN 60950-1+A11
EN 301 489-1/-7/-17
EN 301 511
EN 300 328
Wir erklären, dass alle Serien von grundlegenden Funktests
durchgeführt wurden, und das besagte Produkt alle
notwendigen Anforderungen der Direktive 1999/5/EC erfüllt.
Die Übereinstimmung der Beurteilungsprozedur gemäß Artikel
10 und detailliert Annex IV der Direktive 1999/5/EC wurde
befolgt unter Einbeziehung der folgenden gemeldeten Stellen:
PHOENIX TESTLAB GmbH
Königswinkel 10,
D-32825 Blomberg,
Germany
0700
Technische Dokumentation liegt bei: NGM Italia Srl
Die Dokumentation wird auf Wusch versendet
Geschäftsstelle in der EU ist:
46
NGM Italia Srl
Via L. Da Vinci 7 – Ponticelli
I-56020 Santa Maria a Monte (PI)
S.A.R. (Specific Absorption Rate)
Informationen über SAR Zertifizierung (Specific Absorption
Rate)
Mobiltelefone sind Radio-Funkgeräte. Sie sind entworfen, um
die internationalen Richtlinien für Radiowellen-Exposition nicht
zu überschreiten. Diese Richtlinien sind von den unabhängigen
internationalen wissenschaftlichen Organisationen ICNRP und
IEEE entwickelt worden und beinhalten die Sicherheitslimits um
den Menschen Schutz zu versichern, unabhängig von ihrem
Alter oder Gesundheit.
Dieses Telefon ist den Anforderungen der Europäischen Union
(EU) geeignet, bzgl. der Strahlung von Funkwellen die von
Radio- und Telekommunikationsgeräten ausgehen. Der
Strahlungsstandard für Mobiltelefone, in Maßeinheit SAR
ausgedrückt (Spezifischer Absorbierungsgrad), hat eine EU-Rat
empfohlene SAR Grenze von 2.0 W per kg Körpergewebe.
Der höchste SAR Wert, der für dieses Telefonmodell getestet
wurde, war 0,497 Watt/kg [1,2]. Der aktuelle SAR-Wert des
Telefons während des normalen Betriebs kann weit unter
diesem Maximalwert sein, da das Telefon konstruiert wurde um
lediglich die minimal benötigte Energie in Radiofrequenz
auszustrahlen um die nahest mögliche Basisstation zu erreichen
und damit in Verbindung zu bleiben.
Im Allgemeinen verhält sich die Sendeleistung proportional zum
Abstand zur Basisstation; d.h. je näher Sie an der Basisstation
sind, desto niedriger die Sendeleistung des Telefons. Diese
Übereinstimmungserklärung weist nach, dass das bezeichnete
Produkt in Übereinstimmung mit den notwendigen
Anforderungen und anderen relevanten Vorschriften der
„European Radio & Terminal Telecommunications Equipment“
1999/5/EC ist.
[1] Die Kontrollen sind in Übereinstimmung
internationalen Richtlinien vollendet worden.
mit
Für weitere Informationen über das Thema, lädt NGM Sie ein,
die Dokumente der WHO an der folgenden Web-Adresse zu
lesen:
http://www.who.int/peh-emf/publications/facts/fs193_deutsch_2010.pdf
NGM empfehlt, alle Mobiltelefone unabhängig von Modell oder Marke
mit Mäßigung zu verwenden und es eventuell mindestens 1,5cm entfernt
von sich zu halten oder Kopfhörer bzw. Lautsprecher zu verwenden.
[2] Dieses Telefonmodell ist für die Verwendung neben dem
Körper kontrolliert worden und ist den Richtlinien für die
Exposition zu elektromagentischen Wellen konform wenn es
mit originalen, von NGM gelieferten oder genehmigten
Zubehör verwendet wird oder wenn Zubehöre ohne
metallischen Teilen verwendet werden, die dem Menschen
mit dem Mobiltelefon mindestens 1,5cm Abstand
versichern.
Copyright © 2012 NGM Italia
Warnungen
Die WHO (World Health Organization), bestätigt dass die
aktuellen wissenschaftlichen Informationen keine besonderen
Vorsichtsmaßnahmen für den Gebrauch von Mobiltelefonen
erfordern. Diejenigen Benutzer, die hiervon nicht gemäß
beruhigt sind, können für sich selbst und für die eigenen Kinder
die Exposition vermindern indem sie z.B. Telefongespräche
möglichst kurz halten und Kopfhörer/Lautsprecher verwenden
um das Telefon vom Körper und vom Kopf entfernt zu halten.
Kein Teil dieser Anleitung darf reproduziert, verbreitet, übersetzt oder
übermittelt werden, in keinerlei Form und mit keinerlei elektronischen
oder mechanischen Mitteln oder durch Fotokopierung, Aufnahme oder
Speicherung in Informations-Archiven oder Wiederherstellungssystemen
ohne vorherige schriftliche Genehmigung von NGM Italia erhalten zu
haben.
Bluetooth® ist ein kommerzieller Brand, in der ganzen Welt registriert
von Bluetooth SIG, Inc.
Wi-Fi® und das Wi-Fi Logo sind von Wi-Fi Alliance registrierte
kommerzielle Brands.
47
48
www.ngm.eu