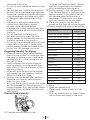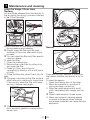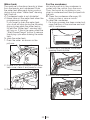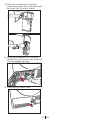
1
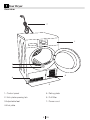
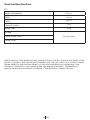
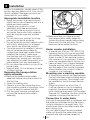
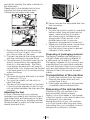
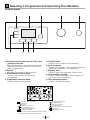
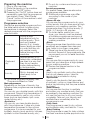
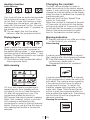
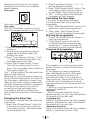
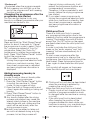
Condenser Sensor Dryer DCU 9330 Read this manual prior to initial operation of the product! Dear Customer, We hope that your product, which has been manufactured in modern facilities and passed through a strict quality control procedure, will give you very good results. We advise you to read through this manual carefully before using your product and keep it for future reference. This User Manual will • Help you use your machine in a fast and safe way. • Read the User Manual before installing and starting your product. • In particular, follow the instructions related to safety. • Keep this User Manual within easy reach for future reference. • Please read all additional documents supplied with your product. Remember that this User Manual is also applicable for several other models. Explanation of symbols Throughout this User Manual the following symbols are used: B Important safety information. Warning for hazardous situations with regard to life and property. Caution; Warning for supply voltage. Caution; Warning for fire hazard. Caution; Warning for hot surfaces. Read the instructions. C Useful information. Important information or useful hints about usage. This appliance’s packaging material is recyclable. Help recycle it and protect the environment by dropping it off in the municipal receptacles provided for this purpose. Your appliance also contains a great amount of recyclable material. It is marked with this label to indicate the used appliances that should not be mixed with other waste. This way, the appliance recycling organised by your manufacturer will be done under the best possible conditions, in compliance with European Directive 2002/96/EC on Waste Electrical and Electronic Equipment. Contact your town hall or your retailer for the used appliance collection points closest to your home. We thank you doing your part to protect the environment. 2960310463/120411.1633 A TABLE OF CONTENTS 1 Your Dryer 4 Overview..............................................4 Technical Specifications........................5 2 Important safety instructions6 General safety......................................6 Intended use........................................7 Children’s safety...................................7 3 Installation 8 Appropriate installation location............8 Removing the transportation safety assembly..............................................8 Under counter installation.....................8 Mounting over a washing machine........8 Connection to water drain;...................8 Adjusting the feet..................................9 4 Electrical Connection 10 Warning indicators..............................17 Changing the delay time.....................18 Cancelling the time delay....................18 Starting the programme......................18 Progress of programme......................18 Changing the programme after the programme has started......................19 Adding/removing laundry in standby mode..................................................19 Child-proof lock..................................19 Ending the programme through cancelling ..........................................20 End of programme.............................20 7 Maintenance and cleaning 21 Filter Cartridge / Door Inner Surface....21 Sensor ..............................................21 Water tank;.........................................22 For the condenser .............................22 Attention!............................................10 Electrical requirements........................10 Fitting a different plug ........................10 Washer/dryer combination..................10 8 Suggested solutions for problems 24 9 Guarantee 26 5 Initial preparations for drying11 What is covered?.......................... 26 What is not covered?.................... 26 Important notes............................ 26 Things to be done for energy saving:..11 Laundry suitable for drying in the machine.............................................11 Laundry unsuitable for drying in the machine.............................................11 Preparing laundry for drying................12 Correct load capacity.........................12 10 Service 6 Selecting a Programme and Operating Your Machine 13 Control panel......................................13 Programme selection..........................14 Timer Programmes.............................15 Programme selection and consumption table...................................................16 Programme table................................16 Drying degree ...................................17 Anti-creasing ....................................17 Changing the contrast........................17 3 EN 27 1 Your Dryer Overview 7 1 6 5 2 4 3 1- Control panel 5- Rating plate 2- Kick plate opening tab 6- Fluff filter 3-Adjustable feet 7- Power cord 4-Kick plate 4 EN Technical Specifications EN 2 Height (adjustable) 84,6 cm Width 59,5 cm Depth 59,8 cm Capacity (max.) 9 kg Weight (net) 38 kg Voltage Rated power input See rating plate Model code Specifications of this appliance may change without notice to improve the quality of the product. Figures in this manual are schematic and may not match your product exactly. Values stated on the machine labels or in the documentation accompanying it are obtained in laboratory in accordance with the relevant standards. Depending on operational and environmental conditions of the appliance, values may vary. 5 EN 2 Important safety instructions This section includes safety information that will help protection from risks of personal injuries or materialistic damages. Failure to follow these instructions shall cause any warranty and reliability commitment to become void. • General safety • Never place the machine on a carpetcovered floor, otherwise, lack of airflow beneath the machine may cause electrical parts to overheat. This will cause problems with your machine. • If the power cable or mains plug is damaged, you must call Authorised Service Agent for repair. • The product should not be plugged in during installation, maintenance and repair works. Such works should always be made by the technical service. Manufacturer shall not be held responsible for damages arising from processes carried out by unauthorised persons. • Connect the product to a grounded outlet protected by a fuse of suitable capacity as stated in the technical specifications table. • Operate your product at temperatures between +5°C and +35°C. • Do not use electrical devices in the product. • Do not connect the air exit of the product to the exit ducts which are used for the exhaust fumes of the devices operating with gas or other types of fuel. • You must provide enough ventilation in order to prevent gases exiting from devices operating with other types of fuels including the naked flame from accumulating in the room due to the back fire effect. • Always clean the lint filter before or after each loading. • Never operate your dryer without the lint filter installed. • Do not allow fibre, dust and dirt accumulation around the exhaust exit and at adjacent areas. • Power cable plug must be within easy reach after installation. • Do not use extension cords, multi-plugs • • • • • • • • • 6 EN or adaptors to connect the dryer to power supply in order to decrease the risk of electric shock. Do not make any changes on the plug supplied with the product. If it is not compatible with the socket, have a qualified electrician change the socket with a suitable one. Items cleaned or washed with gasoil/ fuel oil, dry-laundry solvents and other combustible or explosive materials as well as the items that are contaminated or spotted with such materials should not be dried in the product since they emit flammable or explosive vapor. Do not dry items cleaned with industrial chemicals in the dryer. Do not dry unwashed items in the dryer. Items soiled with cooking oils, acetone, alcohol, fuel oil, kerosene, stain remover, turpentine, paraffin and paraffin removers must be washed in hot water with plenty of detergent before being dried in the dryer. Garments or pillows bolstered with rubber foam (latex foam), shower bonnets, water resistant textiles, materials with rubber reinforcement and rubber foam pads should not be dried in the dryer. Do not use fabric softeners and anti-static products unless they are recommended by the manufacturers of the fabric softener or the product. This product must be earthed. Grounding installation decreases the risk of electric shock by opening a path with low resistance for the electricity flow in case of a malfunction or failure. Power cable of this product is equipped with a conductor and a grounding plug that allows for grounding the product. This plug must be installed appropriately and inserted into a socket which is grounded in accordance with the local laws and regulations. Do not install the product behind a door with a lock, sliding door or a door that has a hinge against the hinge of the dryer. Do not install or leave this product in places where it will be exposed to outdoor conditions. • Do not tamper with the controls. • Do not perform any repair or part replacing procedures on the product even if you know or have the ability to perform unless it is clearly suggested in the operating instructions or the published service manual. • Inside and exhaust duct of the product must be cleaned by the qualified service personnel periodically. • Wrong connection of grounding conductor of the product can cause electric shock. If you have any suspect about the grounding connection, have it checked by a qualified electrician, service representative or service personnel. • Do not reach into the machine when the drum is spinning. • Unplug the machine when it is not in use. • Never wash down the appliance with water! There is the risk of electric shock! Always disconnect by unplugging from the mains before cleaning. • Never touch the plug with wet hands. Never unplug by pulling on the cable, always pull out by grabbing the plug only. Do not operate the machine if the power cable or plug is damaged! • Never attempt to repair the machine yourself, otherwise, you will be putting your life and others’ lives in danger. • For malfunctions that cannot be solved by following the information given in the safety instructions: Turn off the machine and contact an authorised service agent. • Do not stop the dryer before the drying cycle comes to an end unless you will remove all laundry from the dryer fast in order to lay them and dissipate the heat. • Remove the door of the drying compartment before decommissioning or disposing of the product. • The final step of the drying cycle (cooldown cycle) occurs without applying heat to ensure that the items are left at a temperature that will not damage them. • Fabric softeners or similar products should be used as specified by the fabric softener instructions. • Underwear that contains metal reinforcements should not be placed in a dryer. Damage to the dryer can result if metal reinforcements come loose during drying. • Check all garments for forgotten lighters, coins, metal pieces, needles, etc. before loading. • At times when your dryer is not in use or after the laundry is taken out following the completion of drying process, turn off by using the On/ Off button. In cases when the On/ Off button is on (while the dryer is energized), keep the door of the dryer closed. Intended use • This product has been designed for domestic use. It should not be used for other purposes. • Use the product only for drying laundry that are marked accordingly. • Dry only those articles in your product that are stated in this manual. • This product is not intended to be used by persons with physical, sensory or mental disorders or unlearned or inexperienced people (including children) unless they are attended by a person who will be responsible for their safety or who will instruct them accordingly for use of the product. Children’s safety • Electrical appliances are dangerous for the children. Keep children away from the machine when it is operating. Do not let them tamper with the machine. • Packaging materials are dangerous to children. Keep the packaging materials out of reach of children or dispose them by classifying according to waste directives. • Do not allow children sit/climb on or enter in the product. • Children should be supervised to ensure that they do not play with the product. • Close the loading door when you leave the area where the product is located. 7 EN 3 Installation A Prior to installation, visually check if the product has any defects on it. If so, do not have it installed. Damaged products will cause risks for your safety. Appropriate installation location • Install the product in an environment which has no risk of freezing and is in a stable and level position. • Operate your product in a well ventilated, dust-free environment. • Do not block the air ducts in front of and under the product with materials such as long pile rugs and wooden plinths. • Do not place your product on a long pile rug or on similar surfaces. • Do not install the product behind a door with a lock, sliding door or a hinged door which can strike the product. • Once the product is installed, it should stay at the same place where its connections have been made. When installing the product, make sure that the rear wall of it does not touch anywhere (tap, socket, etc.) and also pay attention to install the product at a place where it will stay permanently. BDo not place the product on top of the power cable. • Keep at least 1.5 cm distance to walls of other furniture. Removing the transportation safety assembly AMake sure that you have removed the transportation safety assembly (nylon+styrofoam pieces) before using the product for the first time. Do not leave any items inside the drum. Under counter installation • A special part (Part no. 297 360 0100) replacing the top trim can be provided and installed by the Authorised Service Agent in order fit the machine under a low counter or in a cupboard. It should never be operated without the top trim. • Leave at least 3 cm of space between the side and rear walls of the product and the walls of the counter/cupboard when installing your product under a counter or in a cupboard. Mounting over a washing machine ARemove the transportation safety assembly before using the product for the first time. 1. Open the loading door. 2. There is a nylon bag inside the drum that contains a piece of styrofoam. Hold it from its section marked with XX. 3. Pull the nylon towards yourself and remove the transportation safety assembly. • A fitting device should be used between the two machines when installing above a washing machine. The bracket must be installed by the Authorised Service Agent. • Place the product on a firm floor. If it will be placed on top of a washing machine, the approximate weight of both machines may reach 180 kg when they are full. Therefore, the floor must be capable of carrying the load on it! Connection to water drain; In products equipped with a condenser unit the water accumulated during the drying cycle is collected in the water tank. You should drain the accumulated water after each drying cycle. You can directly send the accumulated water out through the water drain hose supplied with the machine instead of 8 EN periodically draining the water collected in the water tank. Please refer to the detailed instructions supplied with the accessories pack. Connecting the water drain hose; C Never unscrew the adjustable feet from their housings. First use 1. Remove the hose on the machine by pulling it out from its end. Do not use any tools to take out the hose. 2. Connect the special drain hose supplied with the machine to the pipe fitting. 3. The other end of the drain hose can be directly connected to the wastewater drain or to the washbasin. The fitting must always be secured in all types of connections. Your house may be flooded if the hose gets out of its housing during water discharge. Important: • The hose should be attached to a height of maximum 100 cm. • You must be careful not the pinch or bend the hose. • The end of the hose should not be bent, it should not be stepped on and it must not be folded between the drain and the machine. Adjusting the feet In order to ensure that your machine operates more silently and vibration-free, it must stand level and balanced on its feet. Balance the machine by adjusting the feet. Rotate the feet to adjust until the machine stands level and firmly. • To have the product ready for operation before calling the authorised service agent, make sure that its location and power supply installations are appropriate. If they are not, call a qualified electrician to have any necessary arrangements carried out. • Make sure that the power connections of the product are in accordance with the instructions given in relevant chapters of this manual. Disposing of packaging material Packaging materials are dangerous to children. Keep packaging materials in a safe place out of reach of children. Packaging materials of your product are manufactured from recyclable materials. Sort and dispose of them in accordance with recycled waste instructions. Do not dispose of them with normal domestic waste. Transportation of the machine 1. Unplug the machine from the mains. 2. Remove the water drain and vent connections (if any). 3. Drain water remaining in the machine completely before transportation. Disposing of the old machine Dispose of your old machine in an environmentally friendly manner. Refer to your local dealer or solid waste collection centre in your area to learn how to dispose of your machine. Before disposing of your old machine, cut off the power cable plug and make the loading door lock unusable to avoid dangerous conditions to children. 9 EN 4 Electrical Connection Built-under installation Make sure that you have an earthed power outlet socket rated at 13 amps (minimum). Attention! If you use your dryer as built-in, the socket must be reachable after installation, or a separate switch (which can disconnect the two poles) must be used in the installation. Check for suitability. For a permanent connection, a master switch with at least 3mm contact clearance and minumum 13 A rating must be used. Electrical requirements Before you insert the plug into the wall socket make sure that the voltage and the frequency shown in the rating label corresponds to your electricity supply. We recommend that this appliance be connected to the mains supply via a suitable switched and fused socket in a readily accessible position. Should the mains lead of the appliance become damaged or need replacing at any time, it must be replaced by a special purpose made mains lead which can only be obtained from a Authorised Service Agent. A Warning This appliance can be installed under a worktop. A Undercounter installation without the top cover must only be carried out by an authorised agent.Risk of electric shock. A Important Fitting a different plug As the colours of the wires in the mains lead of this appliance may not correspond with the coloured markings identifying the terminals on your plug, proceed as follows: 1 Connect the green - yellow or green (earth) wire to the terminal in the plug marked ‘E’ or with the symbol or coloured green and yellow or green. 2 Connect the blue (neutral) wire to the terminal in the plug marked ‘N’ or coloured black. 3 Connect the brown (live) wire to the terminal in the plug marked ‘L’ or coloured red. With the alternative plugs a 13A fuse must be fitted either in the plug or adaptor or in the main fuse box. If in doubt contact a qualified electrician. Green and yellow or green This appliance must be earthed If the fitted moulded plug is not suitable for your socket, then the plug should be cut off and an appropriate plug fitted. The moulded plug on this appliance incorporates a 13A fuse. Should the fuse need to be replaced an ASTA approved BS1362 fuse of the same rating must be used. Do not forget to refit the fuse cover. In the event of losing the fuse cover, the plug must not be used until a replacement fuse cover has been fitted. Colour of the replacement fuse cover must be the same colour as that visible on the pin face of the plug. Fuse covers are available from any good electrical store. In order to avoid hazards, damaged supply cord should be replaced by the manufacturer, its service agent or similarly qualified people. N Blue or black L Brown or red Washer/dryer combination Do not stack washing machine on top of the tumble dryer. This would damage both appliances and guarantees would become void. It is also unsafe to stack an appliance on top of another without using a suitable and approved stacking kit obtained from the manufacturer of the appliances. 10 EN 5 Initial preparations for drying Things to be done for energy saving: • Make sure that you operate the product at its full capacity but pay attention to not exceeding it. • Spin your laundry at the highest speed possible when washing them. Thus, the drying time is shortened and energy consumption is decreased. • Pay attention to dry same types of laundry together. • Follow the instructions in the user manual for programme selection. • Make sure that sufficient clearance is provided at the front and rear side of the dryer for air circulation. Do not block the grill at the front side of the product. • Do not open the door of the machine during drying unless necessary. If you must certainly open the door, pay attention not to keep it open for a long time. • Do not add new (wet) laundry during drying. • Lint and fibres released from the laundry to the air during the drying cycle are collected in the “Lint Filter”. Make sure that you clean the filters before or after each drying. • In models with condenser, make sure that you clean the condenser regularly at least once every month or after every 30 drying cycles. • In vented models, follow the hose connection rules in the user manual and pay attention to the hose cleaning. • Ventilate the room, where the dryer is located, well during drying. • For power saving in models with lamps, at times when your dryer is not in use, keep the door closed if the On/ Off button is pressed (if the dryer is energized). Laundry suitable for drying in the machine C Always follow the suggestions on the laundry labels. Dry only the laundry having a label stating that they are suitable for drying in a dryer and make sure that you select the appropriate programme. A B C D Low l n m o p q Laundry unsuitable for drying in the machine • Laundry items with metal attachments such as belt buckles and metal buttons can damage your dryer. • Do not dry items such as woollens, silk garments and nylon stockings, delicate embroidered fabrics, laundry with metal accessories and items such as sleeping bags in the dryer. • Laundry made of delicate and valuable fabrics as well as lace curtains can be creased. Do not dry them in the dryer! • Do not dry items made of hermetic fibres such as pillows and quilts in the dryer. • Laundry made of foam or rubber will be deformed. • Do not dry laundry containing rubber in the dryer. • Do not dry laundry exposed to petroleum, oil, combustible or explosive agents in the dryer even if they are washed beforehand. • Overly wet laundry or laundry with dripping water must not be put into the dryer. • Items cleaned or washed with gasoil/ fuel oil, dry-laundry solvents and other combustible or explosive materials as well as the items that are contaminated or spotted with such materials should not be dried in the product since they emit flammable or explosive vapor. • Do not dry items cleaned with industrial 11 EN chemicals in the dryer. “Programme Selection Table”. Always • Do not dry your unwashed laundry in the start the programme in accordance dryer. with the maximum load capacity. • Items soiled with cooking oils, acetone, C Adding laundry to the machine more alcohol, fuel oil, kerosene, stain remover, than the level shown in the figure is not turpentine, paraffin and paraffin removers recommended. Drying performance must be washed in hot water with plenty will degrade when the machine is of detergent before being dried in the overloaded. Furthermore, your dryer dryer. and your laundry can be damaged. • Garments or pillows bolstered with C Place your laundry into the drum rubber foam (latex foam), shower loosely so that they will not get tangled. bonnets, water resistant textiles, Following weights are given as examples. materials with rubber reinforcement and Approximate rubber foam pads should not be dried in Home articles weights (g) the dryer. Cotton quit covers (double) 1500 • Do not use fabric softeners and anti-static products unless they are Cotton quit covers (single) 1000 recommended by the manufacturers of Bed sheets (double) 500 the fabric softener or the product. Bed sheets (single) 350 • Do not dry the underwear reinforced with metal parts in the dryer. If these metal Large tablecloths 700 reinforcements loosen and break during Small tablecloths 250 drying, they will damage your dryer. Preparing laundry for drying • Check all laundry items before loading them into the product to make sure that there are no lighters, coins, metal items, needles and etc. in their pockets or on any part of them. • Fabric softeners and similar products must be used in accordance with the instructions of the manufacturer of the relevant products. • All laundry must be spun at the highest spin speed that your washing machine allows for the laundry type. • Laundry may be tangled after washing. Separate your laundry before placing them into your dryer. • Sort your laundry according to their types and thicknesses. Dry the same type of laundry together. E.g.: fine kitchen towels and table cloths dry faster than the thick bath towels. Correct load capacity Tea napkins Bath towels Hand towels Garments Blouses Cotton shirts Shirts Cotton dresses Dresses Jeans Handkerchiefs (10 pieces) T-Shirts 100 700 350 Approximate weights (g) 150 300 200 500 350 700 100 125 Loading • Open the loading door. • Place laundry items loosely into the dryer. • Push the loading door to close. Ensure that no items are caught in the door. AConsider the information in the 12 EN 6 Selecting a Programme and Operating Your Machine Control panel 1 9 2 8 7 3 4 5 6 1. Washing machine spin speed*/ Timer programme selection 5. On/Off button 2. Display 7. Dryness level Spin speed used to spin the laundry in the washing machine / Indicates the time for timer programmes. Indicates the status of the machine. Used to turn on and off the machine. 6. Anti-creasing Prevents the laundry from creasing after the machine completes its programme. Used to adjust the required dryness level. 3. Start/Pause/Cancel button 8. Cancel audio warning 4. Programme selection knob 9. Time delaying buttons Used to start, pause or cancel the programme. Used to select a programme. Used to cancel the audio warning given at the end of the programme. Used to set the time delay. Child-proof lock warning icon Time delaying mode Door open warning icon Anti-creasing mode Audio warning level / Cancel audio warning Drying degree Anti-creasing is activated Spin speed / Timer programmes Operation icon Pause icon Water tank full warning icon Filter cleaning warning icon Condenser cleaning warning icon Remaining time indicator Spin speed is used to show the remaining time more accurately. It does not affect the performance of your machine. 13 EN Preparing the machine 1. Plug in your machine. 2. Place the laundry in the machine. 3. Press the “On/Off” button. C Pressing the “On/Off” button does not necessarily mean that the programme has started. Press “Start/Pause/ Cancel” button of the machine to start the programme. Programme selection Decide the appropriate programme from the table below which includes drying temperatures in degrees. Select the desired programme with the programme selection knob. Extra dry Cupboard dry Iron dry Drying at high temperature only for cotton laundry. Thick and multi layered laundry (E.g.: towels, linens, jeans) are dried in a way that they do not require ironing before placing in the wardrobe. Normal laundry (E.g.: tablecloths, underwear) are dried in a way that they do not require ironing before placing in the wardrobe. Normal laundry (E.g., Shirts, dresses) are dried ready to be ironed. Special programmes For special cases, there are also extra programmes available: C Additional programmes may differ according to the model of your machine. •Xpress 35 min. You can use this programme to dry your cotton laundry that you have spun at high speeds in your washing machine. This programme dries 2 kg cotton laundry (2 Shirts / 5 T-shirts) in 35 minutes. C To obtain better results from your dryer, your laundry must be washed at suitable programmes and spun at the recommended spin speeds in the washing machine. •Shirts This programme dries the shirts more sensitively and creases them less and thus, helps to iron them more easily. C There may be a little humidity on your shirts at the end of the programme. We recommend you not to leave the shirts in the dryer. •Jeans You can use this programme to dry your jeans that you have spun at high speeds in your washing machine. C Review the relevant section in the programme table. •Mix Used to dry synthetic and cotton laundry that do not release colour. Used for laundry that is suitable for drying. •Sportswear CFor further programme details, see, "Programme Selection Table" Main programmes Depending on the type of laundry, the following main programmes are available: •Cottons You can dry your durable laundry with this programme. Dries at high temperature. It is recommended to use for your cotton items (such as bed sheets, quilt cover, underclothing, etc.). •Synthetics CDo not dry curtains and lace in your machine. You can dry your less durable laundry with this programme. It dries at a lower temperature compared to the cottons programme. It is recommended for your synthetic laundry (such as shirts, blouses, synthetic/cotton blended laundry, etc.). Used to dry the laundry that are made of synthetic, cotton or mixed fabrics and have a tag indicating that they are suitable for drying. •Wool Refresh You can use this function to ventilate and soften your woollen laundry that can be washed in the washing machine. Do not use this function to dry your laundry completely. Take out your laundry and ventilate them immediately after the programme is over. •Daily Quick This programme is used to dry cottons and synthetics daily, and lasts for 1 hour. •Baby Clothing This programme is used for baby clothes that bear machine dryable approval on its 14 EN label. •Delicates You can dry your highly delicate laundry that are suitable for drying or laundry which is advised to be hand-washed at a lower temperature. C It is recommended to use a cloth bag to prevent certain delicate laundry from getting creased or damaged. Take your laundry immediately out of the dryer and hang them after the programme ends in order to prevent them being creased. •Freshen up Only ventilation is performed for 10 minutes without blowing hot air. You can air your clothes that have been kept at closed environments for a long time and deodourise unpleasant odours thanks to this programme. •Timer programmes You can select one of the 10 min., 20 min., 30 min., 40 min., 50 min., 60 min., 80 min., 100 min., 120 min., 140 min. and 160 min. timer programmes to achieve the desired final drying level at low temperatures. Programme dries at the selected time regardless of the drying temperature. Timer Programmes The display shows the time remaining for the programme to complete while a programme is running. Time is displayed in hours and minutes as “02:30”. The exemplary display image shows the dryer when it is running and child-proof lock is active. C Programme duration may differ from the values in the consumption table subject to the changes in the water hardness and temperature, ambient temperature, type and amount of laundry, auxiliary functions selected, and changes in the supply voltage.. 15 EN Programme selection and consumption table Programme table EN Programmes 2 Capacity (kg) Spin speed in washing machine (rpm) Approximate amount of remaining humidity Drying time (minutes) Cottons / Coloreds A Extra dry 9 1000 60 % 149 A Cupboard dry 9 1000 60 % 142 A Iron dry 9 1000 60 % 112 Xpress 35 min. 2 1400 50 % 35 Shirts 1.5 1000 50 % 40 Jeans 4 1000-1200 50 % 80 Mix 4 800-1000 60 % 83 Sportswear 4 800-1000 60 % 92 Wool Refresh 1.5 600 50 % 6 Daily Quick 4 1400 50 % 59 Baby Clothing 3 1000-1200 60 % 70 Cupboard dry 4,5 800 40 % 58 Cupboard dry 2 800 40 % 40 Approximate amount of remaining humidity Energy consumption value kWh Synthetics B Delicates B Energy consumption values Programmes Spin speed in washing Capacity (kg) machine (rpm) Cottons linen Ready to wear* 9 1000 60 % 5.05 Cottons Ready to iron 9 1000 60 % 4.1 4.5 800 40 % 1.9 Synthetics Ready to wear * : Energy Label standard programme (EN 61121:2005) All values given in the table have been fixed according to EN 61121:2005 Standard. These values may deviate from the table according to the laundry type, laundry spin speed, environmental conditions and voltage fluctuations. ** : Times on the display may change depending on the drying time. CWhen selecting the Cottons programme, send the condensed water out through the drain hose. 16 EN Auxiliary function Changing the contrast Audio Warning Your dryer will give an audio warning when the programme comes to an end. If you do not want to hear this buzzing or want to change the volume level, you need to press the “Volume level” button. No audio warning will be given when “x” appears on the screen. C You can select this function either before or after the programme starts. Contrast can be adjusted in order to make the symbols on the display appear clearer. It may particularly be necessary to change the contrast setting of the display when the dryer is installed over a washing machine.press and Press and hold the Spin Speed/Time button for 3 seconds. When the contrast is changed at the end of 3 seconds, all symbols on the display will become visible for 3 seconds in order to indicate that the process is complete. Perform the same procedure to revert back to the previous contrast setting. Drying degree Warning indicators Cancel audio warning Audio warning level 1 Audio warning level 2 Audio warning level 3 C Warning indicators may differ according to the model of your machine. Filter cleaning Used to adjust the required dryness level. More drying is performed compared to the default settings when “+” sign appears and less drying is performed when “-” sign appears. Programme duration can change depending on the selection. AThis function must be selected before the programme starts. Anti-creasing A warning symbol will appear to remind filter cleaning after the programme finishes. C If the filter cleaning symbol flashes continuously, please refer to “Suggested solutions for problems”. Water tank A 2-hour anti creasing programme to prevent laundry from creasing will be activated if you do not take the laundry out after the programme is over. This programme rotates the laundry in 600-second intervals to prevent creasing. Press “Anti-creasing” button to activate. Anti-creasing is activated but the programme is running in the first example above. Drying is over and the first step of anti-creasing has started in the second example. A warning symbol will turn on at the end of the programme or when the tank is full with water. The machine stops operating if the warning symbol turns on when a programme is running. To restart the machine, please drain the water in the water tank. Press “Start/Pause/Cancel” button to start the programme after you have emptied the water tank. The warning symbol turns off and the programme resumes operating. Cleaning the condenser 17 EN Warning symbol turns on with certain intervals to remind that the condenser needs cleaning. 2. Press Time delay buttons “+” or “-” to set the desired time delay. 3. Press “Start/Pause/Cancel” button. The Time delay symbol lights up. Pause symbol fades. Start symbol lights up. 4. The “:” in the middle of the displayed time delay will start flashing. Door open Cancelling the time delay Dryer door open symbol lights up. Time delay With the “Time delay” function you can delay the programme start up to 24 hours. If you want to cancel the time delay countdown and start the programme immediately: 1. Press “Start/Pause/Cancel” button for 3 seconds to cancel the programme. 2. Then, press “Start/Pause/Cancel” button to start the desired programme. Starting the programme 1. Open the loading door and put the laundry in. 2. Set the drying programme and spin speed, and if required, select the auxiliary functions. 3. Press “Time delaying” buttons “+” and “-” to set the desired time delay. The time delay symbol will flash. 4. Press “Start/Pause/Cancel” button. Then the time delay starts to count down. The Time delay symbol lights up. Start symbol lights up. The “:” in the middle of the displayed time delay will start flashing. More laundry may be loaded or taken out during the time delay period. At the end of the time delay countdown process, time delay symbol fades, drying process starts and the programme duration is displayed. The time on the display is the total of normal drying time and delay time. Time delay is started by pressing the start/pause/cancel button in the example above. Changing the delay time If you want to change the time during the countdown: 1. Press “Start/Pause/Cancel” button for 3 seconds to cancel the programme. Time delay function must be set again for the required time. 1. Press “Start/Pause/Cancel” button to start the programme. 2. “Start/Pause” symbol will light up to indicate that the programme has started and “:” symbol between the remaining time will continue flashing. Progress of programme Drying Iron Wardrobe (Extra) Anticreasing Ventilation The progress of a running programme is shown through a number of symbols on the screen. At the beginning of each programme step, the relevant symbol in the series of symbols will light up and thus, all symbols will remain lit up at the end of the programme. The symbol that is lit up at the far right of the series of symbols indicates the step that is being carried out. “Drying”: - Lights up in all programmes apart from drying and ventilation. “Iron Dry”: - Starts to illuminate when the drying degree reaches “iron dry” step and remains illuminated until the next step. “Cupboard dry”: Starts to illuminate when the drying degree reaches “wardrobe dry” step, and remains illuminated until the next step. “Wardrobe Dry Extra”: Starts to illuminate when the drying degree reach to “wardrobe dry extra” step. 18 EN “Freshen up”: - Illuminates when the programme ends. C Anti-creasing icon will light up at the end of the programme if anti-creasing function is active. Changing the programme after the programme has started You can use this feature to dry your laundry in a different programme after your machine has started to run. interrupt drying continuously, it will extend the programme duration and increase energy consumption. Therefore, it is recommended to add laundry before the drying programme has started. CIf you select a new programme by turning the programme selection knob while your machine is in standby, then the current programme is cancelled and new programme information is displayed. Child-proof lock For example; Press and hold the “Start/Pause/Cancel” button for about 3 seconds to “Cancel” the programme in order to select “Extra Dry” programme instead of “Iron Dry” programme. Select the “Extra Dry” programme by rotating the programme knob. Press “Start/Pause/Cancel” button to start the programme. CIf you select a new programme by turning the programme selection knob while your machine is running, then the current programme is cancelled and new programme information is displayed. There is a child-proof lock to prevent any programme interruption due to the pressing of button while the programme is running. The loading door and all button except the “On/Off” button on the panel are deactivated when the child-proof lock is active. In order to activate the child-proof lock, press on the “audio warning” and “anticreasing” buttons simultaneously for 3 seconds. To start a new programme after the programme is over or to interrupt the programme, the child-proof lock should be deactivated. Press the same buttons for 3 sec. again to deactivate the child-proof lock. Lock symbol will appear on the screen when the child-proof lock is activated. Adding/removing laundry in standby mode In order to add or take out laundry after the start-up of the programme; 1. Press the “Start/Pause/Cancel” button to switch the machine to “Pause” mode. Drying process will stop. 2. Open the door at Pause position and close it again after adding or taking out laundry. 3. Press “Start/Pause/Cancel” button to start the programme. CAny laundry added after the drying process was started may cause the already dried clothes in the machine intermingle with wet clothes and the result will be wet laundry after the drying process is over. CLaundry may be added or taken out as much as desired during a drying process, but as this process will CChild-proof lock will also be deactivated when the machine is restarted by pressing the on/off button. When the child-proof lock is activated: • Display icons will not change even if the position of programme selection knob is changed while the machine is running or in halt. • If the child-proof lock is deactivated after changing the position of the programme selection knob while your machine is running, your machine stops and new programme information is 19 EN displayed Ending the programme through cancelling A new programme can be selected and started after “Programme cancel” is activated in order to change the drying programme. To cancel any selected programme: Press “Start/Pause/Cancel” button for about 3 seconds. “Lint filter cleaning” and “Water tank” warning symbols light up and “End” label appears on the screen as a reminder at the end of this period. AAs the inside of the machine will be excessively hot when you cancel the programme while the machine is running, activate the ventilation programme to cool it down. CIf you change the position of programme selection knob while your machine is running, then the machine stops, current programme is cancelled and new programme information is displayed. End of programme “Filter cleaning” and “Water tank” warning symbols light up and “End” label appears on the screen in the programme followup indicator when the programme ends. The door can be opened and the machine becomes ready for a second cycle. Press “On/Off” button to turn off the dryer. C When selected, the 2-hour anti creasing programme will be activated to prevent laundry from creasing if you do not take the laundry out after the programme has come to an end. C Clean the filter after each drying (please see, Filter cleaning). C Drain the water tank after each drying (please see, Water tank) 20 EN 7 Maintenance and cleaning Filter Cartridge / Door Inner Surface Lint and fibres released from the laundry to the air during the drying cycle are collected in the “Filter Cartridge”. CSuch fibre and lint are generally formed during wearing and washing. C Always clean the filter and the inner surfaces of the cover after each drying process. C You can clean the filter and filter area by vacuum cleaner. To clean the filter: 1. Open the loading door. 2. Remove the cover filter by pulling it up and open the filter. 3. Clean lint, fibre, and cotton by unravelling by hand or with a soft piece of cloth. 4. Close the filter and place it back into its seat. C Clogging may arise on the filter surface after using your machine for some time; if this occurs, wash the filter with water and dry it before using again. Sensor There are humidity sensors in your dryer that detect whether the laundry is dry or not. To clean the sensor: 1. Open the loading door of the dryer. 2. Allow the machine to cool down if drying has been carried out. 3. Wipe the metal sensors with a soft cloth, dampened with vinegar and dry them. C Clean metal sensors 4 times a year. ANever use solvents, cleaning agents or similar substances when cleaning since these materials can cause fire and explosion! C Clean the entire inner surface of the door and door gasket by wiping with a damp cloth. 21 EN Water tank; The moisture in the damp laundry is taken from the laundry and condensed. Drain the water tank after each drying cycle or during drying when “Water tank” warning light turns on. ACondensed water is not drinkable! ANever take out the water tank when the programme is running! If you forget to drain the water tank, your dryer will stop during the following drying cycles when the water tank is full and the “Water tank” warning light will turn on. If this is the case, press the “Start/Pause/Cancel” button to resume the drying cycle after draining the water tank. To drain the water tank: 1. Drain the water as shown on the picturre . For the condenser Hot and humid air in the condenser is cooled with the cold air from the room. Thus, the humid air circulating in your dryer is condensed and then pumped into the tank. C Clean the condenser after every 30 drying cycles or once a month. To clean the condenser: 1. If a drying process has been carried out, open the door of the machine and wait until it cools down. 2. Unlock the 2 condenser locks after opening the kick plate. 2. If there is lint accumulation in the water tank cover, clean it and press to close. 3. Pull out the condenser. 3. Place the water tank into its seat. 22 EN 4. Clean the condenser by applying pressurized water with a shower head and wait until the water drains. 5. Place the condenser in its housing. Fasten the 2 locks and make sure that they are seated securely. 6. Close the kick plate cover. 23 EN 8 Suggested solutions for problems Drying process takes too much time • Meshes of the filter may be clogged. Wash with water. Laundry comes out wet at the end of drying. • Meshes of the filter may be clogged. Wash with water. • Excessive laundry might have been loaded in. Do not load the dryer in excess. Dryer does not switch on or the programme does not start. Dryer is not activated when set. • It might have not been plugged in. Make sure that the machine is plugged in. • The loading door may be ajar. Make sure that the loading door is properly closed. • Programme might have not been set or the "Start/Pause/Cancel" button might have not been pressed. Make sure that the programme has been set and it is not in “Pause” mode. • "Childproof lock" might have been activated. Deactivate the childproof lock. Programme has been interrupted without any cause. • The loading door may be ajar. Make sure that the loading door is properly closed. • Electricity may be cut off. Press "Start/Pause/Cancel" button to start the programme. Laundry has shrunk, become felted or deteriorated. • A programme suitable for the laundry type might have not been used. Dry only the laundry which is suitable for drying in dryer after checking the labels on your clothes. • Select a programme with suitable low temperature for the laundry type to dry your clothes. Drum lightning does not come on. • Dryer might have not been started by using the "On/Off" button. Make sure that the dryer is on. • Bulb may have blown. Call the authorized service to replace the bulb. “Final / Anti-creasing” symbol flashes. • The 2-hour anti creasing programme to prevent laundry from creasing might have been activated. Turn off the dryer and take out the laundry. “Final / Anti-creasing” symbol is on. • Programme has come to an end. Turn off the dryer and take out the laundry. Water comes out the cover. • Clean the entire inner surface of the cover and door gasket. Cover opens spontaneously. • Push it until you hear that it is closed. For products with a condenser: “Water tank” warning symbol is on. • Water may be full. • Anti-creasing programme might be running. Drain the water in the tank. “Filter cleaning” symbol is on. • Filter might have not been cleaned. Clean the cover filter. 24 EN “Condenser cleaning” symbol is on. • Filter drawer/Condenser might have not been cleaned. Clean the filters in the condenser/filter drawer under the kick plate. A Call an authorised service if the problem persists. 25 EN 9 Guarantee Your new product is guaranteed against the cost of breakdown repairs for twelve months from the date of the original purchase. insurance policy, or may be available separately from your retailer). Important notes What is covered? • Repairs necessary as a result of faulty materials, defective components or manufacturing defect. • The cost of functional replacement parts, but excluding consumable items. • The labour costs of a approved repairer to carry out the repair. What is not covered? • Transit, delivery or accidental damage or misuse and abuse. • Cabinet or appearance parts, including knobs, flaps, handles or container lids. • Accessories or consumable items including but not limited to, ice trays, scrapers, cutlery baskets, filters and light bulbs. • Repairs required as a result of unauthorised repair or inexpert installation that fails to meet the requirements contained in the user instruction book. • Repairs to products used on commercial or non-residential household premises. • Loss of frozen food in freezers or fridge/ freezers. (Food loss insurance is often included within your household contents • Your product is designed and built for domestic household use only. • The guarantee will be void if the product is installed or used in commercial or nonresidential domestic household premises. • The product must be correctly installed, located and operated in accordance with the instructions contained in the User Instructions Booklet provided. • Professional installation by a qualified Electrical Domestic Appliance Installer is recommended for all Washing Machines,Tumble Dryers, Dishwashers, Dryers and Electric Cookers • Gas Cookers must only be installed by a Gas safe registered Gas Installer. • The guarantee is given only within the boundaries of the United Kingdom and the Republic of Ireland. • The guarantee is applicable only to new products and is not transferable if the product is resold. • disclaims any liability for incidental or consequential damages. • The guarantee does not in anyway diminish your statutory or legal rights. 26 EN 10 Service Please keep your purchase receipt or other proof of purchase in a safe place; you will need to have it should the product require attention under guarantee. You should also complete the details below; it will help us assist you when requesting service. (The model number is printed on the Instruction Booklet and the serial number is printed on the Rating Label affixed to the appliance) Model No: Serial No: Retailer: Date of purchase: Republic of Ireland All Refrigeration, 01 862 3411 All Cookers Washing Machines & Dryers, Tumble Dryers Dishwashers Before requesting service please check the trouble-shooting guide in the Operating Instructions as a charge may be levied where no fault is found even though your product may still be under guarantee. Service once the manufacturers guarantee has expired. If you have purchased an extended guarantee please refer to the instructions contained within the extended guarantee agreement document. Otherwise please call the appropriate number above where service can be obtained at a charge. Should you experience any difficulty in obtaining service please contact the Customer Help-Line. Tel: 0845 600 4911 For service under guarantee simply telephone the appropriate number below. UK Mainland & Northern Ireland Fridges & Freezers 0845 600 4903 Electric Cookers 0845 600 4902 Gas & 0845 600 4905 Dual Fuel Cookers Washing Machines & Dryers Tumble Dryers 0845 600 4906 27 EN