1
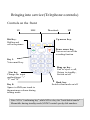
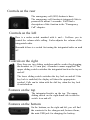
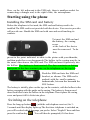
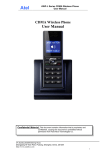
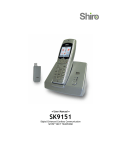
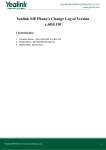
ENGLISH Contents Safety information ..................................................................... 4 Bringing into service ................................................................. 5 Controls on the front.............................................................5 Controls on the rear..............................................................6 Controls on the left ...............................................................6 Controls on the right.............................................................6 Features on the top ..............................................................6 Features on the bottom ........................................................6 Starting using the phone ................................................................7 Insert the SIM card and battery………………………………….7 Switching on the telephone...................................................7 Setting the time and date .......................................................8 Charging the battery.............................................................8 Symbols on the display .......................................................8 Calling ....................................................................................... 9 Accepting calls ....................................................................9 Rejecting calls .....................................................................9 Calling with direct dialing ....................................................9 Dialing with redial function ..................................................9 Speed dialing.......................................................................10 Dialing with the quick phonebook key .................................10 Hands-free talking and muting .............................................10 Call history................................................................................ 10 Missed calls ..........................................................................10 Dialed calls and received calls .............................................10 Other call log functions .......................................................11 Messaging (SMS) ..................................................................... 11 View SMS received ..............................................................11 Writing and sending SMS.....................................................11 Writing SMS text ..................................................................11 Sending SMS ......................................................................12 SMS settings........................................................................12 SMS server ........................................................................12 Voicemail server ................................................................12 Common settings ...............................................................12 Preferred storage .................................................................13 Phonebook..............................................................................................13 Call.........................................................................................13 Send text message ................................................................13 View .......................................................................................13 Add new contact....................................................................13 Edit.........................................................................................13 Delete.....................................................................................13 Copy ......................................................................................14 Move ......................................................................................14 Copy/Move/Delete all contacts ..............................................14 Phonebook settings .............................................................14 Preferred storage ..................................................................14 Memory status .......................................................................14 Settings ........................................................................................14 The answering machine problem...........................................15 Configuring the emergency call ............................................15 Emergency numbers ............................................................15 Sending an emergency SMS................................................16 Emergency SMS content......................................................16 Emergency alarm .................................................................16 Aborting the emergency call ..................................................16 Important information on emergency call functions ...............16 Sound settings..................................................................................17 Tone settings .........................................................................17 Volume ....................................................................................17 Alert type .................................................................................17 Ring type.................................................................................17 Answer mode ..........................................................................17 Speed dial................................................................................17 Call setting ........................................................................................17 Caller ID ..................................................................................18 Call waiting .............................................................................18 Call divert ................................................................................18 Call barring ...........................................................................18 Network selection ...................................................................19 Phone settings ...................................................................................19 Time and date ............................................................................19 Language .................................................................................19 ref. input methods ....................................................................19 Family number…………………………………………………….. 19 Contrast ...................................................................................19 LCD backlight ..........................................................................19 Security settings .................................................................................20 SIM lock ....................................................................................20 Phone lock ...............................................................................20 Change password ...................................................................20 Emergency settings..................................................................20 Restore factory settings ...................................................................20 Silent mode .....................................................................................20 My cares ………………………………………………………………….21 Recorder ........................................................................................21 Recording voice notes and phone calls...................................21 Options after recording ...........................................................21 New record ...........................................................................21 Play .......................................................................................21 Append .................................................................................21 Rename..................................................................................21 Delete ....................................................................................21 List.........................................................................................22 Settings .................................................................................22 FM radio ..........................................................................................22 Options in radio mode.........................................................23 Channel list .......................................................................... 23 Manual input ........................................................................23 Auto search...........................................................................23 Settings .................................................................................23 Alarm clock ...................................................................................23 Birthdays .........................................................................................24 Calculator.........................................................................................24 Appendix .........................................................................................25 CE sign ..................................................................................25 Safety information * Only use the telephone at locations where calling is allowed. As a rule, use of mobile phones is prohibited in hospitals, aircraft and at filling stations. * Do not open the device yourself, and do not attempt repairs on your own. Repairs may only be performed by qualified specialists. * Do not expose the telephone to smoke, chemicals, humidity,dust or excessive heat (direct sunlight). * Keep the telephone and accessories away from children. * This telephone's speaker can be set very loud. Check volume before use to avoid damaging your hearing. * While driving, use this telephone only with an approved hands-free set. * Observe specific national legislation governing use of mobile telephones. * If applicable, keep a 20 cm distance between the telephone and any implanted pacemaker. Immediately switch off the telephone if you feel or suspect any impairment. * Use only the provided power supply unit, and no other. * Use only original accessories and batteries. * The telephone is not water-tight. Avoid contact with liquids. * Dispose of the device and the battery according to environmental guidelines. Your local waste disposal provider offers collection points for electronic waste. Do not dispose of the device and the battery in household rubbish or in a fire. * Please dispose of packaging materials according to local regulations. Note: For safety reasons, the battery switches off before it is totally discharged. If you have not used the telephone for a long time, wait up to 5 minutes after you have plugged the charger in. This will switch the battery back on and the charging process will start Bringing into service(Telephone controls) Controls on the front M1 SMS Dial key: Dialling and call acceptance Phonebook M2 Up arrow key: Down arrow key: Turn on or turn off the recording function Key 1: Voicemail key Star key: Change the input method,insert “+” “P” and “W” Key 0: Space in SMS,one touch to themaximum volume during talking mode. Hang up key : End or reject a call, Return to standby, Switch on/off Hash key: Switch silent mode on/off Note: M1 is “confirming key”,while M2 is a key for “back/delete/cancle” Meanwhile during standby mode,M1/M2 control speedy dial numbers. Controls on the rear The emergency call (SOS) button is here. The emergency call function is triggered if this is pressed for about 3 seconds. You'll find a description of this function in the "Emergency Call" chapter. Controls on the left Here is a rocker switch marked with + and –. It allows you to control the volume while calling. It also adjusts the volume of the integrated radio. Beneath it there is a switch for turning the integrated radio on and off. Controls on the right Here there are two sliding switches and the socket for plugging the headset in (3.5 mm pin). A headset comes supplied. The upper sliding switch switches the integrated torch on the top on and off. The lower sliding switch switches the key lock on and off. If the key lock is enabled, the display will show the appropriate symbol. Calls can be taken with the dial key when the key lock is switched on. Features on the top The integrated torch is on the top. The upper sliding switch on the right-hand side is used to switch it on and off. Features on the bottom On the bottom, on the right and left, you will find the contacts for the charger and, betwee them, the mini-USB jack for charging the battery. Here, on the left, adjacent to the USB jack, there is another socket for connecting a charger and, to the right of this, the microphone. Starting using the phone Installing the SIM card and battery Before the telephone is first used, the SIM card and battery need to be installed.The SIM card is not provided with the device. Your service provider will provide one. Handle the SIM card with care and avoid touching its contacts. To insert the SIM card and the battery, the casing cover at the back of the device must be removed. To do this, press on the point indicated in white in the picture with your thumbs, and then push the cover downwards.The hollow in the casing must be in the same direction as the SIM card. The SIM card must fit precisely into the hollow. The battery is then inserted. The three contacts on battery must point to the three contact pins on the telephone on the top left. Push the SIM card into the SIM card bracket, as shown. The SIM card is pushed, with the card's contacts underneath, between the beneath the SOS button. The battery is initially place on the top, on the contacts, with the hollow in the battery engaging with the guide on the casing. The battery is then pressed down from above into the hollow in the telephone.Then replace the casing cover and press it till it clicks into place. Switching on the telephone Press the hang up button (with the red telephone receiver) for 3– 5 seconds until the display lights up.The first time telephone is switched on, you will be asked which language you prefer. Select “English” here and then press the confirm key .You will then be prompted (if it has been enabled) to enter your SIM card PIN (personal identification number). You will find this four digit number in the documentation for your SIM card. Use the keypad to enter the four numbers, and then press the confirm key . Note: You can change your SIM card PIN using the telephone settings, and you can also disable the PIN prompt given when the telephone is switched on. Setting the time and date After the telephone has been switched on for the first time (and after removing the battery), the time and date need to be set.In the Phone Settings menu, select the "Time and Date" entry, and press the confirm key again. The time appears in the HH:MM (hours: minutes) format, Use the number key to enter the current date in the YYYY:MM: DD format, i.e. first the year (four digits), then the month and then the day (both two digits). So, for the 23rd August 2011, you would first have to enter 2011, then 08, and then 23. Confirm your entries with confirm key . Then press the confirm key several times until the telephone is back to its base status. Charging the battery Your telephone is delivered with a charger and the corresponding power supply unit. Insert the small connector on the power supply unit into the jack at the rear of the charger, then connect the power supply unit to the wall socket.The battery will now be charged. The right-hand bar segment in the charge status display will flash on and off in the display while it is charging. As soon as it is fully charged, all the segments in the display will be filled in. The charge status display will no longer flashing. Before initial operation, completely charge the battery. To preserve the battery, thereafter only place the telephone in the charger once the battery is almost empty (when only 1-2 bars in the charge status display are filled in). Note: Instead of charging via the charger, Confort 100 is also compatible with the cradle charger.You can charge it by the cradle charger directly. Symbols on the display As well as the name of the mobile phone provider, the date and the time, display always shows the strength of the mobile network signal and the battery charge status. Other symbols shown only appear depending on the situation. Symbol Description Indicates wireless network strength. Battery charge status. Key block switched on New unread text message(s) (SMS). Missed call(s). Normal ring mode enabled Silent mode enabled. Silent mode with vibration enabled Muting during a call enabled Alarm on. Headset connected. Calling Accepting calls When a call comes in, the telephone rings (providing "Silent" is not enabled). If the caller for that number is saved in the phone book, the name of the caller is displayed instead of the number. The call is accepted by pressing the dial key. Rejecting calls If you press the hang up key when a call comes in, the call is rejected. Calling with direct dialling For direct dialling, enter the desired call number with the numeric keys, then press the dial key . The call is made to your desired subscriber. Note: Don't forget that with mobile networks you must always dial a prefix. If "Speaking keys" is enabled in the settings, the telephone speaks when keys 0-9 are pressed. Dialling with redial function If you press the dial key without first entering a number while the telephone is in standby, the call history is opened. With the nevigation keys, you can scroll up and down the call log. Press the green dial key to dial the number selected. Speed dialling This telephone features speed dial keys on which frequently dialled numberscan be saved.When the phone is in standby, these speed dial keys are called up by pressing digits 2-9 for about 2 seconds. The corresponding saved number is then automatically dialled.You should ensure that the Speed dial status is on. Dialling with the quick phone book key The phone has the key for opening the quick phone book.When this key is pressed,a list opens with all the contacts.You can use navigation keys to page through the saved contacts.And use the the answering key call selected contact. Hands-free talking and muting During a call, you can switch from receiver mode to hands-free mode.If you press the dial key during a call, a selection menu opens with the items --"Loudspeaker","Mute" and "DTMF". Use the Navigation keys to select and confirm with the dial key. Call history When the telephone is on standby, your attention is drawn to calls that you have not taken by the text "Missed Calls" and the flashing red LED. When you press the confirm key ,the calls log opens and displays only your missed calls. If you have already displayed all your missed calls, when the telephone is on standby and you press the confirm key, the calls log displays the calls missed, the calls taken and the numbers dialled. By selecting the main menu and then "Call history", you can display the calllogs separated by call type. Missed calls When the "Missed calls" menu item is selected and you press the confirm key , you get a log of the calls you have missed and you see the last number that tried to reach you. If you press the confirm key again, a menu appears in which you can call the caller back, see details about the call, send them a text message (SMS), or delete the call from the calls log. Dialled calls and received call These logs are used in the same way as the missed calls log, except for the fact that the logs display dialled numbers or accepted calls. Other call log functions With "Delete call logs" you can delete individual call logs or all the logs. "Call timers" shows the duration of the last call, of all outgoing connections, and all accepted calls, and you can reset the call time. Messaging (SMS) With your telephone, you can receive and send short text mssages (SMS). View SMS received If you have received a text message (SMS), the display will show this and the telephone's red LED will flash.Pressing the confirm key shows you the message contents, when the SMS is open, you press the confirm key , you are given a selection menu from which you can reply to the SMS, view details,all the sender, delete the SMS or save the sender as a contact. Messaging (SMS) In the telephone's base status, you can press the upper navigation key to open its main menu and choose "Messaging" to open your phone's message centre.There,in"Inbox",you’llsee all the text messages that you’ve received.Unread texts are indicated by the symbol , read texts by confirm key,in“Outbox”,you will find all the messages that not sent out yet. in Writing and sending SMS Writing SMS text You use the number keys to write the actual text message. Three to four letter are printed adjacent to the number keys to . If you press the relevant key once, the first letter is displayed, twice in quick succession, thesecond letter, etc. You can change input method with “*” key. The input method currently selected is displayed in the top left of the display this is upper case in the factory settings. Smart input you can also select the "Smart ABC" (upper case) and "Smart abc" (lower case) input methods, whereby the telephone uses your inputs to calculate and propose frequently used words.Apart from Send, the selection menu also enables you to edit or delete a recipient, remove all recipients or save the message as a draft. Note: If you want to save a message as a draft, but just saved as a draft.You can open the message under Drafts in the SMS menu, change the text again, and then send it. Sending SMS When the SMS text has all been entered, press the confirm key and select "Send to".You are given a choice by which you can either enter a number manually or add the recipient from your phonebook. Hint: If you want to send the same SMS to more than one recipient, you can enter more than one number, one after the other, or add them from your contacts. The SMS is then sent to all the selected recipients.When you have selected the message's recipients, press the confirm key and then select "Send". The SMSis is then sent to the recipient/s.Apart from Send, the selection menu also enables you to edit or delete a recipient, remove all recipients or save the message as a draft. Note: If you want to save a message as a draft, it is not sent, but just saved as a draft. You can open the message under Drafts in the SMS menu, change the text again, and then send it. SMS settings SMS server This is where you enter the number of your service provider's SMS service. You can enter up to two numbers for sending SMS and enable profile be used. Voicemail server This is where the number of your service provider for calling the (answering machine) mailbox for your mobile number. This number is dialled if you keep the “ 1 ” key pressed down while the telephone is on standby, the number will be queried and saved in this configuration item. You do not usually need to make any settings here, because your service provider's SMS number is automatically taken from the inserted SIM card. Common settings If "Delivery report" is enabled here, a status message will be sent to you by SMS after you have sent the SMS to the recipient. Preferred storage Here you can choose whether text messages are to be saved in the telephone's memory or the SIM card's memory. Phonebook The telephone has storage space for up to 100 numbers and names. Additional numbers can be stored on the SIM card. To open the phonebook, press the confirm key while on standby. You go to the main menu. There, use the arrow keys to select the "Phonebook" entry, and then press the confirm key.If you only want to dial numbers that have been saved as contacts, you can also use the key to open your quick contacts ,or you can set the top contacts in the “M1”and “M2”.You can page through the contacts with “Navigation key, above the first contact you can select the "Add new contact" en- try. This function can also be accessed via the Options. Send text message Sends a text message (SMS) to the selected contact. View Displays the details (name and number) of the selected contact. Add new contact You are given selection for name and number.With the "Name" field, you press the confirm key to enter name,press the confirm key to save.During a internatonal network,you should enter the numbers in international format, i.e. including the country code.Press the “*”key twice in quick succession,you’ll get “+” Edit Here you can change the existing selected contact. Delete Deletes the selected contact. Copy Copies the selected contact. You will be asked whether you want to copy the contact to the SIM card or the telephone's memory. Move Moves the selected contact to the telephone memory if it was stored on the SIM card , or to the SIM card if it was stored in the telephone. Copy/Move/Delete all contacts These entries copy, move or delete not just the selected contacts. You can then, first, copy all your contacts from the old SIM card to the telephone and then back from the telephone to the new SIM card. Phonebook settings This is where you make settings for the contacts. Preferred storage Here you specify whether the contacts are to be stored in the telephone or on the SIM card. Storing them on the SIM card is advantageous because the entries are kept if the telephone is changed. Vice- versa, saving them in the telephone is advantageous because the en- tries are kept if the SIM card is changed.If you in doubt, you can always use the copy function to copy the entries from the SIM card to the telephone or vice-versa if you are changing your SIM card or the telephone. However, it is important that all the entries are stored in the same place. Memory status The memory status shows how many numbers are stored on the SIM card and in the telephone and how many numbers, maximum, can be stored on both media. Settings In the default setting, you get to the phone set via the Navigation keys. If the call is not accepted, the telephone calls the next savedemergency number. If none of the emergency calls goes through (or if emergency call function is not stopped after the call), the telephone repeats the cycle of calls to all emergency numbers three times.After an outgoing emergency call (regardless of whether accepted, unsuccessful ) the telephone automatically accepts incoming calls and switches into hands-free mode.This allows contact with an incapacitated person, even if the emergency call has already ended. To close this function the telephone must be completely turned off, then back on again. The answering machine problem The telephone cannot differentiate whether the emergency call is accepted by a person, an answering machine or a fax machine.Should an emergency call be accepted by an answering machine,you can end the current call by quickly pressing hang up key.The telephone then dials the next emergency number.As the telephone pursues the emergency call function even after acceptance of the call, the call to the next emergency no.occurs even after acceptance by an answering machine in case the distressed person does not quickly press the hang up key, or is un- able to do so.they’re are generally configured to break off the call after a few seconds, if no specific and clear vocal message follows – yet this is no reliable safeguard .When entering the emergency numbers, you should make sure that no answering machine or fax machine is connected to said numbers. Test the emergency call function While testing, please consider that when making an emergency call the user of the device will be in a stressful situation. Persons receiving the emergency call should thus become familiar with using the emergency call function so as to be able to give instructions, as the case arises. Configuring the emergency call To configure the emergency call it must be enabled, and the emergency text and numbers must be entered.When the phone is on standyby,select the key and then Set Emergency Settings. Here you will find all the settings for configuring the emergency call,pressed down and then save the entry. Emergency numbers Enter your emergency numbers (up to five) under "Emergency Numbers". If there is an emergency, the first number entered will be dialed first, then the second, etc. You can enter the emergency numbers manually or take them from phonebook. To delete an emergency number, you edit it, you thereby delete the entire number by keeping the hang up key, pressed down and then save the entry. Sending an emergency SMS Here you specify whether an SMS will also be sent to the emergency number. You can decide for each of the emergency numbers, 1 to 5, whether the emergency SMS will be sent. Emergency SMS content This is where you enter the text which is sent as an SMS if there is an emergency call. You may change the text. Emergency alarm Here you specify if the emergency call alarm is to be played before the actual emergency call function. "No alarm sound" means that the emergency call is made with no alarm. 5 or 10 seconds means that the alarm sounds for 5 or 10 seconds before the actual emergency call function begins. Aborting the emergency call If an emergency call has been triggered accidentally, it can be aborted by keeping the hang up key pressed down.To quit the emergency call function completely, the telephone must be turned off, then back on again. Important information on emergency call functions Do not rely exclusively on this emergency call function. In certain situations (e.g. no network coverage or no credit for outgoing calls), the emergency call function might not operate. Make sure that no answering machines are associated with emergency call numbers. It is vital that you discuss the entering of emergency call numbers with the subscribers of those numbers, so that they know exactly what to do in case of emergency. The general emergency number for mobile networks (112) may not be entered as an emergency call number; this also applies to 110 and other official emergency numbers. After setting up the emergency call function, test it thoroughly in order to correct any configuration errors. Please note that an emergency call can be unintentionally triggered by contact with other objects, i.e. in a handbag; so take good care of your telephone if the emergency call function is enabled. Sound settings Here you specify the device's tones and the type of signal. Note: This setting is available in normal mode only not in silent mode. Tone settings Here you select the tones for incoming calls, the alarm, power the device on and off, messages (SMS) and for the keypad.When you select the relevant item, the melody that is currently set plays and you can use the arrow keys to change it. When you press dial key the selected melody saved.with key tones, you can choose between a tone and a clicking sound and switching the key tone off. Volume Here you can set the volume of the tones (incoming calls, messages and Alarm) and the key tone. Note: During a call, the volume of the receiver is adjusted using the rocker switch with the + and – symbol on the left of the device. This change will then be automatically saved. Alert type Here you set whether your telephone will only ring, only vibrate, first vibrate and then ring, or ring and vibrate at the same time. Ring type Here you can set whether, for incoming calls, your telephone will play the ringtone just once, or repeatedly, or ascending (starting quietly and getting louder). Answer mode Here you can specify that incoming calls can be taken not only with the dial key , but with any key you want. Speed dial Here you can assign the speed dial numbers to the numerals to. Call settings This is where you set the network settings for calls. Caller ID Here you can specify whether your number is displayed to the person you are calling."Hide ID" means that your number is not displayed, while "Send ID" means that it is sent. "Set by network" means that the network provider's setup determines whether your number will be displayed or not. Call waiting This is where you can switch call waiting on and off, and query the status set with the network provider.If call waiting is switched on, any other call that comes in while you are on the phone will be remark by a call waiting tone, and you can switch backwards and forwards between the two calls. The second caller hears the ringtone. If you have switched off call waiting, the second caller hears the engaged tone . Call divert Here you can switch call diversion on and off, and query the current status. Select "All voice calls" if all your calls are to be diverted. With "Divert if busy", other incoming calls are only diverted if you are on the phone. "Divert if no answer" means that calls are diverted if you fail to take the call within 15 seconds. When you select "Divert if unreachable". Settings You specify that calls are only diverted if your telephone is switched off or not logged onto the network.Select the diversion type you require with the dial key. In the sub- menu, you can then enable or disable the diversion, and query the current status with the network provider.After enabling it you will be asked whether you want to divert callers to your voicemail box (the answering machine) or to a different number Call barring In this configuration item you can set up call blocking for outgoing and incoming calls. Your service provider has to support call blocking and, to set it up, you require the PIN2 that your provider has given you. Network selection Here you can set whether your telephone is to automatically search for the mobile network, or if you prefer to select the network manually. With an automatic search, your telephone, in this country, always automatically logs onto your supplier's network, while outside this country it logs onto the network with the best reception. Manual selection only makes sense outside this country and only if you want to use a particular network there. Phone settings Here you specify certain telephone settings. Time and date Here you can set the date and the time. the date and time appear in the display when the telephone is on standby. Language Here you set the language of the telephone text. The first time that you use the device you will automatically be prompted to select a language, but you can use this menu to change this at any time after- towards. Pref. input methods In the device's default setting, the input method for all text entry is set to upper case in the selected language. If you prefer a different input method, you can change the device's default setting here. Contrast Here you can change the contrast in the display. Select a setting which enables you to easily read the text on the background. LCD backlight Here you can specify how long the display light will remain on if no key is pressed. Possible values are 5 to 60 seconds. Security settings This is where you can set up PIN queries for SIM card and the telephone. Settings SIM lock Here you can specify whether the telephone queries your SIM card's PIN (personal ID number) or not when it is switched on.You get the SIM card PIN along with the card, from your service provider.Switching off the PIN query is more convenient. However, if there is no PIN query there is, for example, no protection against unauthorized use if you lose it, which can lead be very costly. With the SIM lock you protect your card against unauthorized use.You get the SIM card PIN along with the card, from your service provider. However, you can change the PIN with any mobile phone and save the change on the card. Phone lock Here you can specify whether your telephone will be locked with a password. With the telephone lock, you protect our telephone against unauthorized use. Change password Here you can change the SIM PIN and the telephone password. Emergency settings This is where emergency numbers are entered and emergency settings made. Find a description in the "Emergency Call" chapter. Restore factory settings Here you can reset thephone to the settings it had when supplied.Some settings are not reset, e.g. the phone book is not deleted, , and any saved audio files arenot deleted.The reset code is “0000”. Silent mode Switches the telephone to silent mode so that you and other people e.g., during an event, are not disturbed by it ringing. Note: It is usually better to switch the telephone off rather than put it onsilent, as the caller then is then informed bytext that your telephone cannot be reached. You can use the Silent item in the main menu to switch silent mode with and without vibration on and off.If the telephone is set to silent, the symbol in the display. If it is set to silent with vibration, the symbol indicates this. Hint:If, while on standby, you keep the pressed down, you can switch quickly between "Silent" and normal mode. However, the "Silent and vibrating" function can only be enabled with the "Silent mode" menu. ORGANIZER Recorder You can use the recorder to record voice messages or record phone calls. E.g., you can quickly record a shopping list, or save a set of directions during a call. The recorder functionality is accessed via the "Recorder" item in the main menu and, for quick access, you can use the “recor d ” key, and down ar r ow ke y to play back Recording voice notes and phone calls While the device is on standby, if you press down arrow key, the telephone will begin to record a voice note. If you press the “Answering key” during a call, the phone call will begin to be recorded.You can interrupt and continue the recording with confirm key up or ends up by return key(M2).After recording, you can either save it with the Confirm key or cancle by return key(M2).When you are recording, speak loudly and clearly towards the micro- phone which is on the bottom of the device, next to the charge contact on the right-hand side. Note: Note that you are legally obliged to get the consent of the person you are talking to before beginning to record a call. Options after recording After recording, you can use the dial key to access the recording options. New record Starts a new recording. Play Plays back the recording you have just saved. Append Restarts the recording and adds it to the file that has just been saved. This option is only available after saving a recording. Rename The file name of the saved audio file can be changed here. This option is only available after saving a recording. Delete Deletes the audio file that has just been saved. This option is only available after saving a recording. List Opens the list of saved recordings. Settings Here you can choose whether recordings are to be saved in the "AMR" or "WAV" file format and with lower or higher audio quality. The "WAV" and "High" choice for the audio quality delivers the best result, but also leave you with correspondingly less recording time. Play back recordings When press down navigation key when phone in standyby mode,the recording list opens. You can use the navigation keys page through the recordings. Options in the recording list Use the confirm key to open the options in the recording list. Play Plays back the selected recording. Append Restarts the recording and adds it to the selected recording. Rename The file name of the selected recording can be changed here. Delete Deletes the selected recording/Deletes all the recordings. FM radio Your telephone features an integrated FM radio. You switch it on by pushing the lower sliding switch on the left of the telephone, or via the "FM radio" item in the main menu. Note: The headset must be connected to use the radio. When you switch on the radio, the station last set starts playing and the station's frequency appears in the display. You can use the“ Navigation keys” to change the frequency in small steps.While is playing, you can adjust volume using the rocker switch labeled + and - on the left of the phone. Options in radio mode You can access the radio mode options using the dial key . Channel list Displays the list of all the channels that have been saved, and allows them to be played, deleted and edited. Manual input Here you can enter a frequency manually. Auto search Automatically searches for stations and saves them to the memory fields in the channel list. Note: The automatic search overwrites the stations saved in channel list. Settings Here you can specify whether the background playback and the loudspeaker are to be switched on or off.When background playback is switched on, the radio continues to play the selected station, to stop playback, you need to use the radio switch on the left of device.If the loudspeaker is switched on, the radio station plays via the loud- speaker on the back of the device, as well as through the headset. Alarm clock Your telephone has an integrated alarm clock with up to five alarm times. Select the alarm time that you want to edit, and press confirm key. In the alarm settings, you first set whether the alarm is to be switched on or off. Next, you use the number keys on the keypad to enter the alarm time you want. Thirdly, you decide whether the alarm is to repeat just once or every day. Under "Alert type", specify whether the telephone will only ring, only vibrate, or ring and vibrate at the alarm time.The symbol in the display indicates when an alarm has been set. At the alarm time, the telephone will ring and show the date and time on the display. It also shows "Stop" , and "Snooze",. In the the "Subject" field. Here you enter a text that the telephone will display when providing the birthday reminder (e.g. "Eric's birthday"). In the "Alarm" field. Here you can switch the alarm on and off by pressing the confirm key . Note:You can change the alarm sound via Settings. Sound settings- Tone settings-Alarm Use confirm key for”Subject”field. Here you enter a text that the telephone will display when providing the birthday reminder (e.g. "Eric's birthday"). The text is entered in the same way as when writing an SMS. When the text has been entered, press confirm key and press the "Done" item in the Options menu to apply the text. Whereas in the"Alarm" field. Here you can switch the alarm on and off by pressing the comfirm key.You also have the option of specifying that the telephone will remind you 5, 15 or 30 minutes before the time that has been set. Then press the confirm key to save it.The birthday is then saved. From this point onwards, the telephone will remind you of the birthday at time set. Birthdays You can use this function to manage birthdays with your telephone and remind you of them. Select the "Birthdays" item in the main menu.If a birthday has already been saved, the Options menu opens when you press the dial key . This menu enables you to add a new birthday, to view, edit and delete the selected birthday, or to delete all the birthdays that have been created. The phone display will show the date, time and subject, and the alarm will go off. It also shows "OK", which you can select with the confirm key , and "Snooze", which you select with the hang up key . "OK" terminates the reminder. You can use "Snooze" to be reminded again in 5 minutes.If no key is pressed, the telephone continues to execute the alarm function at intervals. Calculator Your telephone has a simple, integrated calculator. When the telephone is on standby, you access it via the Calculator item in the main menu, You can use this function to manage birthdays with your telephone and remind you of them. Select the "Birthdays" item in the main menu. CE sign This device is approved for the connection and use within the analogue public telephone networks in all EC countries – according to the European Requirements. Due to technical deviations in individual countries, we cannot grant an unlimited guarantee for the successful operation at all types of telephone accesses. TTM hereby declares that the device complies with all fundamental requirements of the European directive 1999/5/EC. This conformity is confirmed by the CE sign on the device