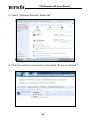
1
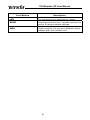
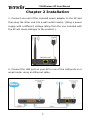
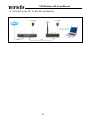
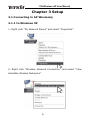
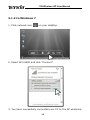
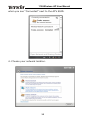
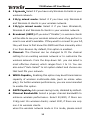
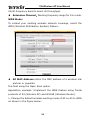
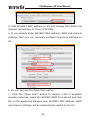
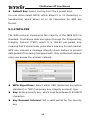
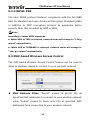
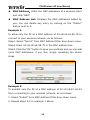
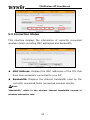
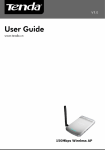
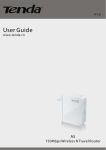
11N Wireless AP User Manual
Copyright Statement
is the registered trademark of Shenzhen Tenda
Technology Co., Ltd. All the products and product names
mentioned herein are the trademarks or registered trademarks of
their respective holders. Copyright of the whole product as
integration, including its accessories and software, belongs to
Shenzhen Tenda Technology Co., Ltd. Without prior expressed
written permission from Shenzhen Tenda Technology Co., Ltd, any
individual or party is not allowed to copy, plagiarize, reproduce, or
translate it into other languages.
All photos and product specifications mentioned in this manual are
for references only. Upgrades of software and hardware may occur;
Tenda reserves the right to revise this publication and to make
changes in the content hereof without obligation to notify any
person or organization of such revisions or changes. If you would
like to know more about our product information, please visit our
website at www.tenda.cn.
1 11N Wireless AP User Manual
Table of Contents TABLE OF CONTENTS...................................................................................................... 2
CHAPTER 1 PRODUCT OVERVIEW ........................................................................ 4
1.1 PACKAGE CONTENTS.................................................................................................... 4
1.2 PANEL OVERVIEW ........................................................................................................ 5
CHAPTER 2 INSTALLATION ..................................................................................... 7
CHAPTER 3 SETUP........................................................................................................ 9
3.1 CONNECTING TO AP WIRELESSLY .............................................................................. 9
3.1.1 In Windows XP .................................................................................. 9
3.1.2 In Windows 7...................................................................................11
3.2 LOGIN TO AP.............................................................................................................. 13
3.3 QUICK ENCRYPTION ................................................................................................... 13
CHAPTER 4 SYSTEM STATUS ................................................................................................. 15
4.1 WIRELESS................................................................................................................... 15
4.2 LAN ............................................................................................................................ 16
4.3 SYSTEM STATUS ........................................................................................................ 17
CHAPTER 5 WIRELESS SETTINGS........................................................................................... 18
5.1 BASIC SETTINGS........................................................................................................ 18
5.2 WIRELESS SECURITY ................................................................................................. 23
5.2.1 WEP................................................................................................23
5.2.2 WPA-PSK.........................................................................................24
5.2.3 WPA2-PSK .......................................................................................25
5.3 MAC-BASED WIRELESS ACCESS CONTROL ............................................................. 25
5.4 CONNECTION STATUS................................................................................................ 27
CHAPTER 6 LAN SETTINGS.................................................................................................... 28
6.1 STATIC IP................................................................................................................... 28
6.2 DYNAMIC IP (DHCP)................................................................................................ 29
CHAPTER 7 TOOLS ................................................................................................................ 30
7.1 TIME SETTINGS .......................................................................................................... 30
7.2 BACKUP/RESTORE SETTINGS.................................................................................... 30
7.3 RESTORE TO FACTORY DEFAULT SETTINGS ............................................................. 32
7.4 FIRMWARE UPGRADE ................................................................................................. 33
7.5 AP REBOOT ................................................................................................................ 33
7.6 CHANGE PASSWORD .................................................................................................. 34
7.7 SYSLOG ...................................................................................................................... 35
2 11N Wireless AP User Manual
APPENDIX 1: GLOSSARY ........................................................................................ 36
APPENDIX 2: FEATURES ......................................................................................... 38
APPENDIX 3: TROUBLESHOOTING .................................................................... 39
APPENDIX 4: REMOVE WIRELESS NETWORK ON YOUR PC................... 41
APPENDIX 5: SECURITY STATEMENT ............................................................... 44
3 11N Wireless AP User Manual
Chapter 1 Product Overview
The Tenda AP is a Wireless N Range Extender which is designed to
extend the coverage and improve the signal strength of an
existing wireless network using either AP mode or WDS mode.
Combined with leading wireless N technologies, superior security
(WEP, WPA-PSK,WPA2-PSK,WPA-PSK&WPA2-PSK, MAC-based
wireless client access control) and backward compatibility with
wireless b/g, the Tenda AP makes it a secure high speed solution
that vastly improves your network coverage without changing
existing wireless network, giving you the freedom to roam
anywhere in the house and access Internet without worrying
about coverage. Plus, the world’s most intuitive user interface lets
you, even a novice, configure the AP in a few seconds without any
network know-how required. It is the best solution for home,
dorm and SOHO environment.
1.1 Package Contents
Please unpack the box and check the following items:
◆
Wireless AP
◆
Power Adapter
◆
Quick Installation Guide
◆
CD-ROM
If any of the above items are incorrect, missing, or damaged,
please contact your Tenda reseller for immediate replacement.
4 11N Wireless AP User Manual
1.2 Panel Overview
LED overview (Take A3 as an example):
LED
Status
Description
STATE
Blinking
System is functioning properly
Port/Button Overview: (A3 is used in the figure below):
5 11N Wireless AP User Manual
Port/Button
Description
LAN
For connection to a computer or router.
RESET
Pressing this button for 7 seconds restores the
device to factory default settings.
PWR
Power receptor. Do not use a different power
adapter than the included one.
6 11N Wireless AP User Manual
Chapter 2 Installation
1. Connect one end of the included power adapter to the AP and
then plug the other end into a wall outlet nearby. (Using a power
supply with a different voltage rating than the one included with
the AP will cause damage to the product.)
2. Connect the LAN port on your AP to one of the LAN ports on a
wired router using an Ethernet cable.
7 11N Wireless AP User Manual
.3. Connect your PC to the AP wirelessly.
8 11N Wireless AP User Manual
Chapter 3 Setup
3.1 Connecting to AP Wirelessly
3.1.1 In Windows XP
1. Right click “My Network Places” and select “Properties”.
2. Right click “Wireless Network Connection” and select “View
Available Wireless Networks”.
9 11N Wireless AP User Manual
3. Select the AP’s SSID.
4. Click “Connect Anyway”.
10 11N Wireless AP User Manual
3.1.2 In Windows 7
1. Click network icon
on your desktop.
2. Select AP’s SSID and click “Connect”.
3. You have successfully connected your PC to the AP wirelessly
11 11N Wireless AP User Manual
when you see “Connected” next to the AP’s SSID.
4. Choose your network location.
12 11N Wireless AP User Manual
3.2 Login to AP
1 、 Open a web browser, enter http:// 192.168.0.254 in the
address bar and then press “Enter” to go to interface below:
3.3 Quick Encryption
Use the interface below to fast secure your wireless network (Only
a catchy security key is required) or go to Advanced (click the
"Advanced" tab on the upper right corner)–Wireless–Basic
Settings for more settings (Apart from the security key option,
you can select a security mode and a cipher type that best fit
yourself or keep the defaults thereof unchanged. Detailed settings
for this latter option refer to Section 5.2 hereof).
The interface below allows you to setup a wireless password
(security key) that consists of 8 characters only. The password is
preset to 12345678 by default; you can change it to whatever
catchy phrase of 8 characters only.
13 11N Wireless AP User Manual
14 11N Wireless AP User Manual
Chapter 4 System Status
This section allows you to view the AP’s information.
4.1 Wireless
◆
Wireless Working Mode: Displays AP’s current working
mode: AP or WDS mode.
◆
Network Mode: Displays AP’s current IEEE802.11 mode:
11n/g/b.
◆
SSID: Displays AP’s current wireless network name.
◆
Security Mode: Displays AP’s current wireless security mode.
◆
Channel: Displays AP’s current wireless channel.
15 11N Wireless AP User Manual
4.2 LAN
◆
Address Mode: Displays AP’s current IP mode: Dynamic IP
or Static IP.
◆
MAC Address: Displays AP’s LAN MAC address.
◆
IP Address: Displays AP’s current IP address.
◆
Subnet Mask: Displays AP’s current IP subnet mask.
◆
Gateway: Displays AP’s current gateway address.
16 11N Wireless AP User Manual
4.3 System Status
◆
System Time: Displays the time customized by you or
obtained from Internet.
◆
Running Time: Displays device’s up time.
◆
Connected client : Displays the number of connected
computers.
◆
Software Version:Displays router’s firmware version.
◆
Hardware Version: Displays router’s hardware version.
17 11N Wireless AP User Manual
Chapter 5 Wireless Settings 5.1 Basic Settings
◆
Enable
Wireless
Functions:
Check/uncheck
to
enable/disable the wireless feature. When unchecked, all
wireless related features will be disabled.
◆
Wireless Working Mode: Select either AP or WDS according
to your practical needs.
◆
AP mode:To simply convert your existing wired network to a
wireless network that allows flexible mobility for LAN access,
select this AP mode.
◆
Network Mode: Select a right IEEE802.11 mode from the
following according to your wireless client. The default mode
is 11b/g/n mixed.
◆
11b mode:Select it if you have only Wireless-B clients in your
wireless network.
18 11N Wireless AP User Manual
◆
11g mode:Select it if you have only Wireless-G clients in your
wireless network.
◆
11b/g mixed mode: Select it if you have only Wireless-B
and Wireless-G clients in your wireless network.
◆
11b/g/n mixed mode: Select it if you have Wireless-B,
Wireless-G and Wireless-N clients in your wireless network.
◆
Broadcast (SSID): If you select “Disable”, no wireless clients
will be able to see your wireless network when they perform a
scan to see what’s available. If they want to connect to your AP,
they will have to first know this SSID and then manually enter
it on their devices. By default, this option is enabled.
◆
Channel: The Channel can be changed to fit the channel
setting for an existing wireless network or to customize the
wireless network. From the drop-down list,you can select a
most effective channel, which ranges from 1 to 11. You can
also select “Auto Select” to let system detect and choose one
that best fits your network.
◆
WMM-Capable:Enabling this option may boost transmission
capacity of wireless multimedia data (such as online video
play). For better wireless performance, you are recommended
to enable this option.
◆
ASPD Capable:Auto power saving mode, disabled by default.
◆
Channel Bandwidth: Select a proper channel bandwidth to
enhance wireless performance. Select 20/40M, if there are
11b/g and 11n wireless clients; select 20M, if there are only
non-11n wireless clients.
when the wireless network mode is 11n mode, please select
19 11N Wireless AP User Manual
20/40 frequency band to boost its throughput.
◆
Extension Channel:Working frequency range for 11n mode.
WDS Mode:
To extend your existing wireless network coverage, select the
WDS (Wireless Distribution System) feature.
◆
AP MAC Address: Enter the MAC address of a wireless link
partner or populate
this field using the Open Scan option.
Application example: Implement the WDS feature using Tenda
products of A3 (Wireless AP) and W316R (Wireless Router).
1. Change the default wireless working mode of AP on A3 to WDS
as shown in the figure below:
20 11N Wireless AP User Manual
2. Add W316R’s MAC address to A3 and change A3’s SSID and
channel respectively to those of W316R.
a. If you already know W316R’s MAC address, SSID and channel
settings, then you can manually configure the same settings on
A3.
b. Or you can use the Open Scan option.
1)Click the “Open Scan” button to display a list of available
wireless networks, select the W316R’s SSID from the list and click
OK on the appearing dialogue box; W316R’s MAC address, SSID
and channel settings will be automatically added to the A3.
21 11N Wireless AP User Manual
2. Click OK to save your settings.
3. Configure wireless security settings. For this step, refer to
section 5.2 hereof.
4. Repeat steps 1-3 on W316R.
Note: SSID, channel, security settings and security key must be
the
same
on
both
A3
and
W316R
for
successful
WDS
implementation.
Note:
1. WDS feature can be implemented only between 2 wireless devices
that both support the WDS feature. Plus, SSID, channel, security
settings and security key must be the same on both devices. Using the
Open Scan option and selecting link partner from the scan list
automatically change the AP’s existing SSID and channel settings
22 11N Wireless AP User Manual
respectively to those of link partner as well as add link partner’s MAC
address. So we recommend you to use this Open Scan option for easy
WDS settings.
2. Using WEP encryption improves WDS compatibility. For this reason,
we recommend you to encrypt your wireless network with WEP when
using the WDS feature.
5.2 Wireless Security
This section allows you to configure wireless encryption to block
unauthorized access to your wireless network and prevent
malicious packet sniffing. 3 ways are provided to encrypt your
data: WEP, WPA-PSK and WPA2-PSK.
5.2.1 WEP
WEP (Wired Equivalent Privacy) is intended to provide data
confidentiality comparable to that of a traditional wired network. It
has super compatibility. Try to use this encryption if you are
coming across a failure when implementing WDS with a wireless
device of a different chip.
23 11N Wireless AP User Manual
◆
Default Key: Select one key from the 4 preset keys.
You can either select ASCII, which allows 5 or 13 characters, or
hexadecimal, which allows 10 or 26 characters for WEP key
format.
5.2.2 WPA-PSK
The WPA protocol implements the majority of the IEEE 802.11i
standard. It enhances data encryption through the Temporal Key
Integrity Protocol (TKIP) which is a 128-bit per-packet key,
meaning that it dynamically generates a new key for each packet.
WPA also includes a message integrity check feature to prevent
data packets from being hampered with. Only authorized network
users can access the wireless network.
◆
WPA Algorithms: Select either AES (advanced encryption
standard) or TKIP (temporary key integrity protocol) type.
◆
Key: Enter a security key,which must be between 8-63 ASCII
characters.
◆
Key Renewal Interval: Set a valid period for the security
key.
24 11N Wireless AP User Manual
5.2.3 WPA2-PSK
The later WPA2 protocol features compliance with the full IEEE
802.11i standard and uses Advanced Encryption Standard (AES)
in addition to TKIP encryption protocol to guarantee better
security than that provided by WEP or WPA.
Note:
According to latest WIFI standards,
a. When WEP or TKIP is selected, network mode will change to “11b/g
mixed” automatically.
b. When AES or TKIP&AES is selected, network mode will change to
“11b/g/n mixed” automatically.
5.3 MAC-based Wireless Access Control
The MAC-based Wireless Access Control feature can be used to
allow or disallow clients to connect to your wireless network.
◆
MAC Address Filter: “Permit” means to permit PCs at
specified MAC addresses to connect to your wireless network
while “Forbid” means to block only PCs at specified MAC
addresses from connecting to your wireless network.
25 11N Wireless AP User Manual
◆
MAC Address:Enter the MAC addresses of a wireless client
and click “Add”.
◆
MAC Address List: Displays the MAC addresses added by
you. You can delete any entry by clicking on the “Delete”
button next to it.
Example 1:
To allow only the PC at a MAC address of 00:e8:c8:a4:56:75 to
connect to your wireless network, do as follows:
Step1. Select “Permit” from MAC Address Filter drop-down menu.
Step2. Enter 00:e8:c8:a4:56:75 in the MAC address box.
Step3. Click the “OK” button to save your settings and you can add
more MAC addresses, if you like, simply repeating the above
steps.
Example 2:
To prohibit only the PC at a MAC address of 00:c2:a5:67:d4:23
from connecting to your wireless network, do as follows:
1. Select “Forbid” from MAC Address Filter drop-down menu.
2. Repeat steps 2-3 in example 1 above.
26 11N Wireless AP User Manual
5.4 Connection Status
This interface displays the information of currently connected
wireless clients including MAC addresses and bandwidth.
◆
MAC Address: Displays the MAC addresses of the PCs that
have been wirelessly connected to your AP
◆
Bandwidth: Displays the channel bandwidth used by the
currently connected hosts (connected wireless clients).
Note:
"Bandwidth" refers to the wireless channel bandwidth instead of
wireless connection rate.
27 11N Wireless AP User Manual
Chapter 6 LAN Settings Click “LAN Settings” to enter the interface below. The AP’s LAN IP
can either be static or dynamic.
6.1 Static IP
◆
MAC Address: Displays the AP‘s LAN MAC address, which
cannot be changed.
◆
Address Mode: Select either static or dynamic IP.
◆
IP Address: The default LAN IP address for this AP is
192.168.0.254. You can change it according to your need.
◆
Subnet Mask: Enter the AP’s LAN subnet mask. The default
value is 255.255.255.0.
◆
Gateway: Enter a connected router’s IP address.
◆
Primary DNS Address: Enter the DNS address provided by
your ISP or a connected router’s IP address.
◆
Alternate DNS Address: Enter the secondary DNS address if
your ISP provides, and it is optional.
28 11N Wireless AP User Manual
6.2 Dynamic IP (DHCP)
Select this option only if you have a DHCP-enabled router on your
network to assign an IP address to your AP. Otherwise use the
static IP option.
Note:
1. If you change the device’ LAN IP address, you have to enter the new
one in your browser to get back into the web-based configuration
utility.
2. If you are using the dynamic IP option, you need to first go to the
management interface of the DHCP-enabled router (where your AP
obtains IP) to check your AP’s IP address and then use this IP to log in
to your AP’s management interface. So, do not use this option unless
you have authorized access to the router to check your AP’s IP address
therein or you don’t need to go to AP’s management interface to
configure any settings.
29 11N Wireless AP User Manual
Chapter 7 Tools 7.1 Time Settings
This section assists you in setting the device’s system time; you
can either select to set the time and date manually or
automatically obtain the GMT time from Internet.
NOTE:
The configured time information loses once the device is powered off.
But it obtains the GMT time automatically when you connect it to the
Internet. Features/functions based on time (e.g. security settings)
take effect only after Time and Date settings are configured manually
or updated automatically from Internet.
7.2 Backup/Restore Settings
This section allows you to backup current settings or to restore the
previous settings configured on the device.
30 11N Wireless AP User Manual
◆
Backup Settings: Once you have configured the device the
way you want it, you can save these settings to a configuration
file on your local hard drive that can later be imported to your
device in case that the deivce is restored to factory default
settings. To do this, click the “Backup” button next to where it
says “Select the file directory to save the configured
parameters” on the screen above.
And then,click the “Save” button on the appearing screen above
to store it under the selected path.
◆
Restore Settings: Click the "Browse" button to locate and
select a configuration file that is saved previously to your local
31 11N Wireless AP User Manual
hard drive.
And then click the "Restore" button to reset your device to
previous settings.'
7.3 Restore to Factory Default Settings
To restore all settings to the device's factory default values, click
the "Restore to Factory Default” button on the interface below:
Factory Default Settings:
◆
Password: There is no preset password by default.
◆
IP Address: 192.168.0. 254
◆
Subnet Mask: 255.255.255.0
Note:
To activate your settings, reboot the device after you reset it.
32 11N Wireless AP User Manual
7.4 Firmware Upgrade
Firmware upgrade is released periodically to improve the
functionality of your device and also to add new features. If you
run into a problem with a specific feature of the device, log on to
our website(www.tenda.cn)to download the latest firmware to
update it.
◆
Browse: Click this button to select an upgrade file.
◆
Upgrade: Click this button to start an upgrading process.
After the upgrade is completed, the device will reboot
automatically.
NOTE:
Do not disconnect the device from your management PC (the PC you
use to configure the device) or power off it during the upgrade process;
otherwise, it may be permanently damaged. The devoce will restart
automatically when the upgrade process, which takes several minutes,
completes.
7.5 AP Reboot
By Rebooting the device,new settings can be brought into effect.
33 11N Wireless AP User Manual
And LAN connection will be cut automatically during this process.
7.6 Change Password
On the screen below, you can change the password for login to the
device's Web-based interface.
◆
Old Password: Enter the old password. (If you have not
changed the login password before, then just leave this field
blank, for there is no preset password by default.)
◆
New Password: Enter a new password.
◆
Confirm new Password: Re-enter the new password for
confirmation.
If you enter a correct old password, then clicking the "OK" button
saves your new password.
NOTE:
For the purpose of security, it is highly recommended that you
34 11N Wireless AP User Manual
change default login password.
7.7 SysLog
The Syslog option allows you to view all events that occur upon
system startup and check whether there is attack on your
network.
◆
Refresh: Click this button to update the log.
◆
Clear: Click this button to clear the log record.
35 11N Wireless AP User Manual
Appendix 1: Glossary
Channel
A communication channel, also known as channel, refers either to
a physical transmission medium such as a wire or to a logical
connection over a multiplexed medium such as a radio channel. It
is used to transfer an information signal, such as a digital bit
stream, from one or more transmitters to one or more receivers.
If there are several APs coexisting in the same area, it is
recommended that you configure a different channel for each AP
to minimize the interference between neighboring APs. For
example, if 3 American- standard APs (i.e. adopts channel 11)
coexist in one area, you can setup their channels respectively to 1,
6 and 11 to avoid mutual interference.
SSID
Service set identifier (SSID) is used to identify a particular 802.11
wireless LAN. It is the name of a specific wireless network. To let
your wireless network adapter roam among different APs, you
must set all Aps’ SSID to the same name.
WPA/WPA2
The WPA protocol implements the majority of the IEEE 802.11i
standard. It enhances data encryption through the Temporal Key
Integrity Protocol (TKIP) which is a 128-bit per-packet key,
meaning that it dynamically generates a new key for each packet.
WPA also includes a message integrity check feature to prevent
data packets from being hampered with. Only authorized network
36 11N Wireless AP User Manual
users can access the wireless network.
The later WPA2 protocol features compliance with the full IEEE
802.11i standard and uses Advanced Encryption Standard (AES)
in addition to TKIP encryption protocol to guarantee better
security than that provided by WEP or WPA.
37 11N Wireless AP User Manual
Appendix 2: Features
¾
Compliant with IEEE802.11n/g/b,IEEE802.3/3u
¾
Wireless speed up to 300Mbps/150Mbps
¾
Supports Wi-Fi Multimedia (WMM) to smooth video and audio
¾
High gain antenna(s) for better coverage
¾
Supports WEP/WPA-PSK/WPA2-PSK encryptions
¾
Supports WDS to seamlessly expand your wireless network
¾
Supports hidden SSID broadcast for better security
¾
Syslog records AP's usage status
¾
1* 10/100M auto-negotiation Ethernet port
¾
MAC-based wireless access control
¾
Supports SNTP, auto MID/MDIX.
38 11N Wireless AP User Manual
Appendix 3: Troubleshooting
1. Q: I can’t log in to AP’s web-based management
interface after entering 192.168.0.254 in the browser’s
address bar, what should I do?
A: 1). Verify that your PC’s IP address is set to any value between
192.168.0.2-192.168.0.253.
2). Try a different browser or delete your existing browser’s
cache and cookies. Make sure your browser’s connection mode is
“Never dial a connection”.
3). Restart your PC if you are using Windows 98 OS and have
changed your PC’s IP address.
4). Verify that your wireless adapter is working correctly.
Renew adapter’s drive in presence of multiple connection failure.
2. Q: I forget
the login password to my AP, what should I
do?
A: In this case, you need to restore the AP to factory default
settings. To do so, Press the hardware RESET on your AP for about
7 seconds and then release.
3. Q: My PC is unable to search AP’s wireless network, what
should I do?
A: 1). Verify that wireless is enabled on your PC.
2). Make sure that AP is correctly powered.
3). Remove any large metal objects in between your PC and AP.
4). Clear any interference sources such as cordless telephones
and microwave ovens, etc.
39 11N Wireless AP User Manual
If you still have some problems, please contact our
technical support.
Technical Support
¾
Toll Free: 400-6622-666 (For Mainland China Only)
¾
Toll Free: 1-800-570-5892 (For USA only)
¾
Tel: +86 (755) 2344 2820
¾
Skype: tendasz
¾
MSN: [email protected]
¾
Email: [email protected]
¾
Headquarter Shenzhen:
¾
Add:
Tenda
Industrial
Zone,
No.34-1
Shilong
ShiyanTown, Baoan District, Shenzhen, China. 518108
¾
Tel:(86)755-27657180
¾
Fax: (86)755-27657178
¾
Email: [email protected]
¾
Technical Support: [email protected]
40 Road,
11N Wireless AP User Manual
Appendix 4: Remove Wireless
Network on Your PC
Changing wireless settings on AP while keeping them unchanged
on your PC may lead to connection failure when trying connecting
to the AP wirelessly. So, do remember to delete the wireless
settings on your PC when you have changed them on the AP.
Below presents you the way to do so.
In Windows XP
1.
Right click “My Network Places” and select “Properties”.
2.
Click Wireless Network Connection and then select Properties.
41 11N Wireless AP User Manual
3. Click “Wireless Networks”, select the item under “Preferred
networks” and click the Remove button.
In Windows 7
1.
Click network icon
on your desktop and select Properties.
42 11N Wireless AP User Manual
2. Select “Manage Wireless Networks”.
3. Click the wireless connection and select “Remove network”.
43 11N Wireless AP User Manual
Appendix 5: Security Statement
FCC Statement
This equipment has been tested and found to comply with the
limits for a Class B digital device, pursuant to part 15 of the FCC
rules. These limits are designed to provide reasonable protection
against harmful interference in a residential installation. This
equipment generates, uses and can radiate radio frequency
energy and, if not installed and used in accordance with the
instructions,
may
cause
harmful
interference
to
radio
communications. However, there is no guarantee that interference
will not occur in a particular installation. If this equipment does
cause harmful interference
to radio or television reception, which can be determined by
turning the equipment off and on, the user is encouraged to try to
correct the interference by one or more of the following measures:
-Reorient or relocate the receiving antenna.
-Increase the separation between the equipment and receiver.
-Connect the equipment into an outlet on a circuit different from
that to which the receiver is connected.
-Consult the dealer or an experienced radio/TV technician for help.
To assure continued compliance, any changes or modifications not
expressly approved by the party responsible for compliance could
void the user’s authority to operate this equipment. (Example- use
only shielded interface cables when connecting to computer or
peripheral devices).
“The antenna(s) used for this transmitter must not be co-located
44 11N Wireless AP User Manual
or operating in conjunction with any other antenna or transmitter.”
FCC Radiation Exposure Statement
This equipment complies with FCC radiation exposure limits set
forth for an uncontrolled environment. This equipment should be
installed and operated with the minimum distance of 20 cm.
Operation is subject to the following two conditions:
1) This device may not cause interference, and
2)
This
device
must
accept
any
interference,
including
interference that may cause undesired operation of the device.
Caution!
The manufacturer is not responsible for any radio or TV
interference caused
by unauthorized modifications to this
equipment. Such modifications could void the user authority to
operate the equipment.
Eu Declaration or Declaration of Conformity
Hereby, SHENZHEN TENDA TECHNOLOGY CO.,LTD, declares that
this
wireless
requirements
device
and
is
other
in
compliance
relevant
1999/5/EC.
45 with
provisions
the
essential
of
Directive