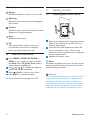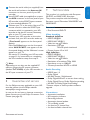
1
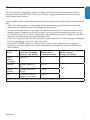
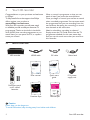
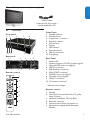
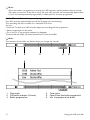
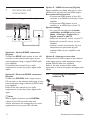
HDT 8520
www.philips.com/support
For support call 0800 331 60 15
EN High-Definition Digital Terrestrial Recorder
2

1
Important
1.1 Safety information
1.2 Reducing power consumption
4
5
7
2
2.1
2.2
2.3
2.4
2.5
Your HD recorder
What’s in the box?
What you also need (not supplied)?
Overview
How to read this manual?
How to use the menus?
8
8
9
9
10
10
3
3.1
3.2
3.3
3.4
Getting started
Preparing your remote control
Connecting your HDTV
Installing your HD recorder
What if no channels are found?
4
4.1
4.2
4.3
4.4
4.5
4.6
4.7
4.8
4.9
5
7
Accessories and connections 7.1 Connecting your audio equipment
7.2 Connecting your
standard-definition TV
34
34
8
Guarantee and service
35
9
Technical data
35
34
10 Frequently asked questions
37
10
10
11
11
13
11 Glossary
40
12 Index
42
Contact information
42
Using your HD recorder
Standby/wake up
Changing channels
Adjusting volume
Using the channel banner
Using channel lists
Using the TV guide
Using the Tools menu
Pausing live TV
Recording programmes
14
14
14
14
14
16
16
17
17
18
Trademarks and partner logos
43
5.1
5.2
5.3
5.4
Using more of your
HD recorder
HD recorder
Remote control
Front-panel display messages
Using the Main menu
23
23
24
25
27
6
6.1
6.2
6.3
Maintenance
Cleaning
Replacing
Disposing
33
33
33
33

3
ENGLISH
Table of contents
1
Important
Thank you for purchasing a Philips product. Take time to read this user manual before using your
HD recorder. It provides important information on the installation, operation and safety of your HD
recorder. Keep this manual next to your HD recorder for future reference.
Disposal of your old product
Your product is designed and manufactured with high quality materials
and components, which can be recycled and reused.
When this “crossed-out wheeled bin” symbol is attached to a product
or its packaging, it means that the product is covered by the European
Directive 2002/96/EC.
Please inform yourself about the local separate collection process for
electrical and electronic products.
Please act according to your local rules and do not dispose of your old
products with your normal household waste. The correct disposal of
your old product will help prevent potential negative consequences for
the environment and human health.
The “Material recyclability” symbol affixed on the package cardboard and
user manual means that these parts are recyclable.
So do not dispose of them with your normal household waste.
The “Material recyclability” symbol affixed on plastic packaging parts
means that these parts are recyclable.
So do not dispose of them with your normal household waste.
The “Green Dot” symbol affixed on the cardboard means that
the manufacturer of the product has financially contributed to the
“Avoidance and Recovery of Packaging Waste” organization.
4
Important
ENGLISH
1.1
Safety information
Your HD recorder is powered using a 12 V power supply unit.Your HD recorder has been
manufactured to meet the appropriate safety standards, but you must follow the below instructions
to operate it safely. Keep these instructions for future reference.
Danger
• Your HD recorder does not contain any user-serviceable parts. Do not attempt to open it. All
maintenance work must be carried out by qualified service centres.
• The supplied mains plug is a non-rewireable type. If you need to replace the fuse, you must use an
ASTA- or BSI-approved BS 1362 fuse, rated at 3 A and marked as shown below.
or
The plug has its fuse beneath a fuse cover on its face. Use a screwdriver to lever off the fuse
cover, replace the fuse with a new one and refit its cover. Never use a plug if its fuse cover is
missing.
AM
The fuse is inside the rewireable plug. Use a screwdriver to remove the plug’s back cover. Never
put the plug into the mains socket when its cover is removed. Lever out the fuse and replace it with a
new one. Replace the plug’s back cover.
FUSE of correct value
E
L
3 AMP
N
If the supplied mains plug is not suitable for your mains socket-outlet, DO NOT plug
it in. Remove its fuse and then cut the plug off the lead. Destroy the severed plug
immediately to avoid the shock hazard which would exist if this were to be plugged
into a mains socket. Fit an appropriate mains plug on the lead. If this plug contains
a fuse, it should be as described above. If you are using a non-fused plug, an external
fuse must not exceed 5 A.
Important
5
Warnings
• Before connecting the 12 V power supply unit to the mains, check that the mains supply voltage
corresponds to the voltage printed on it. If the mains voltage is different, consult your local dealer.
• The 12 V power supply unit has been designed for indoor use only.
• Use only the original 12 V power supply unit.
• Unplug the 12 V power supply unit from the wall socket before lightning storms.
• Ensure that the 12 V power supply unit is easily accessible in case you need to shut down your HD
recorder in an emergency.
• To prevent fire or shock hazard, do not expose your HD recorder to rain or moisture.
• Place your HD recorder on a firm surface, and do not cover the ventilation openings with items
such as newspapers, table clothes, curtains, etc.
• Do not install your HD recorder near heat sources such as radiators, stoves or other equipment
that produce heat. Protect it from direct sunlight.
• In order to ensure a free flow of air around your HD recorder, allow at least 5 cm of space above
and around it. This prevents overheating of your HD recorder.
• Do not place any combustible objects such as candles, etc., on your HD recorder.
• Never stand objects filled with liquids, such as vases, on top of your HD recorder. Do not place
anything on your HD recorder that might drip or spill into it. If this happens, disconnect the
12 V power supply unit from the wall socket and have your HD recorder checked at any
authorized service centre.
• While the hard disk is running, do not move the product or turn off the power suddenly. The
company shall not be liable for any corruption of data on the hard disk caused by the carelessness
of or misuse by users.
• The batteries installed in the remote control should not be exposed to excessive heat such as
sunshine, fire or the like.
Please also pay attention to all the warnings and cautions listed throughout this manual.
6
Important
Reducing power consumption
ENGLISH
1.2
Your HD recorder is designed to reduce its impact on the environment and complies with the
European Directive 2009/125/EC. This is part of Philips’ ongoing commitment to lead the way in
environmental responsibility.
It has a standby mode of operation that needs very little power. See the table below and please note
that:
• When your HD recorder is in the standby mode, you save energy (and therefore money) and
reduce carbon dioxide emissions that damage the environment.
• You use the standby button on your HD recorder or remote control to switch between on and
standby modes. In addition, if your HD recorder is on, but you do not press any button on it or
your remote control for 3 hours (configurable - see ‘Automatic eco mode’ on page 30), your HD
recorder will automatically get into the standby mode.
• If you are not going to use your HD recorder for several days, you can cut its energy consumption
to zero by unplugging it from the mains wall socket.
• In the off and standby modes, your HD recorder cannot receive updates from the network.
However, at recorder wake-up, you will be prompted by a message if an update notification has
been received.
Mode
*
Front-panel standby
indicator and display
Typical power
consumption (W)
Power
adaptor
unplugged
Not lit up
0
Standby
Standby indicator is
red
0.31 W
Active
Standby
Standby indicator is
orange
11.5 W
On
A channel number is
shown on the display
13.6 W
Typical annual
energy use (kWh)
0
22.5 *
Based on your HD recorder being On for 4 hours daily and being in standby for 20 hours.
Important
7
2
Your HD recorder
Congratulations on your purchase and welcome
to Philips!
To fully benefit from the support that Philips
offers, register your product at
www.philips.com/welcome.
With your HD recorder, you will never need
to schedule your life around your favourite TV
programmes. Thanks to the built in hard-disk
drive (HDD) that records programmes as you
watch them, you can pause live TV, or repeat a
scene you missed.
2.1
Want to record a programme so that you can
watch it later? Just press the record button.
Once you begin to record, you are free to watch
other recorded programmes.You can even watch
the programme that you are recording from the
start without disrupting the recording, or record
two channels at the same time.
Need to schedule a recording in advance?
Simply access the TV Guide, which lists the TV
programme schedule for the next seven days.
And you can do much more than just record on
this recorder.
What’s in the box?
HD recorder
TEXT
RADIO
GUIDE
MENU
HDMI cable
RF cable
User manual
Quick start
guide
Mains lead
EXIT
OPTIONS
INFO
BACK
LIB
HDD
12 V power
supply unit
AD
DIGITAL RECORDER
Remote control
and 2 x AAA
batteries
Freeview flyer
Retune flyer
Caution
Plastic bags can be dangerous.
To avoid suffocation, keep the bag away from babies and children.
8
Your HD recorder
What you also need (not supplied)?
ENGLISH
2.2
SCART cable
(required only if you have a
standard-definition TV)
TV
2.3
Overview
Front panel
1
4
6
7
2 3 5
1
2
5
3 4
Remote control
1
TEXT
RADIO
GUIDE
MENU
10
9
8
Rear panel
EXIT
2
OPTIONS
3
INFO
BACK
LIB
4
HDD
5
6
AD
DIGITAL RECORDER
Your HD recorder
Front Panel
1 Standby indicator
2 Standby button
3 Programme +/- buttons
4 Resolution button
5 V-Out button
6 Display
7 HD indicator
8 Record indicator
9 USB 2.0 connector
10 Top lighting
6
7
9
8
10
Rear Panel
1 Antenna IN*
2 Antenna output to TV/VCR (antenna signal)*
3 Optical S/PDIF audio out (digital)*
4 USB 2.0 connector*
5 RJ45 Ethernet connector*
6 AUX SCART connector*
7 DIGITAL audio out (digital)*
8 L/R audio out (analogue)*
9 HDMI™ connector*
10 12 V power connector*
*
Safe extra low voltage
Remote control
1 Standby
2 Text, Picture format, Radio, Exit, TV guide, Menu, Options
3 Up/Down, Left/Right, OK, Info, Back
4 Recorder functions
5 Volume control, Mute, Programme +/6 Alphanumeric keypad, Audio description, Subtitles
9
2.4
How to read this manual?
Danger
Describes situations of injury or loss of life.
3
Getting started
3.1
Preparing your remote control
Warning
Describes actions that may cause damage to the product.
Note
Additional information.
Tip
Information that is useful to know but
not essential to the task. For example,
information about alternative use.
2.5
How to use the menus?
Press MENU, GUIDE, OPTIONS or
INFO on your remote control to display
the Main menu, TV guide,Tools menu or
channel banner respectively.
Use / / / to navigate through the
menus and change any setting.
Press or OK to confirm your choice.
Press EXIT to remove the menu.
For more information, see pages 14 to 33.
10
+
+
Caution
Describes actions that are required to avoid dangerous or illegal situations.
Remove the battery cover by gently pressing
down in the small circle on the cover and
sliding it downwards.
Insert the two AAA batteries as shown. Be
sure to match the + and - marks on the
batteries to their respective marks inside the
battery compartment.
Replace the battery cover.
Note
For better reception, point your remote control
directly at the front panel of your HD recorder
while pressing any button.
Caution
Do not leave batteries in your remote control for
long periods of time without use. Replace both
batteries at the same time. Do not dispose of
used batteries with your domestic waste. Used
batteries should be recycled at the end of their
useful life. Do not dispose of batteries in a fire.
Getting started
Connecting your HDTV
Danger
Risk of electric shock!
Before making any connections, ensure that your
equipment is disconnected from the mains.
1
HD recorder
Aerial wall
socket
3.3
Installing your HD recorder
Before you start installation, make sure you have
made all the required connections.
Insert the two-way connector on the
supplied mains lead into the 12 V power
supply unit. Connect the 12 V power supply
unit to the 12 V power connector on the
rear panel of your HD recorder.
Connect the mains plug to the mains wall
socket.
Your HD recorder displays a welcome
message after a few seconds.
TV
2
HDMI
Mains wall
socket
Connect the aerial cable (not supplied) from
the aerial wall socket to the Antenna IN
connector on the rear panel of your HD
recorder.
Use the supplied HDMI cable to connect the
HDMI connector on the rear panel of your
HD recorder to the HDMI input connector
of your TV. For the next step, note the
chosen HDMI input of your TV (e.g. ‘HDMI
1’).
Connect your TV to the mains and select the
correct A/V source on your TV. This should
correspond to the HDMI input connector
to which your HD recorder is connected. If
necessary, refer to your TV’s user manual for
instructions.
Notes
•Optionally, you can also use the supplied
RF cable to connect the RF output
connector (labelled To TV/VCR) of your
HD recorder to the RF input connector of
your TV.
•To connect your HD recorder to your
standard-definition TV, see page 34.
Getting started
Press the green button to start the
installation.
The Antenna powering menu appears.
Let the Antenna powering setting be Off
unless you use an indoor antenna that can
be powered by the coaxial cable connected
to the Antenna IN socket of your HD
recorder (see note).
Note
Your HD recorder can only deliver 50 mA
current under 5 V, so refer to your indoor
antenna’s user manual to check if its power
requirement fits the capability of your HD
recorder.
11
ENGLISH
3.2
Press the green button to confirm.
The TV shape menu appears.
Use / to highlight the network that you
want to install and press the green button.
A progress screen displays to confirm that
the search is taking place.
When the search is complete, a screen displays
the number of TV and radio channels that your
HD recorder has found.Your HD recorder
automatically saves these channels. Press the
green button to go to the next step.
Let the TV shape setting be 16:9 if you use
an HDMI connection to your TV. Press the
green button to confirm and start scanning
for the available channels.
Note
If you are in an area that receives signals
from more than one network and possibly
variant of the same channel (e.g. BBC1,
BBC1 Scotland), then your HD recorder
will prompt you to select the network and
channel variant that you want in the All TV
and All Radio lists.
12
Note
In case your HD recorder does not find any
channels, see the ‘What if no channels are
found?’ section on page 13.
Note
Digital terrestrial broadcasting is progressing
throughout the UK. Please note that the
reception of digital signals may need to be
verified as it can be adversely affected by
physical elements, such as mountainous
areas, high buildings, etc. When analogue
broadcasting in your region is switched off,
there should be a quality improvement in
digital broadcasting. As digital switch over
happens, the number of digital channels
available in each region may also increase.
Please visit this website to find out when the
digital switch over is scheduled for your area:
www.digitaluk.co.uk
On the Code entry menu, use / or the
number buttons to enter your area’s postal
code, and then press OK to highlight PIN
code.
Getting started
Note
Entering your postal code is mandatory.
You will not be able to complete the first
installation setup without entering your
postal code.
If your HD recorder is still not able to find
any channels, press the yellow button.
Use / to manually check the quality
and strength of the signals received by your
antenna in various channel frequencies.
To change the default PIN code (0000),
press and use the number buttons to
enter you new PIN code.You will then be
prompted to re-enter your PIN code to
confirm.
Note
Your new PIN code can be any 4-digit
number other than the default PIN code
(0000).
Press the green button to confirm your
choice and complete the installation.
If the Signal strength bar is green, then
your antenna and HD recorder are properly
connected. If it is red, then you need to first
check your connection. If the Signal quality
bar is green, then you can be sure that you
are receiving digital broadcast signals. If
your reception is not optimal (few channels
or “blocky” image), you must check your
antenna installation as it may need to be
realigned or fixed.
You can now start using your HD recorder.
Getting started
13
ENGLISH
3.4
What if no channels are found?
In case your HD recorder does not find any
channels, check your connections (see pages
11 and 34) and press the red button to start
the first installation setup again.
4
Using your HD recorder
4.1
Standby/wake up
To put your HD recorder into standby, press
on your HD recorder’s front panel or remote
control. To take your HD recorder out of
standby, press again.You can also press
BACK , P+/P- or any number button on
your remote control to wake up your HD
recorder. See page 7 for more information.
4.2
Changing channels
To change channels, use the P+/P- on your
remote control or your HD recorder’s front
panel.You can also use the number buttons on
your remote control.
Press BACK to switch to the last channel
you were watching.
You can also use the on-screen channel lists or
channel banner to change channels (see sections
4.4 and 4.5).
Note
Initially, HD programmes are available on
channels 50 and 51. Switch to these channels to
watch HD programmes.
4.3
Adjusting volume
To increase or decrease the volume, press
VOL+/VOL-. The volume level is shown briefly
on your TV.
To mute or restore the sound, press . When
you mute your sound, the
icon is shown
in the top right corner of your TV. This icon
disappears after a few seconds.
4.4
Using the channel banner
Channel information
When you change a channel, the channel banner
appears briefly to show information about the
current programme. By default, it appears for
5 seconds. To set the length of time that the
channel banner remains on-screen, see page 29.
Changing channel
To change the channel, display the channel
banner by pressing INFO.
When the channel banner is on-screen,
use / to see what programmes are
currently showing on other channels. If you
see a programme you want to watch,
press OK.
To display more information about the
current programme on the channel listed in
the channel banner, press INFO
again.
To display what programme is on next (on
the channel listed in the channel banner),
press the yellow button.
Press INFO
a third time, or press EXIT
to remove the channel banner without
changing the channel. Alternatively, press
BACK to return to the channel banner.
14
Using your HD recorder
Channel number
Channel name
ENGLISH
4.4.1 More about the channel banner content
Current time
Multi-channel digital audio output
Select and watch a program among those broadcast now
• Press / to choose desired program
• Press OK to watch the selected program
Subtitle(s)
Audio languages
Current channel list
Time before next program starts
Network change information
Current program name
Next program name
Start time / End time / progress status of current program
Banner for the reception of a broadcast program
Banner for a playback of:
- Either an HDD library program
- Or a paused program
“Recording duration” for a playback from HDD library
Or “Live on - Program name:” from a paused program
Using your HD recorder
15
4.5
Using channel lists
You use the channel list menu to switch to any
TV or radio channel from the All TV or
All Radio channel list, or your favourite lists.
Changing channel
Press OK to display the current channel list.
Use / to select the channel you want to
watch.
Press OK to preview the channel; press OK
again to watch it.
4.6
Using the TV guide
The TV guide provides you with a listing of
all programmes available on all channels for
up to eight days, making it easy to find the
programmes you want to watch.
Press GUIDE
to display the TV guide.
Changing current channel list
Press OK to display all the channels of the
current channel list.
Press to display all the available channel
and favourite lists. To create new favourite
lists, see page 27.
Use / to see what programmes are on
at different times on a channel.
Use / to move through the list of
channels.
Use the yellow (+1 day) and green (-1 day)
buttons to move forward and backwards by
a day through the listings.
Use the blue button to switch between the
evening and current-time TV guide views.
Press GUIDE , BACK or EXIT to
remove the TV guide.
Notes
•You can also schedule a recording using the
TV guide (see page 19).
•Some channels may not offer an extensive
TV guide.
Use / to highlight the list you want to
use.
Press OK to confirm and display all the
channels of the selected list.
Use / to highlight a channel and press
OK to preview it. Press OK again to watch
the channel or press EXIT to remove the
channel list menu without changing the
channel.
16
Using your HD recorder
Press or OK and then press / to
select an option from the list that appears
on the right.You can change these settings
using the Tools menu:
Settings
Options
Subtitles language
On
Off (default)
Audio language
Available languages
depend on the
broadcast
programme.
Audio desc. level
Set the audio
description volume.
(Available if
‘Audio description’
is turned on and
broadcast.)
Lip sync
Set the DIGITAL
audio output delay to
synchronise audio
with video.
Using your HD recorder
Press to save your changes and return to
the tools menu.
Press OPTIONS , BACK or EXIT
to remove the tools menu.
4.8
Pausing live TV
When you switch to a channel, your HD
recorder automatically starts recording the
programme that is being played and stores it
temporarily in the time-shift buffer. When you
switch to a different channel, your HD recorder
discards the previously recorded programme,
and starts recording the current programme.
This feature enables you to pause a live
programme at any moment and later continue
watching it from that point, or instantly rewind
and watch what you have seen (or missed) in the
last few seconds.
Note
• Your HD recorder stores up to 3 hours of
live TV content in the time-shift buffer. At
the end of 3 hours, the oldest part of the
recording is overwritten.
• Your HD recorder empties the contents of
the time-shift buffer when you change the
channel, or turn off your HD recorder or
put it in standby.
To pause any live TV programme, press
pause K. The time-shift bar appears.
To start playback, press play .
To stop playback and return to live TV, press
stop L. In the menu that pops up, make
sure that Back to live ... is highlighted and
press stop L again. If you do nothing, this
menu disappears after about 5 seconds.
17
ENGLISH
4.7
Using the Tools menu
You use the Tools menu to display subtitles,
change the audio language, control audio
description and synchronise audio with video.
Press OPTIONS
to display the Tools
menu.
Use / to highlight the setting you want
to change.
Note
Until you return to live TV viewing, you will not
be able to use any other function of your HD
recorder.
4.8.1 Instant replay
You can instantly replay what you have seen (or
missed) during the last few seconds.
Press while watching live TV.
The time-shift bar appears and you are taken
back 15 seconds, by default. To increase this
time, see the Instant Replay duration
setting on page 29.
To return to live TV, press stop L. In the
menu that pops up, make sure that Back to
live ... is highlighted and press stop L again.
Alternatively, you can press P+/-.
Note
If you have just switched to a channel and have
been watching a programme on it for less than 30
seconds (or the Instant Replay duration you set),
pressing takes you back to the time you started
watching the programme instead of 30 seconds (or
the Instant Replay duration you set.)
4.8.2 Moving through the time-shift bar
While playing back programmes temporarily
stored in the time-shift buffer:
Press / to move to back 15 seconds or
forward 30 seconds (by default). To change
this time, see the Instant Replay duration
and Commerical Skip duration settings
on page 29.
Press the yellow button to jump to the time
you started watching the programme or to
return to live TV.
18
In the menu that pops up, use / to
highlight your choice and press OK to
confirm.
To pause playback at any moment, press
pause K. To restart playback, press play .
High-speed playback
To rewind at twice the speed (x2), press
rewind
during playback.
To increase the speed, press rewind
again, up to 3 times (x4, x32, x128).
To decrease the speed, press
fast forward .
To return to normal speed playback, press
play .
You can fast forward in the same way as
you rewind, just press fast forward to
increase the fast forward speed, and rewind
to decrease the fast forward speed.
Slow-motion playback
To rewind or forward in slow motion, press
pause K and then rewind
or fast
forward
to choose the speed you want
(x1/2 or x1/4).
To return to normal speed playback, press
play .
4.9
Recording programmes
4.9.1 Instant recording
To instantly start recording a programme
that you are watching, press record l.
A message appears confirming that the
programme is being recorded to your HD
recorder’s hard disk. The record indicator
on the front panel also lights up.
Using your HD recorder
4.9.2 Scheduling recordings
Press GUIDE
to display the TV guide.
Use / / / to highlight the
programme you want to record, and press
the red button. In the menu that pops up,
use / to highlight Record the selected
programme or Record the selected
series and press OK to confirm.
If the programme is on now, your HD
recorder starts recording instantly. If it is
on at a later time, your HD recorder will
record the programme when it starts. The
Using your HD recorder
programme is highlighted in red in the TV
guide.
ENGLISH
By default, the instant recording feature is
designed to record only the next two hours
of the selected programme. The end time
is shown after the programme name in the
Record Management pop-up menu.
To increase this time by 10 seconds, press
record l when the Record Management
menu is on-screen. By pressing record l
multiple times, you continue to increment
the end time by 10 seconds.You can also
change this end time using the Scheduled
recordings menu (see page 21).
To record a complete programme or series,
use the TV guide. See the next section.
If you try to record a programme when
two other programmes are already being
recorded, the Conflict - check guide
message is displayed in the Record
Management pop-up menu.
To stop recording, press stop L. In the
Record Management menu that pops up,
use / to highlight the programme you
no longer want to record and press stop L
again.
You can also use the Scheduled
recordings menu to view all the
programmes you have selected for recording
(see page 21).
When you select a programme to record,
your HD recorder checks whether it is on
at the same time as any other programmes
you have previously selected for recording.
If more than two selected programmes are
on at the same time, this creates a conflict.
Your HD recorder lets you know about
the conflict and shows which previously
scheduled recordings you can cancel in
order to record your new selection.
If a conflict was caused due to a change in
the time of the broadcast programme, then
you use the Scheduled recordings menu
to view and resolve such conflicts
(see page 21).
To cancel the scheduled recording of a
programme, use / / / to highlight
the programme in the TV guide, and press
OK.
19
Note
When you select a programme to record, your HD recorder checks whether there is enough
disk space to record it. If the disk is nearly full, your HD recorder will automatically delete some
of your old and unprotected programmes to make space for the new programme.
4.9.3 Time-shift bar for a paused programme
Your HD recorder automatically records the program you are watching.
This recording may fill in a buffer for a maximum of 3 hours.
You can:
- Pause live TV while your HD recorder keeps on recording the live programme.
- Restart watching from the pause.
- Go to live TV or any program sequence in between.
The time-shift bar helps you watch paused live TV from the buffer.
Note
The contents of the buffer are flushed when you change the channel.
1
2
3
4
5
6
1
2
3
20
Play mode
Full buffer indicator (3 hours)
Buffer progress bar
4
5
6
Time index
Open/Close the buffer program list
List of program in the buffer
Using your HD recorder
Instant
Replay
Commercial
skip
Play
Pause
In play mode:
Fast Forward
(x2, x4, x32, x128)
In Pause mode
Slow forward
(x1/2, x1/4)
In play mode:
Fast Rewind
(x2, x4, x32, x128)
In Pause mode
Slow backward
(x1/2, x1/4)
In Play mode
One Touch Recording
In EPG
Schedule a recording
on selected program
Stop playback
or stop recording
or return to live TV
4.9.5 Viewing scheduled recordings
Press to display the Scheduled
recordings menu.You can also access this
menu from the Main menu (MENU >
TV guide & scheduling > Scheduled
recordings)
The Scheduled recordings menu appears,
which shows all the programmes you have
selected to record.
Using your HD recorder
ENGLISH
4.9.4 Controlling playback and recording
Open / Close
HDD Library
To cancel the scheduled recording of a
programme, use / to highlight it and
press the red button.
To change the end time of an instant
recording, use / to highlight End time
and press the OK button. In the menu that
appears, use / / / to change the end
time.
Any scheduled recording conflicts, which
are caused due to a change in the time of
the broadcast programme, are indicated by
a warning symbol next to the programme
name. To resolve such conflicts, select a
programme that you no longer want to
record and press the red button to cancel it.
Press EXIT to remove the Main menu.
21
4.9.6 Watching recorded programmes
To view all the recorded programmes, press
HDD (LIB).
The Recordings menu appears.
All recorded programmes are protected by
default to prevent you from deleting them
accidentally. To delete a protected recording,
use / to highlight it, press the blue
button to unprotect it, and then press the
red button to delete it. A message appears
asking you to confirm. If you are sure, press
the green button; if not, press the red
button.
To lock a recording and set viewing
restrictions, use / to highlight the
recording and press the green button. Note
that if the Parental control limits is set
to off (see page 30), your HD recorder will
let you watch a locked recording without
entering your PIN code.
To sort the list, press the yellow button. In
the pop-up menu, use / to highlight how
you would like to sort the list and press OK.
To playback a recording, use / to
highlight it and press OK or play .
To pause playback at any moment, press
pause K.
Press / to move to back 15 seconds or
forward 30 seconds (by default). To change
this time, see the Instant Replay duration
and Commerical Skip duration settings
on page 29.
To rewind or forward at high speed, press
rewind
or fast forward , during
playback, up to 4 times to choose the speed
(x2, x4, x32 or x128).
22
To rewind or forward in slow motion, press
pause K and then rewind
or fast
forward
to choose the speed you want
(x1/2 or x1/4).
To stop playback and return to the
Recordings menu, press stop L twice.
Press EXIT to remove the Recordings
menu and return to live TV.
Note
You can also access the Recordings menu from
the Main menu – press MENU to access the
Main menu; use / to highlight Library and
press or OK.
Note
Press HDD (LIB) to check the free disk space
available for recording.
Note
You can also check the available recording time
on your hard disk:
Press Menu.
Highlight Settings and press OK.
Highlight Set-up and press OK.
Highlight Hard disk drive information.
The available recording time is shown on the
right side of the screen.
Using your HD recorder
Using more of your
HD recorder
5.1
HD recorder
ENGLISH
5
Front panel
1
Rear panel
6
4
7
10
5
1
2 3
5
8
1
2
9
Standby indicator:
Red: initialisation mode and standby
mode
Orange: active-standby mode
2
standby button: Switches your HD
recorder into or out of standby
3
P+ & P- buttons: To change channel up or down
4
Res button: To change the HDMI output
resolution to Auto (default), 576i,
576p, 1080i or 1080p
5
V-Out button: To change the active video
output to HDMI (default) or SCART
6
Display: 16-digit alphanumeric display
7
HD indicator: Lights up when
you are watching an HD channel
8
Record indicator: Lights up when your
HD recorder is recording
a programme
9
USB 2.0*: Universal Serial Bus port
10 Top lighting
1
2
3
4
5
6
7
8
9
10
3
4
6
7
9
8
10
Antenna IN*: To connect your aerial
cable from the wall socket
To TV/VCR*: Antenna output to TV/VCR
(antenna signal)
SPDIF audio out*: To connect an optical
cable to an hi-fi amplifier
USB 2.0*: Universal Serial Bus port
Ethernet*: To connect your HD recorder
to an Internet access point
AUX SCART*: To connect to the
SCART connector on your standard definition TV
DIGITAL audio out*: To connect an
hi-fi amplifier
HDMI*: To connect to the HDMI input
connector on your high-definition TV
AUDIO L + R*: To an hi-fi amplifier
Power*: To connect the 12 V power supply
unit
* Safe extra low voltage
Using more of your HD recorder
23
5.2
Remote control
1
1
15
16
2
TEXT
RADIO
EXIT
3
4
17
GUIDE
MENU
OPTIONS
18
5
19
6
INFO
BACK
7
20
21
22
23
24
8
9
LIB
HDD
10
11
25
12
26
13
27
AD
DIGITAL RECORDER
24
14
Switch to standby or wake
up from standby
2 RADIO
Switch between radio and
TV channels
3 EXIT
Remove menus, channel
banner and channel lists
4 Colour buttons Used in contextual menus
and MHEG applications
5
Open/close ‘Tools’ menu
6 U, D, L, R
Move up/down/left/right
within lists or menus
7
Return to the previous
channel or menu screen
8 K
Pause live TV
9 F
Fast forward
10 HDD (LIB)
Open/close ‘Recordings’
menu
11 Open/close ‘Scheduled
recordings’ menu
12 P +/-
Change channel up/down
13 Number buttons Alphanumeric keypad
14
Turn subtitles on/off
15
Change picture format
16 TEXT
Open/close MHEG
applications
17 MENU
Open/close ‘Main’ menu
18
Open/close ‘TV guide’
19 OK Confirm selection in menu
or list.
Open/close channel list
20
Open/close channel banner
21 R
Play
22 G
Rewind
23 L
Stop
24 l
Start instant recording
25 VOL +/-
Turn volume up/down
26 Mute/restore sound
27 AD
Turn Audio Description on/off
Using more of your HD recorder
Front-panel display messages
ENGLISH
5.3
Your HD recorder is starting up
Your HD recorder is tuned to TV channel 1
Your HD recorder is tuned to radio channel 4
Antenna signal is not available
Subtitle on
Subtitle off
Main menu is open
Channel list is open
TV guide is open
Your HD recorder is in the standby mode
HDMI is the active A/V output (recommended) of your
HD recorder
AUX SCART is the active A/V output of your HD recorder
Picture format is 4:3 with black bars
Picture format is 4:3 stretched to 16:9
Picture format is 4:3 zoomed in to the screen width
Using more of your HD recorder
25
Software update is starting
Software is being loaded
Software is being saved
Successful update
Automatic resolution adjustment (recommended)
Resolution is set to 576i
Resolution is set to 576p
Resolution is set to 720p
Resolution is set to 1080i
Resolution is set to 1080p
Recording library is open
Play
Rewind
Pause
Fast forward
Fast rewind
Your HD recorder is in the first installation setup
26
Using more of your HD recorder
Use / to highlight a setting.
Press or OK to confirm your choice.
Press BACK to return to the Main
menu. Press BACK again, MENU or
EXIT to remove the Main menu.
Note
Use the colour buttons to perform contextual
actions, which are described at the bottom of
the screen.
5.4.1 Managing favourite lists
Your HD recorder allows you to create
favourite lists that include the channels you
watch the most. This lets you access your
favourite channels quickly instead of scrolling
through the entire list.
Creating a favourite list
On the Main menu, make sure that
Favourites is highlighted and press
OK.
The Favourites menu appears.
Using more of your HD recorder
Use / to highlight either TV channels
or Radio channels, and press or OK.
The menu now displays the selected full
channel list (All TV or All Radio) and the
existing favourite lists.
Press the red button to create a new
favourite list.Your HD recorder, by default,
names the new favourite list as List1 (for TV
channels) or RLst1 (for radio channels).You
can create up to four separate TV and radio
favourite lists. To rename these lists, see
page 28.
To add a channel to your favourite list,
use / to highlight a channel and
press OK.
or
To remove a channel from your favourite list,
use / to highlight it and press OK.
When you are finished adding all your
channels, press the green button.
Press to return to the Favourites menu.
27
ENGLISH
5.4
Using the Main menu
Press MENU to display the Main menu.
Renaming favourite lists
From the Favourites menu, use / to
highlight either TV channels or Radio
channels and press or OK.
The menu now displays the default channel
list (All TV or All Radio) and any existing
favourite lists.
Use / to highlight the favourite list that you
want to rename, and press the blue button.
In the Rename list menu that pops up,
use / or the number buttons to
rename your favourite list. Press the green
button to confirm or press the red button
to return to the previous menu without
saving any changes.
Press or BACK
Favourites menu.
to return to the
Modifying/Editing favourite lists
From the Favourites menu, use / to
highlight either TV channels or Radio
channels and press or OK.
The menu now displays the default channel
list (All TV or All Radio) and any existing
favourite lists.
Use / to highlight the favourite list that
you want to modify, and press or OK.
To add a channel, press the red button.
Then use / to highlight the channel you
want to add and press OK. Press the green
button to save your changes.
To remove a channel, use / to highlight
it and press the green button.
To reorder the channels in your favourite
list, use / to highlight a channel you want
to move and press the blue button.
Use / to move the channel up or down
and press OK.
Press to return to the Favourites menu.
Deleting favourite lists
From the Favourites menu, use / to
highlight either TV channels or Radio
channels and press or OK. The menu
now displays the default channel list (All TV
or All Radio) and any existing favourite lists.
Use / to highlight the favourite list that
you want to delete, and press the green
button. A message appears asking you to
confirm. If you are sure, press the green
button; if not, press the red button.
Press or BACK to return to the
Favourites menu.
5.4.2 Using the Settings menu
You use the Settings menu to customise your
HD recorder. For example, you can lock certain
channels, change display settings, etc.
Accessing the Settings menu
From the Main menu, use / to highlight
Settings and press or OK.
The Settings menu appears.
Press or BACK
Main menu.
28
to return to the
Using more of your HD recorder
Use / / / / OK to navigate through
the settings and options, and make changes.
Press or BACK to save your changes
and return to the previous menu.
You use the Preferences menu to change
these settings:
Display
•Banner duration - Use this to set the
length of time (3 to 10 seconds) that the
channel banner remains on-screen when
you change channel. By default, it is set to
5 seconds.
•Front panel brightness - Use this to set the
brightness of the front-panel display.You can
set this to Low, Medium (default) or High.
•Top lighting demo mode - Use this to
turn on or off (default) the lighting around
the top-panel of your HD recorder.
Language preferences
•Information language - Use this to
set your preferred language for displaying
programme information to English
(default), Gaelic, Welsh or Irish.
•Audio language - Use this to set your
preferred audio language to English
(default), Gaelic, Welsh or Irish.
•Default subtitles mode - Use this to
set how you prefer to display subtitles.You
can set this to Activated, Not activated,
Auto when no correct audio (default),
Using more of your HD recorder
Auto when audio is muted or For
hearing-impaired.
•Subtitles language - Use this to set your
preferred language for subtitles to English
(default), Gaelic, Welsh or Irish.
Recording
•Instant replay duration - Use this to set
the instant replay duration (see page 18).
It is also used while moving through the
time-shift bar (see page 18) or a recording
(see page 22).You can set this to 15
seconds (default), 30 seconds, 1 minute,
2 minutes or 5 minutes.
•Commercial skip duration Use this to set the typical duration of
commercials in between programmes.You
use this while moving through the timeshift bar (see page 18) or a recording (see
page 22).You can set this to 15 seconds,
30 seconds (default), 1 minute, 2
minutes or 5 minutes.
Analog output
•Video on AUX - Use this to set the type
of analogue video signals that are output
on the AUX SCART connector of your
HD recorder.You can set this to RGB
(default when V-Out is set to AV) or CVBS
(default when V-Out is set to HDMI).
•Audio on AUX - This setting applies
when your HD recorder is connected via
a SCART Cable to a standard-definition
TV. Use this to set the type of analogue
audio signals that are output on the AUX
SCART connector of your HD recorder.
You can set this to Mono or Stereo
(default).
•TV format - Use this to set the format
of the analogue video that is output on the
AUX SCART connector of your HD
recorder.You can set this to 4/3 Letter Box,
4/3 Centre Cut Out or 16/9 (default).The
options determine how widescreen (16:9)
programmes show on a standard-definition
TV with aspect ratio of 4:3.
29
ENGLISH
Setting your preferences
From the Settings menu, use / to
highlight Preferences and press or OK.
The Preferences menu appears.
Digital output
•HDMI output resolution - Use this to
set the HDMI video resolution to 576i,
576p, 720p, 1080i, 1080p, Auto (default)
or Original. Note that you can also
change this setting using the RES button
on the front panel of your HD recorder.
•Audio capabilities on HDMI - Use this
to set the HDMI audio format to PCM
(default) or Auto*.
•Audio capabilities on S/PDIF - Use this
to set the S/PDIF audio format to PCM
(default) or Dolby Digital*.You can also
set this to Not connected.
•Easy Link mode - For future use.
•TV format - Use this to set the format
of the high-definition video that is output
on the HDMI connector of your HD
recorder.You can set this to 16/9 Pillar
Box (default), 16/9 Full Screen or 16/9
Zoom. These options determine how
standard (4:3) programmes show on a
TV with aspect ratio of 16:9. Note that
you can directly change this setting using
the picture format button
on your
remote control.
* The Auto and Dolby Digital settings on
HDMI or S/PDIF are not recommended until
your HD recorder has been updated with the
appropriate software.
Visit www.philips.com/support regularly to
check if the relevant software update is available.
Automatic eco mode
Use this to set the time after which your
inactive HD recorder automatically enters
into the active standby mode.You can set
this to off, 3 hours (default), 4 hours,
5 hours, 6 hours, 7 hours or 8 hours.
Return channel
Use this to configure your HD recorder
to connect to the internet, which then
serves as a return channel to your Digital
TV service provider. The return channel is
necessary to use any interactive applications
30
that your Digital TV service provider may
offer. Before configuring the return channel,
be sure to connect your HD recorder to
your network router using an Ethernet
cable. Then choose either DHCP to set up
your connection automatically or manually
enter all the parameters like IP address,
Network mask, Gateway and DNS
settings to match your router’s settings.
Default volume
Use this to set the default volume at wakeup of your HD recorder.
Recording auto deletion
When you select a programme to record,
your HD recorder checks whether there
is enough disk space to record it. If the
disk is nearly full, your HD recorder will
automatically delete some of your old and
unprotected programmes to make space for
the new programme. Use this setting to turn
off or on (default) this feature.
Changing parental control settings
From the Settings menu, use / to
highlight Parental control and press or
OK. The Parental control menu appears.
To change the parental control severity
settings, use / to highlight Parental
control limits, and press or OK.
Use / to highlight the severity level you
want to set, and press or OK to save your
changes and return to the previous menu.
Note that if you set the Parental control
limits to Off, the child timers and channel
Using more of your HD recorder
Note
When Parental control limits is set to
ON, menu items like Parental control and
Set-up will be protected by the PIN code.
To create a new child timer, use / to
highlight Child timers, and press or OK.
Make sure that Define child timer is
highlighted and press or OK.
Use / / / to set the time period
during which you will be able to watch any
unlocked channel without having to enter
your PIN code. Press the green button to
confirm.
To delete the child timer, make sure Modify
child timer is highlighted and press the red
button.
To modify the child timer, make sure Modify
child timer is highlighted and press or
OK. Make the required changes and press
the green button to confirm.
To lock a channel, use / to highlight
Channel lock, and press or OK.
Use / to highlight the channel you want
to lock, and press OK. Press or BACK
to return to the previous menu.
To change your PIN code, use / to highlight
Change PIN code, and press or OK.
Use the number buttons to first enter
your current PIN code and then enter your
new PIN code. Use the number buttons
to enter your new PIN code again, for
confirmation. If you correctly entered the
Using more of your HD recorder
PIN codes, your HD recorder briefly displays
a message confirming that your PIN has been
changed, and then returns to the Parental
Control menu.
Note
Your new PIN code can be any 4-digit
number other than the default PIN code
(0000).
Press or BACK to return to the
Settings menu.
Retuning your HD recorder
From the Settings menu, use / to
highlight Set-up and press or OK.
In the Set-up menu that appears,
make sure Channel installation is
highlighted and press or OK.
In the Channel Installation menu that
appears, make sure Re-tune is highlighted
and press or OK.
A progress screen displays to confirm that the
search is taking place.
Press the green button to save any new
channels and return to the Set-up menu.
Press the red button to cancel the search and
return to the Set-up menu.
Note
The Network messages menu (under the
Settings menu) alerts you of any changes
to your network such as recently added
channels, services, etc. To save time, check
this menu before retuning your HD recorder.
31
ENGLISH
lock settings (see below) will not have any
effect.
Updating your HD recorder’s software
manually
You can manually update your HD recorder
software using a USB memory stick.
Download the latest software file from the
Philips website (www.philips.com/support),
unzip it and transfer it to a USB memory
stick. Be sure to place the downloaded file
in the top-level folder of your USB memory
stick.
Connect your USB memory stick to the USB
connector on the rear panel (or on the side)
of your HD recorder.
From the Settings menu, use / to
highlight Set-up and press or OK.
In the Set-up menu that appears,
use / to highlight Software update and
press or OK.
A message appears asking you to confirm.
If you are sure, press the green button, or
press the red button to cancel and return
to the previous menu. If you press the
green button, your HD recorder restores
the factory default settings and restarts.You
will then be required to complete the first
installation setup (see page 11).
Note
Resetting your HD recorder to the factory
default settings erases all of your preferences
and settings. For example, all of your favourite
lists and recording timers will be erased.
Your HD recorder locates the software
available on your USB memory stick and
displays a confirmation message. Press
the green button to install the software
immediately. Press the red button to cancel
and return to the previous menu. If you
press the green button, your HD recorder
updates the software and restarts.You may,
depending on the update, then be required
to complete the first installation setup
(see page 11).
Restoring factory default settings
From the Settings menu, use / to
highlight Set-up and press or OK.
In the Set-up menu that appears,
use / to highlight Factory reset and
press OK twice.
32
Changing other system settings
From the Settings menu, use / to
highlight Set-up and press or OK.
The Set-up menu appears.
To turn on or off the channel updates
that automatically happen when your HD
recorder is in the active-standby mode, make
sure Channel installation is highlighted
and press or OK. Press to highlight
Automatic update and press or OK.
Use / to highlight On or Off.
Using more of your HD recorder
Note
Set Portable antenna powering to On
only if you need to power an active-indoor
antenna that requires a 5 V power supply
not exceeding 50 mA current consumption.
Be sure to read your indoor antenna’s user
manual before turning this setting on.
To control antenna output, press to
highlight Antenna output and press or
OK. Use / to highlight Inactive in eco
mode or Always active.
Press to save your changes and return to
the previous menu.
Note
If Antenna output is set to Inactive
in eco mode while Portable antenna
powering is set to On, the device(s)
connected to the To TV/VCR output will
not receive the antenna signal.
To see information about your HD recorder,
press and highlight System information.
Details such as software version, model
number, serial number, etc., are displayed on
the right.
To see the available space on your HD
recorder’s hard-disk drive, press and
highlight Hard disk drive information.
Maintenance
To format your HD recorder’s hard disk, press
to highlight Factory reset and press
or OK. Press to highlight Format hard
disk and press OK. In the menu that pops up,
press the green button to confirm, or the red
button to cancel and return to the previous
menu.
Press or BACK to return to the
Settings menu.
6
Maintenance
6.1
Cleaning
For cleaning, use a soft, damp (not wet) cloth.
Never use any abrasive cloth and aerosol
cleaners
6.2
Replacing
Your HD recorder does not contain any userserviceable parts. Do not attempt to open it.
All maintenance work must be carried out by
qualified service centres.
6.3
Disposing
Your HD recorder is designed and manufactured
with high-quality materials and components,
which can be recycled and reused.
Please inform yourself about the local separate
collection process for electrical and electronic
products.
Please act according to your local rules and
do not dispose of your old products with your
normal household waste. The correct disposal
of your old product will help prevent potential
negative consequences for the environment and
human health.
33
ENGLISH
Press to save your changes and return to
the previous menu.
To check the signal quality of any channel
that you are receiving, press to highlight
Signal quality and press or OK.
In the Signal quality test menu that
appears, use / to select a channel that
you want to check. Press or BACK to
return to the previous menu.
To turn on or off powering your activeindoor antenna using the Antenna IN
connector on the rear panel of your HD
recorder, press to highlight Portable
antenna powering and press or OK.
Use / to highlight Off or On.
Press to save your changes and return to
the previous menu.
7
Accessories and
connections
7.1
Connecting your audio equipment
HD recorder
TV
A
D
C
B
HDMI
Audio Equipment
S/PDIF
Digital
L
R
Analogue
HDMI OUT
HDMI IN
Digital
C
Option A – Optical S/PDIF connection
(Digital)
Connect the SPDIF audio output of your HD
recorder to the relevant audio input of your
audio equipment using an optical S/PDIF cable
(not supplied).
Consult the user manual of your audio
equipment to choose the proper digital audio
inputs.
Option B – Electrical S/PDIF connection
(Digital)
Connect the DIGITAL audio output of your
HD recorder to the relevant audio input of your
audio equipment using an electrical S/PDIF cable
(not supplied).
Refer to the user manual of your audio
equipment to choose the proper digital audio
input.
Option C - HDMI connection (Digital)
Recent amplifiers are fitted with one or more
HDMI source input(s) and one HDMI output.
Recommended connection
•Connect the HDMI output of your HD
recorder to an HDMI source input of your
amplifier.
•Connect the HDMI output of your
amplifier to an HDMI input of your TV.
System settings
•For your HD recorder, set the Audio
capabilities on HDMI setting (under
Menu > Settings > Preferences >
Digital output) to AUTO.
•Select the correct A/V source on your TV.
•Select the correct A/V source on your
amplifier.
•Volume controls and necessary Lip sync
adjustments are performed by your
amplifier. Refer to your amplifier’s user
manual.
Option D – Analogue connection
Connect the L/R audio outputs to the relevant
audio inputs of your audio equipment using a
double CINCH cable (not supplied).
Refer to the user manual of your audio
equipment to choose the proper analogue audio
inputs.
7.2
Connecting your standarddefinition TV
1
HD recorder
Aerial wall
socket
TV
Note
With a digital connection via the DIGITAL
output of your HD recorder, mute and
volume operations are managed by your audio
equipment and not by your HD recorder.
34
2
SCART
Mains wall
socket
Accessories and connections
Note
Optionally, you can also use the supplied RF
cable to connect the RF output connector
(labelled To TV/VCR) of your HD recorder to
the RF input connector of your TV.
8
Guarantee and service
For the Philips warranty applicable to your HD
recorder, please visit the Philips website:
www.philips.com/guarantee.
In case you do not have an Internet connection,
please contact your local Philips Consumer Care
Centre (see page 42).
Guarantee and service
9
Technical data
ENGLISH
Connect the aerial cable (not supplied) from
the aerial wall socket to the Antenna IN
connector on the rear panel of your HD
recorder.
Use a SCART cable (not supplied) to connect
the AUX connector on the rear panel of your
HD recorder to the SCART input connector
of your standard-definition TV.
Connect your TV to the mains. Use your TV’s
remote control to select the SCART input
connector, which is connected to your HD
recorder, as the the A/V source. If necessary,
refer to your TV’s user manual.
Connect your HD recorder to the mains
and wait until your HD recorder wakes up
(‘First Install’ appears on the front-panel
display).
Press the V-Out button on the front panel
twice. ‘AUX SCART’ now appears on the
front-panel display and the ‘Welcome’ screen
appears on your TV.
See section 3.3, Installing your HD recorder,
on page 11 for instructions on completing
the first installation setup from step 3.
This product is in conformity with European
95/47/EC and 2002/21/EC directives.
The product complies with the following
European council Directives: 2006/95/EEC and
2004/108/EC.
Front end
• Dual front end DVB-T2
Video decoding
Standard definition
• MPEG2 MP@ML
• MPEG4 AVC MP@L3
• Video bit rate 15 Mbit/s
• Resolution: 576i max
720x576 pixels interlaced
• Picture format 4:3 et 16:9
High definition
• MPEG2 MP@HL
• MPEG4 AVC HP@L4
• Video bit rate 20 Mbit/s
• Resolution of broadcast: 720p, 1080i
• Upscale up to: up to 1080p50
• Content protection: HDCP on HDMI
Audio Decoding
• MPEGI layer I, II
• Dolby Digital
• HE-AAC stereo / Multichannel
• Dolby Digital/HE AAC to stereo down-mixing
• Dolby Digital Plus to Dolby Digital transcoding
• HE-AAC to Dolby Digital transcoding*
* Feature subject to future product software
upgrade
Convenience
• Automatic installation
• HD reception indicator
• Recording indicator
• Automatic channel update
• TV and Radio modes
• 4 x favorite TV channel lists
• 4 x favorite Radio channel lists
35
•
•
•
•
•
•
•
•
•
•
•
•
•
•
•
•
Programme list editing: Add, Move, Delete
Parental control – Child lock
8 days Electronic Programme Guide
Event timer 8
Event programming via EPG
DVB subtitling
Digital TXT / MHEG with Interaction channel
Video scaling on HDMI output: Auto, Original,
576i, 576p, 720p, 1080i, 1080p50
Dolby Digital 5.1 audio output
ECO power management
IP address assignment: Manual or DHCP
Software update:
Update via OTA download
Local update via USB for consumer
Switchable Powering for active antenna
Watch and record
Time shift buffer & trick modes
Freeview +HD features (Series recording,
alternate …)
Application system resources
• Processor STi 7105
Reception - Demodulation
• Reception of DVB-T broadcast (EN 300744)
• Reception of DVB-T2 broadcast (acc. D-Book
6.1)
• Demodulation type: COFDM FFT
• Input frequency range: UHF IV / V
470 – 862 MHz
• Active RF Loop-through:
Bandwidth 47 - 862 MHz
Switch to passive loop-through in standby mode
• Channel bandwidth (BW) (target): 8 MHz
• Network: MFN / SFN
36
Rear panel connections
• RF in: type IEC 169-2 female
• RF out: type IEC 169-2 male
• HDMI output
• AUX SCART configurable by menu
- SCART VCR configuration (for recorder)
Outputs: CVBS*, fixed level L/R audio
- SCART TV configuration (for a TV)
Outputs: CVBS*or RGB/FB, fixed level L/R audio, Slow blanking
• L/R analogue Audio output
• Digital audio output:
Cinch electrical SPDIF
Optical SPDIF
• DC power inlet
• RJ45
• USB 2.0 (Master)
* Video standard: PAL
Hard Disk Drive
• Capacity 500 GB
• Recording time
In MPEG2 220 hours
In MPEG4 110 hours
• Data Scrambling AES
• Pairing HDD /STB
• Features
Trick modes 128 x to 1/8 x
Time shift buffer 3 hours
Smooth trick mode up to 4x
Antenna control for indoor aerial
• Via RF IN connector
• DC powering : 5 Volts / 50 mA
• Switchable via menu: On/Off
Front-panel display / buttons
• 1x bi-color LED & 1x blue LED
• 1x Red LED
• 16 digit white VFD display
• 5 x buttons: Standby, P+, P-, Res,V-Out
• 1 x USB (on product side)
Technical data
Miscellaneous
• Temperature range (°C)
Operating +5 °C to +45 °C
Storage -25 °C to +70 °C
• Mains: AC 230 V +/- 10%, 50 Hz
• Power consumption: < 15 W
Standby: < 0.4 W
• Weight:
Product: 1.75 Kg
Including packaging: 2.7 Kg
• Dimensions:
Product (mm) 240 x 210 x 65
Packaging (mm) 360 x 290 x 100
Due to continued improvements, this
information is subject to change without notice.
10 Frequently asked questions
Connection
Your HD recorder does not display any
digital TV channels on your TV.You may
also see the on-screen message “Signal
lost”.
• Check that the aerial cable from the aerial
wall socket is correctly connected to your
HD recorder (see page 11).
• There may be a temporary problem with
the reception, caused, for example, by bad
weather; try again later.
• Check if there is any network message
related to this signal loss.You can access the
Network messages menu from Menu >
Settings > Network messages.
The time-shift bar with “Live” indication
appears when you try to change a
programme.
Repeat the programme change request to watch
the programme.
Setup
Your HD recorder does not seem to be
working and there are no lights on the
front panel.
Check that the 12 V power supply unit is
correctly connected to your HD recorder.
Your HD recorder does not seem to be
working and a channel number is shown
on the front-panel display.
• Check that all connections are properly
made (see page 11).
• Check that your TV is plugged into the mains
and that it is switched on.
• Check that you have selected the correct
A/V channel/source on your TV depending
on how your HD recorder is connected to
it (that is, using HDMI or SCART). Refer to
your TV’s user manual for instructions.
Frequently asked questions
37
ENGLISH
Accessories
• Remote control
Protocol: RC6
• Batteries: 2 x 1.5V type AAA/R03
• User manual
• QSG
• Freeview flyer
• Retune flyer
• Coaxial RF cable
• HDMI cable
• AC/DC converter incl. mains cord
Your HD recorder seems to be switching
off automatically after some time.
If your HD recorder automatically goes into
standby mode (standby indicator on the front
panel lights up), this is due to the Eco mode.
The Eco mode is set to 3hours, by default
(environmentally friendly product). To modify
it, go to Menu > Settings > Preferences >
Automatic Eco mode, and choose a different
value. See page 30.
Your remote control is not working.
• Make sure that you point your remote
control directly at your HD recorder and
that nothing is between it and your HD
recorder. The standby indicator on your HD
recorder’s front panel should flash each time
you press a remote control button.
• Check the batteries and replace them, if
necessary.
The picture is not displayed on your
HDTV and an HDCP authentication error
is displayed.
Your HDTV does not support HDCP, which
allows your HD recorder to transmit fullresolution video to your HDTV. As a result, the
HDMI output displays a message masking the
video, which asks you for changing the resolution
down to 576p (see page 23 - Res button).
The picture seems to be stretched or
squashed.
Check the TV format setting under Digital
output or Analog output (Main > Settings
> Preferences). Alternatively, press the picture
format button
on your remote control to
scroll through the different settings.
Also refer to your TV’s user manual.
You cannot find all the channels you think
should be available.
Retune your HD recorder (see page 31).
Alternatively, reset your HD recorder to its
factory default settings (see page 32) and
proceed with the first installation setup.
Note
During the first installation, your choice of the
network may affect the number of installed
channels.
You cannot find any HD channels.
Initially, HD programmes are available on
channels 50 and 51. Switch to these channels.
Note that the HD indicator on the front panel
of your HD recorder lights up while watching an
HD channel.
Digital terrestrial broadcasting is progressing
in the UK. As digital switch over happens, the
number of digital channels available in each
region may also increase. Please visit one of the
following websites to find out when the digital
switch over is scheduled for your area:
www.digitaluk.co.uk
www.freeview.co.uk/availability (coverage
checker for HD)
Your HD recorder seems to lock up or get
stuck while retuning it to search for new
channels.
In parts of the country where the analogue TV
services have already been switched off, the time
taken to retune can increase. This is because
your HD recorder scans for all the transmitters
in your area, which can take up to 15 minutes.
Please wait for the retune to complete. This is
not a fault.
Your HD recorder displays ‘err’ on the
front-panel display when you plug in a
USB memory stick.
Reformat your USB memory stick using a
computer. Ensure that the filesystem is FAT16 or
FAT32.
38
Frequently asked questions
Your HD recorder found all the expected
channels after you retuned it. However,
when you turned on your HD recorder
the next day, the picture was breaking up
and some channels were missing.
Your HD recorder has an automatic retuning
feature; this allows it to keep up to date with
minor service changes. However, when the signal
level of nearby relay transmitters are high or
if the antenna signal is being amplified, these
problems can occur.
To solve this problem:
• Turn off the automatic channel updates
feature of your HD recorder (see page 32).
Frequently asked questions
• Remove any signal amplifiers or boosters
that are fitted on your antenna. These are
not required after the digital switch over.
• Check that your antenna is aligned properly
and is a model adapted for digital signal
reception in your area. If you are not sure,
please use the services of a recognised CAI
antenna installation company.
You set a recording but your HD recorder
did not record what you wanted.
Check the TV guide or the Recordings menu
to see if an alternate instance of the programme
was automatically selected due to a conflict.
Your hard disk is full with protected
recordings.
Remove the protection on your recordings so
that your HD recorder can automatically free
up some disk space by erasing the recorded
programmes.
Although you set Audio capabilities to
“Auto” for HDMI or “Dolby Digital” for
S/PDIF, your HD recorder does not deliver
Dolby Digital 5.1 multi-channel audio
output.
• Your HD recorder needs a software
upgrade.
• Visit www.philips.com/support regularly
to check if the appropriate software for
ugrading your HD recorder via USB is
available.
• Set the Audio capabilities setting to PCM
until the upgrade of your HD recorder is
done.
39
ENGLISH
You cannot find all the channels you think
should be available even after retuning
your HD recorder.
• The missing channels may not be available
in your area. Check your coverage on the
Freeview website: www.freeview.co.uk.
• Your antenna may need to be upgraded
(signal power, position, orientation or cabling).
• A signal booster may be fitted on your
antenna. Consider having this removed as
amplifiers are normally not required after
the digital switch over. Too high a signal level
can cause your HD recorder to skip some
channels.
• Some early digital receivers manufactured
prior to 2004 support only the 2K mode
of digital transmissions. As part of the
digital switch over, the UK Freeview TV
platform will be upgraded to a more robust
transmission standard. The change in
transmission standard has been authorised
by OFCOM and the new standard is
supported by products that have the “Digital
Tick”.
• If you have a SKY box, switch it to standby
mode and then retune the terrestrial
receiver. If it then receives all expected
Freeview channels, then the modulator
needs adjusting on your Sky box. Contact
Sky to find out how to adjust the modulator.
You get a picture or a freezed picture,
a program number on the front display
and your receiver seems blocked while
not responding to the remote control
commands.
Your HD recorder has hung up.You have to
reset your HD recorder. Press the standby
button on the front panel until PHILIPS is
shown on the front-panel display.
If you have tried all of the actions suggested
above and still are not able to resolve the
problem, contact your local Philips Consumer
Care Centre (see page 42).
11 Glossary
Analogue audio
Analogue sound is output from the LEFT/RIGHT
audio connectors on the rear panel of your HD
recorder. The red and white sockets send audio
through two channels, the left and right.
Aspect ratio
Aspect ratio refers to the length-to-height ratio
of TV screens. The aspect ratio of a standard
TV is 4:3, while the ratio of a high-definition
or widescreen TV is 16:9. The letterbox format
allows you to watch a video with a wider aspect
ratio on a standard 4:3 TV.
DHCP
Dynamic Host Configuration Protocol (DHCP)
is a network protocol that enables a router or
server to automatically assign IP addresses to
devices that are part of its network.
Digital audio
Digital sound is available when you use the
DIGITAL audio connector (coaxial S/PDIF)
on the rear panel of your HD recorder. These
sockets send audio through multiple channels,
instead of just two channels as analogue does.,
Dolby Digital
A surround sound system developed by Dolby
Laboratories containing up to six channels of
digital audio (front left and right, surround left
and right, centre and subwoofer).
DVB
Digital Video Broadcasting
40
Glossary
EasyLink
The Philips EasyLink™ technology enables you
to control multiple devices, which are connected
through standard HDMI cables, using a single
remote.
MPEG
Motion Picture Experts Group. A collection of
compression systems for digital audio and video.
PIN Code
A 4-digit code used to prevent access to
inappropriate programmes (parental control).
HDCP
High-bandwidth Digital Content Protection
(HDCP) is a type of digital copy protection
system. When your HD recorder is attached via
an HDMI cable to an HDCP-compliant HDTV,
the HDTV and HD recorder negotiate a secure
link, which allows your HD recorder to transmit
full resolution video to your HDTV.
SDTV
Standard-Definition Television.
HDD
Hard Disk Drive
USB memory stick
A small size storage device, which is used to
update your HD recorder’s software (see
page 32). Connect it to the USB 2.0
connnector on the rear panel of your HD
recorder.
HDMI
High-Definition Multimedia Interface (HDMI) is
a high-speed digital interface that can transmit
uncompressed high-definition video and digital
multi-channel audio. It delivers perfect picture
and sound quality, completely free from noise.
HDMI is fully backward compatible with DVI.
Surround
A system for creating three dimension sound
fields full of realism by arranging multiple
speakers around the listener.
HDTV
High-Definition Television
Lip Synchronisation
Setting used to synchronise audio with video
in case a delay is experienced, in particular, if
speech does not match lip movements.
Glossary
41
ENGLISH
EPG
Electronic Programme Guide
12 Index
Contact information
Change channel, 14 -16
Channel banner, 14, 15
Connect
HDMI, 11
SCART, 35
Control volume, 14
Favourite lists
Create, 27
Delete, 28
Modify, 28
Rename, 28
First installation, 11
Front panel, 23
Indoor antenna
Powering, 11, 33
HDT 8520/05
Serial number:
UNITED KINGDOM
Phone: 0800 331 60 15
Rear panel, 23
Record
Instantly, 18
Scheduled, 19, 21
Remote control, 24
Restore factory settings, 32
Retune, 31
Return channel, 30
Scheduled recordings, 19, 21
Software update, 31
System settings, 32
Time-shift bar, 18, 20
TV guide, 16
Wake-up your HD recorder, 14
Watch recorded programmes, 22
42
Index
ENGLISH
Trademarks and partner logos
The Philips wordmark and the Philips shield are registered trademarks of Koninklijke Philips
Electronics N.V. and are used by Pace plc under license from Koninklijke Philips Electronics N.V.
Manufactured under license from Dolby Laboratories.
“Dolby” and the double-D symbol are trademarks of Dolby Laboratories.
HDMI, the HDMI logo, and High-Definition Multimedia Interface are trademarks or registered
trademarks of HDMI licensing LLC in the United States and other countries.
Trademark of the DVB Digital Video Broadcasting Project (1991 to 1996)
The FREEVIEW service is subject to coverage. The FREEVIEW, FREEVIEW+, FREEVIEW HD and
FREEVIEW+HD words and logos are trademarks of DTV Services LTD. © DTV Services Ltd 2010.
The “HD TV” Logo is a trademark of EICTA.
100% recycled paper
Pace and
are trademarks and/or registered trademarks of Pace plc.
Trademarks and partner logos
43
© 2010 Koninklijke Philips Electronics N.V.
All rights reserved.
Document order number: 502-1039801