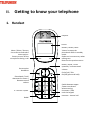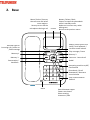
1
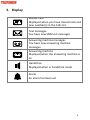
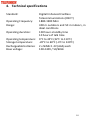
USER GUIDE OPERATING INSTRUCTIONS CORDED DECT TELEPHONE TD 291 Colombo Combo I.Box contents ...................................................................... 6 II.Getting to know your telephone ....................................... 7 1. Handset .......................................................................... 7 2. Base ................................................................................ 8 3. Display ............................................................................ 9 4. Technical specifications ................................................ 10 III.Getting started............................................................... 11 1. Location ........................................................................ 11 2. Handset range .............................................................. 11 3. Signal strength .............................................................. 11 4. Connection to the base ................................................ 12 5. Connecting the handset ............................................... 12 6. Low battery warning .................................................... 13 7. Battery life .................................................................... 13 8. Turning on .................................................................... 13 9. Date and time ............................................................... 14 10. Mains power failure, base only .................................... 14 IV.How to use your phone ................................................. 15 1. Navigating the menu .................................................... 15 2. Making an external call ................................................ 15 3. Receiving an external call ............................................. 16 4. Handsfree ..................................................................... 16 5. Volume settings............................................................ 17 2 6. 7. 8. 9. Turning off the microphone ......................................... 17 Ending a call.................................................................. 17 Keylock, handset .......................................................... 18 Switching the handset on/off ....................................... 18 V.Phonebook ..................................................................... 18 1. Viewing and calling a number in the phonebook ......... 18 2. Adding a new entry ...................................................... 19 3. Viewing an entry .......................................................... 19 4. Entering a pause ........................................................... 20 5. Entering names ............................................................ 20 6. Editing an entry ............................................................ 21 7. Changing a ringtone ..................................................... 22 8. Copying an entry to the handset .................................. 22 9. Copying all entries to the handset ............................... 22 10. Quick-dial memories .................................................... 23 11. Making a quick-dial call ................................................ 23 12. Deleting an entry .......................................................... 24 13. Deleting all entries ....................................................... 24 14. Memory status ............................................................. 24 15. Text messaging ............................................................. 25 VI.Calls list ......................................................................... 26 1. Looking at the calls list ................................................. 27 2. Calling from the calls list .............................................. 27 3. Saving a number from the calls list .............................. 28 4. Deleting a number from the calls list ........................... 28 3 5. Deleting all numbers from the calls list ........................ 28 VII.Clock and alarm ............................................................ 29 VIII.Personal settings ......................................................... 29 1. Setting the ringtone ..................................................... 29 2. Adjusting the ringer volume ......................................... 30 3. Setting the dialling mode ............................................. 30 4. Setting the ring priority ................................................ 30 5. Setting the recall mode ................................................ 31 6. Setting the system PIN ................................................. 32 7. Resetting your telephone ............................................. 32 8. Setting the ECO mode .................................................. 33 IX.Advanced settings .......................................................... 33 1. Setting the display language ........................................ 33 2. Setting the screensaver ................................................ 34 3. Setting the light timeout duration ............................... 34 4. Setting keypad tones .................................................... 35 5. PABX access code ......................................................... 35 X.Agenda ........................................................................... 35 1. Adding a new event ...................................................... 35 2. Switching off the agenda ring ...................................... 36 3. Showing the agenda details ......................................... 37 4. Editing the Agenda entries ........................................... 37 5. Deleting an Agenda entry ............................................. 37 6. Delete all Agenda entries ............................................. 38 XI.Registration ................................................................... 38 4 1. 2. 3. 4. 5. 6. Registering a handset ................................................... 38 Selecting a base ............................................................ 39 De-registering a handset .............................................. 40 Making an internal call ................................................. 40 Transferring a call ......................................................... 41 Making a 3-way conference call ................................... 41 XII.Answering machine ...................................................... 42 1. Switching the answering machine on/off .................... 42 2. Setting the answer delay .............................................. 43 3. Setting the time saver .................................................. 43 4. Switching the message alert tone on/off ..................... 44 5. Setting the on-screen alert ........................................... 44 6. Outgoing messages (OGM) .......................................... 44 7. Recording a memo ....................................................... 46 8. Call screening ............................................................... 47 9. Message playback ........................................................ 47 10. Handset, button shortcuts ........................................... 48 11. Deleting all old messages ............................................. 49 12. Switching the remote access PIN on/off ...................... 49 13. Changing the remote access PIN .................................. 49 14. Switching your answering machine on remotely ......... 50 15. Playing messages remotely .......................................... 50 16. Memory full .................................................................. 51 XIII.Safety instructions ....................................................... 52 XIV.Warranty ..................................................................... 53 5 Thank you for purchasing a TELEFUNKEN DECT digital cordless telephone! Before using your device, please consult these operating instructions and keep them so you may refer to them later on. If you have difficulties, contact our technical support at the following email address: [email protected] or at the following number: + 33 (0)5-45-60-82-51 (International number) I. Box contents 1 Handset 1 Base 2 Power adapter 1 Telephone cord 1 German plug 1 French plug 2 AAA NiMh, 550 mAh rechargeable batteries 1 Set of operating instructions The maximum range of the handset from the base is approx. 300m. The range may be reduced in certain environments and when used in certain conditions (proximity to other appliances, walls, various obstacles). Indoors, the range is generally inferior (approx. 50m) to the outdoors. 6 II. Getting to know your telephone 1. Handset Earpiece Screen Menu / Select / Secrecy Use to access and select menu options. Secrecy to turn off the microphone during a call Conversation Handsfree Phonebook / Scroll downward in menus / Decrease sound volume 0. To enter a space Names / Delete / Back 'Names' to open the phonebook while in standby mode. Delete an incorrect entry when editing text. Return to the previous menu. Redial / Pause / Scroll upwards / Increase sound volume End of call / Exit On/Off (press and hold) Switch between upper/lower-case letters when entering characters / Edit Lock the keypad Intercom - internal call Redial 2. Base Menu / Select / Secrecy Use to access and select menu options. Secrecy to turn off the microphone during a call Screen Names / Delete / Back 'Names' to open the phonebook while in standby mode. Delete an incorrect entry when editing text. Return to the previous menu. Redial / Pause (press and hold) / Scroll upwards / Increase sound volume Play message / Pause Indicator light for incoming call / power on /New message Memory 1 Memory 2 Intercom - internal call Memory 3 Redial Conversation/ handsfree Answering machine on/off, fast-forward Phonebook / Scroll downwards / Decrease sound volume Play announcements Rewind Micro Switch between upper/lower-case letters when entering characters / Edit 1 3. Display Missed Calls Displayed when you have missed calls and new number(s) in the Calls list. Text messages You have new SMS text messages Answering machine messages You have new answering machine messages Answering machine Displayed when the answering machine is on Handsfree Displayed when in handsfree mode Alarm An alarm has been set 9 4. Technical specifications Standard: Operating Frequency: Range: Operating duration: Operating temperature: Storage temperature: Rechargeable batteries: Base voltage: Digital Enhanced Cordless Telecommunications (DECT) 1880-1900 MHz 300 m outdoors and 50 m indoors, in ideal conditions 100 hours standby time 10 hours of talk time 0°C to 45°C (32°F to 113°F) -20°C to 60°C (-4°F to 140°F) 2 x NiMH 1.2V (AAA) each 100-240V / 50/60Hz 10 III. Getting started 1. Location You need to install the base less than 2m from an electrical outlet and a telephone jack. Ensure that the base is at least 1m away from other electrical appliances to avoid interference. The telephone works by sending radio signals between the base and the handset. Signal strength depends on where the base is sited. Placing it high ensures a stronger signal. 2. Handset range Your TELEFUNKEN telephone has a range of 300m outdoors when there is a clear line of sight between the base and the handset. Any obstacle between the base and the handset seriously reduces the range. If the base is indoors and the handset is either indoors or outdoors, the range is up to 50m. Very thick walls can affect the range. 3. Signal strength The symbol on your handset indicates when you are in range. 11 When the handset is out of range, the screen displays SEARCHING, the symbol flashes and the handset emits a warning tone each minute. This tone is repeated as long as the handset is out of range. If you go out of range while on a call, the call will drop. Go back within range before making any further calls. The handset will reconnect with the base automatically. 4. Connection to the base Plug the transparent connector of the power adapter into the place marked underneath the base, and plug the other end into a wall outlet. 5. Connecting the handset Insert the 2 AAA NiMH batteries supplied into the handset. Slide the battery compartment cover back into place. Place the handset in the base, and leave it to charge for at least 24 hours. Make sure it is inserted in the right direction. When the handset is charged, the symbol is displayed. After 24 hours, plug the telephone cord into the base and into the telephone wall jack. 12 6. Low battery warning If the symbol flashes on the screen, you must recharge the handset before using it again. While it is charging, the symbol will scroll across the screen. 7. Battery life Under ideal conditions, fully charged batteries should give about 10 hours of talk time and 100 hours of standby on a single charge. Note: New batteries do not reach full capacity until they have been in normal use for several days. To keep your batteries in optimal condition, leave the handset off the base for several hours at a time. Draining the batteries at least once per week will help them to last as long as possible. The charge capacity of the batteries decreases with time and use, thus reducing talk/standby time. They should be replaced at this point. Batteries and the handset may become warm during charging. This is normal. 8. Turning on When turning on your phone for the first time, you are asked to indicate the country in which you are using it: select the country using the ▲/▼ scrolling keys, then confirm with Menu/OK. 13 9. Date and time If you subscribe to your telephone operator's Caller ID service, the date and time will be automatically set on all the handsets upon each call received. If you do not subscribe to this service, you can set the date and time manually. Manually setting the date and time 1. Press 'MENU', then ▼ to display 'Clock & Alarm'. Press ‘Select’, the screen displays 'Date & Time'. Press ‘Select’ again. 2. Enter the date in DD-MM-YY format, for example 04-11-10 for 4 November 2010. 3. Press ‘Save’ and enter the time in 24-hour, HH-MM format. For example, 14-45 for 14:45 or 2:45pm. 4. Press ‘Save’ to confirm. You can either wait a few seconds for the display to return to standby or press ‘Back’ twice. The time that you entered will now be displayed in the top right of the screen. Your Colombo Combo telephone is now ready for use. 10. Mains power failure, base only If you have a mains power failure, you can still use your base to make and receive telephone calls. The phone will ring when you receive an incoming call in power failure mode but the 14 display will not light up and the caller’s details will not be stored in the calls list. You will not be able to use the other features and functions of the base or the handset until mains power is restored. IV. How to use your phone 1. Navigating the menu Use ▲ and ▼ to scroll through the menu options. 2. Making an external call - Direct calling Base Lift the handset and dial the number. Handset 1. Press . 2. Dial the telephone number. - Preparatory dialling Base 1. Enter the phone number (maximum 32 digits). If you make a mistake press ‘Clear’. 2. Press to dial the phone number entered. To continue the call via the handset, just lift the handset. 15 Handset 1. Enter the phone number (maximum 32 digits). If you make a mistake press ‘Clear’. 2. Press to dial the phone number entered. 3. Receiving an external call Base 1. When the phone rings, lift the handset to answer the call. Handset 1. When the phone rings, press to answer the call. When answering the handset from the charger base with ‘Auto Talk’ set to ‘On’, nothing needs to be pressed. 4. Handsfree Base When the phone rings, press to answer the call in Handsfree mode. To continue the call via the handset, just pick up the handset. To switch back to handsfree mode again, just press and replace the handset. Handset When the phone rings, press twice to answer the call in Handsfree mode. You can press each time you wish to switch between handset and handsfree mode. Caution: Holding the handset too close to your ear when it is ringing may damage your hearing. Activating handsfree mode can suddenly raise the earpiece volume to a high level. Make 16 sure the handset is not too close to your ear. 5. Volume settings During a call, press ▲ or ▼ to adjust the earpiece or speaker volume. The volume level appears on the screen. 6. Turning off the microphone Turning off the microphone lets you to speak to another person nearby without letting your caller hear. 1. During a call, press ‘Secrecy’. ‘Secrecy On’ is displayed. 2. Press ‘Off’ again to turn the microphone back on and speak to your caller again. 7. Ending a call Base Replace the handset or press . After you hang up, the duration of your call is displayed for 5 seconds. Handset Press . After you hang up, the duration of your call is displayed for 5 seconds. 17 8. Keylock, handset To lock the keypad press and hold ‘#’. ‘Keypad Locked’ is displayed. To unlock the keypad press ‘Unlock’, followed by ‘#’. ‘Keypad Unlocked’ is displayed. 9. Switching the handset on/off 1. 2. V. Press Press until the handset shuts off. again to turn the handset on. Phonebook You can store up to 250 entries in your Colombo Combo base phonebook. Each number can be up to 24 digits long and each name can be up to 12 characters long, including any dots or spaces. Entries are stored in alphabetical order. 1. Viewing and calling a number in the phonebook 1. 2. Press ▼. The display shows the first entry. Scroll ▲or ▼to the entry you want. Or to search alphabetically, press ▼then press the key with the first 18 3. 4. letter of the name, e.g. if the name begins with N, press 6 twice. The display shows the first entry beginning with N. If required, press ▲or ▼to scroll to the exact entry. Press ‘Options’. ‘Show Details’ is highlighted. Press ‘Select’. Press or ‘Dial’ to dial the entry displayed. To continue the call via the handset, just lift the handset. 2. Adding a new entry 1. 2. 3. 4. 5. Press ‘Names’. Scroll ▼to highlight ‘Add Entry’. Press ‘Select’. ‘Enter Name:’ is displayed. Enter a name using the keypad and press ‘OK’. Enter a number. Press ‘OK’ to save. Press ▲or ▼to select a melody and press ‘Select’ to confirm. Press ‘Back’ to return to standby. 3. Viewing an entry 1. 2. 3. 4. Press ‘Names’ to open the phonebook menu. Enter the first letter of the name you want then scroll ▲or ▼if necessary to the exact name. Press ‘Options’, then scroll ▼to ‘Show Details’. Press ‘Select’. Press ‘Back’ 3 times to cancel the Phonebook display and return to the call timer display. 19 4. Entering a pause If your Colombo Combo is connected to a switchboard, you may need to enter a pause in a stored number. This gives the switchboard time to find an outside line. A Pause is normally stored after the switchboard access code (e.g. 9). When storing a number, press and hold ▲ until the display shows ‘P’. You can then continue storing the phone number. Note: You can cancel storing an entry at any time during the process by lifting and replacing the handset or waiting for the display to timeout to standby before you press ‘OK’ to save. 5. Entering names Use the alphanumeric keypad to enter names into the phonebook. For example, to enter the name PAUL: P Press once. A Press once. U Press twice. L Press three times. To enter a space, press '0'. Press 'Clear' to delete a letter, or press and hold 'Clear' to delete everything. Press '#' continuously to switch between upper case ABC, lower case abc letters and digits. 20 Table of characters and symbols 6. Editing an entry 1. 2. 3. 4. 5. 6. 7. Press ▼. Scroll ▲or ▼to the entry you want to edit and press ‘Options’. Scroll ▼to ‘Edit Entry’ and press ‘Select’. Edit the name and press ‘OK’ to confirm. Press ‘Clear’ to delete character(s). Press ‘OK’ and edit the number. Press ‘OK’ to confirm. Press ▲or ▼to select a melody and press ‘Select’ Press ‘Back’ twice to return to standby. 21 7. Changing a ringtone You can change a ringtone assigned to a phonebook entry, quickly and simply. 1. Press ▼. 2. Scroll ▲ or ▼ to the entry with the ringtone you want to change and press ‘Options’. Scroll ▼ to ‘Ringtone’ and press ‘Select’. 3. Press ▲ or ▼ to select a different melody and press ‘Select’ to confirm. 4. Press ‘Back’ twice to return to standby. 8. Copying an entry to the handset 1. 2. 3. 4. Press ▼. Scroll ▲ or ▼ to the entry you want to copy and press ‘Options’. Scroll ▼ to ‘Copy Entry’ and press ‘Select’. Scroll ▼ to ‘To Handset’ and press ‘Select’. On the receiving handset, e.g. Handset 1., ‘Copy Phonebook?’ is displayed. Press ‘Yes’ to accept or ‘No’ to reject the phonebook entries. Press ‘Back’ three times to return to standby. 9. Copying all entries to the handset 1. Press ‘Names’. 2. Scroll ▼ to ‘Copy Phonebook’ and press ‘Select’. ‘To Handset’ is highlighted. Press ‘Select’. 22 3. The other handsets registered to the base are displayed, e.g. Handset 1. Press ▲ or ▼ to select the handset that you would like to copy the entries to and press ‘Select’ to confirm. ‘Please wait...’ is displayed. 4. On the receiving handset, e.g. Handset 1., ‘Copy Phonebook? ’ is displayed. Press ‘Yes’ to accept or ‘No’ to reject the phonebook entries. 5. Press ‘Back’ three times to return to standby. 10. Quick-dial memories You can copy the 3 phonebook entries that you are likely to call most often, to the 3 1-touch speed-dial buttons. 1. Press ▼. 2. Scroll ▲ or ▼ to the entry you want to copy and press ‘Options’. Scroll ▼ to ‘Quickdial’ and press ‘Select’. 3. Press ▲ or ▼ to select ‘Key 1’, ‘Key 2’ or ‘Key 3’ and press ‘Select’. 4. Press ▲or ▼to select ‘Assign’ or ‘Clear Entry’ and press ‘Select’. 5. Press ‘Back’ to return to standby. 11. Making a quick-dial call 1. 2. Press the memory 1, 2 or 3 button. The telephone will switch to handsfree mode and will dial the number. The name of the person you are calling will be displayed. To continue the call via the handset, just lift the handset. Replace the handset or press the button to end the call. 23 12. Deleting an entry 1. 2. 3. 4. 5. Press ▼. Scroll to the entry you want to ‘Delete’ and press ‘Options’. Scroll ▼to ‘Delete Entry’ and press ‘Select’. Display shows ‘Delete?’ and the name of the entry. Press ‘Yes’ to confirm or ‘No’ to return to the options. Press ‘Back’ to return to standby. 13. Deleting all entries 1. 2. 3. 4. Press ‘Names’. Scroll to the entry you want to delete and press ‘Options’. ‘Delete All Entries?’ is displayed. Press ‘Yes’ to confirm or ‘No’ to return to the options. Press ‘Back’ to return to standby. 14. Memory status You can check how many phonebook entries you have saved on your base and how many entries you still have available. 1. Press ‘Names’. 2. Scroll ▼to ‘Memory Status’ and press ‘Select’. 3. Press ‘Back’ twice to return to standby. 24 15. Text messaging Sending a text message 1. Press ‘Menu’, ‘Text Messaging’ is displayed, press ‘Select’. 2. ‘Write Message’ is highlighted. Press ‘Select’. 3. Use the keypad to enter your message. The maximum number of characters in a text message is 160. Press # to switch between upper case ABC, lower case abc letters and digits. 4. Press ‘Options’. ‘Send’ is highlighted. Press ‘Select’ to send the message. Enter the phone number or press ‘Search’ to open the phonebook, then scroll to the number you want and press ‘Select’. Now press ‘Send’. You can also scroll ▲or ▼to: SAVE Press ‘Select’ to save the message in the Drafts folder. INSERT SYMBOL Press ‘Select’. The symbol table is displayed. Press ▲or ▼to highlight the symbol you want and then press ‘Insert’. INSERT EMOTICON Press ‘Select’. The Emoticon table is displayed. Press ▲or ▼to highlight the Emoticon you want then press ‘Insert’. INSERT TEMPLATE Press ‘Select’. The list of Templates is displayed. Press ▲or ▼to highlight the Template you want then press ‘Insert’. 5. When sending a message, ‘Sending Message’ will be displayed, followed by ‘Message Sent’. 25 VI. Calls list If you subscribe to your provider's Caller ID service and the caller ID is not hidden, the number, date and time of the call will be displayed on the screen. Note: If the caller’s number is stored in your phonebook along with a name, the name will also be displayed. If the telephone number is not available for incoming calls, ‘Unavailable’ will be displayed. Information about incoming calls will vary by country and network operator. Some operators may charge a subscription for their Caller Line Identification service. The calls list contains details of missed, received and dialled calls. Details include the date and time of the call. Entries are displayed in chronological order with the most recent call at the top of the list. When the calls list is full, a new call replaces the oldest in the list. The base can hold details of up to 30 answered or unanswered calls and 20 dialled Calls. If you receive more than one call from the same number, only the most recent call is kept in the calls list. When you have ‘Missed Calls’ (incoming calls that you haven’t answered) the display shows ‘You have X New missed calls’. If you press ‘Back’, the screen returns to standby and the missed call icon is displayed. 26 1. Looking at the calls list 1. 2. 3. Press ‘View’ when ‘New missed calls’ is displayed. Press ▲ or ▼to scroll through the list. Alternatively, if you pressed ‘Back’ and the screen is at Standby. Press ‘Menu’, press ▲or ▼to scroll to ‘Calls Lists’ and press ‘Select’. ‘Missed Calls’ will be highlighted, press ‘Select’ to view the calls list. Press ▲or ▼to scroll to the entry you want to view. Press ‘Options’, ‘Show Details’ is highlighted. Press ‘Back’ five times to return to standby. 2. Calling from the calls list 1. 2. 3. 4. 5. Press ‘Menu’, scroll ▼to ‘Calls Lists’ and press ‘Select’, ‘Missed Calls’ is highlighted. Scroll ▲or ▼to select ‘Missed Calls’, ‘Received Calls’ or ‘Dialled Calls’. Press ‘Select’. You can now scroll ▲or ▼through the list. Press ‘Options’, ‘Show Details’ is highlighted. Press ‘Select’ to see the Caller’s details. Press ‘Dial’ or to dial the entry displayed. To continue the call via the handset, just lift the handset. To end the call, replace the handset or press . 27 3. Saving a number from the calls list 1. 2. 3. 4. 5. 6. Press ‘Menu’, scroll ▼to ‘Calls Lists’, then press ‘Select’, ‘Missed Calls’ is highlighted. If required, scroll ▲or ▼to ‘Received’ or ‘Dialled’ Calls’ then press ‘Select’. Scroll ▲or ▼to the entry you want and press ‘Options’. Scroll ▼to ‘Save number’ and press ‘Select’. Enter a name and then press OK. The number is displayed. Press ‘OK’. Scroll ▲or ▼to the ringtone you want and press ‘Select’. Press ‘Back’ four times to return to standby. 4. Deleting a number from the calls list 1. 2. 3. 4. Press ‘Menu’, scroll ▼to ‘Calls Lists’ and then press ‘Select’. ‘Missed Calls’ is highlighted. If required, scroll ▲ or ▼to ‘Received Calls’ or ‘Dialled Calls’ then press ‘Select’. Scroll ▲or ▼to the entry you want and press ‘Options’. Scroll ▲to ‘Delete Call’. Press ‘Select’ Press ‘Back’ three times to return to standby. 5. Deleting all numbers from the calls list 1. Press ‘Menu’, scroll ▼to ‘Calls Lists’ and then press ‘Select’. ‘Missed Calls’ is highlighted. Scroll ▼to ‘Delete Calls’ and press ‘Select’. 28 2. 3. 4. ‘Missed Calls’ is highlighted. Scroll ▼to ‘All Calls’ and press ‘Select’. Display shows ‘Delete All Calls?’ Press ‘Yes’ to confirm or ‘No’ to cancel. Press ‘Back’ three times to return to standby. VII. Clock and alarm If you subscribe to your network’s Caller ID service, the time on your Base is set automatically each time you receive a call, depending on your network provider. You can also set or adjust the time using the Clock & Alarm menu. VIII. Personal settings Caution: Avoid holding the handset too close to your ear while it is ringing. This can damage your hearing. 1. Setting the ringtone 1. 2. 3. 4. Press ‘Menu’, scroll ▼to ‘Settings’ and press ‘Select’. ‘Set Handset’ is highlighted. Press ‘Select’. ‘Ringtone’ is highlighted. Press ‘Select’. Press ▲or ▼to highlight ‘External Call’ or ‘Internal Calls’. Press ‘Select’ to confirm. 29 5. 6. Scroll ▲or ▼to highlight the ringtone you want, there are 20 to choose from. Press ‘Select’ to confirm. Press ‘Back’ three times to return to standby. 2. Adjusting the ringer volume 1. 2. 3. 4. 5. Press ‘Menu’, scroll ▼to ‘Settings’ and press ‘Select’. ‘Set Handset’ is highlighted. Press ‘Select’. Scroll to ‘Ringer Volume’ and press ‘Select’. Press ▲or ▼to highlight the volume level you want, there are 5 to choose from. Press ‘Save’ to confirm. Press ‘Back’ three times to return to standby. 3. Setting the dialling mode Your Colombo Combo telephone is set to Tone dialling. You should not normally need to change this setting. The dial mode options are Tone or Pulse. 1. Press ‘Menu’, scroll ▼to ‘Settings’ and press ‘Select’. 2. Scroll ▼to ‘Set Base’. Press ‘Select’. 3. ‘Dialling Mode’ is highlighted. Press ‘Select’. 4. Press ▲or ▼to highlight ‘Pulse’ or ‘Tone’. Press ‘Select’ to confirm. 5. Press ‘Back’ three times to return to standby. 4. Setting the ring priority Your Colombo Combo telephone is set so that when you 30 receive an incoming call the base and the handset will ring at the same time. With ‘Ring priority’ you can set the handset to ring 2, 4 or 6 times before the base will ring. 1. Press ‘Menu’, scroll ▼to ‘Settings’ and press ‘Select’. 2. Scroll ▼to ‘Set Base’. Press ‘Select’. 3. Scroll ▼to ‘Ring priority’. Press ‘Select’. 4. Scroll ▼to ‘Select Handset’. Press ‘Select’. The other handsets registered to the base are displayed, e.g. Handset 1. Press ▲or ▼to select the handset that you would like to ring first and press ‘Select. 5. Press ▲or ▼to highlight to 2, 4 or 6 Rings and press ‘Select’. 6. Press ‘Back’ three times to return to standby. Note: To change back to the original setting of the base and handset ringing at the same time select ‘All Handsets’ at Step 4. 5. Setting the recall mode The default recall time is suitable for your country and network operator and is set at 100 ms (Recall 1). 1. Press ‘Menu’, scroll ▼to ‘Settings’ and press ‘Select’. 2. Scroll ▼to ‘Set Base’. Press ‘Select’. 3. Scroll ▼to ‘Recall Mode’. Press ‘Select’. 4. Press ▲or ▼to highlight ‘Recall 1’ (100ms) or ‘Recall 2’ (250ms). Press ‘Select’ to confirm. 5. Press ‘Back’ three times to return to standby. 31 6. Setting the system PIN The System PIN is used when changing certain settings and for handset/base registration/deregistration. The default setting is 0000 but you can change this to your own personal PIN number with up to 8 digits. When you enter a PIN the digits are displayed as ‘****’. 1. Press ‘Menu’, scroll ▲to ‘Settings’ and press ‘Select’. 2. Scroll ▲to ‘Set Base’. Press ‘Select’. 3. Scroll ▼to ‘System PIN’. Press ‘Select’. 4. Enter the old PIN (original setting 0000) and press OK. 5. Enter the new PIN and press OK. Re-enter the new PIN and press OK. 6. Press ‘Back’ three times to return to standby. 7. Resetting your telephone You can restore your telephone to its default (original) settings. The Phonebook, Calls List and Answering Machine messages and personal Outgoing Messages will not be affected. All handsets registered to the base will continue to be registered. All text, answering machine, handset and base settings, such as ringer volumes etc., will be reset. 1. Press ‘Menu’, scroll ▼to ‘Settings’ and press ‘Select’. 2. Scroll ▼to ‘Set Base’. Press ‘Select’. 3. Scroll ▼to ‘Master Reset’. Press ‘Select’. 32 4. 5. ‘Are You Sure?’ is displayed. Select ‘Yes’ to confirm or ‘No’ to cancel. If you select ‘Yes’, enter the system PIN (original setting 0000) then press OK. ‘Please wait...’ and then ‘Reset Complete’ will be displayed. The base will then announce your answering machine outgoing message and then return to standby. 8. Setting the ECO mode To reduce the level of power emissions, you can select ‘ECO mode’. When the ECO mode is set to ‘On’, the base transmission power will be reduced. 1. Press ‘Menu’, scroll ▼to ‘Settings’ and press ‘Select’. 2. Scroll ▼to ‘Set Base’. Press ‘Select’. 3. Scroll ▼to ‘ECO Mode’. Press ‘Select’. 4. Press ▲or ▼to highlight ‘Off’ or ‘Eco Mode’. Press ‘Select’ to confirm. 5. Press ‘Back’ three times to return to standby. IX. Advanced settings 1. Setting the display language Your telephone has 6 different display languages; these are English, French, German, Italian, Spanish and Dutch. 33 Note: As soon as you select a new display language, all the handset text displays will immediately change to this language. 1. Press ‘Menu’, scroll ▲to ‘Settings’ and press ‘Select’. 2. ‘Set Handset’ is highlighted. Press ‘Select’. 3. Scroll ▲or ▼to ‘Language’. Press ‘Select’. 4. Scroll to the language you want and press ‘Select’. 5. Press ‘Back’ three times to return to standby. 2. Setting the screensaver 1. 2. 3. 4. 5. Press ‘Menu’, scroll ▲to ‘Settings’ and press ‘Select’. ‘Set Handset’ is highlighted. Press ‘Select’. Scroll ▲or ▼to ‘Screensaver’. Press ‘Select’. Press ▲or ▼to highlight ‘Clock’ or ‘Off’ and press ‘Select’. Press ‘Back’ three times to return to standby. 3. Setting the light timeout duration 1. 2. 3. 4. 5. Press ‘Menu’, scroll ▲to ‘Settings’ and press ‘Select’. ‘Set Handset’ is highlighted. Press ‘Select’. Scroll ▲or ▼to ‘Light Timeout’. Press ‘Select’. Press ▲or ▼to highlight ‘15 Seconds, ’30 Seconds’ or ‘45 Seconds’ and press ‘Select’. Press ‘Back’ three times to return to standby. 34 4. Setting keypad tones 1. 2. 3. 4. 5. Press ‘Menu’, scroll ▲to ‘Settings’ and press ‘Select’. ‘Set Handset’ is highlighted. Press ‘Select’. Scroll ▲or ▼to ‘Key Beep’. Press ‘Select’. Scroll ▲or ▼to ‘On’ or ‘Off’. Press ‘Select’ to confirm. Press ‘Back’ three times to return to standby. 5. PABX access code 1. 2. 3. 4. 5. X. Press ‘Menu’, scroll ▲to ‘Settings’ and press ‘Select’. ‘Set Handset’ is highlighted. Press ‘Select’. Scroll ▲or ▼to ‘PABX Access Code’. Press ‘Select’. Scroll ▲or ▼to ‘On’, ‘Off’ or ‘Set Code’. Press ‘Select’ to confirm. If you select ‘Set code’, enter the switchboard access code e.g. 9, then press ‘Save’. Press ‘Back’ three times to return to standby. Agenda You can use your handset to remind you of details of up to five events such as birthdays, anniversaries or appointments. Each entry can be up to 24 characters long. 1. Adding a new event 1. Press ‘Menu’, scroll ▼to ‘Agenda’ and press ‘Select’. 35 2. 3. 4. 5. 6. 7. If no previous event is stored, ‘Add Event’, is highlighted, press ‘Select’. Or If events are already stored, they are listed. Press ‘Options’, ‘Add Event’ is highlighted. Press ‘Select’. Enter the subject and press ‘Save’. Enter the date (DD/MM) and press ‘Save’. Enter the time, (HH:MM) and press ‘Save’. If the current time format setting is 12 hour, ‘Select’ am or pm by pressing ▲or ▼. Press ▲or ▼to highlight ‘Silent’ or ‘Alarm’ and press ‘Select’. Press to return to standby. Selecting the alarm: 1. Scroll ▲or ▼to highlight ‘Once’ or ‘Annually’ and press ‘Select’. 2. Scroll ▲or ▼to highlight when you want to receive the reminder ‘At event time’ or ‘30 min before’, press ‘Select’. 3. Press to return to standby. 2. Switching off the agenda ring The event is displayed. Press ‘View’ to stop the alarm and see the details of the event. Or press ‘Back’ to stop the alarm and return to the standby screen. 36 3. Showing the agenda details 1. 2. 3. 4. Press ‘Menu’, scroll ▼to ‘Agenda’ and press ‘Select’. Stored events are displayed. If required scroll ▼to the event you want and press ‘Options’. Scroll ▼to ‘Show Details’ and press ‘Select’. The description, date and time of the reminder are displayed. Press to return to standby. 4. Editing the Agenda entries 1. 2. 3. 4. 5. 6. 7. Press ‘Menu’, scroll ▼to ‘Agenda’ and press ‘Select’. Stored events are displayed. If required scroll ▼to the event you want and press ‘Options’. Scroll ▼to ‘Edit Event’ and press ‘Select’. Edit the subject and press ‘Save’. Edit the date and time and press ‘Save’. Press ▲or ▼to highlight ‘Silent’ or ‘Alarm’ and press ‘Select’. Press to return to standby. 5. Deleting an Agenda entry 1. 2. 3. 4. Press ‘Menu’, scroll ▼to ‘Agenda’ and press ‘Select’. Stored events are displayed. Scroll ▼to the event you want to delete and press ‘Options’. Scroll ▼to ‘Delete Event’ and press ‘Select’. Press ‘Yes’ to confirm or ‘No’ to cancel. 37 5. Press to return to standby. 6. Delete all Agenda entries 1. 2. 3. 4. 5. Press ‘Menu’, scroll ▼to ‘Agenda’ and press ‘Select’. Stored events are displayed. Press ‘Options’. Scroll to ‘Delete All Events’ and press ‘Select’. Press ‘Yes’ to confirm or ‘No’ to cancel. Press to return to standby. XI. Registration Up to 5 handsets can be registered to the Colombo Combo base. Additional handsets must be fully charged and registered to the base before you can use them. Note: The handset in the box with the Colombo Combo base will already have been registered and you will not need to register it. The instructions described below apply specifically to a Colombo Combo handset. If you wish to register another manufacturer’s handset, the instructions may vary. The Master PIN is required before you can register or deregister handsets. The default PIN is 0000. 1. Registering a handset At the base: 38 1. Press and hold the ‘intercom’ button for at least 3 seconds until you hear a double beep. You have 60 seconds in which to register your additional handset. At the handset: 2. If the handset is new and ‘Please Register’ is displayed. Press ‘Menu’. ‘Registration’ is displayed’ press ‘Select’ Or If the handset has already been registered to another base the standby display is shown. Press ‘Menu’, scroll ▲ or ▼to ‘Registration’ and press ‘Select’. 3. ‘Register Handset’ is highlighted, press ‘Select’. 4. Bases are displayed. If necessary scroll ▲or ▼to a new base you wish to register your handset to and press ‘Select’. 5. Enter the System PIN (original PIN is 0000) and press OK. 6. 6. ‘Searching Base X’ (where X is the chosen base number) then ‘Handset Registered’ is displayed. The handset is automatically assigned the next available handset number e.g.: 2. 2. Selecting a base You can register your handset with up to 4 bases. Once registered, you can switch between bases, for example, bases at home and at work. 1. Press ‘Menu’, scroll ▲or ▼to ‘Registration’ and press ‘Select’. 2. Scroll ▼to ‘Select Base’ and press ‘Select’. 39 3. 4. All base numbers are displayed. (In use) is added to bases where the handset has been previously registered. Scroll ▲or ▼to the base you want and press ‘Select’. ‘Searching base...’ is displayed, followed by the standby display for that base. 3. De-registering a handset 1. 2. 3. 4. 5. 6. Press ‘Menu’, scroll ▲or ▼to ‘Registration’ and press ‘Select’. Scroll ▼to ‘De-register’ and press ‘Select’. Enter the system PIN (original PIN is 0000) and press OK. Scroll ▲or ▼to the handset you want to deregister and press ‘Select’. Press ‘Yes’ to confirm or ‘No’ to cancel. The display confirms de-registration. Press to return to standby. 4. Making an internal call With your Colombo Combo you can make internal calls between the handset and the base. At the base: 1. Press ‘intercom’ followed by the number of the handset ‘1’. 2. Press OK to dial. At the handset: 1. Press ‘int’ (bottom right of the keypad), followed by the number of the base ‘0’ 40 2. Press OK to dial. 5. Transferring a call You can transfer an external call from the base to the handset or from the handset to the base. During your call: 1. Press ‘Int’ on the base or on the handset, followed by the number of the handset ‘1’ or base ‘0’ that you want to call. 2. Press ‘OK’ to dial or press ‘End’ to cancel the call request and return to the caller. 3. When the other handset answers you can announce the caller. 4. Press on the handset or replace the handset/press on the base to complete the transfer. 6. Making a 3-way conference call You can hold a 3-way conference call between 2 internal and 1 external caller. During your call to an external caller: 1. 2. 3. Press ‘Int’ on the base or on the handset, followed by the number of the handset ‘1’ or base ‘0’ that you want to call. Press ‘OK’ to dial. When the other handset/base answers you can announce the caller. 41 4. 5. Press ‘Join’ to begin the conference call. ‘Conference Call’ is displayed. Press on the handset or replace the handset/press on the base to end the call. XII. Answering machine Your Colombo Combo answering machine records unanswered calls when it is activated. It can store up to 59 messages within the maximum recording time of 30 minutes. Each message can be up to 3 minutes long. Your personal outgoing messages can be up to 3 minutes long. On the base you can quickly access the main answering machine functions via the central square button surrounding the green ‘Play/Pause’ button. Please see the illustration below: Play/Pause Play OGM Skip back Answer on/off Skip forward 1. Switching the answering machine on/off Note: When the answering machine is switched on the base and the handset will display in standby mode. 42 Base Press the square surround to the right of the Play/Pause button. Handset 1. Press ‘Menu’, scroll ▼to ‘Answer Machine’ and press ‘Select’ 2. Scroll ▼to ‘Answer On/Off’ and press ‘Select’. 3. Scroll ▲or ▼to highlight ‘On’ or ‘Off’ and press ‘Select’. 2. Setting the answer delay Answer delay sets the number of times your telephone will ring before the answer machine picks up the call and starts playing the outgoing message. You can change this to between 2-9 rings or Time Saver. The default setting is 5 rings. 1. Press ‘Menu’, ‘Answer Machine’ is highlighted. Press ‘Select’ 2. Scroll to ‘Answer Settings’ and press ‘Select’. 3. Scroll to ‘Answer Delay’ and press ‘Select’. 4. Scroll or to highlight the delay you want. Press ‘Select’ to confirm. 5. Press ‘Back’ three times to return to standby. 3. Setting the time saver When you ring in to access your messages remotely, if your answering machine ‘Answer Delay’ is set to time saver, and 43 you have new messages, it will answer after 2 rings. 4. Switching the message alert tone on/off 1. 2. 3. 4. 5. Press ‘Menu’, ‘Answer Machine’ is highlighted. Press ‘Select’ Scroll ▲to ‘Answer Settings’ and press ‘Select’. Scroll ▼to ‘Message Alert’ and press ‘Select’. Scroll ▲or ▼to highlight ‘On’ or ‘Off’ and press ‘Select’. Press ‘Back’ three times to return to standby. 5. Setting the on-screen alert When you have new answering machine messages, the screen on the base and the handset displays ‘You have X new messages.’ Press ‘Play’, then scroll ▲or ▼through the list of messages if there is more than one. 6. Outgoing messages (OGM) The outgoing message is the message a caller first hears when the answering machine picks up their call. There are 2 prerecorded outgoing messages to choose from or you can record your own up to 3 minutes long. Answering and recording The caller can leave a message. The pre-recorded message is 44 ‘Hello, your call cannot be taken at this moment, so please leave your message after the tone.’ Answering Only The caller can listen to your announcement but cannot leave a message. The pre-recorded message is ‘Hello, your call cannot be taken at this moment, and you cannot leave a message, so please call later’. Recording your own outgoing message 1. Press ‘Menu’, ‘Answer Machine’ is highlighted. Press ‘Select’ 2. Scroll ▼to ‘Outgoing Message’ and press ‘Select’. 3. ‘Record’ is highlighted. Press ‘Select’. 4. Scroll ▲or ▼to ‘Answer & Record’ or ‘Answer Only’ and press ‘Select’. 5. You will hear ‘Please Speak after the Tone’ and this is also displayed on the handset. 6. After the tone, speak your message clearly into the handset then press ‘Save’ to end the recording. 7. Your outgoing message is played back. If you want to delete it, press ‘Delete’ during playback. If you press ‘Save’ or wait for the message to play back it will be saved. Checking or deleting your outgoing message 1. Press ‘Menu’, ‘Answer Machine’ is highlighted. Press ‘Select’ 2. Scroll ▼to ‘Outgoing Message’ and press ‘Select’. 3. Scroll ▼to ‘Play’ and press ‘Select’. 45 4. 5. 6. Scroll ▲or ▼to ‘Answer & Record’ or ‘Answer Only’ and press ‘Select’. Scroll ▼to ‘Personal OGM’ and press ‘Select’. The message is played. Press ‘OK’ to stop playback or press ‘Delete’ to delete a personal OGM. Selecting the outgoing message mode 1. Press ‘Menu’, ‘Answer Machine’ is highlighted. Press ‘Select’ 2. Scroll ▼to ‘Answer Settings’ and press ‘Select’. 3. ‘Answer Mode’ is highlighted. Press ‘Select’. 4. Scroll ▲or ▼to ‘Answer & Record’ or ‘Answer Only’ and press ‘Select’. 5. If there is a personal OGM saved, press ▲or ▼to ‘Default OGM’ or ‘Personal OGM’ and press ‘Select’. Your selection is confirmed. If there is no personal OGM saved the default OGM will be selected. 7. Recording a memo 1. 2. 3. 4. Press ‘Menu’, ‘Answer Machine’ is highlighted. Press ‘Select’. Scroll ▼to ‘Record Memo’ and press ‘Select’. You will hear ‘Please Speak after the Tone’ and this is also displayed on the handset. After you hear the tone, speak your memo then press ‘Save’ to end the recording. 46 5. Your memo is played back. If you want to delete it, press ‘Delete’ during playback. If you press ‘Save’ or wait for the message to play back, it will be saved. 8. Call screening When your answering machine is on and answers a call, you can use the loudspeaker to listen to the caller leaving a message. You can then identify the caller and decide whether to take the call in person. Base Just pick up the handset to speak to the caller. Handset 1. When your telephone rings, wait for the answering machine to take the call. When the caller begins leaving a message, the handset will display ‘Recording’. Press ‘Screen’ to hear the caller. 2. To interrupt and speak to the caller, press or, after the caller has hung up and the display shows ‘You have a new message’, press ‘Play’ to play new messages. 9. Message playback Base 1. Press ‘Menu’, ‘Answer Machine’ is highlighted. Press ‘Select’ 47 2. ‘Play’ is highlighted. Press ‘Select’ and scroll ▲or ▼to choose which messages to listen to. Press ‘Play’. During playback you can ‘Pause’, ‘Skip Forward’, ‘Skip Backward’, or ‘Delete’ your messages. Handset 1. Press ‘Menu’ and scroll ▼to ‘Answer Machine’ and press ‘Select’. 2. ‘Play’ is highlighted. Press ‘Select’ to choose which messages you want to play or scroll ▼to ‘Play All’ and press ‘Select’ to play all messages. 3. You can press to switch between the earpiece and handset loudspeaker to listen to your messages. During playback press ‘Options’, then scroll ▲or to: ‘Pause’, ‘Repeat Message’, ‘Skip Forward’, ‘Skip Backward’, ‘Delete’. 4. Press ‘Select’ to choose the highlighted option. 10. Handset, button shortcuts During playback: 1 Pause 2 Resume 3 Repeat message 4 Play previous message 5 Delete current message 6 Play next message 48 11. Deleting all old messages Base 1. Press ‘Menu’, ‘Answer Machine’ is highlighted. Press ‘Select’ 2. Scroll ▼to ‘Delete Messages’ and press ‘Select’. 3. ‘Delete All Old Messages?’ is displayed. Press ‘Yes’ to confirm or ‘No’ to cancel. Remote access You can operate your answering machine from any TM Touchtone phone by calling your Colombo Combo telephone and entering a 4-digit security code (original code is 0000). 12. Switching the remote access PIN on/off 1. 2. 3. 4. Press ‘Menu’, ‘Answer Machine’ is highlighted. Press ‘Select’ Scroll ▼to ‘Answer Settings’ and press ‘Select’. Scroll ▲or ▼to ‘Remote Access’ and press ‘Select’. Scroll ▲or ▼to highlight ‘On’ or ‘Off’ and press ‘Select’. 13. Changing the remote access PIN You should change your remote PIN from the original setting of 0000 to something more memorable and personal to you. Please keep a note of your new PIN and keep it somewhere 49 safe. 1. 2. 3. 4. 5. 6. Press ‘Menu’, ‘Answer Machine’ is highlighted. Press ‘Select’ Scroll ▼to ‘Answer Settings’ and press ‘Select’. Scroll ▲or ▼to ‘Remote Access’ and press ‘Select’. Scroll ▲or ▼to highlight ‘Set Remote PIN’ and press ‘Select’. Enter the old 4-digit PIN and press ‘Save’ (original PIN is 0000). Enter the new 4-digit PIN and press ‘Save’. Enter the new PIN again and press ‘Save’. 14. Switching your answering machine on remotely If you forget to switch your answering machine on, you can do it remotely from another phone. 1. 2. 3. Dial your phone number and let it ring. After 20 rings you will hear your outgoing message. Press ‘*’ on the telephone keypad and then enter your security code (original setting 0000). Press 0 and your answering machine will switch on ready to answer incoming call. 15. Playing messages remotely 1. Dial your phone number and let it ring. When you hear your outgoing message, press ‘*’. 50 2. 3. 4. Enter your 4-digit PIN. If you enter an incorrect PIN you will hear ‘Incorrect security code’. You can try and enter the PIN 1 more time. If it is still incorrect you will hear the above voice prompt and the Colombo Combo telephone will end the call. If no button is pressed for 8 seconds or more your Colombo Combo telephone will end the call. Use your telephone keypad to operate your answering machine: 1 To hear the main menu 2 Play messages 3 Play new messages 4 Skip back during messages 5 Delete during messages 6 Skip forward during messages 7 Set to answer only (or answer & record) depending upon the Answer Mode status of the telephone at the time. 8 Record a new outgoing message 9 To set to answer off 0 To set to answer on 16. Memory full The memory is full if there is less than 10 seconds of recording time left or if the maximum total of 59 messages has been reached. 51 XIII. Safety instructions When using your telephone, simple safety precautions should be followed to prevent any risk of fire, electric shock or any other accident: Read the instructions contained in this guide and follow them carefully. Follow all the warnings contained in this guide and on the telephone. Unplug the telephone from the electrical outlet before cleaning. Do not use any liquid or aerosol cleaners; use a lintfree cloth. Do not use the telephone in close proximity to water, for example sinks, baths, taps, swimming pools and so on. Do not overload electrical outlets or extension cords; this may cause a risk of fire or electric shock. Unplug the phone from the electrical outlet, and contact technical support in the following cases: When the electrical cord or the electrical socket are damaged or stripped. If the telephone does not work normally when the instructions given in this guide have been followed. - If the telephone has been dropped and some parts are broken. - If the telephone shows clear signs of change in its operation. Avoid using a telephone during a storm. There may be a serious risk of electric shock due to lightning. Do not use the telephone to report a gas leak while in the 52 immediate vicinity of the gas leak. Use only rechargeable NiMH (nickel-metal hydride) batteries. Use of any other kind of battery or use of non-rechargeable batteries may be dangerous. It might cause interference or damage to the phone. The manufacturer shall not be held liable for repairing or replacing the telephone if batteries of a type different than that originally supplied have been used. - Recharge the batteries by leaving them in the handset and placing the handset on the base. Any other recharging method could damage the telephone. - Ensure the polarity is correct when installing batteries in the handset battery compartment. - Do not submerge batteries in water, and do not incinerate them. XIV. Warranty The warranty concerns the telephone and does not include the accessories. The following are considered accessories: - Rechargeable batteries - Power supply unit - Telephone cord However, these accessories may be ordered from our technical division. [email protected] or at the following number: + 33 (0)5-45-60-82-51 (International number) 53 Warranty period This telephone comes with a warranty period of 12 months. The warranty begins on the date the telephone is purchased. The warranty must be proven by presenting the original invoice or receipt showing the date and the model purchased. Coverage A defective telephone must be returned complete to your distributor with an explanation. If this telephone presents a defect during the warranty period, the authorised After-Sales Service will repair any defective component or manufacturing defect. The After-Sales Service will unilaterally decide whether to repair or replace part or all of the telephone. The initial purchase date will determine the starting date for the warranty period. If the telephone is repaired or exchanged by our After-Sales Service, the warranty period is not extended. Exclusions Damage or defects caused by the improper use or handling of the telephone, or by the use of accessories that are not original or not recommended in these instructions, are not covered by the warranty. The warranty does not cover damage caused by outside elements, like lightning, water or fire, or any other damage caused during transport. 54 No warranty coverage may be claimed if the telephone serial number has been modified, removed, erased or made illegible. No warranty coverage may be claimed if the telephone has been repaired, altered or modified by the buyer or any repair personnel not officially qualified and authorised. Compliance with current regulations This telephone complies with the EC standards in force: RECYCLING OF ELECTRICAL AND ELECTRONIC EQUIPMENT AT THE END OF ITS LIFE CYCLE Used electrical and electronic devices must not be discarded with ordinary household refuse. The presence of the symbol on the telephone or its packaging serves as a reminder of this. Some materials constituting this telephone may be recycled if you take them to an appropriate recycling centre. By reusing the components and raw materials of old devices, you contribute significantly to protecting the environment. For further information on collection sites of used equipment, you can enquire at your city hall, the waste treatment department or in the shop where you purchased the telephone. 55 This user guide is property of SOPEG SA and specific to model TELEFUNKEN TD 291 Colombo Combo. This user guide can not be used for any other purpose. 56