1
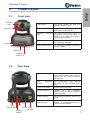
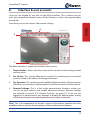
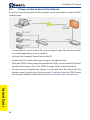
SwannEye
Pan/Tilt IP Camera
M440IPC050911E
FCC Verification
NOTE: This equipment has been tested and found to comply with the limits for Class B digital device,
pursuant to part 15 of the FCC Rules. These limits are designed to provide reasonable protection against
harmful interference in a residential installation. This equipment generates, uses and can radiate radio
frequency energy and, if not installed and used in accordance with the instructions, may cause harmful
interference to radio or television reception, which can be determined by turning the equipment off and
on, the user is encouraged to try to correct the interference by one or more of the following measures:
•
Reorient or relocate the receiving antenna
•
Increase the separation between the equipment and the receiver
•
Connect the equipment into an outlet on a circuit different from that to which the receiver is
connected
•
Consult the dealer or an experienced radio/TV technician for help
These devices comply with part 15 of the FCC Rules. Operation is subject to the following two conditions:
1. These devices may not cause harmful interference, and
2. These devices must accept any interference received, including interference that may cause
undesired operation.
IMPORTANT NOTE:
All jurisdictions have specific laws and regulations relating to the use of cameras. Before using any
camera for any purpose, it is the buyer’s responsibility to be aware of all applicable laws and regulations
that prohibit or limit the use of cameras and to comply with the applicable laws and regulations.
FCC Regulation (for USA): Prohibition against eavesdropping
Except for the operations of law enforcement officers conducted under lawful authority, no person shall
use, either directly or indirectly, a device operated pursuant to the provisions of this Part for the purpose
of overhearing or recording the private conversations of others unless such use is authorized by all of the
parties engaging in the conversation.
WARNING
Modifications not approved by the party responsible for compliance could void user’s authority to
operate the equipment.
IMPORTANT SAFETY INSTRUCTIONS
Make sure product is fixed correctly and stable if fastened in place
•
Do not operate if wires and terminals are exposed
Do not cover vents on the side or back of the IP camera and allow adequate space for ventilation
•
•
DEFAULT PASSWORD INFORMATION
To ensure your privacy, this IP camera supports password protection.
•
The default, all-access username is “admin”. If the camera asks you to log in before you’ve set a
password, enter admin as your username and 123456 as the password. This will give you full access
to all areas of the SwannEye.
•
To ensure your ongoing privacy, we strongly recommend setting a password as soon as possible.
Choose something that you’ll remember, but that others would be unlikely to guess.
•
If you do manage to lock yourself out of the SwannEye, you’ll need to contact us at the Swann
Technical Support Telephone Helpdesk - the number is on the back cover.
1.
Welcome
The SwannEye IP Camera is an integrated wireless IP (network) camera solution.
Put simply, it’s a very smart camera that has its own web server embedded. Once
configured, the camera only needs a power source to operate. Communication to
the camera can be done wirelessly through almost any browser from almost any
broadband internet connection in the world.
You can adjust where the camera is looking, view and record images, listen and
speak to someone located near the camera and even access the camera through
your smartphone device.
The quick start guide will get you up and running to get the camera operational
and see images. You can then work through the Administrator section (“8.4.
Administrator settings” on page 26) to fully configure the camera to your needs.
Note: You can access the camera from almost any browser such as Internet
Explorer, Google Chrome, Mozilla Firefox, Apple Safari and Opera. For best results,
we suggest using Internet Explorer - many features are not available in other
browsers.
Package Contents
Wireless IP Camera w/ wi-fi antenna
Power Adapter
Software CD
Screws and Wall Plugs
Wall/Ceiling Mount
Manual
Contents
1.Welcome
3
2.
Product Features
6
3.
Product Layout
7
3.1. Front view................................................................................................................. 7
3.2.
Rear View................................................................................................................... 7
3.3.
Bottom View............................................................................................................ 8
4.Installation
8
5.
Software installation
9
5.1. PC configuration.................................................................................................... 9
5.2. Mac OS X configuration.....................................................................................10
6.
Using the SwannEye Search Tool on the local network
11
6.1. SwannEye Search Tool options.......................................................................12
6.1.1.
Device Information.......................................................................13
6.1.2.
IP Config...........................................................................................13
7.
Accessing the camera from the Local Area Network (LAN)
15
7.1. Username and password..................................................................................16
7.2. Login page.............................................................................................................17
7.2.1.Language.........................................................................................17
7.2.2.
Browser options on the PC........................................................17
7.2.3.
Browser options on the Mac.....................................................18
8.
Interface & user accounts
19
8.1. Device Status.........................................................................................................20
8.2. Visitor Access.........................................................................................................21
8.3. Camera Controls...................................................................................................23
8.4. Remote Settings...................................................................................................25
8.4.1.
Device Info.......................................................................................25
8.4.2.
Alias Settings..................................................................................25
8.4.3.
Date & Time Settings....................................................................26
8.4.4.
User Settings...................................................................................26
8.4.5.
Multi-Device Settings..................................................................27
8.4.6.
Network: Network Settings.......................................................29
8.4.7.
Network: Wireless Settings........................................................30
8.4.8.
Network: ADSL Settings..............................................................32
8.4.9.
Network: UPnP Settings..............................................................33
8.4.10.
Network: DDNS Settings............................................................34
8.4.11.
Alarm: Alarm Settings..................................................................35
8.4.12.
Alarm: eMail Settings...................................................................36
8.4.13.
FTP Settings....................................................................................38
8.4.14.
Alarm Settings (Motion Detection)........................................40
8.4.15.
Other Settings................................................................................42
8.4.16.
Maintain: Device Info...................................................................43
8.4.17.
Maintain: Alias Settings...............................................................44
8.4.18.
Maintain: Date & Time Settings................................................45
8.4.19.
Maintain: Upgrade Firmware....................................................46
8.4.20.
Maintain: Log..................................................................................47
8.4.21.
Restore Factory Settings.............................................................48
8.4.22.
Reboot Device................................................................................48
8.4.23.Home.................................................................................................48
9.
Connecting the camera to the internet
49
9.1. Connect directly through ADSL modem (no router)..............................49
9.2. Using a router to access the Internet............................................................50
10.
Accessing the camera from the internet
51
10.1. What are IP addresses........................................................................................51
10.2. Your IP Address.....................................................................................................52
10.2.1.
Dynamic IP address......................................................................52
10.3. Static IP address....................................................................................................52
10.4. Port mapping........................................................................................................53
10.4.1.
Automatically forwarding ports using UPnP......................53
10.4.2.
Manually forwarding ports........................................................53
10.5.DDNS........................................................................................................................54
10.5.1.
Linking DDNS names to IP addresses....................................54
10.5.2.
How to link the name?................................................................54
10.5.3.
How to register a name?.............................................................55
10.5.4.
Access the IP camera using a DDNS name...........................56
11.
Accessing the camera through a mobile device
57
11.1.iPhone/iPad............................................................................................................57
11.2. Android Device.....................................................................................................57
12.Troubleshooting
58
12.2.1.
Forgotten the administrator username or password?.....58
12.2.2.
Indoor images flicker?.................................................................58
12.2.3.
There is no picture in Internet Explorer (IE).........................58
12.2.4.
IP Address configuration............................................................58
12.2.5.
Network Configuration problems...........................................59
12.2.6.
Problems with receiving images.............................................59
12.2.7.
Images slow to update or poor frame rate..........................59
12.2.8.
Can’t access the Network camera from the internet?......60
12.2.9.
Problems using Mozilla Firefox (or other browsers).........60
13.Specifications
61
14.
Warranty Terms & Conditions
63
15.
Helpdesk / Technical Support Details
64
2.
Product Features
Quick and easy installation: The included SwannEye Search Tool helps you find
your camera on the network and the intuitive web interface makes setup a breeze.
Wired & Wireless access: The camera can be accessed through a wired connection
using the 10/100 RJ45 LAN port or through wireless. The wireless 802.11b/g/n
standards are supported as well as WEP, WPA and strong WPA2 encryption.
Mobile Viewing: With support for MJPEG, the camera provides live viewing
across multiple platforms including PC, Mac and smartphones such as iPhone and
Android devices.
Multi-client access: The camera supports up to 4 simultaneous remote users. It
also can be configured to view up to eight more IP cameras from the one interface.
Infrared Night Vision: The integrated Infrared LEDs automatically turn on in low
light to provide night vision up to 33ft/10m.
Monitor and record live viewing from almost anywhere: You can view and
record live footage from the camera from almost anywhere in the world where you
have access to a computer, a web browser and internet broadband connection.
Notifications: Receive notifications to your email when an alarm is triggered
including the upload of images to your email, and FTP site or website.
WARNING: Do not attempt to move the pan/tilt functions of the camera by hand
as this may result in damage to the internal motors.
SwannEye IP Camera
Product Layout
3.1.
Front view
Setup
3.
Infrared
LEDs
Light Sensor
Light Sensor detects low light and
switches to night vision
Light Sensor
Infrared LEDs
These allow the camera to achieve
night-vision up to 33ft/10m.
Network
LED
Microphone
Activity This will flash when there is
information being sent over a
network to or from the camera,
either wired or wireless.
CMOS Lens Sensor
The lens is fixed and cannot have its
focus manually adjusted.
Built-In Microphone
Lets you listen remotely to activity
near the camera.
Audio output socket
Connect speakers or headphones
to this socket to hear what is being
captured by the cameras internal
microphone.
RJ45
socket
RJ45 10/100 Base-T plug. Connect
the camera to your network router
here.
Power LED
Network
Activity LED
3.2.
Rear View
DC5V
RJ45
Reset Button
Antenna
Mount
(Ethernet)
DC5V/1.5A socket
Connect the supply here.
Antenna mount
Connect
the
WiFi
(wireless)
antenna here to achieve wireless
communication.
Alarm I/O Block
For connecting external alarms and
sensors.
Speaker
(not pictured)
The camera features a built-in
speaker - it’s located inside the case,
near the Alarm I/O Block.
Audio Alarm
I/O Block
7
SwannEye IP Camera
3.3.
Bottom View
Setup
The reset switch is located on the rear of the camera, right under the antenna.
If you ever need to reset the camera back to factory settings and are unable to do
this from the menu screens, you can use the reset switch.
With the power on, insert a small non-pointed implement (such as a paperclip
or toothpick) into the hole until you can detect the button being depressed and
hold for at least five seconds.
4.
Installation
Before mounting your camera, we recommend you plug it in and configure it to
ensure you it is working the way you want. Even if you plan on using the camera
wirelessly, the initial configuration needs to be done through a wired (LAN)
connection.
1.
Screw the antenna into the antenna mount at the rear of the camera
2.
Attach an ethernet (LAN) cable to the RJ45/LAN port at the rear of the camera
3.
Attach the other end of the cable to either your PC (for a direct connection)
or to your router (to configure it over your local area network (LAN).
4.
Plug the power supply into the DC5V socket in the rear of the camera and the
other end into a power outlet.
Power supply: Make sure you use only the power adapter supplied with the
device. Using a non-approved adapter may damage the camera.
Self-Test: When powered on, the camera will perform a self test which will take
about 30 seconds. This may include the head rotating through a range of motions
before coming to rest in the centre as well as the Network Activity LED blinking.
8
SwannEye IP Camera
Software installation
To configure the camera, you need to access it. This is done through a web browser
or the included CMS software (on the included CD) but:
You will need to know the IP address:port number
assigned to the camera by your network.
The simplest way of doing this is via the SwannEye Search Tool included on the
CD. There is a version for PC and Mac. The SwannEye Search Tool is also available
from our website.
5.1.
PC configuration
To install the software:
1.
Insert
the
installation
CD
into your CD/
DVD drive and the
installation screen
should
appear
automatically. If it
does not appear,
navigate to the
CD/DVD
drive
using
Windows
Explorer.
2.
To open the search tool (which locates your camera on your network) choose
Open SwannEye Search Tool.
3.
To install the CMS software, choose Install SwannEye Monitoring.
Note: The software is only compatible with the Windows operating system. If
you’ve got a Mac OS-X based system, see “5.2. Mac OS X configuration” on page
10.
9
Setup
5.
SwannEye IP Camera
5.2.
Mac OS X configuration
Setup
To use the SwannEye Search Tool under Mac OS X:
• No installation is required. Simply run the tool from the CD
by double-clicking on the ‘SwannEye Search Tool’ file. We
recommend you first copy the file to your desktop and run it
from there in case you need to use the tool at some point.
• Once you double-click on it, the SwannEye Search Tool window will open. You
can now proceed to configure your camera using the following instructions.
Note: The SwannEye Search Tool file is also available on our website.
10
6.
Using the SwannEye Search Tool on the local
network
Double click the SwannEye Search Tool icon on the desktop and the SwannEye
Search Tool window will open.
The SwannEye Search Tool will search your network for any IP cameras and
devices.
IP cameras found on the LAN: : If one or more cameras are found on the LAN,
they will be listed in the Device List window. Once you select an item from the
Device List window, the right side of the window will self-populate with the IP
address information.
One or more IP cameras installed within the LAN do not share the same
subnet with the monitoring PC: If the message “Subnet doesn’t match, double
click to change” appears, double-click the listed camera with the mouse and
select “Network Configuration” to manually change the subnet for that camera to
match the same subnet as the LAN. See “6.1. SwannEye Search Tool options” on
page 12 for more information on what to do.
Note: Sometimes when the camera has not had enough time to fully communicate
with the router and configure itself, you will get the above subnets error. Simply
closing and restarting the SwannEye Search Tool may correct this.
11
Setup
SwannEye IP Camera
SwannEye IP Camera
6.1.
SwannEye Search Tool options
Setup
If your camera is successfully listed in the Device List window, you can now
proceed to “6. Using the SwannEye Search Tool on the local network” on page
11 to log in and view the camera and configure its settings.
The right side of this window will show you the Device Information, IP Config and
Authentication information.
Search (F3): Refreshes the Device List.
Browse (F4): Opens the feed from the highlighted camera in the Device List in
an Internet browser window. The browser will be your default browser. For best
results, we suggest using Internet Explorer.
Note: The IP address shown here for each camera is the INTERNAL Local Area
Network (LAN) IP address for each camera. You can use this address to access the
IP camera from within the same network you have attached it to but you cannot
access the IP camera from the internet using this number. See “10.1. What are IP
addresses” on page 51 for more information.
12
SwannEye IP Camera
Device Information
Some basic information is provided such as Device name and the System/App
Firmware Version numbers.
6.1.2.
IP Config
This page is used to configure the network settings.
Set IP Automatically (Recommended): Check this box to obtain an IP address
from the DHCP server. The camera needs to be connected to a router via ethernet
(LAN) cable and the router needs to have DHCP capabilities.
To trigger this selection, you will need to enter the username (default: admin)
and password (default: 123456) and click Update (F5) and Yes to confirm. The
camera will reboot and when restarting, will attempt to get an IP address from
the DHCP server.
13
Setup
6.1.1.
SwannEye IP Camera
Setup
IP Address: The IP address assigned to the camera. If you are not having this
automatically assigned by a DHCP server, you will need to manually enter in
a valid static IP that is available on your network. The first sections match the
first three sections of your subnet.
Subnet Mask: The subnet the camera is connected to. The default subnet of
the camera is 255.255.255.0
Gateway: Make sure the subnet for each camera is set to the same subnet as
the PC IP address. The default gateway address is: 192.168.0.1
DNS Server: Enter the DNS address of the DNS server you want to use.
HTTP Port: The web port the camera will communicate on. Normally this is port
80 although this is sometimes blocked by some ISPs. We therefore recommend
you increment slightly to 85 or 90 to enable communication.
To successfully change any of these values, you will need to enter the administraor
username and password and click OK.
Viewing Account: The administrator username. Only the administrator has the
ability to make these changes. The default username is admin.
Viewing Password: The password for the viewing account you’re using. The
default password for admin is 123456.
Update (F5): Click to update the IP address and port information to the camera.
You’ll need a valid administrator username and password to be entered into the
Viewing Account / Password fields. When prompted, choose Yes to apply your
changes and reboot the camera.
14
7.
Accessing the camera from the Local Area
Network (LAN)
The ‘SwannEye Search Tool’ shows the IP address+port number for your camera
on the Local Area Network (LAN).
You can access the camera by double-clicking on it in the ‘SwannEye Search
Tool’ list or by entering the camera’s IP address+port number (as shown in the
‘SwannEye Search Tool’ into a browser like Microsoft Internet Explorer or Safari.
Browser preference: On the PC, we recommend using Internet Explorer to access
the full range of options available.
In the SwannEye Search Tool’s Device List (as shown below left) we can see the
camera found is called ‘SwannEye’ and the IP config section (below right) shows
the IP address assigned is 192.168.99.176 and the port number assigned to it is 85.
• To open the web interface of the camera, you can either click the Browse (F4)
button; or
• Type in the IP address+port number that is listed in the ‘SwannEye Search Tool’
into a browser. For example:
15
Setup
SwannEye IP Camera
SwannEye IP Camera
7.1.
Username and password
Setup
When the login screen appears, enter the username and password. By default,
there is an Administrator account already set up in the camera. The default
Administrator account name is : admin and the password is 123456. There are
three types of access:
Administrator: Administrator accounts have full access to the camera. They can
configure the advanced function of the camera as well as having all the functions
of Operator and Visitor accounts.
Operator: Operator accounts can control the image settings of the camera and
Visitor functions.
Visitor: Visitor accounts can only view the camera images.
Remember: The default username is admin and the password is 123456. This is
an administrator account so you should at least change the password when you
first log in to prevent unauthorized access to the camera. We also recommend you
change the username. The Administrator username does not have to be admin.
It can be anything you like (write it down somewhere safe so you don’t forget it).
Note: If you get the following message when trying to access the camera using
the Microsoft Internet Explorer browser:
Record function can not work because IE Protected Mode is on. You can add this site to
the list of Trusted sites (IE Tools menu > Internet Options > Security tab > Trusted sites)
you will need to follow the instructions given and adjust your Internet Explorer
browser security settings to authorise IE to ‘trust’ the camera and not block the
information it is trying to send to your browser for recording.
• In Internet Explorer, click the ‘Tools’ menu
• Click ‘Internet Options’ at the bottom of the list
• Click the tab labelled ‘Security’
• Click the ‘Trusted Sites’ icon and then the ‘Sites’ button
• Make sure ‘Require server verification (https:) for all sites in this zone’ is
unchecked
• Click ‘Add” to add the destination you are currently trying to reach with the
browser (which should be your camera)
• Click ‘Close’ to exit the window and click ‘OK’ to close the Internet Options
window. Your camera is now in the trusted list and can record through the
browser.
16
7.2.
Login page
7.2.1.
Language
The camera defaults to English but if you need a different language, click on it
from the list along the top row. After a few seconds, the interface will update with
the new language.
7.2.2.
Browser options on the PC
First you have the option of choosing which method you want to use to access
the camera.
Mode 1: If you are using Internet Explorer, choose Mode 1 - this will use the ActiveX
components in IE to enhance performance. Accept the warning to download the
ActiveX control. This mode provides additional functionality to other modes.
If this is the first time you’re using the web interface, choose Download and
Install Player (first use). You’ll only have to do this once.
Mode 2: If you are using a browser other than Internet Explorer, choose Mode
2. The interface is not quite as powerful (it’s missing some options) but it’s
compatible with browsers other than Internet Explorer.
Mobile View: For use with mobile devices.
Note: The Internet Explorer ActiveX plugin provides ‘For Visitor’ controls and
extended Device Status controls.
17
Setup
SwannEye IP Camera
SwannEye IP Camera
7.2.3.
Browser options on the Mac
Setup
Mode 1: This mode should not be used on the Mac.
Mode 2: Choose Mode 2 for all browsers when run on a Mac-based computer.
Note: If you are finished configuring or monitoring the camera in your browser,
you should close your browser completely to log out and avoid anyone else
gaining access to the camera. Simply closing a browser tab will NOT log you out
of a session. The session will remain open with the current login username and
password allowing the next user to go directly to the camera’s control panel when
they access the camera.
18
SwannEye IP Camera
8.
Interface & user accounts
Once you are logged in, you will see the Main Interface. This is where you can
view your cameras and control many of their functions such as turning recording
on and off.
Visitor
From here you can also access the remote settings.
4
2
3
1
The Main Interface is organised into four main section.
1.
Device Status: Shows the Alias name of the current camera being viewed
and any alerts.
2.
For Visitor: This section allow basic controls for reviewing any connected
cameras without the ability to change parameters.
3.
For Operator: This section provides additional functionality to Visitor control,
allowing a user to adjust viewing options and the movement of the camera.
4.
Remote Settings: This is a link to the administrator functions where you
can set up your camera and modify advanced settings. Remote settings
are covered in section “8.4. Remote Settings” on page 25. If you are not
logged in as administrator, any attempt to modify an administrator setting
will present a login box requiring administrator login credentials.
Note: The full compliment of controls shown in the above interface are only
available when using the ActiveX plugin in Microsoft Internet Explorer.
19
SwannEye IP Camera
8.1.
Device Status
In addition to the IP camera you are accessing, you can link a further eight cameras
to the interface and view and control them all from the one interface.
The Device Settings section displays the current status of the camera you are
curently viewing, along with icons for all nine cameras. When an alarm is triggered
on a camera, a colored icon will superimpose over the camera triggering the alert.
Visitor
Note: Use the Visitor section to select which camera you wish to view. The icons in
Device Settings only provide visual feedback.
GREEN: The camera is functioning normally.
YELLOW: A yellow disc will appear over a camera icon when connection is lost to
that camera.
RED: A red disc will flash steadily over a camera icon when an alarm such as a
motion event is triggered on that camera. A steady beep sound will also be heard.
20
SwannEye IP Camera
8.2.
Visitor Access
The camera currently being viewed has yellow border around its viewing window
When viewing more than one camera (such as in four or nine camera grid mode),
you can select a different camera by clicking on its window.
Double-clicking on a camera window changes the view to full-screen.
Double-clicking in full-screen view returns to normal view.
21
Visitor
Window mode: From this section you can switch between displaying only one
camera in the viewing window to four or nine in grid mode. To add more cameras,
see “8.4.5. Multi-Device Settings” on page 27.
SwannEye IP Camera
PLAY / STOP / AUDIO / TALK / RECORD / SNAPSHOT:
Play: Provides a live feed from the camera or returns to live view.
Visitor
Stop: Stops live video viewing of the camera. The camera can not be recorded,
and is not displayed on the viewing screen. The Record button will not work
while the video feed is stopped - choose Play to resume.
Audio: Toggles the audio input stream from the camera on or off, allowing you
to hear the audio being captured by its microphone.
Talk: Toggles ‘talk’ mode allowing you to speak into a microphone at your PC
and have it audible at the camera. This is useful if you want to communicate
with someone standing near the camera from your remote location.
Record: Records video from the camera to an AVI file. By default the filename
is in the format:
alias_yyyymmddhhmmss.avi
where alias is the name you have assigned to the camera and the date
and time are the current date and time set in “8.4.18. Maintain: Date &
Time Settings” on page 45.
To stop recording, press the Record button again which while recording shows
the RED icon.
Note: If you press the Stop button next to the Play button, this will also stop
recording but will also stop live viewing of the camera. Record will not operate
until the video feed is resumed by clicking Play.
Snapshot: Takes a picture of the current view and opens it in a new browser
window. To save it, you will need to right click on the image and choose a
location to save it.
22
SwannEye IP Camera
Camera Controls
The camera control panel (for
Operators and Administrators) gives
the user all the functions of visitor
access plus the ability to control the
movement of the camera through pan/
tilt. Operator access does not allow the
user to adjust any of the Administrator
settings however Administrators do
have access to Operator functions.
Note: To recall the function of any
item, hover the mouse pointer over an
item and a pop-up label will appear.
1
2
3
12
5
4
6
7
8
Operator
8.3.
9
10
11
1.
PTZ Control pad: Use the control pad to adjust the Pan/Tilt (where
applicable) of the camera. You can click on the directional pad to move the
camera up/down and left/right. Press the Center button (curled arrow) to
return the camera to its original direction.
2.
Vertical Patrol / Stop Vertical Control: Click ‘Vertical Patrol’ to start
the camera patrolling in an up and down movement. Click ‘Stop Vertical
Control’ to stop patrolling.
3.
Horizontal Patrol / Stop Horizontal Control: Click ‘Horizontal patrol’
to start the camera patrolling in a left and right movement. Click ‘Stop
Horizontal Control’ to stop patrolling.
4.
Mirror: Check the box next to this icon to flip the image on the screen
horizontally. This is best used to re-orient the image the right way up if you
mount the camera upside down from a ceiling.
5.
Vertical Flip: Check the box next to this icon to flip the image on the screen
vertically.
23
SwannEye IP Camera
6.
FPS: The number of Frames Per Second the interface will display. “Full Speed”
will display the maximum number of frames supported by the camera and
your network connection. Typically, this will be Realtime. Lowering the
frame rate can improve performance if you’re on a slow network/Internet
connection.
7.
Resolution: Set the viewing resolution to 640x480 (VGA), 320x240 (QVGA)
or 160 x 120 (QQVGA).
8.
Mode: Select between 50Hz, 60Hz or Outdoor mode, depending on your
region and environment. 60Hz is the usual setting for North America. If you
find that the image flickers in indoor environments when under fluorescent
lights, you probably have this on the wrong setting.
9.
Brightness: Adjusts the brightness. Use the + or - buttons to raise or lower
the value in the range 0-15.
Operator
10. Contrast: Adjusts the brightness. Use the + or - buttons to raise or lower the
value in the range 0-15.
11. Default All: Resets all the settings in this Operator section back to their
default values.
12. Alarm I/O ON/OFF: The top button enables the Alarm I/O panel, and the
button underneath disables it. See “8.4.11. Alarm: Alarm Settings” on page
35 for more information.
24
SwannEye IP Camera
8.4.
Remote Settings
When you login as administrator, Remote Settings is enabled. From here, you can
access a host of options which are listed below. The following pages described
these features in detail.
Note: When adding or changing values in these screens, remember to click
‘Submit’ to save your changes before leaving the screen.
8.4.1.
Device Info
8.4.2.
Administrator
General information about the camera and its firmware/software.
Alias Settings
Enter a descriptive name for the camera that makes sense to you.
25
SwannEye IP Camera
8.4.3.
Date & Time Settings
Set the date and time for your location. This is important when stamping the date
and time onto video files and snapshots to identify when they were taken.
8.4.4.
User Settings
Eight accounts can be created on this system including a name, password and the
level of access they have.
Administrator
Administrator: This is the first account and can access all the functions of the
camera.
There are two other account types which give limited access to functions of the
camera.
Operator accounts: can view the images from the camera, control its movement
and set a limited set of parameters.
Visitor accounts: can only view the images from the camera.
Note: There needs to be at least one Administrator account in order to access all
the functions of the camera including creating and deleting users. Any attempt to
delete an Administrator account or reduce its privileges will result in an error. You
will need to go BACK and ensure at least one Administrator account exists.
26
SwannEye IP Camera
8.4.5.
Multi-Device Settings
This feature is one of the most versatile in a camera of this class. It allows you to
link up to eight other IP cameras to this camera and control and view them from
the one interface.
The camera you are logged into is listed as ‘The 1st Device” with a description of
‘This Device.’ This cannot be changed.
You can add up to eight more cameras to the list for monitoring with a maximum
of nine cameras online simultaneously.
Add cameras connected to the LAN
To add an additional camera that is located on the same network as this camera:
• click refresh to force the camera to search for all current cameras on your
network.
• click the hyperlink for the slot you want to place the camera into. For instance
to assign a camera to slot 2 of 8, click ‘The 2nd Device’ on the left.
• From the ‘Device List in Lan’ box, double-click the camera you want to assign
to that slot. The alias/host and HTTP port will be filled in automatically.
• Enter the correct login username and password and then click ‘Save.’
Use the same procedure to add cameras to the other slots.
When you’re finished, scroll down and click Submit.
27
Administrator
In the Multi-Device Settings page, all the devices/cameras found on the Local
Area Network (LAN) are listed in the ‘Device List on Lan’ window.
SwannEye IP Camera
Add cameras connected to the Internet
To add a device/camera that is not on the Local Area Network but is accessible via
the internet, you will need to enter in its information manually.
Administrator
First make sure you can access the remote camera through an internet browser via
its IP address (i.e. http://202.96.133.134:9008) or DDNS name (i.e. yourdnsname.
dyndns.org:138). See “8.4.10. Network: DDNS Settings” on page 34 for more
details.
To add a camera
• Select the slot you want to assign the camera to by clicking on the title (e.g.
clicking on ‘The 3rd Device’ will open up the fields required to add a camera
to the third slot).
Alias: Enter a name for the camera that easily identifies or describes the camera
to you.
Host: Enter the IP address of the remote camera or the dynamic DNS name.
HTTP Port: Enter the HTTP port of the camera. You can also enter the HTTP port
as part of the hostname (i.e. 202.96.133.134:9008)
User: Enter the username for the camera.
Password: Enter the password for the camera.
Use the same procedure to add cameras to the other slots.
28
SwannEye IP Camera
8.4.6.
Network: Network Settings
Obtain IP Automatically: If the IP camera is connected to a router with DHCP
function, you can check this box to obtain an IP address automatically from your
router. Otherwise, uncheck this box to manually set up a static IP address using
the extra fields which appear. This is enabled by default.
IP Address: The static IP address on your subnet that you wish to assign to
the camrera.
Subnet Mask: This is usually 255.255.255.0.
Gateway: This should be set the same as your router. This is usually the IP
address you use to log in to your router.
DNS Server: Your ISP usually sets this. Log into your router to find the DNS
server being used or enter one that you know you use.
Administrator
HTTP Port: We recommend you choose a port other than 80 since many ISP’s
block this port. Something like 85 or 8080 should work fine.
Remember: Click ‘Submit’ to save your changes.
29
SwannEye IP Camera
8.4.7.
Network: Wireless Settings
This sets up wireless LAN credentials so that the camera can connect to a network
router via WiFi.
Note: To access the camera through WiFi, you need to set it up through this page
while connected to the camera through a wired connection.
Administrator
Wireless Network List: Click the SCAN button under this window to begin a scan
of all the wireless networks within range of your camera. The networks found
will be listed in this window. Double click on the wireless network you wish to
use and enter the authentication information below. Some information will be
automatically pre-filled for you.
Using Wireless LAN: Click this checkbox to turn on the wireless abilities of the
camera.
SSID: Enter the name of the wireless network.
30
SwannEye IP Camera
Encryption: The camera supports WEP, WPA and WPA2 encryption to protect the
data being transmitted between your PC and the camera. You need to match
which encryption you use on the camera to what you are using on your router.
If you select the wireless network from the list, the fields will be pre-filled with the
correct type of encryption. You only need to enter the password (share key) for
that wireless network.
Share Key: Enter the password for the wireless network you are trying to connect
to.
We strongly recommend you use WPA2 if available as it is more secure than
WPA/WEP. Most modern routers support WPA2.
If you select WEP as your encryption method under ‘Encryption,’ the following
additional fields will appear.
Authentication: Choose between Open System or Share Key.
Key Format: Choose between ‘hexadecimal number’ or ‘ascii character’.
Default TX Key: Select which of the four possible keys entered below should be
active.
Key 1/bits: Enter a password key and chose whether it should be 64 bits or 128
bits.
Administrator
Key 2: Enter an additional key as per Key 1.
Key 3: Enter an additional key as per Key 1.
Key 4: Enter an additional key as per Key 1.
Remember: Click ‘Submit’ to save your changes.
31
SwannEye IP Camera
8.4.8.
Network: ADSL Settings
The IP camera can connect to a DSL modem and pass the login details to the
modem to access your ISP account.
Using ADSL Dialup: Check this box to turn on the ADSL feature of the camera.
Make sure the camera is connected to a DSL modem.
ADSL User: Enter the username for your ISP account.
ADSL Password: Enter the password for your ISP acount.
Administrator
Remember: Click ‘Submit’ to save your changes.
32
SwannEye IP Camera
8.4.9.
Network: UPnP Settings
If your router supports UPnP and you have it activated, you should check this box
(and click “submit”) to turn on UPnP on the camera. Your router and the camera
can then automatically negotiate and open the necessary ports required in order
to access the camera over the internet.
Administrator
Note: If you do not use UPnP, you will need to log into your router and manually
forward the ports. If that sentence didn’t make any sense, you may need to get
your local computer geek to give you a hand. UPnP is enabled by default.
Remember: Click ‘Submit’ to save your changes.
33
SwannEye IP Camera
8.4.10. Network: DDNS Settings
Administrator
If you do not already know what DDNS is, it may seem one of the most daunting
aspects of setting up a device to be accessible from the internet.
See the section “10. Accessing the camera from the internet” on page 51 for
an explanation on what DDNS is and why you might want to use it. You almost
definitely will want to use it if you intend to access your IP camera from the
internet (outside the local network it is connected to).
To enter your DDNS details:
DDNS Service: Enter the DDNS provider. You will need an account at one of the
listed providers but the main DDNS providers are supported.
DDNS User: Enter DDNS provider username. This is not your hostname, but the
account you use to log in and maintain your DDNS names.
DDNS Password: Enter your DDNS provider password.
DDNS Hostname: This is the DDNS hostname you registered at your DDNS
provider.
Re-Update Ignoring All Error: For DYNDNS users only. This will force an update
of the DDNS even if there are issues.
• Click ‘submit’ to save your settings
• Restart the camera by clicking on ‘Reboot Device’
• Wait for the camera to restart and then log in to the camera again as
Administrator.
• Click ‘Device Info’ to access the ‘Device Status’ page. If the DDNS has worked
and updated successfully, the DDNS Status field will report success. Your
camera has now been successfully linked to your new DDNS hostname and
can be accessed by that name instead of the IP address.
• If it has not been successful, review your DDNS Service settings.
34
SwannEye IP Camera
8.4.11. Alarm: Alarm Settings
Alarm Detect
Motion Detection Armed: Arms Motion Detection (see page 40).
Audio Trigger Armed: Arms the camera to be sensitive to noise.
Alarm Action
Trigger on Alarm: Instructs the camera to trigger an external device (connected
to the Alarm: Out connection) when an alarm event occurs. Like the Alarm Input,
this is an advanced feature recommended for experienced users only.
Send Mail on Alarm: Sends an email when the alarm is triggered (see page 36).
Upload Images to FTP: Uploads images to an FTP server (see page 38).
Warning sound on View: Your viewing device will emit a warning tone when an
alarm is triggered (volume depends on the viewing device’s speaker/output).
Local Record on View: Triggers your viewing device to record when an alarm
event is detected, in accordance with the local settings of the viewing device.
Scheduler: When you’d like the alarm rules to be active. This schedule is set in the
same way as the other schedules, such as the recording schedule.
35
Administrator
Alarm Input Armed: Arms the alarm block on the rear of the camera. This is an
advanced feature, and recommended for experienced users only.
SwannEye IP Camera
8.4.12. Alarm: eMail Settings
Set up email credentials so that the camera can send warnings and captured
images to your email inbox.
Administrator
Sender: The sender of the email warnings.
Receiver 1 - 4: The recipients of the e-mail warnings. You can define up to four.
SMTP Server: The SMTP server (the sending server) for the senders email account.
You might need to ask your ISP if you don’t know this.
Need Authentication: Check this box if authentication is required in order to
send email through the sender’s email. Some email providers only allow email
from users they recognise to send email through their sending servers.
SMTP User: The username of the sender’s email account.
SMTP Password: The password of the sender’s email account.
TEST (mail): Click the TEST button to send a test email to check your configuration.
36
SwannEye IP Camera
Mail test error messages
The following are error messages you may get when testing the email function.
1.
Cannot connect to the server.
2.
Network Error. Please try later.
3.
Server Error.
4.
Incorrect user or password.
5.
The sender is denied by the server: The sender may need to be
authenticated by the server. Use authentication and ensure the username
and password have been entered correctly.
6.
The receiver is denied by the server. Maybe because of the anti-spam
privacy of the server: This could be due to the anti-spam settings of the
server which do not allow email through its sending service.
7.
The message is denied by the server: This could be due to the anti-spam
settings of the server which do not allow email through its sending service.
8.
The server does not support the authentication mode used by the
device:
Administrator
Report Internet IP by Mail: Check this box to send an email with the new IP
address after successful connection or when the IP changes. Make sure the port
is mapped to the router correctly by UPnP or manually forwarded.
37
SwannEye IP Camera
8.4.13. FTP Settings
Set up FTP credentials so that the camera can send warnings and captured images
to an FTP server.
Note: When Alarm Service Settings->Upload Image on Alarm is checked, the
FTP Service takes effect.
Set these parameters to enable upload of images to an FTP server when an alarm
triggers.
FTP Server: The FTP server address.
Administrator
FTP Port: The port is usually 21.
FTP User: The username for the FTP account.
FTP Password: The password for the FTP account.
FTP Upload Folder: Set the folder on the remote server you want the images to
be stored.
FTP Mode: Set the FTP mode. (PORT) mode and passive (PASV) mode are
supported. Use PASV in most situations, especially if you are behind a NAT firewall.
Test (FTP) button: Test your settings by making a test FTP connection.
Make sure you press SUBMIT first to save your changes!
Upload Image Now: Check the box to upload an image to a server. When checked,
the Upload interval option appears.
Upload Interval (seconds): Set the time (in seconds) between each image
upload.
Undefined: This option has no function.
38
SwannEye IP Camera
FTP Test error messages
Click the TEST button to test your FTP settings. If there is a problem, you will get
one of the following error messages.
Can not connect to the server. Please check FTP Server is correct or not.
2.
Network Error. Please try later.
3.
Server Error.
4.
Incorrect user or password. Please check the username and password is
correct or not.
5.
Can not access the folder. Please be sure the folder exists and your account
is authorized.
6.
Error in PASV mode. Please be sure the server support PASV mode.
7.
Error in PORT mode. PASV mode should be selected if the device is behind a
NAT firewall.
8.
Can not upload file. Please be sure your account is authorized.
Administrator
1.
39
SwannEye IP Camera
8.4.14. Alarm Settings (Motion Detection)
The ALARM SETTINGS page is where you can configure motion detection and
the alarms or actions to be taken when motion is detected. The camera can send
email alerts or upload images to a server when it detects movement.
Administrator
When motion is detected, the green icons in the Camera Monitoring screen will
turn red and you will hear an alert sound.
When you select the checkbox for Motion Detect Armed or Alarm Input Armed,
further options will appear, many of which are common to both choices. All the
options are described below.
Motion Detect Armed: Check this box to turn on Motion Detection.
Motion Detect Sensitivity: Sets the sensitivity at which the camera will react to
motion and begin recording images or send an email alert. The range is 1 to 10
with 10 being the most sensitive. Choose a higher value if you want to make sure
you don’t miss even the slightest movement, or set a lower value if you are getting
many false alarms. A midrange value of 5 is acceptable in most environments.
The recorded footage is saved to c:\users\public\public documents (under
Windows 7). This path can be changed to anything you’d like in the Advanced
Settings > Other Settings menu by choosing the Record Path.
40
SwannEye IP Camera
Upload Images on Alarm: Check this box if you want to send an image when an
alarm is triggered.
Upload Interval (Seconds): Set an interval (in seconds) between each upload .
Scheduler: Use the scheduler to limit motion triggered to only certain periods.
The files will be saved to the default path as specified under ‘Motion Detect
Sensibility.’
The scheduler is a grid showing a seven day period with each day split into 15
minute blocks. Click on a 15 minute block to select it. Double-click on a 15 minute
block within any one hour period to select the entire hour. Click or double-click
to de-select a period or hour block.
Motion detection needs to be activated (armed) for this to work and the browser
window needs to be open and logged in to your camera. If you close the browser
window, you can still receive email alerts but no recording will take place.
Administrator
Note: The camera will only record for 15 minutes if it is set to constantly record
during that period. When motion is detected during a time block, the camera only
records for a few seconds, sends out any email alerts or picture uploads (if set) and
then returns to monitoring mode.
41
SwannEye IP Camera
8.4.15. Other Settings
This lets you set parameters for Pan/Tilt control primarily in regards to speed of
movement of the pan and tilt.
Status LED Mode: Alters the behavior of the Network Indicator LED on the front
of the camera. When set to OPEN, the LED will indicate network connectivity when set to CLOSED the LED will not be illuminated.
Administrator
PTZ Center on Start: Centers camera on start-up.
Horizontal / Vertical Patrol Rounds: The number of times you want the camera
to repeat a horizontal or vertical patrol. Choosing 0 means that the camera will
continue indefinately until manually stopped.
Manual PTZ Rate: Sets the speed at which the camera will pan (move left or right)
and tilt (move up or down). Settings range from 0-10 with the default setting of 1.
Auto Horizontal / Vertical Rate: Sets the speed at which the camera will move
along the selected axis (side to side or up and down) when patrolling. Settings
range from 0-10 with the default setting of 1.
Path Set: How and where the camera will store path information.
Record Path: The location on your computer that a record path will be saved.
Alarm Record Path: As the record path, but specifically for the path associated
with alarm events.
We suggest using one of your local documents folder to store this data. Simply
choose “Browse” and navigate to “My Documents” or similar.
42
SwannEye IP Camera
8.4.16. Maintain: Device Info
The Device Info page contains lots of technical data about the hardware/firmware/
software that the camera uses. You might need to know some of this information
if you’re contacting Swann Technical Support.
Device Name: The name of the camera you selected in the Alias Menu.
Device Embedded Web UI Version: The version number of the web interface
(the one you’ll see when logged into the camera with a web browser).
MAC: A Media Access Control address. Information for advanced users.
Alarm Status: The current alarm state of the camera.
Custom DDNS Status: Information about the success or failure of updating a
dynamic DNS server.
UPnP Status: The latest information about the success or failure of UPnP to
facilitate communication across your network. The example image above shows
an error in this field (the router in the example did not support UPnP).
43
Administrator
Device Firmware Version: The current version of the firmware that the camera
is using. You may need to know this information if you’re contacting Technical
Support.
SwannEye IP Camera
8.4.17. Maintain: Alias Settings
Administrator
The camera can be named here.
Alias: The name of the camera. Enter the name you want for the camera here. You
can choose anything you like - however, for maximum compatibility with other
network devices, we suggest using:
•
8 characters or less,
•
no spaces,
•
no special characters (such as $, %, ^, & and so on) - alphanumeric characters
only!
44
SwannEye IP Camera
Device Clock Time: The current time as measured by the camera.
Device Clock Timezone: Where the camera is located in the world, relative to
GMT (Greenwich Mean Time). For example, the Eastern Standard Time in the USA
is GMT-05:00, whereas the time on the east coast of Australia is GMT+10:00.
Sync with NTP Server: When selected, the camera will automatically check the
time periodically and update its internal clock. This is enabled by default.
Daylight saving time(DST): For enabling daylight savings time (the adjustment
of the time by one hour during a certain time of the year).
NTP Server: The online source you’re using to update the time. There are a few
presets, or you can choose “...” from the drop-down menu to define your own.
Sync with PC Time: If you choose Submit while this option is enabled, the camera
will automatically update its internal clock to match the time on the PC you’re
using to access the camera.
45
Administrator
8.4.18. Maintain: Date & Time Settings
SwannEye IP Camera
8.4.19. Maintain: Upgrade Firmware
Administrator
The device and embedded Web User Interface (UI) occasionally get upgraded to
correct errors or add new features. Use this function to load the new settings into
the camera.
Use the ‘Browse’ button to find the file containing the update and click ‘Open.’
Then click the ‘Submit’ button to upgrade with the new software.
Upgrade Device Firmware: Firmware upgrades the internal operating system of
the camera.
Upgrade Device Embedded Web UI: Upgrades the User Interface that you access
through a browser. This is the UI you are using to upgrade the camera.
Do not turn off your camera while it is being upgraded.
46
SwannEye IP Camera
8.4.20. Maintain: Log
Administrator
The Log will show you a list of all the camera’s recent activities.
47
SwannEye IP Camera
8.4.21. Restore Factory Settings
This resets all the settings in the camera back to the way they were when left the
factory. Use this carefully since it will delete any settings or preferences such as
your network settings and you will have to re-setup the camera again.
8.4.22. Reboot Device
This shuts down and restarts the camera as if it was just turned on. You will not lose
any settings you have made. Use ‘Reboot’ as a first attempt to fix any issues you
may be experiencing with the camera. This can usually resolve many networking
issues.
A warning dialog will appear asking you to confirm whether you want to reboot
the camera. Click ‘OK’ and wait for the camera to restart fully before proceeding.
8.4.23. Home
Return to the login screen (see “7.2. Login page” on page 17).
Administrator
48
SwannEye IP Camera
9.
Connecting the camera to the internet
9.1.
Connect directly through ADSL modem (no router)
The IP camera can connect to an ADSL modem and pass the login details to the
modem to access your ISP.
Alternatively, it can connect to a router in bridge mode.
• Connect the IP camera to the DSL modem using a network cable
• Activate the ‘SwannEye Search Tool’ on the PC
• Login to the IP camera web browser page as an Administrator
• Go to the ADSL settings page and enter your ISP login credentials
Using ADSL Dialup: Check this box to activate direct connection through ADSL
ADSL User: Enter the ADSL username for your ISP account
ADSL Password: Enter the ADSL password for your ISP account
Select ‘Reboot Device’ to restart the camera.
• You can now test whether the camera is accessible from the internet by the
domain name (outside your local network). To do this, type the DDNS name
into Internet Explorer in the format http://yourdomainname.dyndns.org
49
Administrator
Enter the DDNS settings page and enable the DDNS service and click ‘Submit’ to
reboot the camera. See “10.5. DDNS” on page 54 for more information.
SwannEye IP Camera
9.2.
Using a router to access the Internet
If you are using a router to access the internet, you do not need to set up the ADSL
settings page.
• Connect the IP camera to the LAN using a network cable. This can be a switch
or a router depending on your network.
• Activate the SwannEye Search Tool on the PC
• Login to the IP camera web browser page as an Administrator
• Enter the DDNS settings page and enable the DDNS service and click ‘Submit’
to reboot the camera. See “10.5. DDNS” on page 54 for more information.
• You can now test whether the camera is accessible from the internet by the
domain name (outside your local network). To do this, type the DDNS name
into Internet Explorer in the format http://yourdomainname.swanndvr.net
Internet Access
50
SwannEye IP Camera
10.
Accessing the camera from the internet
Using the ‘SwannEye Search Tool’ you have been able to access the IP camera
from the same network that your computer and IP camera were connected to.
Ideally, you will want to access the camera from a remote location outside your
local network whether that is on the other side of the town or the other side of
the world.
This can be one of the more daunting aspects of accessing devices over the
internet but this section aims to help you through.
10.1.
What are IP addresses
Every device connected to the internet needs an IP address. An IP address is a
number by which the device is identified, a bit like a mailing address for your
house. An IP address is usually in the format of four numbers (each from 0-255),
separated by periods (i.e. 123.123.123.123). If the number is less than three digits ,
the zero is sometimes omitted (i.e. 123.123.123.8 is the same as 123.123.123.008).
Google.com for instance has the number 74.125.153.147. If you type this number
into a browser, you will reach Google.com.
These numbers are hard to remember, just like phone numbers are hard to
remember. That’s where Domain Name Servers (or DNS) come in. Domain Name
Servers are like Yellow Pages listings for IP addresses. They are computers located
around the world that link a name (like Google.com) to an IP address. When you
type in Google.com into your browser, the name is checked at a DNS server which
tells it what number is linked to that name and where to find it.
Note: The IP address we refer to here is the EXTERNAL IP address that the rest of
the world sees. It is also called a WAN (Wide Area Network) public IP address and
is usually assigned by your ISP. The IP address you used from the SwannEye Search
Tool to access your camera is your INTERNAL IP (also called your LAN (Local Area
Network) private IP address. This is usually assigned by your router using DHCP.
51
Internet Access
Google not only owns the domain name Google.com, but they also own the
number that is attached to it. Therefore, they will always be known by the same
name and the same number. This costs money but is worth it since they intend to
be around for a long time. This type of never changing number is called a static IP
address since it never changes. How does that relate to you?
SwannEye IP Camera
10.2.
Your IP Address
10.2.1. Dynamic IP address
Your IP address is likely to change. This is because every time you connect to your
Internet Service Provider (ISP), you are assigned a new IP number. Sometimes,
your ISP may change your IP address without your knowledge. This is normal and
is done for many reasons including your ISP not wanting you to start running a
company like Google or a games server out of your garage by having the same IP
number day in day out.
This is called a dynamic IP address since it can change.
If you would like to see your EXTERNAL IP address, the one that the world sees,
open your browser and visit the website: whatismyip.com
This site will display a number like the one above. The number it displays is your
current external (WAN) IP address.
You can use this number+port number to access your camera remotely from
almost anywhere in the world. This may only work for a limited time until your
dynamic IP changes. You need some way of being able to find your camera all the
time, even if the IP changes. That is where Dynamic DNS (DDNS) comes in!
10.3.
Static IP address
Internet Access
It is possible to get a static external (or Wide Area Network) IP address that
never changes. Most ISP’s offer this, but usually for a fee and usually on business
accounts as opposed to home or personal accounts.
52
SwannEye IP Camera
10.4.
Port mapping
In addition to an IP address, you need to assign a port to your camera through
which outside communications can access the camera. The port assigned to the
camera is done through “8.4.6. Network: Network Settings” on page 29. Once
assigned you need to map (or ‘forward’) the port in your network router to the IP
address.
You can do port mapping two ways. The easy way and the other way.
10.4.1. Automatically forwarding ports using UPnP
UPnP (Universal Plug and Play): UPnP is a technology which makes configuring
your network easier and faster. To use the UPnP setting on the DVR, you’ll need
a router which supports the feature, with UPnP enabled. Note that many routers
which do support UPnP do not come with the feature enabled by default.
To easiest way to forward ports therefore is to simply activate UPnP on your router
AND your IP camera. The two will then negotiate and open the necessary ports
when needed and close them again when finished. Most modern routers have
UPnP.
10.4.2. Manually forwarding ports
This method involves manually forwarding the port in your router to the IP
address and can be a technically challenging process.
• To manually forward the port for the camera, log in to your router and add the
IP camera’s port to the Virtual Map list. Refer to your router manual for details
specific to your equipment on how to do this, or see below.
Online Guides for Your Router
Internet Access
The specific instructions for forwarding ports vary dramatically from
router to router. There’s simply not enough room in this manual to walk
through the process for every brand and type of router available.
Fortunately, there’s a fantastic online resource that has walkthroughs for
just about every kind of router you can imagine. Simply visit:
www.portforward.com
and look up your router by brand and serial number. There you’ll find
detailed walkthroughs which can guide you through the process.
If possible, we suggest using UPnP. It is much easier.
53
SwannEye IP Camera
10.5.
DDNS
Dynamic Domain Name Servers are similar to DNS servers. The difference is that
they are meant for people who don’t want to buy a domain name (like Google.
com), but still want an easy way to remember their own IP address. Domain
names have yearly fees to register and maintain. You probably want something
a little more simple.
Dynamic DNS names are offered by many website for free or a very small fee if you
want extra features. The free type will suit most uses.
By registering one of these dynamic domain names, you can assign this name
to your IP camera, making it easier to remember. When you type that name into
your browser, the name is checked by a DNS server, the link to your IP address is
found and the information is sent to your camera.
Note: DDNS names with simple features like the ones required here are
generally free. The free type will expire if they are not accessed for 30 days
(such as your IP camera not updating the link). Be warned that if you switch
off your camera for more than 30 days and have no other device using that
DDNS name, it will expire and you will need to register a new DDNS name).
Alternatively, you can pay a small yearly fee which will secure the DDNS name
during your subscription period, even if you don’t use it.
10.5.1. Linking DDNS names to IP addresses
How does the DDNS name know my IP address if my IP address changes all the
time? Good question!
You need to link your DDNS name to your IP address so that when the IP address
changes, the DDNS updates the link. This all happens behind the scenes. All you
need to remember when you are on the other side of the country, or the world, is
that DDNS name.
Internet Access
10.5.2. How to link the name?
The IP camera has DDNS built in! Therefore, once you register your DDNS name,
you can just enter the details in the DDNS Settings (see “8.4.10. Network: DDNS
Settings” on page 34) and the camera will automatically update the link each
time your IP address changes.
You can also set up DDNS at your router so that the DDNS name reaches all your
devices conected to your router.
54
SwannEye IP Camera
10.5.3. How to register a name?
To register a dynamic DNS name of your own, you need to visit the website of one
of the many DDNS providers on the internet. We run our own at www.swanndvr.
com. We offer a free service, which we support alongside your camera.
• Go to http://www.swanndvr.com
• Choose the Registration button.
• Enter a Username. We suggest using your email address, so we can contact
you if there’s a problem, or email you your password if you forget it.
• Choose a Password. Choose something you’ll remember and something that
others would be unlikely to guess.
• Enter your First Name and Last Name in the fields provided.
• Choose a security question and answer, so we can confirm it’s you if you’ve
lost your password.
• Choose Submit.
Internet Access
Once you have a new DDNS, you can now configure your camera so that you
can access it from anywhere on the internet using that name! Go to the DDNS
section of the camera (“8.4.10. Network: DDNS Settings” on page 34) and enter
the information you created here.
55
SwannEye IP Camera
10.5.4. Access the IP camera using a DDNS name
To access the camera from the internet outside of your Local Area Network (LAN)
you can now enter the DDNS name+port into a browser in the format:
http://yourdomainname.swanndvr.net:85
Yourdomainname: the DNS hostname you registered with SwannDVR
85: is the port number (in this example only). Your port number is likely to be
different and depends on what you entered in “8.4.6. Network: Network Settings”
on page 29.
If you have multiple IP cameras connected to the same router (on the same
network), you can use the DDNS name to access them all. You will however have
to use a different port number for each camera to differentiate them.
For example, you may have four cameras that can be accessed directly through:
http://yourdnsname.swanndvr.net:85
http://yourdnsname.swanndvr.net:90
http://yourdnsname.swanndvr.net:8080
http://yourdnsname.swanndvr.net:9090
Of course, the simpler way would be to access one camera and join the other
three into the one interface using “8.4.5. Multi-Device Settings” on page 27.
Internet Access
56
SwannEye IP Camera
11.
Accessing the camera through a mobile device
11.1.
iPhone/iPad
You can download the SwannEye app from the App Store. Install it on your device.
11.2.
Android Device
You can download the SwannEye app from GooglePlay.
Internet Access
We’re continually making improvements and updates to our mobile viewing
software. For instructions on their use, check out the release notes for each
version or log on to www.swann.com/swanneye for the latest instructions.
57
SwannEye IP Camera
12.
Troubleshooting
12.2.1. Forgotten the administrator username or password?
The default username is: admin. The password is 123456.
If you have set a new administrator username or password and you cannot
remember it, you will need to reset the camera back to its default factory settings.
Press and hold down the RESET BUTTON on the camera for 5 seconds. The
cameras will be reset back to factory settings with default username: admin and
the password is 123456.
12.2.2. Indoor images flicker?
This happens when the camera is used under fluorescent lights. Set the MODE
option under ‘For Operator’ to the correct setting for your region (i.e. 50hz or
60hz). Try the other setting. If it doesn’t work, you can easily change it back.
12.2.3. There is no picture in Internet Explorer (IE)
• Have you accepted the warning and downloaded the ActiveX control in IE?
• Have you chosen the correct Sign In for your browser? ActiveX will only work
in Internet Explorer. Choose the browser mode that matches your browser. If
your browser is not listed, please use one of the listed browsers to access the
IP camera (i.e. Internet Explorer, Mozilla Firefox, Google Chrome).
12.2.4. IP Address configuration
Check whether IP address of the camera shares the same subnet as your work
station.
Click My Computer > Control Panel>Network & Dial-up Connections > LAN >
Attributes >Internet Protocols (TCP/IP), and check IP Address and Subnet Mask.
Make sure they are in the same subnet when configuring IP Camera IP address
manually.
58
SwannEye IP Camera
12.2.5. Network Configuration problems
Check to ensure that your HTTP server software is configured and running
properly.
If you’re running any firewall software, make sure it’s allowing inbound
connections to the same port configured in your camera (under “8.4.6. Network:
Network Settings” on page 29).
• If using a router, ensure you have activated UPnP or set up port forwarding
properly.
12.2.6. Problems with receiving images
The video streaming is controlled by the ActiveX plugin. If this is not installed
correctly, it could be affecting your ability to view the camera.
• Install the SwannEye Search Tool. The ActiveX controller is installed with this
program.
• When using Internet Explorer, accept and download the ActiveX control when
prompted by the browser. Make sure you set the security of the browser
to allow the plugin. See “7.1. Username and password” on page 16 for
information on how to do this.
12.2.7. Images slow to update or poor frame rate
The frame rate of the images can be affected by several factors. Check each of
these for possible improvement.
1.
Network bandwidth: Your network may be too slow to handle the amount of
data passing through it. Are other devices or programs consuming network
bandwidth? If you have more than one camera on the same network, try
removing one or more cameras to test if the performance improves.
2.
PC performance: Your PC may not be powerful enough to handle the
streams coming in. Does it meet the minimum specification as details in “13.
Specifications” on page 61? Try reducing the number of cameras you are
viewing at once to see if the performance improves.
3.
Number of visitors: Are there more than once visitor viewing the footage at
once? Does the issue occur if only one user is accessing the interface?
4.
Choice of switch of hub: When using multiple IP cameras, we recommend
the use of a switch rather than a hub.
59
SwannEye IP Camera
12.2.8. Can’t access the Network camera from the internet?
• Is the ActiveX plugin correctly installed?
• Is the network port used by the camera blocked by a firewall or anti-virus
software?
• Has UPnP (which will allow sucessful port forwarding) been turned on at the
camera (see “8.4.9. Network: UPnP Settings” on page 33). Has UPnP been
successful? To check, access Device Info (see “8.4.1. Device Info” on page 25)
and check that UPNP Status is showing a ‘successful result.
• If using a router, check that UPnP is also turned on at the router.
• If not using UPnP, have you manually forwarded the port you are using for
the camera (see HTTP Port under “8.4.6. Network: Network Settings” on page
29) on your router. Log in to your router and in the Virtual Map function,
forward the relevant port to the camera.
12.2.9. Problems using Mozilla Firefox (or other browsers)
Most web browsers other than Internet Explorer do not support ActiveX controls.
We suggest using Internet Explorer.
Another option is to install the IE-tab plugin for Firefox. This lets you run web
pages optimised for Internet Explorer from within Firefox. Note that any sites you
visit using this plugin will use the IE cache and history.
60
SwannEye IP Camera
Specifications
Alarm
Network
Pan/Tilt
Video
Camera
13.
Image sensor
1/4 color CMOS
Lens
3.6mm
Infrared LED
8 pcs
Pixel
300,000
Night vision distance
up to 10M / 33ft
AWS/AGC/AES/exposure
Auto
Minimum illumination
0.1Lux
Image format
PAL/NTSC
Compression format
MJPEG
Stream type
HTTP
Maximum frame rate
30FPS@NTSC / 25FPS@PAL
Resolution
640*480 (VGA) / 320*240 (QVGA) / 160 x 120
Horizontal Rotation
350°
Vertical Rotation
100°
Level speed
0-16°/s
Vertical speed
0-16°/s
Network Interface
RJ-45 (10BASE-T/100BASE-TX)
Wireless
IEEE 802.11b/g/n
Protocol
TCP / UDP / IP / ARP / ICMP / DHCP / DNS / HTTP /
FTP / SMTP / NTP / PPPoE / UPnP / DDNS
Motion Detection
Supports motion detection and image snapshots
Alarm Events
Notification by email, FTP
Video recording to local storage
Periodic Sending
Send image pictures to email/FTP within
scheduled times
61
PC System
Requirements
(four camera example)
General
SwannEye IP Camera
62
User authentication
user/password (administrator/operator/visitor)
Simultaneous viewers
4 Viewers
Web browser
Microsoft Internet Explorer 6.0 or above
Google Chrome
Mozilla Firefox
Apple Safari
Opera
Supported mobile
Apple iPhone / Android
Power
DC 5V 1.5A
Power Consumption
4W infrared off
6W infrared on
Operating temperature
-10 to +55°C
Storage temperature
-20 to +60°C
Operating humidity
20-80%RH
Storage humidity
20-95%RH
Dimensions
111mm x 107mm x 121mm
Weight
329g
CPU
2Ghz or above
Memory
256MB or above
Network card
10Base-T or above
Display card
64MB or above
Recommended Operating
System
Windows 7
Windows Vista
Windows XP
Mac OS X
SwannEye IP Camera
14.
Warranty Terms & Conditions
Swann Communications USA Inc.
12636 Clark Street
Santa Fe Springs CA 90670
USA
Swann Communications
Unit 13, 331 Ingles Street,
Port Melbourne Vic 3207
Swann Communications LTD.
Stag Gates House
63/64 The Avenue
SO171XS
United Kingdom
Swann Communications warrants this product against defects in workmanship and
material for a period of one (1) year from its original purchase date. You must present
your receipt as proof of date of purchase for warranty validation. Any unit which
proves defective during the stated period will be repaired without charge for parts
or labor or replaced at the sole discretion of Swann. The end user is responsible for all
freight charges incurred to send the product to Swann’s repair centers. The end user
is responsible for all shipping costs incurred when shipping from and to any country
other than the country of origin.
The warranty does not cover any incidental, accidental or consequential damages
arising from the use of or the inability to use this product. Any costs associated with
the fitting or removal of this product by a tradesman or other person or any other
costs associated with its use are the responsibility of the end user. This warranty
applies to the original purchaser of the product only and is not transferable to any
third party. Unauthorized end user or third party modifications to any component or
evidence of misuse or abuse of the device will render all warranties void.
By law some countries do not allow limitations on certain exclusions in this warranty.
Where applicable by local laws, regulations and legal rights will take precedence.
For Australia: Our goods come with guarantees which cannot be excluded under
Australian Consumer Law. You are entitled to a replacement or refund for a major
failure and for compensation for any other reasonably foreseeable loss or damage.
You are also entitled to have the goods repaired or replaced if the goods fail to be of
acceptable quality and the failure does not amount to major failure.
63
15.
Helpdesk / Technical Support Details
Swann Technical Support
All Countries E-mail: [email protected]
Telephone Helpdesk
USA toll free
1-800-627-2799
(Su, 2pm-10pm US PT)
(M-Th, 6am-10pm US PT)
(F 6am-2pm US PT)
AUSTRALIA toll free
1300 138 324
(M 9am-5pm AUS ET)
(Tu-F 1am-5pm AUS ET)
(Sa 1am-9am AUS ET)
USA Exchange & Repairs
1-800-627-2799 (Option 1)
(M-F, 9am-5pm US PT)
NEW ZEALAND toll free
0800 479 266
UK
0203 027 0979
© Swann Communications 2012