1
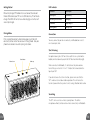
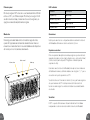
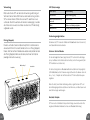
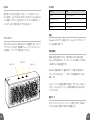
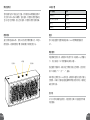
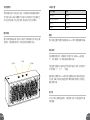
User Manual
Manuel d’ utilisation
LED Indicator
Getting Started
Please fully charge SP1 before initial use. Connect the included
Micro-USB cable to your SP1 and a USB slot of any PC or Mac to
charge. The RED LED will turn on while charging and will turn off
when fully charged.
LED Color
Description
Flashing Red
Low Battery
Alternating Red and White
Charging
Solid White
Fully Charged
Flashing White
Pairing Mode
Pairing Mode
Connections
Push and hold the center button for 6-8 seconds until the LED
constantly flashes white. You are now in Pairing Mode. See your
phone/music device manual for pairing instructions.
You may connect to your device wirelessly via Bluetooth or use a 3.5
mm stereo input cable.
Start Listening
Volume down
Center Button
Volume up
For optimal sound, place SP1 on its base (with the a.m.p. label on the
bottom) and faced towards you (with the SP1 label read from left to right).
When connected via Bluetooth, it’s best to have the phone volume
turned fully up and use the “+” and “-“ buttons that are located on the
top of your SP1.
If you decide to use the 3.5 mm function, please make sure that the
SP1’s volume is turned down before operation. This will reduce the
tendency to overdrive the speaker’s units causing distortion to the audio.
Socializing
The SP1 can be used as a wireless speakerphone. The built-in
microphone will only function under wireless connectivity via Bluetooth.
EN
EN
Answer/End Calls
Press the center button to answer and end calls.
To Make a Call
Use your phone to dial. Your SP1 will then function as a speakerphone.
Troubleshooting
The device is malfunctioning
• Always check for proper charge and make sure that the device is On
• Ensure the SP1 is fully charged
• Turn off the SP1, wait one minute, power it back on and reconnect to the
Bluetooth-enabled device using the instructions listed under the “Pairing
Mode” section
Notice: Avoid placing SP1 near the edge of surfaces since it may shift
during use and fall over. Warranty does not cover physical damages as a
result of such falls and other mishaps.
The device is creating distortion or the sound quality is poor
• Lower the volume on the SP1 and increase the volume on your phone
or device
• Connect the SP1 directly to your device using the 3.5 mm cable
• Check the charge of the SP1 and your mobile audio device and recharge
if necessary
• Re-pair the devices using the instructions listed under the “Pairing
Mode” section
The SP1 fails to pair with Bluetooth enabled device
• Confirm that your device is Bluetooth compatible and that the Bluetooth
setting is enabled
• Re-pair the devices following the instructions listed under the “Pairing
Mode” section
The signal drops or connection fails in Bluetooth mode
• Move the SP1 closer to your mobile device
EN
EN
LED Indicador
Primeros pasos
Por favor, cargue el SP1 antes de su uso. Conecte el Micro-USB del
cable a su SP1 y al USB de cualquier PC o Mac para cargar. El LED
se alternará entre el rojo y blanco mientras se está cargando y se
apagará cuando esté completamente cargado.
LED Color
Descripción
Parpadeo rojo
Batería baja
Alternado rojo y blanco
Cargando
Permanente blanco
Carga completa
Parpadeo blanco
Modo de asociación
Modo dúo
Conexiones
Mantenga pulsado el botón central durante 6-8 segundos hasta
que el LED parpadee constantemente de color blanco. Ahora se
encuentra en modo dúo. Ver el manual del teléfono o del dispositivo
de música para las instrucciones de conexión.
Usted puede conectarse a su dispositivo de forma inalámbrica a través
de Bluetooth o utilizando un cable de entrada de 3,5 mm.
Volume down
Botón central
Volume up
Empieza a escuchar
Para una reproducción óptima de sonido, asegúrese que la unidad este
apoyada plana sobre su base (con la etiqueta a.m.p. en la parte inferior)
y frente a usted (con la etiqueta SP1 legible en el borde izquierdo
superior a la vista).
Cuando se conecta a través de Bluetooth, lo mejor es tener el volumen
del teléfono al máximo y utilizar los botones con el signo “+” y “-” que se
encuentran en la parte superior de su SP1.
Si usted decide usar la función de cable de 3,5 mm, por favor asegúrese
de que el volumen del SP1 este bajo al conectar. Esto reducirá la
tendencia a sobrecargar las unidades del altavoz causando distorsión
en el audio.
Socializar
El SP1 se puede utilizar como un altavoz inalámbrico. El micrófono
incorporado se activa únicamente inalámbricamente vía Bluetooth.
ES
ES
Responder / colgar llamadas
Pulse el botón central para responder y colgar llamadas.
• Vuelva a vincular los dispositivos siguiendo las instrucciones que figuran
en el “Modo dúo”.
Para hacer una llamada
Usa tu teléfono para marcar. En ese momento tu SP1 funcionará como
un teléfono con altavoz.
Se cae la señal o la conexión falla en el modo Bluetooth
• Mueva el SP1 más cerca de tu dispositivo móvil.
• Asegúrese de que el SP1 está completamente cargado.
• Apague el SP1, espere un minuto, vuelva a encenderlo y a conectar el
Bluetooth siguiendo las instrucciones que figuran en el “Modo dúo”.
Llamada en espera
Para responder a otra llamada entrante, basta con pulsar el botón
central.
Solución de problemas
El dispositivo está funcionando mal
• Compruebe si hay nivel de carga adecuada y asegúrese de que el
dispositivo está encendido.
Nota: SP1 fue diseñado para proporcionar un nivel de bajos potente que
puede ocasionar movimientos en superficies duras a alto volumen. Por
favor evite apoyar la unidad en los bordes de la superficie.
El dispositivo está creando distorsión o la calidad del
sonido es pobre
• Baje el volumen en el SP1 y aumente el volumen de su teléfono o
dispositivo de transmisión.
• Conecte el SP1 directamente a su dispositivo mediante el cable de
3,5 mm.
• Compruebe la batería del SP1 y del dispositivo móvil de audio y
recargue si es necesario.
• Vuelva a vincular los dispositivos siguiendo las instrucciones que figuran
en el “Modo dúo”.
El SP1 no asocia a un dispositivo compatible con Bluetooth
• Confirme que su dispositivo es compatible con Bluetooth y que el
Bluetooth está activado.
ES
ES
Indicateur LED
Pour une première utilisation du produit
Veuillez recharger entièrement votre SP1 avant de l’utiliser.
Branchez le câble Micro-USB au SP1 et au port USB d’un PC ou
d’un Mac pour le recharger. L’indicateur LED deviendra rouge et
blanc pendant la recharge et s’éteindra lorsque la recharge sera
pleine.
Appariement
Description
Clignotement rouge
Batterie faible
Alternant rouge et blanc
Chargement
Lumière blanche
Rechargé
Clignotement blanc
Mode appariement
Connexion
Appuyez et maintenez la touche central pendant 6-8 secondes
jusqu’à ce que l’indicateur lumière clignote en blanc. Vous êtes
maintenant en mode appariement. Veuillez lire le manuel d’utilisation
de votre téléphone / appareil de musique pour les fonctions
d’appariement.
Baisser le volume
Couleur LED
Touche centrale
Augmenter le volume
Vous pouvez établir une connexion sans fil via Bluetooth ou utiliser un
câble stéréo de 3.5 mm.
Lecture
Pour un son optimal, assurez-vous que le SP1 est correctement posé à
plat et face à vous (avec la mention a.m.p en dessous et la mention SP1
sur votre gauche face à vous).
Si le produit est connecté via Bluetooth : assurez-vous avant que le
volume du téléphone est au maximum et utiliser les touches “+” et “-“
situés en haut du SP1.
Si le SP1 est connecté via un câble de 3.5 mm : assurez-vous avant que
le volume est au plus bas. Ces précautions diminueront les distorsions
du son des hauts parleurs.
Partager
Le SP1 peut être utilisé en tant que haut-parleurs sans fil. Le
microphone inclus fonctionnera uniquement via Bluetooth et une activité
sans fil.
FR
FR
Recevoir/Terminer des appels
Appuyer sur la touche central pour répondre et terminer
des appels.
Effectuer un appel
Utiliser votre téléphone pour composer un numéro. Votre appareil
servira de haut-parleur.
Appel en attente
Pour répondre à un appel en attente appuyez sur la touche central.
Dépannage
Le produit fonctionne mal
• Toujours vérifier la recharge et s’assurer que le produit est allumé
• Reconnectez l’appareil suivant les instructions mentionnées dans la
section “Appariement”
Le signal ne fonctionne pas ou la connexion Bluetooth ne
marche pas
• Rapprochez le SP1 de votre appareil mobile
• Assurez-vous que le SP1 est complétement rechargé
• Mettez le SP1 hors tension, attendez une minute, puis rallumez et
reconnectez-le à la fonction Bluetooth de l’appareil en suivant les
instructions mentionnées dans la section “Appariement”
Avertissement: Le SP1 est conçu avec des basses puissantes et peut se
«déplacer» lorsqu’il est utilisé à pleine puissance. Veuillez éviter de placer
le SP1 sur les recoins et rebords.
Le produit présente des distorsions ou la qualité du son est
très faible
• Baisser le volume du SP1 et augmenter le volume de votre téléphone
ou appareil
• Connecter le SP1 directement à votre appareil utilisant un câble de
3.5 mm.
• Vérifier la recharge du SP1 et de votre appareil audio et recharger si
nécessaire
• Ré-effectuer le mode appariement en suivant les instructions
mentionnées dans la section “Appariement”
Si le SP1 ne se connecte pas avec le Bluetooth de votre appareil
• Assurez-vous que votre appareil Bluetooth est compatible et que la
fonction Bluetooth est installé
FR
FR
LED Statusanzeige
Vorbereitung
Bitte Laden Sie das SP1 vor der ersten Verwendung vollständig auf.
Verbinden Sie das Micro-USB Kabel aus dem Lieferumfang mit dem
SP1 und einem freien USB Anschluss eines PCs oder Macs um es
aufzuladen. Die LEDs wechseln während des Ladevorgangs zwischen
den Farben rot und weiß und schalten ab sobald das SP1 vollständig
aufgeladen wurde.
Farbe (LED)
Beschreibung
Rot blinkend
Batterieladung gering
Abwechselnd zwischen rot
und weiß
Batterie lädt
Weiß
Batterie vollständig aufgeladen
Weiß blinkend
Pairing (Koppeln) Modus aktiv
Verbindungsmöglichkeiten
Pairing (Koppeln)
Drücken und halten Sie den mittleren Knopf für 6 bis 8 Sekunden bis
die weiße LED blinkt. Das Gerät befindet sich nun im Paring (Koppeln)
Modus. Wie Sie bei Ihrem Telefon oder weiteren kompatiblen Geräten
den Pairing (Koppeln) Modus einschalten, entnehmen Sie bitte der
jeweiligen Gebrauchsanweisung.
Lautstärke -
Mittlere Knopf
Sie können das SP1 entweder drahtlos via Bluetooth oder aber mit einem 3,5
mm Stereo Klinke Kabel verbinden.
So hören Sie Ihre Medien
Für den bestmöglichen Sound, legen Sie das SP1 auf eine flache Unterlage
(a.m.p. Aufkleber auf der Unterseite des Gerätes) und zu Ihnen gewandt (der
SP1 Auskleber muss lesbar sein).
Lautstärke +
Für das beste Ergebnis via Bluetooth sollte die Lautstärke des Abspielgeräts
(z.B. Mobiltelefon) auf das Maximum eingestellt werden. Sie können dann mit
den „+“ und „-“ Knöpfen auf der Oberseite des SP1 die Lautstärke bequem
regulieren.
Wenn Sie die 3,5mm Klinke Verbindung wählen, regeln Sie beim SP1 und
dem Wiedergabegerät die Lautstärke auf ein Minimum, um Übersteuern und
somit Verzerrungen vorzubeugen.
Kontakte Knüpfen
SP1 kann auch als drahtlose Freisprecheinrichtung verwendet werden. Das
eingebaute Mikrofon funktioniert nur bei einer Bluetooth Verbindung.
DE
DE
Anrufe annehmen und beenden
• Führen Sie eine erneute Koppelung durch (siehe Pairing (Koppeln))
Drücken Sie den mittleren Knopf um Anrufe anzunehmen oder um sie zu
beenden.
Die Verbindung bricht bei drahtloser Verbindung ab
Anrufe tätigen
Verwenden Sie Ihr Mobiltelefon zum wählen. Das SP1 wird automatisch als
Freisprecheinrichtung eingestellt.
Anklopfen
Bei anklopfenden Anrufen während eines Telefonats, drücken Sie einfach den
mittleren Knopf um diese anzunehmen.
Problembehandlung
• Stellen Sie das SP1 näher zum Abspielgerät
• Laden Sie das SP1 bei Bedarf vollständig auf
• Schalten Sie das SP1 aus und warten Sie mindestens 1 Minute. Schalten
Sie es wieder ein und führen Sie eine erneute Koppelung durch (siehe Pairing
(Koppeln))
Notice: SP1 is designed with powerful bass so may cause it to ”move” on
some hard surface at loud listening. Please avoid SP1 placed at the edges
Das Gerät funktioniert nicht
• Überprüfen Sie ob das Gerät aufgeladen und eingeschaltet ist
Die Wiedergabe enthält Störgeräusche oder ist von sehr geringer
Qualität
• Verringern Sie die Lautstärke des SP1 und erhöhen Sie die Lautstärke am
Mobiltelefon oder Abspielgerät
• Verbinden Sie das SP1 und Abspielgerät mit Hilfe des 3,5 mm Klinke Kabels
• Stellen Sie sicher, dass das SP1 und das Abspielgerät aufgeladen ist und
laden Sie es bei Bedarf auf
• Führen Sie eine erneute Koppelung durch (siehe Pairing (Koppeln))
Das SP1 kann nicht erfolgreich mit einem Bluetooth kompatiblen Gerät
verbunden werden
• Überprüfen Sie ob Ihr Gerät über eine Bluetoothfunktion verfügt und das
diese aktiviert wurde
DE
DE
Indicatori a Led
Per iniziare
Vi consigliamo di ricaricare completamente il SP1 prima del primo
utilizzo.Collegate il cavo in dotazione alla porta USB di un qualsiasi PC
o Mac. L’indicatore di stato a Led lampeggerà alternativamente tra
rosso e bianco durante il processo di carica e si spegnerà a ricarica
completata.
Colore del Led
Descrizione
Intermittente rosso
Livello batteria basso
Intermittente rosso e bianco
In carica
Bianco fisso
Carica completata
Intermittente bianco
Modalità accoppiamento
Accoppiamento
Connessioni
Premere e mantenere premuto il pulsante centrale per 6-8 secondi
finché il Led non lampeggerà costantemente in bianco. Adesso siete
in modalità accoppiamento. Controllate il manuale del vostro telefono/
dispositivo musicale per le istruzioni di accoppiamento.
Potete collegarvi al vostro dispositivo preferito in modalità wireless Bluetooth
o utilizzare un cavo stereo con jack da 3,5 mm.
Volume giù
Pulsante centrale
Volume su
Iniziare l’ascolto
Per una resa sonora ottimale verificate che l’SP1 sia posizionato
orizzontalmente sulla sua base (logo a.m.p. sul fondo) e rivolto verso di voi
(logo SP1 in alto sulla sinistra guardando il diffusore).
Quando si utilizza il collegamento Bluetooth è preferibile portare al massimo
il volume del dispositivo sorgente e quindi utilizzare i tasti di regolazione “+” e
“-“ presenti nella parte superiore dell’SP1.
Se utilizzate il collegamento via cavo provvedete ad abbassare il volume
prima del collegamento. Questo accorgimento evita che i diffusori siano
sovraccaricati di colpo e previene quindi eventuali distorsioni del suono.
Socializzare
L’SP1 può anche essere utilizzato come vivavoce wireless. Il microfono
integrato funziona esclusivamente se si utilizza la connessione Bluetooth.
IT
IT
Iniziare/Terminare le chiamate
Premete il pulsante centrale per rispondere o terminare la chiamata.
Fare una chiamata
Utilizzate il telefono per chiamare il vostro contatto. L’SP1 funzionerà come
un vivavoce.
Chiamate in attesa
Per rispondere a una seconda telefonata premete semplicemente il pulsante
centrale.
Risoluzione dei problemi
Il segnale viene perso o la connessione Bluetooth non si attiva
• Spostate l’SP1 più vicino alla sorgente audio
• Verificate che l’SP1 sia completamente carico
• Spegnete l’SP1, attendete un minuto, riaccendetelo e ricollegatelo al vostro
dispositivo Bluetooth come indicato nella sezione “Accoppiamento”
Attenzione: l’SP1 è progettato per restituire bassi potenti e potrebbe
quindi muoversi a causa delle vibrazioni durante la riproduzione a volume
molto elevato. Vi consigliamo quindi di non posizionare l’SP1 ai bordi del
piano d’appoggio.
Il dispositivo non funziona correttamente
• Verificate sempre il livello di carica e che il dispositivo sia acceso
Il dispositivo crea distorsioni e la qualità del suono è bassa
• Abbassate il volume sull’SP1 e aumentatelo sulla sorgente
• Collegate l’SP1 direttamente al vostro dispositivo tramite un cavo audio
• Verificate il livello di carica dell’SP1 e del dispositivo sorgente e ricaricateli se
necessario
• Eseguite nuovamente l’accoppiamento dei dispositivi come indicato nella
sezione “Accoppiamento”
L’SP1 non riesce a collegarsi con il dispositivo Bluetooth accoppiato
• Verificate che il vostro dispositivo sia compatibile Bluetooth e che il
trasmettitore sia attivo
• Eseguite nuovamente l’accoppiamento dei dispositivi come indicato nella
sezione “Accoppiamento”
IT
IT
はじめに
LED表示
使用前にSP1を完全に充電してください。マイクロUSBケーブルを
SP1に接続し、もう片方のUSBコネクターをPCまたは、MACのUSBスロ
ットに接続してください。状況を示すインジケーターが充電中は、レ
ッドになり、完全に充電が終了ができると消えます。
LEDの色
詳細
赤点滅
バッテリー残量わずか
赤と白の交互の点灯
充電中
白点灯
充電完了
白点滅
ペアリングモード
接続
ペアリングモード
中央のボタンをLEDが白く点滅するまで6~8秒間押します。これでペ
アリングモードになります。電話機やミュージックデバイスのマニュア
ルを確認し、ペアリングの手順に従ってください。
中央のボタン
音量を下げる。
音量を上げる。
Bluetoothによるワイヤレス接続、または、3.5mmステレオ入力ケーブ
ルによる接続が可能です。
視聴の開始
最適な音質を実現するために、使用の際は、SP1を平面に置き
(a.m.p.ロゴがある面が下)、そしてスピーカーの正面(SP1ロゴが左上)
に直面するように製品を置きます。
Bluetoothの接続の際には、電話等のデバイス側の音量の最大に
した上でSP1上部にある「+」、「-」ボタンで音量を調節することをお
勧めします。
3.5mmケーブルでの接続を選択する際は、まず、ボリューム落として
ください。これによりスピーカーへの過度の振動と音のゆがみを防
ぐことができます。
通話モード
SP1は、ワイヤレススピーカーフォンとしても使用できます。内蔵のマ
イクは、Bluetoothで接続した際にのみ機能します。
JP
JP
着信/通話の終了
着信と通話の終了を行うには、中央の中央のボタンを押します。
発信
電話からダイアルを開始。SP1は、スピーカーフォンとして機能し
ます。
保留
別の着信に応答するには、着信と通話の終了を行うには、中央の
ボタンを押します。
トラブルシューティング
デバイスが機能しない。
• 充電がされているか、電源がオンになっているか常に確認してく
ださい。
音のゆがみや音質が悪い。
• SP1のボリュームを下げ、電話機やミュージックデバイスのボリューム
を上げてください。
Bluetooth対応デバイスでSP1のペアリングができない。
• デバイスがBluetoothに対応しているか確認し、Bluetooth設定を有
効にしてください。
• 「ペアリングモード」の説明にある通り、デバイスを再度、ペアリング
してください。
Bluetoothモードで信号が切断される、接続ができない。
• SP1をお手持ちのデバイスに近づけてください。
• SP1が充電されていることを確認してください。
• SP1の電源を切り、1分間待った後で再度、Bluetooth対応デバイスを
「ペアリングモード」の説明にある通り、再度、ペアリングしてく
ださい。
注意:SP1は、パワフルなベース音に対応するように設計され
ています。そのため、使用時に振動により、SP1が動く事がありま
す。使用の際は、落下等によるダメージを防ぐためにもテーブル
等の隅にSP1を置かないでください。
• 3.5mmケーブルでSP1に直接接続してください。
• SP1と携帯オーディオデバイスの充電を確認してください。必要に応
じて再充電してください。
• 「ペアリングモード」の説明にある通り、デバイスを再度、ペアリング
してください。
JP
JP
LED指示燈
開始使用前
使用前請先將SP1電池完全充電。將內附的USB纜線連接到SP1
及任何PC或Mac的USB插槽,當充電時,狀態指示燈會變成紅
色及白色交替閃爍,當完全充電時,狀態指示燈會自動熄滅。
LED 燈顏色
說明
閃爍的紅色
低電量
紅色和白色交替閃爍
充電中
純白色
完全充電
閃爍白色
配對模式
配對模式
連接
按住中間的按鈕6-8秒,直到LED指示燈不斷閃爍白光,即進入
配對模式。請參閱您的手機/音樂設備手冊的配對方法。
您可以透過藍牙裝置無線連接或3.5 mm立體聲電纜連接到
SP1。
開始使用
為獲得最佳的音質,請確保SP1保持平放(底部的a.m.p.標籤向
下)及正面向前(SP1的標籤在底部的右邊)。
中間鍵
音量減少
音量增加
當透過藍牙連接時,最好先把手機的音量完全關閉,並使用位
於SP1頂部的“+” 及“ - ”按鈕。
如果您決定要使用3.5 mm的功能,請確保在運作前先將音量完
全關閉,以減少音量過高超過揚聲器所能承受的單位,繼而造
成的音頻失真。
生活化
SP1可以作為無線免提使用,內置的麥克風只可透過藍牙無線
功能連接。
TCN
TCN
接聽/結束通話
按中間鍵,接聽和結束通話。
• 關閉SP1並等待一分鐘,再次打開電源,然後參考“配對模
式” 中列出的說明並重新配對設備
撥打電話
可使用您的手機撥打電話,並將您的SP1作為一個揚聲器。
電話插播
只需按中間的按鈕即可接聽另一個來電。
Notice: SP1 is designed with powerful bass so may cause it to ”move” on
some hard surface at loud listening. Please avoid SP1 placed at the edges
故障排除
當設備出現故障情況
• 檢查電量是否充足及是否已經啟動設備
當設備音樂失真或變差
• 降低SP1的音量並增加您的手機音量
• 使用3.5 mm電纜直接連接到您的設備到SP1
• 檢查SP1及手機的電量,如果有必要,需要再次充電
• 參考“配對模式” 中列出的說明並重新配對設備
SP1無法與藍牙設備配對
• 確認您的設備是否兼容藍牙及藍牙設置是否已經啟用
• 參考“配對模式” 中列出的說明並重新配對設備
信號下降或在藍牙模式中連接失敗
• 將SP1放到您的移動式設備旁邊
• 確保SP1已經完全充電
TCN
TCN
LED指示燈
开始使用前
使用前请先将SP1电池完全充电。将内附的USB缆线连接到SP1
及任何PC或Mac的USB插槽,当充电时,状态指示灯会变成红色
及白色交替闪烁,当完全充电时,状态指示灯会自动熄灭。
配对模式
LED 灯顏色
说明
闪烁的红色
低电量
红色和白色交替闪烁
充电中
纯白色
完全充电
闪烁白色
配对模式
链接
按住中间的按钮6-8秒,直到LED指示灯不断闪烁白光,即进入配
对模式。请参阅您的手机/音乐设备手册的配对方法 。
您可以透过蓝牙装置无线连接或3.5mm立体声电缆链接到设备。
开始试用
为获得最佳的音质,请确保SP1保持平放(底部a.m.p.标签向
下)及正面向前(SP1的标签在底部的右边)。
中间键
音量减少
音量增加
当透过蓝牙连接时,最好先把手机的音量完全关闭,并使用位于
SP1顶部的“+” 及“ - ”按钮。
如果您决定要使用3.5 mm的功能,请确保在运作前先将音量完
全关闭,以减少音量过高超过扬声器所能承受的单位,继而造
成的音频失真。
生活化
SP1可以作为无线免提试用,内置的麦克风只可透过蓝牙无线
功能连接
SCN
SCN
接听/结束通话
按中间键,接听和结束通话。
• 关闭SP1并等待一分钟,再次打开电源,然后参考“配对模式”
中列出的说明并重新配对设备
拨打电话
可使用您的手机拨打电话,并将您的SP1作为一个扬声器。
电话插播
只需按中间的按钮即可接听另一个来电。
Notice: SP1 is designed with powerful bass so may cause it to ”move” on
some hard surface at loud listening. Please avoid SP1 placed at the edges
故障排除
当设备出现故障情况
• 检查电量是否充足及是否已经启动设备
检查电量是否充足及是否已经启动设备
• 降低SP1的音量并增加您的手机音量
• 使用3.5 mm电缆直接连接到您的设备到SP1
• 检查SP1及手机的电量,如果有必要,需要再次充电
• 参考“配对模式” 中列出的说明并重新配对设备
SP1无法与蓝牙设备配对
• 确认您的设备是否兼容蓝牙及蓝牙设置是否已经启用
• 参考“配对模式” 中列出的说明并重新配对设备
信号下降或在蓝牙模式中连接失败
• 将SP1放到您的移动式设备旁边
• 确保SP1已经完全充电
SCN
SCN
Federal Communication Commission Interference Statement
This device complies with Part 15 of the FCC Rules. Operation is
subject to the following two conditions: (1) This device may not cause
harmful interference, and (2) this device must accept any interference
received, including interference that may cause undesired operation.
This equipment has been tested and found to comply with the limits
for a Class B digital device, pursuant to Part 15 of the FCC Rules.
These limits are designed to provide reasonable protection against
harmful interference in a residential installation. This equipment
generates, uses and can radiate radio frequency energy and, if not
installed and used in accordance with the instructions, may cause
harmful interference to radio communications. However, there is no
guarantee that interference will not occur in a particular installation. If
this equipment does cause harmful interference to radio or television
reception, which can be determined by turning the equipment off and
on, the user is encouraged to try to correct the interference by one of
the following measures:
- Reorient or relocate the receiving antenna.
- Increase the separation between the equipment and receiver.
- Connect the equipment into an outlet on a circuit different from that
to which the receiver is connected.
- Consult the dealer or an experienced radio/TV technician for help.
FCC Caution: Any changes or modifications not expressly approved by
the party responsible for compliance could void the user’s authority to
operate this equipment.
This transmitter must not be co-located or operating in conjunction
with any other antenna or transmitter.
Radiation Exposure Statement:
This product complies with the Canada portable RF exposure limit set
forth for an uncontrolled environment and is safe for intended
operation as described in this manual. Further RF exposure reduction can
be achieved if the product is kept as far away as possible from the user
body or by selecting a lower output power if such a function is available
on the device.
Industry Canada statement:
This device complies with RSS-210 of the Industry Canada Rules.
Operation is subject to the following two conditions: (1) This device
may not cause harmful interference, and (2) this device must accept
any interference received, including interference that may cause
undesired operation.
Ce dispositif est conforme à la norme CNR-210 d’Industrie
Canada applicable aux appareils radio exempts de licence. Son
fonctionnement est sujet aux deux conditions suivantes: (1) le
dispositif ne doit pas produire de brouillage préjudiciable, et (2) ce
dispositif doit accepter tout brouillage reçu, y compris un brouillage
susceptible de provoquer un fonctionnement indésirable.
Radiation Exposure Statement:
This product complies with the Canada portable RF exposure limit
set forth for an uncontrolled environment and is safe for intended
operation as described in this manual. Further RF exposure reduction
can be achieved if the product is kept as far away as possible from the
user body or by selecting a lower output power if such a function is
available on the device.
Déclaration d’exposition aux radiations:
Le produit est conforme aux limites d’exposition pour les appareils
portables RF pour les Etats-Unis et le Canada établies pour un
environnement non contrôlé.
Le produit est sûr pour un fonctionnement tel que décrit dans ce
manuel. La réduction aux expositions RF peut être augmentée si
l’appareil peut être conservé aussi loin que possible du corps de
l’utilisateur ou que le dispositif est réglé sur la puissance de sortie la
plus faible si une telle fonction est disponible.
Déclaration de la Commission Fédérale des Communications
d’Interférence (FCC)
Cet appareil est conforme à partie 15 des règlements de la FCC. Son
fonctionnement est soumis aux deux conditions suivantes: (1) Ce
dispositif ne peut causer d’interférences nuisibles, et (2) cet appareil
doit accepter toute interférence reçue, y compris les interférences qui
peuvent provoquer un fonctionnement indésirable.
Cet équipement a été testé et trouvé conforme aux limites pour
un dispositif numérique de classe B, conformément à la Partie 15
des règlements de la FCC. Ces limites sont conçues pour fournir
une protection raisonnable contre les interférences nuisibles dans
une installation résidentielle. Cet équipement génère, utilise et
peut émettre des fréquences radio et, s’il n’est pas installé et utilisé
conformément aux instructions, il peut causer des interférences
nuisibles aux communications radio. Cependant, il n’existe
aucune garantie que des interférences ne se produiront pas dans
une installation quelconque. Si cet équipement provoque des
interférences nuisibles à la réception radio ou télévision, ce qui peut
être résolu en éteignant et en allumant l’équipement, l’utilisateur est
encouragé à essayer de corriger l’interférence par l’une des mesures
suivantes:
- Réorienter ou déplacer l’antenne de réception.
- Augmentez la distance entre l’équipement et le récepteur.
- Branchez l’appareil à une prise sur un circuit différent de celui
dans laquelle le récepteur est connecté.
- Consulter le revendeur ou un technicien radio / TV pour de l’aide
Avertissement FCC : Tout changement ou modification non
expressément approuvés par la partie responsable de la conformité
pourrait annuler l’autorité de l’utilisateur de faire fonctionner cet
équipement.
Cet émetteur ne doit pas être co-localisés ou fonctionner en
conjonction avec une autre antenne ou transmetteur.
L’exposition aux radiations:
Cet équipement est conforme aux limites d’exposition aux
rayonnements de la FCC établies pour un environnement non
contrôlé. Cet équipement doit être installé et utilisé avec une distance
minimum de 20cm entre le radiateur et votre corps.
Déclaration d’Industry Canada :
Ce dispositif est conforme à la norme CNR-210 d’Industrie
Canada applicable aux appareils radio exempts de licence. Son
fonctionnement est sujet aux deux conditions suivantes: (1) le
dispositif ne doit pas produire de brouillage préjudiciable, et (2) ce
dispositif doit accepter tout brouillage reçu, y compris un brouillage
susceptible de provoquer un fonctionnement indésirable.
Déclaration d’exposition aux radiations:
Cet équipement est conforme aux limites d’exposition aux
rayonnements IC établies pour un environnement non contrôlé. Cet
équipement doit être installé et utilisé avec un minimum de 20 cm de
distance entre la source de rayonnement et votre corps.
For Taiwan 警語: (電信管制射頻器材使用)
經型式認證合格之低功率射頻電機,非經許可,公司、商號或使用
者均不得擅自變更頻率、加大功率或變更原設計之特性及功能。
低功率射頻電機之使用不得影響飛航安全及干擾合法通信;經發
現有干擾現象時,應立即停用,並改善至無干擾時方得繼續使用。
前項合法通信,指依電信法規定作業之無線電通信。低功率射頻
電機須忍受合法通信或工業、科學及醫療用電波輻射性電機設備
之干擾。
仅适用于海拔2000米以下地区安全使用
仅适用于非热带气候条件下安全使用
Antec, Inc.
47900 Fremont Blvd.
Fremont, CA 94538
USA
tel: 510-770-1200
fax: 510-770-1288
Antec Europe B.V.
Stuttgartstraat 12
3047 AS Rotterdam
The Netherlands
Customer Support:
US & Canada
1-800-22ANTEC
[email protected]
Europe
+ 49-40-226-139-22
[email protected]
Asia
+ 866-(0)800-060-696
[email protected]
© 2012 Antec, Inc. All rights reserved.
All trademarks are the property of their respective owners.
Reproduction in whole or in part without written
permission is prohibited.
Printed in China.