1
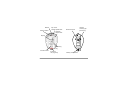
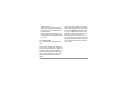
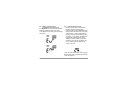
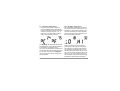
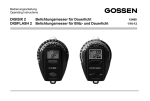
Operating Instructions
Digiflash
Exposure meter for flash and ambient light
15136
1/05.03
Diffuser
Setting window
Exp. times
Shutter speed scale
Socket for tripod
Aperture/
f-stops scale
Camera
mounting clip
(accessory)
Display
Measuring
key
Function button
Eyelet for
carrying strap
2
Battery compartment
GOSSEN Foto- und Lichtmeßtechnik
Contents
1
The functioning of the Digiflash . 4
1.1 Preparation and self-test ................ 4
1.2 Incident light and reflected light ...... 5
1.3 Duration of read-out in display ....... 5
2
Functions of the Digiflash ........... 6
2.1 Setting the film speed ..................... 6
2.2 Exposure measuring ambient light . 7
2.2.1 Read-out of the values measured .. 7
2.3 Flash measurement ....................... 8
2.3.1 Setting the sync speed (meas. time) 8
2.3.2 Measuring ...................................... 8
2.3.3 Fill-in Flashes ................................. 9
2.4 Taking a measurement
outside the measuring range 10
2.5 Contrast measurements ............... 10
2.6 Setting correction values .............. 11
2.7 Function TIMER ........................... 12
2.8 Watch/Alarm clock ....................... 13
2.9 Measuring temperatures .............. 15
2.9.1 Min./Max. temperatures ............... 15
3
Service and repairs .................... 16
4
Technical data ............................ 17
GOSSEN Foto- und Lichtmeßtechnik
The Digiflash is a small but smart GOSSEN exposure meter, with digital read-out,
for ambient light and flash. The Digiflash is
made to exacting GOSSEN calibration
standards for high precision measurements. The trendy styling and logical functioning make it easy and comfortable to
operate. Key features:
• Incident and reflected light meas. mode
• Measuring of ambient and flash light
• µP controlled
• Digital LCD read-out in the display
in 1/3 stop increments
• Contrast readout in 1/3 EV steps
• Storage of the measuring results
• Indication of all suitable combinations
of shutter speeds and f-stops
• Signal "range over" or "range under"
• Automatic battery check
• Countdown timer for long exposures
• Function Watch/Alarm clock
• Measuring temperatures
3
1
The functioning of the Digiflash
1.1
Preparation and self-test
Battery
The Digiflash is powered by a 3 V Lithium
battery, type CR 2032. When the battery is
running low, BAT appears in the display.
– The battery should be replaced as soon
as possible. When BAT is shown alone
in the display, the battery will need to be
replaced before further measurements
are possible.
– To replace the battery, pull out the battery
compartment located under the eyelet for
the carrying cord.
– Remove the old battery and insert the
new one. Observe the "+" and "–"
polarity!
– Close the battery compartment
Attention! The Digiflash is provided with a
battery memory of 10 seconds. If the battery
is removed briefly or replaced only within
GOSSEN Foto- und Lichtmeßtechnik
those ten seconds, the values stored in
memory will be maintained. Otherwise
changing the battery or pressing one of the
buttons will cancel all the individually stored
values.
Self-Test
After the new battery has been inserted,
the microcomputer will carry out a self-test.
Every display segment appears in the
display panel. The self-test takes 10 seconds. It can be interrupted before by pressing any button.
After the self-test, the standard settings will
4
be shown as set by the factory.
Standard settings
ISO 100/21° COR 0 ambient EV 8
t
1/125
flash
EV 12
1.2 Incident light and reflected light
Incident light method
For the incident mode, the diffusor is to be
shifted to the left and placed in front of the
measuring aperture. Taking measurements
using the incident light mode in particular
produces in most cases perfectly exposed
shots. In this mode, the DF measures from
the subject towards the camera. This guarantees that the tone quality of the picture is
equivalent to that of the subject. This is especially important for very bright or dark
subjects. Even under very difficult lighting
conditions, as e.g. with subjects which have
a lot of contrast, the incident light mode is a
more reliable way of producing well exposed pictures.
GOSSEN Foto- und Lichtmeßtechnik
Reflected light method
For the reflected mode, the diffuser must be
shifted to the right. Care must be taken, that
the light sensor is entirely free.
The measurement is taken from the position
of the camera towards the subject. In this
method, only the light reflected from the
subject is detected by the meter. Therefore,
the measuring values always depend on the
reflection capacity of the subject. As a result
of this, bright subjects are reproduced
darker and therefore not properly exposed.
Consequently, this mode is conveniently
used, when the suject does not show too
high contrasts between bright and dark
areas.
1.3 Duration of read-out in display
The Digiflash will always display the last
function used. The meter does not
automatically switch off, as the power
consumption is extremely low.
5
2
Functions of the Digiflash
Press the function button for selecting the
individual functions of the Digiflash.
Each time the button is pushed, the next
function will be activated.
The display panel will show the functions in
the following sequence:
•
•
•
•
•
•
Ambient light
Flash light
Timer
Watch
Alarm clock
Temperature
The next function will only be activated after
the Function button has been released.
When the Function button is kept pressed
down for more than two seconds, the
settings of that function are displayed and
can be adjusted as desired.
GOSSEN Foto- und Lichtmeßtechnik
2.1 Setting the film speed
– Select the function "Exposure ambient
light" and hold down the function button
until the OK-signal sounds. The display
will show ISO, blinking.
– Use the measuring key M to select the
desired film speed.
When holding the key M pressed down,
the film speed will automatically be
increased. When getting close to the
desired ISO value, release the key M
and set the desired film speed by pushing
the key in individual steps.
Each time you push the key, the film
speed is increased by a 1/3 stop.
6
– Confirm the speed you selected by
pushing the Function button until the
OK-signal sounds and the Digiflash returns to the function "Exposure ambient
light". The film speed is shown in the upper right corner of the display.
2.2 Exposure measuring ambient light
– Use the Function button to select the
function „Exposure measuring ambient
light“.
– The measurement is taken by briefly
pressing down the measuring key M.
2.2.1 Read-out of the values measured
The EV value measured will appear in the
display. The values will be indicated in
1/3 - stop increments by one dot, the
2/3 - stop increments by two dots.
If the film speed is changed, the measurement read-out stored in the memory will be
immediately converted to the new ISO
settings.
The film speed selected will stay stored
in memory until it is changed in the way
described above.The film speed selected
will be valid both for ambient and flash light.
GOSSEN Foto- und Lichtmeßtechnik
7
– Transfer that EV value from the display to
the setting window in the calculator rings
and place it precisely under the red indicator line.
– All the suitable combinations of aperture
(f-stops) - t (shutter speeds) can now be
seen at the upper part of the circular
scales (see previous example).
2.3 Flash measurement
2.3.1 Setting the sync speed
(measuring time)
– Press the function button for selecting the
function „flash measurement“. A small
stroke in front of the sync time will appear
in the display to signal „flash metering“.
– Keep the function button pressed down
until the ok signal sounds. The display will
now show the sync speed blinking.
– Use the measuring key to input the desired sync speed, in the range of 1 sec to
GOSSEN Foto- und Lichtmeßtechnik
1/500 sec. and confirm by pressing the
function button.
2.3.2 Measuring
– Push the measuring key.
The Digiflash is ready to measure for
30 sec, as long as „F“ in the display is on.
8
– Trigger the flash.
– Transfer the value measured from the
display to the window in the printed scales above and set it precisely under the
red indicator line.
– Read the f/stop in the upper part of the
scale opposite the sync speed you had
preselected (for 1/90 read between 1/60
and 1/125).
2.3.3 Fill-in Flashes
You will find the right combination in two
steps:
In the second step, you determine the fill-in
flash by measuring the flash in the incident
mode. From the shadow area of the subject
you direct the Digiflash towards the camera in such a way that the meter will only receive the fill-in flash and the stray light, but
definitely not the main light source.
The resulting EV value should be lower by
1 to 2 stops than the EV value for the ambient light. If not, adjust the power of the flash
unit or change the distance to get the desired EV value.
First you take a reading of the background
in the function „ambient light“. Transfer the
EV value from the display to the setting window above. Then set the corresponding
combined shutter speed and f/stop to your
camera, while taking care that the shutter
speed must be equal to the flash sync
speed.
GOSSEN Foto- und Lichtmeßtechnik
9
2.4
Taking a measurement
outside the measuring range
The Digiflash will not produce any useable
readings outside its measuring range:
in the display Eu (too dark) or En (too bright)
will appear.
2.5 Contrast measurements
– Use the Function button to select the
function "Exposure ambient light".
– Keep the measuring key M pressed down
and the meter will switch over to contrast
measurement. Continue holding down
the key to measure various other areas in
the subject. In the display, the difference
between the individual results of the
additional measurements and the first
measuring value will be indicated in EV.
A new metering will be made approx.
2 times a second.
After you have released the measuring key
M, the value of the first exposure measurement will reappear.
GOSSEN Foto- und Lichtmeßtechnik
10
2.6 Setting correction values
In order to deliberately change the
exposure of your photos, you may adjust
the factory calibration.
– Remove the battery from the Digiflash
and press one of the buttons (battery
memory will be deactivated). Put the battery back in the compartment. The meter
will then make the self-test.
– During this test, keep the measuring key
and also the function button pressed
down until the accoustic signal sounds.
Release the key to enter the
CORRECTION function.
Use the measuring key M to enter or
change the correction value.
Press the function button again and hold it
down until the OK signal sounds to return
the meter to the normal measuring functions.
GOSSEN Foto- und Lichtmeßtechnik
The EV in the display will blink to remind
you that the standard factory calibration has
been changed. Input of the correction in
1/3-stops in the range of ± 3 EV.
For cancelling the correction value, remove
the battery from the compartment and then
put it back again.
In case of over-exposure a positive
correction, in case of under-exposure
a negative correction value should be set.
11
2.7 Function TIMER
A timer function is provided in the Digiflash,
useful for long exposure or other timings
ranging from one second to thirty minutes.
– Use the function button to select the
function TIMER and hold it down until the
OK-signal sounds. The display shows the
last value used. The read-out will show
the "minutes" and will flash to allow the
countdown timer to be adjusted.
– Use the key M to enter the desired time
in minutes.
– Confirm by pushing the function button.
The read-out "seconds" in the display
will flash.
GOSSEN Foto- und Lichtmeßtechnik
– Enter the "seconds" of the desired length
of time. Confirm by pressing and holding
the function button until the OK-signal will
sound. The timer will now be in the Start/
Stop function.
– Push the key M to start the timer.
The display will show the remaining time
of the count-down. In addition to that,
during the last 10 seconds of the countdown, interrupted signals can be heard.
At the end of the set time, a continued
signal will sound.
12
2.8
Watch/Alarm clock
WATCH – Setting the time
– Use the function button to select the
function WATCH and hold the key down
until the OK-signal will sound.
12/24 will flash.
– To pause the count-down, push the
measuring key; pressing it again will
restart the count-down.
The timer will work in the background so
that you can use other measurements.
GOSSEN Foto- und Lichtmeßtechnik
– With the function button select either
12 hours (AM/PM) – 24 hour display.
– Confirm with the function button.
The read-out "hours" will flash.
13
– Use the key M to set the hours and
confirm with the function button.
The read-out "minutes" in the display
will flash.
– Use the key M for setting the minutes. To
confirm settings hold down the function
button until the OK-signal is heard.
ALARM CLOCK
– Use function button to enter the function
"ALARM CLOCK" and hold it pressed
down until the OK-signal will sound.
The time of the alarm clock is set in the
same way as the watch.
– Hold the function button until the
OK-signal sounds.
– The alarm is activated or deactivated
with the measuring button.
– When the alarm is activated it is shown
in the display with a bell symbol.
– When the alarm is sounded it will sound
each second for 1 min. It can be stopped
by pressing either the measuring key or
the function button.
GOSSEN Foto- und Lichtmeßtechnik
14
2.9 Measuring temperatures
– Use the function button to select the
function TEMPERATURE and hold the
button pressed down until the OK-signal
sounds. To change between °C or °F
read-outs, press and hold the function
button until the display changes.
2.9.1 Min./Max. temperatures
When repeatedly pressing the measuring
key, the minimum (Lo) and maximum (Hi)
temperature values will be indicated. The
minimum and maximum values indicated
are those that have been measured since
the last cancellation operation.
The Digiflash will indicate the actual ambient temperature. The temperature probe is
incorporated in the meter housing.
As a result, the temperature measurement
may be affected if you are holding the meter
in your hand. If you attach the Digiflash
with the clip to your camera, these errors
can be avoided.
The min. and max. temperature values
stored in memory can be cancelled by
pressing the measuring key until the OKsignal sounds. The temp. measurements
are repeated automatically every two min.
providing always the actual values. These
min. and max. temp. values will make it possible for you to check, whether your films
may have been exposed to excessive high
temperatures and have been damaged.
GOSSEN Foto- und Lichtmeßtechnik
15
3
Service and repairs
In the event that your Digiflash is not working to your complete satisfaction, please
send it to:
GOSSEN Foto- und Lichtmeßtechnik GmbH
Thomas-Mann-Str. 16-20
D - 90471 Nürnberg
or to the GOSSEN agency in your country.
16
GOSSEN Foto- und Lichtmeßtechnik
4
Technical data
Exposure meter
Measuring modes
Light sensor
Film speeds
Ambient light
Flash light (non cord)
Incident light method
Reflected light
method
Contrast measurem.
sbc photo diode
Meas. range ambient light
(when ISO 100/21°) EV 0 to 18
Shutter speeds
1/2000 s to 4 min
Apertures
f/1 to f/32
ISO 6 to 3200
in 1/3 increments
Measuring angle
reflected light mode
approx. 25°
Timer
1 sec to 30 min
Watch
adjustable to 12 hrs
(AM + PM) or 24 hrs
Accuracy
5 min / year
Thermometer
adjustable to °C/ °F
Meas. range flash light
(when ISO 100/21°) f/2 to f/32
Measuring range
–15 ... 70 °C or
5 ... 160 °F
Synch speeds
(Measuring times)
1 to 1/500 sec.
incl. 1/90 sec.
Accuracy
± 2 °C or ± 4 °F
Correction values
± 3 stops
GOSSEN Foto- und Lichtmeßtechnik
17
Display
Digital read-out of
measuring values
and analogue scales
Accessories incl.
Battery, carrying
case, cord,
instruction manual
Duration of read-out
The DF will always
display the last
function used
Optional accessory
Mounting clip
for camera shoes
Order code V069A
Battery
1 x 3 V Lithium
battery CR 2032
Operating temp.
–10 °C ... 60 °C
Dimensions
75 x 50 x 23 mm
Weight
40 g incl. battery
18
GOSSEN Foto- und Lichtmeßtechnik
GOSSEN Foto- und Lichtmeßtechnik
19
Printed in Germany • Subject to change without notice
GOSSEN Foto- und Lichtmeßtechnik GmbH
Thomas-Mann-Str. 16-20
D-90471 Nürnberg
Phone: +49 911 / 8602-181
Fax:
+49 911 / 8602-142
http://www.gossen-photo.de