Transcript
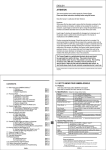
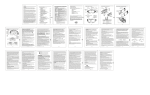
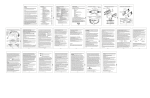
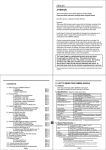
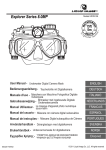
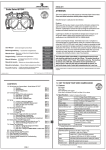
ENGLISH
1.0 GET TO KNOW YOUR CAMERA GOGGLE
CONTENTS
ATTENTION
This manual explains how to safely operate the Camera Goggle.
Please read these instructions carefully before using the camera.
Keep this manual in a safe place for later reference
Disclaimer
While every effort has been made to ensure that the information contained in the
guide is accurate and complete, no liability can be accepted for any errors or
omissions. Liquid Image Co reserves the right to change the specifications of the
hardware and software described herein at any time without prior notice.
Liquid Image Co declines all responsibility for damages due to improper use of
this product, failure to adhere to the instructions given in this manual, or
modifications to the CAMERA GOGGLE.
Cautions concerning data storage: Stored data may be lost or corrupted. It is
recommended that any important data be copied onto a separate media (such as
a hard disk, DVD-R or CD-R disk). Liquid Image Co makes no warranties and shall
not be held responsible for damages resulting from corrupted or lost data due to a
malfunction of the camera, the software, the memory cards, personal computer,
peripheral devices, or for any losses that result from images that could not be
recorded, are erased, destroyed, or damaged in any way due to a problem or a
mistake while utilizing the camera or any of its accessories.
1.0 Get to know your CAMERA GOGGLE
1.1 Features
1.2 Specifications
1.3 System requirements
2.0 Functional Parts
2.1 Included Parts and Accessories
2.2 Part Names - Front View
2.3 Part Names - Back View
2.4 Part Names - Exploded View
2.5 Outrigger Detail
3.0 Goggle Setup
3.1 Recharging or Replacing the Li-ion Battery
3.2 Inserting Micro SD/SDHC Memory Card
3.3 Setting the Date and Time Mode
4.0 Recording Pictures and Video
4.1 Video Mode
4.2 Still Image Mode
4.3 Power Offf
5.0 Transferring Still Images and Video to a Computer
5.1 Opening Memory Compartment
5.2 Connecting and Transferring Files
5.3 Disconnecting and Closing Memory Compartment
6.0 Viewing Videos and Still Images on TV
6.1 Setting Correct NTSC/PAL Mode for your TV
6.2 Video and Still Image Playback on a TV
7.0 Video and Image File Size
8.0 Care and Maintenance
9.0 Replacing Lenses
9.1 Removing the Lens
9.2 Inserting the Lens
10.0 Camera Warnings and Precautions
11.0 Battery Warning and Precautions
12.0 Commonly Asked Questions and Troubleshooting
TM
ENG- 2
ENG- 2
ENG- 2
ENG- 3
ENG- 4
ENG- 5
ENG- 6
ENG- 7
ENG- 8
ENG- 8
ENG- 9
ENG-10
ENG-10
ENG-10
ENG-11
ENG-11
ENG-12
ENG-13
ENG-14
ENG-14
ENG-15
ENG-16
ENG-16
ENG-16
ENG-18
ENG-19
3.0 CAMERA GOGGLE SETUP
OUTRIGGERS IN
Helmet Compatible Goggles - Pull out
Outriggers to fit different size helmets.
CAUTION: An adult 18 years or older should perform this function. Always
make sure the CAMERA GOGGLE is completely dry before performing these
steps. Set up should always take place in a clean dry space with a controlled
environment. These steps should be performed indoors to avoid exposure to
the elements.
3.1 Recharging or Replacing Li-Ion Battery
Only use a Liquid Image Rechargeable 3.7V 1150mAh Lithium Battery with the
CAMERA GOGGLE.
NOTE: The LCD indicator shows battery life. When no remaining bars are
displayed, the battery is low and the LCD screen will show the word “LO” and will
make a beeping sound. Recharge or replace battery to continue using. Files on the
Micro SD/SDHC card will not be lost if battery power runs out or during replacement
of the battery.
OUTRIGGERS OUT
To Recharge Battery:
1) Open MEMORY COMPARTMENT door.
2) Plug USB CABLE into both the USB Port on the CAMERA GOGGLE and the Computer.
The battery will start charging and the RED LED will start blinking. When the charge is
complete, the RED LED will stop blinking and will switch to a solid GREEN LED light.
To insert or replace battery:
1. Unlock and Slide Battery Compartment door forward and then down to open.
2. Insert the Battery as shown on page ENG-6. Notches on the battery will only
allow you to put the battery in one direction.
3. Close the BATTERY COMPARTMENT door carefully.
Estimated Battery life for a new 1150 mAh Rechargeable Lithium Battery
Still image mode: up to 5000 pictures
Video clip recording mode: up to 120 minutes
V
3.2 Inserting Micro SD or SDHC Memory Card - Mandatory
NOTE: A Micro SD/SDHC Memory Card may or may not be included with your
CAMERA GOGGLE. It is recommended that you utilize a commercially sold Micro
SD/SDHC Card to add memory storage to your CAMERA GOGGLE. It is best to utilize
a high performance Micro SD/SDHC card as this will improve the performance of
ENG-7
ENG-8
Please conduct a FILE SIZE TEST before you use your CAMERA GOGGLE to capture
important images and video. Test various video file sizes to make sure your
computer will be able to store and play the videos that you record. If you have
difficulty in playing back video files smoothly, try taking a shorter video. You may
also try opening the video file with a different media player as not all media players
work the same.
Please read the sample chart below to estimate your file size per minute of
recording time.
bag or a soft cloth to remove any smudges.
6. To prevent scratching, do not use paper towels, ski gloves or clothing to clean the lens.
Only use a micro bag or a soft cloth. Abrasive materials may scratch the lens.
7. For optimum life and performance of your lens, store completely dry and in the protective
bag or case. Lens should be kept in a dry environment at room temperature when not in
use. Store the lens away from direct sunlight, or excessive heat or cold.
8. To prevent scratching, do not place lens face down.
NOTE: Video file sizes will vary due to the complexity of the scene. The file sizes listed are only estimates.
Approximate Video File Sizes - TIME (min):
.5
1
SIZE OF FILE: 30MB 60MB
CAMERA GOGGLE
10
20
600MB 1.2GB
NOTE: Depending on the battery's charge as well as the size of your Micro SD/SDHC
card, you may be able to record a video for an hour or more. It is, however, best to
take short videos. This will make transferring files and playing them back easier.
The camera will split a video file over 1 hour into two files to improve the performance
of the camera.
8.0 CARE AND MAINTENANCE
1. Before each use, the goggle should be inspected for any cracks, deformities or damage.
If there is any damage or deformation to the frame, or scratches or damage to the lens
that could obstruct or impair vision, do not use. Replace any damaged parts such as
the lens, strap or face foam prior to use.
2. Do not expose goggle to heat, strong detergents, or chemicals.
3. To clean, rinse the frame with tap water. A mild soap may be utilized on the frame only
when needed. To prevent damaging the lens, only clean the lense with tap water. Dry
with a soft cloth.
4. IMPORTANT: Do not rub lens when wet. When the inner lens surface is wet, it
becomes soft and is more susceptible to scratching. Rubbing the inner lens when it is wet,
may also reduce the effectiveness of the anti-fog coating.
5. To Dry: Gently shake snow and moisture off the lens. Use the micro bag or a soft cloth
to gently blot away moisture or allow lens to air dry. Make sure ventilation ports are clear
of snow or other debris. If wearing the goggle, motion will increase airflow and help to dry
the goggle. Once the lens has completely dried and is at room temperature, use the micro
ENG-15
9.0 REPLACING LENSES
Wash and thoroughly dry hands prior to removing or inserting the lens. Do not change
the lens while wearing gloves as the glove material may scratch the lens.
9.1 Removing Lens
1. Hold the bottom of the frame and grab the top of the frame from the inside.
2. Gently pull the top of the frame away from the lens.
3. Gently lift the lens out of the sides and bottom of the frame.
9.2 Inserting Lens
1. Insert the lens at the nose of the frame. Take care to align the notch of the lens with
the post in the frame. Gently push the lens onto the post.
2. Continue inserting the lens into the groove along the bottom and sides of the frame.
Make sure to push the lens completely into the groove of the frame.
3. Align the notch on the lens with the post at the top of the frame.
4. Check the lens to make sure that it is correctly set in the frame prior to use.
10.0 CAMERA WARNINGS AND PRECAUTIONS
Never touch the camera connection components that are exposed when the
MEMORY COMPARTMENT OR BATTERY COMPARTMENT are open. There is a
risk of shock if the components in the compartments become wet.
5.0MP CMOS sensor
5.0 Megapixels (2592x1944)
F/3.2 f=3.02mm (135 Degree FOV)
1.2m to infinity
32MB NAND Flash Memory for CPU only
Micro SD/SDHC Card supports up to 32GB
Must be Class 4 and above
P (1280X720) with Audio
30FPS@HD 720P
Picture: JPEG, Video: H.264 with Audio
LCD Display
USB
PALL and NTSC
3.7V Lithium Rechargeable Battery 1150mAh
180 seconds
Video Mode **
File Format
Status Display
PC Interface
TV Output
Power
Auto Off System time
* Quantity of pixels is only an approximate number ** Approximate frames per second
1.3 System Requirements ***
Operating System
CPU
Windows XP (SP2 or higher), Vista,
ista,
Windows 7 or Mac 10.4
Intel® Core™ 2 Duo CPU E6300 processor
(or above), AMD Athlon 64 X2 3800+ (or above)
RAM
1GB RAM (2GB recommended for editing HD videos)
Memory
Graphics Card
300 MB available hard disk space
256 MB Graphics Card or above is recommended
Approximate File Storage
Micro SDHC Card 32GB
Images: 19,060
Video: 546 minutes
3.3 Setting the Date and Time Mode
This feature allows you to set the Date and Time to the photo or video file.
1. Press and hold the SHUTTER/SELECT
T button down. Then press the
POWER/MODE button once. The camera will turn on.
2. Continue holding the SHUTTER/SELECT button down and press the
POWER/MODE button 3 times continuously and then release the
SHUTTER/SELECT button. The LCD screen will access the Time Setting mode.
You will be able to change Year (YY), Month (MM), Day (DD), Hour (hh), and
Minute (mm). The first window will be YY for Year.r Press the SHUTTER/SELECT
T
button and the numbers will appear (eg.“10”, means year 2010). The first number “1”
in the year will start blinking.
3. Press the POWER/MODE button to change the blinking character from 0-9. Press
the SHUTTER/SELECT button to select the number and move onto the next number
““0”.
” The setting process is from the left to right and will go through the different
settings from Year,r Month, Day, Hour, and minute. Once the number is confirmed by
pressing the SHUTTER/SELECT button, the next digit will start blinking. Once
you see the letters again such as MM for Month, press the SHUTTER/SELECT
button to move to the numbers representing the month. Continue the process until
you return to YY..
4. To get out of the Date and Time Setting Mode, press and hold the
SHUTTER/SELECT button for 2 seconds. The GOGGLE will return to the
Video mode (BLUE LED).
5. In case the battery needs to be replaced or the battery runs out, the date setting
data will be maintained for 24 hours.
ENG-9
1. Using the CAMERA GOGGLE in a manner other than what the product use is
intended for may result in injury to you, the product, or other persons.
2. This is not a safety Goggle. Only use for intended purposes. The Goggle lens
provides basic protection against wind, dirt, dust, snow and glare. The lens will not
withstand a severe impact. This lens does not protect against hard or sharp objects.
Care should be taken to avoid impact with hard or sharp objects.
3. Avoid jolts, drops, collision with other hard objects, or shaking of the CAMERA
GOGGLE. These movements may damage the components.
4. Never open the camera body with a screw driver. There is a risk of shock if you
touch the camera components.
5. Children under 13 years of age should never wear or operate the CAMERA
GOGGLE.
6. Children age 13 to 17 should always have adult supervision with use of this
product. The CAMERA GOGGLE is not a toy and needs to be treated with the same
care as any other digital camera.
7. An adult age 18 or older should always dry the product thoroughly before
performing the battery replacement or before performing the transfer of image and
video files to a computer..
8. If the inside of the camera gets wet, immediately turn it off and dispose of the
battery. Then dispose of the CAMERA GOGGLE in accordance with laws for
disposing electronics in your country. Using the camera after any internal
compartments have become wet may cause a fire or electric shock.
9. If the battery becomes wet, there is a risk of fire, shock, shorting the electrical
system, or corrosion. Dispose of the battery immediately in accordance with the
local laws in regards to proper battery disposal.
10. Do not place on an unstable surface or near the edge of a surface. The camera
may fall, resulting in damage to the camera or injury. If the camera has fallen and its
body is damaged, turn it off, remove the battery and dispose of the CAMERA GOGGLE
in accordance with laws for disposing electronics. Using the camera after its body
has been damaged may cause a fire or electric shock.
11. Never leave the CAMERA GOGGLE in direct sunlight. Never leave the Camera
in the trunk of a car or in a car on a warm or hot day. Direct sunlight or high
temperatures may damage the CAMERA GOGGLE or cause the housing to burst.
4.0 RECORDING PICTURES AND VIDEO
NOTE: The CAMERA GOGGLE has 2 modes and pressing the POWER/MODE button
cycles through the modes in the following order: Video and Still Images. To advance
to the next mode, press the POWER/MODE button one time. The camera will
remain on and ready to use for 180 seconds, after which the CAMERA GOGGLE will
turn off automatically. If you press and hold the POWER/MODE for more than 1
second, the camera will also turn off.
4.1 Video Mode - BLUE LIGHT
1. Press the POWER/MODE button for at least 1 second. The camera turns on.
The camera will power up in Video mode.
Note: the BLUE MODE LIGHT INDICATOR is on and the CAMERA GOGGLE
in the VIDEO READY mode and set to take Videos. The LCD screen displays the
video icon.
2. Press the SHUTTER/SELECT button once. Recording begins.
Note: the BLUE MODE LIGHT INDICATOR
T is blinking. The light will continue to
blink until the camera stops recording.
3. To stop recording, press the SHUTTER/SELECT button again.
4.2 Still Image Mode - RED LIGHT
1. Press the POWER/MODE button for at least 1 second. The camera turns on.
2. Press the POWER/MODE button again for less than a second to change to
Still Image Mode.
Note: the RED MODE LIGHT INDICATOR is on and the CAMERA GOGGLE is now in
the STILL IMAGE READY mode and set to take still images. The LCD screen
displays the Camera icon.
3. Press the SHUTTER/SELECT button once. A still image is captured.
NOTE: To capture the sharpest images, it is important that the distance between
the camera and the subject is at least 1.2 Meters (47.25 inches).
4.3 Power Off
1. Press the POWER/MODE button for more than 1 second to turn the camera off.
NOTE: If either the POWER/MODE or the SHUTTER/SELECT button has not been
used in 180 seconds, the CAMERA GOGGLE will turn off automatically.
ENG-10
12. Do not use the CAMERA GOGGLE in a location where there is explosive gas, or
any other flammable material in the air. Doing so may cause a fire or an explosion.
13. If the camera is not going to be used for a long period of time, remove the
battery from the camera. This will prevent any possible excess heat or leakage of
battery fluid that may result in injuries or damage to nearby objects.
14. Do not attempt to check the LCD display while moving. If riding or otherwise in
motion, come to a complete stop and make sure you are not on a path that others
may use. When motionless, remove the goggle to look at the LCD status display.
11.0 BATTERY WARNINGS AND PRECAUTIONS
1. Only Liquid Image 3.7V 1150mAh batteries are to be used with the CAMERA GOGGLE.
2. Use only appropriate refuse points for environmentally correct disposal of spent
batteries.
3. Batteries are to be inserted with correct polarity. See page ENG-6.
4. Parental guidance is necessary when installing or replacing battery.
5. Do not throw batteries into fire.
6. After use, always switch off the device. Take out battery to store the device.
7. The supply terminals are not to be short-circuited.
8. Do not drop, hit, or submit the battery to strong shocks.
9. Do not allow the battery to come into contact with fresh or salt water, or allow
the terminals to become wet.
10. If the battery is leaking and the battery fluid gets on your skin or clothing,
immediately rinse with clean water and seek emergency care.
11. Rechargeable batteries are only to be charged under adult supervision.
If the CAMERA GOGGLE emits a strange noise, smoke or odor, turn off
immediately and remove the battery.
ENG-16
ENG-17
Please check the contents now (before use) to confirm that it is complete.
Contact your Liquid Image Co dealer if anything is missing.
USER MANUAL
TM
TM
CAMERA GOGGLE
USB CABLE
RCA CABLE
WARRANTY
MICRO STORAGE BAG
RECHARGEABLE LI-ION BATTERY 3.7V 1150mAh
SNOW LENS
MX LENS
TEAR SHEETS
TEAR SHEET STRAP CLIP
NOSE GUARD
REPLACEMENT FACE FOAM
OUTRIGGER LOCK
WEDGE
NOTE: The CAMERA GOGGLE will be referred to as the
"CAMERA GOGGLE" throughout this instruction manual.
“If the product is exposed to a strong electrostatic charge, its memory
contents may be damaged or the keys may stop working. In such case,
reinstall battery to clear the memory and restore normal key operation.”
ENG-18
CAMERA
LENS
SHUTTER/SELECT
BUTTON
MICROPHONE
WITH WIND GUARD
DATE AND TIME SETTING
BATTERY LIFE
CAMERA
VIDEO CAMERA
MEMORY CARD
(not included)
NUMBER OF
FILES
LCD DISPLAY
MODE LIGHT
INDICATOR
(red - still image)
(blue - video)
(also used for recharging)
POWER/MODE
BUTTON
BATTERY
COMPARTMENT
GOGGLE LENS
RCA
WARNING: NEVER OPEN THE CAMERA BODY THAT IS FACTORY
SEALED WITH SCREWS. THIS WILL VOID ANY WARRANTY. NEVER USE
A SCREW DRIVER TO OPEN ANY PORTION OF THE CAMERA GOGGLE.
RCA CABLE
USB CABLE
Red Green Blue White
Audio
1150
ENG-2
r with both a Micro SD card orr a
your CAMERA GOGGLE.This CAMERA GOGGLE works
Micro SDHC card up to 32 GB (Class 4+). Carefully read the instructions and warnings
that come with the card. If your card is not FAT16 formatted, it will be reformatted once
placed into the Micro SD/SDHC card slot on yourr CAMERA GOGGLE and the Power is
turned on. Please note that any data on the card will be lost. Make sure to back up
any data on the Micro SD/SDHC Card prior to inserting into the CAMERA GOGGLE.
NOTE: The CAMERA GOGGLE does not have
internal memory to store the images and videos
You must
taken by the CAMERA GOGGLE.
.
insert a Micro SD/SDHC card prior to taking images
and videos. 4GB Micro SDHC Class 4+ is
recommended for peak performance.
Sensor
Image Resolution *
Lens
Focus range
Internal Memory
External Memory Card
2.4 Part Names - Exploded View
2.1 Included Parts and Accessories
*** No Software required to download files
ENG-1
2.5 Outrigger Detail
1.2 Specifications - Subject to change without notice
2.3 Part Names - Back View
4.3
Products mentioned above or throughout the manual may be trademarks or registered trademarks of their respective
companies.
Still Images
Video Clips
Micro SD/SDHC Card support
Driver free for Windows XP/Vista/7 and Mac 10.4 or above
2.2 Part Names - Front View
1150
The Camera Goggle is a sophisticated electronic device and should
be supervised by an adult at all times. This product should not be
used by children under 13 years. This product is not a toy. The inserting
of memory cards, USB cable, and battery must be performed by an
adult 18 years or older who has read and understands this manual. An
adult must always check all water resistant compartments prior to each use.
1.1 Features
2.0 Functional Parts
ENG-4
ENG-3
ENG-3
5.0 TRANSFERRING STILL IMAGES AND VIDEO TO A
COMPUTER
CAUTION: ALWAYS DRY THE VIDEO GOGGLE BEFORE OPENING THE
COMPARTMENTS.
The CAMERA GOGGLE has two ways to transfer your image and video files to a
computer. The CAMERA GOGGLE comes with a USB cable to connect your
CAMERA GOGGLE directly to a computer
.
You may also choose to purchase
and use a commercially sold Micro SD/SDHC Card to store and transfer
images and videos that were taken with the CAMERA GOGGLE
. The computer
does not require software to access the files stored on the CAMERA GOGGLE's
Micro SD/SDHC card. The CAMERA GOGGLE will act as an external removable disc
when the USB cable connects the camera
.
to a computer.
5.1 Opening Memory Compartment
1. Make sure the CAMERAGOGGLE is thoroughly clean and dry. Follow the CARE
AND MAINTENANCE instructions.
2. Open the MEMORY COMPARTMENT to expose the USB Port, and the Micro
SD/SDCH port.
5.2 Connecting and Transferring Files
1. Choose a method to transfer files: USB or Micro SD/SDHC Card.
USB TRANSFER
Plug the USB cable into the USB connection port on the computer and then into the
USB Port on the CAMERA GOGGLE. Press the POWER/MODE to turn on the
CAMERA GOGGLE. NOTE:The USB cable will be able to access the files stored
on the Micro SD/SDHC Card.
MICRO SD/SDHC CARD TRANSFER
Press down on the Micro SD or SDHC Card
. gently. The card will pop up for removal.
Carefully remove the card and insert it into the Micro SD card adapter that comes
with the Micro SD/SDHC Card and then insert the card into your computer's SD
Card Slot as directed by the manufacturer.
ENG-11
* Make sure your computer's SD Card Slot can handle High Capacity
SDHC cards as they are different than standard SD cards. You may need an adapter.
CAUTION: Never insert a wet Micro SD/SDHC Card into a card adapter or into a
Computer..
2. The connection screen opens on your computer monitor automatically.. Choose
the option: OPEN FOLDER TO VIEW FILES.
NOTE: If the screen does not automatically open, look for a new hard drive icon on
the computer next to your other hard drive icons. Click on the icon to view your
image and video files.
3. The image and video files will appear in a folder..
4. Copy the files to a folder on your computer (For example: My Pictures\California).
Alternatively, you may copy the entire folder to your computer..
5. If you wish to delete the data from the CAMERA GOGGLE's Micro SD/SDHC
Card, select the files you wish to delete and press delete on your computer keyboard.
6. Click the close button.
NOTE ON MEDIA PLAYERS:
There are multiple media players available online to play the HD (H.264) video files
created with the CAMERA GOGGLE. The preferred video player is QUICKTIME. If
your default computer media player is unable to play the videos, your player may be out
of date and you may need to update it online. You may also try using an alternate
media player if your computer has one or if you choose to download one from a
source that you trust online.
5.3 Disconnecting and Closing Memory Compartment
1. Safely disconnect the USB from your computer and from the CAMERA GOGGLE
.
Alternatively, if you transferred files using the SD Card method, disconnect the SD
Card from the computer and then remove the Micro SD/SDHC card from the adapter.
Reinsert the Micro SD/SDHC Card into your CAMERA GOGGLE
.
NOTE: It is recommended that you always delete all the files from your Micro
SD/SDHC card after transferring your files to a computer. This will free up space for
more images and video files. Deleting files can only be done through the computer.
ENG-12
12.0 COMMONLY ASKED QUESTIONS AND
TROUBLESHOOTING
1. Is the CAMERA GOGGLE water proof? The CAMERA GOGGLE is water resistant.
It is not intended for underwater use. However, it is designed to withstand rain, sleet,
and snow or a brief accidental submersion underwater. Be sure to always check
that your battery and memory compartments are completely sealed prior to
exposing them to moisture.
2. My CAMERA GOGGLE has stopped recording. If your camera stopped recording
photos or videos, check to see if the memory is full or if your battery is empty.
The LCD will display “FUL”, if your memory is full. If the battery is empty the
battery icon will not have any bars. It is also possible that your micro SD/SDHC
card may have failed. Try an alternate card.
3. My goggle fogs. The CAMERA GOGGLE is treated with anti-fog on the inside
lens, which should minimize any fogging under normal use conditions. Always air-dry
your lens or use a micro bag or soft cloth. Using gloves, clothing or other abrasive
materials may remove the anti-fog coating when wet. If fogging occurs, it is possible
that your anti-fog coating has rubbed off. You may need to replace your lens.
4. My CAMERA GOGGLE is no longer working (no power). Your battery may be
completely drained or your micro SD/SDHC card may not be working. Thoroughly
dry the CAMERA GOGGLE as directed in the CARE and MAINTENANCE (section 8.0).
Check the Goggle for any loose parts or open ports. DO NOT OPEN THE FACTORY
SEALED BODY OF THE CAMERA. If there were any open ports, check to make
sure they are not wet. Be careful not to touch any camera components inside the
MEMORY COMPARTMENT or BATTERY COMPARTMENT. If the components
are wet, follow the CARE AND MAINTENANCE (section 8.0). Check that the
battery and the memory card are completely inserted. If that does not solve the
problem, remove the battery and the micro SD/SDHC card. Fully charge the battery,
then reinsert into the camera. If the battery was not the issue, check the
micro SD/SDHC card by inserting another card, preferably a different brand, into the
camera. Please note that micro SD/SDHC cards can fail. Be sure to use a card that
meets the camera's specifications (see section 3.2). And be sure to follow the
manufacturer's Care and Maintenance instructions. If you had previously recorded
ENG-19
ENG-5
6.0 VIEWING VIDEOS AND STILL IMAGES ON A TV
The CAMERA GOGGLE can act as a media player and will be able to play videos
and pictures directly from your CAMERA GOGGLE onto a television set.
The RCA CABLE is included to connect the CAMERA GOGGLE with a HD television set.
IMPORTANT!
Make sure your camera is set to the correct NTSC or PAL video setting or your
CAMERA GOGGLE will not work properly with your TV for either Video or photo
playback. Select NTSC if viewing on a TV in North America. Choose PAL if viewing
on a TV outside of North America or if viewing on a PAL TV in any region.
6.1 Setting correct NTSC/PAL mode for your TV
This feature allows you to set the TV video output mode to PAL or NTSC. Please
check your Television Set to see if the TV can accept either PAL or NTSC video
playing devices. The CAMERA GOGGLE is set at the factory in the PAL mode. If you
need to change the output mode to NTSC or vice versa, follow the below directions.
1. Press and hold the SHUTTER/SELECT button down and then press and hold the
POWER/MODE button down. The BLUE LED light will turn on. Wait 5 seconds after
the BLUE LED turns on and then release both buttons. You are now in the TV Video
Output setup mode and will see one of the following screens:
For more trouble shooting, visit our website's help section www.LiquidimageCo.com
or email our CUSTOMER SUPPORT at [email protected].
LIMITED WARRANTY: See limited warranty form included with this product.
®
Camera Goggle, All-Sport Series, Xtreme Sport Cams, XSC,
LIC, and Liquid Image are Trademarks of Liquid Image Co, LLC.
US and Foreign Patents Pending
Colors and style may vary from picture shown
ENG-20
6.2 VIDEO AND STILL IMAGE PLAYBACK ON A TV
1. With the CAMERA GOGGLE turned off, connect the RCA cable to the CAMERA
GOGGLE and the HD TV.
2. Turn on the CAMERA GOGGLE and the camera will automatically start up in video
mode and begin playing the first video on the TV screen.
3. Press the SHUTTER/SELECT button to advance to the next video and press the
POWER/MODE button to go back to the previous video.
4. To switch to the playback of Pictures, press and hold the POWER/MODE button for
3 seconds. You will now be in the picture mode. To advance to the next picture, press
the SHUTTER/SELECT button and to go back to the previous picture, press the
POWER/MODE button.
5. You can toggle between the Picture and Video mode by pressing the POWER/MODE
button for 3 seconds.
6. To turn off, disconnect the RCA cable from the CAMERA GOGGLE and press and
hold the POWER/MODE button for a few seconds until the camera turns off.
Video Time Code
Qty of videos per Mode
Mode
File name
PAL
Mode
NTSC
Mode
2. To change the TV video output mode from PAL to NTSC or from NTSC to PAL,
press the POWER/MODE button once. You may cycle between the two output
modes by pushing the POWER/MODE button again.
3. To Select the TV output mode of either PAL or NTSC, press the
SHUTTER/SELECT button once and the camera will save your selected mode, exit
the TV video output mode, and return to the Video mode (BLUE LED).
4. To complete the TV video output mode setting on the CAMERA GOGGLE, restart
the CAMERA GOGGLE by pressing the POWER/MODE button for more than a few
seconds until the camera turns off. Press the POWER/MODE button again to restart
the CAMERA GOGGLE. Your camera will now be setup in the TV Video Output mode
that you selected. You do not have to repeat this procedure if you replace batteries.
The CAMERA GOGGLE will remain in this mode until you decide to change the TV
video output mode through the steps above.
ENG-13
files to the micro SD/SDHC card that was removed from the camera, you may check
the card on a computer to see if any files were recorded and if they appear to have
recorded normally.
NOTE: Any large changes in temperature, exposure to extreme temperatures or
sudden jolts, including dropping your CAMERA GOGGLE may damage the camera
components. If you have not dropped your camera or caused damage through any
physical shaking or colliding of the camera with a hard object, or if you have not
caused exposure to extreme temperatures or temperature fluctuations, there may be
an issue of water leakage into one of the compartments.
5. My CAMERA GOGGLE is "FROZEN" (Turned ON, but not functioning).If your
camera is "frozen" or not functioning while turned on, you may need to reset the
camera functions. First, check to see if the memory is full. You will see the word
"FUL" displayed on the LCD screen. Also check to see if your battery is empty or low.
If that does not reset the functions of the camera, move to a clean and
dry environment, check that the camera is completely dry in accordance with the
CARE AND MAINTENANCE (section 8.0), then remove the battery. Reinsert the
battery. Close the compartment door. Turn on the camera and retest the functions.
ENG-6
Battery Life
0006 / 0003 00:02:28 00:45:11
TV SCREEN
Qty of pics per Mode
Mode
Total Time
of Video
Video Mode
FOR AMERICAN USERS
The following advisory is included in accordance with the laws of the state of
California (USA)
WARNING:
This product contains chemicals, including lead on the internal electronic board,
known in the State of California to cause cancer, birth defects or other
reproductive harm. Wash hands after handling.
Warning: Changes or modifications to this unit not expressly approved by the party
responsible for compliance could void the user's authority to operate the equipment.
NOTE: This equipment has been tested and found to comply with the limits for a
Class B digital device, pursuant to Part 15 of the FCC Rules. These limits are
designed to provide reasonable protection against harmful interference in a
residential installation. This equipment generates, uses and can radiate radio
frequency energy and, if not installed and used in accordance with the instructions,
may cause harmful interference to radio communications.
However, there is no guarantee that interference will not occur in a particular
installation. If this equipment does cause harmful interference to radio or television
reception, which can be determined by turning the equipment off and on, the user is
encouraged to try to correct the interference by one or more of the following
measures:
* Reorient or relocate the receiving antenna.
* Increase the separation between the equipment and receiver.
* Connect the equipment into an outlet on a circuit different from that to which the
receiver is connected.
* Consult the dealer or an experienced radio/TV technician for help.
Shielded cables must be used with this unit to ensure compliance with the Class B
FCC limits.
FOR CANADIEN USERS
This Class B digital apparatus complies with Canadian ICES-003.
ENG-21
0006 / 0003
TV SCREEN
Still Image Mode
7.0 Video and Image File Size
When recording video it is very important that you are already familiar with the file
size that your computer can store and playback. If you record a continuous video
clip onto a CAMERA GOGGLE's Micro SD/SDHC card, you may not be able to
download or play the video file on your computer because of the large file size.
Also, your media player may not be able to play large HD Videos.
ENG-14
Warning: TO PREVENT THE RISK OF FIRE OR ELECTRIC SHOCK, DO
NOT EXPOSE THE INNER ELECTRONICS TO RAIN OR MOISTURE.
File name
Battery Life