1
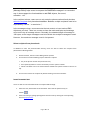
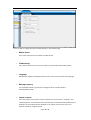
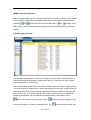
Phonesuite
User Manual
PhoneSuite User Manual
Preliminary
Instructions:
Phone
Suite
Installation and First Use
The software PhoneSuite can be used directly from CD or after installation on the PC.
In any case, when using the application for the first time, it’s necessary to copy the USB driver on
the PC before launching PhoneSuite.
The driver will be automatically copied on the PC hard disk when selecting “Copy Driver on PC”
from the Main Menu, that will be visualized after inserting the PhoneSuite CD.
1.
2.
3.
4.
5.
6.
7.
connect to the PC the USB cable that should have come with your mobile;
connect the USB cable to the mobile phone;
at this point, the phone screen will show the following three options: 1. mass storage - 2.
com port;
select the “com port”option;
the PC will install the 6218 USB Modem Driver on the PC;
launch PhoneSuite application; if the application is used directly from CD, click on “Start
PhoneSuite from CD” from the Main Menu; if you want to install the application on your
PC, click on “Install PhoneSuite on PC” from the Main Menu, then select the desired
installation path (or accept the default path) and start the application using the desktop
shortcuts or the Start Menu;
8. the lower side of the PhoneSuite screen will show now the notice “Connected!”;
9. now you can use the Phone Suite application: please see the following instructions for
further details.
NOTE: during the installation procedure, it is possible to get a messagge on the PC screen
warning that the software has not passed the testing to verify its compatibility with Microsoft
products. In any case this software has been tested for a long time with Microsoft systems and
it’s virus-free guaranteed.
Pagina 1 di 22
Welcome to PhoneSuite
PhoneSuite provides various functionalities for users to manage their mobile phone
easily on PC side. It will communicate with mobile phone via serial communication,
IrDA or Bluetooth.
• Phonebook is used to manage the contacts information between mobile phone
and PC folder. In addition to adding, editing and deleting contacts, users can get the
phonebook database on hand and backup them to PC folder. PhoneSuite also imports
contact list from Lotus Notes, Outlook, and Outlook Express. Users can copy these
information to the PC folder or mobile phone.
• Message helps users to read, edit and send SMS/EMS messages directly from PC.
Besides, you can create personal folders to categorize all messages on PC side.
• Settings contains the system-related settings and message default settings. Users
also can set whether they want to import contact list from other software or not here.
• MMS Message helps users to read, edit MMS messages directly from PC. Users
also can transport MMS messages between PC and mobile phone. Whether this
functionality is supported or not depends on the mobile phone connects to
PhoneSuite.
• File Manager provides a friendly interface for users to manage their files between
PC side and mobile phone. Functionalities of "copy", "paste", "delete", "rename" and
"new folder" are provided in out tool. Besides, File Manager supports local java
installation from PC side.
Pagina 2 di 22
[Phonebook] Overview
[Phonebook] supports the functions to manage the contacts information in mobile
phone and PC folder. Users are able to add, edit and delete contacts, and move or
copy contacts from one folder to another. This tool also can imports contact list from
other software, such as Lotus Notes, Outlook, and Outlook Express. Users only can
copy contacts form these three folders to mobile phone or PC folder.
In the phonebook main viewer, users can see the details of each contact in familiar
explore style. Besides, all the contacts are well-organized by different memory types:
•
Handset folder displays the contacts, which are saved in mobile phone or SIM card.
•
PC foler displays the messages, which are stored on pc side. Besides, you can create
personal folders to categorize all messages on PC side.
•
Trash Can contains the contacts that have been deleted from Handset folder or PC
folder by user.
•
Lotus Notes contains the contacts in the software "Lotus Notes". In this folder, users
only can copy contacts.
•
Outlook contains the contacts in the software "Outlook". In this folder, users only can
copy contacts.
•
Outlook Express contains the contacts in the software "Outlook Express". In this
folder, users only can copy contacts.
Pagina 3 di 22
Furthermore, users can left-click the mouse on each column to sort the contacts in ascending or
descending order.
Add new contact
Users are able to add new contact in PC and Handset folder.
1. Click the [New contact] on toolbar
2.
3.
4.
5.
, then the Phonebook Editor will be opend.
Choose the memory type (In mobile phone or PC).
Click the information column first, and then start to edit.
Press [OK] to save this contact.
Select the destination folder in the pop-up dialog.
Edit contact
Users are able to edit the information of contact in PC and Handset folder.
1. Execute one of the following steps:
• Select one contact and click the
on toolbar.
• Double-click on specific contact.
• Right-click on the contact list to bring up the pop-up menu, and click [Open] item.
2. Only when the original memory type is SIM or phone, the memory type can be changed.
3. Click the information column first, and then start to edit.
4. Press [OK] to save the modifications.
Delete contact
Users are able to delete contacts in PC and Handset folder.
1. Select the contact(s) you want to delete.
2. Execute one of the following steps:
• Click the [Delete] on toolbar
.
• Press [Delete] key.
3. Then shows a pop-up dialog for you to decide:
Pagina 4 di 22
• Delete the contacts forever ?
• Just move them to the Trash Can folder ?
Move and Copy contact
Users are able to move or copy contacts from one folder to another.
Move contact
1. Select the contact(s) you want to move.
2. Click the [Cut] on toolbar
.
3. Select the destination folder in the tree view.
4. Click the [Paste] on toolbar
.
Copy contact
1. Select the contact(s) you want to copy.
2. Click the [Copy] on toolbar
.
3. Select the destination folder in the tree view.
4. Click the [Paste] on toolbar
.
Tip
You can also use mouse dragging and dropping to move the contacts. If you want to
copy them to another folder, the difference is to press CTRL key at the same time.
1. Dragging the selected contacts.
2. Dropping them to the destination folder in the tree view.
Save as contact to file
Users are able to save as the contact(s) to file.
1. Select the contact(s) you want to save to file.
2. Right-click on the contact list to bring up the pop-up menu, and click [Save As] item.
Pagina 5 di 22
3. You should select the file location and then enter the file name. And it will be a text file
which file extesion is .txt.
4. Press [Save] to save file.
Download phonebook
Users are able to download the phonebook from mobile phone to PC side. After
successfully downloading the phonebook, all the contacts will be stored in the
Handset folder, and then users have the chance backup the database to PC folder by
copying contacts.
1. Click the [Download] on toolbar
.
2. Then you will see the progress in the pop-up dialog, and you can stop downloading by
clicking [Cancel] button.
Add new folder
Users are able to add new folder in PC and Trash Can folder.
1. Right-click on the specific folder in the tree view.
2. Click [New Folder] on the pop-up menu.
3. Enter the name of folder and press Enter key.
4. Then users can rearrange the contacts to different folders.
Rename folder
Users are able to rename the subfolder in PC and Trash Can folder.
1. Right-click on the specific folder in the tree view.
2. Click [Rename] on the pop-up menu.
3. Enter the name of folder and press Enter key.
Tip
You can also do the following steps to rename a folder:
Pagina 6 di 22
1. Select one folder in the tree view.
2. Click on the folder again to modify its name.
Delete folder
Users are able to delete subfolder in PC and Trash Can folder.
1. Right-click on the specific folder in the tree view.
2. Click [Delete] on the pop-up menu.
3. Then shows a pop-up dialog for you to decide:
• Delete the folder forever ?
• Just move it (including subfolders and contacts) to the Trash Can folder ?
[Message] Overview
[Message] helps users to access the SMS/EMS functions of mobile phone in a
convenient way. Besides, you can create personal folders to categorize all messages
on PC side.
Users are able to compose new message and send it to multiple recipients with one
click. Besides, users can reply, forward specific message, and move or copy
messages from one folder to another.
Pagina 7 di 22
In the message main viewer, users can see the details of each message in familiar
explore style. Besides, all the messages are well-organized by different memory
types:
•
Handset folder displays the messages, which are saved in mobile phone or SIM card.
o
o
•
PC foler displays the messages, which are stored on pc side. Besides, you can create
personal folders to categorize all messages on PC side.
o
o
o
o
o
•
Inbox folder shows the received unread/read messages in mobile phone.
Outbox folder shows the stored unsent/sent messages in mobile phone.
Inbox folder is used to backup the messages stored in Handset/Inbox folder.
Outbox folder shows the stored unsent/sent messages in mobile phone.
Sent Message folder shows the messages that are successfully sent from PC
side.
Draft folder shows the messages that are not finished.
Personal folder is reserved for users to organize their own messages.
Trash Can contains the messages that have been deleted from Handset folder or PC
folder by user.
Furthermore, users can left-click the mouse on each column to sort the messages in ascending or
descending order.
Compose new message
Users are able to compose new message in PC and Handset folder.
1. Click the [New Message] on toolbar
, then the Message Editor will be opend.
2. Enter the mobile phone number of recipient(s), and separate them by ',' or ';'.
3. Enter the message contents in message column.
4. You can save or send this message directly.
Edit message
[PhoneSuite] provides Message Editor and Message Viewer to open the stored and
received messages repectively. It means that users are able to edit the stored
Pagina 8 di 22
messages in PC and Handset folder; and to reply or forward the received messages
to others. The message contents of received messages cannot be modified.
1. Execute one of the following steps:
• Select one contact and click the
on toolbar.
• Double-click on specific contact.
• Right-click on the contact list to bring up the pop-up menu, and click [Open] item.
2. Modify the mobile phone number of recipient(s), and separate them by ',' or ';'.
3. Modify the message contents in message column.
4. You can save or send this message directly.
Reply message
Users are able to reply the received messages in specific folder.
1. Select the recevied message you want to reply.
2. Click the [Reply] on toolbar
, or open the message first and then click the button in
[Message Viewer].
3. Then shows Message Editor to compose the reply message.
4. Enter your reply contents in the message column.
5. Click the [Send] on toolbar
.
Forward message
Users are able to forward the received messages in specific folder.
1. Select the recevied message you want to forward.
2. Click the [Forward] on toolbar
, or open the message first and then click the button
in [Message Viewer].
3. Then shows Message Editor to compose the message.
4. Enter the mobile phone number of recipient(s), and separat them by ',' or ';'.
5. Click the [Send] on toolbar
.
Pagina 9 di 22
Delete message
Users are able to delete messages in PC and Handset folder.
1. Select the message(s) you want to delete.
2. Execute one of the following steps:
• Click the [Delete] on toolbar
.
• Press [Delete] key.
3. Then shows a pop-up dialog for you to decide:
• Delete the messages forever ?
• Just move them to the Trash Can folder ?
Move and Copy message
Users are able to move or copy messages from one folder to another.
Move message
1. Select the message(s) you want to move.
2. Click the [Cut] on toolbar
.
3. Select the destination folder in the tree view.
4. Click the [Paste] on toolbar
.
Copy message
1. Select the message(s) you want to copy.
2. Click the [Copy] on toolbar
.
3. Select the destination folder in the tree view.
4. Click the [Paste] on toolbar
.
Pagina 10 di 22
Tip
You can also use mouse dragging and dropping to move the messages. If you want to
copy them to another folder, the difference is to press CTRL key at the same time.
1. Dragging the selected messages.
2. Dropping them to the destination folder in the tree view.
Save as message to file
Users are able to save as the message(s) to file.
1. Select the message(s) you want to save to file.
2. Right-click on the contact list to bring up the pop-up menu, and click [Save As] item.
3. You should select the file location and then enter the file name. And it will be a rich text
file which file extesion is .rtf.
4. Press [Save] to save file.
Download message
Users are able to download the SMS/EMS messages from mobile phone to PC side.
After successfully downloading the messages, they will be categorized according to
the status and stored in the Inbox/Outbox of Handset folder.
1. Click the [Download] on toolbar
.
2. Then you will see the progress in the pop-up dialog, and you can stop downloading by
clicking [Cancel] button.
Send all message
Users are able to send all the SMS/EMS messages to mobile phone, i.e. the
messages in PC/Outbox folder will be sent to the recipients one by one. Finally, the
successfully sent messages will be displayed in Sent Message folder.
1. Click the [Send all messages] on toolbar
.
2. Then you will see the sending progress and status for each recipient in the pop-up dialog.
You can stop sending the unprocessing messages by clicking [Cancel] button.
Pagina 11 di 22
Add new folder
Users are able to add new folder in PC and Trash Can folder.
1. Right-click on the specific folder in the tree view.
2. Click [New Folder] on the pop-up menu.
3. Enter the name of folder and press Enter key.
4. Then users can rearrange the messages to different folders.
Rename folder
Users are able to rename the subfolder in PC and Trash Can folder.
1. Right-click on the specific folder in the tree view.
2. Click [Rename] on the pop-up menu.
3. Enter the name of folder and press Enter key.
Tip
You can also do the following steps to rename a folder:
1. Select one folder in the tree view.
2. Click on the folder again to modify its name.
Delete folder
Users are able to delete subfolder in PC and Trash Can folder.
1. Right-click on the specific folder in the tree view.
2. Click [Delete] on the pop-up menu.
3. Then shows a pop-up dialog for you to decide:
• Delete the folder forever ?
• Just move it (including subfolders and messages) to the Trash Can folder ?
[Message Editor] Overview
Pagina 12 di 22
[Message Editor] helps users to compose the SMS/EMS messages in a convenient
way. It also suppport the functionalities to add EMS objects, like sound,
animation ...etc.
In the recipient column, users can not only enter the phone number directly but also
select the recipient from phonebook database. Besides, multiple recipients need to be
separated by comma ',' or semicolon ';'.
In the message column, users can enter the text content or insert various EMS
objects as you wish. There is a counter to show the total used bytes and message
count on the top of message column. Generally, the standard length of message is
160 bytes, so the longer messages need to be divide into multiple messages to send.
However, the maximum message count is 4 at present.
Select recipient from phonebook
In addition to enter the phonenumber directly, users are able to select the recipient from
phonebook in Message Editor.
1. Click the button, then the select dialog will be opened.
2. You can do one of the following steps to add new recipient:
• Key in the phone number and press Enter key.
• Press [Search] button to search contacts by name or phone number.
• Select one folder in the tree view and then double-click specific contact in the list on
top.
3. You can also remove the recipient by double-clicking in the list on bottom.
Insert formatted text
Users are able to insert formatted text to compose EMS message.
1. Select the text, which want to be formatted. Then click the [Text format] on
toolbar
.
2. Set the format type, paragraph alignment and font size by clicking the corresponding
item on pop-up menu.
Pagina 13 di 22
Tip
You can also do the following steps to insert formatted text.
1. Click the [Text format] on toolbar
first.
2. Enter the text, which want to be formatted.
Insert sound
Users are able to insert sound to compose EMS message.
1. Click the [Insert sound] on toolbar
, then shows a pop-up menu.
2. Execute one of the following steps:
• Select the predefind sound.
• Click the [Browse...] item to choose the desired midi or iMelody file.
3. Then a melody icon will be inserted to the message content to represent it.
4. You can play the sound by right-clicking the object.
Insert picture
Users are able to insert user-defined picture to compose EMS message.
1. Click the [Insert picture] on toolbar
.
2. Select the picture file in file dialog.
3. Set the width and height of picture.
4. Press [Open] button to finsih.
Insert animation
Users are able to insert animation to compose EMS message.
1. Click the [Insert animation] on toolbar
, then shows a pop-up menu.
2. Execute one of the following steps:
• Select the predefind expression animation.
Pagina 14 di 22
• Click the [Browse...] item to compose the new animation by adding four EMS
pictures. Then you can change the order of EMS pictures by dragging and dropping.
Besides, the resolution of animation is also configurable for users.
3. Then the first EMS picture will be inserted to the message content to represent it.
4. You can play the animation by right-clicking the object.
Send message
Users are able to send the stored messages in specific folder.
1. Click the [Send message] on toolbar
.
2. Then you will see the sending progress and status for each recipient in the pop-up dialog.
You can stop sending the unprocessing messages by clicking [Cancel] button.
3. If the transmission is successful, the messages will be move/copy to the Sent Message
folder.
Save Message
Users are able to save message to specific folder in PC and Handset.
1. Click the [Save message] on toolbar
, then shows a pop-up dialog.
2. Choose the memory type (In mobile phone or PC).
3. Select the destination folder.
4. Press [OK] to save this message.
General settings
Pagina 15 di 22
Users are able to change the system related settings in the General page.
•
Mobile Phone
Users must select the correct model of mobile phone.
•
COM settings
Users have to select the correct port number to communicate with mobile phone.
•
Language
[PhoneSuite] supports multilingual GUI for users to choose their preference language.
•
Message memory
It is the default memory type for the messages that are moved/copied to
Handset/Outbox folder.
•
Import contacts
Users can specify if they want to import contacts from "Lotus Notes", "Outlook", and
"Outlook Express". If PhoneSuite cannot find the path of Outlook and Outlook Express in
windows, the check boxes will be disabled. In the aspect of Lotus notes, users can
indicate its path by using the button.
Pagina 16 di 22
[MMS] Overview
[MMS] provides the functions to create your own mms for mobile phone easily. Users
are able to create new mms or modify the existing files. Besides, the transmission of
mms between PC and mobile phone is also supported.
In the mms viewer, users can see the details of each mms file in familiar explore style.
The mms file list stored in mobile phone, will be displayed on the left side, users are
able to save the file to PC by clicking [Save] button on the bottom just like the melody
viewer. You can also browse the location of PC mms files by using the combo box and
choose the mms type to filter the files in specific folder. Browsing a sub-folder can be
reached by double-clicking a sub-folder. Press
folder. Press
button can browse the upper
button can popup a dialog for you to select the folder you want to
browse directly.
In addition, a simple mms player is embedded in the left preview view to support the
playback functions. Users can view the desired mms by clicking the play button on
playback toolbar. Then the playback progress will be displayed as well. Furthermore,
users can left-click the mouse on each column to sort the melodies in ascending or
descending order.
There are five kinds of MMS folders in mobile phone:
1. Inbox folder is used to backup the messages stored in Handset/Inbox folder.
2. Outbox folder shows the stored unsent/sent messages in mobile phone.
Pagina 17 di 22
3. Sent folder shows the messages that are successfully sent from PC side.
4. Draft folder shows the messages that are not finished. Uploaded MMS messages will
be put in this folder.
5. Templates
Create new mms
Users are able to create new mms.
1. Click the [New] on toolbar
.
2. Edit the mms in the MMS Composer.
Edit MMS
Users are able to edit the existing mms messages.
1. Select one mms message in the list.
2. Execute one of the following steps:
• Click the
on toolbar.
• Double-click on this mms message.
3. Edit the mms message in the MMS Composer.
Delete MMS
Users are able to delete the mms messages in specific folder.
1. Select the mms messages you want to delete.
2. Execute one of the following steps:
• Click the [Delete] on toolbar
.
• Press [Delete] key.
3. Then shows a pop-up dialog for you to decide:
• Do you want to delete the mms messages ?
• Press [Ok] or [Cancel] to finish.
Pagina 18 di 22
Copy MMS
Users are able to copy mms messages from one folder to another.
1. Select the mms messages you want to copy.
2. Click the [Copy] on toolbar
.
3. Select the destination folder by combo box to set the designate folder.
4. Click the [Paste] on toolbar
.
Download MMS
Users are able to download the mms messages from handset to PC.
1.
2.
3.
4.
Select one mms message in the handset list on the left side.
If the file has not been downloaded yet, start to download mms message.
Click the [Save] button on the bottom of handset list.
Enter the file name, which you want to save.
Upload MMS
Users are able to upload the existing mms message from PC to handset.
1. Select one mms message in the list on the right side.
2. Click the
on toolbar.
3. Enter the file name, which you want to stored in handset.
Download MMS list
Users are able to download the mms message list stored in handset.
1. Click the
on toolbar.
2. The mms message list will be shown in the handset list on the left side.
Pagina 19 di 22
[MMS Composer] Overview
MMS Composer helps users to compose their own mms easily. It allows users to add
text by clicking ; drag and drop image and melody files into a slide; add and delete
slides by
and
. Users also can scroll the slides list by
and
. Besides, like in
MMS Viewer, users can preview their design by clicking the play button on playback
toolbar.
[File Manager] Overview
[File Manager] provides the functions to manage your files easily. Users are able to
upload, download files between mobile phone and PC. They also can copy, delete,
paste files/folders in a usual way.
In the file manager viewer, users can see the details of file list in familiar explore style.
The file list stored in mobile phone, will be displayed on the left side, users are able to
save those files to PC by clicking copy and paste buttons on toolbar or using the hot
keys (^C and ^P). You can also browse the location of PC by using the combo box.
Browsing a sub-folder can be reached by double-clicking a sub-folder. Press
button can browse the upper folder. Press
button can popup a dialog for you
to select the folder you want to browse directly. The
Pagina 20 di 22
button is used to create new
folder in current browsed folder. Furthermore, users can left-click the mouse on each
column to sort the melodies in ascending or descending order.
In addition to manage local PC files more conveniently, [File Manager] provides the
functionality of rename files. Users can right-click the mouse to display the menu and
choose "Rename".
In order to describe those functionalities related to managing those files in [File
Manager] more clearly, We enumerate as follows:
1. Copy local files on PC and paste on mobile phone or PC.
2. Copy files on mobile phone and paste on PC.
3. Delete files/folders on mobile phone or PC. It deserves to be reminded that delete a
folder will remove all files in that folder.
4. Create new folder on mobile phone or PC.
5. Rename a file/folder on PC.
Delete Files/Folders
Users are able to delete the files/folders in specific folder.
1. Select the files/folders you want to delete.
2. Execute one of the following steps:
• Click the [Delete] on toolbar
.
• Press [Delete] key.
3. Then shows a pop-up dialog for you to decide:
• Do you want to delete the files ?
• Press [Ok] or [Cancel] to finish.
Copy file
Users are able to copy files from one folder to another.
1. No matter the files are on mobile phone or PC, select the files you want to copy.
2. Click the [Copy] on toolbar
.
3. Select the destination folder in the list or select a folder on the handset file list.
4. Click the [Paste] on toolbar
.
Pagina 21 di 22
Download file list
Users are able to download the file list stored in handset.
1. Click the
on toolbar.
2. The file list will be shown in the handset list on the left side.
Local install java
File Manager helps users to install java directly. Users only need to select a jar or jad
file, and then press the
button on toolbar. No matter the jar/jad file is on mobile
phone or PC, [File Manager] can install that java application on mobile phone.
Sometimes when user select a jad file and start the installation, [File Manager] will
pop up a window to ask for a jar file.
Pagina 22 di 22