1
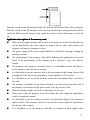
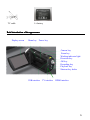
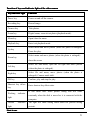
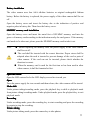
PC25HD
Preface
Thanks for your selection of this digital video camera. The user’s manual shall be
carefully read and put in a safe place before application for further reference.
The contents covered by this manual refer to the latest information when this manual is
compiled. The screen display, illustration and other instructions in this manual are used to
more specifically and directly describe the operation of this video camera. Owning to the
difference of technical development and production batch, they may be a little different
from the digital video camera actually used by you.
Description
The video camera shall be used according to the following order.
Check the power supply
of the video camera
Insert and format the
memory card
Recording / picture taking
Install the driver
Connect to the computer
Note: if it is a newly bought memory card or a card has been used in other
digital camera/ video camera is adopted by this camera, it shall be firstly formatted
by this video camera. Before formation, the backup of important data shall be made
in other media, such as soft disk, hard disk and CD.
Instruction for use
The video camera has no memory, SD memory card and MMC card (multi-media
memory card) can be used. SD memory card has writing protection switch which is to
prevent delete or formatting of image files.
2
Metal foots of memory card
Writing protection switch
Push the switch on the SD memory card to the bottom and then the data will be protected.
Push the switch on the SD memory card to the top and then the writing protection will be
cancelled. Before picture taking, please push the switch on the SD memory card to the
top.
Application description of the memory card
●
When newly bought memory card is used or the memory card has the data that can
not be identified by the video camera or images shot by other video camera, the
memory card must be formatted at first.
●
The power supply of the video camera shall be cut off before inserting or taking the
memory card out.
●
The performance of the memory card will be debased after application for several
times. If the performance of the memory card is debased, a new one shall be
bought.
●
The memory card is precise electronic device. It is forbidden to bend, fall down or
let the memory card bear heavy pressure.
●
It is forbidden to put the memory card in the environment with strong electric field
or magnetic field, such as the propinquity of the amplifier or TV receiver.
●
It is forbidden to use or put the memory card in the environment that is too hot or
too cold.
●
The memory card shall be kept clean and liquid is not allowed to touch the card. If
the memory card touches liquid, please make it dry by soft dry cloth.
●
When the memory card is not used, it shall be put in its case.
●
Please notice that the memory card will become hot after long-time application,
which is completely normal.
●
It is forbidden to use the memory card that is used in other digital video camera or
digital camera. The memory card to be used in this camera shall be formatted at
first by the video camera.
●
It is forbidden to use the memory card that is formatted in other digital video
3
camera or card reader of a memory card.
If one of the following situation occurs, the record data may be damaged:
-The memory card is improperly used.
-When recording, delete (formatting) or reading, the power supply is cut off or the
memory card is taken out.
● It is advised to copy the important data in other media, such as soft disk, hard disk
and CD.
Maintenance and care of the video camera
When the video camera is not used, it shall be kept in dry and dark place and the battery
must be taken out.
●
The wrist sling shall be kept during application to avoid sliding.
●
Proper protective case shall be used to prevent damage on camera lens and display
If the surface of camera lens is cleaned, the dust on the surface shall be blew away
at first and then use cloth or paper suitable for cleaning optical equipment to lightly
wipe the camera lens. If necessary, detergent can be used to wipe the camera lens.
It is forbidden to use organic solvent to clean the video camera.
●
It is forbidden to touch the surface of the camera lens with fingers.
●
4
System required
When this digital video camera is operated or used, the lowest system requirement to the
computer for the video camera shall be referred. We strongly recommend you to use
better computer to operate the video camera to exert the best function of the video camera.
The following is the lowest system required:
System required
Operation system
Central processing unit
Memory
Sound card, graphic card
Microcode Windows 2000, XP, VISTA,Windows 7
Higher than Intel PIII667 or the CPU with equal
performance
More than 128 MB
The sound card and graphic card support DirectX8 or
higher version
CD-ROM
Higher than 4 quad speed
Hard disk
Remaining space is more than 1 GB
Others
One standard USB 1.1 or USB 2.0 interface
Performance features
The video camera has several features and functions:
●
Digital video camera
●
Digital camera (five-million pixels)
●
Mass Storage (Movable disk)
●
PC Camera (camera)
●
8-time digital zoom
Fittings
After opening the package of the video camera, you can see the following main fittings:
USB connective cable
Installation CD
User’s manual
5
TV cable
Li-battery
Brief introduction of the appearance
Display screen
Menu key
Power key
Camera key
Zoom key
Working indicator light
Direction key
OK key
Recording key
Playback key
Shortcut key delete
USB interface
TV interface
HDMI interface
6
Trumpet
Portrait indicator light
LED fill light
Camera lens
Wrist sling button
Wrist sling
Microphone
7
Function of keys and indicator lights of the video camera
Key/Indicator light
Function
Power key
Power on and off the camera.
Recording key
Record image.
Camera key
Take photos.
Zoom key
Digital zoom, zoom in/out photo (playback mode).
Menu key
Open/close the menu.
Playback key
Enter/exit playback mode.
Select menu and move photos (when the photo is enlarged).
Up key
Pause the play.
Select menu and move photos (when the photo is enlarged),
Down key
close the screen
Select file and menu, open the fill light and move photos
Left key
(when the photo is enlarged).
Select file and menu, move photos (when the photo is
Right key
enlarged). Camera mode shift.
OK key
Confirm, play and stop the play.
Shortcut key delete
Enter shortcut key delete state.
key
Working
indicator
light
Portrait
light
It will shine once when picture taking and will shine
constantly when the disk is moved as it is connected with the
computer.
indicator
The light will shine during count down the process during
portrait.
Start to use
8
Battery installation
The video camera uses four AAA alkaline batteries or original rechargeable lithium
battery. Before the battery is replaced, the power supply of the video camera shall be cut
off.
Open the battery cover and insert the battery due to the indication of positive and
negative poles in battery bin. Then close the battery cover.
SD/MMC memory card installation
Open the battery cover and insert the metal feet of SD/MMC memory card into the
groove of memory card according to the indication nearby the card groove. If the memory
card needs to be taken out, please press the SD/MMC memory card to take it out.
Note:
● Before replacing the memory card, the power supply of the video camera
shall be cut off.
● The card shall be inserted with the correct direction. Proper stress shall be
adopted when the card is inserted to prevent damage of the card or parts of
video camera. If the card can not be inserted, please check whether the
direction is correct.
● When the memory card is used for the first time or has been used in other
video camera, it shall be formatted at first.
Open the screen
Open the LED outward to let the LED display screen face toward you.
Open
Press the power supply for two seconds and then release, the video camera will be started.
Mode shift
Under picture taking/recording mode, press the playback key to shift to playback mode
from picture taking/recording mode. Under playback mode, press the playback key to exit
playback mode.
Recording
Under recording mode, press the recording key to start recording and press the recording
key again to stop the recording.
Picture taking
Under picture taking mode, press the camera key to take photos.
9
Playback
Press the playback key to enter playback mode to browse photos and play the video shot
by the camera.
Browsing photos: use left key or right key to select photos and use zoom key to enlarge
the photo. After the photo is enlarged, press the up/down/left/right key to move the photo.
Movie play: use left key or right key to select the movie you want to play and press OK
key to start the play. Press OK key again to stop the play. During the play process, the
play can be paused by pressing the up key and press the up key again to continue the play.
HDMI output
When the image and sound in the camera have to be output to the HDMI TV, please insert
the output port of the HDMI wire into the HDMI interface on the camera and connect the
HDMI input port to the video input port of the video equipment Note: please stop the
recording/sound recording or play before connecting the HDMI or withdrawing the
HDMI wire.
TV output
When images and sound in video camera needs to be outputted to TV, insert the public
terminal of TV cable into TV interface in the video camera. Yellow port connects with
video input port of video equipment and the red/white port connects with audio input port
of video equipment. Note: before TV is connected or TV cable is pulled out, the
video/sound recording or play shall be stopped.
Close
Under start-up state, press the power key for a long time, then the video camera will be
closed.
If the video camera stays in unused state and no operation is carried out beyond the set
automatic close time (one minute/three minutes/five minutes), the video camera will be
automatically closed to save power.
Menu setting
Under picture taking/recording and playback mode, press the menu key to open the menu
and then press the up/down/left/right key to select menu. Press OK key to enter the
submenu. When selecting menu, the background of the selected menu option will be
displayed with high brightness.
10
▲ Recording/picture taking menu
Date and time setting
Press the menu key to open the menu and then press the left and right key to enter setting
menu. Press the down key to select “date and time” menu option and press OK key to
enter setting window.
In setting window, press the left and right key to select the item to be adjusted (date and
time), then the background of the selected item will be displayed in blue. Then press the
up key or down key make adjustment. After adjustment is completed, press the
confirmation key for confirmation or press the menu key to cancel the setting and exit.
Finally press the menu key to exit the setting mode.
Connect to the computer
Before the computer is connected, the driver of the video camera shall be installed with
installation CD.
Firstly, connect the power supply of the video camera and then use USB connective cable
in the fittings to connect with the usable USB port of the computer. USB mode is
movable hard disk or PC camera. The video camera will automatically enter movable
disk mode and it is possible to enter PC camera by pressing the playback key.
11
Progressive operation
Picture taking/recording mode
The camera will automatically enter picture taking/recording mode after it is started.
Press the shutter key to directly take photos.
Press the recording key to start shoot and press the recording key again to stop shooting.
Press T key or W key to achieve digital zoom.
Press the left key to open or close LED fill light (the fill light can not be used under
playback mode).
When the video camera is in idle state, press the down key to shift among the three screen
display states, namely, close icon, close screen and normal display.
◆
Information displayed on the screen under picture taking/recording mode
7
14
13
1
5
6
10
9
8
12
15
4
2 3
Serial NO.
Icon name
11
11
Description
1
Picture
mode
taking
2
White balance
Indicate that under picture taking mode,
picture taking can be carried out by
pressing shutter key
Indicate the current white balance setting
12
3
Photometry mode
Indicate current photometry mode
4
Exposure
Indicate current selected exposure value
5
Image Dimension
Indicate current dimension of Resolution
of photo
6
Image quality
Indicate current selected image quality
7
Possible number
of photos
Indicate the remaining number of photos
8
SD card
9
Face detection
10
Count down
portrait
11
Focus indication
12
Quantity
electricity
13
Recording mode
14
Recording time
15
Video format
Indicate inserting memory card and
that the SD card that is used has wiring
protection
Open face detection
of
Indication of count down during portrait
Indicate current digital zoom time
of
Indicate current battery state. When red is
displayed, it means that the battery is
used up and the video camera will
automatically close
Indicate that under recording mode, press
the recording key to carry out recording
Idle time means remaining feasible
recording time; record time means the
recorded time
Indicate the resolution of current video
◆
Menu setting
Press the menu key to open the main menu of recording/picture taking and press the left
and right key to select the menu. Press OK key to enter the submenu. In the submenu,
press the menu key or OK key to return to the main menu and press the left and right key
to make selection and finally press OK key for confirmation. After returning to the main
menu, press the menu key to exit the menu.
During menu selection, the selected menu will be covered and displayed by blue and
13
bright striation.
Recording menu option:
Main menu
Submenu
Description
4032x 3000
12-million pixels Resolution
3264 x2448
8–million pixels Resolution
Resolution
2592x1944
5-million pixels Resolution
2048X1536
3-million pixels Resolution
1280x720
Format with high Resolution
640X480
Format with medium Resolution
Excellent
Best image quality
Good
Good image quality
Video
Image quality
Normal
Photometry
mode
Central
photometry
Multi-spot
photometry
Spot photometry
FD
Photometry
The photometry depends on the central area
The photometry depends on multi-spot
The photometry depends on one spot
on
Open FD Photometry, optimize face automatically
off
Close FD Photometry automatically
Auto
White
balance
Common image quality
Use automatic white balance, suitable for most
situations
Sunlight
Suitable for sunlight environment
Cloudy
Suitable for cloudy environment
Fluorescent
Suitable for light
fluorescent lamp
source
environment
of
14
Exposure
Filament
Suitable for light source environment of filament
lamp
/
Use
left and right key to adjust exposure
compensation
Close
Recording
mode
2s
Use portrait mode with 2 s delay
10s
Use portrait mode with 10 s delay
Successive
picture taking
Normal
Special effect
Date Stamp
Smile Capture
Blink detect
Successively taking photos
Normal effect
B&W
Black and white effect
Retro
Memorable effect
Negative
Negative effect
Red
Reddish effect
Green
Greenish effect
Blue
Bluish effect
Off
The date/time won’t print on file
Date
When Recording/picture taking,date will be printed
Date&time
Face detect
Use common mode of taking single picture
Recording/picture taking,date /time will be printed
On
Indicate on the screen
Off
Close face detect
On
Capture the smile, taking picture automatically
Off
Close smile capture
On
Detect the blink, taking picture will stop automatically
15
Off
Close blink detect
Setting menu
No matter under recording mode or picture taking/recording or playback mode, after the
menu is opened by pressing the menu key, press the left and right key to enter setting the
main menu. Then press the up, down, left and right key to select menu and press OK key
to enter the submenu. In the submenu, press the menu key or OK key to return to the
main menu and press the up key or down key to select and finally press OK key for
confirmation. After returning to the main menu, it is possible to press the menu key to
exit from the menu.
▲
Setting menu
▲
During menu selection, the selected menu will be displayed in high brightness.
Main menu
Submenu
Description
Shutter
Open/close
Open sound
No//1/2/3
Key sound
Open/close
Volume
0/1/2/3
Off
No playback after picture taking
1 second
Playback for 1 second after picture taking
3 seconds
Playback for 3 seconds after picture taking
Sound
Auto Review
16
50 Hz
Set the frequency of light source as 50 Hz
60 Hz
Set the frequency of light source as 60 Hz
1 minute
Automatic close under 1 minute of idle state
3 minutes
Automatic close under 3 minutes of idle state
5 minutes
Automatic close under 5 minutes of idle state
Off
Cancel the automatic close
/
Set date and time and format of the date
English
Menu language is set as English
French
Menu language is set as French
German
Menu language is set as German
Italian
Menu language is set as Italian
Dotch
Menu language is set as Dotch
Spanish
Menu language is set as Spanish
Portuguese
Menu language is set as Portuguese
NTSC
The TV model is set as NTSC
PAL
The TV model is set as PAL
Format.
Yes/no
Format memory card
Reset All
Yes/no
Restore factory setting
Power
Frequency
Power Save
Date and time
Language
TV out
When date and time is set, use left key to shift the item that is to be set and press the up
key or down key to make the adjustment. Press OK key for confirmation and press the
menu key to cancel the setting and return to the main menu.
Picture taking/recording mode
The camera will automatically enter picture taking/recording mode after it is started.
Press the camera key to start picture taking and press the recording key to start and stop
17
the recording.
Press T key or W key to achieve digital zoom.
The 10s delayed portrait can be realized after pressing the right key of the shortcut key.
Portrait mode: press the camera key to start count down and the photo will be taken after
2 s or 10 s.
Application of LED fill light: press the left light key to open or close the fill light. (The
fill light can not be used after entering playback mode.)
When the video camera is in idle state, press down key to shift among three screen
displays, including close icon, close screen and normal display.
Note:
● During recording, the video camera shall be kept steadily and you’d better put
it on supports such as tripod to get clear photos.
● After pressing the shutter key for picture taking, the BUSY light will shine.
At this moment, the video camera can not be moved. After BUSY light is off,
the video camera can be moved to prevent the situation that the photos are
blurring.
◆
Menu setting
Press the menu key to open picture taking/recording main menu and press the down key
or up key to select menu and then press OK to enter the submenu. In the submenu, press
the menu key or left key to return to the main menu and press the down key or up key to
select and then press OK key for confirmation. After returning to the main menu, it is
possible to exit from the menu by pressing the menu key.
During menu selection, the background of selected menu will be displayed in blue..
Picture taking menu option:
Note: when adjusting exposure compensation in exposure submenu, use the left and right
key to adjust the exposure compensation value and the image brightness on the screen
will change accordingly. After the setting is finished, press OK key for confirmation and
return to the main menu. Then press the menu key to cancel the setting.
Setting menu
The operation method is the same with the method under picture taking/recording mode.
Playback mode
Use the playback key to enter playback mode.
18
Under playback mode, press the left key to select previous file or press the right key to
select next file.
When recording is selected, press OK key to start the play, meanwhile, the play
timekeeper will appear on the right upper corner on the screen. During the play process,
press the up key to pause the play. After the play pauses, the play can continue by
pressing recording key and the play will be stopped by pressing Menu key.
When photo is selected, press T key to enlarge the photo and press OK key for
confirmation and then use up and down key to move the photo.
Setting playback menu
Press the menu key to open playback main menu and press the up key or down key to
select the menu. Then press OK key to enter the submenu. In the submenu, press the
menu key or OK key to return to the main menu. Then press the up key or down key to
select and press OK key for confirmation. After returning to the main menu, it is possible
to exit from the menu by pressing the menu key.
When selecting menus, the selected menu is highlighted.
▲playback menu
Picture menu options:
Main menu
Submenu
Description
File lock
Lock/unlock the file
Lock all
Lock/unlock current file
Lock all files
Unlock all
Delete the file
Unlock all files
Delete current file
File deleting
Slide play
Delete all
Delete all files
Start
Start slide play
Interval
1 s ~10 s
19
Sound memo
Circulation
Yes/no
add
Add the sound memo on picture
Delete
Delete sound memo on picture
Attention: each picture can add sound memo at most 30senconds. On playback mode to
add sound memo, the picture will show
.press OK key to start play sound memo, you
can press UP key or Menu key to stop it,
Download photo/video by connecting with the computer
After the video camera is connected with the computer, and enters movable
disk
mode, there will be a new movable disk displayed in “my computer” window and the
photos or videos are saved in the directory of “DCIM\100MEDIA” in the movable disk.
After entering this directory, the files can be copied to your hard disk in the computer.
Note: during download process, the USB connection can not be disconnected. When
USB is connected, the memory card can not be pulled out to prevent data lost.
Application of PC camera function
Before the application of PC camera function, make sure to confirm that the camera
driver has been installed to the computer. After driver is installed, the “start
all
programs” menu will be increased with one “SPCA 1528 PC Driver” menu which has the
shortcut icon
. After the video camera has been connected with the computer
and has entered PC camera mode, click this shortcut icon (shown as the following picture)
to open AMCAP window. All the relevant images corresponding to the camera lens of
video camera will be displayed in AMCAP window. When AMCAP software is not
opened, application of PC camera function can send video images by network.
20
Make sure to select the
Preview in Option menu.
Install Software
Insert the accompanied CD into CD-ROM, and the installation guide program will run
automatically, the installation guide window appearing. There are four keys on the guide
window:
Install Driver
Install MediaImpression
Browse CD
Exit
21
Install Driver
Click the Install Driver button to finish installation step by step according to the clew.
After finishing installation, please restart the computer.
Note: Before installing the driver, do not connect the camera with the computer in
order to avoid the install error.
MediaImpression Installation and Use:
Install Mediaimpression:
Click “Install MediaImpression” button and complete the installation as per the
tips.
22
After installation, please restart the computer.
Run MediaImpression :
Double click the
open:
MediaImpression
icon on the desktop or follow “Start → Programs” to
After starting MediaImpression,, click the “Import” to import the media.
23
Choose the video camera storage and choose the output location.
Choose require file and click the import, selected file will be stored in the output
location.
Click “Go to start page” to return the main screen, click the “Video” or “All media”
to use the “YouTube” function.
24
Choose file and click the “upload to YouTube.
Enter you username and password to login the YouTube, execute upload.
Specification
Image inductor
Photo resolution
5-million pixels CMOS image inductor
12M (4032 x 3000), 8M (3264 x 2448), 5M (2592 x
File format
1944), 3M (2048 x 1536)
built-in 32MB, available of an external SD card
(between 4GB and 32GB)
JPEG, AVI, WAV
Resolution of video
Portrait delay
HD 1280X720,VGA 640×480
2 s / 10 s
Digital zoom
8 times
Saver
25
White balance
Automatic / sunny day/ cloudy / fluorescent lamp /
filament lamp
Exposure compensation
USB interface
-2.0 ~ +2.0
USB 2.0
TV output
NTSC / PAL
Display screen
2.7 TFT LCD
Power supply
Four AAA alkaline batteries, or one 3.7 V rechargeable
lithium battery
Menu language
English / French/German/Italian/Dotch/ Spanish/Portuguese
Focus
f=6.5 mm
Diaphragm
Automatic close
F 3.1
1 minute / 3 minutes / 5 minutes
Operation system
required
Windows 2000 / XP / Vista/Windows7
Size
122 mm × 63 mm × 55 mm
Note: the designed specification of the product is based on the latest information when
this manual is made. No further notice will be issued and please subject to the actual
video camera bought by you.
26
Solution of common problems
The video camera
can not be started
after the battery is
installed
Picture taking and
recording can not
be carried out after
pressing the shutter
key
The photos
blurring
are
The photos or
videos are dark
The video camera
automatically
closes
The files in video
camera can not be
deleted
The quantity of electricity of the battery is insufficient, the
battery shall be replaced.
The package of the battery is not removed.
The battery is installed in reversed way. Please confirm
whether the installation way of the battery is correct.
No memory card is inserted, the picture taking and recording
can only be carried out after memory card is inserted.
The SD card in the video camera has writing protection. Take
the SD card out and push writing protection switch to cancel
the protection.
When photos are taken, the hands are shaking. Hold the video
camera firmly with the hands or stabilize the body of video
camera by tripod or other things. The video camera shall be
kept steady when taking pictures.
The light in recording environment is insufficient. The
recording shall be carried out in the place with sufficient light
or the lighting shall be used to increase the brightness.
The quantity of electricity of the battery is insufficient, the
battery shall be replaced.
To save electricity, the video camera will automatically close
upon the setting when on operation is not carried out beyond 1
minute (3 minutes or 5 minutes, which depends on the setting)
The SD card in the video camera has writing protection. Take
the SD card out and push writing protection switch to cancel
the protection.
27
In accordance with the following applicable directives:
2004/108/EC Electromagnetic Compatibility
This product has been assessed against the following
applicable stancards:
EN 55022:2006+A1:2007
EN 55024:1998+A1:2001+A2:2003
EN 61000-3-2:2006
EN 61000-3-3:2008
For more information please visit our Website:
http://www.mpmaneurope.com
28