1
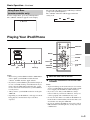
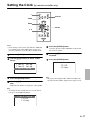
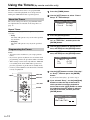
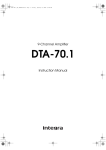
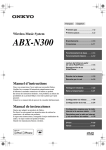
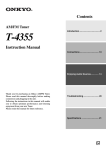
Dock Music System ABX-100 Getting Started ............................En-2 Connections .................................En-7 Instruction Manual Basic Operation ..........................En-8 Playing Your iPod/iPhone ......En-9 Setting the Clock..................... En-11 Thank you for purchasing an Onkyo Dock Music System. Please read this manual thoroughly before making any connections and plugging it in. Following the instructions in this manual will enable you to obtain optimum performance and listening enjoyment from your new Dock Music System. Please retain this manual for future reference. Using the Timers ..................... En-12 Miscellaneous (Reset Procedure) ........................ En-14 En WARNING: TO REDUCE THE RISK OF FIRE OR ELECTRIC SHOCK, DO NOT EXPOSE THIS APPARATUS TO RAIN OR MOISTURE. CAUTION: TO REDUCE THE RISK OF ELECTRIC SHOCK, DO NOT REMOVE COVER (OR BACK). NO USER-SERVICEABLE PARTS INSIDE. REFER SERVICING TO QUALIFIED SERVICE PERSONNEL. WARNING AVIS RISK OF ELECTRIC SHOCK DO NOT OPEN RISQUE DE CHOC ELECTRIQUE NE PAS OUVRIR The lightning flash with arrowhead symbol, within an equilateral triangle, is intended to alert the user to the presence of uninsulated “dangerous voltage” within the product’s enclosure that may be of sufficient magnitude to constitute a risk of electric shock to persons. The exclamation point within an equilateral triangle is intended to alert the user to the presence of important operating and maintenance (servicing) instructions in the literature accompanying the appliance. Important Safety Instructions 1. 2. 3. 4. 5. 6. 7. 8. 9. 10. 11. 12. 13. 14. En-2 Read these instructions. Keep these instructions. Heed all warnings. Follow all instructions. Do not use this apparatus near water. Clean only with dry cloth. Do not block any ventilation openings. Install in accordance with the manufacturer’s instructions. Do not install near any heat sources such as radiators, heat registers, stoves, or other apparatus (including amplifiers) that produce heat. Do not defeat the safety purpose of the polarized or grounding-type plug. A polarized plug has two blades with one wider than the other. A grounding type plug has two blades and a third grounding prong. The wide blade or the third prong are provided for your safety. If the provided plug does not fit into your outlet, consult an electrician for replacement of the obsolete outlet. Protect the power cord from being walked on or pinched particularly at plugs, convenience receptacles, and the point where they exit from the apparatus. Only use attachments/accessories specified by the manufacturer. Use only with the cart, stand, PORTABLE CART WARNING tripod, bracket, or table specified by the manufacturer, or sold with the apparatus. When a cart is used, use caution when moving the cart/ apparatus combination to avoid injury from tip-over. S3125A Unplug this apparatus during lightning storms or when unused for long periods of time. Refer all servicing to qualified service personnel. Servicing is required when the apparatus has been damaged in any way, such as power-supply cord or plug is damaged, liquid has been spilled or objects have fallen into the apparatus, the apparatus has been exposed to rain or moisture, does not operate normally, or has been dropped. 15. Damage Requiring Service Unplug the apparatus from the wall outlet and refer servicing to qualified service personnel under the following conditions: A. When the power-supply cord or plug is damaged, B. If liquid has been spilled, or objects have fallen into the apparatus, C. If the apparatus has been exposed to rain or water, D. If the apparatus does not operate normally by following the operating instructions. Adjust only those controls that are covered by the operating instructions as an improper adjustment of other controls may result in damage and will often require extensive work by a qualified technician to restore the apparatus to its normal operation, E. If the apparatus has been dropped or damaged in any way, and F. When the apparatus exhibits a distinct change in performance this indicates a need for service. 16. Object and Liquid Entry Never push objects of any kind into the apparatus through openings as they may touch dangerous voltage points or short-out parts that could result in a fire or electric shock. The apparatus shall not be exposed to dripping or splashing and no objects filled with liquids, such as vases shall be placed on the apparatus. Don’t put candles or other burning objects on top of this unit. 17. Batteries Always consider the environmental issues and follow local regulations when disposing of batteries. 18. If you install the apparatus in a built-in installation, such as a bookcase or rack, ensure that there is adequate ventilation. Leave 20 cm (8") of free space at the top and sides and 10 cm (4") at the rear. The rear edge of the shelf or board above the apparatus shall be set 10 cm (4") away from the rear panel or wall, creating a fluelike gap for warm air to escape. Precautions 1. Recording Copyright—Unless it’s for personal use only, recording copyrighted material is illegal without the permission of the copyright holder. 2. Care—Occasionally you should dust the unit all over with a soft cloth. For stubborn stains, use a soft cloth dampened with a weak solution of mild detergent and water. Dry the unit immediately afterwards with a clean cloth. Don’t use abrasive cloths, thinners, alcohol, or other chemical solvents, because they may damage the finish or remove the panel lettering. 3. Power WARNING BEFORE PLUGGING IN THE UNIT FOR THE FIRST TIME, READ THE FOLLOWING SECTION CAREFULLY. For U.S. models FCC Information for User CAUTION: The user changes or modifications not expressly approved by the party responsible for compliance could void the user’s authority to operate the equipment. NOTE: This equipment has been tested and found to comply with the limits for a Class B digital device, pursuant to Part 15 of the FCC Rules. These limits are designed to provide reasonable protection against harmful interference in a residential installation. For Canadian Models AC outlet voltages vary from country to country. Make sure that the voltage in your area meets the voltage requirements printed on the AC adapter. NOTE: THIS CLASS B DIGITAL APPARATUS COMPLIES WITH CANADIAN ICES-003. The AC adapter is used to disconnect this unit from the AC power source. Make sure that the adapter is readily operable (easily accessible) at all times. Modèle pour les Canadien If you do not intend to use the unit for an extended period, remove the AC adapter from the AC outlet. 4. Batteries and Heat Exposure Warning Batteries (battery pack or batteries installed) shall not be exposed to excessive heat as sunshine, fire or the like. 5. Never Touch this Unit with Wet Hands—Never handle this unit or its power cord while your hands are wet or damp. If water or any other liquid gets inside this unit, have it checked by your Onkyo dealer. 6. Handling Notes • If you need to transport this unit, use the original packaging to pack it how it was when you originally bought it. • Do not leave rubber or plastic items on this unit for a long time, because they may leave marks on the case. • This unit’s top and rear panels may get warm after prolonged use. This is normal. • If you do not use this unit for a long time, it may not work properly the next time you turn it on, so be sure to use it occasionally. REMARQUE: CET APPAREIL NUMÉRIQUE DE LA CLASSE B EST CONFORME À LA NORME NMB-003 DU CANADA. For European Models Declaration of Conformity We, ONKYO EUROPE ELECTRONICS GmbH LIEGNITZERSTRASSE 6, 82194 GROEBENZELL, GERMANY declare in own responsibility, that the ONKYO product described in this instruction manual is in compliance with the corresponding technical standards such as EN60950-1, EN55022, EN55024 and EN61000-3-2, -3-3. GROEBENZELL, GERMANY K. MIYAGI ONKYO EUROPE ELECTRONICS GmbH En-3 Contents Features Important Safety Instructions .......................... 2 Precautions........................................................ 3 Features ............................................................. 4 Supplied Accessories....................................... 5 Using the Remote Controller ........................... 5 Replacing the Battery ....................................... 5 Getting to Know the ABX-100 .......................... 6 Connections ...................................................... 7 Installing the iPod Universal Dock Adapter.... 7 Basic Operation................................................. 8 Turning On the ABX-100 ............................... 8 Selecting the Input Source ............................ 8 Adjusting the Volume..................................... 8 Muting the ABX-100 ..................................... 8 Changing the Downlight Brightness .............. 8 Adjusting the Bass and Treble....................... 8 Using Super Bass.......................................... 9 Playing Your iPod/iPhone ................................ 9 Navigating the iPod/iPhone Menus ............. 10 Select playlists............................................. 10 Random Playback ...................................... 10 Repeat Playback ......................................... 10 Displaying Song Information........................ 10 Setting the Clock............................................. 11 Using the Timers ............................................. 12 About the Timers ......................................... 12 Programming the Timers ............................. 12 Turning Timers On and Off.......................... 13 Using the Snooze Function ......................... 13 Using the Sleep Timer ................................. 13 Other Settings (Reset Procedure) ................. 14 Troubleshooting.............................................. 14 Power .......................................................... 14 Audio ........................................................... 14 iPod/iPhone ................................................. 15 Remote Controller ....................................... 15 External Components .................................. 15 Timers.......................................................... 15 Clock............................................................ 15 Specifications.................................................. 16 General • • • • • Control your iPod/iPhone* with the remote controller Bass and treble tone controls Super Bass (S.Bass) function for deeper bass sounds Line input for external audio source Downlight with adjustable dimmer iPod/iPhone • Made for iPod touch (1st, 2nd, 3rd and 4th generation), iPod classic, iPod with video, iPod nano (1st, 2nd, 3rd, 4th, 5th and 6th generation), iPhone 4, iPhone 3GS, iPhone 3G and iPhone • iPod/iPhone charging capability Timers and Clock • 2 programmable timers • Sleep timer • Snooze function * iPhone, iPod, iPod classic, iPod nano, iPod shuffle, and iPod touch are trademarks of Apple Inc., registered in the U.S. and other countries. “Made for iPod” and “Made for iPhone” mean that an electronic accessory has been designed to connect specifically to iPod or iPhone, respectively, and has been certified by the developer to meet Apple performance standards. Apple is not responsible for the operation of this device or its compliance with safety and regulatory standards. Please note that the use of this accessory with iPod or iPhone may affect wireless performance. En-4 Supplied Accessories Replacing the Battery Make sure you have the following accessories: Use only a battery of the same type (CR2025). 1 While sliding the stopper to the side, pull out the battery holder. Back side Remote controller (RC-806S) and battery (CR2025) 2 AC adapter (DC output 15V 2A) (Adapter varies from country to country.) Insert a lithium button battery in the battery holder, and then replace the holder. Positive (+) side Note: • The AC adapter supplied with the ABX-100 is designed exclusively for use with the ABX-100. Do not use it with any another device. Likewise, do not use any other AC adapter with the ABX-100. Doing so may damage the ABX-100. Using the Remote Controller Remove the plastic film before using the remote controller. Notes: • If the remote controller doesn’t work reliably, try replacing the battery. • If you intend not to use the remote controller for a long time, remove the battery to prevent damage from leakage or corrosion. • Expired batteries should be removed as soon as possible to prevent damage from leakage or corrosion. When using the remote controller, point it toward the ABX-100’s remote control sensor, as shown below. Remote control sensor ABX-100 Approx. 5 m (16 ft.) 30° 30° En-5 Getting to Know the ABX-100 Top Panel 2 1 3 Remote Controller mnop G 4 5 67 Rear Panel k Bottom h i j l r F D C B A E z y x The page numbers in parentheses show where you can find the main explanation for each item. Top/Rear Panel s [] button a Slide cover (7) t TONE button (8) b iPod/iPhone Dock (7) u S.BASS button (9) c Display (10) v VOLUME []/[] buttons (8, 10) d MENU button (8) w MUTING button (8) e []/[] buttons (8) x REPEAT button (10) f ENTER button (8) y SHUFFLE button (10) g [/] button (10) z PLAYLIST []/[] buttons (10) h INPUT button (8) A [/] button (10) i VOL []/[] buttons (8, 10) B [] button j ON/STANDBY button (8) C []/[] buttons (10) k LINE IN jack (7) D ENTER button (8, 10, 11, 12) l DC IN (15V 2A) jack E MENU button (8, 10) Remote Controller m button (8) n TIMER button (11, 12, 13) o SLEEP button (13) p SNOOZE button (13) q DISPLAY button (10, 11, 12) r INPUT []/[] buttons (8) En-6 q F []/[] buttons (8, 10, 11, 12, 13) G DIMMER button (8) s t u v w Connections About Connections ABX-100 rear panel • Before making any connections, read the manuals supplied with your other components. • Don’t connect the AC adapter until you’ve completed and double-checked all connections. Connecting a Portable Audio Device LINE IN AC adapter Stereo miniplug cable (not supplied) Portable audio device’s output jack To wall outlet Connect the ABX-100’s LINE IN jack on the rear panel to the portable audio device’s output jack. Depending on the type of output jack on the portable audio device, you may need to purchase a suitable cable. The ABX-100’s LINE IN jack accepts a stereo miniplug. Notes: • Use a connecting cable that doesn’t have any attenuation resistors in it. • If you connect a portable audio device’s headphone output to the ABX-100’s LINE IN jack, turn down the volume on the portable audio device before you connect it. If the ABX-100 seems quiet even with the volume turned up, try increasing the volume on the portable audio device. Portable audio Caution Regarding Placement Since the sound of the speakers exits the ABX-100 from the side, we recommend that you leave at least 20 cm of space at each side. Installing the iPod Universal Dock Adapter Move the slide cover to the left to expose the iPod dock. First, with the adapter slot facing the back, fit in the front of the adapter and then press in the back until a click is heard. To remove the adapter, lift the back side up. If the adapter is difficult to remove, insert a thin object into the slot and lift the adapter up. Use the Universal Dock Adapter that’s appropriate for your model of iPod/iPhone. If a Universal Dock Adapter was included with your iPod, use that adapter. If none was included, purchase the appropriate adapter separately. Note: • Inserting your iPod/iPhone into the dock without the appropriate adapter may damage the dock connector. En-7 Basic Operation M DIMMER INPUT C/U MENU F/H TONE S.BASS ENTER MENU INPUT F/H VOL H/F Downlight (below the speakers) M ON/STANDBY VOLUME F/H ENTER Turning On the ABX-100 To turn on the ABX-100, press the [ ON/STANDBY] button on the ABX-100 or remote controller. Press the [ ON/STANDBY] button again to set the ABX-100 to Standby. If an iPod/iPhone is connected to the ABX-100, the iPod/ iPhone will be charged. MUTING Changing the Downlight Brightness (remote controller only) You can adjust the brightness of the downlight. Press the remote controller’s [DIMMER] button repeatedly to select normal, dim or off. ABX-100 Selecting the Input Source You can select iPod or LINE, which can be an external component. To select the input source, use the remote controller’s INPUT []/[] buttons. On the ABX-100, press the [INPUT] button repeatedly. Adjusting the Volume Press the VOL Up [] button to increase the volume or the VOL Down [] button to decrease it. You can also use the remote controller’s VOLUME []/ [] buttons. Muting the ABX-100 (remote controller only) To mute the ABX-100, press the remote controller’s [MUTING] button. “Muting” appears on the display for a few seconds. To unmute the ABX-100, press the [MUTING] button again. Tips: While the ABX-100 is muted: • Press the VOL []/[] buttons on the ABX-100 or pressing the VOLUME []/[] buttons on the remote controller will unmute the ABX-100. • If you turn the ABX-100 off, the next time you turn it on, the ABX-100 will be unmuted. En-8 Downlight Adjusting the Bass and Treble 1 Press the [TONE] button to make the display indicate “Tone Control.” 2 Use the []/[] buttons to adjust the value. You can adjust the value in the range of –3 to +3. 3 Press the [ENTER] button. The value of the Treble setting will blink. 4 5 Use the []/[] buttons to adjust the value. Press the [ENTER] button. The original display will reappear. Note: • If you press no buttons for eight seconds, the previous display will appear automatically. Basic Operation—Continued Using Super Bass (remote controller only) To turn on Super Bass, press the [S.BASS] button. The “S.BASS” indication appears on the display. The strength of the ultra-low range will change each time you press the [S.BASS] button. The “S.BASS” indication will disappear when this setting is off. on off S.BASS Clock Sapaaaaaa 123456789123456 Playing Your iPod/iPhone DISPLAY MENU Q/R ENTER F/H PLAYLIST F/H MENU ENTER F/H U/I SHUFFLE VOL H/F Notes: • Before using your iPod/iPhone with the ABX-100, be sure to update your iPod/iPhone with the latest software, available from the Apple website. • If you leave your iPod/iPhone paused when using it on its own, eventually it will go into hibernation. If you insert it into the ABX-100 dock in this state, you’ll need to wait a few moments before your iPod/iPhone is ready for use. • Always remove your iPod/iPhone before moving the ABX-100. • Depending on your iPod/iPhone, or the type of content being played, some functions may not work as expected. U/I VOLUME F/H REPEAT 1 2 Move the slide cover to the left. Insert your iPod/iPhone into the ABX-100’s iPod dock. Notes: • To prevent damage to the dock connector, do not twist or force your iPod/iPhone into the dock, and be careful not to wiggle your iPod/iPhone while inserting it. • If you use a case with your iPod/iPhone, always remove it before you insert it. Otherwise, it may not connect properly and a malfunction may occur. • Do not close the slider cover while an iPod/iPhone is inserted. We recommend that you leave the slide cover closed when not using the ABX-100. • Do not use with any iPod/iPhone accessories, such as FM transmitters and microphones, as they may cause a malfunction. En-9 Playing Your iPod/iPhone—Continued Press the Play/Pause [/] button. Playback starts. Note: • The volume level is adjusted by using the VOL []/ [] buttons on the ABX-100 or its remote controller. Adjusting the volume on your iPod/iPhone has no effect. 3 Pausing Playback To pause playback, press the [/] button. Press the [/] button again to resume playback. Selecting Songs (remote controller only) To return to the beginning of the track that’s currently playing or paused, press the Previous []button. Press the Previous [] button repeatedly to select earlier songs. Press the Next [] button repeatedly to select subsequent songs. Fast Forward and Fast Reverse (remote controller only) To fast forward or fast reverse during playback or while playback is paused, press and hold down the Next [] or Previous [] button, respectively. Navigating the iPod/iPhone Menus 1 Press the [MENU] button on the ABX-100 or the remote controller to display the menu on the iPod/iPhone. 2 Use the []/[] buttons to select an item on the menu, and then press [ENTER]. Select playlists (remote controller only) During playlist playback, press the PLAYLIST [] button to select the previous playlist; press the PLAYLIST [] button to select the next playlist. Random Playback (remote controller only) With random playback, the songs on the iPod/iPhone are played in random order. 1 Press the [SHUFFLE] button. The symbol will appear in the screen of the iPod/iPhone. 2 To start random playback, press the Play [/] button. Cancelling Random Playback To cancel random playback, press the [SHUFFLE] button. The symbol will disappear from the screen of the iPod/iPhone. Repeat Playback (remote controller only) If you press the [REPEAT] button, the song on the iPod/ iPhone will play repeatedly. The type of repeat playback will change as follows each time you press the [REPEAT] button. : Repeat one song : Repeat all songs Cancelling Repeat Playback Press the [REPEAT] button several times until the or symbol disappears from the screen of the iPod/ iPhone. Displaying Song Information (remote controller only) You can display various information about the songs currently playing. During playback, press the [DISPLAY] button repeatedly to display the following song information. Artist name: Name of the artist. Album name: Name of the album. En-10 Setting the Clock (by remote controller only) M DISPLAY TIMER MENU ENTER F, H Note: • Clock settings can be made only while the ABX-100 is in standby mode. If the ABX-100 is powered-on, press the [] button to put the unit in standby mode. 1 2 5 Press the [ENTER] button. A pixel in the lower right will blink to indicate that the clock has started. Press the [TIMER] button. 6 Use the []/[] buttons to select the day of the week. Use the []/[] buttons to select “Clock Setup”. 7 Press the [ENTER] button. Timer1 Setup Timer2 Setup Clock Setup 3 4 Press the [ENTER] button. Use the []/[] buttons to enter the current time. Hold down the buttons to change the value quickly. Clock Setup 12:09 Friday Tip: • If you press the Display button while in standby mode, the time and date will be displayed for eight seconds. Tip: • To change the time format between 12-hour and 24hour, press the [DISPLAY] button. Clock Setup 12:09 Friday En-11 Using the Timers (by remote controller only) The ABX-100 has three timers: two programmable timers for automated playback, and a sleep timer for turning the ABX-100 off after a specified period. 1 2 Press the [TIMER] button. Use the []/[] buttons to select “Timer1 Setup” or “Timer2 Setup”. About the Timers Timer1 Setup Timer2 Setup Clock Setup The various settings for the two programmable timers are explained here. For details on the sleep timer, see page 13. Repeat Timers Each timer can be programmed to operate every week or every day. • Every The timer will operate every week on the specified day and time. 3 4 Press the [ENTER] button. 5 Use the []/[] buttons to specify the On time, and then press the [ENTER] button. 6 Use the []/[] buttons to specify the Off time, and then press the [ENTER] button. • Everyday The timer will operate every day at the specified time. Programming the Timers Notes: • You must set the clock before you can program the timers. • If you don’t operate any buttons for one minute while programming a timer, the procedure will be cancelled. • Timer settings can be made only while the ABX-100 is in standby mode. If the ABX-100 is powered-on, press the [] button to put the unit in standby mode. • Connect your iPod/iPhone to the iPod Dock, and make it ready for playback. M TIMER Timer1 Setup Timer1 On On 6:30 Off 7:00 7 Use the []/[] buttons to select “Everyday” or “Every”, and then press the [ENTER] button. If you selected “Everyday”, proceed to step 9. 8 If you selected “Every”, use the []/[] buttons to select the day of the week on which you don’t want timer playback to occur; then use the []/[] buttons to make the underline character appear in place of that day of the week, and then press the [ENTER] button. SNOOZE DISPLAY Q, R ENTER F, H Use the []/[] buttons to select “Timer1 On” or “Timer2 On”, and then press the [ENTER] button. Timer1 Setup Every MoTuWeThFr En-12 Using the Timers (by remote controller only)—Continued 9 Use the []/[] buttons to specify the ABX-100’s volume level, and then press the [ENTER] button. The timer symbol and number will appear in the upper right of the display; this display will disappear after a few seconds. Clock Setup 12:12 Friday Using the Sleep Timer With the sleep timer, you can set the ABX-100 so that it automatically turns off after a specified period. 1 SLEEP Tip: • You can check the setting by pressing the [TIMER] button and then pressing [ENTER] repeatedly. Turning Timers On and Off 1 2 Press the [TIMER] button. 3 Use the []/[] buttons to select “On” or “Off”, and then press the [ENTER] button. 4 Press the [TIMER] button. Use the []/[] buttons to select “Timer1 Setup” or “Timer2 Setup”, and then press the [ENTER] button. Press the [SLEEP] button repeatedly to select the required sleep time. With the [SLEEP] button, you can set the sleep time from 90 to 10 minutes in 10 minute steps. When the sleep timer has been set, “Sleep 90” appears on the display. The sleep time appears on the display for about eight seconds, then the sleep time display disappears. The display will indicate [SLEEP] while the sleep timer is operating. Checking the Remaining Sleep Time Using the Snooze Function When timer playback is operating, the ABX-100 provides a snooze feature that temporarily silences the song playback and sounds the song playback again after five minutes. Enabling the snooze feature When the timer has started song playback on the ABX-100, you can press the [SNOOZE] button to use the snooze feature. After five minutes, the snooze feature sounds the song playback again. To check the remaining sleep time, press the [SLEEP] button. Note that if you press the [SLEEP] button while the sleep time is being displayed, you’ll shorten the sleep time by 10 minutes. Canceling the Sleep Timer To cancel the sleep timer, press the [SLEEP] button repeatedly until “Sleep Off” appears. En-13 Other Settings (Reset Procedure) When the ABX-100 is in Standby mode, pressing the remote’s [MENU] button will display the following items. 12/24H Format Beep Volume Limit Reset The available settings for each item are shown below. (The default setting is underlined.) “12/24H Format” 12H 24H Switches the time format between 12-hour and 24-hour. On models for the North American market, the default setting is “12H”; for other models, the default setting is “24H.” “Beep” On Off Switches on/off the beep tone that sounds when you press a button on the top panel of the ABX-100. “Volume Limit” 10 40 Specifies the maximum volume in the range of 10–40. The default setting is 40. “Reset” Cancel OK If you select OK and then press the [ENTER] button, the ABX-100 will be reset to its factory-set state. 1 Use the []/[] buttons to select a menu item, and then press the [ENTER] button. 2 Use the []/[] buttons to change the setting. 3 Press the [ENTER] button to finalize the change, and exit the menu. Note: • During this procedure, you can press the [MENU] button to exit the settings. Troubleshooting If you experience any problem while using the ABX-100, look for a solution in this section. Audio There’s no sound. If you can’t resolve the issue yourself, try resetting the ABX-100 before contacting your Onkyo dealer. Reset the ABX-100 as described in the “Reset” section of “Other Settings” (this page). Note that resetting the ABX-100 will delete your custom settings. Power Can’t turn on the ABX-100. • Make sure that the AC adapter is properly plugged into the wall outlet, and that the DC IN connection has been made correctly (see page 7). • Unplug the AC adapter from the wall outlet, wait 10 seconds or more, then plug it in again. The ABX-100 turns off unexpectedly. • If the sleep timer has been set and the SLEEP indicator is shown on the display, the ABX-100 will turn off automatically after a specified period (see page 13). • When timed playback finishes, the ABX-100 automatically switches to Standby mode (see page 12). En-14 • Make sure the ABX-100’s volume is not set too low (see page 7). • Make sure the correct input source is selected (see page 7). • Make sure the ABX-100 is not muted (see page 8). • Check all connections and correct as necessary (see page 7). The sound quality is not good. • The sound quality can be affected by strong magnetic fields, such as that from a TV. Try moving any such devices away from the ABX-100. • If you have any devices that emit high-intensity radio waves near the ABX-100, such as a cellular phone that’s being used to make a call, the ABX-100 may output noise. Audio output is intermittent when the ABX-100 is subjected to vibration. The ABX-100 is not a portable device. Use it in a location that’s not subject to shock or vibration. Troubleshooting—Continued iPod/iPhone External Components There’s no sound. No sound is heard from your turntable. • Make sure your iPod/iPhone is properly seated in the ABX-100’s iPod dock. Even very thin iPod/iPhone cases can prevent the iPod/iPhone from seating properly on the dock connector, so always remove any case before inserting your iPod/iPhone (see page 7). • Make sure the ABX-100 is turned on, the input source is set to iPod, and the volume is not set too low. • Make sure that your iPod/iPhone is compatible with the system (see page 4). • Make sure the turntable has a built-in phono equalizer. If the turntable doesn’t have a phono equalizer builtin, you must provide one. Can’t control your iPod with the ABX-100’s remote controller. • Make sure your iPod/iPhone is properly seated in the ABX-100’s iPod dock. Even very thin iPod/iPhone cases can prevent the iPod/iPhone from seating properly on the dock connector, so always remove any case before inserting your iPod/iPhone (see page 7). • You may not be able to control your iPod/iPhone immediately after inserting it into the ABX-100’s iPod dock. In this case, wait a few moments until your iPod/ iPhone wakes up. • Depending on your iPod/iPhone model, its software version, or the content your playing, some functions may not work as expected (see page 9). • If your iPod/iPhone does not work, remove it, wait a few moments, and then connect it again. • Check whether there might be a problem with your iPod/iPhone. For an iPod touch or iPhone, make sure that the app is working correctly. Timers The timers don’t work. • Make sure the clock has been set correctly (see page 11). • Timed operation will fail if the ABX-100 is already on at the specified On time, so make sure it’s set to Standby (see page 11). • The timer may overlap with another timer. If you program two timers, make sure they don’t overlap. • If you press the [SLEEP] or [TIMER] button while a timed operation is in progress, the timer will be cancelled and the ABX-100 won’t turn off at the specified Off time (see page 12). • Make sure the timer is set to suitable volume setting (see page 12). Clock The clock displays “--:--” • A power outage has occurred and the time setting lost. Set the clock again (see page 11). The timers will all be set to Timer Off, so you’ll need to turn on any necessary timers (see page 12). The timer settings will be preserved. Remote Controller The remote controller doesn’t work properly. • Replace the battery with a new one. • The remote controller is too far away from the ABX-100, or there’s an obstacle between them (see page 5). • The ABX-100’s remote control sensor is being subjected to bright light (inverter-type fluorescent light or sunlight). The ABX-100 contains a microcomputer. In very rare situations, severe interference, noise from an external source, or static electricity may cause it to malfunction or lockup. In the unlikely event that this should happen, unplug the AC adapter, wait at least 10 seconds, and then plug it back in again. If this doesn’t resolve the issue, reset the ABX-100 to its factory defaults (see page 14). En-15 Specifications ■ General Power Supply Power Consumption No-sound Power Consumption Stand-by Power Comsumption Dimensions (W × H × D) Weight Analog Input AC adapter (DC IN 15 V, 2 A) 18 W 3.9 W 0.5 W (when not charging iPod/iPhone) 430 × 131 × 143 mm (16-15/16 × 5-3/16 × 5-5/8 inches) 2.4 kg (5.3 lbs.) LINE ■ Amplifier Power Output 2ch × 10 W (6 Ω, 1 kHz, 1% THD) Total Harmonic Distortion+N 1% Input Sensitivity and Impedance 1000 mV/ 15.6 kΩ ■ Speakers Type Unit Full-Range bass reflex 6.4 cm (2-1/2") cone (magnetically shielded) Specifications and features are subject to change without notice. 2-1, Nisshin-cho, Neyagawa-shi, OSAKA 572-8540, JAPAN Tel: 072-831-8023 Fax: 072-831-8163 http://www.onkyo.com/ 18 Park Way, Upper Saddle River, N.J. 07458, U.S.A. Tel: 800-229-1687, 201-785-2600 Fax: 201-785-2650 http://www.us.onkyo.com/ Liegnitzerstrasse 6, 82194 Groebenzell, GERMANY Tel: +49-8142-4401-0 Fax: +49-8142-4401-555 http://www.eu.onkyo.com/ The Coach House 81A High Street, Marlow, Buckinghamshire, SL7 1AB, UK Tel: +44-(0)1628-473-350 Fax: +44-(0)1628-401-700 Unit 1033, 10/F, Star House, No 3, Salisbury Road, Tsim Sha Tsui Kowloon, Hong Kong. Tel: 852-2429-3118 Fax: 852-2428-9039 http://www.ch.onkyo.com/ 1301, 555 Tower, No.555 West NanJin Road, Jin an, Shanghai, China 200041, Tel: 86-21-52131366 Fax: 86-21-52130396 I1108-1 SN 29400921 (C) Copyright 2011 ONKYO SOUND & VISION CORPORATION Japan. All rights reserved. * 2 9 4 0 0 9 2 1 *