1
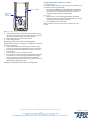
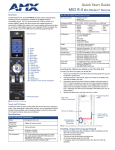
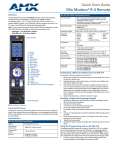
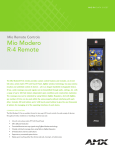
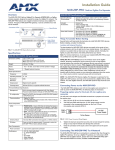
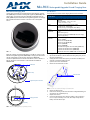
Installation Guide
Mio-RCC Rechargeable Upgrade Kit and Charging Base
Mio Remote Charging Base
Specifications
The Mio series of remotes are complemented either with a Mio-RCC charging
base (FG147-02) or the Mio-RCC rechargeable upgrade kit (FG147-03K). One
charging base, a new back housing and a Mio-RBP rechargeable lithium ion
battery (FG147-10) are included with the rechargeable upgrade kit. The charging
base upgrade kit transforms the Mio R-1 and Mio R-2 into a rechargeable
device.
The specifications for the Mio remote charging base and kit are as follows:
Mio-RCC Remote Charging Kit (FG147-03K) with Base (FG147-02)
Specifications
Dimensions (HWD)
Charging Base - 1.61 (4.09 cm) (height); 4.25 (10.80 cm)
(diameter)
Lithium Ion Battery - 2.13” x 1.38” x .28”
(5.41 cm x 3.45 cm x .71 cm)
Weight
• 1.15 lbs (.52 kg) - Remote Charging Cradle
• .15 lbs (.07 kg) - Power Supply
• .06 lbs (.027 kg) - Rechargeable Lithium Battery
Included
Accessories:
• Rechargeable Lithium Ion battery (4 hours battery life) Kit
only
• Back housing Kit only
• Mio-RCC Charging base (FG147-02) with Power Supply
• Power supply Kit only
Other AMX
Equipment:
•
•
•
•
•
•
•
•
•
•
FIG. 1 Mio Remote Charging Base
Mio-RCC Charging Base (FG147-02) with Power Supply
Mio R-1 (FG147)
Mio R-2 RF 418 (FG147-418)
Mio R-2 RF 433 (FG147-433)
Mio R-3 (FG148-03)
Mio R-4 (FG148-04)
Mio-RBP Rechargeable Lithium Ion Battery (FG147-10)
AXR-RF 418 MHZ RF Receiver (FG782-418)
AXR-RF 433 MHZ RF Receiver (FG782-433)
Mio Modero IR Receiver (FG5797-01xx; xx indicates color)
Begin with Installing The Rechargeable Battery on the Mio R-1 and R-2 for the
Mio-RCC rechargeable upgrade kit (FG147-03K) or Charging The Mio Remote
with the Charging Base for the Mio-RCC charging base (FG147-02).
Installing The Rechargeable Battery on the Mio R-1 and R-2
Consult the operation/reference manuals for the Mio R-1, Mio R-2, Mio R-3, or
Mio R-4 remotes for more information. These manuals are available at
www.amx.com.
2.
Rubber feet
1.
3.
4.
Flip and turn the device so that the buttons are facing away from you and
the device is upside down.
Holding the device in both hands, place your thumbs on the battery door
and push up to slide the battery door free.
If present, remove the AAA batteries.
Remove the 6 screws shown in FIG. 3.
(Bottom View)
6 Screw Points
Angle barrel power connector
FIG. 3 6 Screw Points of the Back Housing for the Mio R-1/R-2
5.
6.
Charging contacts
(Top View)
FIG. 2 Mio Remote Charging Base (Top and Bottom view)
7.
8.
Remove the back housing.
Place the new housing on the device so that the rechargeable battery port
connection is now accessible (FIG. 4).
Replace the 6 screws.
Connect the terminal end of the Lithium Ion battery to the port shown in
FIG. 4. It may be necessary to use a thin, blunt object to fully seat the
battery connector within its port.
Changing Battery Modes (Mio R-1 and R-2)
Configuration Mode
The Configuration Mode allows you to set the battery type on the Mio R-1 and
R-2 remotes. To enter Configuration Mode:
Lithium Ion Battery
Rechargeable
Battery
Port Connection
1.
Press and hold the STOP button and the INPUT button simultaneously.
The two buttons must be pressed within 0.1 seconds of each other and
held down for 2 seconds. The device indicates that you are now in
Configuration Mode. See below for available modes.
Battery Type
2.
3.
Pressing button "6" on the remote toggles the battery type between
Normal and Recharge. The display indicates the selected type. The type
of battery dictates the battery type to be selected.
Press the EXIT key when you are finished.
Note: Your settings will not be lost in the event your batteries die or are
removed.
FIG. 4 Rechargeable Battery Port on The Mio Remote
9.
10.
11.
Press the battery between the rubber pads, with the sticker showing, in
the housing area of the Mio remote. Confirm that the battery is flush with
the bottom of the battery enclosure on the bottom housing.
Replace the battery door and slide to lock it in place.
Begin charging the battery.
Charging The Mio Remote with the Charging Base
The Mio remotes receive power for charging from a charging base. To recharge
the battery in a Mio remote:
1.
2.
3.
4.
Connect the terminal end of the power supply to the bottom external
power port on the Mio remote charging base. See FIG. 2 for the location.
Route the cable through the provided channel so that it comes out the
side of the base.
Connect the power cord to an external power source.
Place the bottom of the Mio remote into the charging base so the contacts
on the device are on top of the charging contacts inside the charging
base. The Power LED on the Mio remote blinks red to indicate it is
charging and illuminates solid red when it is done. Full charge cycle for a
depleted battery is approximately 3 hours.
Avoid placing units equipped with AAA batteries in the charging base.
For full warranty information, refer to the AMX Instruction Manual(s) associated with your Product(s).
11/08
©2008 AMX. All rights reserved. AMX and the AMX logo are registered trademarks of AMX.
AMX reserves the right to alter specifications without notice at any time.
3000 RESEARCH DRIVE, RICHARDSON, TX 75082 • 800.222.0193 • fax 469.624.7153 • technical support 800.932.6993 • www.amx.com
93-0147-02
REV: D