1
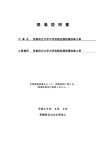
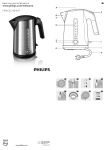
1
HD9385
HD9384
HD9380
User manual
4222.005.0386.2
2
3
4
5
6
7
8
9
10
11
12
13
English
Introduction
Congratulations on your purchase and welcome to Philips! To fully
benefit from the support that Philips offers, register your product
at www.philips.com/welcome.
General description (Fig. 1)
1Lid
2Spout
3 Water level indicator
4 Lid release button
5Base
6 Base connector
7 Cord storage facility
8 Mains plug
9 Black/Fruit/Herbal tea button
10 Instant soup/Hot chocolate button
11 Instant coffee button
12 Green tea button
13 40ºC button
14 KEEP WARM button
Important
Read this user manual carefully before you use the appliance and save it for
future reference.
Danger
-- Do not immerse the kettle or the base in water or any other liquid.
Warning
-- Check if the voltage indicated on the appliance corresponds to the local
mains voltage before you connect the appliance.
-- Do not use the appliance if the plug, the mains cord, the base or the
appliance itself is damaged.
-- If the mains cord is damaged, you must have it replaced by Philips, a
service centre authorised by Philips or similarly qualified persons in
order to avoid a hazard.
-- This appliance is not intended for use by persons (including children)
with reduced physical, sensory or mental capabilities, or lack of
experience and knowledge, unless they have been given supervision or
instruction concerning use of the appliance by a person responsible for
their safety.
-- Children should be supervised to ensure that they do not play with the
appliance.
-- Keep the mains cord out of the reach of children. Do not let the
mains cord hang over the edge of the table or worktop on which the
appliance stands. Excess cord can be stored in or around the base of
the appliance.
-- Do not place the appliance on an enclosed surface (e.g. a serving tray),
as this could cause water to accumulate under the appliance, resulting in
a hazardous situation.
-- Hot water can cause serious burns. Be careful when the kettle contains
hot water.
-- Do not touch the body of the kettle during and some time after use,
as it gets very hot. Always lift the kettle by its handle.
-- Never fill the kettle beyond the maximum level indication. If the kettle
has been overfilled, boiling water may be ejected from the spout and
cause scalding.
-- Do not remove the lid while the water is heating up. Be careful when
you remove the lid immediately after the water has boiled: the steam
that comes out of the kettle is very hot.
-- Only use the kettle in combination with its original base.
Caution
-- Only connect the appliance to an earthed wall socket.
-- Always place the base and the kettle on a dry, flat and stable surface.
-- The kettle is only intended for heating up and boiling water. Do not use
it to heat up soup or other liquids or jarred, bottled or tinned food.
-- When you select a temperature below 100ºC, the water is not boiled
(sterilised) first, but is heated up directly to the temperature of the
selected preset button.
-- Always make sure you fill the kettle at least up to the 1-cup indication
(0.25l) to prevent the kettle from boiling dry.
-- Depending on the hardness of the water in your area, small spots or
stains may appear on the heating element of your kettle when you
use it. This phenomenon is the result of scale build-up on the heating
element and on the inside of the kettle over time. The harder the water,
the faster scale builds up. Scale can occur in different colours. Although
scale is harmless, too much scale can influence the performance and
--1
2
3
4
durability of your kettle. Descale your kettle regularly by following the
instructions given in chapter ‘Cleaning and descaling’.
Some condensation may appear on the base of the kettle. This is
perfectly normal and does not mean that the kettle has any defects.
This appliance is intended to be used in household and similar
applications such as:
staff kitchen areas in shops, offices and other working environments;
farm houses;
by clients in hotels, motels and other residential type environments;
bed and breakfast type environments.
Boil-dry protection
This kettle is equipped with boil-dry protection. The boil-dry
protection automatically switches off the kettle if it is accidentally switched
on when there is no water or not enough water in it. Fill the kettle with
approx. 1 litre of water. Leave the kettle off the base for 1 minute and then
place it on the base. The kettle is now ready for use again.
Electromagnetic fields (EMF)
This Philips appliance complies with all standards regarding electromagnetic
fields (EMF). If handled properly and according to the instructions in this
user manual, the appliance is safe to use based on scientific evidence
available today.
Before first use
1Remove stickers, if any, from the base or the kettle.
2Place the base on a dry, stable and flat surface.
3To adjust the length of the cord, wind part of it around the cord
storage facility in the bottom of the base (Fig. 2).
4Rinse the kettle with water.
5Fill the kettle with water up to the MAX indication and let the water
boil once (see chapter ‘Using the appliance’).
6Pour out the hot water and rinse the kettle once more.
Using the appliance
1Press the lid release button (1). The lid opens automatically (2) (Fig. 3).
2Fill the kettle with the desired amount of water (Fig. 4).
Note:You can also fill the kettle through the spout.
3Close the lid (Fig. 5).
4Place the kettle on its base and put the plug in the wall socket (Fig. 6).
The appliance is now ready for use.
Heating up water with preset buttons
Different hot drinks require different temperatures to taste their best. With
the preset buttons on the base, you can choose the right temperature for
your favourite hot drink.
To make sure the appliance accurately* heats up the water to the set
temperature, fill the kettle with at least 0.25l water.
* This kettle has been designed to achieve maximum temperature accuracy.
However, the actual temperature of the water may deviate slightly from the
indicated temperature.
-- There are 4 buttons that represent different hot drinks: black/fruit/
herbal tea (100ºC), instant soup/hot chocolate (95ºC), instant coffee
(90ºC) and green tea (80ºC). There is also a 40ºC button and a KEEP
WARM button.  (Fig. 7)
1Press one of the preset buttons (Fig. 8).
,, The water starts heating to the temperature of the selected preset
button.
,, While the water is heated, the light ring around the selected
button slowly pulsates until the water has reached the desired
temperature (Fig. 9).
,, If the current temperature of the water in the kettle is higher than
the temperature of the selected preset button, the light ring does
not pulsate, but flashes 3 times to indicate that this button cannot be
operated (Fig. 10).
Note:You can deactivate the appliance by pressing the button again or by
removing the kettle from the base.
2The kettle heats the water to the temperature of the selected preset
button.
,, When the water has reached the set temperature, you hear an
audible signal. The light ring around the selected button stops
pulsating and lights up continuously (Fig. 11).
Note:The audible signal is repeated as a reminder after 2 minutes.
Note:You can select a different type of hot drink by pressing a different preset
button while the kettle is operating.This is only possible if the temperature of
the water is still below the temperature of the newly pressed button.
Keeping water warm
You can use the keep-warm function to keep water warm for 30 minutes at
the temperatures of the different preset buttons (40°C, 80°C, 90°C, 95°C
or 100°C).
Note: Only use the keep-warm function in combination with a preset button.
Only use the keep-warm function when there is at least 0.25l water in
the kettle. If there is too little water in the kettle, the kettle may switch
off before the 30 minutes have elapsed to protect the heating element.
Keeping water warm at a desired temperature
1Press a preset button to set the desired temperature (see section
‘Heating up water with preset buttons’ in this chapter).
2Press the KEEP WARM button (Fig. 11).
,, When the kettle heats up the water to keep it at the selected
temperature, the light ring around the KEEP WARM button lights up
continuously.
,, When the water has reached the selected temperature, the light ring
around the KEEP WARM button slowly pulsates until the keep-warm
function is cancelled or switches off automatically after 30 minutes.
Note: If you press the KEEP WARM button before you press a preset button,
nothing happens. If you have just prepared hot water, you can press the same
preset button again and then press the KEEP WARM button.
3The kettle keeps the water warm for 30 minutes.
,, After 30 minutes, you hear an audible signal and the appliance
switches off automatically.
Note:You can stop the keep-warm process at any time.To do so, press the KEEP
WARM button again, press the selected preset button or remove the kettle
from the base.
Note: If you remove the kettle from the base, the set keep-warm temperature
is lost.
Note: If you press another preset button while the keep-warm function is
activated, the keep-warm function switches off and the kettle starts heating up
the water to the temperature of the preset button.
Note: If the keep-warm function has not been activated, the appliance switches
off automatically after 5 minutes of inactivity.
Cleaning and descaling
Always unplug the base before you clean it
Always remove the kettle from the base before you clean the kettle.
Never immerse the kettle or its base in water.
Never use scouring pads, abrasive cleaning agents or aggressive liquids
such as petrol or acetone to clean the appliance.
Cleaning the kettle and the base
1Clean the outside of the kettle and the base with a soft cloth
moistened with warm water and some mild cleaning agent.
Caution: Do not let the moist cloth come into contact with the cord, the
plug and the connector of the base.
Cleaning the filter
Scale is not harmful to your health but it may give your drink a powdery
taste. The anti-scale filter prevents scale particles from ending up in your
drink.
Clean the single-action filter regularly in the following way:
1Take the filter out of the kettle (Fig. 12).
2Gently clean the filter with a soft nylon brush.
3Slide the filter back into the kettle.
Note: HD9385 only:The filter at the bottom of the kettle cannot be removed.
You can clean this filter by descaling the kettle, see section ‘Descaling the kettle’
below.
Descaling the kettle
Regular descaling prolongs the lifetime of the kettle.
In case of normal use (up to 5 times a day), the following descaling
frequency is recommended:
-- Once every 6 months for areas with low water hardness.
-- Once every 3 months for areas with average water hardness.
-- Once every month for areas with high water hardness.
1Fill the kettle with white vinegar (8% acetic acid) up to one quarter of
the MAX indication.
2Add water to the MAX indication.
3Press the green tea button to heat up the water to 80ºC and then
press the KEEP WARM button.
4Empty the kettle after 30 minutes and rinse the inside thoroughly.
5Repeat the descaling procedure if there is still some scale in the kettle.
Note:You can also use an appropriate descaler. In that case, follow the
instructions on the package of the descaler.
Note: If you take the kettle off the base before the descaling process is finished,
the appliance switches off automatically.You can also deactivate the descaling
process by pressing any of the preset buttons.
Storage
-- To store the cord, wind it around the cord storage facility in the bottom
of the base (Fig. 2).
Ordering accessories
To purchase accessories for this appliance, please visit our online shop at
www.shop.philips.com/service. If the online shop is not available in
your country, go to your Philips dealer or a Philips service centre. If you have
any difficulties obtaining accessories for your appliance, please contact the
Philips Consumer Care Centre in your country. You find its contact details in
the worldwide guarantee leaflet.
Environment
-- Do not throw away the appliance with the normal household waste
at the end of its life, but hand it in at an official collection point for
recycling. By doing this, you help to preserve the environment (Fig. 13).
Guarantee and service
If you need service or information or if you have a problem, please visit
the Philips website at www.philips.com/support or contact the Philips
Consumer Care Centre in your country. You find its phone number in the
worldwide guarantee leaflet. If there is no Consumer Care Centre in your
country, go to your local Philips dealer.
Troubleshooting
This chapter summarises the most common problems you could encounter
with the appliance. If you are unable to solve the problem with the
information below, visit www.philips.com/support for a list of frequently
asked questions or contact the Consumer Care Centre in your country.
Signal
Meaning/solution
The light ring around one
preset button lights up while
the other light rings are off.
After the water has reached the set temperature, the light of the selected preset
button stays on for 5 minutes.
The light ring of the preset
button I pressed flashes 3
times.
The temperature of the water is higher
than the temperature of the selected
preset button.
The kettle beeps.
The water has reached the set temperature.
Problem
Possible solution
I cannot set the
desired temperature.
The current temperature of the water in the kettle
is probably higher than the temperature you want to
set. You can add cold water to the kettle. If you wish
to reheat the water immediately, you can only select
100ºC.
I try to switch
on the kettle but
it switches off
automatically.
When there is no water in the kettle, the boil-dry
protection trips and the kettle switches off automatically. You may need to put more water in the kettle
(at least 0.25 litres).
The kettle is not placed on its base correctly. Remove the kettle from the base and correctly place it
on the base again.
The kettle
switches off automatically when
the keep-warm
function is active.
The kettle keeps the water warm for 30 minutes and
then switches off automatically. To keep the water
warm longer, press the KEEP WARM button again
after it has finished.
EspaÑol
Introducción
Felicitaciones por su compra y bienvenido a Philips. Para disfrutar de todos
los beneficios que le ofrece la asistencia de Philips, registre su producto en
www.philips.com/welcome.
Descripción general (Fig. 1)
1Tapa
2Pico
3 Indicador de nivel de agua
4 Botón de apertura de la tapa
5Base
6 Conector de la base
7 Espacio para almacenamiento del cable
8 Enchufe del cable de alimentación
9 Botón de infusión de hierbas/frutal/té negro
10 Botón de sopa instantánea/chocolate caliente
11 Botón de café instantáneo
12 Botón de té verde
13 Botón de 40 ºC
14 Botón KEEP WARM
Importante
Antes de usar la unidad, lea atentamente este manual del usuario y
consérvelo para futuras consultas.
Peligro
-- No sumerja la pava ni la base en agua ni en otros líquidos.
-----
---
-------
Advertencia
Antes de enchufarlo, verifique que el voltaje indicado en el artefacto
coincida con el de la red eléctrica local.
No utilice el producto si el enchufe, el cable de alimentación, la base ni
el artefacto están dañados.
Si el cable de alimentación está dañado, deberá ser sustituido por Philips
o un taller autorizado Philips para evitar riesgos.
Este artefacto no debe ser utilizado por personas con capacidad física,
mental o sensorial reducida (adultos o niños) o sin los conocimientos y
la experiencia necesarios, a menos que sean supervisados o instruidos
acerca del uso del artefacto por una persona responsable de su
seguridad.
Asegúrese de que los niños no jueguen con este artefacto.
Mantenga el cable de alimentación fuera del alcance de los niños. No
deje que el cable de alimentación cuelgue de la mesa o la superficie
donde está el artefacto. El cable sobrante puede guardarse en la base o
alrededor de la unidad.
No coloque el aparato sobre una superficie cerrada (por ejemplo, una
bandeja para servir), ya que el agua podría acumularse bajo el aparato y
generar una situación de peligro.
El agua caliente puede causar quemaduras graves. Tenga cuidado.
La pava toma mucha temperatura, no la toque durante el
funcionamiento ni poco después de usarla. Siempre levante la pava de
la manija.
Nunca llene la pava por encima del nivel máximo. Si la llena en exceso,
el agua hirviendo puede salir por el pico y causar quemaduras.
No retire la tapa mientras el agua se está calentando. Tenga cuidado al
retirar la tapa justo después de hervir el agua, ya que el vapor que sale
de la pava está muy caliente.
Utilice la pava sólo con su base original.
Precauciones
-- Conecte la unidad solamente a un tomacorriente de pared con
descarga a tierra.
-- Coloque siempre la base y la pava sobre una superficie seca, plana y
estable.
-- Esta pava está diseñada únicamente para calentar y hervir agua. No
la utilice para calentar sopa u otros líquidos, ni comida enlatada,
embotellada o en frasco.
-- Cuando selecciona una temperatura inferior a los 100 ºC, el agua no
hierve (esteriliza) primero, sino que se calienta justo a la temperatura
del botón de preajuste seleccionado.
-- Siempre asegúrese de llenar la pava al menos hasta la indicación de
1 taza (0,25 litros) para impedir que hierva estando seca.
-- Según la dureza del agua de su zona, con el uso pueden aparecer
pequeñas manchas sobre el calentador de la pava. Este fenómeno es el
resultado de la formación de depósitos de sarro en el calentador y en
el interior de la pava. Cuanto más dura sea el agua, más rápida será la
formación de estos depósitos. Los depósitos de sarro pueden presentar
diferentes colores y, aunque no son nocivos, su acumulación excesiva
puede afectar el rendimiento y la duración del artefacto. Elimine el sarro
--1
2
3
4
de su pava con regularidad, tal como se indica en las instrucciones del
capítulo “Limpiar y eliminar los depósitos de sarro”.
Puede producirse condensación en la base de la pava. Esto es
perfectamente normal y no significa que el artefacto sea defectuoso.
Este artefacto ha sido diseñado para utilizarse en entornos domésticos
o similares, por ejemplo:
cocinas de comercios, oficinas y otros entornos laborales;
granjas;
por los clientes de hoteles, moteles y otro tipo de entornos
residenciales;
hostels en los que se ofrecen desayunos.
Sistema de seguridad para evitar el hervor en seco
Esta pava está equipada con una protección contra el hervor en seco.
La protección contra el hervor en seco apaga automáticamente la
pava si alguien la enciende en forma involuntaria cuando no tiene agua
suficiente. Llene la pava con aproximadamente 1 litro de agua, déjela fuera
de la base por 1 minuto y luego, vuelva a colocarla en la base. Ahora la pava
está lista para volver a usarla.
Campos electromagnéticos (CEM)
Este producto Philips cumple con todas las normativas sobre campos
electromagnéticos. Si se emplea correctamente y de conformidad con las
instrucciones de este manual, el uso del artefacto es seguro de acuerdo con
las evidencias científicas disponibles en la actualidad.
Antes del primer uso
1Quite los autoadhesivos de la base o de la pava, si los hay.
2Coloque la base en una superficie seca, estable y plana.
3Para ajustar la longitud del cable, enrolle una parte de él en el espacio
para enrollar el cable, ubicado en la parte inferior de la base (Fig. 2).
4Enjuague la pava con agua.
5Llene la pava con agua hasta la indicación MAX y deje que hierva una
vez (consulte el capítulo “Uso del aparato”).
6Vacíe el agua caliente y enjuague la pava una vez más.
Uso del artefacto
1Pulse el botón de liberación de la tapa (1). La tapa se abre
automáticamente (2) (Fig. 3).
2Llene la pava con la cantidad de agua que desee (Fig. 4).
Nota:También puede llenar la pava a través de la boquilla.
3Cierre la tapa (Fig. 5).
4Coloque la pava en la base y enchufe la unidad en la toma de
corriente (Fig. 6).
El aparato está listo para usarse.
Calentar agua con los botones de preajuste
Las diferentes bebidas calientes requieren distintas temperaturas para
optimizar su sabor. Con los botones de preajuste de la base, puede escoger
la temperatura correcta para su bebida caliente favorita.
Para comprobar que el aparato caliente con precisión* el agua a la
temperatura establecida, llene la pava con al menos 0,25 litros de agua.
* Esta pava está diseñada para brindar la máxima precisión de temperatura.
Sin embargo, es posible que la temperatura real del agua difiera levemente
de la temperatura indicada.
-- Existen 4 botones que representan distintas bebidas calientes: infusión
de hierbas/frutal/té negro (100 ºC), sopa instantánea/chocolate caliente
(95 ºC), café instantáneo (90 ºC) y té verde (80 ºC). También existen
el botón de 40 ºC y el botón a KEEP WARM (Conservación de
calor).  (Fig. 7)
1Pulse uno de los botones de preajuste (Fig. 8).
,, El agua comienza a calentarse a la temperatura del botón de preajuste
seleccionado.
,, Mientras se calienta el agua, el anillo luminoso alrededor del botón
parpadea lentamente hasta que el agua alcanza la temperatura
deseada (Fig. 9).
,, Si la temperatura actual del agua en la pava es más alta que la
temperatura del botón de preajuste seleccionado, el anillo luminoso
no parpadea de manera de manera constante, sino que parpadea 3
veces para indicar que no se puede usar este botón (Fig. 10).
Nota: Puede desactivar el aparato al volver a pulsar el botón o al retirar la pava
de la base.
2La pava calienta el agua a la temperatura del botón de preajuste
seleccionado.
,, Cuando el agua alcanza la temperatura establecida, usted escucha una
señal sonora, el anillo luminoso alrededor del botón seleccionado
deja de parpadear y queda encendido en forma constante (Fig. 11).
Nota: La señal sonora se repite a modo de recordatorio después de 2 minutos.
Nota: Puede seleccionar un tipo distinto de bebida caliente al pulsar otro botón
de preajuste mientras la pava está funcionando. Esto solo es posible si la
temperatura del agua aún está por debajo de la temperatura del botón que
acaba de pulsar.
Mantener el agua caliente
Puede usar la función de conservación de calor para mantener el agua
caliente por 30 minutos a las temperaturas de los distintos botones de
preajuste (40 °C, 80 °C, 90 °C, 95 °C o 100 °C).
Nota: Solo use la función de conservación del calor de manera combinada con
un botón de preajuste.
Utilice únicamente la función de conservación del calor cuando haya
al menos 0,25 litros de agua en la pava. Si el nivel de agua de la pava es
muy bajo, es posible que esta se apague en 30 minutos para proteger el
calentador.
Mantener el agua caliente a la temperatura deseada
1Presione un botón de preajuste para ajustar la temperatura deseada
(consulte la sección “Calentar agua con los botones de preajuste” en
este capítulo).
2Pulse el botón KEEP WARM (Fig. 11).
,, Cuando la pava calienta agua para mantenerla a la temperatura
seleccionada, el anillo luminoso alrededor del botón KEEP WARM se
enciende en forma constante.
,, Cuando el agua alcanza la temperatura seleccionada, el anillo
luminoso alrededor del botón KEEP WARM parpadea lentamente
hasta que cancele la función de conservación de calor o se apaga
automáticamente después de 30 minutos.
Nota: Si pulsa el botón KEEP WARM antes de pulsar un botón de preajuste,
no sucede nada. Si acaba de calentar agua, puede volver a pulsar el mismo
botón de preajuste y luego, pulsar el botón KEEP WARM.
3La pava mantiene caliente el agua durante 30 minutos.
,, Después de 30 minutos, oirá una señal sonora y el aparato se apagará
automáticamente.
Nota: Puede detener la función de conservación del calor en cualquier
momento. Para ello, pulse el botón KEEP WARM, presione el botón de preajuste
seleccionado o bien quite la pava de la base.
Nota: Si retira la pava de la base, se borrará la temperatura de conservación de
calor establecida.
Nota: Si presiona otro botón de preajuste mientras está activada la función de
conservación de calor, esta se apagará y la pava comenzará a calentar el agua
a la temperatura del botón de preajuste.
Nota: Si no ha activado la función de conservación de calor, el aparato se apaga
automáticamente después de 5 minutos de inactividad.
Limpiar y eliminar los depósitos de sarro
Desenchufe siempre la base antes de limpiarla
Retire siempre la pava de la base antes de limpiarla.
No sumerja nunca la pava ni su base en agua.
No utilice esponjas ni limpiadores o líquidos abrasivos como bencina o
acetona para limpiar el artefacto.
Limpieza de la pava y de la base
1Limpie la pava y la base por fuera con un paño humedecido con agua
tibia y un producto de limpieza suave.
Precauciones: No deje que el paño húmedo entre en contacto con el
cable, el enchufe ni el conector de la base.
Limpieza del filtro
Los depósitos de sarro no son nocivos para la salud pero pueden dar un
sabor extraño a su bebida. El filtro antisarro evita que las partículas de sarro
lleguen a su bebida.
Limpie el filtro de acción simple regularmente de la siguiente manera:
1Extraiga el filtro de la pava (Fig. 12).
2Lave el filtro cuidadosamente con un cepillo suave de nylon.
3Deslice el filtro nuevamente en la pava.
Nota: Solo HD9385: el filtro ubicado en el fondo de la pava no puede quitarse.
Puede limpiarlo al eliminar los depósitos de sarro de la pava. Consulte la
sección “Eliminar los depósitos de sarro de la pava” a continuación.
Eliminación de los depósitos de sarro
Si elimina los depósitos de sarro en forma regular, prolongará la vida de la
pava.
En caso de uso normal (hasta 5 veces al día), se recomienda eliminar los
depósitos de sarro con la frecuencia que se indica a continuación:
-- Una vez cada 6 meses en áreas donde el agua tiene poca dureza.
-- Una vez cada 3 meses en áreas donde el agua tiene una dureza
promedio.
-- Una vez al mes en áreas donde el agua es muy dura.
1Llene la pava con vinagre blanco (8% de ácido acético) hasta llenar un
cuarto de la indicación MAX.
2Añada agua hasta la indicación MAX.
3Pulse el botón de té verde para calentar el agua hasta 80 ºC y luego,
pulse el botón KEEP WARM.
4Vacíe la pava después de 30 minutos y enjuáguela cuidadosamente por
dentro.
5Repita el proceso de eliminación de los depósitos de sarro si todavía
quedan depósitos en la pava.
Nota:También puede utilizar un producto antisarro especial. En ese caso, siga
las instrucciones indicadas en el producto.
Nota: Si retira la pava de la base antes de que finalice el proceso de
eliminación de depósitos de sarro, el aparato se apagará en forma automática.
También puede desactivar el proceso de eliminación de depósitos de sarro al
presionar cualquiera de los botones de preajuste.
Guardado
-- Para guardar el cable, enróllelo en el espacio para enrollar el cable,
ubicado en la parte inferior de la base (Fig. 2).
Pedido de accesorios
Si desea adquirir accesorios para este aparato, visite nuestra tienda en
línea en www.shop.philips.com/service. Si la tienda en línea no está
disponible en su país, diríjase a su distribuidor Philips o a un centro de
servicio Philips. Si tiene cualquier dificultad para obtener accesorios para
su aparato, póngase en contacto con el Servicio de Atención al Cliente
de Philips en su país. Encontrará los datos de contacto en el folleto de la
garantía mundial.
Medioambiente
-- Cuando finalice la vida útil del artefacto, no lo deseche junto con los
residuos domésticos habituales. Llévelo a un centro de recolección
oficial para su reciclaje. De esta forma, ayudará a proteger el medio
ambiente (Fig. 13).
Garantía y servicio técnico
Si necesita información o si tiene algún problema, visite la página Web de
Philips en www.philips.com/support, o póngase en contacto con el
Servicio de Atención al Cliente de Philips en su país. Hallará el número de
teléfono en el folleto de la garantía mundial. Si no hay Servicio de Atención
al Cliente de Philips en su país, diríjase a su distribuidor local Philips.
Solución de problemas
Este capítulo resume los problemas más comunes que puede experimentar
con el aparato. Si no los puede solucionar con ayuda de la información
a continuación, visite www.philips.com/support para ver una lista de
preguntas frecuentes o contacte al Servicio de Atención al Cliente en su país.
Señal
Significado/solución
El anillo luminoso alrededor
de un botón de preajuste se
enciende mientras los demás
están apagados.
Después de que el agua alcanza la
temperatura establecida, la luz del botón
de preajuste seleccionado permanece
encendida por 5 minutos.
El anillo luminoso del botón
de preajuste que pulsé parpadea 3 veces.
La temperatura del agua es más alta que
la temperatura del botón de preajuste
seleccionado.
La pava emite un pitido.
El agua ha alcanzado la temperatura
establecida.
Problema
Posible solución
-- 전기주전자는 반드시 원래의 받침대를 사용하십시오.
No puedo ajustar
la temperatura
deseada.
Es probable que la temperatura actual del agua en
la pava sea más alta que la temperatura que desea
ajustar. Puede agregar agua fría a la pava y, si desea
volver a calentar el agua de inmediato, sencillamente seleccione 100 ºC.
Intento encender
la pava pero se
apaga en forma
automática.
Cuando la pava no contiene agua, se activa la protección contra el hervor en seco y la pava se apaga
automáticamente. Es posible que deba verter más
agua en la pava (al menos 0,25 litros).
주의
-- 제품은 반드시 접지된 벽면 콘센트에 연결하십시오.
-- 전기주전자와 받침대는 항상 물기가 없고, 평평하며 안정된
곳에 놓으십시오.
-- 본 전기주전자는 물을 가열하고 끓이는 용도로만 사용하는
제품입니다. 수프나 기타 액체 또는 항아리, 병, 캔에 든 음식을
조리하지 마십시오.
-- 100ºC 이하의 온도를 선택하면 먼저 물이 끓지(소독되지)
않고 선택한 프리셋 버튼의 온도까지만 가열됩니다.
-- 전기주전자가 물이 없는 상태에서 작동하는 것을 방지하기 위해
항상 한 컵 표시선(0.25리터) 이상 물을 채워야 합니다.
-- 지역에 공급되는 물의 경도에 따라, 제품 사용 중 열판에 작은
반점이나 얼룩이 생길 수 있습니다. 이 현상은 열판이나 제품
내부에 수차례 석회질이 쌓여서 생긴 결과입니다. 물의 경도가
높을수록, 석회질은 더욱 빨리 생성되며 여러 가지 색상으로
나타날 수 있습니다. 석회질은 유해하지는 않지만, 너무 많은
석회질은 제품의 성능에 영향을 줄 수도 있습니다. 본 사용
설명서의 ‘세척 및 석회질 제거’란에서 설명하는 방법에 따라
정기적으로 석회질을 제거해 주십시오.
-- 전기주전자 받침대에 물방울이 맺힐 수 있습니다. 이것은
자연적인 현상이며 제품의 이상이 아닙니다.
-- 본 제품은 가정 및 다음과 같은 유사 환경에서 사용하도록
설계되었습니다.
1 매장, 사무실 및 기타 작업 환경 내 직원용 탕비실
2 주거 시설
3 호텔 및 기타 숙박 시설
4 민박 시설
La pava no está colocada en forma correcta sobre
la base. Retírela de la base y vuelva a colocarla correctamente en ella.
La pava se apaga en
forma automática
cuando la función
de conservación del
calor está activada.
La pava conserva el calor durante 30 minutos y, a
continuación, se apaga en forma automática. Para
mantener el agua caliente más tiempo, pulse de
nuevo el botón KEEP WARM.
한국어
소개
필립스 제품을 구입해 주셔서 감사합니다! 필립스가 드리는
지원 혜택을 받으실 수 있도록 www.philips.co.kr에서 제품을
등록하십시오.
각 부의 명칭 (그림 1)
1 뚜껑
2 주입구
3 수위 표시기
4 뚜껑 열림 버튼
5 받침대
6 받침대 연결부
7 코드 보관함
8 전원 플러그
9 홍차/과일차/허브차 버튼
10즉석 수프/핫 초코 버튼
11인스턴트 커피 버튼
12녹차 버튼
1340ºC 버튼
14보온 버튼
중요 사항
본 제품을 사용하기 전에 이 사용 설명서를 주의 깊게 읽고 나중에
참조할 수 있도록 잘 보관하십시오.
위험
-- 주전자나 받침대를 물 또는 다른 액체에 담그지 마십시오.
-----
---
------
경고
제품에 전원을 연결하기 전에, 제품에 표시된 전압과 사용
지역의 전압이 일치하는지 확인하십시오.
플러그, 전원 코드, 받침대 또는 제품 자체가 손상된 경우에는
본 제품을 사용하지 마십시오.
전원 코드가 손상된 경우, 안전을 위해 필립스 서비스 센터 또는
필립스 서비스 지정점에 의뢰하여 교체하십시오.
신체적인 감각 및 정신적인 능력이 떨어지거나 경험과 지식이
풍부하지 않은 성인 및 어린이는 혼자 제품을 사용하지 말고
제품 사용과 관련하여 안전에 책임질 수 있도록 지시사항을
충분히 숙지한 사람의 도움을 받으십시오.
어린이가 제품을 가지고 놀지 못하도록 지도해 주십시오.
전원 코드는 어린이의 손에 닿지 않는 곳에 보관하십시오.
제품이 올려져 있는 식탁이나 조리대의 가장자리로 전원 코드가
흘러내리지 않도록 하십시오. 여분의 전원 코드는 받침대 안에
보관할 수 있습니다.
쟁반처럼 주변부가 바닥을 에워 싸는 표면에 제품을 놓지
마십시오. 제품 아래에 물이 고여 매우 위험할 수 있습니다.
뜨거운 물은 심각한 화상을 일으킬 수 있습니다. 전기주전자에
뜨거운 물이 있을 경우에는 주의하십시오.
물이 가열 중이거나 물을 사용한 직후에는 전기주전자가 매우
뜨거우므로 신체에 접촉하지 않도록 하십시오. 항상 손잡이
부분을 잡고 전기주전자를 들어올리십시오.
전기주전자에 최대량 표시인 MAX 눈금 이상 물을 넣지
마십시오. 물을 너무 많이 넣을 경우, 끓는 물이 배출구 밖으로
넘쳐 화상을 입을 수 있습니다.
물이 끓는 동안에는 뚜껑을 열지 마십시오. 물이 끓고 난 다음
바로 뚜껑을 열 경우, 전기주전자에서 나오는 수증기가 매우
뜨거우므로 주의하십시오.
건조 상태 가열 방지 기능
이 전기주전자에는 건조 상태 가열 방지 기능이 장착되어 있습니다.
전기주전자에 물이 없거나 충분하지 않을 때 실수로 전원을
켜더라도 이 장치가 자동으로 주전자의 전원을 차단시킵니다. 약
1리터의 물을 채운 다음 1분간 받침대에서 주전자를 내려놓았다가
받침대에 다시 놓으면, 건조 상태 가열 방지 기능이 해지됩니다.
이후에 전기주전자를 바로 사용할 수 있습니다.
EMF(전자기장)
이 필립스 제품은 EMF(전자기장)와 관련된 모든 기준을
준수합니다. 이 사용 설명서의 지침에 따라 적절하게 취급할 경우
이 제품은 안전하게 사용할 수 있으며 이는 현재까지의 과학적
증거에 근거하고 있습니다.
최초 사용 전
1받침대 또는 전기주전자에 스티커가 붙어있을 경우 모두
제거하십시오.
2받침대는 물기가 없고 안정적이며 평평한 곳에 놓으십시오.
3전원 코드를 받침대 바닥의 코드 보관함 주위에 감아 길이를
조절하십시오 (그림 2).
4전기주전자를 물로 헹구십시오.
5전기주전자의 MAX 눈금까지 물을 채운 다음 한 번
끓여주십시오. (‘제품 사용’란 참조)
6뜨거운 물을 버리고 전기주전자를 다시 한 번 물로 헹구십시오.
제품 사용
1뚜껑 열림 버튼을 누릅니다. (1) 뚜껑이 자동으로 열립니다.
(2) (그림 3)
2전기주전자에 필요한 만큼의 물을 채웁니다 (그림 4).
참고: 전기주전자의 주입구를 통해 물을 채울 수도 있습니다.
3뚜껑을 닫으십시오 (그림 5).
4전기주전자를 받침대에 놓고 플러그를 벽면 콘센트에
꽂으십시오 (그림 6).
이제 제품을 사용하실 수 있습니다.
프리셋 버튼으로 물 끓이기
따뜻한 음료를 이상적으로 즐길 수 있는 온도는 각각 다릅니다.
받침대의 프리셋 버튼으로 적정 온도를 선택하여 최고의 맛을
음미하세요.
설정한 온도로 물이 정확히* 데워지도록 전기주전자를 최소한 약
0.25리터 이상의 물로 채우십시오.
* 이 전기주전자는 최대한 정확한 온도로 데워지도록 설계되어
있지만, 실제 물의 온도는 표시된 온도와 약간 다를 수 있습니다.
-- 홍차/과일차/허브차(100ºC), 즉석 수프/핫 초코(95ºC),
인스턴트 커피(90ºC), 녹차(80ºC)의 4가지 따뜻한 음료
버튼이 있습니다. 40ºC 버튼과 보온 버튼도 있습니다.
(그림 7)
1프리셋 버튼 중 하나를 누릅니다 (그림 8).
,, 선택한 프리셋 버튼의 온도로 물이 가열되기 시작합니다.
,, 물이 끓는 동안 원하는 온도에 도달할 때까지 선택한 버튼
주위의 표시등이 천천히 깜박입니다 (그림 9).
,, 전기주전자에 담긴 물의 현재 온도가 선택한 프리셋 버튼의
온도보다 높은 경우 표시등이 깜박이는 대신 3번 빠르게 깜박여
이 버튼이 작동할 수 없음을 알려줍니다 (그림 10).
참고: 버튼을 다시 누르거나 전기주전자를 받침대에서 들었다가
다시 놓으면 기능이 해제됩니다.
2전기주전자가 선택한 프리셋 버튼 온도까지 물을 데웁니다.
,, 물이 설정 온도에 도달하면 신호음이 들립니다. 선택한 버튼
주위의 표시등이 깜박임을 멈추고 계속 켜져 있습니다
(그림 11).
참고: 신호음은 2분 후에 다시 울립니다.
참고: 전기주전자가 작동하는 동안 프리셋 버튼을 바꿔서 다른
종류의 음료를 선택할 수 있습니다. 단, 물의 온도가 새로 설정한
온도보다 낮은 경우에만 가능합니다.
보온 기능
다양한 온도의 프리셋 버튼으로(40°C, 80°C, 90°C, 95°C,
100°C) 30분 동안 온도를 유지하는 보온 기능도 사용할 수
있습니다.
필터 세척
석회질은 몸에 해롭지는 않지만 물을 마시면 약간의 가루가 섞인
맛을 느낄 수도 있습니다. 석회질 제거 필터는 물을 컵에 따르기
전에 석회질 입자를 걸러줍니다.
싱글 액션 필터를 다음과 같이 정기적으로 청소하십시오.
1전기주전자에서 필터를 꺼내십시오 (그림 12).
2부드러운 나일론 브러시로 필터를 가볍게 청소하십시오.
3전기주전자에 필터를 원래대로 밀어 넣으십시오.
참고: HD9385 모델만 해당: 전기주전자 바닥의 필터는 제거할
수 없습니다. 전기주전자의 석회질을 제거하여 필터를 청소할 수
있습니다. 아래 ‘석회질 제거’란을 참조하십시오.
전기주전자의 스케일 제거
정기적으로 석회질을 제거하면 제품의 수명이 연장됩니다.
일반적으로 사용할 경우(하루 최대 5번), 다음과 같은 주기로
스케일을 제거 하십시오.
-- 물의 경도가 낮은 지역은 6개월에 한 번
-- 물의 경도가 평균인 지역은 3개월에 한 번
-- 물의 경도가 높은 지역은 한 달에 한 번
1주전자에 흰 식초(아세트산 8%)를 MAX 표시선의 1/4 정도까지
채우십시오.
참고: 보온 기능은 반드시 프리셋 버튼과 함께 사용하셔야 합니다.
2MAX 표시선까지 물을 채우십시오.
물이 전기주전자에 0.25리터 이상 있을 때에만 보온 기능을
사용하십시오. 전기주전자에 물이 너무 적으면 열판을 보호하기
위해 30분 전에 전원이 꺼집니다.
3녹차 버튼을 눌러 80ºC까지 물을 데운 다음 보온 버튼을
원하는 온도로 보온
1프리셋 버튼을 눌러 원하는 온도를 설정합니다(이 란의 ‘
프리셋 버튼으로 물 끓이기’ 섹션 참조).
2보온 버튼을 누르십시오 (그림 11).
,, 전기주전자가 설정된 온도까지 물을 데워 유지할 때에는 보온
버튼 주위의 표시등이 계속 켜져 있습니다.
,, 물이 설정한 온도에 도달하면 보온 기능이 취소될 때까지
표시등 주위의 보온 버튼이 천천히 깜박이거나 30분 후에
자동으로 꺼집니다.
참고: 프리셋 버튼을 누르기 전에 보온 버튼을 누르면 기능이
작동하지 않습니다. 물이 이미 끓었다면 같은 프리셋 버튼을 다시
누른 후 보온 버튼을 누릅니다.
3전기주전자의 보온 기능은 30분 동안 유지됩니다.
,, 30분 후 신호음이 들리고 전기주전자가 자동으로 꺼집니다.
참고: 언제든 보온 상태를 중단할 수 있습니다. 보온 버튼을 다시
누르고 선택한 프리셋 버튼을 누르거나 받침대에서 전기주전자를
분리하면 보온 기능 작동이 중단됩니다.
참고: 받침대에서 전기주전자를 분리하면 보온 온도 설정이
초기화됩니다.
참고: 보온 기능이 작동 중일 때 다른 프리셋 버튼을 누르면 보온
기능이 꺼지고 전기주전자는 프리셋 버튼의 온도로 물을 끓이기
시작합니다.
참고: 보온 기능을 사용하지 않은 상태에서 5분간 작동하지 않으면
제품이 자동으로 꺼집니다.
청소 및 스케일 제거
제품을 청소하기 전에는 항상 제품 받침대의 전원 코드를
뽑으십시오.
전기주전자를 청소하기 전에 반드시 받침대에서 제품을
분리하십시오.
전기주전자와 받침대는 절대로 물에 담그지 마십시오.
제품을 세척할 때 수세미, 연마성 세제나 휘발유, 아세톤과 같은
강력 세제를 사용하지 마십시오.
누릅니다.
430분 후에 전기주전자를 비우고 내부를 깨끗이 헹구십시오.
5전기주전자의 석회질이 완전히 제거될 때까지 반복합니다.
참고: 석회질 제거용 세제를 사용하여 헹구셔도 됩니다. 이런 경우,
석회질 제거용 세제에 명시되어 있는 사용지침을 따르십시오.
참고: 석회질 제거가 완료되기 전에 전기주전자를 받침대에서
분리하면 제품이 자동으로 꺼집니다. 프리셋 버튼 중 아무 것이나
누르면 석회질 제거가 해제됩니다.
보관
-- 전원 코드는 받침대 바닥의 코드 보관함에 감아서
보관하십시오 (그림 2).
액세서리 주문
본 제품의 액세서리를 주문하려면 필립스 웹사이트
www.philips.co.kr을 방문하십시오. 해당 국가에서 온라인
쇼핑이 불가능한 경우 필립스 대리점이나 필립스 서비스 센터에
문의하십시오. 본 제품의 액세서리를 구하기 어려운 경우에는
필립스 고객 상담실로 문의하십시오. 연락처 정보는 전세계 제품
보증서에 기재되어 있습니다.
환경
-- 수명이 다 된 제품을 일반 가정용 쓰레기와 함께 버리지 마시고
지정된 재활용 수거 장소에 버리시면 환경 보호에 동참하실 수
있습니다 (그림 13).
품질 보증 및 서비스
더 자세한 정보가 필요하거나 제품을 사용하는 데 문제가 있을
경우에는, 필립스전자 홈페이지(www.philips.com/support)를
방문하거나 필립스 고객 상담실로 문의하십시오. 전국 서비스센터
안내는 제품 보증서를 참조하십시오. *(주)필립스전자: (02)7091200 *고객 상담실: (080)600-6600(수신자부담)
문제 해결
이 란은 본 제품을 사용하면서 가장 일반적으로 경험하게 되는
문제와 그 해결 방법을 제시합니다. 아래의 정보로도 문제를
해결할 수 없는 경우 www.philips.com/support를 방문하여
자주 묻는 질문(FAQ) 목록을 참조하거나 필립스 고객 상담실로
문의하십시오.
전기주전자 및 받침대 청소
1전기주전자 외부는 순한 세척액과 따뜻한 물을 적신 부드러운
천을 사용하여 닦으십시오.
주의: 코드, 플러그 및 받침대 연결부에 젖은 천이 닿지 않도록
주의하십시오.
신호
원인 / 해결 방법
다른 표시등은 꺼져있는데
프리셋 버튼 주위의 표시등이
켜집니다.
물이 설정한 온도까지 도달한
후 선택한 프리셋 버튼이 5분
동안 꺼지지 않습니다.
내가 누른 프리셋 버튼의
표시등이 3번 깜박입니다.
물의 온도가 설정한 프리셋
버튼의 온도보다 더 높습니다.
전기주전자에 신호음이
울립니다.
물이 설정한 온도까지 도달한
것입니다.
문제점
가능한 해결책
원하는 온도로
설정할 수
없습니다.
전기주전자에 담긴 물의 현재 온도가
설정하려는 온도보다 높은 경우입니다.
전기주전자에 찬물을 보충하십시오. 물을
바로 재가열하려면 100°c만 선택할 수
있습니다.
전기주전자의
전원을 켜려고
했으나 자동으로
꺼집니다.
전기주전자에 물이 없으면, 건조 상태 가열
방지 기능이 작동하고 제품이 자동으로
꺼집니다. 전기주전자에 물을 0.25리터 이상
넣어야 합니다.
전기주전자가 받침대 위에 올바르게 놓이지
않았습니다. 전기주전자를 받침대에서
분리하여 다시 정확하게 맞추십시오.
보온 모드가
작동 중인데도
전기주전자의
전원이 자동으로
꺼집니다.
전기주전자는 30분 동안 보온을 유지한 후
자동으로 전원이 꺼집니다. 완료된 후에도
다시 한번 보온 버튼을 누르면 더 오랫동안
물을 따뜻하게 보관할 수 있습니다.
简体中文
简介
感谢您的惠顾,欢迎光临飞利浦!为了您能充分
享受飞利浦所提供的支持,请在
www.philips.com/welcome 上注册您的产品。
基本说明 (图 1)
1 盖子
2 出汁口
3 水位计
4 锅盖打开键
5 底座
6 底座连接器
7 电源线存储装置
8 电源插头
9 黑色/水果/凉茶按钮
10速食汤/热巧克力按钮
11速溶咖啡按钮
12绿茶按钮
1340ºC 按钮
14KEEP-WARM(保温)按钮
注意事项
使用本产品之前,请仔细阅读本使用说明书,
并妥善保管以备日后参考。
危险
-- 不要将产品或底座浸入水或任何其他液体中。
警告
-- 在将产品连接电源之前,请先检查产品所标电
压与当地的供电电压是否相符。
-- 如果插头、电源线、底座或产品本身已经损
坏,请不要使用。
-- 如果电源线损坏,为了避免危险,必须由飞利
浦、飞利浦特约维修中心或有同等维修资格的
专业人员来进行更换。
-- 肢体不健全、精神有障碍及缺乏相关经验和知
识的人(包括儿童)必须在监护人的监督及指
导下使用。
-- 请照看好儿童,本产品不能用于玩耍。
-- 不要让儿童接触到电源线。不要将电源线悬挂在
放置产品的桌子或工作台的边缘上。多余的电源
线可储存在底座中或缠绕在产品的底座上。
-- 不要将产品置于围封式表面(如餐盘)上,因
为这可能引起产品下面积水,从而发生危险。
-- 热水可引起严重的烫伤。如果电水壶中有热
水,要特别注意。
-- 在烧水期间及使用后的一段时间内切勿触碰电
水壶壶身,因为它会变得非常烫手。提起电水
壶时一定要握住它的手柄。
-- 给电水壶加水时,不要超过最大水位标示。
如果水位过高,则水烧开时,会从壶嘴喷出,
从而导致烫伤。
-- 水在加热时请勿打开盖子。如果您在水刚烧开
时就打开盖子,一定要特别小心:从水壶喷出
的蒸汽非常烫。
-- 本水壶只能使用原装底座。
注意
-- 产品只能使用带接地线的插座。
-- 务必将电水壶和底座置于干燥、平稳的表面
上。
-- 电水壶只能用来加热或烧开水。不要用它来热
汤或其他液体,也不要用来加热罐装、瓶装或
罐头食品。
-- 选择低于 100ºC 的温度时,水不会先煮沸
(消毒),而是直接加热至选定的预设按钮的温
度。
-- 始终确保为电水壶注入至少达到 1 杯量水位标
示(0.25 升)的水,以免电水壶干烧。
-- 根据当地水硬度的不同,电水壶用过一段时间
后,加热元件上会出现小点或污渍。这种现象
是因为长时间使用后,水垢在加热元件和电水
壶内部沉积。水越硬,水垢沉积得越快。水垢
有各种颜色。虽然水垢是无害的,但是过多的
水垢会影响电水壶的性能和耐用性。应定期除
水垢。详见“清洁与除水垢”一章。
-- 电水壶底座可能出现水汽凝结,这是正常现
象,水壶本身并无缺陷。
-- 本产品仅打算用于家用及类似用途,如:
1 商店、办公场所及其它工作环境的厨房;
2 农庄;
3 由旅店、旅馆及其它住宿型环境中的客人使
用;
4 提供住宿和早餐的场所。
防干烧保护
本电水壶带有防烧干保护装置。如果电水壶在壶
中无水或水太少的情况下意外地通电,则防干烧
保护装置会自动将电水壶断电。给水壶注入约
1 升水。将电水壶从底座上取下 1 分钟,然后再
置于底座上。此时电水壶方可再次使用。
电磁场 (EMF)
这款飞利浦产品符合关于电磁场 (EMF) 的相关标
准。据目前的科学证明,如果正确使用并按照本
用户手册中的说明进行操作,本产品是安全的。
首次使用之前
1撕去底座或水壶上的所有标签(如果有)。
2将底座放在一个干燥、平稳的表面上。
3要调整电源线的长度,请将部分电源线缠绕在
底座底部的电源线存储装置上。 (图 2)
4用水清洁电水壶。
5将水满到 MAX(最高)水位线的位置,
然后将水烧开一次(见“使用产品”一章)。
6将热水倒出,然后再清洁一次电水壶。
使用本产品
1按开盖按钮 (1)。壶盖会自动打开 (2)。 (图 3)
2给电水壶注入所需水量。 (图 4)
注意: 您也可以从壶嘴注水。
3合上盖子。 (图 5)
4将电水壶放到底座上,然后将插头插入电源插
座。 (图 6)
这时本产品已经准备就绪。
用预设按钮将水加热
不同的热饮需要不同的温度以达到最佳口感。您
可以使用底座上的预设按钮选择适合您最爱热饮
的适当温度。
为确保本产品将水精确* 加热至设定温度,
要向电水壶中至少注入 0.25 升水。
* 本电水壶的设计便于获得最大温度精确度。
但是,水的实际温度可能会与指示的温度稍有
不同。
-- 4 个按钮表示 4 种不同的热饮料:黑色/水果/凉
茶按钮 (100ºC)、速食汤/热巧克力 (95ºC)、速
溶咖啡 (90ºC) 和绿茶 (80ºC)。还有一个
40ºC 按钮和一个 KEEP WARM(保温)
按钮。  (图 7)
1按其中一个预设按钮。 (图 8)
,, 水开始加热至选定的预设按钮的温度。
,, 水在加热时,选定的按钮四周的光环会缓慢脉
动,直至水达到所需的温度。 (图 9)
,, 如果电水壶中当前水温高于选定的预设按钮的
温度,则光环不会脉动,但会闪烁 3 次,表示
此按钮无法工作。 (图 10)
注意: 您可以通过再次按按钮或从底座上取下电
水壶来禁用本产品。
2电水壶将水加热至选定的预设按钮的温度。
,, 水达到设定温度后,您会听到声音信号。
选定的按钮四周的光环会停止脉动而持续亮
起。(图 11)
注意: 2 分钟后,会重复音频信号进行提醒。
注意: 电水壶工作时,您可以通过按不同的预设
按钮来选择不同类型的热饮。只有在水温仍低于
新按下按钮的温度时,才能这样操作。
保温
您可以使用保温功能将水温保持在不同预设按钮
(40°C、80°C、90°C、95°C 或 100°C)的
温度达 30 分钟。
注意: 保温功能只能与预设按钮结合使用。
只有当电水壶中的水量不少于 0.25 升时,才能使
用保温功能。如果电水壶中的水太少,则其可能
会在 30 分钟后关闭,以保护加热元件。
将水温保持在所需的温度
1按预设按钮可设置所需的温度(请参阅本章
中“用预设按钮将水加热”部分)。
2按下 KEEP-WARM(保温)按钮。 (图 11)
,, 当电水壶将水加热以将其保持在所选温度
时,KEEP WARM(保温)按钮四周的光环会
持续亮起。
,, 当水达到选定的温度后,KEEP WARM
(保温) 按钮四周的光环会缓慢脉动,直至取消
保温功能或 30 分钟后自动关闭。
注意: 如果在按预设按钮之前按 KEEP
WARM(保温)按钮,不会出现问题。如果只想
准备热水,可以再次按相同的预设按钮,然后按
KEEP WARM(保温)按钮。
3电水壶可以保温 30 分钟。
,, 30 分钟后,您会听到声音信号,并且本产品会
自动断电。
注意: 可以随时停止保温过程。要进行此操作,
请再次按 KEEP WARM(保温)按钮、按选定的
预设按钮或从底座上取下电水壶。
注意: 如果将电水壶从底座上取下,则设定的保
温温度将无效。
注意: 如果在启动保温功能后按另一个预设按
钮,则保温功能会关闭,电水壶开始将水加热至
预设按钮的温度。
注意: 如未启动保温功能,则本产品会在处于不
活动状态 5 分钟后自动关闭。
清洁与除水垢
清洁底座前,务必先将电源插头拔掉。
清洁电水壶之前,务必将其从底座上取下。
切勿将水壶或底座浸入水中。
不要使用钢丝球、研磨性清洁剂或腐蚀性液体
(例如汽油或丙酮) 来清洁产品。
清洁电水壶和底座
1用蘸有温水和无害清洁剂的软布擦拭壶和底座
的外表面。
注意: 切勿让湿布与电线、插头和底座连接器接触。
清洗过滤网
水垢对您的健康无害,但是它使您的饮料有一种
粉状的味道。水垢过滤网的作用是防止水垢进入
您的饮料。
按照以下方法,定期清洁专用滤网:
1将过滤网从电水壶中取出。 (图 12)
2用软尼龙刷轻轻地清洗过滤网。
3将滤网滑入电水壶。
注意: 仅限 HD 9385:无法取下电水壶底部的滤
网。您可以通过为电水壶除垢来清洁该滤网,
请参阅下面的“为电水壶除垢”部分。
去除水垢
定期除垢可延长电水壶的使用寿命。
在正常使用的情况下(一天使用 5 次),
建议按以下频率去除水垢:
-- 对于水硬度较低的地区,每 6 个月除垢一次。
-- 对于水硬度一般的地区,每 3 个月除垢一次。
-- 对于水硬度较高的地区,每个月除垢一次。
1在电水壶中注入白醋(醋酸度为 8%),
直至 MAX(最高)标示水位的四分之一。
2将水加至 MAX(最高)水位。
3按绿茶按钮可将水加热至 80ºC,
然后按 KEEP WARM(保温)按钮。
430 分钟后,倒空电水壶并彻底冲洗其内部。
5如果水壶中还有水垢,可重复此除垢步骤。
注意: 您也可以使用适当的除垢剂。在这种情况
下,应按照除垢剂包装袋上的指示进行操作。
注意: 如果在除垢过程完成之前从从底座上取下
电水壶,则本产品会自动关闭。您也可以通过按
任一预设按钮禁用除垢过程。
存储
-- 要存放电源线,请将其缠绕在底座底部的电源
线存储装置上。 (图 2)
订购附件
要购买本产品的附件,请访问我们的在线商城
www.shop.philips.com/service。如果您的国家/地
区没有在线商城,请联系您的飞利浦经销商或飞
利浦服务中心。如果您在购买产品的附件时遇到
困难,请联系您所在国家/地区的飞利浦客户服务
中心。可在全球保修卡中找到其详细联系信息。
环保
-- 弃置产品时,请不要将其与一般生活垃圾堆放
在一起;应将其交给官方指定的回收点。这样
做有利于环保。 (图 13)
保修与服务
如果您需要服务或信息,或者有任何疑问,请访
问飞利浦网站:www.philips.com/support。您也
可与您所在国家/地区的飞利浦客户服务中心联系
(可从全球保修卡中找到其电话号码)。如果您
所在的国家/地区没有飞利浦客户服务中心,请与
当地的飞利浦经销商联系。
故障种类和处理方法
本章归纳了使用本产品时最常见的一些问题。
如果您无法根据以下信息解决问题,请访问
www.philips.com/support 查阅常见问题列表,
或联系您所在国家/地区的客户服务中心。
信号
一个预设按钮四周的光
环亮起,而其他光环均
熄灭。
我按下的预设按钮的光
环闪烁 3 次。
电水壶发出蜂鸣音。
问题
我无法设定
所需温度。
我尝试将水
壶通上电源
但它却自动
断电了。
启动保温功
能后,电水
壶会自动关
闭。
方法/解决方案
水达到设定温度后,
选定的预设按钮的指示
灯会亮起 5 分钟。
水温高于选定的预设按
钮的温度。
水已经达到设定温度。
可能的解决方法
电水壶中的当前水温可能高于要
设定的温度。您可向电水壶添加
冷水。如果要立即将水重新加
热,则只能选择 100ºC。
电水壶中没有水时,会启动防干
烧保护并自动关闭电水壶。您可
能需要向电水壶中注入更多的水
(至少 0.25升)。
电水壶未正确置于底座上。
从底座上取下电水壶,重新正确
放置。
电水壶可以保温 30 分钟,然后
自动关闭。要延长保温时间,
请在保温时间结束后再次按
KEEP WARM(保温)按钮。