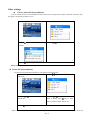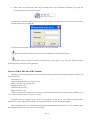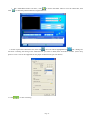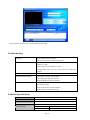
1
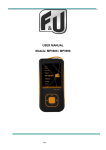
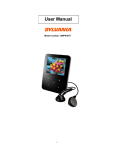
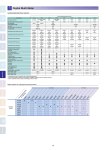
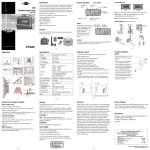
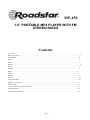
MP-450
1.8” PORTABLE MP4 PLAYER WITH FM
STEREO RADIO
Contents
Overview ……………….……………………………………………………………………………………………1
Know your player……….…………………………………………………………………………………………..3
Main Menu…………………………………………………………………………………………………………4
Music……….………………………………………………………………………………………………………5
Movie………………..…………………..………………….……………………………………………………….6
Record………………..…………………..………………….……………………………………………………….6
Voice………………..…………………..………………….……………………………………………………….7
M radio……………………….…………….………………………………………………………………………7
Photo……………………………………………..………………………………………………………………8
Setup…..…………………………….…………………………………………………………………………….9
E-book……………..…………………..………………….……………………………………………………….9
Game………………..…………………..………………….……………………………………………………….10
Using USB Disk…………………………………………………………………………………………………...10
Upgrade your Player……………….…………………………………………………………………………….11
Other setting………………………………………………………………………………………………………13
Convert video format files into AMV………..………………………………………………………………......17
Troubleshooting…………………………………………………………………………………………………...19
Technical Specifications………………………………………………………………………………………….20
Page 1
Know your player
Key Function Definition
1.
:
2. M:
Confirm/Power On/off , Play, Pause, Stop
Entry main menu or exit from current menu.
3. ON/OFF: Power switch.
4. VOL: Volume selection
5.
: Next, fast forward & volume up
6.
: Previous, fast backward, volume down
7. USB: USB port
8. Earphone port
Battery Level
Battery is full on 3.7 V. As time goes on, the power indication displayed will decrease.
Indicator shows blank when battery almost ran out. You should charge your battery at that time.
Battery recharge:
Please switch on the player before charge. This player cannot be charged in case of power off. You also can
connect the unit to PC to charge.
Please switch off power when not using the player.
Main menu
Basic function
Set the ON/OFF switch to ON position.
Page 2
z
Access to Menu
Press Menu key to enter into the menu.
●
List of Menu
press
or
buttons
Music mode
Movie mode
Record mode
Voice mode
FM Radio mode
Picture mode
Page 3
Setup mode
E-book
mode
Game mode
Music
z
Simple actions
1. Turn on/off: with ON/OFF switch to ON position and unit turned off press and keep pressed play
button to turn it on; with unit turned on, press and keep pressed play button to turn it off.
2. Select Music in main menu, and press
to enter the files, short press
again to play music; during
playback press play button to pause music.
3. Select a music:
: Previous music;
: Next music.
4. Volume adjust: Short press VOL key, and press
to decrease volume
press
to increase volume, to return to previous menu press menu or do not press any
button for 10 seconds.
When playing music, press M key to entry play submenu;
Synchronous Lyric Display
The player supports lyric files with *.LRC suffix, and displays synchronously.
How to use lyric files?
Please make sure the lyric has the same name to the music
Page 4
For example:
Music file: My heart will go on.mp3
Lyric file: My heart will go on.lrc
How to know if lyric available?
When the lyric is available, during playback, press and keep pressed M key to enter lyrics interface:
1. the lyrics are displayed
2. press menu button to return to music mode.
Movie
Before play the movie, please convert the format into AMV. You can find the convert tool in the assorted CD.
Under main menu, select Movie, press
to enter, and short press
to play the movie.
Select a movie: : Previous movie;
: Next movie.
Volume adjust: Short press VOL key, and press
to decrease volume
Short press VOL key, and press
to increase volume
Record
Enter main menu and select Record and press
key to enter
Short press
key to start recording, press
again to pause recording.
Long press M key to save the current recording.
Voice will be recorded in Voice folder.
If displayed “Memory full”, it means mo space to save new record files, please delete other files to release
memory space.
If “Fold full” shown, it means there are 99 record files in this fold. Please choose another one.
The player only responses to
z
and M key when record processing
Select Record Type
1. before starting recording, press “M” to enter the submenu.
Page 5
to select ‘REC type’ submenu, and short press
2. Press
to enter,
.
3. Press
button to select recording mode and confirm with
32K Bit Rate
WAV file
64K Bit Rate
WAV file
button.
Voice
Under main menu, select Voice, and short press
to enter the voice play interface, then press
Select a voiced file: : Previous file;
: Next file.
Volume adjust: Short press VOL key, and press
to decrease volume
Short press VOL key, and press
to increase volume
again to play.
FM radio
Under main menu, select FM radio, and short press
to enter
Auto search
Press M button to enter submenu, press
button to select auto search, press
The 20 stations found will be automatically saved.
Volume adjustment: short press VOL button, press
Short press VOL button, press
button to start stations searching.
button to decrease the volume
button to increase the volume
Page 6
Manual tuning
Press : Downward 100 KHz
Push : Upward 100 KHz
Save channels manually:
In order to manually store a radio station you need to free a memory first, set on the station to delete, press M
button and choose delete channel and short press
button to delete the station. Search the desired station, press M
key, select Save and press
key to save.
Listening to a saved channel:
If there are more than one saved channels. You can press
to choose a saved channel.
Radio recording
Press M key and choose FM radio recording, press
to enter recording mode and press again to start recording,
press and keep pressed M button to stop and save recording.
Photo
Support JPEG, BMP photos.
Under main menu, select Photo,
Press
key to entry corresponding submenu:
or
to select the photo you want to read, press
Press
Long press M key to return to main menu.
Setup
Under main menu, select Setup, and press
to enter
○“System time” Setting
Press
to entry ‘system time’ interface:
Short press VOL to set from the year
Press / to adjust the data
Page 7
to play it, press M key to enter submenu setup.
Short press VOL switch to month
After adjust, press M to exit.
LCD Set
You can adjust the black screen time for automatic turn off display through the
submenu.
Language
Select the language you want to use as default by pressing
confirm.
Power off set
Time setting for automatically unit turn off.
Sleep setting
Online mode
PC connection setting
Memory info
Check the memory free space
Firmware version
Display the current firmware version
Firmware upgrade
Firmware upgrade (only connected to PC)
Exit
Exit from the current interface
/ , and press
to
E-book
Under main menu, select E-book
Press
/
Note: press
select the document you want to read, press
/
key begin to read; press M key to enter submenu setup.
buttons to scroll the text.
Game
Under main menu, select Game, and press
to enter the game
Tetrix
“ ” Move to left
“ ” Move to right
“ ” Pause/ begin
“M” change shape, long press to exit
“VOL”: Speed up
Page 8
Using as USB Disk
The player is also a standard USB disk. Supported by Windows XP, Vista and 7.
The player supports USB power supply. To entry, when on “waiting mode”, press M return to main menu and
choose the operation you need while the player is connected to PC.
This player supports Suspend mode.
When connected to PC, The player works on the three modes below:
Download data
Connect PC
Upload data
Upgrade your player
You can use Pc software to maintain or upgrade player’s firmware.
1. Connect player to PC
2. Running upgrade tools MP3 Player Update Tool (supplied with installation CD), then click ’Select new
firmware file’ to choose the upgrade file.
3. Select a new firmware file.
Page 9
4. Click ‘Start Upgrade’, the upgrade process will start.
5. While upgrade successful, the player will display like this:
Firmware upgrade is to improve player’s performance; you can still use it normally without doing upgrade
process
Player may not work by incorrect process! Please read this manual carefully before doing upgrade process.
The upgrade software cannot work for other player and vice verse.
Page 10
Other settings
z
Choose other fold (Stop submenu)
You can classify files into several different folders that ease to manage them (folders should be created on PC).
The player can identify 9 folders in root
1. When stopped
2. Press M key to entry Stop submenu
3. Press
interface
key to entry folder choosing
4. Press
5. Press
key to entry the selected folder
/
to select a folder
Please note: You can set folders independently in Music / Record / Voice mode
z
Delete file (Stop submenu)
You delete correspond files/channels in each Music/Voice/FM modes.
1. When Stopped. (No stop interface in
FM mode)
2. Press
3. Press
/
‘Delete all’
4. Press /
to select the file you
want to delete, press
key to enter
delete interface. Select YES or No.
5. Press
to choose ‘Delete ’ or
key to entry Stop submenu
key to confirm delete
‘Delete all’ will delete all files in current folder of current mode. I.e. Choose ‘Delete all’ in Music mode will
Page 11
delete all music files; recorder files will not be affected.
On FM mode, all saved channel will be removed.
Please safely removed player and unplug USB cable after delete files on PC, otherwise some files will not be
removed.
z
Play mode (Play submenu)
You can choose different play mode (i.e. repeat, shuffle) when playing music or recorded files
○ REPEAT
(Normal)
Playing music files in sequence until the end of
folder
(Repeat One)
Repeat single music file
(Folder)
Play all music files in folder
(Repeat Folder)
Repeat all music files in folder
(Repeat All)
Repeat all music files
○SHUFFLE
(Random)
Play music files in folder randomly
(Intro)
Play the 10s of each music files in sequence
○INTRO
EQ mode
Natural
Rock
Pop
Classical
Soft
Jazz
DBB
About Secret Space
NOTE: MP3 Player Disk Tool is not compatible with Windows Vista.
Some MP3 user may worry about divulging secret. They do not want others to find private information
contained, therefore these data have to be removed before lend their own MP3 to others. It makes some trouble.
However, this problem has totally solved by ‘Secret Space’ technique!
You can use provided software to divide the whole USB disk into two parts, and encrypt one of them. You can
Page 12
move your privacy into the encrypted part; they will be protected by password.
To active ‘Secret Space’:
1. Connect your player to PC
2. Run Media Player Disk Manager which can be found in provided CDROM
3. Click ‘Partition and Encrypt’ card, Allocate appropriate space and set username and password, and then
click Start.
Page 13
4. After restart you will find two disks (only one disk can be seen on Windows 2K SP4or prior), click the
encrypted disk (the second one) as follow:
5.Running executable file ‘RdiskDecrypt.exe’ and input username and password. If all are correct, disk will be
opened, and files can be copied into.
6.You must enter username and password each time access encrypted disk.
Warning: Divide one disk into parts will remove all data and so does combine process.
Warning: Please remember username and password. If you forget it, you can only making combine
processing and you will loss all encrypted data.
Convert Video files into AMV format
The below video formats could be converted into AMV format video file by using Program tools provided in the
assorted CD driver:
AVI format (.avi)
Windows Media format (.asf, .wmv & .wma)
MPEG 1 format (.mpg, mpeg &.dat)
Realplayer format (.rm)
Quicktime format (.mov)
MPEG 2 format (.vob)
NOTE: to convert some formats it is necessary to have installed the related codec (for example quicktime © for
“.mov” files or DivX Codec© for some “.avi” files)
Installation: Put the assorted CD driver onto your computer CD disk driver, open the file clip name AMV
transfer tool, select program named “Setup.exe” and double click it to run the installation program.
After installation finish, you could find the program named Media Player Utilities 4.25 in your computer, select
the AMV&AVI Video Converter to start your converting.
Page 14
1.
click
Run “AMV&AVI Video Converter”, click
to choose the folder where to save the AMV files, then
to select the position where the original files are.
2. Select unprocessed AMV/AVI files, then click
, the icon will be highlighted into
and a dialog box
will show. Choosing the setting of the AMV/AVI file you want to obtain, then click OK to confirm. (Note: Only
pixels in “160 * 120 can be supported for this player at AMV format, pls refer below)
3. Click
to start converting.
Page 15
4. After convert, the AMV files will be played automatically.
Troubleshooting
No Power
Check if battery have no power
Make sure you have switched the player on
No Sound
Make sure volume is not on 0 position and the connection to
earphone is valid
Please make sure the earphone is clean
Damaged MP3 files may have noise and even cannot be
played
Strange characters on display
Make sure you have chose correct language
FM has bad performance
Adjust place of player and earphone
Switch off power appliance nearby
Earphone MUST be used as antenna
Cannot Download Music
Check USB cable, and make sure the player is properly
connected to the PC
Check if the driver has well installed
Check if there is still blank memory
Technical Specifications
Screen
Matrix (128*160), 65536 colours
Connecting to PC
USB2.0 Full Speed
Memory
4GB
Power Supply
Maximum 4/5 hours in music play mode or 2 hours for video.
Voice Recorder
Sample rate
8KHz
Format
WAV (32K bps)
Page 16
MP3、WMA
FM Radio
Time
35hours (512M Flash)
Max. Output
(L) 10mW + (R) 10mW (32Ohm)
MP3 Bit rate
8K bps – 320K bps
WMA、Bit rate
5K bps – 384K bps
Freq. Response
20Hz to 20KHz
SNR
85dB
Frequency Range
87 MHz – 108MHz
Maximum
Channels
20
Stored
Max. Output
(L) 10mW + (R) 10mW (32Ohm)
SNR
45dB
Supported Music Formats
MP3, WMA, WAV
Supported Video Format
AMV
Operate Temperature
-5 to 40 degree
Multi Languages Display
English, Italian etc
Supported Systems
Windows 2000/XP/Vista/7
This marking shown on the product or its literature, indicates that it should not
be disposed with other household wastes at the end of its working life. To
prevent possible harm to the
environment or human health from
uncontrolled waste disposal, please separate this from other types of wastes
and recycle it responsibly to promote the sustainable reuse of
material
resources.
Household users should contact either the retailer where they
purchased this product, or their local government office, for details of where
and how they can take this item for
environmentally safe recycling.
Business users should contact their supplier and check the terms and conditions
of the
purchase contract. This product should not be mixed with other
commercial wastes for disposal.
Please note: Design and characters may change for product improvement without prior notice.
Page 17