1
User Guide
Intended for products
TrustPort Antivirus 2013
TrustPort Internet Security 2013
TrustPort Total Protection 2013
Revision date: 10/19/2012
Copyright © 2012, TrustPort, a.s., All rights reserved.
Content
CONTENT .................................................................................................................... 2
1 TRUSTPORT ANTIVIRUS ...................................................................................... 10
1.1
PRODUCT OVERVIEW AND KEY FEATURES ...................................................................... 10
1.2
MINIMUM SYSTEM REQUIREMENTS............................................................................. 10
1.3
WHAT IS NEW IN THIS VERSION ................................................................................ 11
2 INTRODUCTION TO THE ANTIVIRUS PROTECTION .............................................. 11
2.1
WHAT IS A COMPUTER VIRUS AND WHAT IS NOT ............................................................. 12
2.2
COMPUTER VIRUSES CLASSIFICATION ......................................................................... 13
2.3
TEN COMMANDMENTS OF AN ANTIVIRUS PROTECTION ....................................................... 18
2.4
WHICH EXTENSIONS ARE (UN)SAFE............................................................................ 18
2.5
ANTIVIRUS PROTECTION GLOSSARY ............................................................................ 22
3 INSTALLATION AND UNINSTALLATION OF TRUSTPORT PRODUCTS .................... 23
4 AFTER INSTALLATION - RUNNING TRUSTPORT ANTIVIRUS ................................ 26
4.1
TRUSTPORT ANTIVIRUS QUICK LAUNCH ...................................................................... 26
4.2
LAUNCHING THE TRUSTPORT ANTIVIRUS FROM THE START MENU ......................................... 28
4.3
INTEGRATION INTO THE WINDOWS SECURITY CENTER ..................................................... 28
4.4
ANTIVIRUS IN THE SHELL CONTEXT MENU ..................................................................... 29
5 USER INTERFACE ................................................................................................. 29
6 ON-ACCESS SCANNER .......................................................................................... 32
6.1
INFORMATION ABOUT AN INFECTION ........................................................................... 32
6.2
CHOOSING AN ACTION FOR THE IDENTIFIED VIRUS .......................................................... 33
7 USER'S ON-DEMAND SCANNER ............................................................................ 33
7.1
ON-DEMAND SCANNER .......................................................................................... 34
7.2
CHOOSING ACTION FOR AN IDENTIFIED VIRUS ............................................................... 34
7.3
SCANNING REPORT ............................................................................................... 35
2
7.4
CONSOLE APPLICATION .......................................................................................... 36
7.5
EXECUTING FROM THE COMMAND LINE ........................................................................ 37
8 INTERNET SCANNER ............................................................................................ 39
8.1
MAIL ANTIVIRUS ................................................................................................. 39
8.2
MAIL ANTISPAM .................................................................................................. 40
8.3
WEB SCANNER.................................................................................................... 40
8.4
PARENTAL LOCK .................................................................................................. 40
9 USB ANTIVIRUS ................................................................................................... 41
9.1
USB ANTIVIRUS CREATION ..................................................................................... 41
9.2
USING USB ANTIVIRUS ......................................................................................... 43
10
ADVANCED CONFIGURATION MANAGER ........................................................... 44
10.1 SHIELDS ........................................................................................................... 45
10.1.1 On-Access Scanner .................................................................................... 45
10.1.1.1
General settings ............................................................................................. 45
10.1.1.2
Options.......................................................................................................... 46
10.1.2 E-mail protection....................................................................................... 49
10.1.2.1
E-mail clients ................................................................................................. 49
10.1.2.2
Mail Antivirus settings ..................................................................................... 51
10.1.2.3
Mail Antispam settings ..................................................................................... 53
10.1.3 Firewall .................................................................................................... 55
10.1.3.1
Filter Administration ........................................................................................ 58
10.1.3.1.1 Editing set of rules ....................................................................................................... 58
10.1.3.2
Filter Definitions ............................................................................................. 60
10.1.3.2.1 New Rule Wizard .......................................................................................................... 61
10.1.3.2.2 Edit Rule ..................................................................................................................... 66
10.1.4 Web Antivirus ........................................................................................... 67
10.1.5 Application Inspector ................................................................................. 68
3
10.2 ACCESS CONTROL ................................................................................................ 74
10.2.1 Parental lock............................................................................................. 75
10.2.2 Volume Security ........................................................................................ 77
10.2.3 Device Security ......................................................................................... 79
10.2.4 Autorun Protection .................................................................................... 82
10.2.5 Password Settings ..................................................................................... 83
10.3 ANTIVIRUS ........................................................................................................ 83
10.3.1 On-Demand Scanner ................................................................................. 84
10.3.2 Internet protection .................................................................................... 86
10.3.3 Quarantine ............................................................................................... 89
10.3.4 Scheduler ................................................................................................. 91
10.3.4.1
Creating new task ........................................................................................... 91
10.3.4.2
Task Properties ............................................................................................... 93
10.3.5 Scanning engines ...................................................................................... 94
10.3.6 Update ..................................................................................................... 94
10.3.6.1
Offline update................................................................................................. 95
10.3.6.2
URL Address ................................................................................................... 96
10.3.7 Advanced Settings ..................................................................................... 97
10.4 SECURE SHREDDING ............................................................................................. 98
10.4.1 Configuration ............................................................................................ 99
10.4.2 Wipe Now ............................................................................................... 100
10.4.3 Panic Shredding ...................................................................................... 102
10.5 ENCRYPTION .................................................................................................... 103
10.5.1 Drives .................................................................................................... 104
10.5.1.1
Unmount options .......................................................................................... 104
10.5.1.2
General options ............................................................................................ 104
10.5.1.3
Mount Manager ............................................................................................. 105
4
10.5.1.3.1 Auto-mounts.............................................................................................................. 105
10.5.1.3.2 Recent mounts ........................................................................................................... 107
10.5.1.3.3 Search ...................................................................................................................... 107
10.5.1.4
Image Editor ................................................................................................ 108
10.5.1.4.1 Open an image .......................................................................................................... 110
10.5.1.4.2 New User Account ...................................................................................................... 110
10.5.1.4.3 Modify a User Account................................................................................................. 111
10.5.1.4.4 Delete a user account ................................................................................................. 112
10.5.1.4.5 Rename a user account ............................................................................................... 112
10.5.1.4.6 Change Password ....................................................................................................... 113
10.5.1.4.7 Set Password for a user account ................................................................................... 114
10.5.1.4.8 Mount/Unmount opened image .................................................................................... 114
10.5.1.4.9 Set Image Limit ......................................................................................................... 115
10.5.1.4.10 Change View ............................................................................................................ 116
10.5.1.4.11 Volume Image Properties........................................................................................... 117
10.5.2 Archives ................................................................................................. 118
10.6 LOGS AND RESULTS............................................................................................ 119
10.6.1 Firewall .................................................................................................. 120
10.6.1.1
Firewall log configuration ............................................................................... 121
10.6.1.2
External File Viewer....................................................................................... 121
10.6.2 Antivirus ................................................................................................ 122
10.6.2.1
Log settings ................................................................................................. 123
10.7 NETWORK UTILITIES ........................................................................................... 124
10.7.1 Network Statistics ................................................................................... 125
10.7.2 Traffic Watcher ....................................................................................... 125
10.7.3 Ping....................................................................................................... 127
10.7.4 WhoIs .................................................................................................... 128
10.8 ADVANCED SETTINGS.......................................................................................... 129
5
10.8.1 Language configuration ............................................................................ 130
10.8.2 Proxy ..................................................................................................... 131
10.8.3 Configuration Maintenance ....................................................................... 132
10.9 ABOUT AND LICENSES ......................................................................................... 134
10.9.1 License Information ................................................................................. 134
10.9.2 About .................................................................................................... 138
11
UPDATE .......................................................................................................... 138
11.1 UPDATING ....................................................................................................... 138
11.2 EXECUTING FROM THE COMMAND LINE ...................................................................... 139
12
PROGRAM LICENSE ........................................................................................ 140
12.1 TRIAL LICENSE .................................................................................................. 140
12.2 TEMPORARY SUPPORT .......................................................................................... 140
12.3 TRIAL LICENSE/TEMPORARY SUPPORT EXPIRATION ......................................................... 141
12.4 REGISTERING THE PRODUCT .................................................................................. 141
13
PERSONAL FIREWALL ..................................................................................... 141
13.1 PRODUCT OVERVIEW ........................................................................................... 141
13.2 SHORTCUT KEYS ................................................................................................ 142
13.3 APPLICATION SETTINGS ....................................................................................... 143
13.4 FINDING OF IP ADDRESSES IN THE COMPUTER ............................................................. 143
14
ARCHIVE ENCRYPTION ................................................................................... 144
14.1 PRODUCT OVERVIEW ........................................................................................... 144
14.2 IN SHELL CONTEXT MENU ..................................................................................... 144
14.2.1 Create new archive .................................................................................. 145
14.2.2 Create CAR SFX installer .......................................................................... 146
14.2.3 Extracting CAR archives (Decrypt) ............................................................. 147
14.2.4 CAR Archive properties ............................................................................ 148
14.2.5 Add/Edit archive comment ....................................................................... 148
6
14.3 ARCHIVE MANAGEMENT - CAR MANAGER ................................................................... 148
14.3.1 Create new archive (Encrypt archive) ........................................................ 150
14.3.2 Open existing archive .............................................................................. 151
14.3.3 Add files to the archive ............................................................................ 151
14.3.4 Delete files from the archive ..................................................................... 152
14.3.5 Extract files from the archive .................................................................... 152
14.3.6 Test archive consistency .......................................................................... 152
14.3.7 Display archive properties ........................................................................ 153
14.3.8 Add or edit archive file comment ............................................................... 153
14.3.9 Archived file/folder properties ................................................................... 154
14.3.10
Files and folders selection ..................................................................... 154
14.3.11
Create new folder ................................................................................ 155
14.3.12
Keyboard shortcuts .............................................................................. 155
14.4 MANAGEMENT OF CAR ARCHIVES - TOTAL COMMANDER ................................................. 156
14.4.1 Packer configuration ................................................................................ 156
14.4.2 Create new archive .................................................................................. 157
14.4.3 Open an existing CAR archive ................................................................... 158
14.4.4 Add files to CAR archive ........................................................................... 159
14.4.5 Delete files from CAR archive .................................................................... 160
14.4.6 Extract files from CAR archive ................................................................... 160
14.4.7 View an archived file................................................................................ 161
14.4.8 Test CAR archive consistency .................................................................... 161
14.5 ARCHIVE ENCRYPTION FAQ................................................................................... 162
15
DATASHREDDER ............................................................................................. 163
15.1 PRODUCT OVERVIEW ........................................................................................... 163
15.2 IN SHELL CONTEXT MENU ..................................................................................... 163
15.3 DATA SHREDDING .............................................................................................. 164
7
15.4 CONSOLE APPLICATION ........................................................................................ 165
15.5 DATASHREDDER FAQ ......................................................................................... 166
16
DISK PROTECTION ......................................................................................... 167
16.1 PRODUCT OVERVIEW ........................................................................................... 167
16.2 IN THE SHELL CONTEXT MENU................................................................................. 168
16.3 QUICK LAUNCH ................................................................................................. 169
16.4 COMMAND LINE PARAMETERS ................................................................................. 169
16.5 HOTKEYS ........................................................................................................ 171
16.6 CREATE A NEW DISK PROTECTION IMAGE ................................................................... 172
16.6.1 New Image Options ................................................................................. 172
16.6.2 Create Administrator's Account ................................................................. 173
16.6.3 Create Image Processing .......................................................................... 173
16.6.4 Finishing Create New Image Wizard ........................................................... 174
16.7 MOUNT WIZARD ................................................................................................ 175
16.7.1 Mounting Options .................................................................................... 175
16.7.2 Volume image authentication .................................................................... 176
16.7.3 Completing Mount Wizard ......................................................................... 176
16.8 QUICK MOUNT .................................................................................................. 177
16.8.1 Quick Mount Options ............................................................................... 178
16.9 DISK PROTECTION FAQ ....................................................................................... 179
17
CHECKIMAGE .................................................................................................. 181
17.1 PRODUCT OVERVIEW ........................................................................................... 181
17.2 DESCRIPTION OF ERROR TYPES AND REPAIRING ............................................................ 181
17.3 SIMPLE MODE ................................................................................................... 184
17.3.1 Check an image in simple mode ................................................................ 185
17.3.2 Errors and their repairing in simple mode ................................................... 186
17.4 USING CHECKIMAGE IN ADVANCED MODE................................................................... 187
8
17.4.1 Check an image in advanced mode ............................................................ 188
17.4.2 Choose the FAT table ............................................................................... 188
17.4.3 Different view modes ............................................................................... 189
17.4.4 Change the repair settings ....................................................................... 191
17.4.5 Repair errors .......................................................................................... 192
17.4.6 Format an image ..................................................................................... 192
17.5 CHECKIMAGE FAQ ............................................................................................. 192
18
TRUSTPORT ANTIVIRUS FAQ .......................................................................... 193
19
TECHNICAL SUPPORT ..................................................................................... 195
Note
██ ... « this part of the manual applies only to products Internet Security and Total Protection
██ ... « this part of the manual applies only to Total Protection product
Remaining unmarked parts of the manual apply to all products, i.e. Antivirus, Internet Security and
Total Protection.
9
1 TrustPort Antivirus
1.1 Product overview and key features
The TrustPort Antivirus is an antivirus program that protects your computer from virus attacks and other
malicious codes. It watches your computer continuously and prevents it from a virus infection. In case
that your computer is attacked, it reveals the infected files before they can be executed and heals them.
It also quarantines files so that they cannot do any harm. It enables you to configure all the components
according to your demands.
Continuously watches your computer by the means of the On-Access Scanner.
Provides the on-demand scanning.
Offers the heuristic analysis function which enables the antivirus software to reveal new and
unknown viruses as well.
Enables checking the activities of the suspicious objects by the means of the virtual computer
functions which is effective for revealing new and unknown viruses.
Enables scanning archives (zip, arj, cab...).
It is suitable for scanning harddisks, mapped network disks and various removable media
including flash disks.
Enables files scanning before reading and after writing, which protects them from malicious codes
attacks.
Creates a detailed, well-arranged and fully compatible report of the scanning history.
Contains a safe region - quarantine where suspicious and infected files are put aside.
It is built on the base of multiengine core.
Enables both scheduled automatic updates without user's intervention and the immediate ondemand update.
Enables setting more update servers and routing to another one in case of failure, without user's
intervention.
It is integrated into both the shell context menu and the Windows status bar.
It is integrated into the Windows Security Center. The Security Center watches if the antivirus
program is installed and checks if the On-Access Scanner is running and if your computer is
secured against a virus infection or not. The Security Center automatically warns you if your
antivirus definitions are not up-to-date.
██ Contains Internet Scanner - a powerful utility which prevents your computer from getting
infected from the network or through email communication and helps to isolate spam from
solicited emails. «
1.2 Minimum System Requirements
The TrustPort Antivirus requires at least the following hardware and software configuration:
Windows 2000/2003/XP/Vista/Win7.
Pentium III or higher Pentium-compatible CPU.
At least 512 megabytes (MB) of RAM; more memory generally improves the responsiveness.
400 megabytes (MB) of hard disk space.
The TrustPort Server Antivirus requires at least the following hardware and software configuration:
Windows 2000/2003/2008/SBS 2008.
Pentium III or higher Pentium-compatible CPU.
At least 512 megabytes (MB) of RAM; more memory generally improves the responsiveness.
400 megabytes (MB) of hard disk space.
10
1.3 What is new in this version
TrustPort Antivirus 2013
- Improved Application Inspector:
new default modes - Secure Mode, Recommended Mode and User Defined Mode
applications are divided into groups - allowed, restricted and blocked
option to run user defined application with special restricted mode (sandbox)
option to divide applications into groups with different rules
option to protect specified parts of filesystem and Windows registry
optional maximum size of checked files, check of digitally signed applications, automatic
enable/disable applications
- ██ Improved Device Security:
new enhanced GUI interface
the possibility of blocking devices by device type or connectivity ports.
device action settings - ask user/allow/block «
- Engines:
new proprietary TrustPort scanning engine based on dynamic whitelisting – technology based on
database of known clean files
upgrade of Vipre scanning engine (including new MX-Virtualization for the heuristic malware‘s
detection. MX-V uses Dynamic Translation emulator optimized for speed)
unified global settings for all scanning engines
new decompression library speeding up the scanning process
- New GUI of the program, simplified basic user interface
- Added new item Scan network drives into On-Access Scanner options
- Added new TrustPort OEM phishing/malware database
- New standard/custom mode in the installer
- Windows 8 compatible
- Update locations are unified for all components, access to updates is optimized for transfer speed
- Silent mode of AV
- Option to restore default configuration
- ██ Portunes – iPhone/Android and Windows password manager/security storage for sensitive information «
- ██ Skytale – iPhone/Android and Windows application for encryption of messages «
2 Introduction to the antivirus protection
In this part of the manual we will try to introduce you the mystique of antivirus problems. We will give
you the basic information step by step in five chapters. You should know the information for proper
using of your antivirus program and you should extract the basic set of pieces of information to
understand better how this antivirus software works, what is and what is not dangerous to change in its
settings and why.
11
What is a computer virus and what is not
Computer viruses classification
Ten commandments of antivirus protection
Which extensions are (un)safe
Antivirus protection glossary
2.1 What is a computer virus and what is not
Computers are threatened not only by viruses but also by other malicious codes. Antivirus programs
detect most of them. But there often appear different phenomena in computers that cannot be classified
as malicious codes - malware (malicious/malign software).
Computer virus - It is a piece of a program code that is able to make copies of itself through the
host application more than once. In a plain language: Virus is a computer program that spreads
without letting know the user sitting at the computer. It has no other property. It does not need
to do harm, it does not need to call anybody's attention to itself, which are examples of extra
symptoms that their authors add for various reasons.
Trojan horse - It is in fact any computer program, which on one hand does what the user is
expecting it to do, but on the other hand does something that the user has no notion of and
that she or he probably would not agree with. Let us give you an example: some dubious
software downloaded from Internet - when you execute it, you can take pleasure in watching a
beautiful African dancer, but the same program can be sending files from your computer at the
moment (and we certainly do not need to emphasize that it makes no difference between
private data and less private data - it is just a dull program) or encrypting some data and
consequently asking for a kickback for the code.
Backdoors - As the name of this software suggests, these are applications that "open" the
computer (without warning the user) for the attackers, who are interested in the data stored on
it or in your computer as a tool for their future attacks. More than a type, this is a software
property. Genuine backdoors occur very seldom, more likely they are combined with another
application type, for example Trojan horses or computer viruses.
E-mail worms - It is a slight exaggeration to say that it is a computer virus that uses e-mail
services for its spread. But it is not as simple as that. While a computer virus needs host
applications for its spread (with the exception of so-called accompanying viruses, which adopt
the name of exe files, but they have the com extension and "presume" on the fact that this
extension is preferred by operating systems), an e-mail worm is generally malicious itself (there
are more exceptions indeed - for example the macrovirus Melissa uses e-mail for its spread)
and needs no "host".
Funny programs - It is perhaps a strange category among the other malicious codes, but it
belongs here. Most of the funny programs behave in a way that they are impossible to quit
correctly and hard restart is unavoidable. It may cause fairly serious problems to machines that
should run non-stop. That is why antivirus programs are often set to detect these undesirable
codes.
Therefore viruses and other malicious programs are detected by antivirus programs. When operating
computers, the following problems can be met frequently:
Programming errors - In spite of the fact that programmers do their best to test and check
their work, sometimes an error or omission occurs. The more complicated and complex
software, the higher probability of an error, of course. That is why sometimes a computer
program disobeys its owner without any obvious reason. It can be due to a virus, but not
necessarily.
Software or hardware collision - Yes, it is like that. Even computer programs compete with
each other for the free system resources or battle against the lack of capacity (for example,
free disk space). Apart from the fact that the most hardware, despite the one hundred percent
compatibility declared, is much less compatible. These breakdowns are often adjudicated to the
effects of malicious codes (according to the motto "the reason is unknown, there must be some
virus behind it").
Hardware failures - Another very often "defect" that we can come across in the world of
information technologies. Harddisk failures may lead to irrevocable loss of data (backup, backup
and once more backup!), but it is not always the consequence of a malicious code attack.
Moreover, viruses are not able to damage the hardware physically (even if they can "simulate"
12
its defect). So if you see some strange colors on the screen, first check the graphic card and its
functionality - sooner than you start to revile the virus authors or the antivirus software
developers.
Software damages - A software damage (being a typical sign of computer viruses) can be
caused by many other ways. For example an incorrect program can terminate (for example due
to short-term power cut) during saving data file. Not every data or software damage is a result
of a work of a computer virus. But it is convenient to be cautious so scan the computer properly
and try to find the source of problems at any rate. At least in order to avoid the same situation
in the future.
False alarms - The illness of all antivirus programs. Despite there are less and less false alarms
(situations, when the scanning program classifies a clean file or area as infected or suspicious),
they will never disappear. "False alarms" are sort of the tax on security, when the antivirus
software developers try to reach the optimal price/performance ratio (in this case it is more the
scanning quickness/user's security ratio).
2.2 Computer viruses classification
Computer viruses and malicious codes in general can be divided with respect to various aspects and
attributes. The attempt to classify codes according to some attributes is not easy at all and in practice,
one can come across codes that combine properties of several categories. Well, there is not everything
only black or white in the real world.
We point out that the computer viruses field is developing very dynamically and that some following
categories belong to the museum at this moment - nevertheless, we list them all for completeness sake.
According to the visible symptoms:
Viruses without symptoms
The most of malicious codes try to show themselves as little as possible - at least in the way
that the attacked user doesn't notice them. The reason is quite simple: any evidence causes the
revelation and the user starts to fight against the malicious code and if she or he does it a little
adroitly, she or he will usually win. This is just the reason why programmers intend to restrict
these symptoms to absolutely unavoidable minimum.
Viruses with a graphic exhibition
If an author of a malicious code decides to involve some exhibition, it is usually the graphic one.
It may be displaying some message on the screen (stop testing products on animals, stop
wildwood felling etc.) or it can modify the desktop. Often programmers take advantage of
graphic exhibition for hiding the virus presence in the computer. It can concern for example
showing some prepared pictures that look like operating system alarm when executing the
malicious code. The user is announced that a file has been corrupted, that this and that driver is
missing or that she or he does not have the actual version of programs used and so on. In the
meantime the dangerous program is being installed. The user thinks that some other software
has initiated a defect that cannot be easily influenced and discards it.
Viruses with a special exhibition
Some malicious codes exhibit in a special way that shows evidence of their authors' sense of
humor. For example, there are programs that force the system clock to go counterclockwise.
Funny? Not so much when thinking of the problem to decide which data backup is the older and
which is the newer.
According to the way of spread:
Computer viruses
Trojan horses
Backdoors
Net worms
We can say that they are computer viruses that use services of any network (both local and
global) for their spread. But it is not as simple as that. While a computer virus needs host
applications for its spread (with the exception of so called accompanying viruses, which adopt
the name of exe files, but they have the com extension and presume on the fact that this
extension is preferred by operating systems), a worm is generally malicious by itself.
13
According to exhibition time:
Viruses activated immediately
The times when rules like "do not start your computer that particular day" were held are gone.
The most contemporary malicious codes are being activated right after entering the computer.
This is because contemporary antivirus methods are able to react to the virus occurrence in a
few hours. Just these few hours are the only time when the code can do what it wants. After
this period, the antivirus protection begins to win.
Viruses activated on a certain date
"Attention, do not start your computer tomorrow! Danger of losing all your data, a malicious
virus is going to strike!" We used to meet such or similar prognoses quite regularly in the
beginning of the nineties. The antivirus protection was still in swaddling clothes (if ever) and it
took months to react to a virus occurrence - on the other hand it took many months before the
virus could spread all over the world in the time before the presence of e-mail and the Internet.
If the programmer wanted to start a real global epidemic, it was enough to set a suitable date.
Not too early in order to enable the virus spread, and not too far to let the antivirus companies
eradicate it.
Viruses activated on a certain act
Special kind of viruses are those that are activated on some interesting act - for example on
every eighth reboot or on every pressing a certain key (or a key combination). Especially some
macroviruses, which used to add their comments to the politicians' names written by the user,
were extremely interesting...
According to the seriousness:
Nondestructive viruses
Most of contemporary viruses belong to this category. The main reasons are two. Firstly,
classical computer viruses (using a host file for their spread) are almost moribund; present
codes create their own files. Secondly, programmers do their best to hide their work, because
not hiding it would mean a cleanup by the attacked user. Data destruction in the whole
computer means a retreat from the seized control.
Destructive viruses
This category should be split into two subcategories: purposely destructive viruses and
inadvertently destructive viruses. For purposely destructive viruses it is their job specification to
destroy: they delete files, damage data etc. Viruses destructive inadvertently do harm as a side
effect: due to an error in the program code or due to some other defect. But from the user's
view, the result is the same in both cases: the loss of data.
According to the infected region:
Boot viruses
Boot sector viruses infect the executable code stored in certain parts of system region on the
disk. It can concern floppy disk boot sectors, harddisk partition table or harddisk boot sector.
Boot sector exists on every floppy disk that has been formatted using MS-DOS, no matter if this
floppy disk is a system disk or data disk. Boot sector contains a short program that uses DOS
for executing the system before passing control to other system programs or command
compiler.
There are very important instructions in the boot sectors that load operating system to the main
memory on every startup, therefore it is enough if the virus or its activating mechanism (jump
to executable code) is stored in this sector, and the virus will be loaded to main memory with
every bootup.
Mentioned viruses usually rewrite the boot sector with their own code and the original part of
the boot sector save on different part of disk. The infection then spreads using floppy disk boot
sectors that got in touch with the infected system and that the resident boot virus replicates
into immediately.
The DOS operating system was an optimum host for them regarding little possibilities to control
it, above all due to frequent usage of the simplest commands such as read and write from/to
disk, floppy disk copying, searching directories etc. The spread of boot sector viruses in 32bit
systems is much more difficult than in DOS because a boot sector virus is detected right away
on the system boot.
File viruses
We should subdivide file viruses according to the target of infection - they are typically
executable files, because the virus's aim is to activate virus through executing host code and
therefore the possibility of its spread. The most frequent file extensions are com, exe, ovl, bin,
14
sys, bat, obj, prg, mnu etc.
In all cases, the file viruses act in a similar way. They most often rewrite the beginning of a file
where they either write the jump command referring to themselves (to the so-called virus
body), or store themselves to this place. The second case may concern so-called overwriting or
destructive viruses. One of their drawbacks is that they destroy or damage the host program.
When you try to execute it, the virus is activated, but the program itself is not able to run. It is
disadvantageous not only for users but also for the virus itself, because the user is warned
about its existence. Hence the overwriting viruses are less common than the non-overwriting
ones.
Overwriting viruses
It is not sometimes possible to detect, and almost never cure, some file viruses, without
checking writing to disk. The viruses are very simple and direct in their actions. They overwrite
the host program with their own code which devaluates it. That is why they are called
overwriting viruses.
When calling the host program the viruses need not to be installed to memory at all (although
there are some cases when they do it) and they just overwrite some program on the disk by
themselves. The program is chosen using some key that is specific for every virus. The program
itself becomes worthless and calling it only activates the malefactor and then an error occurs.
Extending viruses
If the file virus already got into the system and has not been preventively detected, it can
become parasitic. Viruses know several ways of replication and one of them is the method of
adding the virus body to the end (or the beginning) of the file, whichever executable file it is
(the most frequent are com or exe files). This leads to the length extension of the infected file.
If it is a resident virus capable of so-called stealth techniques, this length extension is invisible
to the user when the virus controls the system because all changes are hidden by the virus.
Infection means overwriting first bytes of the infected file that cause immediate passing control
to the virus, or in exe file, first header bytes that refer to the beginning of the program, are
overwritten. "Cleverer" viruses contain self-identification mechanism to avoid multiple attacks.
But there are exceptions, for example twentyfold infection by the 'Jerusalem' virus is not
anything unusual. The process of the self-identification becomes a problem in case of
polymorphic viruses, namely due to decrease of the detection rate, because all decoding is
slow.
These viruses are easy to remove by repairing the beginning of the program and removing the
virus from its beginning or end according to factual virus body localization.
Companion viruses
Companion viruses create a new file with a different extension, which is composed of the
original file and the appended virus. The name of this virus comes from the fact that the virus
accompanies the infected file with a companion file. The virus can be given name for example
file.com. Everytime the user executes file.exe, operating system loads file.com first and
therefore infects the system. The companion virus is often generated by a "phage".
Phages
Phages modify other programs or databases in an unauthorized way. Specialists gave them
their name after the real phages, which are especially destructive, because they replace the
infected cell by their own genetic code.
The computer phage really replaces the executable file with its own code instead of appending
to it. It often generates an accompanying file too. Phages are extremely destructive because
they annihilate every infected file.
Cavity viruses
Not always a virus has to write its body to the beginning or the end of an exe or com file. There
are exceptions, fortunately not many, which inserts its body into host file cavities (usually
command.com). According to our definition, they are not link viruses, because the infection
does not cause file lengthening.
Cluster viruses
Cluster viruses form rather interesting group. They modify only the directory trees reference
such that it refers to one copy of virus located for example at the end of disk, instead of direct
writing to the data region.
Macroviruses
The most dangerous aspect of macroviruses is that they are platform independent - like
Internet - unlike file or boot-sector viruses. Moreover, macroviruses do not confine to
executable or object files, but they primarily take aim at data files.
According to the memory location:
Resident viruses
Resident virus, as its name prompts, is a virus that stays illegally in the memory. It usually
15
becomes resident in the memory at the first executing of the infected file (if it is a file virus) or
at the first loading to the main memory from the infected boot sector (if it is a boot sector
virus) and does harm from there. The virus stays in the memory until the system shutdown.
These viruses got into trouble on the 32bit systems, where their acting and survival is
dependent on their code. Generally, it can be said that the more sophisticated the virus is and
the more unusual commands uses, the less is the chance to stay active and unnoticed after the
32bit system start.
Resident TSR viruses
Some file viruses can install themselves into the memory using DOS services as resident TSR
and then they can secretly harm and replicate themselves. It is a sort of subgroup of the
mentioned resident viruses.
The difference between these two groups is that TSR viruses are installed "legally" and can be
identified by checking interrupt vectors or searching the memory with some of standard
programs. Although it is not easy to find out and localize, it is possible in principle. It is
necessary to watch the changes in the interrupt vectors of resident programs installation and
alert any program attempting to install itself into the memory immediately. Afterwards it is
possible to enable or disable the installation in a software way and to annihilate the program by
the computer reset. Watching viruses trying installing as TSR can be successful. The weak point
of this method is difficult distinguishing between illegal and legal programs.
Nonresident viruses
Viruses do not need to be permanently loaded in memory for their malign activity. It is enough
if they are activated together with the host program. Then they take control as first, do their
activity - most often replicate, and then pass the control back to the host program. This is just
the case of nonresident viruses or direct-action viruses.
Nonresident viruses are mostly file viruses. It is quite an extensive group. These viruses are not
very expanded, because they cannot, due to the absence in the memory, apply advanced
techniques such as a stealth technique (see below) and therefore cannot hide. If they are not
loaded in the memory, they cannot monitor and analyze functions leading to their revealing.
According to the activity:
Stealth and substealth
Invisible viruses hide their modifications of files or boot sectors. They monitor system functions
used by the operating system for reading files or sectors from a memory medium, and then
they simulate the results by calling these functions. It means that the program trying to read
the infected file or sector reads the original, unchanged one. Antivirus program would not
necessarily reveal the modification. To avoid detection, such a virus has to be loaded into the
main memory during the run of antivirus software. A good antivirus program should be able to
recognize any infection on the instant that the virus code is loaded into the memory.
Invisible viruses are usually capable to mask the file size or its contents on reading. Viruses
masking size belong to the group of viruses attacking files. The virus appends to the target
program and replicates, by which the file size increases. But the virus masks the file size, so the
user normally does not notice its activity.
It is quite easy to reveal an invisible virus. The most of standard antivirus programs detects
invisible viruses providing that the antivirus system is executed on "healthy" system (without
active virus). If you do boot system from clean, safe system disk with overwrite protection
before scanning, invisible viruses should be detected. As we mentioned above, invisible viruses
can hide only if they are resident and active in the memory.
Polymorphic viruses
A polymorphic virus encodes its body in order to hide its signature from an antivirus program.
Polymorphic or other encoded viruses spread by decoding the encoded part using a special
decoding routine (it converts the encoded file into the original one). The decoding routine takes
control over the computer for a while to decode the virus body. Afterwards it passes control to
the extracted virus that can start its activity.
First encoded viruses ever were not polymorphic. In other words, they used decoding routines
which did not vary from infection to another one. Although the virus itself was encoded and
hidden, the antivirus program still had a chance to identify and clean the virus due to the
constant signature of the decoding routine.
Recognizing a polymorphic virus is much more complicated because it generates a brand new
decoding routine at every infection so its signature is changing with every virus installation. A
polymorphic virus generally changes its signature using a simple machine code generator, socalled mutator (Mutation Engine). A mutator changes the signature with the help of random
numbers generator and a simple mathematic algorithm. Using a mutator, every virus can be
changed into a polymorphic one. A simple modification of the source code in assembler is
enough to make the virus calling a mutator before copying itself.
Even though basic scanning methods (for example code strings comparison) cannot reveal
16
polymorphic viruses, specially constructed lookup machines modified for encoding schemas
identification are able to find them. Polymorphic viruses are not undefeatable but they have
made scanning programs a hard and expensive task. The majority of antivirus programs contain
searching for encoding mechanism because of protection from polymorphic viruses.
Retroviruses
Retrovirus is a computer virus that tries to evade a capture or protects itself from antivirus
programs operations by attacking antivirus software. Experts sometimes call retroviruses "antiantiviruses" (do not confuse anti-antiviruses with antivirus viruses that are called to paralyze
other viruses!)
It is not a difficult task to create a retrovirus. Of course, authors of viruses can get to any
antivirus on the market. The only thing that they have to do is to study the software they want
to defeat, find some weak point in it and think of how to abuse it. For example, a retrovirus
finds a data file in which an antivirus program stores signatures of viruses, and deletes it. In
that way it decreases the ability of the antivirus software to detect viruses. More sophisticated
retroviruses can find integrity information database and delete it. The removal of the database
has the same consequences for the controller as the removal of data files for the antivirus
software.
Other retroviruses detect the activation of an antivirus program and then they hide from it or
stop it, eventually start a destructive routine before discovery. Some retroviruses change the
computation environment so that it affects operations of the antivirus program. Others use
specific weak points and loopholes of individual antivirus programs to weaken or break their
activity.
Tunneling viruses
A tunneling virus searches for the original interrupt vectors in DOS and BIOS and calls them
directly and thereby avoids any eventual monitoring program in system that could detect any
attempts to call these interrupt vectors.
Such tunneling methods are sometimes used by viruses enemies too - some antivirus programs
use them to avoid any unknown or undetected viruses that might be active at the time of their
execution.
Armored viruses
Armored viruses protect themselves with a special program code that makes tracing, reverse
compiling and virus code understanding difficult for the antivirus software. Armored virus can
be shielded for example by an "envelope code" that draws away watcher's attention. Another
possibility is to hide with a help of a load code that simulates being at a different location.
Multipartite viruses
Multipartite viruses affect executable files, disk boot sectors and sometimes also floppy disks
sectors. Their name comes from the fact that they do not restrict to any specific disk region or
any specific file type, but infect computers in several ways. If you execute any application
affected by the multipartite virus, the virus infects the boot sector of your machine. The virus is
activated on the next system load and infects any suitable program that you execute.
According to the spread rate:
Fast infectors
By fast infectors we mean file viruses that infect not only executed files, but also opened files
(when copying, moving etc.)
Slow infectors
Slow viruses are hard to reveal as they infect files that are modified or copied by operating
system. In other words, "slow" virus affects only file user works with. For instance, it affects
floppy disk boot sector when the boot sector is written by the FORMAT or SYS command. A slow
virus can infect only a file copy, not the original.
The fight with slow viruses is a difficult task. An integrity controller should detect a new file and
alert the user to it, because there is no control sum for this file available. The integrity
controller is an antivirus application that monitors contents of disk devices, size of all files and
control sums. It alerts the user to any case of inconsistence. However, the user probably finds
nothing suspicious in error sums, because he himself ordered the instruction to create a new
file. Most often - quite logically - orders to compute a new sum for the new (infected) file.
Sparse infectors
This term is used for viruses that infect their victims only occasionally or on completing some
condition of little likelihood. Thus they infect only sparsely, which gives them their name. This
behavior minimizes the risk of getting caught by a user.
ZOO viruses
This term denotes viruses that do not spread in the real world at all. They exist, antivirus
programs are able to detect them, but there is no chance to meet them. They were created for
study purposes or the number of their errors makes them non-vital. Some of them might be
17
created by programmers in order not to spread, or by programmers who wanted to gain the
primacy in some field (first virus for Windows 2000 and so on) at any price (malfunction).
Sometimes it is contrasted with so-called In-the-wild viruses: malicious codes that can be met
with some (bad) luck.
2.3 Ten commandments of an antivirus protection
1. Use antivirus software! It is the cornerstone of the whole information security.
2. Be careful using e-mail! Antivirus software is the cornerstone, one of the other
recommendations is not to use an e-mail preview, because some codes are able to activate
without clicking on the attachment. Just opening the message and viewing this preview makes
it easier to them. User has no possibility to remove the suspicious e-mail without infecting the
computer. Moreover, it is convenient not to send e-mails in HTML, because a dangerous code
can be inserted in it on reply. Be careful with any e-mail attachments! It holds especially for
various congratulations or funny programs.
3. Beware of illegal programs! Producers police the (il)legality of their software on computers
and do not enable fundamental functions for the security (for example patching) to irregularly
gained programs.
4. Think over the web pages you want to visit! Many web pages contain malicious codes that
are able to install themselves on the computer and cause many problems there. Try to avoid
suspicious pages where this or similar infection threats: erotics, illegally distributed games,
software and music, serial numbers, cracks, warez, hackers etc.
5. Use a personal firewall! If you are connected to the Internet, the use of a personal firewall is
necessary. It is a computer program checking all the data flowing from or into your computer
and at the same time blocking unrequested or unwelcome operations (attacks from hackers or
viruses etc.). Many current malicious codes spread through the Internet. These codes use
security defects and software weak points for attacking poorly protected computers directly
from the Internet. The problem is that antivirus programs usually cannot deal with such codes:
A net worm uses a network to get into the computer but "lives" only in the computer memory.
If it does not create any file on the disk, antivirus software ignores it. Even if the user removes
it from the computer memory, the malicious code is settling in the computer immediately again.
The whole process could last for ages getting and removing the worm. Personal firewalls can
help us just in these situations.
6. Use the electronic signing and encrypting! Using the electronic signing contributes to an
excellent prevention because it enables warning about any changes in documentation or files
(and if they are infected by virus, they are of course modified). The electronic sign used in
communication can help to the authentication of the message sender. The data encryption
technology ensures that even if an attacker gets the data, she or he can see only a nonsensical
group of characters instead of the usable information. Therefore, encrypting protects data not
only against viruses that steal documents from computers, but also against other inquisitives
and unauthorized people.
7. Get the information! Try to be "in the know" as for new computer viruses. It is good to monitor
web pages of antivirus companies or "virus" paragraphs in the expert press. You will find there
answers to many questions as well as advices how to solve individual situations.
8. Patch! Patches, applied on computer, change the source codes and configuration of the parent
software in order to solve the known problems. These problems may be of various kinds collision with another software, malfunction, an undesirable property that can be used by
hackers or viruses and so on. All patches for the most frequent operating system are available
at WINDOWSUPDATE.MICROSOFT.COM or through the Windows Update in the Start Menu.
9. Backup your data!
10. When appropriate, contact experts! The effects of most computer viruses can be removed
by experts. It requires some knowledge and tools. Most of harm debited to computer viruses
are caused by something different – by non-professional attempts to deal with them!
2.4 Which extensions are (un)safe
Probably each of us knows (or at least guesses) what is the use of extensions EXE, ZIP, DOC, JPG etc.
There are more extensions in the computer - on the following lines you can meet at least the basic ones
that are important for the computer security and antivirus protection.
18
Operating system DOS:
Extension
Description
Note
APP
Digital Research DRDOS executable
DOS executables (16 bit
BIN
Device driver/binary
image
DOS executables (16 bit)
BO?
Boot sector image
Compressed executable boot images
COM
Executable program file
DOS executables (16 bit)
COM
DIET, PKLITE,
CRYPTCOM, ICE etc.
Compressed executable files
DEV
Device driver
DOS executables (16 bit)
DRV
Device driver
DOS executables (16 bit)
EXE
DIET, PKLITE, LZEXE,
UPX etc.
Compressed executable files
EXE
Executable program
DOS executables (16 bit)
EXE
Self-extracting archives
File archives
IM?
Disk image
Archive
MB*
MBR image
System
OV?
Overlay
DOS executables (16 bit)
SYS
Device driver
DOS executables (16 bit)
TD0
Deledisk diskette
images
Compressed boot images
00?
Xtree overlays
DOS executables (16 bit)
Operating system Windows:
Extension
Description
Note
ACM
Audi Compression
Module add-on
Windows System file
CMD
Windows NT batch file
Windows 32-bit Executables
CPL
Control Panel extension
Windows 16-bit Executables
DEV
Device driver
Windows 32-bit Executables
DLL
Dynamic Link Library
Windows 16-bit Executables
DL?
Dynamic Link Library
Windows 32-bit Executables
DRV
Device driver
Windows 32-bit Executables
EXE
DIET, PKLITE, LZEXE,
UPX etc.
Compressed Executable files
EXE
New Executable
Windows 16-bit Executables
EXE
Portable Executable
Windows 32-bit Executables
HLP
Help files
Windows 16-bit Executables
LNK
Shortcut file
Windows Executable
MOD
Kernel Module
Windows 16-bit Executables
MSC
Microsoft Common
Console Document
MSI
MS Windows Installer
File
MSP
Windows Installer Patch
PCI
Windows PCI Miniport
system file
File archives
Windows Executables
19
PIF
Program Information
File
Windows Executables
REG
Windows Registry files
SCR
Screen saver
Windows 16-bit Executables
SYS
Win NT device driver
Windows 32-bit Executables
TSP
Windows Telephony
Service
Windows Executables
VXD
Virtual Device Drivers
Windows 32-bit executables
VWP
Audio plug-in
Windows Executables
WIN
Window file
Windows 32-bit executables
??
MS Compress/Expand
Compressed executable files
286
Device driver for
Windows 2.0 and 3.x
real mode
386
Virtual device driver
Windows 16-bit Executables
HT?
HTML Document
Possibly contains JavaScript
HTML
HTML Document
Possibly contains JavaScript
Extension
Description
Note
PRC
PalmOS application
PDB
PalmOS Database
Unsorted:
Applications for Windows:
Extension
Description
Note
ADP
Microsoft Access Project
ASD
MS Word Au o-backup
file
CDR
Corel Draw vector
graphics
CNV
MS Word Data
conversion support file
D?B
AutoCad
DOC
MS Word Document
Possibly contains macros (VBScript)
DOT
MS Word Document
template
Possibly contains macros (VBScript)
D
B
AutoCAD Project files
DWG
Autocad Drawing files
GMS
Corel products Global
Macro Storage
MD?
MS Access Office
database files
Possibly contains macros (VBScript)
MDE
MS Access MDE
Database
Possibly contains macros (VBScript)
MPD
MS Project Database
file
Possibly contains macros (VBScript)
MPP
MS Project 98
Document
Possibly contains macros (VBScript)
MPT
MS Project 98 Template
Possibly contains macros (VBScript)
Possibly contains macros (VBScript)
Possibly contains macros (VBScript)
20
MSG
Outlook message files
Possibly contains macros (VBScript)
MSO
MS Office 000 files
saved as HTML
Possibly contains JavaScript
OBZ
MS Binder Wizard
Possibly contains macros (VBScript)
OCX
Active-X OLE control
OLB
OLE Object Library
OLE
OLE Object
OTM
MS Outlook macro
(VBA) storage
Possibly contains macros (VBScript)
POT
MS PowerPoint
presentation template
Possibly contains macros (VBScript)
PPS
MS PowerPoint show
Possibly contains macros (VBScript)
PP?
MS PowerPoint
presentations Office
Possibly contains macros (VBScript)
PWZ
MS PowerPoint Wizard
Possibly contains macros (VBScript)
RTF
MS Rich text format
(embedded and
renamed OLE2)
SHW
Corel Presentation
Show
SMM
AMI Pro macro file
TLB
OLE library file
VS?
MS Visio documents
WBK
MS Office workbook
WIZ
Microsoft wizards
Possibly contains macros (VBScript)
WPD
Corel WordPerfect 9
with VBA
Possibly contains macros (VBScript)
WPT
WordPerfect Document
Template
WRI
MS Write
XLB
MS Excel Worksheet
Possibly contains macros (VBScript)
XL?
MS Excel Spreadsheet
Possibly contains macros (VBScript)
XLT
MS Excel Spreadsheet
Template
Possibly contains macros (VBScript)
Possibly contains macros (VBScript)
Possibly contains macros (VBScript)
Archives and compressed files:
Extension
Description
ACE
ACE Archiver file
AIN
AIN-compressed file
ARC
PKARC Archiver file
ARJ
ARJ Archiver file
B64
Encoded base64 MIME
archive
BO?
Boot sector image
BZ
BZIP compressed file
BZ2
BZIP2 compressed file
CAB
MS Cabinet file
Note
Holds also for extensions .A0?, .A1? etc.
21
CAR
Crypted Archive
COM
Self-extracting archives
COM
DIET, PKLITE,
CRYPTCOM, ICE etc.
CPIO
Unix Archive file
CPT
Compressed MAC file
EXE
DIET, PKLITE, LZEXE,
UPX etc.
GZ
GZIP compressed
ICE
ICE compressed
IM?
Disk image
JAR
Java Archive
LIM
Limit compressed
LZH
LHA compressed
MSI
MS Windows Installer
file
PAK
PkPak compressed
RAR
RAR compressed
TAR
Unix TAR compressed
TAZ
Unix Compressed TAR
file
TD0
TeleDisk diskette
images
UU
UUEncoded Unix file
UUE
UUEncode
Z
Unix Compress file
ZIP
PKZIP, WinZip
ZOO
ZOO Compress file
??_
MS Compress/Expand
Holds also for extensions .R0?, .R1? etc.
2.5 Antivirus protection glossary
Explanation of the basic terms you can meet in the world of malicious software:
Update, Upgrade - In the terms of antivirus software it means the completion of a computer
viruses database (update) or the antivirus scanner engine modernizing (upgrade).
Backdoor - Applications that "open" a computer (mostly without user's knowledge) for attackers
- it concerns not only data stored on it, but also a way to future attacks.
Boot sector - A floppy disk boot sector or a hard disk boot sector. It consists of parts of a
program code that can be modified - and some viruses abuse it for their spread (they abused it
mainly in the past).
Worm - It is a malicious code that uses services of any network (local or global) for its spread. A
computer virus needs host applications for its spread, whereas a worm is usually malicious by
itself. (An exception is so-called companion viruses, that take names after exe files, but their
extension is com. They exploit the fact that this extension is preferred by operating systems.)
DDoS (Distributed Denial of Service) - Advanced version of DoS in which the server is
attacked from many places at the same time. This increases the chance of success.
22
Dialer - Malicious software that hides in web pages and is able to redirect the phone connection
to commercial (mostly foreign) phone lines.
DoS (Denial of Service) - Type of a computer attack. Servers are overloaded by many requests
(for example of displaying web pages). The server is unable to manage such amount and falls
down.
Engine - An antivirus program core which detects viruses.
False alarm - Situation when antivirus software makes a mistake and alerts to a non-existing
danger.
Hacker - A person who hacks software in the world of information technology. Originally, hackers
were people who changed computer programs in order to use them in a specific environment.
In the course of time this term has got a different meaning and indicates all people who act
illegally in the cyber world.
Heuristics - It is an analysis of a program code by an antivirus program that reveals unknown
malicious codes based on suspicious sequences or commands.
Hoax - An e-mail message that is not based on truth. It warns against superdangerous viruses
and appeals to send round.
I-Frame - A security defect that allows executing an e-mail attachment without user's click.
In-the-wild - Denotation of viruses and malicious software that can be met ordinary when
working with a computer (i.e. that are not laboratory matter).
Keylogger - A program that records pressed keys. It is usually used for stealing some
information (login and password etc.).
Macrovirus - A computer virus that is able to affect documents and spread through them (Word,
Excel, PowerPoint...).
Malign Software (Malware) - Malicious software. It is a complex denotation of any undesirable
programs that are installed on the computer without user's knowledge and behave in an
unwanted way.
On-access - Processing (mainly scanning for viruses) in the act of doing something with file,
region etc.
On-demand - Processing (mainly scanning for viruses) defined group of files/programs etc.
(usually whole disks or directories).
Patch - A process on which computer software errors are corrected.
Resident antivirus program - An antivirus program permanently running in the computer
memory where checks files real-time.
Social engineering - An attack method whose object is to gain data and information from the
weakest security point (which is usually human). Uses mostly deceits or cheats.
Spyware (Spy Software) - Software installed on a computer that monitors running tasks (all or
only some of them) - entering passwords, executed programs, written e-mails etc.).
Stealth - Computer virus's ability to become "invisible" for antivirus programs.
Trojan horse - Any computer program that does what the user expects but besides does
something that the user does not know at all and that would probably disagree with.
Virus - A part of a program code that is able to replicate repeatedly using a host application. In a
clear and simple language: virus is a computer program that spreads without being noticed by
the person sitting at the computer.
ZOO viruses - Viruses that normally cannot be met. Only test samples or technological
specimens are denoted by this term.
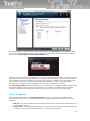
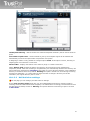
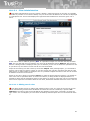
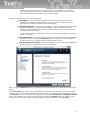
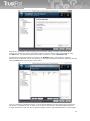
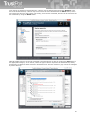
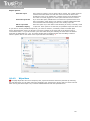
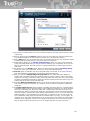
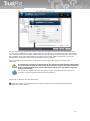
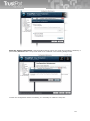
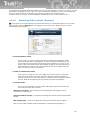
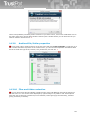
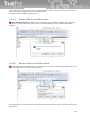
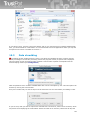
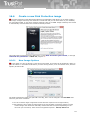
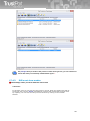
3 Installation and uninstallation of TrustPort
products
Installation of applications TrustPort Antivirus, TrustPort Internet Security and TrustPort Total Protection
is set up by the starting program setup.exe (the program icon is figured below). Installation program is
a transparent wizard that enables the installation even for the less experienced users.
Installation can be performed in two modes – standard, intended for common users, when the product
is installed with recommended settings, or advanced, when users themselves can select further
parameters of installation, such as selection of target directory, shortcut location in the Start menu,
advanced settings regarding computer protection, proxy settings.
23
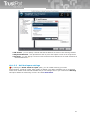
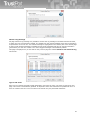
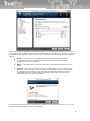
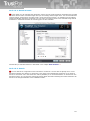
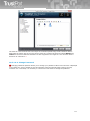
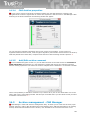
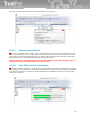
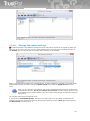
If the user has bought the licence key, he can use this key already during the installation. Just copy a
license key file, named according to the type of the product (antivirus.key, internetsecurity.key,
totalprotection.key), to the installation file setup.exe and launch the setup file.
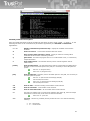
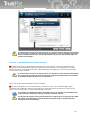
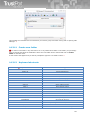
You can modify the type of installation by command line parameters:
/SILENT,
/VERYSILENT
The silent installation can be done in two modes: SILENT or VERYSILENT. In
case of /SILENT, neither the Setup nor the background window are displayed,
but the installation process window is. If the switch /VERYSILENT is used, not
even the installation process window is displayed.
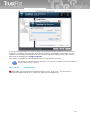
/NOCANCEL
The user is not allowed to interrupt the installation process due to disabling the
button 'Cancel' and ignoring the close application button. This switch can be
used together with /SILENT.
/DIR="x:\directory
name"
This overwrites the implicit directory name displayed on the Select Destination
Path page of the Setup wizard. Full path to the directory must be entered. It is
also available in both the silent installation modes.
/GROUP="group
name"
Overwriting the implicit folder name displayed on the Select Start Menu Folder
page of the Setup wizard.
/SN=“activation
code“
If a valid activation code is entered, pages regarding registration are skipped
and the product is registered.
/LICKEY=“path to
licence key “
If a path to valid licence key is entered, including filename, pages regarding
registration are skipped and product is registered.
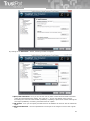
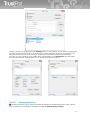
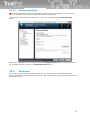
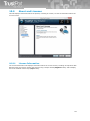
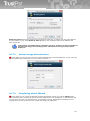
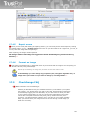
██ Integration to e-mail clients:
TrustPort Internet Security and TrustPort Total Protection integrate themselves into e-mail clients and
therefore enable the scanning of incoming and outgoing e-mails for viruses and spam. Supported clients
include Microsoft Outlook, Microsoft Outlook Express, Windows Mail, Mozilla Thunderbird and The Bat!.
Integration to the default e-mail client is chosen automatically.
24
Integration to more e-mail clients is possible by checking the checkbox next to the name of the required
client (their number is not limited). If some e-mail client is not supported by the operating system, then
it is not possible to choose this client from the list and support for this client will not be installed. If
some e-mail client is supported by the operating system, but isn't installed on the computer in the
installation time or its current version is not supported, then it is not possible to choose this client from
the list, but support for this client will be installed.
List of supported clients and their versions:
Outlook Express - version 6
Windows Mail - version 6
Thunderbird - version 3.1.x to 15.0
Microsoft Outlook - version 2000-2007, 2010 (32bit, 64bit)
The Bat! – version 5.0
If the default e-mail client is later changed, and it was not selected on this page during installation, then
it is possible to easily register TrustPort Antivirus to this client directly in the user interface. The
process will be similar in case of integrating TrustPort Antivirus into additionally installed e-mail client, if
it wasn’t selected during installation on this page. «
Registration using activation code / licence key
Product registration can be done in the last step of the installation. The process is analogous to
registration through user interface.
25
The standard uninstallation process can be modified by the use of switch /SILENT as well. It requires
executing the file unins000.exe, located in the program installation directory, with the /SILENT
parameter.
4 After installation - running TrustPort Antivirus
4.1 TrustPort Antivirus Quick Launch
This application runs in the Windows notification area and allows monitoring of current status of virus
protection and protection against hackers, and also runs the most popular features of TrustPort
Antivirus. Quick launch (TrustPort Tray) is automatically started when a user logs into Windows.
Protection against viruses – Antivirus, Internet Security, Total Protection
██ Protection against hackers – Internet Security, Total Protection «
Status of On-Access and Internet Protection is immediately visible through the quick launch icon. This
icon is divided into two halves. The left upper half indicates the status of Protection against viruses
(status of Real Time Protection, Application Inspector and virus updates) and right lower half indicates
the status of Protection against hackers (status of E-mail Protection, Parental Lock, Web Antivirus and
Firewall).
If both protection against viruses and hackers are turned on, the entire icon is green (see figure on the
left). If either the virus protection or protection against hackers is turned off, half of the icon will be red
in this case (see figure in the middle). Protection status is also recorded in the tooltip that appears when
you hover the mouse over the quick launch icon. When both protection against viruses and hackers is
turned off, the whole icon turns red (see figure on the right).
Changes in protection against viruses and hackers are also shown. During enabling or disabling, a blue
TP icon appears. During the update of the virus database the icon also displays the download progress.
Clicking on the quick launch icon, the following options appear (number of items depends on the
installed product):
TrustPort Antivirus
TrustPort Total Protection
26
Antivirus:
Enables the user to activate on-demand scanning in different modes. For example:
Scan all disks - engages the on-demand scan of all local and mapped network drives.
Scan all removable media - runs on-demand scan for all removable media connected to your
computer, such as floppy disks, CDs, external drives, ZIP drives, USB tokens, etc.
Scan selected target - runs on-demand scan of your chosen directory.
Also allows you to temporarily disable on-access or internet protection and also view brief statistics of
scanned / infected files.
██ Network:
allows setting the desired degree of firewall protection, such as allowing all connections, allowing only
outgoing connections or using firewall rules. «
Tools:
██ allows operation with encrypted disks and also activates the CAR Manager which allows you to create
encrypted archives. «
██ Also allows you to launch Portunes, the password manager, and Skytale for encryption of messages.
«
Update:
Update virus definitions – is used to start an immediate update of virus definitions, i.e. the
antivirus databases will be updated with the latest known viruses. Use this function only in
exceptional cases, it is preferable to set up automatic updating of the database in the Update
tab.
Update Antivirus – is used to check for new versions of the TrustPort product which is currently
installed.
Presets:
allows mass enabling or disabling of individual items to protect your computer by predefined profiles.
Based on the selected profile, the below items are active:
High
Security
██ Medium
Security
Low
Security
Game Mode
Real Time
Protection
Yes
Yes
Yes
Yes
Application
Inspector
Yes
Yes
No
No
██ Internet
Protection
Yes
Yes
No
No
██ Web
Antivirus
Yes
Yes
No
No
██ Email
Protection
Yes
No
No
No
██ Parental
Lock
Yes
Yes
No
No
██ Firewall
Updates
Use
Firewall
Rules
Yes
Enable
Outgoing
Connections
Yes
Enable
Outgoing
Connections
Yes
Enable
Outgoing
Connections
No
Silent mode
No
No
No
Yes
27
If the user changes the protection settings manually in the user interface, this new status will be
indicated as Custom status in the quick launch menu.
Configure
is used to run the configurator, with which you can change the behavior of the antivirus program.
Exit
ends and closes the quick launch application. If you have a program running under On-access
Protection, then closing this application does not mean the antivirus program is aborted.
4.2 Launching the TrustPort Antivirus from the Start menu
You can get to the antivirus program through the button Start - Programs (All programs). Select the
TrustPort Antivirus (Internet Security, Total Protection) item and the following menu displays:
TrustPort Antivirus (Internet Security, Total Protection) can be used to launch
configurator, which is used to change the behavior of the antivirus program.
TrustPort Home Page contains link to TrustPort website.
Buy Now contains link to website, where you can buy TrustPort products.
Uninstall TrustPort Antivirus (Internet Security, Total Protection) executes uninstaller,
which helps you to remove currently installed TrustPort product from your computer.
Register executes registration wizard, which helps you to register TrustPort products using
activation code or licence key.
Start TrustPort Tray executes quick launch application in the Windows status bar. This
application is automatically started after user is logged on to Windows.
4.3 Integration into the Windows Security Center
The TrustPort Antivirus is fully integrated into the Windows Security Center (available in
Windows XP SP2). This feature keeps the user informed about the antiviral protection of his computer.
The Windows Security Center informs you whether your Antivirus software is installed and whether it is
working properly. If the virus definitions are not up-to-date or the On-Access scanner is disabled, the
user is warned about this fact.
28
4.4 Antivirus in the shell context menu
The TrustPort Antivirus is associated with the shell context menu which is displayed when a user clicks
the right mouse button on any file, folder or disk. In this menu you can execute the On-Demand
scanner to scan the selected object by selecting the Scan for viruses... item. If this object is a folder,
all its subfolders will be scanned too.
5 User Interface
An antivirus program protects your computer against attacks from viruses and other malicious codes. In
the event of an infection of your computer, the program can also be used to remove the infection. In
order to wholly fulfill its function, the program must be regularly updated and if necessary adjust its
settings.
This controller combines all the features of the antivirus settings that somehow affect the behavior of
the program. Control is available in a simplified user interface or in an advanced configuration
manager.
The simplified user interface is clear and simple in design so that a common user can easily operate the
program. For experienced users, advanced configuration manager is available. Features available
depend on the installed product.
29
TrustPort Antivirus
TrustPort Total Protection
The simplified interface header contains the name of the installed product along with its version number.
At the top of the interface window, the current state of computer protection is also displayed. Text
informing about the state of protection against viruses and hackers is also accompanied by an icon that
changes color depending on the current state of protection. The same icon is then displayed in the
Windows notification area.
Protection against viruses – Antivirus, Internet Security, Total Protection
██ Protection against hackers – Internet Security, Total Protection «
The interface also contains several buttons for setting up quick protection of your computer. With one
click the user can easily enable or disable on-access protection, application inspector, parental lock, run
the updates, set the level of firewall protection etc. The number of buttons varies depending on which
type of product is currently installed.
30
On-Access Scanner, Application Inspector, Check for updates – Antivirus, Internet Security, Total
Protection
██ E-mail Scanner, Parental lock, Web Scanner, Firewall – Internet Security, Total Protection «
These buttons change the colour depending on the current protection status, from green (active) to red
(disabled).
Below the buttons are drop-down menus with other antivirus options:
Antivirus
From the menu, Antivirus scanning can be started by selecting a specific target to be scanned for
viruses. You can also view the quarantine contents, show report of the last on-demand scan, view the
logs with a list of recent antivirus activities, create a USB Antivirus, plug-in for BartPE or
Windows PE CD, set the behavior of on-access and on-demand protection when an infection is found,
and finally set the interval of virus definition updates.
██ Network
Use the drop down menu to view network logs informing about recent firewall and internet protection
activities and to adjust some settings for e-mail protection, parental lock and the firewall.
Parental Lock allows you to change the level of blocking for certain websites. You can select a preset
profile with a selection of categories blocked, block all, allow all, or customize the categories and
blocked addresses. Parental Lock setting is password protected. «
Tools
██ By clicking on Create new encrypted drive, the Disk Protection Image Creation Wizard opens. With it
you can safely store files in encrypted disk images. Any created encrypted disk can then be connected
or disconnected from the system using the appropriate item. Through the Wipe now item, you can safely
delete temporary files, history, and files containing sensitive information. Clicking on Open CAR Manager
opens a file manager that is used to create the CAR archives and other operations with these archives.
31
Through the Configure Drive Encryption, you can set which encrypted disks will be automatically
mounted after system boot. «
██ In the Tools menu are two more items, they can be used to launch Portunes, the password manager,
and Skytale for encryption of messages. «
General Settings
Here it is possible by using the Register License item to run the Registration Wizard which will register
the product, you can also check whether program updates are available, as well as set whether to verify
the availability of this update automatically in the future. There is also the possibility to change the
program language.
At the bottom part of the window (if running the program in a trial version) a warning to purchase the
full version is displayed and also a link to TrustPort, where the product can be purchased. This
information disappears when the product is registered.
Below left you can use links to display the Help, information About the program or to open the
Advanced Configuration Manager, where advanced users can change in detail the settings of the
product. The Close button closes the window.
6 On-Access Scanner
On-Access Scanner checks computer operations all the time and protects the computer from virus
attacks on-line. The On-Access Scanner is a name coming from the "DOS times" and even though it is
not very suitable, it has survived in people's minds until now.
The On-Access Scanner of antivirus software is sometimes called a "resident shield". By the resident
shield we mean an antivirus software function that constantly monitors all the opened files, system
folders and what you actually work with, at the system task in the background. If you have an infected
file in the computer and you open it, the antivirus software by means of the resident shield alerts the
virus presence in a certain file. What happens with such a file depends on the On-Access Scanner
setting.
The On-Access Scanner is often the last chance to detect a virus before executing in the main memory,
which usually leads to the further spread.
6.1 Information about an infection
If the On-Access Scanner finds an infected file, an information window with the following information will
be displayed:
Affected file - the name of the infected file.
Reason - the reason why the On-Access Scanner called the information window.
Name - if the reason is a virus, its name is displayed here.
Action - which action the On-Access Scanner responded.
32
Which action the On-Access Scanner responds, depends on its settings. By default, the option Rename
is selected.
If you select an action that cannot be performed for any reason, the On-Access Scanner performs the
following one, according to these priorities: Deny access, Repair, Rename, Move to quarantine, Delete.
6.2 Choosing an action for the identified virus
If the On-Access Scanner finds a virus and the Ask user mode is set in the On-Access Scanner
settings, a user can select one of the following actions: Deny access, Repair, Rename, Move to
quarantine, Delete. The selected action is used to clear the virus infection.
If you select an action that cannot be performed for any reason, you are asked for selecting another
action. Now you cannot select any action which has been tried on the infected file before.
If the Ask user mode isn't selected in the On-Access Scanner settings, the antivirus program always
performs one of the following actions: Deny access, Repair, Rename, Move to quarantine, Delete.
7 User's On-Demand Scanner
The computer is constantly protected by the On-Access Scanner, but it is convenient to use the OnDemand Scanner from time to time. It concerns scanning the whole computer or selected area
(directory, file) on user's demand. It can happen that in specific cases a malicious code gets into a
computer without being detected by the On-Access Scanner (it did not know it at the time of infection; a
short time failure of the antivirus protection occurred and so on).
33
7.1 On-Demand Scanner
The On-Demand Scanner is used for scanning viruses and other malicious codes in the selected
directory on the hard disks or removable media. It can be executed from the Start menu, shell
context menu or through the quick launch.
If the On-Demand Scanning is running, an information window with some details is displayed.
There are scanning statistics displayed (number of scanned, infected and solved infections).
You can whenever interrupt the Scanner by pressing the Pause button or terminate it by pressing the
Cancel button. The paused scanning can be resumed by pressing Continue button (scanning will
continue from the point where it has been paused) or finished by pressing Cancel button. You can also
set that the computers turns off after the on-demand check is finished. It can be done through the
Shutdown automatically after the scan has been completed checkbox.
When the scanning is finished, you can choose either Close or Display Report. Display Report leads to
displaying the scanning report in an Internet browser with the basic information about the antivirus
software and the scanning results.
If the scanner finds a virus, the program behaves according to the settings.
7.2 Choosing action for an identified virus
If a virus is found by the On-Demand Scanner, the antivirus program behaves according to the
settings. Implicitly, program tries to clean the virus.
If the Ask user action is set, you can select one of the following actions: Do nothing, Repair, Rename,
Move to quarantine, Delete. The selected action is used for repairing the virus infection. If you select
action that cannot be performed for any reason, you are asked for selecting another action. Now you
cannot select any action which has been tried on the infected file before.
34
In case that the Ask User mode is not selected, the user is kept posted by statistics. You will get to
know which files were infected and how the infection was resolved, from the results in the report.
7.3 Scanning report
The scanning report is an output of the On-Demand Scanner. It is saved in the XML format in the
report.xml file in the docs directory in the installation directory. Besides this file there are files
report.css, report.xsl and the img directory. If you want to save the Report for a future use, you have to
copy all these files, not only the XML file.
The scanning report is created as an output of every On-Demand scanning. Since the reports would
cumulate uselessly, the file report.xml is always rewritten with the last test's result and it is up to the
user to save the "interesting" reports. If you want to save the output of the last test, you have to
backup this file latest before finishing the following test by the Close button, otherwise the previous
contents of this file will be lost.
The report can be divided into some basic parts:
Header - contains the information about the time and date of scanning.
Test parameters - says what was scanned, i.e. disk(s) or file(s) separated by semicolon and the
scanning parameters defined in the options of the On-Demand Scanner, i.e. which extensions were
scanned and so on.
Results - can show the text No infection found, or some of the sections Boot sectors and Files. The
Boot sectors section informs you about scanning the boot sectors of individual devices connected to your
computer, such as disk, floppy disk or CD mechanics. This section is displayed only if you use the tests
of hard disks or removable mechanics. The Files section appears only in case of finding any infection.
You get to know which file was infected, which virus attacked it and how the infection was resolved.
Statistics - always contains the Boot sectors and Files sections. The Boot sectors section contains the
number of scanned, infected and repaired sectors. The Files section contains the number of scanned,
infected, repaired, renamed and deleted files.
35
7.4 Console application
Sometimes it is necessary to be able to execute scanning in the console mode, which enables easier
cooperation with other applications, allows you to execute the service using batch files, scheduled
application executing and so on. For these reasons, application AVCC.EXE executable in console mode
was created besides the On-Demand Scanner AVC.EXE running in graphic mode. Both applications can
be configured with the same parameters.
Error levels, which can be returned from on-demand scanners:
List of error levels:
0
No infection, everything OK
1600
Infected/suspected object has been repaired/disinfected
1601
Infected/suspected object has been renamed
1602
Infected/suspected object has been moved to the quarantine
1603
Infected/suspected object has been deleted
1606
Computer requires a reboot to clean the infection
1610
Archive is password protected, so it couldn't be scanned
1611
Unsupported compression format
1612
Illegal structures in the scanned file
1613
Error parsing compressed file
36
1614
CRC checks do not match
Viruses:
-1602
AV engine has found a virus (some object is infected)
-1603
AV engine reports that the scanned object is suspected
Other errors:
-1610
No AV engine found => av cannot work
-1611
AV engine initialization has failed
-1612
AV engine integrity error
-1613
AV configuration error
-1614
AVMGMA communication error OR service is stopped
-1615
Antivirus Self-check failed
Cleaning errors:
-1620
Infected/suspected object couldn't be deleted
-1621
Infected/suspected object couldn't be renamed
-1622
Infected/suspected object couldn't be moved to the quarantine
-1623
Infected/suspected object couldn't be repaired/disinfected
7.5 Executing from the command line
The antivirus software can be configured with parameters. You can execute the AVC.EXE or AVCC.EXE
file from the command line with parameters. If you execute the AVCC.EXE without any parameter,
available parameters will be displayed.
37
Detailed parameters description:
Each command and switch must be preceded by the switch symbol, which is dash '-' or slash '/'. In the
following list there are all command line parameters supported by the AVC.EXE and AVCC.EXE
applications:
-? or -h
Display command line parameters help - displays all available command line
functions.
-b
Scan boot sectors - scans all the hardware with boot sectors.
-x
Stop scanning when infection is found - activity of antivirus scanning will be
terminated at the moment of detecting infection.
-q
Quiet mode - the antivirus program will run in so-called silent mode, i.e. without any
output information.
-s
Scan subdirectories - the selected directory will be scanned together with its
subdirectories.
[folder]
Scan specified folder - the selected directory will be scanned without subdirectories.
Attention, if there are blank spaces in the path, it is necessary to insert the path into
quotes.
AVC.exe "C:\Program Files\"
AVCC.exe "C:\Program Files\"
[file]
Scan specified file - Attention, if there are blank spaces in the path, it is necessary to
insert the path into quotes.
AVC.exe "C:\Documents and Settings\Jirka\My
Documents\smlouva.doc"
AVCC.exe "C:\Documents and Settings\Jirka\My
Documents\smlouva.doc"
-ad
Scan all disks - all disks including network disks will be scanned.
-adl
Scan all local disks - all local disks will be scanned.
-adr
Scan all removable media - all removable media will be scanned.
-rs
This option is enabled only in console mode together with option -q, when the output
information is reduced only to the name of the found infection.
AVCC.exe -rs -q file.exe
-l=x
Log level - sets the log verbosity level by number x from 0 to 2 with the following
meaning:
0 ... silent mode
1 ... normal mode
38
2 ... verbose mode
AVC.exe -l=2 -ad
AVCC.exe -l=2 -ad
-c="file"
Read configuration from specified XML file - loads the configuration from an XML
file.
-cs="file"
Read config from specified XML file and save it - loads and saves the configuration
from/to an XML file.
-r="file"
Write the scanning report to the specified XML file - writes the scanning report to
an XML file.
-tl="file"
Read targets to be scanned from the specified file - loads scanning targets from an
external text file. This file must include a list of targets (i.e. paths to objects on the local
drive or on LAN you want to scan). Each target must be on a new line. Usable for
example in need of scanning more objects than is limit of command line.
AVC.exe -tl="setting.lst"
AVCC.exe -tl="setting.lst"
-le
Display list of installed engines and their definition files - displays the list of
installed antivirus engines and antiviral signatures files.
-ns
No statistics will be shown - using this switch will cause that no statistics will be
displayed after the scanning has finished.
-man
Open the Antivirus User's Guide.
8 Internet Scanner
██ For a complete protection of your computer against malicious codes, it is also necessary to scan your
Internet communication. In case of your computer being connected to the Internet, this feature can
detect and remove incoming malicious codes before they are written to your disk so they cannot do any
harm. This protection consists of four parts: Mail Antivirus, Mail Antispam, Web Scanner and
Parental Lock. These parts are described in appropriate chapters. «
8.1 Mail Antivirus
██ This feature serves for scanning your email communication. The scanner checks emails' body and
attachments. In case of detecting a virus, the email or its attachment is immediately moved to
quarantine or deleted in dependency on your settings. Instead of the infected file, a text file with basic
information about the infection is attached to the email. You can see an example of such a text file on
the picture below.
In case of using an encrypted connection (POP3 over SSL - POP3S), scanning for malicious codes is not
technically possible. «
39
8.2 Mail Antispam
██ Mail antispam helps you to handle unsolicited emails in a desired way. If this feature is enabled,
every incoming email is evaluated by predefined antispam rules. If an email is classified as a spam, an
informational header is added to the email and the email subject is modified so you can create a rule in
your email client and put such marked emails into a separate folder, delete them etc. «
8.3 Web Scanner
██ Web Scanner checks and evaluates your HTTP communication. In case of trying to view or download
an infected file, it will display an error screen with basic information about the infected file in your
Internet browser as shown on the image below.
When downloading files, Web Scanner downloads the file and scans it for viruses before passing it to the
target application (most likely your browser). This might take a long time in case of using slow
connection or downloading a large file. Thus if you want to get information about download progress you
can click the Internet Scanner tray icon which appears if downloading lasts longer than a specified
interval.
In case of using an encrypted connection (HTTPS), scanning for malicious codes is not technically
possible. «
8.4 Parental Lock
██ This feature blocks the browsing of inappropriate Web content. These sites can either be defined by a
self created list of unauthorized sites, or you can simultaneously monitor the pages by the content, or
category (such as drugs, violence, spyware, pornography etc.). If the lock evaluates the site as
inappropriate, the web browser will show an error page with basic information about the URL and the
reason for blocking. «
40
9 USB Antivirus
In cases where for example we use portable applications on USB keys, we do not have data protected
throughout the entire use, as is the case with the use of resident scanner. The solution in such
situations is offered by the USB Antivirus that automatically monitors any data written to the protected
USB drive.
Conduct of the USB Antivirus is very similar to that of the residential scanner. All written data is
continuously monitored and if a virus is found, an action determined by you is carried out. Unlike the
resident scanner that is integrated into the system, the launch of the infected file cannot be prevented.
9.1 USB Antivirus creation
Creating USB Antivirus can be achieved from the advanced settings dialogue of the on-demand scanner
through the Prepare TrustPort USB Antivirus button. This button is accessible only in a licensed
installation on a desktop computer. It is not possible to create an additional USB Antivirus, for example
from a previously created one.
41
By pressing the button the dialogue with the selection of interchangeable disks will be displayed, where
installation of the USB Antivirus can be achieved.
All removable disks detected in the system are shown, and only the one which satisfies the minimum
disk space can be chosen. Clicking OK starts the installation process of the USB Antivirus on the
exchangeable disc,
which is completed with information about its successful implementation.
All the required files for the correct functioning of the USB Antivirus are copied. The current
configuration of the antivirus is transferred.
42
9.2 Using USB Antivirus
USB Antivirus is used to monitor the data that are transmitted to the USB drives. After inserting the USB
drive into the computer, the autorun antivirus is automatically triggered. A standard TrustPort antivirus
tray icon is an indication that the program is running, and is only suspended if TrustPort Antivirus is
already installed.
The tray menu of the USB Antivirus contains all the options available with a standard installation, in
addition an option to run the USB scanner in the background.
The background scanner window is very similar to the standard on demand window scanner. It shows
the ongoing status and statistics of the USB scanner throughout the use of the inserted USB drive.
The files are monitored by the USB scanner as opposed to residential protection only in the case of their
registration on to the disk. This means that an infected file can be run from the USB drive. It is
therefore appropriate during the copy of data on a drive without the USB Antivirus to firstly request on
demand scanning.
Scanner configuration, updates, and the use of engines does not vary from the current installation of
TrustPort Antivirus. Some settings are not accessible, such as resident protection, application inspector,
scheduler etc.
43
10 Advanced Configuration Manager
Serves for control of program settings for users with advanced knowledge. In this interface, it is
possible to configure all configuration items. Configuration is divided into the following sections:
o Shields – setting of shields, which serve as a protection of computer against
viruses, malware and spam.
o Access Control – setting of user access to some removable devices, files and
folders, blocking of inappropriate websites.
o Antivirus – setting of on-demand scanner, scheduling of files and folders scanning,
quarantine settings, scanning engines and updates.
o Secure Shredding – shredding of temporary system files, sensitive data, cookies,
panic shredding option.
o Encryption – creating and managing of encrypted drives and archives.
o Logs and results – logs informing about all activities performed by Antivirus or
Firewall.
o Network Utilities – network statistics, network activities, checking availability of
some IP address, getting information about Internet domains.
o Advanced Settings – setting the language, import or export configuration, proxy
settings, restoring default settings.
o About and Licenses – information about the product, including its version,
information about the current license.
44
You can reach individual settings pages from the tree-like list on the left side of the window. After
clicking on one of the configuration sections, the corresponding page is displayed in the right part
of the window. Another way to navigate to the configuration section is to click on the respective
link on the start page.
Every configuration change must be confirmed by pressing Apply in order to take effect!
In the upper part of the window, there is the Manual button, and after clicking on it, it opens page
with the possibility to download PDF manual to the installed TrustPort product.
10.1
Shields
Shields category enables to modify settings of shields, which serve as protection against viruses,
malware, spam through the real time protection, monitoring network connections and checking behavior
of untrusted applications.
10.1.1
On-Access Scanner
On the On-Access Scanner tab, you can modify settings for the scanner that is running in the
background and protects your computer against virus infections. This scanner is the cornerstone of the
protection of your computer and therefore it is necessary to have it activated all the time.
10.1.1.1
General settings
The On-Access scanner can be enabled or disabled here and its basic parameters are shown. You can
also find here the basic statistic information about the On-Access scanner. Only a user with
administrator rights is allowed to make any changes here!
Checking the Real-time virus protection indicates that on-line computer protection is on. Because of
being a very important part of the computer protection, the actual status is also indicated by text
Active or Stopped. We strongly recommend having the On-Access scanner activated!
45
Any change of the On-Access Scanner status is indicated by the icon change on the Windows status
bar. You can enable/disable displaying of the splash screen (see below) during starting of On-Access
Scanner by the Show splash screen while starting option.
When the On-Access scanner is enabled then every file is scanned at the time when it is being read from
the hard disk and when it is being written to the hard disk. In other words: in the first case every file is
scanned before processing and before it can cause any problems, if infected. In the second case every
file is scanned every time it is being modified, changed or created, i.e. after it could be infected
(because the virus attack is also a modification of current file or producing a new one).
The Scanning statistics window is displayed just to inform the user. It displays statistics related to the
On-Access scanner from the moment of its execution. The numbers of scanned, infected, repaired,
renamed, quarantined and deleted files (and boot sectors for the first three groups) are shown.
10.1.1.2
Options
The most important feature is the Requested action by which you can set an immediate action
performed by the scanner. The program's behavior after finding a malicious code can be one of the
following:
Ask user - this mode causes that the On-Access Scanner asks a user about a possible action if a
virus infection is found.
Deny access - the file will physically remain on its position, but the antivirus software blocks any
access to it. It is unable to execute the file or to do any harm through it.
46
Repair - the antivirus software will try to restore the infected file (if it is possible or efficient some files are malicious software themselves, so there is no sense in repairing it).
Rename - the infected file is left on its place, but its extension is changed to some other which is
not associated with any activity in the system.
Move to quarantine - the infected file is moved into a safe directory controlled by the antivirus
software where it cannot do any harm. It is possible to treat the infected file safely in the
quarantine: restore, delete etc.
Delete - the file containing a malicious code (or a file being a malicious code itself) will be
deleted.
If you select an action that cannot be performed for any reason, the On-Access Scanner takes the
following one, according to these priorities: Deny access, Repair, Rename, Move to quarantine, Delete.
The default option is Rename.
Warning:
The user action setting is not relevant to scanning mailboxes. The Repair action is always performed as
the first one. If repairing cannot be performed then the Deny access action is chosen.
Scan files:
Scan all files - scanning all files without difference in format or type.
Scan only files with the following extensions - antivirus software will scan only files with
specified extensions. The predefined list contains dangerous extensions, we recommend
modifying it to experienced users only!
Exclude files with following extensions - antivirus software will not scan files with extensions
that you select. We recommend this option to use to experienced users only!
Scanning options:
Scan compressed files (zip, arj, cab...) - archive files, i.e. their contents, are scanned
(searched for malicious codes). This option slows the scanning down, but on the other hand
increases the computer protection.
Scan network drives – defines, if network drives should be scanned.
47
After clicking the Advanced button the following options will appear:
Exclude from scanning:
Objects (files, folders) - You can select this option if you want to exclude some objects from
scanning. By pressing Manage you can set these objects. We recommend this option to use to
experienced users only!
48
Processes - This functionality could be potentially dangerous and it is recommended only for
experienced users! When you add new process image, changes will be applied immediately
even for already running processes. After removing of process image, currently excluded
processes will remain excluded until its termination. For correct function, it is necessary to
select executable process file.
Process exclusion benefits:
- it is possible to use more antivirus products on single computer simply by excluding
other antivirus scanner process
- it provides compatibility fix for other file system filtering software installed on same
machine
- it could increase overall system performance by excluding some "safe" system
processes (indexing service for example)
Scanning options:
Enable heuristic analysis - antivirus program will not only scan objects for known viruses, but
it will also try to identify unknown malicious codes (suspicious routines, suspicious features
etc.) By the help of heuristics, program can reveal new or unknown viruses. This option slows
the scanning down, but on the other hand increases the computer protection.
Scan modified file after close - antivirus program will automatically scan the files after their
editing, amending of content, and saving.
10.1.2
E-mail protection
10.1.2.1
E-mail clients
██ Antivirus protection settings of email clients can be changed in this section. The list contains all
supported email clients and next to each entry it is also stated if for this client support has been
installed during the installation. For e-mail clients who have support installed, it is possible to choose if
antivirus protection is to be used or not. Warning! To change the settings in this section administrator
privileges are required!
Antivirus protection of the email client will occur only in the case if its usage is allowed. In the opposite
case only a general scan of incoming post will occur and according to the settings in Mail Antivirus and
Mail Antispam.
49
By default during the installation, support is installed for all e-mail clients that are supported by the
operating system. As active are designated all e-mail clients who were selected before the completion of
the installation TrustPort Antivirus product. Warning! If at least one email client uses TrustPort
Antivirus for the scanning of post, it is always necessary to have active choices Enable antivirus mail
protection and Enable antispam mail protection in settings of Email Scanner! Otherwise, e-mail
scanning will not work correctly!
The button Configure will appear next to every supported e-mail client after it has been selected which
enables advanced settings configuration of the client after its selection.
If support has not been installed for any particular e-mail client during the installation or the current
version of e-mail client is not supported, it is not possible to scan emails with the help of TrustPort
Antivirus.
For every e-mail client with active TrustPort Antivirus support, the following buttons are added to the
toolbar:
Mark as spam - marks the selected message as spam. The e-mail message is automatically
grouped into the antispam monitoring database as spam and the subject of the message is
modified according to settings options Subject modifications.
Mark as not spam - cancels selected messages as spam. The e-mail message is automatically
grouped into the antispam monitoring database as a message which is not spam and the string
which marks spam is removed from the subject of the message.
Configure - enables settings of e-mail scanner.
Warning! The buttons of all e-mail clients are added to all accessible task bar buttons, however only to
some clients they are automatically added (Windows Mail is the only exception which does not have
these buttons integrated yet). The buttons are very similar amongst e-mail clients, but not totally
identical. It always depends on the settings of the actual e-mail client.
Advanced settings of e-mail clients
This dialog has the advanced settings of individual e-mail clients. However some characteristics are
supported only for some e-mail clients.
In Incoming e-mails it is possible to configure Requested action. The selected action will be
activated with the infected incoming e-mail. It is possible to choose from the following actions:
Deliver infected - e-mail scanning will not be used and the email will be delivered without
TrustPort Antivirus interference. Warning! If you choose this option, you completely remove all
incoming email scanning and settings Mail Antivirus will not be considered!
Delete infected e-mail - the infected e-mail will be automatically deleted, but it is still possible
to restore it from the Delete items folder from the e-mail client.
Delete infected attachments - all infected attachments will be changed according to settings
options Name of file of Mail Antivirus and they will be placed into quarantine.
50
Use Bayesian filtering - defines whether the method of Bayesian dictionary will be used to check for
spam.
Junk email to spam folder – emails marked as junk by the antispam engine will be marked and
automatically moved to the spam folder of a particular user profile.
In Outgoing e-mails it is only possible to configure option Check. If this option is active, scanning of
outgoing post occurs with the e-mail client.
Show toolbar - displays the toolbar of the antivirus plugin in a client's email GUI.
Option Restore path contains the path to the directory where scanned e-mail messages are
temporarily stored. After their scanning is completed they are automatically deleted. This directory will
also contain files restored from quarantine. This option it is set to directory Restore in the installation
directory of TrustPort Antivirus by default. Warning! This path is stored to a record during the saving
process into quarantine, i.e. if from that time there has been a change in directory for the file
restoration, the original directory will be used! «
10.1.2.2
Mail Antivirus settings
██ On this page you can manage your Mail Antivirus settings.
By the Scan incoming emails check box you can enable/disable scanning for malicious codes in
incoming emails and their attachments. Implicitly it is enabled and it is strongly recommended to have
the Mail Antivirus always turned on. Warning! This option affects the monitoring of post in all used
email clients.
51
Settings
In this part you can edit the basic options of the Mail Antivirus.
All files - all types of attachments will be scanned for viruses.
Selected files with following extensions - only attachments with extensions specified in the
list will be scanned, they can be edited by clicking on Modify button.
Exclude files with following extensions - if you don't want to scan some attachment types,
you can specify them in the list if you enable the check box.
Quarantine infected files - all infected emails and attachments will be moved to quarantine
where you can handle them. In the other case all infected files will be deleted right away.
By clicking on the Advanced... button, following window will appear:
52
Add Header - you can specify a header that will be added to an email in case of being infected.
Subject Modification - text specified here will be put to the subject in front of the original text.
File Name - you can specify a name of a text file which will be attached to an email instead of an
infected attachment. «
10.1.2.3
Mail Antispam settings
██ By enabling the Check emails for spam option, you can enable scanning your email
communication, except for emails, which sender is defined in the White List/Black List, for unsolicited
emails. Such emails will be marked as SPAM and you can manage them in your email client. Warning!
This option affects the monitoring of mail in all used e-mail clients.
53
By clicking on the Advanced... button, following window will appear:
Spam/Ham Threshold - here you can set the ratio by which emails will be divided to solicited
(ham) and unsolicited group (spam). The range is 0 - 10,000, the default value is 5,000.
Increasing the value will cause smaller probability of passing a spam email without marking but
also higher probability of marking a solicited email as a spam.
Add Header - here you can specify a header that will be added to an email in case of marked as
spam.
Subject Modification - the text specified here will be put to the subject in front of the original
text.
54
Maximum scan size (kB) – maximum size in kB, when e-mails will be checked for spam.
Default value is 400kB.
By clicking on the White List or Black List button, you can control the lists of e-mail addresses, which
are not scanned for spam.
In the White list there are e-mail addresses of senders who do not send unsolicited e-mails. Their emails are never marked as spam. The Black list contains e-mail addresses, which are sources of
unsolicited e-mails. E-mail from any of these senders is always marked as a spam.
You can add a new address by clicking on the Add button, edit an address by the Edit button or delete
it by the Delete button. «
10.1.3
Firewall
██ On the page Global Firewall Settings is set the main functionality of TrustPort Personal Firewall.
TrustPort Personal Firewall makes possible to work in four modes that have direct influence on the
safety of the computer connection with the Internet or with the local network. The firewall modes can be
switched by the slider on this page. With each slide movement there is shown a name and description of
the selected mode on the right side.
55
List and description of TrustPort Personal Firewall modes:
Permit all connections
Option Permit all connections makes possible all outgoing and incoming connections.
Firewall will not block any connections and the computer will behave as if no firewall is
installed there. This option is very dangerous and you should not select this option if you are
not sure what you are doing or if it is not necessary for you.
Enable outgoing connections
This option enables all outgoing connections and firewall rules are used only for
incoming communication. This mode is relatively safe but it cannot protect the computer
against Trojan horse or software that sends information to the Internet and that is why it is
necessary to be careful with the software you use and what e-mail attachment you open.
Use firewall rules
When there is mode Use firewall rules, the firewall starts to filter all incoming and
outgoing connections according to the set rules. The rules can be set on pages Manage Rule
Sets and Manage Firewall Rules. This option is safe but it depends how the filter rules are set.
If the filter settings are wrong, it is possible that the computer behaves as if no firewall is
installed and you should be very careful.
Deny all connections
Option Deny all connections prohibits all incoming and outgoing connections. Firewall
will block all connections and the computer will behave as if it is not connected to the
computer network. This option is very safe but the practical utility is only if you do not want,
from some reason, any network connectivity.
The button Advanced serves for dialog window display for advanced setting of TrustPort Personal
Firewall. If you are not an advanced user or you do not have the relevant knowledge of TCP/IP network,
then do not adjust options in this dialog window.
56
Enable DNS resolving - serves for automatic translation of domain names for firewall. TrustPort
Personal Firewall needs during the operation the possibility to covert the domain names and that is way
it is recommended to have this option always permitted. If you do not allow this option, you take risk
that your computer would not communicate correctly in the local network or in the Internet.
Enable DHCP - serves for permission of DHCP service. DHCP service serves for IP address allocation
during computer startup or during connection to the computer network or to the Internet. If you use in
your network DHCP for IP addresses allocation or you connect yourself to the Internet by a service that
appoints IP address to your computer, then select this option. If you deny service DHCP, your computer
will not be able to get the IP address form DHCP server and it will not be possible to get the connection.
If you use connection to the local network with static IP addresses, then it is not necessary to have this
option selected and you can deny it. For details about your IP addresses allocation, contact your
provider of the connection or the administrator.
Create rules for trusted processes - query pop-up dialogs will not be displayed anymore for
processes that are trying to connect to the internet and that aren't signed with a valid digital signature
and therefore are not considered trusted for TrustPort Firewall. A rule will be created for these
applications automatically and they will be included in the list in Application rules section.
Stealth ports - enables the hiding of all the computer's open ports which could be used to perform
attacks from the internet. We recommend enabling this option.
During the mode Use firewall rules the firewall by default attempts to establish the connection, goes
through the rule set and if it does not find any convenient rule, it blocks the attempt. With help of the
function Permit unknown connections you can change the default functionality in a way that all the
attempts for connection that do not satisfy any rule will not be blocked but permitted. This option totally
turns around the logic of the whole firewall and this has an impact on the logic of all settings status. Use
this option only in case that you know exactly what you are doing and when you need to change this
logic. The option Deny unknown connections sets back the default behaviour of the firewall. When
you set the option Permit unknown connections, you will be alerted so as you are careful not to
choose the unwanted firewall setting. Deny unknown connections, but ask – though firewall has all
unknown connections denied, if application tries to connect to the network, it asks if new rule should be
created for this application in filter definitions. «
57
10.1.3.1
Filter Administration
██ Page Filter Administration serves for creation, deletion, import and export of rule sets. It is possible
to create any number of rule sets but always only one set for each IP address. All rule sets are displayed
in a transparent list. This list also displays the legend and the IP address for which the given rule is
active.
A new rule set can be added by pressing New. It is possible to adjust rule sets with the help of button
Edit. The rule sets that are not necessary any more can be deleted by button Remove. After pressing
Remove a dialog window is displayed. Here you are asked if you are sure to delete the specified rule set.
If you select Yes, the chosen rule set with all the rules are deleted.
Import of the existing rule sets is done by the button Import. After pressing Import, you are asked to
select a rule set that you want to import. If you have chosen the right file (unbroken and with the right
data format), a dialog window is displayed. Here it is possible to adjust the name of the rule set and the
IP address to which it will be tied to.
Export of rule sets is done by the button Export. To make the button Export functional, it is possible to
have some rule set specified. When we click on this button, a dialog window is displayed where it is
possible to define the file destination and the name where you want to export the rule set. The following
items will be exported: information about the set name, allocated IP address and all the rules in the set.
«
10.1.3.1.1 Editing set of rules
██ This dialog window serves for editing and importing sets of rules. The name of the new set of rules
will be automatically preset and the IP address for which this new set is destined, is preset to All
addresses. The name of the set and IP address are obligatory items and it is necessary to insert the
right values. It is not obligatory to insert items Created by and Description but we recommend fill them
in.
58
IP address that is tied up with the set of rules can be inserted in several forms:
All addresses - set of rules will be applied for all IP addresses in the computer.
Option all addresses has the smallest priority during firewall processing.
IP address - set of rules will be applied only for the specified IP address. Option IP
address has the highest priority during firewall processing.
Range of IP addresses - set of rules will be applied for all IP addresses that are in
the stated range of IP addresses.
IP address and subnet mask - set of rules will be applied for all IP addresses that
can be included into the stated subnet.
Each set must be unique and therefore it is possible to create a set with a unique name and for unique
IP address. By a unique address is also meant All addresses or ranges of addresses or an address with
subnet mask.
If you have a computer that you connect via network card to the local network with static IP addresses
and modem that you use for connection to the Internet, then we have several possibilities which set of
rules should be created. The safest way is to create a set of rules for one IP address defined by the IP
address that was allocated by the administrator (see Location of IP addresses in computer). Next
we create a second set of rules for IP addresses range where our connection provider allocated our
address to us. It is also possible to create a set of rules for the whole subnet or even for the rest of the
addresses. If we have a connection from our provider by a static IP address for connection to the
Internet (ADSL etc.), then it is more convenient to create set of rules directly for the IP address that we
have appointed by the provider. If we select All addresses, then we have to remember that for each
new IP address created in the computer is automatically used this set of rules. This is why we should
create the set for All addresses with the most general settings and the biggest restrictions.
When we click the button OK, the entered values are verified and stored. If we edit the set of rules, then
its modification is processed and after pressing the button Apply or OK, the core of the personal firewall
is set to these new values in the window of the TrustPort Personal Firewall. During import of the set of
rules the dialog window is pre-filled by the values from the imported file and you have possibilities to
adjust the values further. When you press Apply or OK in the main configuration window TrustPort
Personal Firewall, the firewall is set for the new values and the imported set of rules is stored. «
59
10.1.3.2
Filter Definitions
██ Page "Filter Definitions" serves for creation, deletion and edition of rules for TrustPort Personal
Firewall. The firewall behaviour is influenced by rules. During the attempt for incoming or outgoing
connection, the firewall starts to go via all accessible rules in certain set and it starts to look for a rule
that can be applied for the given connection. If it finds such a rule, then the connection is either
permitted or denied, according the found rule configuration. If it does not find any corresponding rule
for the given connection, the default action configured for the firewall is done. It is set by default that
the connections that do not satisfy any rules are denied. This functionality can be changed on the page
General Firewall Settings in dialog window for advanced configuration. But this turned logic of
TrustPort Personal Firewall is not recommended because of security reasons. When the individual rules
are evaluated if the certain rule can be applied for the given connection, there is also (where it is
specified) carried out the verification of the hash. If the rule is convenient with the given connection and
also with the hash of this application, then the rule is applied to this connection. In the opposite case
the evaluation of the following rules will go on.
Each rule can be temporary inactivated by marking off. The marking off is done by the check box on the
left side next to the rule name. If we disable all the rules, then all the set is also inactivated. The icon by
each rule shows the direction (incoming, outgoing or both directions) for which the certain operation is
done. The orange colour of the arrow means that the rule enables the communication in the given
direction and the grey arrow that the rule denies communication in the given direction. The arrow
towards the right means outgoing connection and the arrow towards left the incoming connection. Two
arrows mean two-way communication. Information in brackets show some important information about
the rule, it means direction of the communication, action and protocol that is active for the given
protocol.
Individual rules can be moved upwards and downwards in the given set of rules. The rule movement is
done by buttons Up and Down or by Shortcut keys. The sequence of individual rules in the set
influences the sequence of rules that are checked by TrustPort Personal Firewall during searching for the
right rule in case of connection attempt.
To have transparent list of rules it is possible to create sub-group s and to add new predefined rules to
this newly created sub-groups. The new sub-groups are created by clicking the right mouse button and
there is chosen the menu Create Group. During creation of predefined rules it is enough to mark the
group where the new predefined rule should be created. It is not possible to shift rules between groups
and create groups inside other group.
Button Add serves for adding of a new rule to the existing rule set. Afterwards wizard is displayed.
Before pressing the button Add it is necessary to choose the set where you want to place the new rule.
60
Button Edit serves for editing of the existing rule. When the button is pressed, a dialog window is
displayed, which serves for editing of the rule features.
Button Remove serves for deletion of existing rule from the set. By pressing Remove is displayed a
confirmation dialog window asking if you are sure to remove the specified rule. «
10.1.3.2.1 New Rule Wizard
██ Welcome to the New Rule Wizard
When the New Rule Wizard is started, this first page is displayed. The user is informed here what can be
done with the help of this wizard. By pressing button Next, it is possible to continue to next wizard
page.
Choose a method
Page Choose a method serves for choosing a method of the new rule creation. There are two methods
for the new rule creation:
Create a new rule from log
This method serves for new rule creation from the logged records of TrustPort Personal
Firewall application. By use of this method the user gains the possibility to create the rule
exactly according the logged message and it is not necessary to write down manually all the
parameters.
Create a new custom rule
The last method is designed for the advanced users and it enables to create a new rule
exactly according their requirements. The user must fill in all important parameters of the new
rule.
61
Choose a log message
On page Choose a log message it is possible to choose the log message of TrustPort Personal Firewall,
to which the new rule should be created. The wizard from the marked message uses all the information
as parameters for a new rule. The marked message is highlighted in the bottom part of the wizard page.
In the list with logged messages are displayed only those messages that can be used as information
(parameters) for new rule creation. The rest of logged messages is automatically hidden.
This page is displayed only in case that on the previous page the method Create a new rule from log
was chosen.
Type a rule name
Each rule of TrustPort Personal Firewall application must have its name. The name is entered on this
page. This name is automatically prefilled. It depends if there was selected some predefined rule or if
there is created a new one. The rule name must contain only the permitted characters.
62
Select main rule preferences
Feature Direction determines for which communication direction this rule will be applied. For example:
if the selection Outgoing is chosen, some application will require a new connection from this computer to
some Internet server and then this rule will be applied and the required operation is done. The possible
values when specifying the direction are Outgoing, Incoming and Both directions.
Feature Protocol defines for which protocol the rule will be active. There can be selected the following
protocols: ICMP, UDP, TCP and combination of TCP with UDP. TrustPort Personal Firewall also enables to
use other protocols. Option Others serves for these other protocols. After selecting this option, another
editing element is displayed, where the number of the protocol can be inserted. The protocol numbers
can be entered in interval from 1 to 255.
Option Action serves for definition what should be done with the connection if it complies with all the
rule features. The connection can be permitted or denied. You can set the option to log information
about denied or permitted connections. You can create log rules by specifying Ask user even if rule is
fired. Log rule is not making final packet decision, but is present only for logging. During creation of
rules it is necessary to take in consideration the fact that all connections that do not satisfy any rule are
automatically denied (providing that there is not configured the opposite logic of firewall operation in
advanced options on page Global Firewall Settings).
Select a local endpoint
Page Select a local endpoint serves for determination of the local address and port. If the ICMP protocol
is specified, then the control elements for port determination are not available because with the ICMP
protocol does not occur the directing the packets to specified ports but to an address as such.
63
For the determination of the local address there is possible to use any address, one address, a range of
addresses, address with network mask or list of addresses. For determination of local port there is
possible to use any port, one port, range of ports or a list of ports.
By a change of roll list Address type it is possible to specify the address type and therefore the way
how the local addresses will be entered. With each change of the roll list is also changed the page
content. The local addresses are entered as IP addresses in format X.X.X.X or as the domain names. For
address entered as domain names are certain limitations, the characters can be only alphanumeric and
they also contain these signs ' / : . - '. During entering local addresses as range of addresses or as an
address with subnet mask it is not possible to use domain names as addresses, there are allowed only
the correct IP addresses.
By a change of roll list Port type it is possible to determine the port type and therefore the way how
the local ports will be entered. For each change of the roll list is also changed the page content. The
ports are entered as full-number values and they must be from 1 to 65535.
Select a remote endpoint
Page Select a remote endpoint serves for determination of the remote address and port. If the ICMP
protocol is specified, then the control elements are not available for port determination because with the
ICMP protocol does not occur the packet directing to certain ports but to address as such.
For the determination of the remote address there is possible to use any address, one address, a range
of addresses, address with network mask or list of addresses. For determination of remote port there is
possible to use any port, one port, range of ports or a list of ports.
By a change of roll list Address type it is possible to specify the address type and therefore the way
how the remote addresses will be entered. With each change of the roll list is also changed the page
content. The remote addresses are entered as IP addresses in format X.X.X.X or as the domain names.
For address entered as domain names are certain limitations, the characters can be only alphanumeric
and they also contain these signs ' / : . - '. During entering remote addresses as range of addresses or
as an address with subnet mask it is not possible to use domain names as addresses, there are allowed
only the correct IP addresses.
By a change of roll list Port type it is possible to determine the port type and therefore the way how
the remote ports will be entered. For each change of the roll list is also changed the page content. The
ports are entered as full-number values and they must be from 1 to 65535.
64
Select an application
This page of a new rule creation serves for application specification that can be added to the rule as
other evaluation criteria. If the connection parameters agree (protocol >, local and remote IP address >
with port s and connection direction) with rule parameters, then there is evaluated as the next criteria
the application that tries to make this connection. If the rule parameters and connection agree and at
the same time there is agreement with the application on this page, then the action that is allocated to
this rule is done.
The state of check box Use any application determines if the application should be used as the next
evaluation criteria or not. If checked, the application will NOT be used as these criteria.
When there is written the name and the path to the application or when there is done the application
selection by Browse, the application is determined. By using the button Use system, you can set the
application as an idle system process. If the application is changed, it means reinstalled by the new
version etc., then it is necessary to allocate it to the rule again. It can be done by the button Update. If
you don’t want Firewall to check application checksum, then use the checkbox Disable hash checking.
Choose ICMP parameters
With the ICMP protocol it is possible to determine what type of ICMP packet it is by defining the ICMP
type and code. ICMP type is a number that specifies the use of ICMP packet and ICMP code determines
use in the frame of ICMP type. Some of the ICMP types have no ICMP codes.
If there is checked the button Use any ICMP types and codes then there will be allowed or prohibited
any ICMP types and ICMP codes in the frame of the newly created rule. If this check box will not be
selected, then it is possible to define ICMP type and ICMP code. The type and code can be chosen from
values in the rolled up lists. In case that it is necessary to use some other ICMP type or code, there is
available the last option in the list called User defined.
65
This wizard page is displayed only in case that there is selected ICMP protocol in previous steps.
Completing the New Rule Wizard
This page of wizard says that there is enough information to complete the required operation. By
pressing Finish the creation itself will be done and the New Rule Wizard is finished. «
10.1.3.2.2 Edit Rule
██ General - dialog window Edit rule - General serves for editing of the main rule features. For all the control
elements are valid the same rules as for control panel on page Main rule features of the New Rule Wizard.
Local endpoint – this dialog window serves for adjustment of addresses and ports that were allocated to
the rule. For all control elements are valid the same rules as for the control elements on page Selection of
local endpoint New Rule Wizard.
66
Remote endpoint - dialog window Edit rule - Remote endpoint serves for address and ports
adjustment, that were allocated to the rule. For all control elements are valid the same rules as for the
control elements on page Selection of remote endpoint of the New Rule Wizard.
Application - dialog window Edit Rule - Application serves for definition of application that was
allocated to the rule. For all control elements are valid the same rules as for the control elements on
page Selection of application of the New Rule Wizard.
ICMP - dialog window Edit Rule - ICMP serves for adjustment of types and codes of ICMP protocol
that were allocated to the rule. For all control elements are valid the same rules as for the control
elements on page Selection of ICMP types and codes of the New Rule Wizard. «
10.1.4
Web Antivirus
██ Web Antivirus serves for protection of your computer against viruses when surfing the Internet. You
can enable/disable its function by using the Use Web Antivirus option.
You can set whether to display an icon in tray if download of a certain file lasts more than the specified
number of seconds. By clicking this icon you can see the download progress. It is also possible to
enable/disable displaying balloon tip above this icon which explains you why you can't see any download
progress information in your browser.
By checking the Exclude the following content types option, you can activate the list of mime types
which you don't want to scan for malicious codes. It will be displayed by clicking on the button Modify...
In the List of excluded content types you can add a new item by clicking on the Add... button. A new
window where you can specify the content-type and subtype will appear. Wild cards are not allowed! By
double-clicking on a particular item of the list or selecting an item and then clicking on the Edit... button
you can edit the particular type. You can delete any item by selecting it and then clicking on the Delete
button. «
67
10.1.5
Application Inspector
Using the Application inspector you can manage potentially dangerous behavior of applications and
untrusted programs from unverified third-parties that seek to modify the system. Application Inspector
is a powerful weapon for the detection of "Zero-day" viruses which antivirus companies have not yet
detected, but also for "walking" mutating viruses, which often changes its structure, and also for not
updated anti-virus solutions. Modern Malware has become so sophisticated that antivirus programs can
no longer only rely on detection methods which are based on file signatures.
By default, the inspector monitors the running of all processes running under user accounts, and after
running an untrusted application that tries to modify protected system locations, the user is asked
whether the operation should be allowed, restricted or blocked - whilst the application is terminated. If
the user checks the Remember box with this rule, it will then be added to the list of User rules and the
user will not be asked again. If the user does not check this box, the dialogue window will appear again
asking the same options.
Descriptions:
Allow – This option allows for the process queried performing all system modifications and the
process is not limited in any way. This option is only recommended for applications and
processes the user trusts.
Restrict – This option is useful for applications that the user does not know, but needs to run.
The application then runs in a restricted mode (sandbox), the inspector shall prohibit
applications which want to modify critical system locations listed in the table of Restricted
locations, but will allow others.
Useful for example with keygens and other harmful applications.
Block – This option eliminates the entire process and the forthcoming operation. Suitable for
unknown applications where the user does not know the origin, or suspects that they may be
dangerous.
Example title of hazardous application: 69W_0S859cc8.exe
68
An example of system location modification can be the editing of protected registries, running other
untrusted processes, an attempt to shut down the computer, obtaining system permission, or shutting
down system services and more.
NOTICE: The credibility of the application when asked by Application inspector must be evaluated by
the user. After blocking the operation, correct behavior of the application is still not guaranteed! We also
recommend avoiding conflicts with programs using a similar technology monitoring system, such as
firewalls of other software companies. In this case, we recommend turning Application Inspector off.
List and description of some system locations which Application Inspector protects against modification:
Protection of system registers – Application inspector monitors and records all
changes to the registers listed in the table Protected locations/Registry. These
registers store sensitive information for the running of the system and to maintain
system integrity. Most malware begins infecting systems by writing to these registers.
File System Protection – Application inspector monitors whether the untrusted process
tries to access files and directories that may contain crucial system information (such as
the c:\Windows or C:\Program Files, etc.). This feature protects all important system
files that are implicitly included in Windows (*.dll, *.exe, autorun.inf) as well as other
software such as Mozilla Firefox, Internet Explorer, etc. All these items are listed in the
table Protected locations/Filesystem.
Protection of processes/threads – If malware or other untrusted applications will try
to access another process/thread other than itself, Application Inspector will evaluate
this behavior as considered dangerous and will warn the user that the program can be
harmful.
Protection of system services – Application Inspector monitors whether there is any
modification/creation/deletion of system services by untrusted processes. Some Trojan
viruses are able to remotely connect to a system service, or create its own, by which
after rebooting the computer a malicious code is run.
Protection of system hooking – Windows hooking is a feature that allows applications
such as media players, programs to extend the keyboard etc., put the executable file
(e.g. DDL) into another application. They are also often used by malware to record
keystrokes, screen capture or control legitimate applications. Application Inspector
monitors system hooking and with potentially dangerous software it can detect this
feature as harmful.
Protection from switching off the system – Application Inspector monitors all
attempts of illegitimate applications to shut down/restart your computer. Malware or
69
other malicious program may try to restart as part of the infection, or turn off the
computer and insert the malicious code as part of the next reboot. If the user acts in
time, the malware will not install correctly on the computer.
Application Inspector may be run in three modes:
Secure Mode – in this mode the Application Inspector will automatically block all
untrusted and unsigned applications without user intervention. Notice will only be
displayed on the desktop, that the process was blocked.
Recommended Mode – in this mode, the Inspector monitors the behavior of potentially
dangerous applications (all files less than 768Kb*), and if an attempt is made to
intervene with protected system locations, a dialog asking the user for further action
will appear (see figure above).
*At the moment 95% of all detected viruses are in files less than 768kB. Implicitly set
barrier by TrustPort.
User Defined Mode – this mode allows the user to customize the behavior of Application
Inspector. This is done using the Advanced button. This option is recommended only
for advanced users. By default, the Recommended mode is active.
Turn off Application Inspector – Application Inspector will be temporarily disabled and
potentially dangerous applications will not be monitored.
After clicking the Advanced button, the advanced configuration dialog box of Application Inspector will
appear.
In the User Rules tab, a list of rules for all applications that have been blocked, restricted or allowed
based on user selection (Recommended Mode) are displayed. This list can be edited through the items
in the Action menu. You can add to the list manually, through the Add allowed / restricted / blocked
items. You can delete an item from the list of items by clicking on Remove. Remove inactive entries
from the list (for example, already uninstalled applications) can be done by selecting Purge.
70
Allowed applications – List of all applications where Application Inspector protection will not be
applied.
Restricted applications – List of all applications that are always running in restricted mode. It is type
sandboxing when the application is running, but modifications of critical system locations are prohibited.
These locations are stored in the table Restricted locations, where you can edit them as needed.
Blocked applications – List of all applications that are blocked by the Application Inspector and thus
will not run at all.
Context Menu – The application can be assigned to each individual location also by right-clicking in Windows
Explorer.
71
Clicking on the Settings button opens the advanced settings dialog.
Don‘t scan applications larger than – Applications that will have a larger size (in kilobytes) than the
value set here, will not be scanned by Application Inspector. This is an optimization function because of
the high false-positive alarms for legitimate applications.
Action – The default settings for pop-up windows.
Show ask dialog – Automatic mode. If the ask dialog is disabled, Application Inspector will
automatically behave to all new applications that it detects as dangerous according to the Action
settings. The ask dialog will not be displayed.
Trust digitally signed applications – Digital signature of applications is confirmation of the software
author and a guarantee that the code was not changed or damaged. All processes are then signed by
trusted certification authorities approved by Microsoft. Application Inspector implicitly trusts these
processes and skips their monitoring.
The Protected locations tab displays a list of protected system and registry locations. This list can be
updated with new items using the items in the Action menu, or records can be deleted from the list by
choosing Remove from the Action menu.
72
Filesystem – A list of all files and directories that are protected. Use the Add filesystem button to add
another protected location. You can choose from already running application, or from any file stored on
disk. By Right-clicking you can duplicate the value and add it to restricted locations. Example of a
protected file location:
Classical:
c:\Program Files (x86)\Adobe\Reader 9.0\Reader\AcroRd32.exe
Wildcard:
c:\Documents and Settings\Administrator\*
(protects all files and subdirectories in the „Administrator“, write format „*.bat“ is also valid)
System variables:
c:\%windir%\system32\*.exe
(all exe files in the directory c:\Windows\system32 are filtered)
Registry – A list of all registry values protected by Application Inspector. All registry branches are
saved for better visibility into different categories like System, Safety, Autostart, Internet, Shell,
Browsers and User-defined. Right-clicking the value can duplicate it and add it to restricted locations.
After clicking the Add registry button, you can insert your own branch to registry and you can also
choose a category to which it is assigned. Formats of supported key names:
Classical:
HKEY_LOCAL_MACHINE\SOFTWARE\Microsoft\Windows\CurrentVersion\Run
(the entire branch „\run“ will be filtered, including all the strings)
Simplified entry:
HKLM\SOFTWARE\Microsoft\Windows\CurrentVersion\Run
(a shortened entry of registry branches „hives“ HKCR, HKCU, HKLM, HKU, HKCC, HKPD)
Wildcard:
*\SOFTWARE\Microsoft\Windows\CurrentVersion\Run
(all the branches such as HKLM, HKCU, HKCR, will be filtered)
Protection of selected string:
HKLM\SOFTWARE\Microsoft\Windows\CurrentVersion\Run\\icq
(With symbol „\\“ only one string is selected, not the entire branch. In this example only the string “icq“
in branch „run“ will be filtered)
73
The tab Restricted locations displays a list of restricted system and locations and registry locations.
Process, which will be in the Restricted applications list and will try to access location specified in this
list, the operation will then be restricted, but the process itself will run anyways. These applications
will run in restricted mode. It is like a type of sandbox security mechanism, when the user is
allowed to edit the location of that process, during its running which would otherwise be rejected. This
list can be updated with new items using the items in the Action menu, or records can be deleted from
the list by choosing Remove from the Action menu.
10.2
Access Control
Access Control is used to set user permissions to access removable devices, folders and files and as well
as blocking inappropriate internet website content. These settings can be protected by a password.
74
10.2.1
Parental lock
██ Parental Lock’s function is to block children's access to inappropriate web content. However it allows
pages that are appropriate for the child and basically prohibits those that could have an adverse effect.
TrustPort Antivirus can be set to filter either on the base of a preset database of inappropriate Web
sites, or you can create a specific list of URLs of sites to block.
With Use Parental Lock button, the Parental Lock and all its functionality is either enabled or disabled.
Using the heuristic method, TrustPort Antivirus seeks to classify the site according to forbidden words.
This method is slower, and we recommend that you set it, unless you are using filtering by category.
75
The Add button acts to add a new user. According to pre-set values choose the Object name and
Locations, in the select field Enter the object names to select that you want to find (such as
Computer _1, User_1...). In the link "Examples" a hint is hidden with several useable syntaxes for
correct filling in of the field. If there is no user profile created, TrustPort Antivirus works from the
settings from "the default profile." These settings are inherited by all other developed profiles. User
profiles may be added only to existing users.
Bookmark Advanced is increased by field Common queries. This field is activated when the computer
is in the domain and set in the way of filtering users from searching. Clicking on Find Now
automatically lists for the given folder and set list all the potential users for the creation of profiles.
76
Profiles in the list can be edited with the Settings button. In this window you can choose the categories
you want to block from the children, or specific URL’s whose access will be denied. An example of an
URL may be www.sex.com, http://sex.com. However we recommend using the star convention
*sex.com, or *sex*, because of the relative links to these pages. In the Exceptions tab, then define
the URLs that TrustPort Antivirus will ignore in the setting of blocked content. «
10.2.2
Volume Security
██ The Volume Security tab is used to set access permissions to selected directories or discs. Volume
security protection is activated by checking the checkbox Enable volume security.
77
Afterwards it is possible to start managing the permissions setting personally. This can be done
through user profiles. By default, the Default profile is present, other profiles can be defined using
the Add button. The process of adding new profile is similar as in case of Parental Lock.
By selecting the required profile and clicking on the Settings button, access rights to selected
directories can be defined. At first, the directory or disc which should have protection applied is selected
using the Add button in the Access Control dialog.
Then, by choosing the particular button, it can be defined whether the user should have full access to
the directory, including writing, or whether the content of the directory should be displayed without
changes permitted, or the user can be denied complete access to the selected directory. System paths
78
and directories such as Program Files, Windows, root and others are denied because of possible
instability to the system. «
10.2.3
Device Security
██ Device Security offers the option to allow or block user access to USB device, CD/DVD, Bluetooth,
Smart cards, iPod, FireWire, memory card readers and other media storage device.
This protection is activated by selecting Use rules. Then you need to set each device that you wish to
block.
79
Specific device can be adjusted in the Categories tab, or you can also make adjustments in terms of
Connectivity ports. By default, all devices are allowed and thus the protection is not active. This can be
changed using the drop-down menu for each item, in which the user can choose from the following
options:
Block - if the protection for a particular device is set to Block, this device after
connecting to the system is blocked without user intervention, and by default a
message is shown on the desktop.
Allow – if the Allow option is selected, protection for this particular device will not be
active.
Ask user - when inserting a particular device, a dialog with a choice of actions will be
displayed. In the case of the device being blocked, by default it will also be displayed
as a message on the desktop. If the Remember box was left selected, this device is
then added to the list of either blocked or allowed devices where you can further
modify the settings for blocking the device.
In the event that the computer is turned off and a USB device is inserted for which a rule is not yet
defined, device protection for it will not be applied.
80
From the list of allowed or blocked devices, a device may be deleted using the button Remove. From
the list of blocked devices, a device may be moved to the list of allowed with the Allow button, which
will connect the device to the system. Conversely, from the list of allowed, devices can be moved to the
list of blocked by using the Block button.
Manually adding a device to the list of allowed or blocked devices is done by clicking the Add button in
the appropriate category. From the list, select the type of device required to be administered, and by
clicking OK it is added to either blocked or allowed devices. Devices marked in gray cannot be managed
by Device Security.
81
If the user wishes to be alerted whenever the device is blocked in the system, he can set this option in
the top of the window by selecting the Show notification for blocked devices. Otherwise, notification
will only appear the first time the device is inserted into the system.
A list of all the devices for which Device Security can be applied can be updated with the Refresh
button. «
10.2.4
Autorun Protection
██ Page Autorun Protection enables or disables protection against the automatic launching of removable
media.
All currently connected FAT type removable media are automatically added to the Autorun protection
list, which can be updated with the Refresh button. Enabling or disabling the protection can be done in
the media using the checkbox Enabled column. After enabling the protection, the autorun.inf file is
blocked in the removable media and cannot be used to read or write until the Autorun protection is
disabled again.
In order for the device protection settings on current computers to function properly, the Windows
autorun function has to be enabled, which can be done using checkbox Enable Windows autorun
feature in the upper part of the window. Reboot is required afterwards. «
82
10.2.5
Password Settings
██ The Settings tab allows users to set password to restrict access to configuration of Access Control
items, i.e. Parental Lock, Devices, Volumes and Directories and Settings.
The password is entered twice for verification; it has to be confirmed with the Create password
button.
Modification of password has to be confirmed with the Change password button. A current password
can be deleted easily by clicking on the Delete password button. «
10.3
Antivirus
This category enables the configuration of other antivirus options such as on-demand protection
settings, scheduled scanning of files and directories, quarantine settings, scanning engine configurations
and update services.
83
10.3.1
On-Demand Scanner
On this page you can set options for the On-Demand Scanner.
In the Requested action setting you can select the software action after finding a malicious code.
These possibilities are available:
Report only - the user is informed about finding an infection by a dialog window and the notice
is also displayed in the final report. No other action is performed.
Ask user - in case of detecting an infection there will be a possibility to decide which action the
antivirus program shall perform. There are the same options as in case of finding an infection
(do nothing, repair, rename, move to quarantine or delete).
Repair - the antivirus software tries to restore the infected objects if possible. If not, it will
automatically rename it, move it to the quarantine or delete it (in this order).
Rename - the infected file is left on its place, but its extension is changed to an extension that is
not associated with any activity in the system.
Move to quarantine - the infected file is "quarantined" - moved to a directory controlled by the
antivirus software, where it cannot do any harm. It is possible to treat the infected file safely in
the quarantine: restore it, delete it etc.
Delete - the file containing a malicious code (or a file that is a malicious code itself) will be
deleted.
If you select an action that cannot be performed for any reason, the On-Access Scanner takes the
following one, according to these priorities: Report only, Repair, Rename, Move to quarantine, Delete.
Option Repair is set by default.
Warning:
The user action setting is not relevant to scanning mailboxes. The Repair action is always performed
as the first one. If repairing cannot be performed then the Report only action is chosen.
84
Scan files:
Scan all files - scanning all files without difference in format or type.
Scan only files with the following extensions - antivirus software will scan only files with
specified extensions. The predefined list contains dangerous extensions, we recommend
modifying it to experienced users only!
Exclude files with following extensions - antivirus software will not scan files with extensions
that you select. We recommend this option to use to experienced users only!
Scanning options:
Scan compressed files (zip, arj, cab...) - archive files, i.e. their contents, are scanned
(searched for malicious codes). This option slows the scanning down, but on the other hand
increases the computer protection.
In the bottom right section there is a button Scan Now.... After the button has been pressed, a context
menu will appear from which it is possible to start the scanning of all disks, or it also possible to choose
a specific target (file, directory, disk) which you wish to scan. Selecting the item from the context menu
enables the on demand scanner to scan with the required parameters.
After clicking the Advanced button the following options will appear:
Exclude from scanning:
Objects (files, folders) - You can select this option if you want to exclude some objects from
scanning. By pressing Manage you can set these objects. We recommend this option to use to
experienced users only!
Scanning options:
Enable heuristic analysis - antivirus software will not only scan objects for known viruses, but
it will also try to identify unknown malicious codes (suspicious routines, suspicious features
etc.) By the help of heuristics, program can reveal new or unknown viruses. This option slows
the scanning down, but on the other hand increases the computer protection.
Scan memory on startup – enables scanning of memory when the on-demand scanner is
launched (time-consuming).
85
Removable volumes scanning:
Scan newly inserted removable volumes (CD-ROM, USB) - antivirus program will begin to
scan removable media (USB, CD-ROM) automatically after being inserted into the computer.
Ask before scanning of removable volumes - after insertion of removable media, the
antivirus will firstly ask whether it should scan it.
Additional features:
Prepare the BartPE plugin - use this button to create a BartPE disk plugin.
Prepare TrustPort USB Antivirus - This button shows a list of attached USB devices where a
USB Antivirus can be installed.
Prepare Windows PE CD - By using this button it is possible to create a boot ISO image that
contains the Windows PE system and TrustPort Antivirus plugin. To create a Windows PE image,
it is necessary to have an installed set of Windows® tools and documentation called the
Automated Installation Kit (AIK). With this tool users can create images of the Windows PE
system, migrate user profiles etc. The finished ISO image can be burned on to a CD, USB or
other removable media and then the computer can be booted from it.
Windows Automated Kit for Windows XP SP2, Windows Vista and Windows server
2003:
http://www.microsoft.com/downloads/en/details.aspx?FamilyID=c7d4bc6
d-15f3-4284-9123-679830d629f2
Windows Automated Kit for Windows 7 and Windows server 2008:
http://www.microsoft.com/downloads/en/details.aspx?FamilyID=696DD6
65-9F76-4177-A811-39C26D3B3B34
10.3.2
Internet protection
██ Internet Scanner protects your computer from attack by viruses and other malicious code from Web
environment. From this page you can enable/disable Internet Protection and modify additional
settings of Internet protection using the Advanced button.
86
Advanced settings
Port list
You can edit a list of ports which you want to be scanned, separately for email and web communication.
By clicking on the appropriate button you can display the list of ports.
On the left side of the window there is a list of ports and protocols that are going to be checked. On the
right side there are three buttons which serve for managing the list. By clicking on the Add button you
87
can add a new item to the list. If you click on the Edit button you can change a desired protocol or
number of a port. By clicking on the Delete button you will delete a selected item.
HTTP scan size limit
It is made for setting up the maximum size of files which will be scanned by the antivirus program.
Maximal possible size of scanned file is 262144kB i.e. 256MB. It accelerates a work with browser along
operating with video, music, viewing pictures etc.
88
Scanning options
Scan compressed files (zip, arj, cab...) - archive files, i.e. their contents, are scanned
(searched for malicious codes). This option slows the scanning down, but on the other hand
increases the computer protection.
Enable heuristic analysis - antivirus software will not only scan objects for known viruses, but
it will also try to identify unknown malicious codes (suspicious routines, suspicious features
etc.) By the help of heuristics, program can reveal new or unknown viruses. This option slows
the scanning down, but on the other hand increases the computer protection. «
10.3.3
Quarantine
If an infected or suspicious object is moved to the Quarantine (which can be determined in the setting of
the On-Access Scanner or On-Demand Scanner), you can find this object on this tab. Quarantined
objects are stored in a special format and therefore do not represent any danger for the computer.
Implicitly, the Quarantine content is not loaded immediately after the software launching. It is necessary
to use the Refresh button to load its content. This behaviour has been changed because of the situation
when the quarantine contains many files.
This information about infected files stored in the Quarantine is displayed:
File name - the name of the file before moving to the Quarantine.
Date and time - when the file was quarantined.
Original location - the file location right before quarantining.
The next actions can be done with the infected files in Quarantine:
Clear - all objects in the Quarantine will be deleted forever.
Refresh - the content of the Quarantine will be loaded from the quarantine on the disk.
Restore - the selected object will be moved to its original location in the same condition as
before quarantining.
Delete - the selected object will be deleted from the Quarantine, the file will be deleted forever.
Details - all details about the infection and quarantining will be displayed.
89
If original folder doesn't already exist, new target directory has to be selected for correct file restoring.
The Quarantine is implicitly located in the quarantine directory in the installation directory. You can
change this location to any existing directory by clicking on the icon in the upper right corner.
90
10.3.4
Scheduler
Thanks to the scheduler you can make the On-Demand scanner be launched automatically. Users can
choose the scanned area (disks, folders), when the scanning starts, how often is the task performed and
some other options.
If you want to scan a particular disk or folder regularly you can create a task by the New task button.
For a new taks you can set the destination of scanning, date and time of the first start and some more
parameters. If you want to learn more about creating new task go the Scheduler – Creating new
task.
There are no tasks when the TrustPort Antivirus is installed.
You can use the check box to enable/disable launching the task. All the created tasks are listed
including:
Task name
Next run time
Last run time
State - indicates if the task is running or not
Last result - last action performed during on-demand scanning (including the result code)
Creator – user, who created the task
You can stop the running task by the Stop task button.
Properties of the not running tasks can be changed by double click on the proper line or by the
Properties button. You can learn more about task properties setting on the Scheduler – setting
parameters of running task page. By clicking on the Delete button you can delete a selected task.
10.3.4.1
Creating new task
While a new task is created, you can set few parameters of the task. You can choose the scanned area
(disks, folders), when the scanning starts and how often is the task performed.
91
You can set:
Task name - name of the task chosen by user (e.g. "D disk scanning")
Command - what area (disks, folders) is scanned.
You can select scanning of registry, all removable disks, all local disks, all disks or define your
own target (disk, folder). If you select the "user defined parameters" option you can specify the
scanning properties by the run parameters.
Priority - the scanning priority to the other processes
Additional parameters - you can edit this if the user defined parameters or user defined target
is selected. If you want to learn more about the parameters go to the Command line
parameters.
Comments - user can type details about the task
Planned tasks are launched automatically, according to the set time and parameters:
Start date and time - when the task is started for the first time. Default start time is the time of
the new task creation.
End date and time - if the Unlimited option is enabled (default setting) the scanning is not
interrupted. Otherwise the running task is stopped at that time automatically.
Run parameters - defines the time period of the task launching. Once a day is the default
setting.
92
10.3.4.2
Task Properties
You can change the task setting by double click on a proper line on the task list or by the Properties
button.
It is possible to edit the same parameters, which are available during creating new task.
93
10.3.5
Scanning engines
The Engines Settings tab contains a list of all the items used to configure the scanning engines.
Archive depth level - determines whether the archive will scan the files with/without limitation
of the depth of immersion archive (e.g. nested .zip files inside .zip file).
Analyze packed executables - if this option is enabled, then all compressed files will be
scanned. Compressed file includes both archive files created without compression such as .zip
files and also executable files whose contents have been compressed using archivers at startup
(run-time packers) such as UPX, ASPack...
Scan e-mail databases - defines whether e-mail databases should be scanned for all types of
viruses.
Scan all memory processes during memory scan – sets when scanning the memory,
whether memory of all running processes should also be scanned. All the processes and all the
supporting libraries of these processes will be scanned. This operation is very time consuming
and can cause system slowdowns.
Scan inside SFX archives – sets whether self extracting archives should be scanned.
Detect adware/riskware – enables scanning of adware / riskware.
Enable second level heuristics analyzer – activates the next level of heuristic analysis.
Enable third level heuristics analyzer – activates the next level of heuristic analysis.
Enable excessive scanning mode – this setting activates the "paranoid" mode. Due to high
demands on system resources, it is recommended to have this off.
Scan for Scripts – enable scanning of scripts.
Scan for Macros – allows scanning of macros.
If the item is dimmed in the list, it means that the appropriate scan engine is not installed and is therefore
not possible to carry out its configuration.
10.3.6
Update
This tab enables users to let the antivirus software check for update by itself. This ensures having the
actual antiviral signatures, scanning engines etc.
94
The most important option on this page is the Enable engines update option. If it is not checked, the
scheduler service is not active.
If you enable the scheduler, you need to set the desired period of the update checking. Intervals from
the start date and time are used. It is necessary to ensure that the computer has a functional Internet
connection at the moment of the update.
For setting the period you can select the combination of values and units. Values can be set to values
between 1 and 32767. You can select the unit from the following options: hour, day, week. If the
scheduler is active, the period of one day is set implicitly. The start date and time are set to the
installation date and time by default.
For completing setting of the scheduler it is necessary to check whether your personal firewall is
configured correctly and the Internet connection is enabled. You can test it by running the update from
the quick launch.
10.3.6.1
Offline update
The Offline update feature is used to manually download virus definitions from the internet which can
then be applied on the required computer.
Virus definitions are downloaded to the computer using the Download packages button.
95
A folder where the updates will be stored is selected in the dialog and by clicking on OK the downloading
starts.
Downloaded virus definitions are applied on the required computer using the Apply packages button.
The user is asked for the location of the update package on the computer, after selecting the correct
location the update is automatically executed.
10.3.6.2
URL Address
The list of URLs that will be used for downloading the update is displayed on this page. As you can see,
it is a list of mirrors that provide the same update packages. After starting the update, the update agent
tries to connect the first server in the list and download the content of an update package from this
server. If the connection fails, the agent tries to connect to the second server in the list etc.
96
The URLs are sorted in the same order as they will be used for update, i.e. the first address on the list
will come first. If the package cannot be downloaded, the following address is tried. Otherwise there is
no need to continue and the other addresses will be ignored.
For the administration of the update servers use the Add, Edit and Remove buttons. The order of the
URL addresses can be changed by the arrows on the right side of the list.
10.3.7
Advanced Settings
On this tab, it is possible to use the checkbox to set that after computer starts, the user processes won’t
be started until the Real Time Protection is started.
Besides, it is possible to activate Silent mode, when no pop-up windows will be displayed.
97
10.4
Secure Shredding
██ In this category, it is possible to perform shredding of temporary system files, sensitive data,
cookies, shredding settings and the panic shredding function can be enabled. «
98
10.4.1
Configuration
██ Page Configuration serves for configuration selection for all parts of the application. This
configuration will be used in shredding process. You can set here the shredding method and the
possibility to generate record file. The method is selected in the dropdown menu. When the method is
chosen, its description is shown below the list. This description contains the basic information about the
method and how many passes of shredding will the file be overwritten. There are following methods
possible: Quick, Russian GOST, TrustPort, U.S. DoD, Bruce Schneier, German VSITR and Peter
Gutmann.
Description of available methods:
Quick method
Quick method is a very quick for file shredding. This method is not very safe
because the data are overwritten only once. The pattern for overwriting works
with the random numbers.
Russian GOST
P5073995
Method suitable for shredding of files containing common information, it uses
Russian standard GOST.
TrustPort
Method developed by TrustPort company, it is set as default.
U.S. DoD 5220.22-M
(E)
Method based on U.S. Department of Defense standard. With the number of
three passes it is suitable rather for files not containing sensitive information.
U.S. DoD 5220.22-M
(E, C and E)
This method overwrites data on magnetic media seven times. It is based on
NSA document specified by number DoD 5220.22-M. The method has the
medium rapidity and it is sufficiently safe.
Bruce Schneier
Algorithm using the method of shredding with random data, with the overall
number of seven passes.
German VSITR
Method suitable for shredding sensitive data, it is based on German standard
VSITR.
Peter Gutmann
Method Peter Gutmann is very safe, but very slow as well, it is the slowest of all
available methods – it uses 35 overwriting cycles. It is a very effective method
how to shred data on magnetic media.
99
Report options:
Generate report
If this option is selected, a file of reports will be created. The created report file
contains information about time and date of the start and the finish of the
shredding process, list of deleted files or folders and the list of shredded items.
The name of currently logged user of the system Windows is also recorded.
Overwrite report file
If you select this option, DataShredder overwrites the report file before each
start of shredding. If this option is not selected, TrustPort DataShredder adds
new information about shredding process to the existing report file.
Ask for report file
name before wiping
Select this option if you wish before each shredding to choose, eventually create
a report file. If this option is not selected, the predefined report file will be used.
If you wish to use the predefined report file, you have to choose it, eventually create in window Open
that is displayed after clicking on directory icon that is placed on the right side on the bottom next to
"Use this file name:". If you do not enter your own suffix during the entering the name then the default
suffix will be appointed to it ".rpt". The same window will be displayed when the shredding is started
with the option "Ask for the name of the report file before shredding". «
10.4.2
Wipe Now
██ The page Wipe Now serves for temporary files, system directories and history discard. By selecting
the relevant items you can easily mark the temporary files, directories or history that you want to shred.
After clicking the button Wipe now, TrustPort DataShredder shreds the specified items.
100
Internet Temporary Files
If you choose this item, TrustPort DataShredder application shreds the content of Temporary Internet
Files. Your internet browser uses the Temporary Internet Files to store web pages, pictures and other
files.
Cookies
By marking this option, you delete all files in directory Cookies. Cookies can contain sensitive data, for
example passwords for access to various internet pages but also information from visited web servers.
System Temporary Directory
This item enables you to shred all files and directories placed in temporary directory of the system. To
shred the temporary system files is used the path to the directory that is defined by system parameter
TMP. If the system variable does not exist, then is used the system parameter defined as TEMP.
Recycle Bin
This item serves for shredding of the bin content of Windows system. The bin can contain sensitive and
secret data.
Internet History
This item enables you to shred internet history. Internet history contains information about visited
internet pages, written addresses to the address line of Internet Explorer and eventually other
information.
Document History
This item serves for shredding of recently opened documents. The list of recently opened documents can
be found in item Documents of Start menu.
Run history
This item enables shredding of all records of all programs that have been run in the item Run in menu
Start. For correct changes we recommend to restart the system Windows once the deleting process is
finished.
Wipe now
When you press this button, the process of shredding itself is started. As parameters for shredding will
be used the settings on the Configuration page. To start the shredding process you must always choose
at least one item. «
101
10.4.3
Panic Shredding
██ Panic shredder tab can be used for safe shredding of user selected files and directories. User can
select freely which files or directories have to be shredded. In order to accomplish panic shredding fast
and silently, it is activated by predefined hotkey.
Use Panic shredding
This option activates/deactivates the Panic shredding function.
Ask for confirmation
If checked, DataShredder will require user confirmation, before panic shredding will be performed.
Panic hotkey
It is possible to specify hotkey in this editbox, simply press requested key combination while focused
this control.
Manage panic objects
Press this button to specify objects (files or folders) to be shredded. «
102
10.5
Encryption
██ Encryption page enables the creation and management of encrypted discs and archives. «
103
10.5.1
Drives
10.5.1.1
Unmount options
██ On this page you can setup some Disk Protection options. The first of them is auto-unmounting
option. You can generally enable or disable this functionality by setting auto-unmounting time. When
you don't do any operation with any mounted drives during this time period then Disk Protection
automatically unmounts all mounted images.
You can choose if Disk Protection should automatically unmount all mounted images when computer
goes to sleep.
The second functionality you can set on this page is force unmount. If you have mounted an image and
opened some document in this image, then system has to close this document when it is going to
unmount this image. When this situation occurs, Disk Protection displays a warning message and asks
you for closing affected applications. If you check Allow forced unmounting of all mounted disks,
Disk Protection will not ask you for closing all affected applications and unmounts the image by force. If
you select Don’t ask before unmounting option then Disk Protection will not display any warning
message.
Beware! Forced unmount can cause unsaved data loss, therefore use this option
cautiously!
You can also setup a hotkey for quick unmounting all currently mounted disks when pressed. «
10.5.1.2
General options
██ You can set-up searching options and recent options here. In the Recent group you can set the
number of recent images, which will be displayed in the list of recent images in the Disk Protection
Quick Launch either as number of images in the list of recently opened images in the Image Editor. If
you want to clear all recent lists (including the recent list in the Recent mount editor) when Windows are
logging out the user then check Clear recent lists during logoff. If you want to do it immediately
then press Clear now button now.
104
You can also limit the image search history in the Search tab in the Mount manager and clear this
history immediately by Clear history button. «
10.5.1.3
Mount Manager
10.5.1.3.1 Auto-mounts
██ At this page you can manage Disk Protection auto-mounts. You can add and remove images, which
will be automatically mounted during the system startup, change their mounting order, mount and
unmount them, run editation tool for editing images and display image file properties. You can select a
mounting point to the selected image will be mounted on. Automatic selection of mounting point is also
available.
105
Use up-arrow or down-arrow to move the selected image in the auto-mounts list up or down
respectively.
Select an image and click Remove button to remove this image from the auto-mounts list.
The affected image will be removed from the list only, not physically deleted.
Clicking Add button you can add a new image to the auto-mounts list. Disk Protection opens
browsing dialog window and you can type or select an image file.
The Edit option allows you to edit the selected image. When you click it, Disk Protection
opens the Image Editor and you will be asked for entering your credentials. Then you can
edit the opened image, add user accounts, change passwords, increase image size limit
and more.
Next option is to click Mount button. After this Disk Protection displays mounting dialog,
where you enter your credentials, and then it mounts the selected image.
Unmount option is available only when selected image is mounted. If you click Unmount,
then Disk Protection immediately unmounts the selected image file.
When you press the Display image file properties button, Disk Protection displays a
window with information about the selected image file (image version, status, encryption
algorithm, key length, used file system, actual and maximum size limits etc.) This window
contains more detailed information about the selected image file than the short info at the
bottom part of the auto-mount manager tab.
The button Remove missing files allows you to check all image files in the list and purge
non-existing images from the list. It is useful if you have moved, renamed or deleted an
image file.
The Toggle Single Sign-on button enables or disables the Single Sign-on or passwordless
automount feature for the selected image. Upon enabling this feature, you will be asked to
enter the credentials with which the image was created. These will then be stored in an
encrypted form within TrustPort Disk Protection configuration files and used automatically
when the image is mounted at system startup without asking you for your user name and
password again. If you attempt to turn Single Sign-on off and you are not the same user
who created the image (and consequently turned the feature on first), you will, again, be
asked for your user name and password. The current state of the feature for each image is
indicated in the rightmost column of the image list table above. Also note that the Single
Sign-on feature cannot be turned on or off for images that are currently mounted. «
106
10.5.1.3.2 Recent mounts
██ At this page you can manage Disk Protection recent-mounts. Disk Protection remembers the file path
and letter of the recent mounted images and you can manage these images here. You can also add and
remove images, change their mounting order, mount and unmount them, run editation tool for editing
images and display image file properties. You can select a mounting point to the selected image will be
mounted on. Automatic selection of mounting point is also available.
Functionality of individual buttons is described in the chapter Auto-mounts. «
10.5.1.3.3 Search
██ You can search for image files on the local disk or a network. You are able to specify one or more
searching locations into Search in combo box. They have to be separated by semicolon if you want to
search in more than one in the same time. Other possibility is to use browse button or choose from the
searching history. If you leave the searching location blank and start searching then Disk Protection will
search in the images subfolder of the installation folder.
107
Running searching procedure can be independently interrupted by clicking Stop button. You can also use
the context menu available after right mouse click on any found image file item.
Use Add to auto-mount list or Add to recent mount list buttons to add selected image file to the
proper list.
Functionality of other buttons is described in the chapter Auto-mounts. «
10.5.1.4
Image Editor
██ TrustPort Disk Protection Image Editor is a user friendly utility that joins most of images
management functionality. The user can easily create a new image, mount and unmount an opened
image or do administration operations as creating a new account in the image, set a password for a user
account and more.
108
Disk Protection defines three types of user privileges:
a normal user
a read-only user
an administrator
All the users can mount and unmount the image but read-only users have granted only restricted
reading access to the image. It means that they cannot write any data to the mounted disk. A user with
administrator's privilege can manage other user accounts – create new, delete, rename and change
account type, set password for selected account, change size limit etc.
109
Image editor allows users to use most functions from the application toolbar or context menu where are
collected frequently used user accounts functions. Next component is status bar where you can see an
image status (green light represents unmounted and red light mounted state) and the name of the
authenticated account.
Create a new image
You can easily create a new image file and then manage it. To do this click New image at toolbar. Disk
Protection opens Create New Image wizard. This wizard helps you create a new image in few steps.
As soon as Create Wizard finishes image creation, this new image is automatically opened in the Image
Editor. This option is available only when you don't have any other image file opened. If you have, then
it is necessary to close it before.
Close image
It closes currently opened image. It isn't important if this image is already mounted. If no image is
opened, this option is disabled. «
10.5.1.4.1 Open an image
██ This function allows user to open an existing image and manage it. When you select this function,
standard opening dialog appears and you can select an image file. This dialog remembers the location of
the last opened image and automatically navigates to this location. When you are opening an image file
for the first time, then installation folder location is used. You can also choose an image file from the list
of recently opened images. It is not important if the opening image is currently mounted. But opening
functionality is disabled when you have already opened an image file. If you want to open another one,
then you have to close it before.
After the authentication data are verified, Image Editor opens selected image, displays all user accounts
and displays name of the authenticated account in the status bar. From this moment, you can modify
the opened image within your user permissions. If you have administrator rights to the image, you can
access all functions. «
10.5.1.4.2 New User Account
██ Adding user function serves to adding new user accounts to the image. There are three types of user
accounts which you can add: user, read-only user and administrator.
110
The user account is a normal user account, which has read-write access to the mounted image, so he
can also copy and delete files in the image. Read-only user account is a restricted account, which allows
only read-only access to the image. Administrator account has the same access rights as a user account
but in addition it can make administration operations in the image. Adding a new user is one of the
administration operations, which needs such administration privileges.
There is possible to create generally 20 accounts in each image and the type of account is not
important.
It is important to choose a strong password. It is possible to leave password fields blank
but we strongly recommend using strong passwords! Be careful to remember passwords
because neither manufacturer can decrypt images and get your data without login and
password knowledge.
This operation is available only when the opened image is not mounted. If it is mounted, it is
necessary to unmount it first and then repeat the operation. «
10.5.1.4.3 Modify a User Account
██ Using this function you can change the user account type. Only accounts with administration
privileges can use this function.
111
This function is available only when opened image is not mounted.
Take care of changing or deleting all administrator accounts from the image. If you
change the last account with administration privileges to non-admin account then this
file becomes uneditable, so there won't be possible to create a new account, change
account type or increase the size limit. «
10.5.1.4.4 Delete a user account
██ Deleting user accounts is an administration operation and can be used for any user account in the
image. Because of this you need an administrator privileges to perform this operation. It is available
when the opened image is not mounted only.
Disk Protection ensures that it isn't possible to delete all user accounts from the image. When a user
tries to do this then Disk Protection displays an error message.
Take care of deleting all administrator accounts from the image. If you delete all
accounts with administration privileges then this file becomes uneditable, so there won't
be possible to create a new account, change account type or increase the size limit. «
10.5.1.4.5 Rename a user account
██ Renaming user accounts is an administration operation and can be used for any user account in the
image. Because of this you need an administrator privileges to perform this operation. It is available
when the opened image is not mounted only.
112
The name of a user account has to be unique in the whole opened image. Disk Protection doesn't
distinguish the letters case in the user account name so it means that accounts named Robert and
robert are the same. National characters are also supported. The length of a user account name is
limited to 31 characters. «
10.5.1.4.6 Change Password
██ Changing password operation allows you to change your password. Name of this account is displayed
in the status bar. It isn't possible to use this operation when the opened image is being currently
mounted. If it is mounted, it is necessary to unmount this file and then change the password.
113
It is important to choose a strong password. It is possible to leave password fields blank
but we strongly recommend using strong passwords! Be careful to remember passwords
because neither manufacturer can decrypt images and get your data without login and
password knowledge. «
10.5.1.4.7 Set Password for a user account
██ Setting password is an administration operation and can be used for setting the password for any
user account. The administration rights are necessary for this operation. It is also possible to change
password for other administration accounts. This functionality is available only when the opened image
is not currently being mounted.
It is important to choose a strong password. It is possible to leave password fields blank
but we strongly recommend using combination of small and capital letters and numbers
of minimum length of 8 characters as a password. «
10.5.1.4.8 Mount/Unmount opened image
██ An opened image file can be mounted without necessity to enter your credentials again. Editor
remembers the credentials, entered during opening of image and uses them also for mounting to the
system. The mounting letter is chosen automatically in this case.
The number of available disk letters is limited to 26 (A-Z). If there is no available letter
in the system for mounting an image, mounting operation will fail.
The image that is going to be mounted mustn't be compressed or encrypted by the NTFS
file system. If Disk Protection detects that the mounting image is compressed then
decompresses it automatically.
114
If the image file is encrypted by the EFS then Disk Protection displays a warning
message and mounting procedure is cancelled. In this case you have to decrypt it
manually.
The mounted image can be unmounted at any time by clicking Unmount button in the toolbar or
pressing proper keyboard shortcut (see hotkeys). There is an exception when the mounted image
cannot be unmounted. It can occur if there are some opened files in the mounted drive. You can modify
this behaviour by setting up the force unmounting option. But be careful setting this option because
you can lose your data in not saved documents in this case. «
10.5.1.4.9 Set Image Limit
██ Each image that you have created has a small amount of size as reserve. It can be usable when you
realize that you disk is nearly full and you need some more space to store your data. In this case it is
possible to increase this image until this limit. The size of reserve depends on size of the image and file
system used in this image.
Required disk size
File System
Reserve
From 5 MB to 8 MB inclusive
FAT12
10 % of disk size + 1 MB
From 8 MB to 256 MB inclusive
FAT16
10 % of disk size + 4 MB
Over 256 MB
FAT32
10 % of disk size + 20 MB
If you create a virtual disk with 512 MB of size then it will use FAT32 file system and you will be able to
increase the limit until 512 MB + 51 MB + 20 MB what is 583 MB. This number is called the
maximum limit and cannot be exceeded.
115
If you still need more space, you have to create new image file and copy all data to it. It is of course
possible to increase the limit gradually, according to increasing requirements to disk space, it is not
necessary to immediately set the maximum size. Minimum step of increasing limit is 1 MB. Values of
both limits can be displayed in Image Properties.
This function is available for authenticated account with administrator privileges.
This function is available when this image file is not currently mounted. If is, then is necessary to
unmount it first and try it again. «
10.5.1.4.10
Change View
██ Image editor can be switched to few different types of view: Large icons - user accounts are
displayed as standard named icons, Small icons, Simple list and Detailed list.
116
If you want to change the view then simply click the particular icon in the toolbar and choose a new
view from the displayed list. «
10.5.1.4.11
Volume Image Properties
██ This window informs the user about an image and displays all available details about an image file:
117
the image file version number
encryption algorithm, which has been selected at the time of image creation
encryption key size, it depends on selected encryption algorithm
file system used for this image file, which depends on image file size. Image file with size
equal or less than 8MB uses FAT 12 file system, an image with size equal or less than
256MB uses FAT16 file system and image up to 32GB uses FAT32 file system
allocation unit size depends on used file system and selected image size
actual limit size, which is current size of the image in megabytes and can be increased with
use of Image Editor
maximum limit size is maximum size that the image can be increased to
status is the state of the image and can be Unmounted or Mounted «
10.5.2
Archives
██ You can edit the configuration of the TrustPort Archive Encryption. You can set-up Drag and Drop
Properties for the CAR Manager window, choose between different compression levels or set the default
viewer for encrypted files.
118
Drag and Drop function allows you to move files or folders automatically encrypting or decrypting them
when you move them from and to encrypted archives.
When you want to view an encrypted archive you can select the file in the CAR Manager and click on the
View file toolbar button or press F3 and CAR Manager will allow you to view the file using the selected
viewer indicated in the Set-up configuration box or in Advanced Configuration Manager.
When you open a file this way it will be extracted to a temporary folder and after closing it, the
temporary file will be securely deleted from there, so no traces of the extracted file will remain in the
computer.
The user can choose any viewer but TrustPort recommends the use of "Lister" viewer (free download at
http://www.ghisler.com/lister/). If you want to set or change the viewer, click on the External viewer
path in the Set-up configuration box and a new window will pop-up where you can browse for and
select the desired viewer. «
10.6
Logs and Results
On the Logs and Results tab, users can browse through all logs informing about activities performed by
the Antivirus or Firewall.
119
10.6.1
Firewall
██ Page Firewall Log Viewer makes possible to display all the accessible logs from TrustPort Personal
Firewall. On the first load of the page are loaded all the logs to the list. The newest log records are
displayed in the highest position on the list.
Button Refresh serves for reload of the list of all log records.
120
Button Clear log deletes all log records from the list. When the button is pressed, a dialog window is
displayed so as the list cannot be deleted by mistake.
Button Save as serves for storage of the list of the log records to the file. The records are stored to the
output file in text form, separated by semicolon, it is so called CSV format. A file created by this way
can be further processed or viewed in another program that supports CSV format file (for example
Microsoft Excel). If the file already exists, a confirm dialog window is displayed for file overwriting. «
10.6.1.1
Firewall log configuration
██ Page Firewall logging serves for feature setting of logging. Option Enable firewall logging
determines if TrustPort Personal Firewall should log the messages or not. This option is set by default
and the firewall carries out the logging of all necessary events.
The number of logged records for storage can be influenced by the option Limit log file. It is possible
to preset how many records can be stored as maximum. «
10.6.1.2
External File Viewer
██ Page External Log Viewer enables to view any file with logged records of TrustPort Personal Firewall
application. The newest log records are displayed in the highest position on the list.
121
Button Open log serves to open the file with logged records and for the list loading. During the file
loading there is displayed a dialog window with the process indication.
Button Save as serves for storage of the list of the log records to the file. The records are stored to the
output file in text form, separated by semicolon, it is so called CSV format. A file created by this way
can be further processed or viewed in another program that supports CSV format file (for example
Microsoft Excel). «
10.6.2
Antivirus
The Log is the antivirus software feature that enables gaining detailed information about activities and
tasks that were done. You can return to them and check them in order to check the computer or the
antivirus software status. All the logged information is stored into files in the log directory in the
installation directory.
The list of logs of the selected scanning source is displayed on this page. You can choose from the
following logging sources:
On-Demand Scanner
On-Access Scanner
Internet Protection
Antivirus Updater
Antivirus System
122
For every log there is its time, process identification code, action code and plain text description of the
event.
Logs of critical events are highlighted by dark colour (e.g. a virus was not repaired). Pink colour is used
for performed action (e.g. a file was quarantined).
10.6.2.1
Log settings
On this page you can enable/disable the log by checking/unchecking the Enable logging option. It is
implicitly enabled.
Using the option Level of detail you can set how detailed the logging should be:
Low - no details will appear in log.
Medium - the log of the antivirus software activity will contain only the basic information of done
actions. This is the default level of the log.
High - the log of the antivirus software will contain a detailed description of done actions.
The Log source options allow you to select which program functions you want to log information of:
On-Access Scanner - events related to the On-Access Scanner are recorded into the avoas.log
file.
On-Demand Scanner - events related to the On-Demand Scanner are recorded into the
avods.log file.
Internet Protection - events related to the Internet Protection are recorded into the avins.log
file.
Updater - events related to updating are recorded into the avupd.log file.
Antivirus System - events that are not related to any of the previous parts (e.g. scheduler) are
recorded into the avsys.log file.
The Log files size limit option allows you to set the maximum log file size (in kilobytes). Events will be
logged into this file. The default value is 1 000 kB. In case of exceeding the predefined file size, it will be
shortened by removing the oldest records.
123
10.7
Network Utilities
██ Network Utilities include a set of useful network tools allowing users to trace network statistics,
network connections, verify accessibility of certain IP addresses or to gain information about internet
domains. «
124
10.7.1
Network Statistics
██ Page Network Statistics serves for display of basic information about the number of transmitted
packets and bytes:
Total packets - The total number of all outgoing and incoming packets transmitted via all
network interfaces in the computer.
Total blocked packets - The total number of all outgoing and incoming packets that were
blocked by application TrustPort Personal Firewall on all network interfaces in the
computer.
Sent packets - The total number of approved sent packet via all network interfaces in the
computer.
Received packets - The total number of approved received packets via all network
interfaces in the computer.
Total bytes transmitted - The total number of all sent and received bytes via all network
interfaces in the computer.
Sent bytes - The total number of sent bytes via all network interfaces in the computer.
Received bytes - The total number of received bytes via all network interfaces in the
computer. «
10.7.2
Traffic Watcher
██ Page Traffic Watcher serves for display of active network TCP/IP connection list. All active
connections are displayed in a transparent table that is renewed periodically. In the table are displayed
information such as protocol, state, local and remote address and relevant ports. On Windows XP there
is moreover displayed information saying which application works with the network connection.
Under the table there is displayed a brief statistics containing information how many TPC connections
are active and how many TCP or UDP connections are waiting for the connection.
125
TrustPort Personal Firewall application enables to edit some features of active network connections
display. To edit the feature display, press the button Settings.
In this dialog window it is possible to set features for list of active network connections display:
Enable DNS resolving - all IP addresses will be displayed as domain names. If
this option is on, the display refreshing may take more time.
Hide listening sockets - all the listening ports stop displaying.
Hide non-listening and non-connected sockets - only active connections and
listening ports will be displayed.
126
10.7.3
Hide TCP connections - all the items for TCP are hidden.
Hide UDP connections – all the items for UDP are hidden.
Show only file name - the name of the communication process will be displayed
only as a name of an executable file without the complete path to the file. The
name display is allowed only on systems Windows XP and higher.
Show whole pathname - there will displayed a complete path by the names of
communicating processes. The display of names of communicating processes will
be permitted only on the system Windows XP and higher.
Update frequency - Slow - sets slow refreshing frequency. The list will be
refreshed each two seconds.
Update frequency - Normal – sets normal refreshing frequency. The list will be
refreshed each second. This option will be set as default one.
Update frequency - Fast - fast refreshing frequency. The list will be refreshed
twice in one second. «
Ping
██ Page Ping is a part of the network utilities and it serves for verification of a certain IP address or host
machine accessibility. The tool Ping can find out even the numbers of the wrong/non-deliverable
transmitted via the network. It is also possible to find out the time required for reach of the host
computer. Tool Ping sends ICMP packets (requirements) of certain size in certain time intervals. The
host computer receives these packets and sends them back as answers. If everything is all right, then
there is the same number of the returned answers as of the sent requirements. If the answer is not
given back in a certain time limit, this requirement is taken for lost.
The editing field Host name or IP address serves for the host name, such as for example
www.trustport.com or IP address that has form X.X.X.X. If this field is not filled in, then it is not possible
to startup the tool Ping.
The switching element Number of retries and Infinite ping serve for determination how many Ping
requirements there should be sent to the host computer. Option Infinite ping ensures that the sending
of Ping requirements will be going on till the user presses the Cancel button. Option Number of
attempts enables to determine how many Ping requirements should be sent to the host computer.
Startup of sending Ping requirements is done by button Start and finish of sending Ping requirements
can be done any time by button Cancel.
127
If the answer to the sent requirement is received, there is displayed information that contains the
following: who was the answer received from, what is the size of the received ICMP packet and what
time passed between the requirement and the answer. If the answer was not delivered in the given time
limit, then information about this event is displayed.
When the Ping requirement sending is finished, the tool Ping analyses the sent requirements and the
received answers and displays a brief statistics. The statistics contains the number of sent and received
packets and the number of lost packets including the percentual formulation. Next there is displayed the
shortest time between the sent requirement and the answer reception. There is also displayed the
longest time and the medium time.
Note! If the TrustPort Personal Firewall configuration does not permit the sending and receiving of ICMP
connections, then the tool Ping will not work. If you want to use this service, create Firewall rule that
enables you to receive and send the ICMP connections (to allow incoming and outgoing connection with
the help of ICMP protocol). «
10.7.4
WhoIs
██ Page WhoIs is a part of network tool pack and it serves for acquiring information about Internet
domain. Each Internet domain has its owner and technical administrator and it must be registered in
domain register of the highest level. Each register have a database of registered domains with
information about the owners and more. All these information are public and accessible via the service
WhoIs. Client WhoIs is a tool that connects to WhoIs server and it gets from here information about the
given domain or object. Some domains or objects can be removed out of WhoIs database but these are
mostly exception.
Into editing field Host name or IP address is entered a host name, for example www.trustport.com or
IP address that has the following form X.X.X.X. If the field is not filled in, then it is not possible to start
the tool WhoIs. Host address must be in the following form domain.xy (for example trustport.com) so it
means only domains of the first and second level, all the other levels will be automatically trimmed and
they will not be used during searching.
128
Note! If there is not allowed the outgoing TCP connection on port 43 in TrustPort Personal Firewall
configuration, the tool WhoIs will not function. If you want to use this service, create firewall rule that
enables you to use outgoing TCP connection on port 43. «
10.8
Advanced Settings
Advanced settings include tabs for language selection, the import or export of configurations, setting of
proxy servers and restoring default configuration.
129
10.8.1
Language configuration
On this page you can set the language version. The default language that is selected is the one you
chose at the beginning of the installation.
In the list of languages, all available language versions are displayed. If you change the selected
language, it is necessary to save the setting by pressing Apply or OK. After this occurs, a window will
appear stating that the computer needs to restart. This procedure is necessary for correct
implementation of the selected language to all parts of the product.
130
10.8.2
Proxy
Proxy server access settings can be done by checking the checkbox Use a proxy server. Next, it is
necessary to enter the proxy server address and port, which will be used to communicate with the
server.
If identification with a username and password is required, these details are entered into the Log on to
proxy server part.
This setting is applied mainly in secured corporate networks.
131
10.8.3
Configuration Maintenance
Configuration Import or Export is done through the Execute Wizard button.
During the import, a file containing TrustPort Management format (.data) configuration is selected from
the computer using the Select button.
During the export, a location where the file should be stored in the computer is selected and a required
name is entered into the dialog window. The import or export itself is performed after clicking on the OK
button.
132
Restoring default configuration (restoring default settings, which were used during product installation) is
performed by Restore button. The process needs to be confirmed in the following dialog window.
To finish the configuration restore successfully, it is necessary to restart the computer.
133
10.9
About and Licenses
This tab displays information about the product, including its version, as well as information about the
current license.
10.9.1
License Information
The License Information tab displays information about the current license, including its expiration date.
Buttons below are used to register the product using a simple wizard (Register button) and to display
the list of installed license keys (Keys button).
134
The standard trial version can be used for 30 days free of charge, but if you want to use the software
over this period, you will have to purchase a full license registration.
Product Registration
The Register button will begin the TrustPort Registration Wizard. With the help of the Wizard you
can register any TrustPort products in just a few simple steps.
In the next window choose the method of registration. If you have a license key, choose the second
option and enter the path to the license key file (e.g. c:\Downloads\keys\antivir.key). If you have an
activation code which you have acquired by purchasing the product, choose the first option and insert it
into the field for registration. The Registration Wizard will liaise with the company server to confirm the
activation code.
135
If the product has been registered with an activation code, here is the opportunity to extend its validity
with the help of a renewal code. This code can be purchased from TrustPort partners (current list can be
found on the TrustPort company website). Under the field where the code is written, the activation
code whose validity is to be extended is also listed.
If for some reason you do not want to extend your current license and have purchased a new activation
code, use the Delete activation code button and confirm this intention in the window. This will remove
all information about the used activation code from this computer. Attention! By pressing this button
there will be no removal or invalidation of the activation code from TrustPort's side. This is only to
eliminate the record from the computer.
136
The window Activation code owner details will appear only in the case that TrustPort products are
being registered with this activation code for the first time. To advance minimum fields of Company
Name/User Name, Country and E-mail are required.
To finish importing of key, click Finish.
137
10.9.2
About
The About tab provides information about the version of the installed product, furthermore it is also
possible to display the License Agreement. By clicking on Show Licenses, information about
thirdparty license libraries is shown, and the last button displays System Information.
11 Update
Regular updates are necessary if you want the antivirus software to protect your computer properly. On
update, the information about new malicious codes and viruses is added. The regular update is
necessary for saving the ability to scan for the newest viruses. In the past it was normal to update the
antivirus software once a month, nowadays it is convenient to do it several times in a week, preferably
every day. The TrustPort Antivirus update is realized through the Internet.
11.1
Updating
The Update virus definitions function from the Quick launch menu enables updating your antivirus
database with the newest known viruses and updating the antispam rules. In the opened window you
can see the updating process.
Use this function only in extraordinary cases. It is more advantageous to set the automatic database
update in the Update tab, that takes care of the regular update according to the set parameters.
During or after the update you can click your mouse on the arrow on the bottom part of the window and
display the information about the update process and see the updated modules.
138
If the present antiviral signatures and/or antispam rules are actual, an announcement that update is not
necessary will appear. The same information will be displayed in case that the update isn't necessary. In
Windows 2000 and XP is the same information also displayed on an information balloon in the
notification area of the Windows status bar.
11.2
Executing from the command line
The update module can be set from the command line with the use of parameters after the name of the
AVUPDATER.EXE file.
Detailed description of parameters:
Each command and switch must be preceded by the switch symbol, which is dash '-' or slash '/'. In the
following list there are all command line parameters supported by the AVUPDATER.EXE utility:
139
-? or -h
Command line parameters help - displays all the command line functions.
-q
Start in the quiet mode - the update program will run in the so-called silent mode,
i.e. without any output information.
-l=x
Log level - sets the log verbosity level by the number x from 0 to 2 with the
following meaning:
0 ... silent mode
1 ... normal mode
2 ... verbose mode
AVUPDATER.exe -l=2
-cfg=cfgfile.conf
Read configuration from a file - loads the configuration from an external file.
-au
Ask - Asks the user whether to start the update. In that case the user has a chance
to make the Internet connection available.
ATTENTION! This option can be used only if the user is currently logged in Windows.
-man
Opens the TrustPort Antivirus User Guide.
12 Program License
12.1
Trial license
If only the Trial license key is installed, the use of all functions of the antivirus software is limited to 30
days from the installation. Within this period the user is announced about this fact by the information
window when using the On-Demand Scanner and during the update. This window pops up only in the
common user interface, not when executing the antivirus program from the command line or as a plugin. The behaviour of the software after the Trial licence key expiration is summarized here.
12.2
Temporary support
It is a full version of the antivirus software with the full functionality during the purchased period. If the
payed period finishes, the program update will no more be possible. The user is warned about this fact.
The On-Access Scanner and the On-Demand Scanner will be working further. Attention! After importing
the full key the application needs executing again (for example Settings), in order to load all its
components with the right settings.
140
12.3
Trial license/temporary support expiration
Trial license
After 30 days of the trial licence period, the functionality of the antivirus program will be restricted.
Using the On-Demand Scanner will not be possible anymore, the update will be disabled and the OnAccess scanner will stop working. Trial license key expiration is announced by this window:
Temporary support
When the temporary support expires, some functions of the antivirus software will be restricted like in
the case of the trial licence. The restrictions do not concern the On-Demand Scanner but only the
antivirus update. The user is warned about this fact by the following dialog window, which will be
displayed at executing the On-Demand Scanner and at an attempt of starting the update.
12.4
Registering the product
See License Information.
13 Personal Firewall
13.1
Product overview
██ TrustPort Personal Firewall is convenient both for advanced users who are aware of network
protocols and services, as well as for those who prefer applications of pre-set rule sets designed for
operation of common Internet applications directly by the producer.
141
TrustPort Personal Firewall creates on the protected computer a gateway where all the network
connections pass by. The gate makes possible to permit or to prohibit communication of the computer
with the neighborhood network. The set of rules can be set by the user for all communication adapters
(those that are represented by their IP addresses) at the same time, for a concrete address or for a
range of addresses. Each concrete IP address of the host computer has its own defined set of rules that
regulates the data flow itself across the firewall gate.
With help of Advanced Configuration Manager user can manage individual sets of rules (create and
edit). The function for rule import and export ensures easy sharing and exchange of configurations
between individual users and it facilitates the work for the administrator. It is possible to configure
freely sets of rules, this includes setting the priority of rules, selecting protocols and directing the
monitored connections. For easier orientation of the user in individual net protocols set of rules are
supplied together with the personal firewall to ensure that the most extended common protocols are
sorted into according categories. Each rule makes possible to carry out also logging of the arising
incidents. TrustPort Personal Firewall is set by default in a way that all passing connections are blocked.
Only after its configuration, rules that permit passing of certain data flows are created.
The solution is supplemented by a monitor module connection on the level of TCP and UDP protocols
that gives to the user the current overview over all network activities. The user can therefore easily
check the efficiency of adjusted filter rules. In transparent display the user can quickly reveal all the
active network applications that he did not know about. With the help of another module -"WhoIs"
client- the user can "verify identity" of individual domain names and check in this way to whom he
wants to permit the access into his computer. Another addition to this module is a client that is able to
determine reliably the geographical position of the given residence. For more detailed tracing of the
individual connecting routes tools such as ping or traceroute with intuitive interface can be used. «
13.2
Shortcut keys
██ Filter Administration:
Shortcut keys
Meaning
Del
Deletion of the marked set of rules
Ctrl + Del
Deletion of the marked set of rules
Ins
Insertion of a new set of rules
Ctrl + Ins
Insertion of a new set of rules
Enter
Edition of the marked set of rules
Alt + Enter
Edition of the marked set of rules
██ Filter Definitions:
Shortcut keys
Meaning
Del
Deletion of the marked rule from the list
Ctrl + Del
Deletion of the marked rule from the list
Ins
Adding of a new rule to the list of rules
Ctrl + Ins
Adding of a new rule to the list of rules
Alt + Enter
Editing of the marked rule
Enter
Editing of the marked rule
Ctrl + arrow down
Shift of the marked rule downwards
Ctrl + arrow up
Shift of the marked rule upwards
Shortcut keys
Meaning
Ctrl + Del
Deletion of all logs
F2
Reloading of the log list
F5
Reloading of the log list
██ Log Viewer:
142
13.3
Ctrl + R
Reloading of the log list
Alt + R
Reloading of the log list
Shift + R
Reloading of the log list
Application Settings
██ This dialog will appear only in case unknown application is trying to communicate through TCP/IP
network. Also option Deny unknown connections but ask (default setting) has to be specified in
Advanced Firewall settings to make this work.
After checking the option Allow this application Firewall creates permanent rule in the filter definitions
(which can be further edited) and will not ask about the application again. The option Block this
application creates rule, which, after it is applied, bans all incoming and outgoing connections. The last
option Create custom permanent rule enables to define your own rule.
The checkbox Remember choice defines, whether permanent rule will be created in filter definitions,
or if the dialog window is displayed again when the application is launched. «
13.4
Finding of IP addresses in the computer
It is necessary to startup Command Prompts if you want to find out what IP addresses there are in the
computer. This can be done by selecting Start/Run and writing cmd.exe. A window will open where
you write command ipconfig.exe without parameters.
Example:
C:\>ipconfig
Windows 2000 IP Configuration Ethernet adapter Local Area Connection:
Connection-specific DNS Suffix . :
IP Address. . . . . . . . . . . . : 192.168.0.192
Subnet Mask . . . . . . . . . . . : 255.255.255.0
Default Gateway . . . . . . . . . : 192.168.0.1
It results from our example that our IP address is 192.168.0.192 and the subnet mask is
255.255.255.0. This IP address is allocated for network connection Local Area Connection.
143
14 Archive Encryption
14.1
Product overview
██ Overview
TrustPort Archive Encryption provides secure on-demand encryption to protect user's data against
unwanted disclosure. This application uses the strongest encryption/decryption algorithm available to
protect confidential and personal information stored in any data storage.
This software can be also used for sending secured files to someone who does not have encryption
software installed on his/her PC. The passphrase for decryption is in that case delivered on an
independent way.
Files and directories are encrypted into .cph files and the passphrase is used as a base for the
encryption key. Encrypted files in PDA are automatically associated with the TrustPort Archive
Encryption application and decrypted when the passphrase is entered.
Key features
- Support most of Microsoft's operating systems (Windows 98, ME, NT 4.0, 2000, XP, Vista, 7).
- File encryption with possibilities of compression and secure original file deletion.
- Encrypted files format compatibility with PDA devices.
- Files and folders encryption to archives. TrustPort Archive Encryption uses strong algorithms.
Files to decrypt can be selected from the archive. Files and directories can be encrypted into a self
extracting .exe file, which can then be packed into a .zip file in order to pass through firewalls and
antiviral gateways.
- Shell context menu integration (Files/Folders/Drives).
- Management of files stored in CAR archive.
- Viewing files from the archives with secure delete of temporary files after.
- The possibility of work with group of selected files (by the extension etc.) inside of archive.
- Transformation of the archives (CAR to self extract EXE or the other way).
- The possibility to use archive as installer (creating SFX archive that during its extraction creates
temporary folder, places its content into it and launches defined file).
- Drag & Drop functions.
- Statistics in status line (number of selected files, size etc.)
- The possibility to set Compression rate. «
14.2
In Shell context menu
██ TrustPort Archive Encryption is fully integrated with the shell context menu. When right-clicking on
any file, folder or disk, item Encrypt archive appears in the menu.
144
If you select any encrypted file or archive then the Decrypt menu item appears.
The context menu also will be different depending if you right-click on a folder, file or on the "up dir"
icon. «
14.2.1
Create new archive
██ To create a new archive using the context menu, right-click on the desired file and select Encrypt
Archive on the context menu. TPE will ask you to type the new archive file's name and password and
you can choose some additional archive creation options. See the following dialog window:
Select among the options, type and confirm the password, choose an encryption algorithm and press
OK. TPE will start the archive creation process and after finishing it, an information box will appear.
Please note that in order to extract this archive TrustPort Archive Encryption must be installed, hence if
you want to send an encrypted archive file to a computer where TrustPort Archive Encryption is not
installed, you will have to check Create EXE archive box on the Encrypt Archive window.
Archive creation options
Move to archive
If you select this option then all selected files will be moved to the created
archive file. It means that in the last step of the archivation procedure all
original files will be securely deleted.
145
Create self-extraction (SFX) EXE archive
To do this you need to check Create EXE archive option. In this case TrustPort
Archive Encryption creates classic CAR archive file, but adds special selfextraction header to the archive file and renames it to the EXE extension. Selfextraction archives can be extracted by running them as normal Windows
programs or by the same way as normal CAR archives.
Pack to ZIP archive
Self extraction archives can be zipped into a ZIP file in order to better pass
through firewalls and antiviral gateways. To do this, select Pack to ZIP archive
option.
Create Installer
See Create installer CAR SFX.
The option Add/Remove SFX on the Edit menu allows the user to simply add
or remove the .EXE extension on any file without the need of decrypting it as in
previous versions. «
14.2.2
Create CAR SFX installer
██ CAR SFX installer allows you to encrypt files into a self-extracting format.
If you want to use SFX Installer you must check the Create an EXE Archive box and then check the
Create Installer box, both in the Encrypt Archive window.
Then you have to select a file, which will be started after installer extracts data to the temporary folder.
146
The created encrypted file using CAR Installer will have an EXE extension, but when you open it, you will
be asked for the password (or you can use -pxxx command line parameter, where xxx is a password)
and if it is valid the file will immediately open and be extracted to a temporary folder.
If the file has any comment, it will be displayed automatically when the user opens the file. «
14.2.3
Extracting CAR archives (Decrypt)
██ If you select an encrypted archive file (CAR or EXE archive) in the Windows Explorer or any other
shell program, then the Decrypt item will appear in the context menu. When you click on it the
following dialog box appears:
Select destination folder
In this window you have to type a password and specify the destination folder
where the archive will be decrypted to. In order to ease the navigation you can
use the pane at the left side of the Decrypt Archive window. If you click on any
folder or drive the selected name with its path will appear in the Extract files to
folder address box and you will not be required to type the full path where you
want to extract the archive's content to.
Create new destination folder
If you want to extract an archive to a folder that currently does not exist then
select the parent folder where the new folder should be created and add the
name of the new one to the end of the line. TrustPort Archive Encryption creates
this new folder at the beginning of the extraction process automatically.
Overwrite mode
There are three different overwrite modes that specify what will be done when
a file with the same name is found.
Ask before overwrite – option shows a warning dialog box and prompts you for
overwriting the existing file.
Overwrite without prompt – overwrites all existing files with the same names without
prompt.
Skip existing files – all of the existing files with the same names will be skipped.
Note: All non-existing folders will be automatically created without prompting. «
147
14.2.4
CAR Archive properties
██ If you want to view the CAR archive properties please click the appropriate file containing the
encrypted archive with the right button or choose File Properties in the File menu in CAR Manager. After
switching to the Archive bookmark the following window will appear:
You can see some important information like current version of the product, current version of
supported CAR archive file format, used encryption algorithm, total number of files stored in the archive,
total and packed size of these files, compress ratio and size of self extracting module if present. «
14.2.5
Add/Edit archive comment
██ From TrustPort Encryption version 1.1 you can add comments to the CAR archive file. Comment is
public information and therefore it is not protected. It means that anyone can read this comment
without needing a password. The maximum number of alphanumeric characters in a comment is 63999.
There is the possibility to load file's comment. If you want to do it, click on the small folder icon on the
upper right corner of this dialog window. TPE will open a window where you can select the file you want
to read the comment from. «
14.3
Archive management - CAR Manager
██ CAR Manager is main CAR archives management utility. It allows you to create new archives, open
existing archives in CAR or SFX formats and convert between them, add files and folders to an existing
archive, delete files and folders from the archive, view selected file in the archive and much more.
148
By clicking on the particular column, you can sort the list by selected properties (name, extension, size
etc.).
If you right-click on the list header you will be able to select the information displayed on the list.
On the bottom of the window you can see the number of selected files and their size (not packed size)
and also there are a red and a green light that indicates when the Manager is busy (red) or ready
(green).
In the navigation box, you can see the directory tree of the CAR archive.
149
In the File menu you can choose, among others, to view the file properties or View file. To enable this
function you have to have the file viewer predefined, see Settings configuration. Add/Remove SFX
allows user to simply add or remove the .EXE extension on any file without the need of decrypting it as
in previous versions. «
14.3.1
Create new archive (Encrypt archive)
██ For creating a new archive you have to click on Create new archive toolbar button or select the
same menu item from the File menu or press CTRL+N key combination.
Following window will be displayed:
In the left pane is the directory's tree with disks and folders and in the right pane is the content of the
selected disk or folder. You can browse your drives and network neighborhood and select a folder or
drive that you want to include into the new archive.
When done press ENTER or click the OK button. TPE will ask you to type the new archive file's name and
password and you can choose some additional archive creation options (see Archive creation
options).
150
TPE will start the archive creation process and after finishing it, an information box will appear. Click the
OK button and TPE automatically opens the created archive file.
Please note that in order to extract this archive TrustPort Archive Encryption must be installed, hence if
you want to send an encrypted archive file to a computer where TrustPort Archive Encryption is not
installed, you will have to check Create EXE archive box on the Encrypt Archive window. «
14.3.2
Open existing archive
██ To open a CAR archive file use the Open archive menu item on the File menu or in the toolbar or
CTRL+ O key combination. TPE will show a standard browsing window. After that TPE will ask you the
file's password.
You could also open a CAR archive double-clicking on a CAR archive. If CAR Manager is not open when
you double-click on a CAR archive, it will be launched immediately.
There can only be one CAR Manager application running at the same time, therefore if you try to open a
CAR archive while the application is busy, a new window will be displayed showing that CAR Manager is
busy. «
14.3.3
Add files to the archive
██ You can add files and folders to the opened CAR archive. To do this, find the folder where you want
to add the new files and select Add files from the toolbar or from the Edit menu. TPE shows a window
where you can browse for files and folders that will be added. When done, press OK button.
151
After that TPE starts to add the selected files and/or folders to the archive. You can interrupt the process
by pressing Esc key or using the Cancel button.
If TPE finds a file with the same name in the archive then will it will display a confirmation dialog window
where you will be asked you if this file should be overwritten or not. «
14.3.4
Delete files from the archive
██ If you want to delete some files and/or folders from the opened archive then you need to select
them and press Delete key or use the Delete files menu item or toolbar button. You will be asked for
confirmation and then the deletion process will begin.
You can interrupt the deleting process pressing Esc key or using the Cancel button. «
14.3.5
Extract files from the archive
██ You can select some files and folders and extract them to any specified directory. To do this, click on
Extract archive toolbar button or press CTRL+E key combinations or from the Edit menu and the
following dialog box will appear.
This dialog box is the same as the one used on Windows' shell archive extraction/decryption but with
one exception: you don't need to type the password because you already typed it when you opened or
created the archive file. «
14.3.6
Test archive consistency
██ TPE uses CRC algorithm to verify that the files stored in the archive are not damaged. If you want to
test the consistency of an archive then simply use the Test archive toolbar button, or select item from
the File menu, or use CTRL+T key combination.
152
After that TPE starts the checking procedure and if there are no damages, an information dialog box will
appear. «
14.3.7
Display archive properties
██ If you click on the Show info toolbar button or select it from menu item on the File menu or press
F5 then you will see some important information about the archive like TrustPort Archive Encryption
current version, the current format version of the CAR archive, the encryption algorithm used, total
number of files stored in the archive, total and packed size of these files etc.
TrustPort Archive Encryption 2.5 uses 1.1 archive's format version. You can work with previous format
versions and as soon as you open or modify those archives, the format version will be upgraded to 1.1.
«
14.3.8
Add or edit archive file comment
██ Comment is public information and therefore it is not protected. It means that anyone can read
this comment without needing a password. The maximum number of alphanumeric characters in a
comment is 63999. If you want to add or edit an archive file comment then press F4 key, use Edit
comment menu item or toolbar button.
153
There is the possibility of loading a file's comment. If you want to do it, click on the small folder icon on
the upper right corner of this dialog window. TPE will open a window where you can select the file you
want to read the comment from. «
14.3.9
Archived file/folder properties
██ If you select a file or folder and click on the File menu and choose File properties or right-click on a
file or folder and select Properties on the context menu, you will see some important information about
the file or folder like type of file, location, size, packed size, the CRC etc. «
14.3.10
Files and folders selection
██ You can select some files and folders in different ways using CAR Manager through the options on
the Edit menu or in the context menu displayed by right-clicking on any folder or file. These options
allow the user to Select all, Unselect all, Invert selection, Select group (by the extension), Unselect
group (unmark by extension).
154
This window will remember the file extensions you used to group even after closing and re-opening CAR
Manager. «
14.3.11
Create new folder
██ To create a new folder in any CAR archive or in any CAR archive folder or sub-folder you just simply
have to browse and select the destination where the new folder will be created and click on Create
folder on the Edit menu.
A new window will appear and you will be prompted to type the new folder's name. «
14.3.12
Keyboard shortcuts
██ Keyboard shortcut
Meaning
F1
On-line manual
SHIFT+F1
About CAR Manager
F3
View selected file
F4
Add/Edit comment
F5
Show info, archive properties
F7
Create new folder
CTRL+N
Create new archive
CTRL+O
Open existing archive
CTRL+L
Close opened archive
CTRL+E
Extract selected files and folders
CTRL+T
Test archive consistency
CTRL+INS
Add files to the archive
DELETE
Delete selected files from the archive
CTRL+R
Set-up configuration
BACKSPACE
Go to parent directory
ENTER
On any folder go into this folder, on file has no effect
UP/DOWN
Moves cursor selector
CTRL+UP/DOWN
Moves selector without selecting
155
14.4
SPACE
Selects file/folder under selector
SHIFT+UP/DOWN
Moves selector - block selection
CTRL+A
Select all files and folders
SHIFT+CTRL+A
Unselect all files and folders
Gray *
Invert selection
Gray +
Group selection using wildcards
Gray -
Group unselection using wildcards
Management of CAR archives - Total Commander
██ Total Commander is a file manager for Windows (TM) similar to Windows Explorer. But Total
Commander uses a different approach: it has two fixed windows side by side like a well-known file
manager for DOS.
Total Commander plug-in allows you to manage CAR archives as any normal file with the only difference
of being asked for a password anytime you want to open a CAR file. For more information about Total
Commander see http://www.ghisler.com. «
14.4.1
Packer configuration
██ CAR plugin has to be configured properly in order to work correctly. The Archive Encryption
installation procedure automatically install this plug-in to Total Commander, but if it is not installed at
the moment you install Archive Encryption, then the plug-in will not be correctly registered. In this case
you will have to register it manually.
156
Run Total Commander and select Options on the Configuration menu.
Click on the Packer tab.
Press the Configure packer extension DLLs button and the following dialog window will
appear:
In the upper right corner combo box type (or select if exist) CAR (without any dot or
asterisk).
Click on the New type button and browse for CARWinCmd.wcx file that is located in the
TrustPort Archive Encryption installation directory and click Open.
Click the OK button.
Confirm by clicking OK. «
14.4.2
Create new archive
██ In Total Commander select the files and/or folders that should be added to the new archive and
press ALT+F5 or select Pack on the Files menu. The following window will open:
157
The most important option is the Move to archive option. If you select it then all files will be moved to
the archive file. It means that after the archivation process the original files will be securely deleted.
Select CAR packer option on the right side of the window (If you don't have this option you have to
configure the packer). If you click the Configure button, you can change the compression level of the
archive.
You will be asked to type in and confirm a password and also you will have the option to choose the
encryption algorithm. The file/folder will be packed into the folder opened in the other panel of Total
Commander, if you haven’t specified it differently. «
14.4.3
Open an existing CAR archive
██ If you want to open an existing CAR archive you only need to locate this file and press ENTER or
doubleclick left mouse button on this file. Total Commander recognizes that the file is a CAR archive and
calls CAR manager plug-in. You will be asked to type in the password.
158
CAR plug-in remembers the name and password of the last opened CAR archive file. If you want to force
CAR plug-in to forget last entered password try to open another CAR archive file and at the password
request window press ESC.
Total Commander's panes work independently, meaning that if you want to open the same CAR archive
on both panes you will be asked twice to enter the password and if you want Total Commander to forget
the password of two open archives you will have to do it on each pane.
Note: Total Commander plug-in interface does not expect password protected archives and if
the password does not match or the user presses ESC, then it displays an error message. It
does not mean that CAR archive file is damaged! «
14.4.4
Add files to CAR archive
██ You can add files and folders only to an open archive. Open a CAR archive file in one pane and
select the files and/or folders that will be added in the other pane. Then press F5 key. Total Commander
recognizes that the copying operation is actually a packing operation and calls the CAR plug-in.
159
On the Pack files window you can set-up the option Move to archive. Then all files will be moved to the
archive file and the original files will be securely deleted.
Press OK button or ENTER to add the files. «
14.4.5
Delete files from CAR archive
██ Open CAR archive file and select the files and folders, which should be deleted. Then press F8 or
Delete key or select Delete from context menu. Total Commander will show a confirmation dialog
window. «
14.4.6
Extract files from CAR archive
██ The simplest way is to select files in any open archive in one pane, open the destination folder in the
other pane and press F5 or simply drag and drop it:
The second way is to use the menu item Unpack specific files on the Files menu or pressing ALT+F9 key
combination.
160
This way you will be able to specify more options than in the first way: «
14.4.7
View an archived file
██ To view an archived file you need to open a CAR archive file first. Then you can select file that you
want to view and press F3 key or right-click on the file and select View from the context menu. Total
commander will call the CAR manager plug-in to extract the selected file to the temporary folder and
then you can view it. The window can be closed pressing ESC as well.
Warning: because Total Commander closes the viewed file by itself, CAR manager plug-in is
not able to securely delete the temporary extracted file. «
14.4.8
Test CAR archive consistency
██ Testing of archive consistency can be done by pressing SHIFT+ALT+F9 key combination or selecting
Test archive(s) on the Files menu. If archive is opened then the checking procedure starts immediately,
if not then the CAR plug-in will ask you for the password. It is possible to select more than one CAR
archive file to check. «
161
14.5
Archive Encryption FAQ
██ Can I open an archive stored on a non-writable media like a CD-ROM?
Yes, it is possible. But remember that it is not possible to modify this archive, in this
case you will not be able to add files, delete files or modify an archive comment.
How can I change an archive's password?
Current version of TrustPort Archive Encryption does not support password changing on
CAR and CPH files. If you need change the password then you have to extract the data
from the archive and create a new archive with a new password. You will have to do the
same with CPH files.
I have some archives made by previous version of TPE 1.0. Can I use them in this
new version of TrustPort Archive Encryption? How is it with backward data
compatibility?
New versions of TPE are backward compatible. It means that all archives and CPH files
created by previous versions of TPE can be read by the new version. Format version of
CAR and CPH files was improved in TPE 1.1. But TrustPort Archive Encryption 2.5 uses
exactly the same format version of CAR and CPH. If you are using TrustPort Encryption
version 1.0 please upgrade it to the latest version, which has many improvements.
What is the difference between CAR and CPH files?
CAR and CPH are two data formats supported by TrustPort Archive Encryption. The first
one is a format for PCs and the latter for mobile devices using TrustPort Mobile Encryption
software that is designed for Pocket PC and EPOC systems. Each of them is destinated for
different method of files security. CAR archives are similar to other well known formats as
ZIP, RAR, ARC and so on, but data in CAR archives is always encrypted using strong
encryption algorithms and none is able to gain access to these files without a password. All
files and folders are stored in one archive file and are compressed and encrypted. In
comparison with this each CPH file contains only one encrypted file and doesn't use
compression.
Why TPE enables packing SFX archives to ZIP format?
If you need for instance to send an e-mail with an attachment to your colleague in other
office over the internet and don't want the file to be opened by anyone but your colleague,
then we recommend you to use a CAR archive. But if you colleague doesn't have TPE
installed on his computer to extract the received CAR archive, then you can add a
selfextracting .EXE form to the CAR archive. If your company has installed an anti-virus
system on the mail server then there could be problems with .EXE attachments, which
could be automatically removed. To solve this problem TPE allows you to pack SFX
archives to ZIP format that usually can pass thru this anti-virus protection without
problems. «
162
15 DataShredder
15.1
Product overview
██ The TrustPort DataShredder is a small utility for secure unrecoverable deletion of your electronic
data. You can easily delete your sensitive files, folders, free space on drives, Cookies, Internet
temporary files, Recycle Bin, System temporary directory, Internet and Document history.
Key features
support of Microsoft operating systems (Windows 2000 and higher),
possibility to choose from eight shredding methods, from the most quick for common files to the
most effective Peter Gutmann method with 35 shredding passes, suitable also for very
sensitive data,
possibility to generate report file with detailed list of deleted files,
shell context menu integration (files/folders/drives),
possibility to wipe various system caches and histories,
unrecoverable deletion of file/folder names, sizes and locations on the drives,
possibility to wipe from the command line. «
15.2
In Shell context menu
██ Program TrustPort DataShredder is fully integrated with the shell context menu and in this way it
supports files/folders and drives the wiping. After installation, it appears as TrustPort DataShredder
new option in the shell context menu displayed in any file manager upon right mouse click on any file,
folder or drive.
In case of drives, there are three options available: Shred data on the disk, Shred free space and Shred
the whole drive (which is a combination of the previous options).
163
If you select a drive, click the right mouse button and run any command from TrustPort DataShredder
item, you will be asked for confirmation. It is recommended to close all applications while you wipe the
free space on the drive or all data on the drive. «
15.3
Data shredding
██ The dialog window, displayed below, informs you about the shredding process. Progress counter
shows percentage of current file processing. Above this progress counter, a special text is displayed.
This text shows current and total number of passes. Total number of passes corresponds with the
selected wiping method (see Configuration).
Most of operations which TrustPort DataShredder does can be interrupted by user. This interruption can
be done by clicking the Cancel button.
Every file or folder that you want to wipe must be confirmed. For the confirmation, this dialog is used.
If you are sure, that you want to wipe all the selected files or directories, select Yes to all button, which
will prevent from displaying the confirmation window for each file or directory. Button No will skip the
164
current file or directory, the process then continues with the following file or folder. If the file or
directory has any attributes, then a dialog window with following notice displays: The file '...' is a file
with attribute. Are you sure you want to shred it?
If the file is kept by another application, while you want to wipe it, a dialog window with the buttons
Abort, Retry, Ignore and Ignore all appears.
After every wiping process, the result window is displayed. «
15.4
Console application
██ Console application TrustPort DataShredder is designed for advanced users and the network
administrators who need to start the shredding from the system Windows console or from the scripts.
Console application TrustPort DataShredder is installed to the same directory as the graphic version of
TrustPort DataShredder application. If you wish to use this console application, then start Command
Prompt (In Windows 98 and Me, the command prompt is also called the MS-DOS prompt) by selecting
"Start/Programs/Accessories/Command Prompt" and go to the directory where is the application
TrustPort DataShredder installed, for example "C:\Program Files\TrustPort DataShredder\Bin". By
writing down the program name (dshrcon.exe) and by pressing Enter is displayed the Help for the
program. The detail parameter description is stated below.
Program dshrcon.exe has the following syntax: dshrcon.exe [ parameters ] [ file | directory ]. If
there are not entered any parameters, then only help is displayed and the program is finished. For
values file or directory is possible to enter any file or directory that you want to shred. The file or
directory can be also specified by relative way. The value parameters can contain following parameters:
Parameter list:
Parameter
Meaning
--help (-h)
Help display with parameter overview that can be used. When the Help of
TrustPort DataShredder is displayed, the application is finished.
--showmethods (-z)
Displays list of available shredding methods. After that, the program is finished.
--yes (-y)
Suppression of requirements to display confirmation about shredding of files and
directories. DataShredder will use the answer Yes to all of them.
--version (-v)
View of version of TrustPort DataShredder application. After the version is
displayed, the application is finished.
--method (-m)
This parameter serves for determination what method should the file use for
shredding. The method is specified as a parameter entered after --method= or
after -m. The possible method values can be found by --showmethods. Example:
dshrcon --method=usdod or dshrcon -m quick.
Parameter starts function of generating the report files.
--genrep (-g)
--repfile (-r)
This parameter determines which file should be used for shredding reports.
Behind the parameter --repfile must be entered the path the report file. It the
path was not entered, the parameter will be ignored.
--askrep (-p)
DataShredder will ask before shredding for the file name where the report should
be recorded.
--repover (-o)
Parameter starts a function of file overwriting before each shredding. This
parameter can be used only together with the –genrep parameter.
165
--inettemp (-i)
Shredding of temporary internet files.
--cookies (-c)
Shredding cookies.
--systemp (-s)
Shredding temporary system files.
--recbin (-b)
Shredding the recycle bin.
--inethist (-n)
Shredding internet history.
--dochist (-d)
Shredding the list of recently opened documents.
--runhist (-u)
Shredding the list of started applications by Start.
--all (-a)
This parameter is a combination of parameters --inettemp, --cookies, --systemp,
--recbin, --inethist, --dochist and --runhist.
When the shredding is finished, there is displayed a report how many files and directories were
shredded and the operation was done successfully.
Example of use:
dshrcon.exe --method=usdod3 --all - It shreds by method U.S.DoD all the accessible temporary
files, directories and history.
dshrcon.exe --method=german c:\data\private.txt - It shreds by method German VSITR file
c:\data\private.txt.
dshrcon.exe -m quick -g -r c:\report.rpt -o -a - It shreds by method QUICK all the accessible
temporary files, directories and history with creation of report file c:\report.rpt, which will be
overwritten. «
15.5
DataShredder FAQ
██ How can I shred disk with TrustPort DataShredder? Which possibilities offers
TrustPort DataShredder for users?
Run some window manager e.g. Windows Explorer, Total Commander. Select some drive,
push the right button of the mouse and the shell context menu appears. In this menu is a
new item TrustPort DataShredder and inside this item are three possible actions: Shred data
on the disk, Shred free space and Shred whole disk (all data and free space together).
Can I select multiple files and shred them with TrustPort DataShredder?
Yes, it is possible. Select multiple files in some window manager, e.g. Windows Explorer,
Total Commander, and push the right button of the mouse. The shell context menu appears
and select TrustPort DataShredder item.
What about already deleted files? Can I shred those files?
Yes, it is possible. If you have files in Recycle Bin already, you can use possibility shredding
Recycle Bin by TrustPort DataShredder in Wipe tab. If you have not files in Recycle Bin yet,
you can use the possibility Shred free space in the shell context menu TrustPort
DataShredder item of disk.
166
Data Shredder uses several methods of shredding, which method is the best?
It is hard to say which is better. The first method is the fastest because it has only 1
shredding cycle but it is the worst from the security point of view. The latest method is the
slowest because it has 35 shredding cycles but is the best from the security point of view. For
common files, it can be used some of the quick methods, for files containing sensitive data is
more suitable method with higher number of shredding passes, such as Peter Gutmann
method. The default method, developed by TrustPort company, uses 3 shredding passes.
How can I securely shred Recycle Bin or temporary files?
You need to run TrustPort DataShredder from Start menu or from the TrustPort Tray. In the
interface, select item Wipe now from the Tools dropdown menu.
Can I securely shred the whole harddisk, where I have current operating system?
Yes, it is possible but this software uses Windows devices to work and this it is not a safe
situation; this software does not guarantee that the harddisk will be shredded all right. For
this purpose TrustPort, a.s. offers program TrustPort DiscShredder, which shreds securely
your harddisk.
How can I get to the latest version of TrustPort DataShredder?
Visit our website. «
16 Disk Protection
16.1
Product overview
██ TrustPort Disk Protection enables to create a new virtual disk on your computer. The work with a
virtual disk is the same as work with any other logical drive. All data stored in this virtual disk are
transparently encrypted and during reading or copying from this drive are automatically decrypted.
Transparent encryption works automatically without user's assistance. When operating system crashes
or a power failure occurs, then no data are avoided. All the data are continuously encrypted on the
image.
Transparent encryption of the data.
Easy to use, you have to create an image file only and plug it in.
Strong hard disk encryption to protect your data.
You can store an image file anywhere on your hard drive, on the network or in any
removable media.
Images located on the network can be shared between more users. But only the user who
mounts the image as first can decide, if the image will be mounted as read and write or
read-only access. If he decides to mount it for read and write then the others will have no
access to this image. Otherwise all users will have read-only access to the mounted image.
Image files can be automatically mounted during Windows start up and automatically
unmounted after a period of time, when computer goes to sleep or pressing a special key
combination.
Disk Protection remembers all mounted images and mounting parameters in the recent
image list and allows quick selecting and mounting of these images. Interactive
management of them is also available.
You can search for Disk Protection images on the local drive or network.
TrustPort Disk Protection automatically chooses the optimal file system according to the
image size. Available file systems are FAT 12, FAT16 and FAT32.
The possibility to create additional user accounts in each image file for sharing the data.
It contains an application aligned to checking and repairing damaged image files. «
167
16.2
In the shell context menu
██ TrustPort Disk Protection is associated with the shell context menu. This context menu is displayed
when you right click on any image file or on a mounted drive. In this menu you can select Mount or
Unmount item, depending on whether the image is currentlymounted or not.
When you right click on any image file and select the Properties menu item, the window with
properties tabs appears. Here you can select the Disk Protection tab:
This window informs the user about an image and displays all available details:
the image file version number,
encryption algorithm, which has been selected at the time of image creation,
encryption key size, it depends on selected encryption algorithm,
file system used for this image file, which depends on image file size. Image file with size
equal or less than 8MB uses FAT 12 file system, an image with size equal or less than
256MB uses FAT16 file system and image up to 32GB uses FAT32 file system,
size of allocation unit, it depends on used file system and selected image size,
actual limit size , what is current size of the image and it can be increased until maximum
image size; to do this use Image editor,
168
maximum limit size, it is the maximum size that the image can be increased to,
status, it is the state of image and it can be Unmounted or Mounted.
At the bottom of this window is a special Edit image button. If you click this button, then Image Editor
will be started and selected image file automatically opens for editation. «
16.3
Quick Launch
██ This application runs in Windows tray and allows you to quickly launch any Disk Protection
application. It allows users to create new encrypted disk or mount/unmount images.
TrustPort tray is automatically started during Windows logon.
Disk Protection Quick Launch also collects all classic Windows shortcuts located in
Shortcuts/DiskProtection folder in your installation directory (for example "C:\Program Files\TrustPort
Disk Protection\Shortcuts\DiskProtection"). You can add other shortcuts to this folder or modify existing
if you want. «
16.4
Command line parameters
██ Disk Protection uses command line parameters, which specifies operation that should be performed.
If you don't specify any command line parameter, then Disk Protection expects mounting request and
runs Mount Wizard.
Detailed description of parameters:
Each command and switch has to be introduced by a special switching character '-' or '/'. In the
following list are described all command line parameters of TDisk.exe application:
-m
Mount an image using Mount wizard,
-ro
mount as read-only,
-am
add the image to the auto-mounts list,
169
-am-
remove the image from the auto-mounts list,
-d
disable modifying mount parameters except user credentials,
-ua=name
given user account name will be used instead of account
name taken from the Windows,
-unrs
special parameter, which makes TDisk.exe to remove itself
from the list of automatically started applications during
Windows start-up (used during installation),
letter:
select the letter, which will be assigned to the mounted
image,
file
the file name of the Disk Protection image that should be
mounted.
TDisk.exe -m -am -d -ua=henry q: "c:\Program
Files\TrustPort Disk Protection\Images\image000.tdi"
-q
Quick mount of an image,
-ro
mount as read-only,
-am
add the image to the auto-mounts list,
-am-
remove the image from the auto-mounts list,
-d
disable modifying mount parameters except user credentials,
-ua=name
given user account name will be used instead of account
name taken from the Windows,
letter:
select the letter, which will be assigned to the mounted
image,
file
the file name of the Disk Protection image that should be
mounted.
TDisk.exe -q -ro -d -ua=henry q: "c:\Program Files\TrustPort
Disk Protection\Images\image000.tdi"
-u
Unmount a virtual disk or disk image respectively,
file
the file name with full path of the mounted image OR
letter:
a letter that should be unmounted OR
-all
unmount of all currently mounted virtual disks.
TDisk.exe -u q:
-c
Create a new Disk Protection image,
-am
add the image to the auto-mounts list,
-im
mount the image after creating,
-f
fill in the parameters automatically,
-alg=
change encryption algorithm, which will be used for the new
created image,
cast
CAST 128 algorithm,
rijn
AES (Rijndael) algorithm
-d
disable modifying creating parameters except user
credentials,
-ua=name
given user account name will be used instead of account
name taken from the Windows,
-is=size
specify new image size in megabytes (current size),
-unrs
special parameter, which makes TDisk.exe to remove itself
from the list of automatically started applications during
Windows start-up (used during installation),
-inst
a modification of creation parameters used in the installation
of Disk Protection application,
file
the name of file name with full path, which will be used for
170
the new Disk Protection image.
TDisk.exe -c -am -im -f -alg=cast -ua=henry -is=512
"c:\Program Files\TrustPort Disk
Protection\Images\image000.tdi"
-e
Edit an image file (user account management, increasing the limit etc.),
file
the file name with full path of an image that will be edited.
TDisk.exe -e "c:\Program Files\TrustPort Disk
Protection\Images\image000.tdi"
-r
Registration of Disk Protection driver. It starts an administration utility that registers the
encryption driver to Windows,
-u
unregistration of Disk Protection driver from Windows.
TDisk.exe -r -u
--man
Open Disk Protection user's guide
-?
Show window with quick help about command line parameters. «
16.5
Hotkeys
██ Image Editor
Hotkey
Meaning
Ctrl + N
Create a new image.
Ctrl + O
Open an image.
Ctrl + L
Close the opened image.
Ctrl + M
Mount image.
Ctrl + U
Unmount image.
Ctrl + S
Change image size limit.
Alt + Enter
Show parameters.
Ctrl + Ins
Add new user account.
Shift + Del
Delete selected user accounts.
F2
Rename selected user account.
Ctrl + E
Set password for authenticated user account.
Ctrl + T
Change account type.
Ctrl + P
Change password for authenticated user account.
F1
Invoke context help from the Disk Protection User's Guide.
Alt + F1
Display About box.
Shift + F1
Display license key information.
██ Mounts Manager
Hotkey
Meaning
Ins
Add a new image to the auto-mount or recent mount list.
Del
Delete selected image from the auto-mount or recent mount list.
Shift + Up
Move selected image file up in the auto-mount or recent mount list.
Shift + Down
Move selected image file down in the auto-mount or recent mount list.
F1
Display help.
171
16.6
Create a new Disk Protection image
██ The Disk Protection Create New Image Wizard is an application that allows you to easily Create a
new image. Images created by this wizard are normal files and you can store them on your harddisk,
any removable media, or also as for example read only files on CD-ROM. Image created by this wizard
is automatically mounted when this wizard successfully finishes.
This wizard can be started from the Start menu or using Disk Protection Quick Launch, or through
command line parameters of TDisk.exe program. «
16.6.1
New Image Options
██ At this page you have to specify a name of the new image. The image can be located any place on
your hard drive or removable media where you have writing access, or on the network drive, with the
capacity at least 5 MB.
The wizard presets the image size (256 MB or 64 MB), but it can be changed in the Size limit field.
There are just three conditions:
You can't create a larger image than the free amount of space on the target location,
Disk Protection can't create an image larger than size limitation of used file system in newly
created image. Disk Protection internally chooses the best file system depending on the
limit size you have setup. There are three supported systems - FAT 12, FAT16 and
172
FAT32. Therefore the size limitation of the new image is 32 GB, what is the limitation of
FAT32 system.
You can't create an image larger than 4095 MB on target disk, if the target disk uses any
FAT file system, because the maximum file size on FAT systems is limited to 4 GB
(approximately 4095 MB). This last mentioned limitation is not relevant on NTFS file
systems, where is no problem to create a file larger than 4 GB.
For more details please go to Set image limit.
You can choose the encryption algorithm, which will be used for the new image. It is not possible to
change the encryption algorithm of already existing image, so you have only one chance to choose it at
this time. You have two choices: AES (Rijndael) and CAST128 algorithms. Default option is AES
(Rijndael) algorithm.
The last option what you can setup on this page is selection if you want to automatically mount the new
created image at system startup. If you check the option Mount it at startup, wizard will add it to the
list of automatically mounted images. It is possible to add any image to this list later using
automounts manager. «
16.6.2
Create Administrator's Account
██ This step is focused on creation of a new account in the image, which will be used for authentication
to this image. Disk Protection automatically fills up the user name field with the user name gained from
the Windows system. You can also change it if you want. Remember that the user name can contain an
alphanumeric character and is case insensitive.
Enter the password into relevant fields.
It is crucial to choose a strong password. It is possible to leave password fields blank
but we strongly recommend using combination of small and capital letters and numbers
in the minimum length of 8 characters. «
16.6.3
Create Image Processing
██ The first step of image creating procedure is collecting of random data needed for data encryption
key generating. Please, keep moving mouse pointer over the window, clicking or pressing any key.
173
TrustPort Disk Protection creates a new image file. You can interrupt this process by clicking Cancel
button or by Esc key.
The process of creating, formatting and encrypting of the image may take some time. Time needed for
this operation depends on the image size, selected method, used file system etc. «
16.6.4
Finishing Create New Image Wizard
██ After the process is finished, new image is created on the target disk and is ready for use.
174
The last page displays summary of information about created image, including new file name, name of
the administrator account, size limit, selected algorithm etc. After clicking on Finish, the image is
mounted and the wizard is closed. If there is an error during mounting the image, the program will
display an error message. If you press Esc, or close the wizard, then the wizard won’t mount the
created image to the system.
Total number of available letters is limited to 26 (A-Z). If there is no letter available for
mounting the image, the mounting process will fail and a warning message will be
displayed. «
16.7
Mount Wizard
██ Mount Wizard allows you to mount an image in a very easy way. Mount Wizard expects that you
have an already created image, see Create a new Disk Protection image wizard. There are more
ways how to start Mount Wizard. You can do this by clicking on an image file or by running application
TDisk.exe without parameters, or with parameter –m, see command line parameters. Mount Wizard
allows you to mount an image from various places, e.g. harddisk, network, CD-ROM, USB device etc. «
16.7.1
Mounting Options
██ If you don't specify an image file name as command line parameter, then you have to type the
filename into the Location field or use the browse button. The next parameter you can change is
mounting letter. You can select it from a list of available letters or you can leave the option
Automatic, which means that first available letter will be used.
175
Read-only access means that image will be mounted as read-only, no matter the user rights defined
by user account. If you select Mount at start up option, then selected image will be added to the
automounts list.
Total number of available letters is limited to 26 (A-Z). If there is no letter available for
mounting the image, the mounting process will fail and a warning message will be
displayed. «
16.7.2
Volume image authentication
██ At this page you have to enter the user name and password for selected image file. A user name can
contain alphanumeric characters only and is case insensitive. «
16.7.3
Completing Mount Wizard
██ At this page you can review all selected mounting parameters. When you click the Finish button,
Disk Protection starts mounting procedure and the image will then be "plugged-in" to the Windows and
you can start using the new mounted drive. If something is wrong, Disk Protection displays an error
message and you can go back thru the wizard and change any parameter.
176
Total number of available letters is limited to 26 (A-Z). If there is no letter available for
mounting the image, the mounting process will fail and a warning message will be
displayed.
The image that is going to be mounted mustn't be compressed or encrypted by the NTFS
file system. If Disk Protection detects that the mounting image is compressed then
decompresses it automatically.
If the image file is encrypted by the EFS then Disk Protection displays a warning
message and mounting procedure is cancelled. In this case you have to decrypt it
manually. «
16.8
Quick mount
██ This application affords you to mount an image very quickly and easily. It expects that you have
already created an image file, see Create a new Disk Protection image wizard. Quick mount can be
launched from the system context menu after right-clicking the image file and selecting the Mount
option, from the Disk Protection Quick Launch, or by parameters of command line. Mount Image
allows you to mount an image from various places on your harddrive, CD-ROM, USB flashdisk, network
etc.
177
You have to enter the username and password, confirm by OK button, then the image will be mounted.
New disk will appear in Windows. If something is wrong, Disk Protection will display an error message
and you can check the parameters.
The number of available disk letters is limited to 26 (A-Z). If there is no available letter
in the system for mounting an image, mounting operation will fail.
The image that is going to be mounted mustn't be compressed or encrypted by the NTFS
file system. If Disk Protection detects that the mounting image is compressed then
decompresses it automatically.
If the image file is encrypted by the EFS then Disk Protection displays a warning
message and mounting procedure is cancelled. In this case you have to decrypt it
manually. «
16.8.1
Quick Mount Options
██ In this dialog window, you can select a mounting letter from the list. Another option is Read-only
access. If you select it, the mounted image will be accessible for reading only. If you select Mount it at
start up option then selected image will be added to the auto-mounts list. If you remove selection, this
image will be removed from the auto-mount list. «
178
16.9
Disk Protection FAQ
██ I want to add a new user account, delete user, rename user, set user password
or change account type function and I cannot choose it in Disk Protection. I don't
understand it, what's happened?
There are more reasons for this situation. Firstly you need administrator privileges to be able
to do these actions. If you are a common user or read-only user then you are not allowed to
do this. The second reason might have been the state of opened image file. If this image is
currently mounted, what is signalized by red light in the status bar, then all administration
functions are disabled.
I have an administration account but I cannot add a new user. TrustPort Disk
Protection displays warning, that there is not enough free space to do this
operation but I have enough free space. I don't understand what happened.
Check number of your users. The maximum number of user accounts in each image is limited
to 20.
I can't format an image file using Windows tools, because Windows isn't able to
complete formatting operation. When I close the format application, Disk Protection
cannot access the mounted drive. What can I do?
This version of Disk Protection doesn't support image formatting using Windows tools.
Windows had locked this drive for exclusive access during formatting operation and because
it didn't finish successfully, this lock hasn't been removed. The solution is to Unmount this
image and mount it again. If you need to format an image, run Disk Protection CheckImage
application from the installation folder (…\TrustPort\DiskProtection\bin\tdcheck.exe), switch
to advanced mode, open the image and use the Format image option in File menu.
I create a new image, unselect Mount at start up option but in spite of this Disk
Protection mounts the new image. I am confused.
The new image is always mounted. If you want different behaviour, you have to change
Create Wizard starting parameters manually. To do this, you need some knowledge of XML
files. Locate tpdptray.htm file in the installation folder's Shortcuts\DiskProtection subfolder
and find the TPT_ITEM element with id="3099". There you can modify the creating
parameters. The Mount at startup means that the image will be automatically mounted when
you logon to Windows next time.
I use Windows XP and I cannot mount an image, even if I have a lot of available
letters. Why?
179
You may have used switching users in Windows XP and there are more users logged in at the
same time and have their own mounted images.
Although I have typed right username and password the Disk Protection informs
me that the image is already mounted. I am confused. I use Windows XP.
There is another user logged-in and this user has already mounted the image file that you try
to mount.
I have mounted an image using Mount Wizard and even if I see that the image is
mounted as read-write, I'm not able to write to this image. Why?
This is a user rights problem. Your user account has only read-only permission and therefore
you can only read data from the mounted disk. To be able to write data to the mounted disk
you need a standard user or administrator privileges.
I can't write any data to a mounted image though I have created this image and
therefore I have administrator's privilege. What's happened?
This can be caused by three different reasons. Are you sure that you have write access to the
place where the image is located? Are you sure that your account has administrator
privileges right now? Another administrator could change your account to read-only for
instance. Check the license, it may have expired. If the license expires, then Disk Protection
allows only read-only mounting.
I forget my administration password. What can I do?
If there is another account with administrator privileges in the image then you can ask this
user to set your password. But if you are the only administrator, then it is a serious problem.
You have to remember your password, because neither manufacturer can help you to get any
data from the image.
I have changed the last administrator account to read-only user account. But I need
to do some administration operation. What can I do?
If you delete or change the last administrator account, then the image becomes uneditable.
It means that nobody is able to create a new user account, delete account, change account
type, change limit, etc. There is only one chance to create a new account: you must create a
new image and copy all the data files to it.
I can't increase limit size of an image. Why?
Check if this image file is not mounted. If it is, unmount it and try this operation again. If this
image is unmounted, then look at the information and check if there is available free space in
size limits (maximum limit and actual limit mustn't be the same). If none of these procedures
helped you, then there is no other possibility to increase this image size. You have to create a
new image and copy your data to it.
I want to create a new image but Disk Protection Create Wizard doesn't allow
creating an image greater than 4095 MB even if I have enough free space on the
destination disk. What's wrong?
You have probably reached the limitation of FAT file system. The destination disk where the
new image should be created uses FAT or FAT32 file system. One of the limitations of FAT
system is that there isn't possible to create a file larger than 4 GB (4095 MB). If you need
larger image file, you have to create a new image on disk with NTFS file system. «
180
17 CheckImage
17.1
Product overview
██ CheckImage is a powerful tool for checking your encrypted images and repairing of opportune errors
that can occur for instance because of wrong computer shutdown. When you encounter a problem in
your image, you are strongly recommended to check it using CheckImage. But you should check your
images after each incorrect shutdown.
You can't check an image that is at the same time mounted to your computer or edited
by utilities like Image Editor. You have to unmount it, or close it, first and then you can
check that image and finally remount it.
CheckImage has two different difficulty levels to make it easy to use and powerful together.
CheckImage finds the errors and chooses appropriate solution automatically using
sophisticated logic.
You can change the method used by repairing for each wrong item.
You can choose the FAT table on which will be the repairing based.
You can also format an image using CheckImage.
CheckImage logs all repairs into a file. «
17.2
Description of error types and repairing
██ This page contains information about error types as CheckImage detects them.
These error names use CheckImage in the Error column:
Crosslinked
Description:
Each file (and directory) consists of several clusters (the whole image is divided into
clusters, their size is fixed by formatting), that aren't in the image always one after
another. Each cluster of such a file has its unique index and in the FAT there is for this
cluster a reference to the next cluster, where that file continues (for the last cluster
there is a mark that the file ends here). Clusters of a file create this way a chain.
But when the FAT goes wrong and a reference from one link of a chain points to a
completely different file, the previous continuing of this chain gets lost and the chain
(= the file) joins a foreign chain. So now two different files have joint ends. This
situation can also simply happen to more than two files at once (they create a
crosslinked group). It's almost impossible to make out to which file belonged the joint
end before.
One clue to this problem is the file length information in the parent directory entry that
logically hasn't been affected by an error in FAT. When a file "stoles" its end from
another file, it's possible that this new end hasn't the same chain length as the former
end had. In this case the file length doesn't consist with the real length of the file
chain. On the other hand if the file length and the length of the chain have the same
value, it is most likely that this file has its own end that other chains joined.
Solution:
If the crosslinked item is a directory, there is no way to repair it and it has to be
deleted.
A crosslinked file is by default set to be deleted. Only if there is just one file in a
crosslinked group that has correct chain size, in this case this file is set to be corrected.
You can't select do nothing option for a crosslinked file.
181
You can repair more files from one crosslinked group. The repairing then proceeds
according to specified priority. The file with the highest priority occupies its whole chain
including the joint part, the others take in sequence as much of their chains as possible
(until they run into a part of the chain that has occupied some file before). This applies
to methods Repair it and Repair it (extend). For method Repair it (shorten) a file
occupies its chain until it reaches its size specified in parent directory.
Too long
Description:
The chain of this file (see first paragraph in the description of "Crosslinked") is too long.
Its size is bigger than the size of this file recorded in the file's parent directory. The
length of the chain is in the parentheses next to this error.
Solution:
There are two possibilities how to repair this error:
Repair it (shorten): this method shortens the file chain so it fits the size specified in the
parent directory.
Repair it (extend): on the other side if you choose this method, the file size in the
parent directory will be increased to the chain size.
Too short
Description:
The chain of this file (see first paragraph in the description of "Crosslinked") is too
short. Its size is smaller than the size of this file recorded in the file's parent directory.
The length of the chain is in the parentheses next to this error.
Solution:
The only way to repair it is to correct the size entry in the parent directory in
agreement with the chain size, so the file gets smaller. You can't enlarge the chain,
because you don't know where it should continue. For the last cluster in the chain there
is no reference to the next cluster.
Too-long-path
Description:
The complete path to this file (or directory) is longer than 255 letters, which is illegal in
Windows. There are two ways how this can happen:
1. This is an error in some parent directory, which implicates that that directory
contains many nested files and directories with unreadable names and enormous sizes.
These files (including the one with "Too-long-name" error) haven't most likely ever
existed, this is just an error in that directory.
2. This file (or directory) is really valid, but the path to this file has been extended over
the limit after that this file was created. Maybe some parent directory has been
renamed or moved into a directory with longer path.
Solution:
1. case: There's no reason to repair this item. You should either delete the whole
wrong directory, or all it's invalid content if it contains some additional valid files.
2. case: If you want to save this file you must change the method to Do nothing
(otherwise it would be deleted by repairing). After the repair you must shorten the path
to this file manually (but you can't rename this file directly). If this is a directory, all
its opportune content will be deleted although you set its action as "Do
nothing", when you repair it. You must shorten the path to this directory before
you repair this image.
182
Self LFName
Description:
In the FAT filesystem (used in TDisk images) has each file since the MS-DOS its name
in the format 8.3 (8 letters for the filename and 3 letters for the file extension). The
Windows operating system added to the filesystem longer names. But these longer
names are stored separately because of holding compatibility with the old system. So it
is possible that a long name is corrupted while the corresponding short name is all
right. That's the case of this error. What CheckImage managed to read from the
corrupted filename is that filename which you can see in the errors list.
Solution:
You can of course delete the whole file. You can also do nothing with this error but it's
possible that you won't be able to read or modify this file later in normal usage. If you
choose to repair this error, the long filename will be deleted so just the short name will
remain. You can, after you mounted the image, rename the file back to its whole long
name manually.
Invalid FAT index
Description:
One cluster from this file's chain has an invalid reference to the next cluster where this
file should continue. That reference pointed to a nonexistent cluster. For further
explanation of file chain see the first paragraph in the description of "Crosslinked". This
error is most likely combined with the "Too short" error.
Solution:
It is impossible to correct the invalid reference in terms of finding the cluster where the
file originally continued. You can just trim the file on position of the invalid reference.
Additional repairing progress depends on other errors that this file contains (e.g. the
length of a file with a "Too short" chain will be shortened to fit the chain length).
A directory with this error has to be deleted.
Loop error
Description:
This error is very similar to the "Invalid FAT index" error. But in this case a bad
reference points from one cluster to another cluster that is already somewhere earlier
in the chain of this file. So the file has in its chain an endless loop.
Solution:
The file has to be trimmed on the position of the bad reference. The repair methods
also depend on other errors in this file.
A directory with this error has to be deleted.
Duplicate name
Description:
Path to each file must be unique. This implies that a directory can't contain more files
with the same name.
Solution:
You can save only one file from such a group of files with the same name. You must
delete all other files from this group. If you don't do this, you won't be able to accede
to these files except for one (except for the file that is in the parent directory as the
first from this group).
183
LFName
Description:
Long filenames (see the description of "Self LFName") are stored in the parent
directory of corresponding files. This error indicates that there are some long filenames
in this directory that don't belong to any files.
Solution:
If you choose to repair this error, these redundant long filenames are simply deleted.
Dots error
Description:
Each directory (except for the root directory) contains two special items. One item
(with the name "..") that points to the parent directory and the other (".") that points
to itself. This error means that these items are somehow corrupted.
Solution:
To repair this error is rather simple (if the item doesn't contain any more serious
error). These two directory items are plainly repaired.
Invalid size
Description:
This directory has too much allocated space. Either there are many redundant deleted
items at the end of this directory (that's no weighty error) or is this directory also
"Crosslinked".
Solution:
If the directory is "Crosslinked", it must be deleted. Else it's easy to repair it by
deleting the unnecessary end of the directory. «
17.3
Simple mode
██ Simple mode is designed for intuitive and easy to use interface. You won't get lost in plenty of
features and functions. All the complexity is hidden inside. When you start the program, there are just
two possible actions: you can check an image or eventually switch to the advanced mode.
184
When you choose to check your image, CheckImage performs all necessary control procedures and
shows you the results. After this you just have to press one button to repair all errors. If you don't want
to do it immediately, you can close the opened image without any repairs, of course. «
17.3.1
Check an image in simple mode
██ When you click on the button Check image on the toolbar or select appropriate command in the File
menu, the standard open file dialog appears.
After you select an image to repair, the program requests your authentication.
If your authentication is valid, the disk is checked. An information dialog appears that brings the results
together.
185
If the image contains no errors, it is closed finally, and you can continue to check other images. «
17.3.2
Errors and their repairing in simple mode
██ In general there are three types of errors that can occur:
Inconsistency in file allocation tables (FAT): FAT table contains information about
every file and directory stored in the image including the size and the exact position,
where it is stored. In each image there are two FAT tables copies that have to be
consistent. If just one FAT table is corrupted, you can save your data using the other
table. If the FAT tables aren't consistent, CheckImage chooses for you the table with less
errors. When you choose to repair the image, the FAT table inconsistency is repaired also.
Lost clusters: Some sectors (the whole image is divided into sectors, each sector contains
512 bytes of data) in FAT table are marked as if they were filled with data, but they don't
belong to any file in the image. These sectors are marked as free space by repairing of the
image.
Damaged object(s): A damaged object means either a file or a directory that contains
errors. The repair method which will be used depends on the error(s) found in each
damaged object. Some of them even can't be repaired and have to be deleted.
Information about errors in the image you have checked is in the line at the bottom of the application
window.
186
Damaged objects are listed in the table in the middle of the window. For each object there is information
about its name (with the full path), size (just for files), errors and the method which will be used by
repairing. More information about errors and relevant repair methods is on page Description of error
types in images.
Now the last remaining action is to repair the image. The repaired image is closed in the end. «
17.4
Using CheckImage in advanced mode
██ When you switch to the advanced mode, you can, also as in the simple mode, check an image.
Additional features in the advanced mode (compared to the simple mode):
CheckImage lets you choose on which FAT table you want to base the image check and
repair.
You can also change what you want to do with wrong files and directories (if there are more
possibilities to choose from).
There are three different views you can use to change the actions to take during the
reparation.
You can directly format an image if it is too corrupted.
187
Advanced mode is for experienced users only! If you didn't understand something from
this part of the manual, it would be better to read the part of the manual about the
simple mode first. «
17.4.1
Check an image in advanced mode
██ Checking of an image consists of a few steps:
1. Choose the image file from a standard file open dialog.
2. Type in your authentication data necessary to open the image.
Information dialog appears that presents you the results of the performed check:
There is more information about errors found in the checked image on a line at the bottom of the
window. Basically there are three kinds of errors:
Inconsistency in file allocation tables (FAT): FAT table copies are not exactly
consistent. CheckImage chooses for you the table by which less errors were found, but
you can later select the determining FAT table yourself. When you choose to repair the
image, the selected FAT table will be copied over the other.
Lost clusters: Some sectors are marked as if they were filled with data, but they don't
belong to any file in the image. These sectors are marked as free space by repairing of the
image.
Damaged object(s): A damaged object means either a file or a directory that contains
errors. The repair method which will be used depends on the error(s) found in each
damaged object. Some of them even can't be repaired and have to deleted. «
17.4.2
Choose the FAT table
██ If there is an inconsistency in FAT tables, in advanced mode you can choose which of them you want
to use by repairing. The actual selected FAT table toolbar button is pushed down. If the FAT tables are
consistent, the buttons for selecting them are disabled. When you switch actual FAT table, CheckImage
shows you the results from check based on the newly selected table that can be completely different
from the previous results.
188
Any changes that you made in the previous results won't get lost, you can continue to
edit it after that you eventually switched back again. «
17.4.3
Different view modes
██ CheckImage offers you three different view modes
All errors
In this basic view you can see all wrong items in one list. Each line contains the path of
the wrong item, its size, errors (separated by comma) and method which will be used
by repairing. You can sort the list by several columns by clicking on their header
buttons.
189
Crosslinked groups
Some files or directories in the image can be crosslinked together, see Description of
error types in images. On the left side of this view you can select which group of such
together crosslinked items you want to see, on the right side there is a list of items you
selected. There is one more column with information about priority by repairing and the
items are sorted by this priority. This priority is related just to items that are going to be
repaired. You can change the priority. Irreparable items are right at the bottom of the
list.
All files
This view is intended for browsing through the entire disk. It shows you not only the
erroneous items but also the others. For simpler browsing there is a tree view on the left
side showing the directory structure. Each directory has an icon indicating whether it
contains any errors inside (eventually that the directory is wrong itself). «
190
17.4.4
Change the repair settings
██ In advanced mode it is possible to change the action that will be carried out by repairing. When you
right-click on an item in the list, a context menu appears where you can select the action to make. In
the All files view you can set also an errorless file or directory to be deleted.
When you change selected action for a damaged item, no data is deleted or repaired or any other action
made at that moment, but after clicking on Repair image from toolbar or Repair errors from File
menu.
When you set a directory to be deleted, new check in the background is performed excluding the
content of that directory. Any of your changes won't get lost. Similarly when a directory is set
to be deleted and you choose another action, the image is checked again including the content of
that directory.
You can also select more list items at once.
If you are in the Crosslinked groups view and if you right-click on an item which is selected to be
repaired, you get two more menu items for changing the repairing priority: Move up to higher priority
and Move down to lower priority. «
191
17.4.5
Repair errors
██ When you are ready with editing of repairing actions, you can finally do the actual repair by clicking
the toolbar button, or File -> Repair errors menu item. If you don't want to do it right now, you can, of
course, close the image without repairing it.
After repairing, the image remains opened.
All changes made in this image are logged into the file CheckImage.log located in the log
directory. «
17.4.6
Format an image
██ This action is accessible only in advanced mode. If you find out that an image is too corrupted, you
can format it directly using CheckImage.
NOTE! By formatting an image file, all data on this disk will be lost!
In CheckImage you can't change any properties (size, encryption algorithm etc.) of
image when you format it. If you want to change it, use Image Editor. «
17.5
CheckImage FAQ
██ When should I use CheckImage?
Similarly as Windows check your harddisk whenever you shutdown your system
not properly, you should check your disk in this case. Disk Protection images are
unmounted by logging out from Windows, so you don't have to check your disk
if your system freezes after you log out. On the other hand data in the image
can be also corrupted some other way than just by unsafe unmount (force
unmount - see Disk Protection options). So if you have on your image valuable
data, you should check your image from time to time during normal usage (at
least once a month).
192
How can I prevent from errors in my images?
There are basically two ways how your image can be corrupted that you can in
some cases prevent. The first way is as mentioned before when you shutdown
the system without unmounting your image (which is done automatically by
logging out). Sometimes you can avoid it but not always. The other way is when
the disk or other medium on which is your image stored is somehow damaged.
Hence you shouldn't store your image with some valuable data on an old and
erroneous harddisk for instance.
What is the meaning of the texts in the "Error" column?
Each row contains a comma-separated list of errors that were found to this
wrong item. See Description of error types in images.
When I try to check an image, just a message "This file is already opened!"
appears. What's wrong?
This message means that you try to check an image that is currently in use. In
most cases is the problem that you haven't unmounted your image before you
check it using CheckImage. You can't check an image that is mounted at the
same time!
For what reason are there in the advanced mode the "FAT 1" and "FAT 2" buttons?
I've opened an image but they're always grayed out.
These buttons can be used only if there is an inconsistency in FAT tables. Than
you can switch between these two FAT tables (you choose the relevant one for
repairing). If the FAT tables are consistent there's no reason to choose one of
them, so the buttons are grayed out. More information about choosing the FAT
table can be found here.
What can I do when CheckImage reports that "This image is far too corrupted, it
can't be checked!"?
This image is so corrupted that it can't be checked and also it can't most likely
be mounted. In this case there's unfortunately no way to rescue your data
saved in this image. You can just format it or create a new image.
If I try to run CheckImage on my CD-ROM, it displays an error in access to this file.
What's happened?
This version of TP CheckImage requires Read-Write access to take control of the
image. However CD-ROM device is designed for read-only usage therefore you
can't repair images stored on CD-ROM. If you need to do this, copy your image
to writable media and try the operation again. «
18 TrustPort Antivirus FAQ
Why do I need to restart the computer after the installation?
For higher security of your computer it is better if the computer is restarted and the OnAccess Scanner is loaded into the memory right after rebooting.
193
The On-Access Scanner does not work after start. What shall I do?
Go to the Antivirus Settings and check if the On-Access Scanner is active. If not, activate
it. Another possibility is that your license of this product has expired; in that case contact
our technical support.
When executing the On-Demand Scanner, a window announcing that I have a trial
version pops up. Can I switch it off somehow?
No, this window cannot be switched off, but if you buy the full version of this software,
this window will not appear.
How often is the update needed?
It is recommended to perform the update every day, preferably using the scheduler. This
way the update will be done automatically.
When I launch the update, an alert that connection to a server failed is shown.
What shall I do?
Check whether your internet connection works (e.g. you can load the www.trustport.com
webpage in your web browser). In case it doesn't work, contact your internet service
provider. If everything works fine, maybe there's a proxy server in your network and you
haven't configured the updating correctly. Ask your network administrator what are the
settings for connecting through your proxy server and fill it in the proxy server
settings.
After installing the TrustPort Antivirus several programs are freezing all the time.
What's the problem?
It seems that you have overlooked the installation instructions and you have got one
more antivirus product together with TrustPort Antivirus installed. When you uninstall the
other product, everything should work fine.
Why is it impossible to have the TrustPort Antivirus with some other antivirus
software on a computer at the same time installed?
This is impossible because of the technical details of the solution of the On-Access
Scanner. Any two antivirus programs can't be run simultaneously, so this is no special
requirement of the TrustPort Antivirus.
I've installed TrustPort Antivirus. It seems like my computer works slower than
before. How is it possible?
One part of the antivirus solution is also the On-Access scanner. It means that this
program runs in the background and checks for viruses all the data you are working with.
Such a protection slightly slows down the computer, of course. For the highest
performance while keeping reasonable level of security, set the On-Access Scanner this
way:
On the Options tab set scanning of Selected files with following extensions and switch off
Use heuristic methods.
What is the On-Demand Scanner good for, when the computer is guarded by the
On-Access Scanner constantly?
In the On-Demand Scanner we use several advanced techniques to reveal viruses that
can't be used in the On-Access Scanner because they are too time-consuming. Therefore
the On-Demand Scanner is more effective. We recommend to use it e.g. for checking files
downloaded from the Internet from a not very reliable source.
194
What are logs good for?
Logs are records about all program activities. They are used mostly by system
administrators. A regular user doesn't have to care about them.
I received a license key for the TrustPort Antivirus, what shall I do with it?
Click the right button on the quick launch icon in the right bottom corner of the screen
and choose the Configure item in the antivirus menu. When a window opens, choose
Register license from the General Settings dropdown menu. Find the file with the license
key in a dialog and press Open. In the following dialog information about the license key
is displayed. Finish the product registration by pressing the Import button. The changes
aren't applied until you close all windows of the TrustPort Antivirus!
The TrustPort Antivirus found a virus and moved the infected file to the quarantine,
but I cannot find it there. What should I do with it?
You had probably opened the user interface before. Click on the Refresh button and the
quarantine content will be loaded from the disk. The quarantine content isn't
automatically refreshing because of the situation when the quarantine contains many
files.
19 Technical support
Thank you for using the TrustPort Antivirus. If you wish to meet other products of our company, you can
find all the necessary information on our web pages. If you have any comments or questions about the
TrustPort Antivirus, please first read Frequently asked questions (FAQ) and visit our website. If you
do not find answers there, use any of the contacts below.
Error announcement:
If you come across an error in the TrustPort Antivirus, you can announce it to some of the contacts
below. Please, prepare the following information in advance:
the exact description of error,
the program version including the compile number (you will find this information in the About
dialog window),
which operating system you use, including its version.
Contact:
Address:
TrustPort, a.s.
Holandská 2
639 00 Brno
Czech Republic
Web:
www.trustport.com
E-mail:
[email protected]
[email protected]
195