1
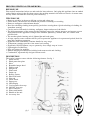
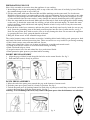
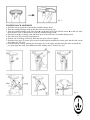
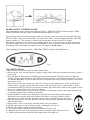
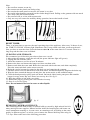
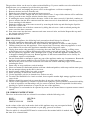
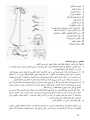
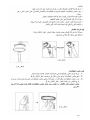
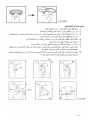
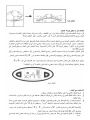
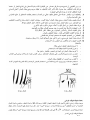
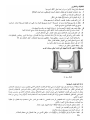
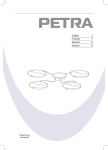
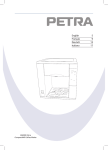
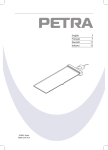
Instructions for use
TYPE 332832
VERTICAL STEAMER PRO
2
UK
ARAB
Instructions for use . . . . . . . . . . . . . . . . . . . . . . . . . . . . . . . . . . . 4
.......................................................
JAN 09 V0
10
PRINCESS VERTICAL STEAMER PRO
ART. 332832
BEFORE USE
First read all instructions before use and retain for later reference. Only plug this appliance into an earthed
socket. Before using for the first time remove the packing materials and wash accessories in warm water,
and dry. Make sure that the electrical parts remain dry.
TIPS FOR USE
•
•
•
•
•
•
•
•
•
•
•
•
•
•
•
Removes wrinkles in the most efficient, easiest and safest way
Faster than a conventional iron without the problem of burning or scorching
Removes wallpaper with minimum hassles
Ideal for refreshing clothing items quickly just before wearing them. Quick refreshing of clothing for
immediate wearing
Can be used as indicated for clothing, wallpaper, drapes and most of the fabrics
The high temperature of the steam provides multiple usages for sanitary purposes and ensures a great
improvement in the appearance and provides furniture upholstery, curtains, hats, etc with the best
possible look.
The modern plastic housing unit is lightweight and looks great
A large capacity water container allows you to operate the appliance for a protracted period; ideal for
long and continuous operation.
Ergonomic and comfortable container handle for easy usage
Transparent container provides clear water level reading
Ergonomic ON/OFF button, easy to operate by foot, simply step on it once
Lightweight, flexible Hose
Easy-roll casters for mobility
Modern hanging mechanism for holding both steam nozzle and clothing
Comfortable, ergonomically designed steam nozzle.
DESCRIPTION
The vertical steamer comes with the following features. See fig 1
1. Steam nozzle
2. Hand protection plate
3. Hose
4. Rotatable hanger head
5. Folding rack
6. Hanger rod
7. Water tank
8. Drain cap
9. Rolling casters
10. Hard sofa brush
11. Lint pad
12. Fabric brush
13. Pants press
14. LED display
15. Cord rewinder foot-step
16. ON/OFF foot-step
17. Hose connector
18. Water tank handle
19. Handle of the unit
20. Accessory box
fig.1
4
PREPARATION FOR USE
Note: Only assemble accessories when the appliance is not working.
1. Insert hanger rods in the corresponding hole on top of the unit, and screw it in firmly by hand. Then fix
the rotatable hanger head on top of the rod.
2. Fill the water tank with water between Min and Max markings on the water tank. Use fresh water.
Distilled or filtered water is recommended to avoid scale and sediments. Never use hot water or any other
liquids as it may damage the water tank and/or the appliance. Note: Do not put any detergent, or soap,
or other additions into the water tank as it may damage the internal aluminium parts of the appliance.
3. Place the water tank back on the unit. Make sure the water tank is fixed in the right position before turning
on the unit. To detach the water tank for refilling, switch off the unit and unplug. To detach the water
tank for refilling, switch off the unit and unplug. Handle of tank is only used to carry the water tank,
not the whole unit.
4. Insert the hose in the hose connector, and turn the plastic nut firmly onto hose by hand (do not use any
tool). Insert the protruding parts of the hand protection plate into the slots of steam nozzle, see fig 2.
Note: Do not pull the hose with excessive force as it may damage the hose. Do not move the appliance
by grasping the hose. Only grasp the handle of the unit.
5. Hang the steam nozzle on the rotatable hanger head.
The vertical steamer comes with 6 other accessories, including fabric brush, folding rack, pants press, hard
sofa brush, lint brush and hand protection plate. These accessories are very useful for you during steaming.
• Fabric brush sweeps away unwanted threads, lint etc.
• Pants press clamps the crease out of pants and shirts for a straight and smooth result.
• Folding rack fixes the clothes to avoid movement during steaming.
• Hard sofa brush helps to clean.
• Lint pad removes hair, lint and animal fur for a professional finish.
• Hand protection plate protects your hand while steaming.
FABRIC BRUSH ASSEMBLY
1. Align the pegs of fabric brush alongside the holes on the steam Nozzle. See fig 3.
2. Push until the brush is firmly in position.
fig. 2
fig. 3
PANTS PRESS ASSEMBLY
1. Move the end of the pants press towards the peg at the bottom of steam nozzle.
2. Push the pants press gently until it is firmly in position. See fig 4.
3. Unlock the pants press by pushing buttons on both sides of pants press until they are released, and then
remove the pants press from the steam nozzle. See fig 5.
Warning: To avoid damage the locks, only remove the pants press when both buttons are unlocked.
fig. 4
5
fig. 5
FOLDING RACK ASSEMBLY
1. Push the lock A upwards to unlock the rotatable hanger head.
2. Turn the rotatable hanger head so that the hole faces towards you.
3. Turn the rotatable hanger head. The arrow on the head will align with the arrow on the rod. And
then push the lock A downwards to lock the rotatable hanger head.
4. Slant the hook(B) of folding rack and then insert it into the hole of rotatable hanger head.
5. Press the hook (B) vertically and tighten it.
6. Pull the arm of folding rack flatly until the two poles (E) are aligned.
7. Push the fixed pipe (F) on the pole to the left and align the marked dot on the pole and the hole on the
fixed pipe (F). See fig 6
8. Fold the folding rack by pushing the fixed pipe (F) to the right, and then hold the arms and push the
two poles upwards with your thumbs until the folding rack is folded. See fig 7.
fig. 6
6
fig. 7
LEARN ABOUT CONTROL PANEL
The control panel comes with a power indicator light, a ‘TIME TO CLEAN’ indicator light, a LED,
standby/L/H/Turbo indicator lights, left button and right button. See fig 8
Insert the plug into wall socket and turn on the unit by using your foot to press the ON/OFF foot-step.
The unit makes a beep sound. Meanwhile, the power and ‘Turbo’ indicator lights illuminate. The LED
displays number ‘4’. The steamer is running and will produce steam in around 35 seconds.
The vertical steamer has four steam levels: standby(steam level 1), L(steam level 2), H(steam level 3)
and Turbo(steam level 4). You can use buttons or to set the steam level. The number on the LED
will change with a short beep accordingly when you push the or button.
After operating for 30 hours in total, ‘TIME TO CLEAN’ indicator light illuminates.
fig. 8
USE WITH STEAM:
1. Place the vertical steamer on a flat, stable surface/floor.
2. Pull the power cord out and plug into a proper voltage outlet. Push cord rewinder foot-step to rewind
power cord.
3. Use your hand or foot to push ON/OFF switch to activate the unit. The power indicator light and
‘Turbo’ indicator light illuminate. The LED will display number ’4’ (the default steam level is level 4).
Use buttons or to set your desired steam level. It takes around 30 seconds before the steam emits
from steam nozzle.
Note: Do not switch the steamer on if there is no water in water tank because it may overheat. It is
normal to hear a gurgling sound from the steamer while the heater starts to create steam, or when
condensation builds up. If this occurs during operation, just position the steam nozzle upright to allow
the excess condensation to drain back into steamer.
4. To steam a garment, place it on a clean and rust-free clothes hanger and use the clothes hanger hook,
or hang the garment on the folding rack directly.
5. Grasp the handle of steam nozzle, and place the steam nozzle at the bottom of the garment.
Steam will rise along the inside and outside of the fabric, removing wrinkles. Slowly
slide the steam nozzle vertically, from the bottom to the top of the garment. See fig 9.
6. Move the steam nozzle from the bottom to the top of the garment, and smooth the fabric
with the other hand.
7. Repeat steps 2 and 3 as necessary until the fabric is free of wrinkles.
8. Curtains and draperies can be steamed while still hanging. See fig 10.
9. Heavier fabrics may require repeated steaming.
10. To remove stubborn wrinkles, the fabric brush may also be used.
11. Hang the steam nozzle in an upright position on rotatable hanger when not in use.
12. Switch off the appliance and remove the plug from socket after use.
7
Note:
• Do not allow steamer to run dry.
• Do not unscrew the plastic nut during using.
• Do not aim the steam nozzle at anyone, the steam is very hot.
• Be careful when handling garments on the clothes hanger hook. Pulling on the garment with too much
force may cause the unit to overturn.
• Do not touch silk or velvet with steam nozzle
• Only use easy-roll casters for mobility during operation, but not the handle of unit.
fig. 9
fig. 10
RESET TIMER
There is an inner timer to preserve the total operating time of the appliance. After every 30 hours of use,
the ‘TIME TO CLEAN’ indicator light illuminates with 5 beep sounds each time you turn on the unit.
Now you have to reset the timer. Press the buttons and at the same time for 3 seconds. There is a
long beep and the timer reset is finished.
CLEANING AND STORAGE:
We recommend you follow this procedure at least once a week.
1. After using the steamer, switch the unit off (the power indicator light will go out)
2. Unplug the unit from the outlet.
3. Allow the steamer to cool for at least 30 minutes.
4. Remove the hose and shorten the hanger rod, then set them aside.
5. Remove and drain the water tank. Rinse the water tank with fresh water, and drain completely.
Place the water tank back on the water reservoir.
6. Drain the vertical steamer by removing the drain cap and emptying the contents.
7. Flush the water reservoir and the hose with fresh water, and drain completely. Replace the drain cap.
8. Wrap the hose around the hanger rod and place the steam nozzle on the rotatable hanger.
9. Clean the hand protection plate, hard sofa brush, lint brush, fabric brush, pant press and rotatable
hanger in soapy water. Dry well. Store in accessory box. See fig 11.
10. Wipe the outside of unit with a wet cloth.
11. Rewind the plug by pressing the cord rewinder foot-step.
12. Store in a cool, dry place.
Note: Do not immerse the base in water or other liquids.
fig. 11
REMOVING MINERAL BUILD-UP:
One common problem with steamer is mineral build-up caused by high mineral levels in
many municipal water supplies. Mineral residue inside the internal pipes and heater can
cause intermittent steaming or, in some cases, no steaming at all. According to the water
quality in different regions, we advise you to remove the mineral build-up after using for
7-15 days. Please take note of the following procedure.
8
The procedure below can be used to reduce mineral build-up. If you are unable to use de-mineralized or
distilled water, we recommend you follow this procedure.
1. Turn the unit off, and unplug the power cord. Let the appliance cool down completely.
2. Remove the hose and rods from the unit.
3. Drain the water from the water tank and water reservoir.
4. Mix a solution of 50% vinegar and 50% water. In most cases, 2 cups of this solution will be sufficient.
5. Slowly pour the water-vinegar solution into the hose connector.
6. If standing the water-vinegar solution becomes visible in the water reservoir’s inlet hole, continue to
pour to solution into the hose connector until the water reservoir is about half-full, near the top of hose.
7. Leave standing for 40 minutes.
8. Drain the solution out of the water reservoir by removing the drain cap and allowing the liquid to
drain into a sink or tub.
9. Drain the solution out of the hose connector by tilting the unit over a sink or tub and pouring the
water out of the hose connector.
10. Pour clean water into the hose connector and water reservoir inlet, and drain. Repeat this step until
the vinegar odour dissipates.
11. Reassemble the unit.
PRINCESS TIPS
When using this appliance, the following basic precautions should always be followed:
1. Read the instructions thoroughly and understand all instructions before use.
2. To reduce the risk of electrical shock, do not immerse the appliance in water or other liquids.
3. Children should not use this appliance. Close supervision is necessary when any appliance is used
near children. Do not leave the appliance unattended while plugged to outlet.
4. Unplug from outlet when attaching or removing the water tank, before cleaning, refilling water,
or/and when not in use. When disconnecting from outlet, grasp and pull plug. Never tug the cord.
5. Do not operate any appliance with a damaged cord or plug, or after the appliance malfunctions, or
is dropped or damaged in any way. Return appliance to the nearest authorized service facility for
examination, repairs or adjustments.
6. Do not disassemble or attempt to repair any part of the appliance under any circumstances. Return the
appliance to the nearest authorized service facility for examination, repairs or adjustments.
7. Do not let the power cord or the extension cord come into contact with sharp edges or hot surfaces,
including the stove.
8. Steam only in an up and down vertical motion.
9. Never use steamer in a horizontal position or tilt into a backward position, as this may result in water spray.
10. Do not attempt to hang up the unit by the hose.
11. Avoid contact with hot parts, hot water or steam.
12. While operating, do not let the water tank dry.
13. Use the appliance only for its intended use. Indoor use only.
14. To reduce the likelihood of a circuit overload, do not operate another high wattage appliance on the
same circuit.
15. Children should be supervised to ensure that they do not play with the appliance.
16. The use of this appliance by children or persons with a physical, sensory, mental or motorial disability,
or lack of experience and knowledge can give cause to hazards. Persons responsible for their safety
should give explicit instructions or supervise the use of the appliance.
17. The appliance is not intended to be operated by means of an external timer or separate remote-control
system.
U.K. WIRING INSTRUCTIONS
The wires in the mains lead are coloured in accordance with the following code:
BLUE
BROWN
GREEN/YELLOW
NEUTRAL
LIVE
EARTH
As the colours of the wire in the mains lead of this appliance may not correspond with the
colour markings identifying the terminals on your plug, proceed as follows:
The wire which is coloured BLUE must be connected to the terminal which is marked with
the letter N or coloured black.
9
The wire which is coloured BROWN must be connected to the terminal which is marked with the letter L
or coloured red.
The wire which is coloured GREEN/YELLOW must be connected to the terminal which is marked with
the letter E or
and is coloured GREEN or GREEN/YELLOW.
If a 13Amp (BS1363) plug is used, a 13Amp (BS1362) fuse must be fitted, or if any other type of plug is
used, a 13Amp fuse must be fitted, either in the plug or adaptor, or on the Distribution Board.
WARNING: THIS APPLIANCE MUST BE EARTHED
PRINCESS VERTICAL STEAMER PRO
ART. 332832
10
11
12
13
14
15
16
17
18
19
© PRINCESS 2009