1
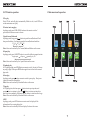
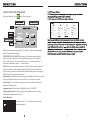
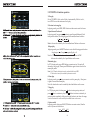
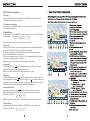
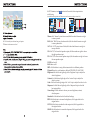
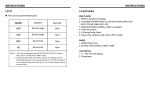
Warmly Suggestion
04
FEATURES
05
1.Front Panel Function Instruction
06
07
3.Remote Control Function
09
4.Main menu touch operation
11
5 . SETUP FUNCTION OPERATION
12
15
7.
8.DVD function operation
17
9.VCD/MPEG-4 function operation
23
10.CD function operation
26
11.MP3/USB/SD card
28
operation
20
12.Other Play Mode
29
13. Trouble Shooting
30
14.Wiring Diagram
31
15.Specifications
32
16.Accessory
33
17.Setup Need Password
33
WELCOME
Thank you for enjoying our serirs of digital car A/V product.
To properly use this product, please go through this instruction manual for installation
and operation, put it in a safe place for future use!
WARNING
1. Please keep the disc slot clean, wipe it off when there is some dirt on it. You should
wipe off any dirt on the disc before you place it into the unit. If the disc is dirty and you
place it inside the unit, it will cause the unit to go into an error and will not play the
disc. Please ask professional to clean the laser.
16.ACCESSORY
Accessory
Quantity
User Manual
1PC
Wire
1PC
USB Cable
1PC
Remote controller
1PC
Warranty card
2PCS
2. Playing the radio at higher volumes for a long period of time may cause hearing
issues. You should play this unit at a moderate listen level.
17.SETUP NEED PASSWORD
3. This unit is set up by precision parts. If you open up this unit, you will void any and
all of your warranty.
4. Please do not touch LCD display with any hard object so that you prevent it from
getting scratched or damaged.
5. To avoid an accident caused by watching the LCD screen. This unit has a vehicle
lock out wire so that you will not be allowed to watch a video while driving down the
road.
6. This unit is meant for a 12V power and negative ground system from a vehicle.
Setup need password
During actual operation, when you enter TV setup,
system setup, radio area and touch calibration, you
need to enter the password "888888".
DVD Parental control function:The default set
for DVD is #8 adult, which means all grades of
DVD can be read without entering password.To
change the default grade,you need to follow the
below procedure: Press SETUP button on the
remote, display will show the system set up menu
and the submenu,select password and enter
0000, you will be able to choose the DVD
grade as default.
NOTE:
We keep improving this product all the time. There may be some changes in it that are
not in this manual.
33
FEATURES
15.SPECIFICATIONS:
DVD PLAYER
Power supply
DC 12V
Power range
10.8-16.0V DC
Max operate current
10A
Dimensions
155X182X53MM
Negative ground
Ground system
Amp Rating
85 Watts x 4 Channels
1.MPEG-4 Decoder Technology
2.Compatible with MP4(AVI/5.X),DVD(DVD-R/DVD-RW),VCD,SVCD,CD-RW,
WMA,MP3,JPEG
3.Supporting Multiles Subtitles,Angles,Languages
4.Child lock function
5.4-Channel Audio Output
6.Pause, play, UP/Down, Stop, Zoom, PBC Function
FM tuner
RADIO
USA frequency range
1.AM/FM Radio Tuner
2.30 Radio Preset Stations (18FM, 12AM)
87.5-107.9MHz
Signal/Noise ratio
55dB
Stereo separation
30dB
Search station volt
20-30dBuv
1.5%
Distortion rate
AM tuner
European frequency range
522-1620KHz
USA frequency range
Limit noise sensitivity
530-1710KHz
32dB
DVD PLAYER
Signal/Noise ratio
70dB
Frequency response
20Hz-20KHz
32
1.Front panel function instruction
14.WIRING DIAGRAM
This player is equipped with ISO standard connector, please follow below instruction:
DBAS
●
Red - ACC ON (+12V)
●
Grey/Grey black - Right front speaker (+/-)
●
Yellow – 12 V Constant
●
White/White black - Left front speaker (+-)
●
Black – Ground wire
●
Purple/Purple black - Right rear speaker (+/-)
●
Blue - Power Antenna / Remote Amp Turn On
●
Green/Green black - Left rear speaker (+/-)
●
Orange – Back-Up Camera Trigger (+)
●
Pink – Parking Brake (-)
BV9555
B:
Dark grey with red-white tip: front RCA output(red right white left)
Grey with red-white tip: rear RCA output(red right white left)
Black with red-white tip: AUX audio input(red right white left)
Brown with brown tip: subwoofer output(optional)
C:
Black with yellow tip: external video input
Grey with yellow tip/dark grey with yellow tip:2 channel video output
Brown with yellow tip: CCD video input
Black with black tip: USB wire(optional)
D:
Radio antenna
Brown with yellow tip: back sight video input(optional)
SWC wire: black---steering wheel ground wire
brown—steering wheel
White— steering wheel
2. DBAS Button
Note:
The “PARKING BRAKE” wire must be connected to the parking brake system
of your car. When the parking brake is engages, the LCD will be allowed to view
your video. If not, the screen will produce an image saying, “PARKING BRAKE”.
This is a safety feature designed for the driver not to watch a video while driving.
The video output on this unit will not be affected by this.
31
13.TROUBLE SHOOTING
2. DBAS Button
Press this button to bass on/off.
30
12.Other mode
can slide the panel upward or downward
29
11.MP3/USB/SD card operation
KEY
(1).
(2).
nex t
song
(3).Speed forward/ backward
/ button to speed forward/backward.
In playing mode, long press
Each time press the button , the changing speed of forward/backward as below:
Play
Note: it also can be worked by the "forward/backward"button on the screen
(4).Repeat play
In playing mode, press AMS/RPT button to excute the following repeat function.
Single repeat
Directory Search
all repeat
repeatedly play off
Note: it also can be worked by the "repeat" button on the screen.
28
27
4.Main menu touch operation
10.CD function operation
1.Disc play
Slot in CD disc, unit will play it automatically. If disk is in slot , touch DVD icon
on the main menu can to play.
2.Previous /next song play.
In playing mode, press SEEK-/SEEK+ button on the remote control or"
previous/next"button on screen to choose.
3.Speed forward/ backward
In playing mode, long press / button to speed forward/backward. Each
time press the button , the changing speed of forward/backward as below:
X2 X4
X8
Play
X16 X20
Note: it also can be worked by the "forward/backward"button on the screen.
4.Repeat play
In playing mode, press AMS/RPT button to excute the following repeat function.
Single repeat
all repeat
repeatedly play off
Note: it also can be worked by the “repeat”button on the screen.
5.Randomly play
In CD playing mode, press RDM button on remote control , the unit will choose
any song to play. Please press RDM button again if want to back to the normal
play mode.
6.Pause play
In playing mode, press button on remote control to pause play. . Short press
it again to resume the normal play.
Note: it also can be worked by the related button on the screen.
7.Stop play
In CD playing state, first time press
button to enter pre-stop state, and
press button to continue to play. Press
button two times continously to
enter stop state completely, while press the play button to start from disc songs.
Note: it also can be worked by the related button on the screen.
8.OSD
In playing mode, press OSD button on remote control to display all the
information of the current playing disc.
Note: it also can be worked by the"sreen display" button on the screen.
26
5.SETUP FUNCTION OPERATION
In the main interface, touch
into following interface.
Note: Touch corresponding function, it will display in yellow words reminding,
and blue background reminding.
TIME DISPLAY AND ADJUST:Time display: Touch main menu into adjust
mode, press time setup button, the corresponding function will be display in
yellow words.Press “+” on hour to add hour, press “-” to reduce hour;Press “+”
on minute to add minute, press “-” to reduce minute.
NOTE: Touch the correspondence function, will be display in green background.
The unit include two times system: Europe time (24 hour setup), America time
(12 hour setup), when show the AM mark it indicate morning time, when appear
the PM mark, it show the time of afternoon.
System setup:Click this button,then input password"888888".click "ok" into system
setup, press relevant button to choose on /off. Press “ok” button to confirm.
radio setup:click "ok" into radio setup. It provides 5 areas (Europe, American 1,
American 2, Japan, Russia).
Language setup:Click into choose "Simplified Chinese"/"ENGLISH"
steering wheel setup:click into steering wheel setup.Please refer to (steering
wheel function operation instructions)
Touch calibration:
Touch the center of "+" to calibrate screen when the
position misgrated.
25
10.Zoom in/out picture size
24
9.VCD/MPEG-4 function operation
1.Disc play
Slot in VCD/MPEG-4 disc, unit will play it automatically. If disk is in slot ,
touch DVD icon on the main menu can to play.
2.Previous /next song play
In playing mode, press SEEK-/SEEK+ button on the remote control to choose.
3.Speed forward/ backward
In playing mode, long press / button to speed forward/backward. Each
time press the button , the changing speed of forward/backward as below:
alloc ate
X2
X4
X8 X16
Play
X20
Note: it also can be worked by the "forward/backward"button on the screen.
4.Repeat play
In playing mode, press AMS/RPT button to excute the following repeat function.
Single repeat
all repeat
repeatedly play off
Note: In VCD mode, this function can be worked while shut off PBC .
it also can be worked by the “repeat”button on the screen
5.Randomly play
In VCD playing mode, press RDM button on remote control , the unit will
choose any song to play. Please press RDM button again if want to back to the
normal play mode.
Note: 1.In VCD mode, this function can be worked while shut off PBC
2.This function can only be worked by the remote control.
6.Pause play
In playing mode, press button on remote control to pause play. . Short press
it again to resume the normal play.
Note :this function also can be worked by the related button on the screen
7.Stop play
In VCD playing state, first time press
button to enter pre-stop state, and
press
button to continue to play. Press
button two times continously to
enter stop state completely, while press the play button to start from disc songs.
3
3
Note :this function also can be worked by the related button on the screen
8.System switch
In playing mode, short press BAND/P/N button on remote control, then the
order of system switch as below:
Auto
NTSC
PAL
23
4. You can not switch the angle when slow playing.
Slide the panel upward
22
Slide the panel downward
RDS
1. EON (RDS Mark)
Indicate main unit is on auto tracking RDS mode.
2. AF (RDS Auto Tracking Mark)
Indicate radio is auto tracking RDS channel.
3. TA (RDS Signal Increasing Output)
Indicate RDS channel have signal increasing output.
4. TP (RDS Channel Stereo Mark)
Indicate RDS channel is on stereo playing mode.
5. POP.M (RDS Channel Mark)
Indicate RDS channel name.
I. RDS Tracking System
Press AF button in FM mode, and then press
/
last 2 seconds, RDS will auto search
channel up and down, it will stop searching when RDS channel be founded, but “AF”
will keep remaining on the screen and waits for the next traffic emergency report.
II. RDS Tracking on Playing Mode
In playing mode, “AF” tracking system keeps on opening and waits for traffic
emergency report.
1)PTY: RDS button, press once will show music mode POP, press 1-6 function
memory button, every group have 2 channel.
POP M
ROCK M
EASY M
LIGHT M CLASSICS M OTHER M
JAZZ
COUNTRY
NATION
2)Press PTY button twice and then press 1-6 function memory button, every
button have 3 channel.
NEWS
AFFAIRS
INFORMATION
SPORT
EDUCATION DRAMA
CULTURE
SCIENCE
CHILDREN
SOCIETT
TELIGION
PHONING
TRAVEL
Note: RDS channel in broken line is available.
AF: RDS auto search button, in radio mode also can press this button shortly auto
tracking RDS channel, press this button shortly can cancel RDS function.
TA: In RDS mode, press this button can output TA signal, and check RDS channel is
exist or not, if no RDS signal TFT will show “NO. TA. TP”.
21
7.
8.DVD function operation
DVD play:
Pls slot in DVD disk, the unit will play it automatically. If disc is in slot, touch
DVD button on main menu to play disc.
1.Previous /next song play:
In playing mode, press SEEK-/SEEK+ on remote control or press the “previous”/”
next”button on the screen.
2.Repeatedly play:
In playing mode , press AMS/RPT button on remote control to start up following
repeat function. Repeat(chapter)
Repeat title
All repeat
repeat play/off
Note: it also can be worked by the “repeat”button on the screen.
3.Items play:
In playing mode, directly press any program sequence in the number button of
remote control, then unit will auto play the input program.
For above 10 programs ,you can via number button 10+ on remote control ,
work with number button 0---9 to choose.
Note: press the number button 10+ once to be 10+ program, and press 10+button
two times to be 20+program, just as follows.
Note: it also can be worked by the number button on the screen.
4.Pause play
In playing mode, press button on remote control to pause play. . Short play
it again to cancel pause, and resume to normal play.
Note: it also can be worked by the related button on the screen.
5.Stop play
In DVD playing mode , press
button on remote control to enter into pre-stop
state, then press the button to continue to play. Press
two times continuously
to enter into stop completely. Then press play button to play from the first song.
Note: it also can be worked by the related button on the screen.
6.Forward/Backward
In playing mode, press longer
button on remote control to forward/
backward respectively.Each time press this button, the speed of forward or
backward is as follows: X2 X4 X8 X16 X20
Play
Note: it also can be worked by the “forward/backward” button on the screen.
7.Switch system
In playing mode, shortly press the button BAND/P/N to switch system , the
sequence is as follows: AUTO
PAL
NTSC
In DVD interface, touch
as following:
button into the audio/video setup interface
(note :the button position will be concave on the screen when you touch it)
VOL
BAS
Audio mode
26.Click to select your desired song or chapter
27.Return to the menu one level
PBC
video mode
Volume:click "volume"to turn down sound;click the related character on right
to turn up sound.
BASS: click "BASS"to turn down bass effect;click the related character on right
to turn up bass effect.
ALT: click "ALT"to turn down alt effect;click the related character on right to
turn up alt effect.
L/R: click "L/R"to choose left speaker output,click the number on right to choose
the right speaker output .
F/R: click "F/R"to choose front speaker output,click the number on right to choose
the rear speaker output.
LOUD:loud on/off.
BASS: bass on/off.
MBP: click this button to enjoy the best music effects in different position.
EQ(on/off):touch to switch modes as follows:POP-ROCK-CLASS-CLOSE.
Brightness:click the left and right edge of the "brightness" strip to adjust the
video’s brightness.
Contrast: click the left and right edge of the "contrast" strip to adjust the
video’s contrast.
Color: click the left and right edge of the "color" strip to adjust the video’s color.
Sharpness: click the left and right edge of the "sharpness"strip to select the
best output effects.
Own setting: click this button to choose your own brightness,contrast,
color,sharpness.
Standard:click this button back to the default settings.
BRIG:click this button to increase the brightness,click it again back to the
original station.
SOFT:click this button to make the video output soft,click it again back to
the original station.
SHAR:click this button to increase the sharpness,click it again back to the
original statio.