1
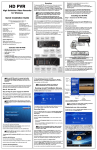
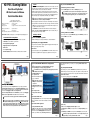
The Hauppauge HD PVR 2 Gaming Edition records video in HD from a video game console. The
software which comes with HD PVR 2 only runs on Windows PCs, but there are third party applications which run on the Mac. Please see our website for more information.
Xbox 360 and PlayStation3
HD Video Recorder for Windows
HD PVR 2 recordings are made onto a computer’s hard drive in a compressed H.264 format. It
records from HDMI or Component Video (also called YPrPb). You can also record S-Video or composite video using and optional A/V cable (you can purchase this on the Hauppauge Webstore). It
will record at 1080p30, 720p or 480p at datarates from 1Mbit/sec up to 13.5Mbits/sec.
Quick Installation Guide
Telephone: 631-434-1600
Fax: 631-434-3198
Tech Support: 631-434-3197 Hours: M-F 9:00AM to 6:30PM EST
Hauppauge Computer Works, Ltd
Telephone:0207-378-1997
MP4: this is an H.264 format which can be played on an XBox360. MP4 recordings are used
by many video editors such as Sony Vegas.
TS and M2TS: these are native H.264 formats which can be recorded as a Blu-ray disc.
HD PVR 2 comes bundled with ArcSoft’s ShowBiz. ShowBiz is used to record videos, trim your
videos or upload your video recordings to YouTube.
Included with HD PVR 2 Gaming Edition:
HD PVR 2 Gaming Edition recorder: H.264 high definition video recorder, USB
1 HDMI cable to connect HD PVR 2 to your TV monitor
•
PS3 Component Video gaming cable
•
Hauppauge A/V cable set for Component video
•
USB 2.0 cable
•
6v 1.66 amp Power Supply
•
HD PVR 2 Installation CD, with HD PVR 2 drivers for Windows and Arcsort ShowBiz
ote: your HD PVR 2 needs to be powered on for Passthrough Video Output to operate.
Also, ShowBiz needs to have set the Video in source correctly for passthrough to operate. If you are having passthrough problems, please see the Troubleshooting section.
N
Audio can be supplied to the HD PVR 2 from stereo audio or via the HDMI port. The recording format used by HD PVR 2 is H.264 with AAC audio. There are three types of HD PVR 2 record formats:
Internet addresses: Sales: [email protected] | Tech Support: [email protected]
•
Connect the HDMI output from the HD PVR 2 to the HDMI input on your TV set.
ote: if you are recording from a PS3, you must use the Component Video port on the
PS3. The PS3 does not allow recording from the HDMI port.
Crown House
Fax:0207-357-9171
Home Gardens, Dartford, Kent, DA1 1DZ Tech Support:0207-378-0202
•
Connection to your TV set or monitor
N
© 2012 Hauppauge Computer Works, Inc.
QI-HDPVR2_GamingEdition-V1.3-ENG Jan. 2, 2013
Hauppauge Computer Works, Inc.
91 Cabot Court
Hauppauge, NY 11788
Step 3: Connect the HD PVR 2 cables
Overview
HD PVR 2 Gaming Edition
Installing the HD PVR 2
Connect your Xbox 360 to HD PVR 2
If you are using an Xbox 360, plug the HDMI cable (supplied) into the HDMI out of your Xbox 360
and into the HDMI in on the HD PVR 2.
Step 1: Boot into Windows on your PC
HD PVR 2 works with laptops or desktop PCs with Windows 8, 7, Vista and Windows XP.
Step 2: Plug the power supply into HD PVR 2
After your PC has booted to Windows, plug the supplied Power Supply into the Power input on HD
PVR 2. The power supply is 6VDC@ 1.66amps.
USB connection
Plug one end (the square end) of the supplied USB cable into the HD PVR 2’s USB cable connector. HD PVR 2 is compatible with USB 2.0 (high speed) only. Plug the other end into your PC.
Page 1
Page 3
Page 2
image which will be ‘burnt’ into your recording. Once complete, you will be asked to restart.
Please do so.
Step 4: Install the HD PVR 2 Windows driver and applications
or more information, please see the Hauppauge HD PVR 2 support page:
http://www.hauppauge.com/site/support/support_hdpvr2.html
F
N
Step 5: Using ArcSoft ShowBiz
ote: the HD PVR 2 needs to be powered up in this step and plugged into your PC while
the Windows drivers are installed.
If a 'Found New Hardware' wizard
appears, please cancel it.
After restarting your PC, you will see a Showbiz icon on your Windows desktop. Click this icon.
With ShowBiz you can record video from your game console, upload the recording to YouTube, trim
the ends and burn the recording onto a DVD disc. The program is divided into three main functions:
Capture, Edit and Produce.
To record your video game play, click on the Capture button.
Insert the HD PVR 2 Installation CD-ROM
in your PC’s CD-ROM drive.
ote: if the CD does not autorun,
navigate to the CD and run the
'Setup.exe' file.
N
Connect your PS3 to HD PVR 2
If you are using a PS3, you will use Component video to record your game play. The PS3
Component Video gaming cable (supplied) has Green/Blue/Red and White/Red connectors
at the end. Plug these colored cables into the corresponding Green/Blue/Red and White/Red RCA
connectors of the Hauppauge A/V cable set for Component video.
The Hauppauge Installation CD window will appear on the screen. Choose a
language.
Step 1: Check your cables
Plug the PS3 Component Video cable into the AV Multi Out of your PS3. Plug the Hauppauge
A/V cable set for Component video into the A/V in connector on the HD PVR 2.
Click Step 1: Check cable connections
ote: the A/V connector should be plugged in with the word PUSH facing DOWN.
Step 2: Install the HD PVR 2 driver
N
N
ote: If you are using a PS3, make sure your HDMI cable is not plugged in. If you had previously had an HDMI cable plugged in to your PS3, you will need to reset the PS3 video
output. To do this, push the power button the front of the PS3 until the light goes Red. Then,
PUSH and HOLD the Power button until you hear the second BEEP. The second beep means
the video mode has been reset and you should now have video coming from the PS3.
Page 4
Capture
Edit
Produce
Click Step 2: Install Drivers. A blue screen will open and begin installing
drivers for your HD PVR 2. Once the drivers have installed, click on the Click
to exit bar.
Step 3: Install the HD PVR 2 applications
Capture setup
Click Step 3: Install HD PVR 2 software
In Source, make sure Hauppauge Siena Video Capture is selected.
Click Next. The HD PVR 2 applications will be installed. The Record application allows you to start and stop recordings by using the Record button
on HD PVR 2. The ArcSoft ShowBiz application will be installed and an
icon will be on your Windows desktop. Personal Logo inserter loads an
In the Video Input: select HDMI if you are using an Xbox 360 or Component (YPrPb) if you are
using a PS3.
In the Audio Input: select HDMI when using an Xbox and Line in (RCA) if you are using a PS3.
Page 5
ote: During recording and preview, there will be a 2 - 3 second delay between your game
Page 6
play and what you see in the preview window. This is normal.
N
box. Click the Record button to start recording.
add it to the timeline below. If you wish to edit a recording, first click on the clip in the timeline, then
click the scissors above.
Video passthrough
Video passsthrough starts once you have chosen the correct source in the Capture application.
Until you do this, video passthrough is disabled.
Editing your video recordings
In the trim window, you can remove unwanted portions of the video by using mark in at the start of
the portion to be removed and mark out at the end. Then click OK.
Using the Record button
The Record button is on top of HD PVR 2. When you push it, Capture is run and HD PVR 2
starts to record video. It uses the video source last selected in the Capture module. The Green
LED light ring will turn on when recording. When recording, you can stop recording by hitting the
Record button again.
Produce
Once you have added all media and made the desired cuts, click on Produce. In Produce, you can
upload to YouTube or burn Blu-ray compatible DVD discs.
You should now see live video from your video source in the preview window, and also hear audio.
You can adjust the recoding bitrate by clicking on Format Settings => Video Encoder. You can
set the bitrate from 1 Mbit/sec to 12 Mbits/sec. The higher the bitrate, the more disk space is used
but the higher the video quality. When recording game play, we recommend 9 Mbits/sec or higher.
The format created by the HD PVR 2 is a H.264 using AAC audio in an AVCHD (TS), M2TS or MP4
file format. If you would like to edit your videos with Sony Vegas, use the MP4 format.
Start recording by clicking on the Capture button. Recordings are stored in the MyVideos folder.
The default name of the video will be the date and time (i.e. 2008_3_20 _09_08_32.TS).
During recording, the Capture button will turn green and the button will change to a Stop button.
You can make a recording of a specified time duration by entering a value in the Capture duration
Click Edit to enter the video editor. Here, you can add videos together and trim your videos. Icons
of your recordings will appear in the box on the upper left side of the Edit window. Double click it to
Page 7
Page 8
This screen will allow you to create menus for your disc. Once
you have created your video,
press Preview.
Preview allows you to test the
disc before burning. Produce
allows you to burn the project to
the disc.
If capture fails, it is likely something is wrong with the video input to HD PVR 2. This could be a broken or loose video cable or you plugged the cables into the wrong connector on HD PVR 2.
-
Green LED ring: indicates that HD PVR 2 is recording video to your PC.
Pass through video problems
-
Red light: this means the video encoder inside HD PVR 2 cannot send data to your PC. There
are a number of reasons this could happen. If your PC is running slowly and cannot get data
from HD PVR 2 quickly enough, the red light might go on for a few seconds until the PC can
accept data. If there is a problem with your USB cable or the USB port on your PC, the red
light might be illuminated. Change to another USB port on your PC, then power down HD PVR
2, wait a few seconds and power up again. If you continue to see the Red light while recording
and have checked your cabling, contact Hauppauge technical support.
Black screen in the ShowBiz Capture preview window:
Step 1: In the ShowBiz Capture module, make sure Hauppauge Siena Video Capture is listed
under Source. If not, then please check your USB cables and make sure the blue light is on on the
front of HD PVR 2. If you cannot see Hauppauge Siena listed, reinstall the Windows driver by running Step 1: Install HD PVR 2 Drivers from the Installation CD. Power cycle the HD PVR 2 and
reboot your PC after reinstalling the drivers.
Step 2: Check your cables. Try removing each cable and make sure it is firmly reseated into each
device you are using. If using an Xbox, try swapping the HDMI cable (you might have a bad cable).
Step 3: Check the Video input setting. If the Video input setting is wrong, you will get a black preview window. Set Video input to HDMI for the Xbox and Component video for a PS3. Is the yellow light on on the front of HD PVR 2? If the yellow light is not on, then either you have the wrong
Video input source set or your game console is not turned on.
Step 4: On the PS3, disconnect the HDMI cable between your game console and your TV set.
Having HDMI connected at the same time as Component video will shut off Component Video and
you will not see video in ShowBiz.
Troubleshooting
What do the lights on front of HD PVR 2 mean?
-
Blue light: When HD PVR 2 is powered on and ready to start recording, the blue light is on. When
the blue light is blinking, the HD PVR 2 is not ‘seen’ by your PC. Check the USB cable!
-
Yellow light blinks once when Capture runs: the HD PVR 2 is ready to start recording.
-
Yellow light on: this means video is present and HD PVR 2 detects video on the currently selected
Page 10
Page 9
video source. For example, if you are using ShowBiz and have selected HDMI and have a
active HDMI source, then you will see a yellow light on the front of HD PVR 2.
Upload to YouTube allows you to upload video to your YouTube account.
Create AVCHD creates a disc that can be played back on a Blu-ray DVD player in HD. You can
record about 2 hours of HD video on a standard DVD-RW or DVD-R disc. If you choose to Create
AVCHD, you will be brought to the design screen.
Create file lets you convert the file to several available formats for playback on other devices such
as a personal media player.
Step 5: If you have confirmed your video source is on, the Video input is correctly set and the yellow light is on the front of HD PVR 2, if you still see a black preview window in ShowBiz, try capturing some video in the Capture module. If you can successfully playback a recording but you cannot
see live video in the Preview window, there might be a video rendering problem (video card drivers,
hardware acceleration…) Check device settings for video decoder details. To enable hardware
acceleration, select “hardware acceleration” in ShowBiz Capture.
Page 11
No video on my TV set or I see flashing or distorted video on my TV set:
Open ShowBiz and verify the correct Video input is selected. Video and audio input must be
set initially for passthrough to work (if you power cycle the HD PVR 2, it may revert to its
default setting and will need to be set again). Also, check the video mode on your PS3 or Xbox 360.
No video on my TV set but I can see video in ShowBiz Capture
Check that the HDMI cable from the HD PVR 2 (HDMI out) is connected to your TV monitor and the
TV is set to the correct HDMI port if multiple are available on yourTV.
Try changing the output resolution from your game console. Some TV monitors may not support all
HDMI output resolutions.
I do not get video on either preview or pass-through
1.
If using HDMI, verify your source device does not use HDCP copy protection (the PS3 uses
HDCP on HDMI). If this is the case use the component video input.
2.
If you are using a PS3, make sure your HDMI cable is not plugged in. If it was plugged in,
you need to reset your PS3.
Reset the PS3: Turn the PS3 off via the power button on the front of the unit. Then, PUSH and
HOLD the power button on the front of the PS3. Once you hear the second beep, release the power
button on the front of the PS3. Your PS3 video will be reset.
Reset the Xbox: Remove any games from the optical drive. Turn the Xbox 360 off. Turn the Xbox
back on via the controller. As the console starts, press and hold the Y button, and then pull the right
trigger at the same time. Your Xbox video will be reset.
Page 12