1
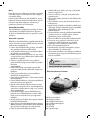
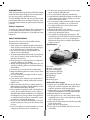
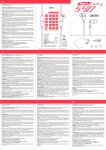
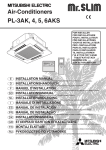
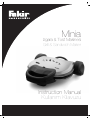
Minia
Izgara & Tost Makinesi
Grill & Sandwich Maker
Instruction Manual
Kullan›m K›lavuzu
• fiebeke kablosunun keskin, sivri veya s›cak yerlerle
temas›na engel olunuz.
• Cihaz›n›z› asla f›r›n, ocak gibi s›cak yerlere yak›n
yerlefltirmeyiniz.
• Cihaz›n fiflini prizden ç›karmak için asla kablosundan
çekmeyiniz.
• Cihaz› belirtilen amac›n d›fl›nda baflka bir ifllev için
kullanmay›n›z.
• Büyük hacimli yiyecekler, metal folyolu paketler veya
di¤er uygun olmayan malzemeler, yang›n veya elektrik
çarpmalar›na neden olabilece¤i için asla
kullan›lmamal›d›r.
• Cihaz›n›z kullan›m s›ras›nda yanabilecek malzemelerle
çevrelenirse veya bu maddeler cihaz›n içerisine
yerlefltirilirse yang›na neden olabilir.
• Cihaz›n›z kullan›m s›ras›nda yaln›z b›rak›lmamal›d›r.
• Cihaz›n›z›n ar›za yapmas›n› önlemek için s›k s›k
temizleyiniz. Kullan›lmad›¤›nda veya temizlik
yap›laca¤› zaman mutlaka fifli prizden çekiniz.
• Cihaz› kuru yüzeylerde kullan›n›z.
• Sert deterjanlar› veya bulafl›k süngerlerini, yüzeye
zarar verecekleri için, kullanmay›n›z.
• Cihaz sadece ev kullan›m› için tasarlanm›flt›r. Kullanma
talimatlar›na uygun olmayan ticari kullan›mlar garanti
kapsam› d›fl›ndad›r.
Girifl
Uzun y›llar sorunsuz çal›flmas› için tasarlanan ve üretilen
Fakir Minia Izgara ve Tost Makinesini sat›n ald›¤›n›z
için teflekkür ederiz.
Benzer ürünleri kullanmaya al›fl›k olabilirsiniz, ancak
kullanma k›lavuzunu okumak için lütfen zaman ay›r›n›z.
Bu k›lavuz sat›n alm›fl oldu¤unuz üründen en iyi
performans› alman›z için haz›rlanm›flt›r.
Güvenlik önemlidir
Kendi güvenli¤iniz ve di¤erlerinin güvenli¤i için ürünü
çal›flt›rmadan önce kullanma k›lavuzunu okuyunuz.
Bu k›lavuzu ilerideki kullan›mlar için güvenli bir yerde
saklay›n›z.
Güvenlik uyar›lar›
Elektrikli bir cihaz kullan›l›rken, afla¤›daki önlemler her
zaman al›nmal›d›r. Yang›n, elektrik çarpmas› ve kiflisel
yaralanmalar› engellemek için;
• Cihaz›n alt›nda belirtilen ak›m gücünün, evinizdeki
ak›m gücüyle eflit olmas›na dikkat ediniz.
• S›cak yüzeylere dokunmay›n›z, tutamaklar› kullan›n.
D›fl yüzeyler afl›r› s›cak olabilir.
• Elektrik çarpmalar›na karfl› kabloyu, fifli veya cihaz›
su veya baflka bir s›v›ya dald›rmay›n›z. Lütfen temizlik
talimatlar›n› inceleyiniz.
• Cihaz›n›z çocuklar taraf›ndan veya çocuklar›n
yak›n›nda kullan›laca¤› zaman mutlaka bir yetiflkin
taraf›ndan
gözetlenmelidir.
• Cihaz kullan›lmad›¤› zamanlarda veya temizlik
s›ras›nda mutlaka prizden çekilmelidir. So¤umas›n›
bekleyiniz.
• Cihaz› iyice temizlemek için piflirme plakalar›n›
kald›r›labilir ve y›kayabilirsiniz.
• Cihaz› asla suya dald›rmay›n›z. Cihaz› nemli bir bezle
temizleyebilirsiniz.
• Cihaz›n elektrik kablosunun s›cak piflirme plakalar›na
temas etmemesine özen gösteriniz.
• E¤er bir uzatma kablosu kullanacaksan›z, uzatma
kablosunun iyi durumda olmas›, toprak ba¤lant›s›na
sahip olmas› ve kablo telinin en afla¤› 1 mm çap›nda
olmas› gerekmektedir.
• Cihaz› kullanaca¤›n›z zaman elektrik kablosunu
tamamen aç›n›z. Elektrik kablosunu cihaz›n alttaki
kablo yuvas›na sarmadan önce iyice so¤umas›n›
bekleyiniz.
• Ar›zal›, kendisi veya kablosu hasar görmüfl cihazlar
kesinlikle kullan›lmamal›d›r.
• Uygun olmayan ek malzemelerin kullan›lmas› yang›na,
elektrik çarpmas›na, yaralanmalara sebep olabilece¤i
gibi garantinin bozulmas›na da sebep olacakt›r.
• Cihaz d›fl mekanlarda kullan›lmamal›d›r.
NOT!
NOT!
“BU KULLANMA KILAVUZUNU ‹LER‹DEK‹
KULLANIMLAR ‹Ç‹N SAKLAYINIZ.”
Ürün Parçalar›n›n Tanıtımı
7
6
4
8
1
01
1. Tutma Sap›
2. Üst piflirme plakas›
3. Alt piflirme plakas›
4. S›cakl›k kontrol lambas›
5. S›cakl›k kontrol dü¤mesi
6. Sa¤ ayak
7. Sol ayak
8. Ya¤ ak›nt› a¤z›
2
3
5
KULLANIM ÖNCES‹
tamamlanm›fl olacakt›r ve yiyeceklerinizi plakalara
yerlefltirebilirsiniz.
Plakalar›n De¤ifltirilmesi
• Elektrik kablosunu prizden çekiniz.
• Cihaz›n so¤umufl oldu¤undan emin olunuz.
• Cihaz› tamamen açarak (180°) düz hale getiriniz.
• Tespit mandal›n› afla¤› do¤ru iterek piflirme plakas›n›
kald›r›n›z.
• Ayn› ifllemi ikinci plaka için de tekrarlay›n›z.
•
•
•
•
•
• Piflirme plakalar›n› arka kenar›ndan cihaza yerlefltiriniz.
• Piflirme plakas›n› indiriniz ve yavaflça tespit mandal›n›n
alt›na bast›r›n›z.
NOT!
NOT!
Cihaz›n180°
yüzeyi
kullan›mözelli¤ine
s›ras›nda çok
s›cak
Cihaz
aç›labilme
sahiptir.
Piflirme
plakalar›
ç›kar›labilir
ve çift
olaca¤›ndan
bu yüzeylere
dokunmay›n›z
ve
yönlüdür.
kullan›m s›ras›nda daha dikkatli olunuz.
Alt ve üst tablay› hafifçe ya¤lay›n›z.
Tost makinenizin fiflini tak›n›z.
Üst tablay› saplar› tutarak yatay hale getiriniz.
S›cakl›k ayar dü¤mesini seçti¤iniz konuma al›n›z.
Cihaz s›cakl›k seviyesine ayarland›¤›nda, k›rm›z› ›fl›k
yanacakt›r.
• ‹stenilen s›cakl›k seviyesine ulafl›ld›¤›nda k›rm›z› ›fl›k
sönecektir.
• Is›nma süresi yaklafl›k 5-10 dk.d›r. Bu sürede piflirilecek
yiyeceklerinizi haz›rlayabilirsiniz.
• Tost makineniz ilk ›s›nmada koku ve hafif duman
ç›karabilir. Bu durum normaldir.
Plakalar›n Tak›lmas›
Temizlik ve Bak›m
• Izgaran›z›, yiyeceklerin yap›flm›fl k›s›mlar›n›n kalmamas›
için, her kullan›mdan sonra mutlaka temizleyiniz.
• Cihaz› temizlemeden önce, ›zgaray› kapat›n ve fiflini
prizden çekiniz. Temizlemeye bafllamadan önce,
›zgaran›z›n ›l›k duruma gelmesini bekleyiniz. Makine
hafif ›l›kken, daha kolay temizlenir.
• Cihaz› tamamen aç›n›z ve tespit mandal›na bast›rarak
piflirme plakalar›n› ç›kar›n›z.
• Piflirme plakalar›n› s›cak sabunlu suda, üzerine yap›flan
art›klar› yumuflatmak üzere yaklafl›k befl dakika
bekletiniz.
• Piflirme plakalar›n› s›cak sabunlu suda ya da bulafl›k
makinesinde temizleyiniz.
• Cihaz›n›z›n d›fl yüzey k›sm›n› nemli bir bez ile
silebilirsiniz. Z›mpara etkili temizlik malzemesi ya da
sert deterjanlar› kullanmay›n›z.
NOT!
NOT!
Cihaz›n yüzeyi kullan›m s›ras›nda çok
s›cak olaca¤›ndan bu yüzeylere
dokunmay›n›z ve kullan›m s›ras›nda
daha dikkatli olunuz.
UYARI!
UYARI!
E¤er cihaz yüzeyinde herhangi bir çatlak
var ise, elektrik çarpmas›n› engellemek
için cihaz› kullanmay›n›z.
NOT!
NOT!
NOT!
‹lk kullan›mda cihazdan biraz duman ve
koku ç›kabilir, bu durum yeni maddeler
›s›t›ld›¤› için normaldir ve bir süre sonra
yok olacakt›r.
Saklama
• Cihaz›n›z›n fiflini prizden çekiniz.
Izgaran›n tamamen so¤umas›n› bekleyiniz.
• Yerden tasarruf sa¤lamak amac›yla cihaz› dik olarak
muhafaza edebilirsiniz.
KULLANIM
Ön Is›tma
• Cihaz› fifle tak›n›z, gösterge ›fl›¤› yanacakt›r.
• Gösterge ›fl›¤› yeterli s›cakl›k seviyesine ulafl›nca
sönecektir. ( Ortalama 8-10 dk.)
• Gösterge ›fl›¤›n›n sönmesi ile ön ›s›tma süresi
NOT!
Piflirme plakalar›, yap›flmaz yüzeyle
kaplanm›flt›r. Sert siliciler kullanmay›n›z.
Yap›flmaz kaplaman›n üstüne sprey
s›kmay›n›z. Bu piflirme tepsisindeki
yap›flmaz yüzeyin performans›n›
etkileyecektir.
02
• To disconnect, grasp plug and remove from outlet.
Never unplug by pulling the cord.
• Do not use toaster for other than intended use.
• Oversized foods. Metal foil packages or utensils must
not be inserted in the machine as they may involve
a risk of fire or electric shock.
• Do not operate machine near flammable materials
such as curtains, wall fabric, etc. to prevent fire.
• To avoid possibility of fire, do not leave toaster
unattended during use.
• Always use the grill on a dry surface.
• Avoid the use of scouring pads or harsh detergents
as they may damage the surface.
• Your appliance is designed for personal use. The
manufacturer will not be liable nor will the warranty
remain in the effect in case of any inappropriate
Professional which does not meet the specifications
of the use manual.
INTRODUCTION
Thank you for purchasing Fakir Minia Grill and Sandwich
maker which has been designed and manufactured to
give you many years of trouble-free service.
You may already be familiar with using a similar product,
but do please take time to read these instructions - they
have been written to ensure you get the very best fromyour
purchase.
Safety is Important
To ensure your safety and safety of others, please ensure
you read safety instructions before you operate this
product. Keep this information in a safe place for future
referances.
SAFETY INSTRUCTIONS
Do not touch hot Top cover. Use handles or knobs.
Surfaces become extremely hot.
• Check if the mains voltage indicated on the bottom
of the appliance corresponds to the mains voltage in
your home before you connect the appliance.
• Do not touch hot surfaces. Use the handles. The
surfaces can be extremely hot.
• To prevent against electrical hazards, do not immerse
cord , plug or toaster in water or other liquid, See
instructions for cleaning.
• Close supervision is necessary when any appliance
is used by children or near children.
• Always unplug appliance from outlet when not in use
and before cleaning. Allow to cool before cleaning
and handling.
• For cleaning, you can remove the cooking plates.
• Never immerse the appliance in water. You can clean
it with a damp cloth.
• Do not let cord hang over edge of table or counter
or touch hot surfaces.
• If you need to use an extension cord, verify that it is
in proper condition, earthed and that the wires are
at least 1 mm.
• Fully unwind the cord when you use the appliance.
Let the appliance cool down properly before you wind
the cord around the hooks in the base.
• Do not operate any appliance with a damaged cord
or plug, Do not replace that if the power or plug is
damaged. After appliance malfunctions, or is dropped
or damaged in any manner. Return the appliance to
an authorized service facility for examination, repair
or electrical or mechanical adjustment.
• Do not use any unauthorized attachments. This will
void the warranty and may cause fire, electric shock
or injury.
• Do not use outdoors. Do not place toaster on or near
a hot gas or electric burner or a heated oven.
Specifications
7
6
4
8
1. Handle
2. Upper cooking plate
3. Lower cooking plate
4. Temperature pilo light
5. Temperature Control
6. Right hinge
7. Left Hinge
8. Draining grove
2
5
3
1
Before first time usage
03
• Unpack your new Health Grill and remove all extra
fittings such as plastic wrappers and cable clamps
meant for protection during transportation.
• Before starting up your new Health Grill, check the
contents for completeness and any visible damage.
• Read the directions for use carefully.
• Put the appliance on a firm, level surface with a
completely open as if you were peforming a double
side cooking operation.
• Remove the cooking plates and wash them separetly
in hot soapy water.
• Rinse and dry cooking plates.
• Find a place for the health grill where it can be
used safely.
• Soak the cooking plates in hot soapy water for five
minutes to loosen any residues that might have caked
on it.
• Clean the cooking plates in hot soapy water or put
them in dishwasher.
• You can clean the surfaces of the unit with a damp
cloth. Do not use any scouring cleaning agents or
materials.
NOTICE!
NOTICE!
The temperature of accessible surfaces may
be high when the appliance is operating. Do
not touch surfaces, always use the handle.
WARNING!
NOTICE!
WARNING!
NOTICE!
If the surface is cracked, switch off the
appliance to avoid the possibility of the
electric shock.
The cooking plates are coated with a nonstick surface, do not use abrasives. Do not
use spray on non-stick coatings as this will
affect the performance of non-stick surface
on the cooking plate.
NOTICE!
NOTICE!
STORAGE
• Switch off the appliance and unplug from the power
outlet.
Allow the Grill to fully cool.
• To save space, you can store the appliance in upright
position.
• Put the appliance in vertical position.
During the initial use, some smoke can appear,
this is normal for new heating elements and
will cease with further use.
OPERATION
Preheating
• Plug in the appliance.The indicator light is on.
• Let your appliance heat up for a little until the pilot light
goes off. (8-10 min.)
• Your appliance is ready for grilling.
Removing the Cooking Plates
• Unplug the appliance.
• Let it cool down before you touch it.
• Completely open your appliance as if you were
peforming a double side cooking operation.
• Push the fixing clip and remove the plate.
Do this operation for the second plate.
Reassembling the Cooking Plates
• Place the rear edge of the cooking plates on the
appliance.
• Lower the grilling plates onto the appliance and press
them down under the fixing clip.
Care and Cleaning
• Always clean your Grill toaster after each use to prevent
a build up of bake-on foods.
• Before cleaning, turn the power off at the power outlet
and then remove the plug. Allow your health Grill to
cool before cleaning. The unit is easier to clean when
slightly warm.
• Completely open your appliance as if you were
performing a double side cooking operation and remove
the cooking plates by pressing on the fixing clips.
04
NOT / NOTES
05