1
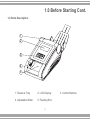
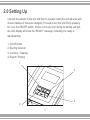
User Guide
Pro Authenticator
D580
Thank you for purchasing this AccuBANKER product.
We recommend reading all information in the user guide to become
familiar with this product.
AccuBANKER and its logo are registered trademarks of Hilton Trading Corp. All Rights Reserved.
Table of Contents
1.0
Before starting.............................................................4
3.0
Operation....................................................................10
2.0
4.0
5.0
6.0
Setting Up.....................................................................8
Software Upgrade Procedure...................................14
Maintenance...............................................................15
Specifications............................................................19
3
1.0 Before Starting
Counterfeit money could potentially cost your business hundreds and possibly
thousands of dollars. Due to complex copiers, high-resolution scanners and other
equipment, it is harder than ever to detect fake bills.
The new D580 Counterfeit Detector uses the latest in counterfeit detection
technology to alert you to fraudulent money. The automatic multi-orientation
loading system, combined with an integrated audible alarm and easy readable
warning messages, will make bill verification the simplest of tasks.
1.1 Standard Features:
• Automatic Multi-Orientation Recognition Feeding System
• High Resolution LCD Display
• Multi-Currency Detection (up to 8 currencies)
• IR (infrared) detection sensors
• UV (ultraviolet) detection sensors
• MG (magnetic) detection sensors
• Audible alarm
• Currency Value Recognition and Grand-Total Value
• Detailed Final Counting Report
4
1.0 Before Starting Cont.
• Integrated Rechargeable Long Lasting Batteries
• Easy Software Upgrade and Maintenance
• Battery Status Indicator
We recommend the user to verify that the box contains all of the items listed here:
1. D580 Unit
2. User’s Guide
3. Warranty Card
4. Receiver Tray
5. 110V-220V AC/DC Adaptor
6. Interface Cable for Upgrade.
5
1.0 Before Starting Cont.
1.2 Battery Information
The battery status is displayed on the upper right corner of the display window.
A solid symbol means the battery is full and an empty symbol means the battery
is dead. If the symbol is flashing and changing from solid to empty, it means the
battery is being charged. When the battery is not enough, “Low Battery”
message will be displayed. If the battery is too low, the detector will automatically
turn off. If the detector doesn’t have the built-in battery, the battery status will not
be displayed.
1.3 Low Power Consumption Mode
When the detector is free for more than 5 minutes, the detector will enter into a
low power consumption mode. The power indicator is led; the LCD monitor is
turned off. When pressing power key or feeding notes, the detector will
automatically wake up.
6
1.0 Before Starting Cont.
1.4 Parts Description
1
2
3
4
5
1. Receiver Tray 2. LCD Display
4. Adjustable Slider
5. Feeding Slot
7
3. Control Buttons
2.0 Setting Up
Connect the adaptor to the unit and then to a power outlet (the unit will work with
its own batteries if these are charged). Proceed to turn the unit ON by pressing
for 3 sec the ON/OFF switch. If there is not any error during its starting self test,
the LCD display will show the “READY” message, indicating it is ready to
start detecting.
1. On/Off button
2. Ejecting Direction
3. Currency / Clearing
4. Report / Printing
1
3
4
2
8
2.0 Setting Up Cont.
2.1 Bill Ejection Setting
The user can set the unit with two different ejection settings directions for the
scanned bill: ejection by the frontal slot or ejection by the rear slot. To set the
desired option, the user must press the “DIR” button once and the arrow on the
display will show the ejection direction selected.
If the ejection setting is selected to eject bills by the rear slot, the stacking tray
should be attached to the unit.
2.2 Currencies Selection
The default currencies to be detected by the detector are EUR and USD, the
other currencies are optional. In order to choose the desired currency, press
“CUR” button for 2 seconds, the detector will automatically enter in the Currency
Selection Menu and display the list of available currencies.
In this mode, the currencies to be selected are on the left and the currency selected is on the right. Pressing “CUR” key repeatedly, the currencies will be displayed in the currency selecting area consecutively. After confirming the currency
to be detected, press “CUR key for 2 seconds to save current setting and exit the
Currency Selection Mode.
Press the “STA” key to exit the currency selecting mode without saving the
current setting.
9
3.0 Operation
3.1 Bill Detection
• Avoid inserting banknotes that are torn, too old or crumpled.
• Avoid banknotes that have staples
attached, or have been covered totally or partially with adhesive media.
• Never insert wet or heavily stained bills.
Insert the banknote to be verified by the
feeding slot, doesn’t matter the feeding
orientation you chose, the unit is able to
recognize and verify the note as is. The
bill must be fed as close as possible to the
right edge, as the figure show.
10
$
$
$
$
$
$
$
$
3.0 Operation Cont.
• If the bill is recognized as a genuine bill, the unit will display the banknote’s
value as well as the number of bills and the grand total value already scanned.
• If the bill is recognized as a suspicious banknote, a warning message will be
shown on the display with the error code that belongs to the specific parameter
was detected as suspicious. Also the unit will sound warning 3 beeps to confirm
the banknote suspicious condition.
11
3.0 Operation Cont.
3.2 Reporting Mode
Meanwhile the user is scanning the bills, the display will show 4 types of data:
1. Banknote’s Type (USD,EURO,NGN…etc)
2. Banknote’s Denomination
3. Total Banknotes Number (for this specific currency)
4. Grant Total Value (for this specific currency)
In order to see a detailed breakdown of the number of bills per denomination of
each currency present in the counting, press the “STA” key once and the unit
will show the specific currency with the total number of bills as well as the grand
total value that belongs to this number. Pressing the “STA” key again, the unit will
show the detailed report of number of notes per denominations present for this
specific currency.
12
3.0 Operation Cont.
3.3 Print Report
After detecting the notes, press “STA” key for 2 seconds, the “Print” message
will be displayed on the display and the report will be printed.
After finishing printing, the detector will return to scanning preparation condition.
If the serial number identification function is available, the serial number will be
printed at the same time.
Important: Printing data procedure doesn’t delete the current counting record,
you must clearing the data before next scanning event.
3.4 Clearing Data
In order to avoid any confuse among two different banknotes lots, don’t forget
clear the recorded data that belongs to the previous lot of bill already scanned.
For clearing the current data and start with the next scanning, press the “CUR”
key for 3 sec and a “Clear Data” message will be shown on the display.
Important: Before press the CUR key for delete the data, make sure the unit must
be in Reporting Mode.
.
13
4.0 Software Upgrade Procedure
It is possible to update the unit with new detection information when new bills are
released. Once this update is installed, the unit will be able to recognize the new
currency for which the update was created.
Follow these instructions:
1. Turn off the detector first, and then connect the detector to the PC with the special cable for downloading.
2. Keeping pressed the “STA” key, turn the unit on.
3. The unit will display the “Ready downloading code” message for let you know the unit is in Downloading Mode.
4. Open the downloading application software on the PC. See the following figure.
5. Click “Load File” button and then select “.UPL” file.
6. After selecting the file, click the “Update Unit” button.
7. The software will be downloaded into the detector.
8. After about 1 minute, the upgrade procedure will be finished.
Upgrade port
14
5.0 Maintenance
5.1 Cleaning the Sensors
To keep the unit operating at peak efficiency, clean periodically (once a month)
the internal sensors. Follow these instructions
1. Open the top cover
2. Using a cotton swab slightly soaked in alcohol, clean the sensors, magnetic
heads and rubber wheels.
5.2 Replacing the battery
The unit includes an internal Lithium-Ion rechargeable battery. When the user
realize the battery performance is not the same as before, that means the battery
is not holding the charge as before, then the battery need to be replaced.
1. Open the battery cover located
beneath the unit (3 phillips screws)
2. Carefully take out the old one battery
and replace the new one.
3. Don’t forget to unplug and plug back
the battery connector.
15
5.0 Maintenance Cont.
5.3 Self-Test Error Codes
CODES
DESCRIPTION
ST_ULIR_ERR
Error of the upper left infrared sensor
ST_ULSP_RED_ERR
Error of upper left red spectrum sensor
ST_ULSP_BLUE_ERR
Error of upper left blue spectrum sensor
ST_UMIR_ERR
Error of the upper middle infrared sensor
ST_URSP_RED_ERR
Error of the upper right red spectrum sensor
ST_URSP_BLUE_ERR
Error of the upper right blue spectrum sensor
ST_URIR_ERR
Error of the upper right infrared sensor
ST_DLIR_ERR
Error of the lower left infrared sensor
ST_DLSP_RED_ERR
Error of the lower left red spectrum sensor
ST_DLSP_BLUE_ERR
Error of the lower left blue spectrum sensor
ST_DMIR_ERR
Error of the lower middle infrared sensor
ST_DRSP_RED_ERR
Error of the lower right red spectrum sensor
ST_DRSP_BLUE_ERR
Error of the lower right blue spectrum sensor
ST_DRIR_ERR
Error of the lower right infrared sensor
16
5.0 Maintenance Cont.
CODES
ST_MAG1_ERR
DESCRIPTION
Error of the magnetic head senor 1
ST_MAG2_ERR
Error of the magnetic head senor 2
ST_MAG3_ERR
Error of the magnetic head senor 3
ST_MAG4_ERR
ST_MAG5_ERR
Error of the magnetic head senor 4
Error of the magnetic head senor 5
ST_START_ERR
Error of feed sensor
ST_PASSL_ERR
Error of left pass-through sensor
ST_PASSM_ERR
ST_PASSR_ERR
Error of middle pass-through sensor
Error of right pass-through sensor
ST_KEY_ERR
Error of keys
ST_MOTOR_ERR
Error of motor or length sensor
17
5.0 Maintenance Cont.
5.4 Error Codes during Detection
Code
E01
E02
E03
E04
E05
E06
E07
E08
E09
E10
E11
Description
MAG Error
IR Error
Paper Error
Length Error
Image Error
Spectrum Error
Thread MAG Error
Ink MAG Error
MAG Energy Error
Thickness Error
Pass Error
18
6.0 Specifications
1. Detection features: Magnetism, Infrared, Image, Spectrum, Length, Thickness
2. Dimensions: 220x140x90 (mm)
3. Power supply: AC100V~240V 50/60Hz or DC12V/1.5A
4. Operating temperature: 0~40oC (32~104oF)
5. Storage temperature: -20~65oC (0~149oF)
6. Battery: rechargeable lithium battery 10.8V/1000mAH
7. Power consumption: <10W
8. Speed: <0.5second/ note
9. Weight: 1.05kg
19
www.accubanker.com