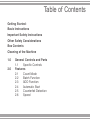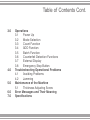
1
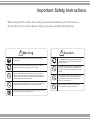
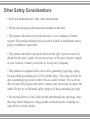
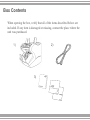
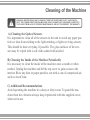
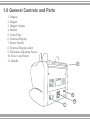
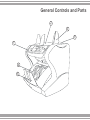
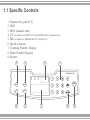
User Guide
Digital Bill Counter
AB4000
Warning
Before turning the power on, please make sure there are no objects
obstructing the operation of the rollers and wheels.
Operate the machine only under normal temperatutres.
AccuBANKER and its logo are registered trademarks or trademarks of Hilton Trading Corp. All Rights Reserved.
Table of Contents
Getting Started:
Basic Instructions
Important Safety Instructions
Other Safety Considerations
Box Contents
Cleaning of the Machine
1.0
2.0
General Controls and Parts
1.1
Specific Controls
Features
2.1
Count Mode
2.2
Batch Function
2.3
ADD Function
2.4
Automatic Start
2.5
Counterfeit Detection
2.6
Speed
Table of Contents Cont.
3.0
4.0
5.0
6.0
7.0
Operations
3.1
Power Up
3.2
Mode Selection
3.3
Count Function
3.4
ADD Function
3.5
Batch Function
3.6
Counterfeit Detection Functions
3.7
External Display
3.8
Emergency Stop Button
Troubleshooting Operational Problems
4.1
Avoiding Problems
4.2
Jamming
Maintenance of the Machine
5.1
Thickness Adjusting Screw
Error Messages and Their Meaning
Specifications
Basic Instructions
The AB 4000 Series low-cost front-loading banknote counter provides a simple
and agile manner for counting money. It provides effective, accurate, and reliable
counting of banknotes along with optional counterfeit detection.
This manual has been compiled to provide complete and clear instructions for
operating the machine.
Before using the machine, read this manual thoroughly. Pay special attention to
Sections 1.0 – 3.0, in order to familiarize yourself with the functions and operations of the machine.
There are three models in the AB4000 series:
AB4000 Basic model: A range of functions including count, add, batch, and variable counting speeds.
AB4000 UV model: In addition to the functions of the basic model, there is
ultraviolet (UV) counterfeit detection function.
AB4000 MG/UV: In addition to the functions of the basic model, there are two
counterfeit detection functions – ultraviolet (UV) and magnetic (MG).
Important Safety Instructions
When using this bill counter, basic safety precautions should always be followed to reduce the risk of fire, electric shock or injury to persons, including the following:
!
War n i n g
Do not use this product in areas where it may be exposed to water
or other liquids.
Unplug this product from the wall outlet before cleaning. Do not use
liquid or aerosol cleaners. Use a damp cloth for cleaning.
To reduce the risk of electric shock, do not disassemble this product.
Take it to qualified service personnel when service or repair work is
required. Opening or removing covers may expose you to dangerous
voltages or other risks. Incorrect re-assembly can cause electric shock
when the appliance is subsequently used.
Only use the cable provided with the unit. The use of other cables may
result in electric shock, fire or cause serious damage to the unit.
Do not operate the unit in areas with high temperature or high humidity
since it may prevent it from working correct ly.
!
C aution
When unplugging the power cord, do not pull it by the
cord, but rather grip the plug to pull it out. Not following
these instructions may result in electric shock, fire or
damage to the unit.
Do not use the unit if the power cord is damaged or if
the plug socket contact is loose. Not following these
instructions may result in electric shock, fire or other
hazards.
Do not place heavy objects over the cord and do not
bend it excessivel since it could get damaged. Not
follwoing these instructions may result in electric
shock, fire or other hazards.
When not using the unit for a long period of time,
remove the power plug from the wall outlet.
Other Safety Considerations
• Read and understand all of the safety instructions.
• Follow all warnings and instructions marked on the unit.
• This product should never be placed near or over a radiator or heater
register. This product should not be placed in a built-in installation unless
proper ventilation is provided.
• This product should be operated only from the type of power source indicated in this user’s guide. If you are not sure of the type of power supply
in your location, consult your dealer or local power company.
• This product is equipped with a three-wire grounding type plug, a plug
having a third (grounding) pin (110V models only). This plug will only fit
into a grounding type power outlet. This is a safety feature. If you are unable to insert the plug into the outlet, contact your electrician to replace the
outlet. Do not try to defeat the safety purpose of the grounding type plug.
• Never push objects of any kind into the unit through any openings, since
they may touch dangerous voltage points or shortcut parts, resulting in a
risk of fire or electric shock.
• Never spill liquids of any kind on the product.
• Unplug this product from the wall outlet and refer to servicing by
qualified service personnel under the following conditions:
-
When the power supply cord or plug is damaged or frayed.
-
If liquid has been spilled into the unit.
-
If the unit has been exposed to rain or water.
-
If the unit does not operate normally while following the operating
instructions. Adjust only those controls that are covered by the operating
instructions. Improper adjustment of other controls may result in damage
and will often require extensive work by a qualified technician to restore
the product to normal operation.
-
If the product has been dropped or the case has been damaged.
-
If the product shows a noticeable change in performance.
• Not following these safety instructions will expose you to severe/fatal
risks, which, since already disclosed, will be the sole responsibility of the
user.
Box Contents
When opening the box, verify that all of the items described below are
included. If any item is damaged or missing, contact the place where the
unit was purchased.
1)
2)
3)
Cleaning of the Machine
!
WARNING: BEFORE DOING ANY CLEANING, TURN THE POWER SWITCH OFF AND DISCONNECT THE POWER CORD FROM THE MACHINE. KEE P IN MIND TH AT PROBLEMS OR DEFECTS
THAT ARISE FROM LACK OF PERIODIC MAINTENANCE ARE NOT COVERED BY THE WARANTY.
A) Cleaning the Optical Sensors
It is important to clean all of the sensors in the unit to avoid any paper particles or dust from sticking to the light-emitting or light-receiving sensors.
This should be done everyday, if possible. The glass surfaces of the sensors may be wiped with a soft cloth soaked with alcohol.
B) Cleaning the Inside of the Machine Periodically
It is necessary to clean the inside of the machine once a month or when
needed. Unplug the machine and lift the top cover to gain access to the
interior. Blow any dust or paper particles out with a can of compressed air,
such as AccuClean.
C) Additional Recommendations
Avoid operating the machine in a dusty or dirty room. To guard the machine from the elements always keep it protected with the supplied cover,
when not in use.
1.0 General Controls and Parts
1. Display
2. Hopper
3. Hopper Guides
4. Stacker
5. Catch Plate
6. External Display
7. Power Switch
8. External Display outlet
9. Thickness Adjusting Screw
10. Power cord Oulet
11. Handle
11
AC110V
DISPLAY
8
POWER
ION
CAUT
7
10
General Controls and Parts
2
3
9
1
4
5
1.1 Specific Controls
1. Numeric key pad (0-9)
2. ADD
3. MNL (manual start)
4. UV (available on AB4000 UV and AB4000 MG/UV models only)
5. MG (available on AB4000 MG/UV model only)
6. Speed selection
7. Counting Number Display
8. Batch Number Display
9. Restart
5
2
8
1
AB4000 MG/UV
F
MG
ADD
UV
MNL
4
3
N
S
restart
7
6
9
2.0 Features
2.1 Count Mode: This is the default mode. The machine will count all
banknotes placed in the hopper.
2.2 Batch Function: Batch Counting in any range from 1 – 999.
2.3 ADD Function: This function adds and totals all consecutive operations up to 9999. Removing the banknotes from the stacker will not reset
the count to 0.
2.4 Automatic Start: The machine begins counting automatically when
banknotes are placed in the hopper. To disable this function or use Manual
start, press the MNL button.
2.5 Counterfeit Detection: Check banknotes for counterfeits while counting with UV and/or MG counterfeit detection. UV detection can be used
for most currencies, while MG is best suited for currencies that use magnetic ink.
2.6 Speed: The AB4000 Series has 3 variable speeds (approximate):
Fast (F): 1200 pcs/min
Normal (N): 900 pcs/min
Slow (S): 600 pcs/min
3.0 Operations
3.1 Power Up
Connect the power cord to power outlet and turn the POWER switch ON.
The unit will conduct a self-test diagnostic. The counting number display
will show “0” when the unit is ready. Refer to Section 6.0 for any
self-test codes.
3.2 Mode Selection
Press the button corresponding to the desired function (ADD, UV,
MG, MNL).
3.3 Count Function
To begin a basic counting function, place a stack of banknotes on the
hopper. The machine will begin counting automatically and deposit the
banknotes in the stacker. With the “MNL” button turned on the machine
will not start counting until the “restart” button is pressed.
3.4 ADD Function
Pressing the “ADD” button will allow the counted banknotes to be added
to all consecutive counted banknotes. Totals will be counted up to a value
of 9999.
Operations Cont.
3.5 BATCH Function
Set the batch number by pressing the numeric keypad buttons 1 to 9. The
selected number(s) will be displayed in the batch number display. Press
the “clear” button to remove the selected batch number and turn off the
batch function.
3.6 Counterfeit Detection Functions
3.6.1 UV Detection (for UV and MG/UV models only)
Press the “UV” button to turn on the UV detection. The corresponding indicator light will turn on. Also, the batch number display will show “Uv1.”
Press the “UV” button once more to increase the sensitivity to “Uv2.”
Pressing the “UV” button for a third time will turn the detection function
and indicator light off.
3.6.2 MG Detection (for MG/UV model only)
Press the “MG” button to turn on the MG detection. The corresponding
indicator light will turn on. The batch number display will show “NG1.”
To increase the sensitivity, press the “MG” button again and the display
will show “NG2.” Pressing the “MG” button for a third time will turn the
detection function and indicator light off.
Operations Cont.
3.7 External Display (optional)
Connect the external display to the back of the machine by the serial cable.
The external display will replicate the counting number from the counting
display on the machine.
3.7 Emergency Stop Button
In the event of an emergency, this feature can be activated manually by
depressing the red Emergency Stop Button located on the right side top
cover of the machine. Once the Emergency Stop feature is activated, all
operations will be canceled. The machine must be turned OFF; the
foreign objects removed and turned back ON to continue the banknote
counting operations.
4.0 Troubleshooting Operational Problems
4.1 Avoiding Problems
Avoid strong light or magnetic sources that will disturb the counterfeit
detection functions.
Keep the machine clean and free of dust from the sensors.
Unplug the machine when not in use.
Pre-select the banknotes to be counted in the machine.
Do not attempt to count:
•
•
•
•
Banknotes with metal clips
Banknotes with adhesive media
Washed banknotes
Torn or ripped banknotes
Operational Problems Cont.
4.2 Jamming
Before beginning operation of the machine, make sure there are no foreign objects in any of the mechanisms such as silica bags, spare parts, etc.
To avoid jamming, ensure that banknotes are placed correctly in the
machine. If jamming occurs, turn the machine off. Carefully remove the
jammed banknotes from the machine with a wooden or rubber stick. Look
for any foreign objects such as paper clips, staples, rubber bands, etc. and
remove them, if necessary.
Maintenance of the Machine
5.1 Thickness Adjustment Screw
The thickness gap is very important to ensure smooth and accurate counting. The gap is calibrated and set at the factory. Adjustments should only
be made when persistent errors are encountered or as instructed by an
authorized service technician.
Using a coin edge or flat head screwdriver, turn the thickness adjustment
knob toward the left or “-“ when “EC” or “Ed” messages appear frequently with chained or doubled banknotes. If excessive jamming and “Ej” error
occurs, turn the knob toward the right or “+” to open the gap.
Error Messages and their Meaning
Self-test Codes Meaning
Solution
E1
Left counting sensors are Clean the sensors or contact
dusty or damaged
your authorized service center
for repair.
E2
Right counting sensors
Clean the sensors or contact
are dusty or damaged
your authorized service center
for repair.
E3 (MG/UV
MG sensor error
Clean the sensors or contact
model only)
your authorized service center
for repair.
E4 (UV and
UV sensor error
Clean the sensors or contact
MG/UV modyour authorized service center
els only)
for repair.
E5
Hopper sensor error
Clean the sensors or contact
your authorized service center
for repair.
E6
Stacker sensor error
Clean the sensors or contact
your authorized service center
for repair.
Error Messages and their Meaning
Error Code
CF1 (UV
and MG/UV
models only)
CF2 (MG/
UV model
only)
EC
Meaning
UV suspicious
banknote detected
Eh
Half detection
EJ
Jam detection
MG suspicious
banknote detected
Chain detection
Solution
Remove the suspected
banknote from the stacker
and recheck.
Remove the suspected
banknote from the stacker
and recheck.
Remove chained notes and
check thickness adjusting
screw (Section 5.0).
Remove the half note and
recheck.
Remove all banknotes from
the hopper and stacker.
Check the thickness adjusting screw and recount the
bills (Section 5.0).
7.0 Specifications
Error Code
HP
Meaning
Empty hopper
St
Stacker obstruction
Ed
Double note detection
Solution
Place banknotes in the
hopper and restart.
Check the stacker sensor
for dust or obstructions.
Once cleared recount.
Remove chained notes
and check thickness
adjusting screw (Section
5.0).
7.0 Specifications
•Ambient Temperature: 32˚ F – 104˚ F (0˚ C – 40˚ C)
•Ambient Humidity: 30% – 80% R.H.
•Feeding System: Roller Friction System
•Hopper Capacity: 300
•Stacker Capacity: 200
•Size of Countable Banknotes: (50 mm X 115 mm – 85 mm X 175 mm)
•Thickness of Countable Banknotes: ~ 0.06 – 0.12 mm
•Counting Number Display: Four Digits Red LED
•Batch Number Display: Three Digits Green LED
•Power Source: Single Phase ~110 V, 60 Hz or 220 V, 50 Hz
•Power Consumption: < 60 Watts
•Dimensions: 10.5” W X 9.7” D X 9.5” H (270 mm X 248 mm X 245mm)
•Weight: 15 lb (6.8 kg)
•Counting Speeds: (approximate) 600, 900, 1200 pcs./min.
Notes
Notes