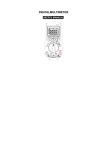
1
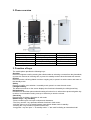
3G DUAL
User Manual
V.1.0
Contents
1. Safety......................................................................................................................................... 2
2. Phone overview ......................................................................................................................... 3
3. Function of keys ........................................................................................................................ 3
4. Getting started ........................................................................................................................... 4
4.1 Installation.............................................................................................................................4
4.2 Using code ............................................................................................................................4
4.3 Installing T-flash card............................................................................................................5
4.4 Charging the battery .............................................................................................................5
4.5 Using a travel adapter ..........................................................................................................5
4.6 Power on/off the mobile phone.............................................................................................5
5. Dialing calls ............................................................................................................................... 5
5.1 Make a voice call ..................................................................................................................5
5.2 Make a video call ..................................................................................................................6
5.3 Answer/end a call .................................................................................................................6
6. Connection ................................................................................................................................ 7
6.1 Network connection ..............................................................................................................7
6.2 Bluetooth...............................................................................................................................7
6.3 USB connection ....................................................................................................................7
6.4 Using the headset.................................................................................................................7
7. Menu .......................................................................................................................................... 7
7.1 Camera .................................................................................................................................7
7.2 Player....................................................................................................................................8
7.3 Apps ......................................................................................................................................8
7.4 Web.......................................................................................................................................8
7.5 Messages .............................................................................................................................9
7.6 My stuff .................................................................................................................................9
7.7 Call log ..................................................................................................................................9
7.8 Contacts..............................................................................................................................10
7.9 Calendar ............................................................................................................................. 11
7.10 Alarm................................................................................................................................. 11
7.11 Tools .................................................................................................................................. 11
8. Appendix .................................................................................................................................. 12
1
1. Safety
Read these guidelines, do not follow these illegal or dangerous usage. Read the complete user
guide for further information.
Switch on safely
Do not switch on device when wireless device usage if prohibited
or the use may cause danger and interference.
Traffic safety first
Please comply with local laws, driving with both of your hands and
minding road security firstly.
Interference
All wireless devices may get performance decline because of
interference.
Switch off in hospital
Please obey relevant rule and restriction, switch device off around
hospital.
Switch off in airplane
Please obey relevant rule and restriction, interference caused by
wireless device is dangerous.
Switch off when fueling up
Do not use wireless device in gas station, neither nearby chemical
or flammable material.
Qualified service
Only qualified personnel recommended to install or maintain the
device
Accessories and batteries
Use only approved accessories and batteries, do not connect to
incompatible devices.
Waterproof capacity
This device is not waterproof, please keep it dry.
Make a copy
Do remember to save a copy for all important information stored
in the device, lest that it should get lost due to unpredictable
reason.
Emergency call
Make sure network service is available and call function has been
enabled, when some network or native function is on, emergency
call may not be available, please switch off these function then
dial the emergency number again.
2
2. Phone overview
1. Front camera
4. Left soft key
7. Right soft key
10. Number key
13. Microphone
16. Loud speaker
2. Earpiece
5. Send key(SIM 1)
8. End/power key
11. Navigation key
14. Earphone/Charger plug
3. Screen
6. Send key (SIM 2)
9. Player/cancel key
12. Ok/select key
15. Rear camera
3. Function of keys
The mobile phone provides the following keys:
Send key
Press it to originate a call by entering the called number or selecting a contact from the phonebook;
or press it to receive an incoming call; or press it in standby mode to show the latest call records
End key
Press it to end a call being dialed or end an outgoing call; or press it to exit the menu and return to
the standby mode.
Ok key
Press it to confirm your selection. In standby mode, press it to enter the main menu.
Left/right soft key
The bottom most lines on the screen displays the functions indicated by the left/right soft key.
Navigation key
Press them to scroll the options when browsing a function list. In edit mode to press navigation key
to select. In conversation mode, press up or down key to tune the volume.
Cancel key
Press this key to delete a character in edit mode.
Number keys, * key and # key
-Press number keys 0-9 to input numbers and characters;
-The # key and the * key represent different functions in each menu.
-Hold the # key up to 2s to switch between normal and vibrate mode in standby.
-Pressing the * key to select a symbol in edit mode.
-Long press * key can input "+" in standby mode. "+" are used for dialing an international call.
3
4. Getting started
Installing the USIM cards and the battery
An USIM card carries useful information, including your mobile phone number, PIN (personal
identification number), PIN2, PUK (PIN unlocking key), PUK2 (PIN2 unlocking key), IMSI
(international mobile subscriber identity), network information, contacts data, and short messages
data.
Note: After powering off your mobile phone, wait for a few seconds before removing or inserting a
SIM card.
Exercise caution when operating a SIM card, as friction or bending will damage the SIM card.
Properly keep the mobile phone and its fittings such as the SIM cards beyond children’s reach.
4.1 Installation
-Hold the end key for a while to power off the mobile phone
-Push the back cover above the battery and remove it.
-Pull the left battery buckle outward and then lift the battery away.
-Insert the card into the USIM card slot.
4.2 Using code
Phone lock code
The phone lock code may be set to prevent your mobile phone from being misused. In general,
this code is provided along with the mobile phone by the manufacturer. The initial phone lock code
is set to 0000 by the manufacturer. If the phone lock code is set, you need to input the phone lock
code when powering on the mobile phone.
PIN
The PIN (personal identification number, 4 to 8 digits) code prevents your USIM card from being
used by unauthorized people. In general, the PIN is supplied with USIM card by the network
operator. If PIN check is enabled, you need to input the PIN each time when you power on your
mobile phone. The USIM card will be locked if you input wrong PIN code for three times.
Unlocking methods as follows:
-Input the correct PUK according to the screen tips to unlock the USIM card.
-Then input the new PIN and press the ok key.
-Input the new PIN again then press the ok key.
-If the PUK input is correct, the SIM card will be unlocked and the PIN will be reset.
Note: the USIM card will be locked if you input wrong PIN code for three times. To unlock the USIM
card, you need to input the PUK. In general, the PUK can be obtained from the network operator.
PUK
The PUK code (personal unlocking key, 8digits) is required to change a blocked PIN. It is supplied
with SIM card. If not, contact your network operator. If you input wrong PUK code for 10 times,
USIM card will be invalid. Please contact the network operator to replace the SIM card.
PIN2
The pin2 code (4 to 8 digits), supplied with USIM card, is required to access some functions such
as “call costs setup” and “fixed dialing setup”. Please contact the network operator to verify
whether your USIM card supports these functions. If you input wrong PIN2 for three times, the
PIN2 will be locked. To unlock the PIN2, input the correct PUK2 as follows:
-Input the correct PUK2 according to the screen prompt to unlock the PIN2.
-Then input the new PIN2 and press the ok key.
-Input the new PIN2 again and then press the ok key.
PUK2
The PUK2 code (personal unlocking key2, 8digits), supplied with USIM card by the vendor. If not,
contact the network operator. If you input wrong PUK2 for ten times, the PIN2 will be invalid and
the corresponding functions cannot be used. Please contact the network operator to replace the
4
USIM card.
Barring code
A barring code is required for setting the call barring function. You can obtain this code from the
network operator to set the call barring function.
4.3 Installing T-flash card
To install the T-flash card, open its latch, place its indented side downward, insert the card into the
card slot, and then close the latch.
Note: The mobile phone cannot automatically identify the T-flash card being inserted when the
mobile phone is powered on. You must power off the mobile phone and then power it on, so that
the phone can identify the T-flash card.
4.4 Charging the battery
The lithium battery delivered with the mobile phone can be put into use immediately after being
unpacked. Battery level indication:
Your mobile phone can monitor and display the battery state.
Normally the remaining energy of the battery is indicated by the battery level icon at the upper right
corner of the displayed screen.
When the battery energy is insufficient, the mobile phone prompts "battery low". If you have set an
alert tone, an alert tone will be given off when the battery level is too low.
4.5 Using a travel adapter
-Install the battery into the mobile phone before charging the battery.
-Connect the adapter of the travel charger with the charging slot in the mobile phone. Ensure that
the adapter is fully inserted.
-During the charging, the battery level grids in the battery icon keep flickering till the battery is fully
charged.
-Power off the mobile phone before removing the battery.
Note: to guarantee your personal safety and protect the environment, do not litter the battery!
Return the old battery to the mobile phone manufacturer or place it in specified battery reclamation
areas. Do not litter any battery with other rubbish.
Warning: short-circuits of the battery may cause explosion, fire, personal injury or other severe
consequences!
4.6 Power on/off the mobile phone
-Hold the end key for a while to power on the mobile phone. A power-on animation appears on the
display screen.
-Input the phone lock code and press the ok key if the mobile phone prompts you to input the
phone lock code. The original code is 0000.
-Input the PIN and press the ok key if the mobile phone prompts you to input the PIN. The PIN is
provided by the network operator for new opening USIM card.
5. Dialing calls
In the standby mode, press number keys to input the area code and the telephone number, and
then press the send key to dial a call. To end the call, press the end key.
5.1 Make a voice call
-Make a voice call in idle screen
1) In idle screen, press number key to input a phone number.
2) Press send key to make a call.
5
-Make a voice call from contact
1) Select contact on main menu to enter contact list.
2) Scroll through the list by pressing up and down key, till you find the right contact name.
3) Hold and press the send key.
-Make a voice call from call log
1) Select call log on main menu to enter call log management.
2) Pressing left/right key to switch among catalogs: answered, missed, dialed, all calls and most
used.
3) After switched to target catalog, you can scroll through the list by pressing up and down key.
4) Focus on the contact name which you want, hold and press the send key.
5.2 Make a video call
-Make a video call in idle screen
1) In idle screen, press number key to input a phone number.
2) Select option on screen to enter sub-menu.
3) Select video call on the seb-menu.
4) Press to dial the video call
-Make a video call from contact
1) Select contact on main menu to enter contact list.
2) Scroll through the list by pressing up and down key.
3) Select option on screen to enter sub-menu
4) Select video call on the sub-menu.
5) Press to dial the video call.
-Make a video call from call log
1) Select call log on main menu to enter call log management.
2) Pressing left/right key to switch among catalogs: answered, missed, dialed, all calls and most
used.
3) After switching to target catalog, you can scroll through the list by pressing up and down key.
4) Focus on the contact name which you want, make sure that it’s a video call number, otherwise,
you can’t send video call to this contact and no video call choice on menu for you.
5) Press send key to make a call.
5.3 Answer/end a call
-To answer a call, press send key or select accept on screen to accept the call.
-To reject the call, press end key or select reject on screen.
-Press end key to hang up a call.
Switch to speaker during a call
During a call, you can switch to speaker by select speaker on screen.
To adjust the volume of speaker during a call, you can press up or down key.
Other operations during a call
During a call, select options on screen to enter sub-menu:
Hold-------- put the call on hold
Mute-------- mute the microphone or speaker.
Call log----open call log during a call for you to query call history, this operation will not suspend or
hang up the call.
Contact----open call log during a call for you to query some contact information, this operation will
not suspend or hang up the conversation.
Message---open message box during a call for you to query some message information, this
operation will not suspend or hang up the call.
Redial
On desktop, you can press send key to open call log, then you can redial any number recorded in
call history.
6
6. Connection
6.1 Network connection
Your device can switch between GSM and 3G networks, if auto mode enabled, it can automatically
switch between GSM and 3G mode.
Select network mode
1) Press ok key to access main menu
2) Press left soft key to select settings to enter its sub-menu (settings page).
3) Select network settings to continue
4) Select network mode to enter sub-menu
5) Select network as per your willing, if “auto mode” selected, the device can automatically switch
between GSM and 3G mode according to the network availability, parameters and the roaming
agreements between network service providers. For further information, please contact your
network service provider.
6.2 Bluetooth
About Bluetooth
With Bluetooth, you can make a wireless connection to other compatible devices, such as mobile
phones, computers, headsets and car kits.
You can use the Bluetooth to send images, video clips, music, sound clips and notes, and transfer
files from your compatible pc.
Bluetooth settings
1) Press ok key to access main menu
2) Press left soft key to select settings to enter its sub-menu (settings page).
3) Select Bluetooth to continue. You can perform the following operation on Bluetooth:
Switch on/off—turn off Bluetooth when you don’t want to connect other devices to your phone; turn
on Bluetooth to allow other devices to connect to your phone.
Device list—add trusted devices that you can connect to your phone without entering the pass key
again.
Search for new devices—search for new devices nearby to add to your device list.
Visibility—allow your devices to be found by other devices, if your device is hidden (not visible), it
can only be connected to by a previously paired device.
Your phone name—enters a name for your device. This name will be shown in other Bluetooth
devices.
Bluetooth information—shows some information of your Bluetooth.
6.3 USB connection
1)Connect your device to a compatible device with a USB data cable.
2)Plug in one side of the USB cable to the USB jack which located in the bottom of your phone.
3)Plug the other side in other compatible device ,after it both of them recognize the USB device,
connection between these two device is set up successfully.
6.4 Using the headset
It would enter headset mode automatically when you insert headset to the slot. Make sure of
inserting it at the bottom of the slot, or you can’t use it normally.
7. Menu
Users are able to access main menu by pressing ok key.
7.1 Camera
7
Select camera on main menu to activate it to capturing mode.
Zoom in or out by pressing up or down key. Then select snapshot key (ok button) to take photos.
7.1.1 Video
1) Select camera on main menu to activate it to capturing mode.
2) In capturing mode, select options to show tool bar.
3) Focus “capture mode”, select ok, and then the sub-menu will show you four modes.
4) To save the video, pressing stop to stop the recording and the video clip will be saved to main
menu/my stuff/movies.
7.1.2 Save images
After capturing a picture, it will be stored in image viewer automatically. You have two choices to
view this picture.
-You can select options enter sub-menu, where you can choose image viewer to view
photos/pictures directory.
-You can also select My stuff to enter photos/pictures directory, all pictures captured can be found
there.
7.1.3 Tool bar
In capturing mode, select options to show tool bar, the displayed tools are used for improving the
quality of image.
-Capture mode: You can choose camera, camera (picture msg.), video or video (picture msg.) As
required.
-Change camera: Select main camera or auxiliary camera as required.
-Size: set image size.
-Night mode: Turn on/off night mode as required.
-Auto timer: Choose on or off. When choose on, camera will capture picture without press the
snapshot key (ok button) when the time you set is exhausted.
-Hide icons: You can choose on or off.
-Effect: Normal, black & white, negative and sepia are available.
-Quality: High, medium and low are available.
-Save to: You can choose phone or memory card as needed.
-Image viewer: Access this item to view pictures.
7.2 Player
With media player, you can listen to music and other audio files stored in your device or on a
compatible memory card (if inserted) and audio stream from internet.
You can also play video clips in your device (for example, the video you captured by the camera)
or video files stored in compatible memory card (if inserted).
Select player on main menu to enter media player.
7.3 Apps
It’s a folder where downloaded games and applications are stored.
7.4 Web
With the browser, you can view HTML web pages on internet. You can also browse web pages
specially designed for mobile devices which are created by extensible hypertext markup language
(XHTML).
1) Select web on main menu to enter browser menu page.
2) Input the correct website address in address column or choose an address from the
bookmark/history/saved pages and press open to enter the page you want.
3) If you want to go to home page, just focus on “home page” then choose open.
4) To move around the page, press “up” “down” ”left” “right” navigation key.
Bookmark
8
Bookmark is used to keep track of your favorite web pages. A bookmark leads you to the page
without inputting its web address.
History
Up to 50 web addresses can be saved automatically as history, it helps to retrospect pages easily.
Saved pages
The web pages you select are stored in this item. You can use the ‘saved pages’ to visit a specific
web page easily.
Homepage
Log on homepage through a website.
7.5 Messages
Select messages on main menu to enter message interface
Writing message
You can type a message or insert a pre-defined message from “templates”. While writing a
message, select “options” to access all the messaging options. You can save your messages that
you send often to “drafts”.
Email
Access this item to edit an email. Several receivers and carbon copies are available at the same
time, and you can add subject and attachment to this email. While writing an email, select
“options” to access all the email options. After finishing, select ‘send’ to send the email.
Inbox
New messages are stored in this item. If the short message memory is full, you can no longer
receive message. To receive messages, delete some or all the existed messages.
Outbox
The messages send failed are stored in this item.
Drafts
After finishing writing, the messages you select to ‘save to drafts’ are stored in this item.
Sent box
Messages being sent successfully will be stored in this menu.
Template
Ten text templates are stored in this item, they can be used for creating a new message. You can
add text template or picture template to this item as per your willing.
Pull-mail
To use this function, users need to set account details and mail details of pull-mail through the path:
message>settings>pull-message setting>options>new.
Settings
In this item, you can set the configuration of text message, picture message, push message,
pull-mail and broadcast, and refer to message memory. “Message memory” lists the used and free
memory on USIM card and phone.
7.6 My stuff
You can select my stuff to enter music/movies/pictures/memory card directory, all audio files,
pictures and video clips can be found there easily.
7.7 Call log
Browse call log
1) Select call log on main menu to enter call log management.
2) Pressing left/right key to switch among catalogs: answered, missed, dialed, all calls and most
used.
3) After switching to target catalog, you can scroll through the list by pressing up and down key.
Dial from call log
1) Select call log on main menu to enter call log management.
2) Pressing left/right soft key to switch among catalogs: answered, missed, dialed, all calls and
most used.
9
3) After switching to target catalog, you can scroll through the list by pressing up and down key.
4) Focus on the contact name you want.(if you want to send a video call, please first make sure
that it’s a video call number, otherwise, you can just send voice call to this contact and no video
call choice on menu for you.)
5) Press send key to dial
Delete call log
1) Select call log on main menu to enter call log management.
2) Pressing left/right key to switch among catalogs: answered, missed, dialed, all calls and most
used.
3) After switching to target catalog, you can scroll through the list by pressing up and down key.
4) Focus on the contact item you want to delete, select option to enter sub-menu.
5) Select “delete” to delete the call log.
7.8 Contacts
Browse phonebook
Select contacts on main menu to enter contacts index page. Scroll through the whole contact list
by pressing up and down key. After focusing on a certain item, select view to see contact details
Add a new contact
Add a new contact from contacts index page
1) Select contacts on main menu to enter contacts index page.
2) Focus on add new contact and select add new to enter an edit mode.
3) Edit name/memory location (phone memory or USIM memory) /ringtone/email/message alert
and so on.
5) After finishing, select save to save the record.
Add a new contact from call log
1) Select call log on main menu to enter call log management.
2) Pressing left/right key to switch among catalogs: answered, missed, dialed, all calls and most
used.
3) After switched to target catalog, you can scroll through the list by pressing up and down key.
4) Focus on the number you want to add, press ok button to enter its detail information.
5) Select option enter sub-menu
6) Select add to contact, the number you select will be stored into contact list.
Modify contact
1) Select contacts on main menu to enter contacts index page.
2) Focus on the contact you want to modify.
3) Select option enter sub-menu.
4) Select manage contact.
5) Select edit to modify its information.
6) Select save to save you modification after that.
Search contact
You can search certain contact alphabetically or by its number.
Select contacts on main menu to enter contacts index page.
On contacts index page, focus the search column at the middle top:
Press # to switch among input methods.
The contacts match you requested will be listed.
Delete contact item
1) Select contacts on main menu to enter contacts index page.
2) Focus on the contact you want to delete.
3) Select option to enter sub-menu.
4) Select manage contact.
5) Select delete contact to modify its information.
Export contacts
You can export contact information to another one.
1) Select contacts on main menu to enter contacts index page.
2) Focus on the contact you want to export.
3) Select option enter sub-menu.
4) Select send contact via
10
5) Press ok key to extend sub-menu, where you have three choices to send the contact:
Message—transfer this contact information via message, the contact name and number will
be sent as the message content.
Pull-mail—transfer this contact information via pull-mail
Bluetooth—transfer this contact information via bluetooth.
7.9 Calendar
Once you enter this menu, there is a monthly-view calendar for you to keep track of important
appointments, etc. Days with events entered will be marked.
After accessing calendar, select option to edit the following items:
New: users can create new event or new to do through this item. To create a new event, users
need to edit start date, start time, category, event summary, alarm status and reminder.
-Sort by: use this function to list all things created in the calendar.
-Weekly view: turn the monthly-view calendar into a weekly-view calendar.
-Delete: to delete some events through this access.
-Go to date: input the date you want to jump to, and then press ok key to go to the target date.
7.10 Alarm
Three alarm clocks are set but deactivated by default. You can activate one, multiple or all of them
as needed. For each alarm clock, the state, time, alarm sound and alarm volume can be set.
When the preset alert time is up, the mobile phone gives off an alert tone whereas the current date
and time blinks on the screen. Select ok to stop the ring or snooze to temporarily stop the ring.
Select cancel all can disable all alarms.
Note: If your device is switched off when alarm is due, the device will switch itself on and start
sounding the alarm tone.
7.11 Tools
7.11.1Calculator
The calculator can add, subtract, multiply and divide. To use the calculator:
Press the up, down, left and right key to select +, -, ×, ÷, = respectively.
* and # key are corresponding to minus sign and decimal point.
Press right soft key to delete the figure.
Note: this calculator provides limited precision and is only applicable to simple arithmetic
calculation.
7.11.2 Notepad
The phone provides a notepad for users to keep trace of important events.
7.11.3 World time
To view city of each time zone, corresponding date and time will display at the bottom of the
screen. Press direction key to choose to view cities.
7.11.4 Stopwatch
Stopwatch is simple application for measuring time with possibility to register several results and
suspend/resume measurement.
7.12 Audio video
7.12.1 FM radio
Your phone is equipped with an FM radio. You can use the application as a traditional fm radio with
automatic tuning and saved channels. Insert the headset into its corresponding slot is necessary
before you use this function.
11
7.12.2 Video camera
This function enables you to record dynamic pictures. Adapt the VCR to the scene or the figure,
the press ok to start recording. Press left soft key to select ‘stop’ to end recording. For more
operation, please refer to the usage of camera.
7.12.3 Voice recorder
Use this function to record audio files. The record files will be stored in memory card.
After finishing recording:
You can select ’send’ to send the audio file via picture message, pull-mail or Bluetooth.
Or you can select ‘options’ to perform further options: play, delete, rename the file or choose audio
viewer to visit music directory.
You can find the audio file through the path: my stuff>music>tracks.
8. Appendix
Appendix 1:Troubleshooting
If you find exceptions when operating the mobile phone, restore the factory settings and then refer
to the following table to solve the problem. If the problem persists, contact the distributor or service
provider.
Fault
The phone
slowly responds
to the touch
screen pen
Usim card error
Poor received
signal quality
Cause
The touch
screen is not
appropriately
calibrated
The usim card
is damaged.
The usim card
is not in
position.
The metal face
of the usim
card is
polluted.
Signals are
obstructed.
For instance,
radio waves
cannot be
effectively
transmitted
nearby a high
building or in a
basement.
Line
congestions
occur when
you use the
mobile phone
in high-traffic
hours
Solution
Calibrate the touch screen
Contact your network service provider
Check the usim card
Clean the usim card with a clean cloth
Move to a place where signals can be effectively transmitted
Avoid using the mobile phone in high-traffic hours
12
The mobile
phone cannot
be powered on
The battery
energy is
exhausted.
Charge the battery
Calls cannot be
dialed
Call barring is
activated
Cancel call barring
The usim card
is invalid
Contact your network service provider
The mobile
phone is not in
a service area
of the gsm
network
Move to the network operator's service area
The mobile
phone cannot
connect the
network
The battery
cannot be
charged
The signal is
weak
The charging
voltage does
not match the
voltage range
indicated on
the charger
An improper
charger is
used
Poor contact
Move to a place where the signal quality is high
Ensure the charging voltage matches the voltage range indicated
on the charger
Use the charger specially designed for the mobile phone
Ensure the charger plug is in good contact with the mobile phone
13