1
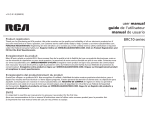
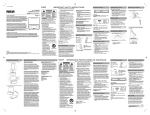
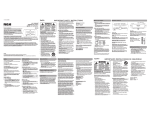
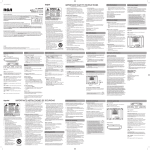
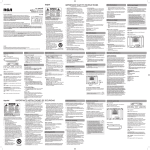
E
v1.0 (1.0.1.0) (EN/F/E)
user manual
guide de l’utilisateur
manual de usuario
RCD10
Product registration
Thank you for purchasing an RCA product. We pride ourselves on the quality and reliability of all our electronic products but if
you ever need service or have a question, our customer service staff stands ready to help. Contact us at www.rcaaudiovideo.com.
PURCHASE REGISTRATION: Registering On-line will allow us to contact you in the unlikely event a safety notification is required
under the Federal Consumer Safety Act. Register Online at: WWW.RCAAUDIOVIDEO.COM. Click on Product Registration and
Fill Out the Brief Questionnaire.
Enregistrement du produit
Merci d’avoir acheté un produit RCA. Nous sommes fiers de la qualité et de la fiabilité de tous nos produits électroniques, mais en cas
de nécessité de réparation ou pour toute question, le personnel de notre service clientèle est prêt à vous aider. Contactez-nous sur
www.rcaaudiovideo.com. ENREGISTREMENT D’ACHAT: Enregistrer votre produit en ligne nous permettra de communiquer avec vous
pour tout avis de sécurité au sujet du produit en vertu du Federal Consumer Safety Act (Loi fédérale de protection du consommateur).
Enregistrez votre produit en ligne sur: WWW.RCAAUDIOVIDEO.COM. Cliquez sur Enregistrement produit et remplissez le
court questionnaire.
Enregisregistro del productotrement du produit
Gracias por comprar un producto RCA. Nos enorgullece la calidad y fiabilidad de todos nuestros productos electrónicos, pero si alguna vez necesita servicios técnicos o si tiene alguna pregunta,
nuestro personal de atención al cliente está a su disposición para ayudarle. Comuníquese con nosotros en www.rcaaudiovideo.com. REGISTRO DE COMPRA: El registro en línea nos permitirá
comunicarnos con usted en el caso de tener que enviarle algún aviso de seguridad en virtud de la Ley Federal de Seguridad del Consumidor. Registre el producto en línea en:
WWW.RCAAUDIOVIDEO.COM. Haga clic en Registro del producto y responda al cuestionario.
EN/F/E
PLEASE READ AND SAVE THIS FOR FUTURE
REFERENCE
•
or other personal injury.
Please help to protect the environment
by recycling or disposing of batteries
Before you begin
General controls
Clock
Installing the battery
Top view
Setting clock manually
1. Remove battery compartment door
(located at the bottom of the clock) by
applying thumb pressure to the tab on
battery door and then lift the door out
and off the cabinet.
•
•
It is important to read this user manual prior to using your new product for the first time.
Nous vous recommandons de lire ce manuel d’instructions avant d’utiliser votre nouveau produit pour la première fois.
Es importante leer este manual antes de usar por vez primera su equipo.
IMPORTANT SAFETY
INSTRUCTIONS
S
a
a
sh
u
•
•
•
•
•
•
•
1. Slide the ALARM OFF/ALARM ON/
ALARM SET/TIME SET switch to the
TIME SET position to enter clock
setting mode.
A
2
English IMPORTANT SAFETY INSTRUCTIONS
PLEASE READ AND SAVE THIS FOR FUTURE REFERENCE
ser manual
l’utilisateur
l de usuario
or plug is damaged, liquid has been
spilled or objects have fallen into the
apparatus, the apparatus has been
exposed to rain or moisture, does not
operate normally, or has been dropped.
RCD10
ne alguna pregunta,
línea nos permitirá
a en:
Some of the following information may not
apply to your particular product; however,
as with any electronic product, precautions
should be observed during handling and
use.
• Read these instructions.
• Keep these instructions.
• Heed all warnings.
• Follow all instructions.
• Do not use this apparatus near water.
• Clean only with dry cloth.
• Do not block any ventilation openings.
Install in accordance with the
manufacturer’s instructions.
• Do not install near any heat sources
such as radiators, heat registers,
stoves, or other apparatus (including
amplifiers) that produce heat.
• Refer all servicing to qualified service
personnel. Servicing is required when
the apparatus has been damaged in
any way, such as power-supply cord
ADDITIONAL SAFETY INFORMATION
• Apparatus shall not be exposed to
dripping or splashing and no objects
filled with liquids, such as vases, shall
be placed on the apparatus.
• Do not attempt to disassemble the
cabinet. This product does not contain
customer serviceable components.
• The marking information is located at
the bottom of apparatus.
Important battery precautions
•
•
•
•
Any battery may present a risk of fire,
explosion, or chemical burn if abused.
Do not try to charge a battery that is
not intended to be recharged, do not
incinerate, and do not puncture.
Non-rechargeable batteries, such as
alkaline batteries, may leak if left in
your product for a long period of time.
Remove the batteries from the product
if you are not going to use it for a
month or more.
If your product uses more than one
battery, do not mix types and make
sure they are inserted correctly. Mixing
types or inserting incorrectly may cause
them to leak.
Discard any leaky or deformed battery
immediately. They may cause skin burns
Es importante leer este manual antes de usar por vez primera su equipo.
IMPORTANT SAFETY
INSTRUCTIONS
PLEASE READ AND SAVE THIS FOR FUTURE
REFERENCE
or other personal injury.
• Please help to protect the environment
by recycling or disposing of batteries
according to federal, state, and local
regulations.
WARNING: The battery (battery or batteries
or battery pack) shall not be exposed to
excessive heat such as sunshine, fire or
the like.
Ecology
Help protect the environment - we
recommend that you dispose of used
batteries by putting them into specially
designed receptacles.
Precautions for the unit
•
•
•
•
Do not use the unit immediately after
transportation from a cold place to a
warm place; condensation problems
may result.
Do not store the unit near fire, places
with high temperature or in direct
sunlight. Exposure to direct sunlight or
extreme heat (such as inside a parked
car) may cause damage or malfunction.
Clean the unit with a soft cloth or
a damp chamois leather. Never use
solvents.
The unit must only be opened by
qualified personnel.
Technical specification
Power source: 2 x AAA batteries
Before you begin
General controls
C
Installing the battery
Top view
S
1. Remove battery compartment door
(located at the bottom of the clock) by
applying thumb pressure to the tab on
battery door and then lift the door out
and off the cabinet.
1
2
•
3
4
Battery
compartment
2. Observe the polarities and place two
AAA batteries (not included) in the
compartment.
3. Replace the compartment door.
ALARM OFF/ALARM ON/ALARM SET/
TIME SET – Turn the alarm on/off; Enter
clock setting mode and alarm setting mode
HR – Adjust hour in clock setting mode or
alarm setting mode
A
S
1
MIN – Adjust minute in clock setting mode
or alarm setting mode
SNOOZE/LIGHT – Enter snooze mode
where the alarm will quiet but sound again
once the snooze period is over; light up
the display
2
•
3
4
T
1
any way, such as power-supply cord
immediately. They may cause skin burns
Clock
Alarm
Warranty information
Setting clock manually
will turn on to show that the alarm is
on.
2. Slide the ALARM OFF/ALARM ON/
ALARM SET/TIME SET switch to the
ALARM OFF position. The
indicator
will turn off to show that the alarm is
off.
12 Month Limited Warranty
Applies to RCA Clock Radios
1. Slide the ALARM OFF/ALARM ON/
ALARM SET/TIME SET switch to the
TIME SET position to enter clock
setting mode.
2. Press HR to set the hour.
• The clock is in 12 hour format. The PM
indicator will appear for showing a PM
time.
3. Press MIN to set the minute.
4. Slide the ALARM OFF/ALARM ON/
ALARM SET/TIME SET switch to the
ALARM OFF to confirm and exit clock
setting mode.
Alarm
Setting alarm time
1. Slide the ALARM OFF/ALARM ON/
ALARM SET/TIME SET switch to the
ALARM SET to enter alarm setting
mode. The AL indicator appears.
2. Press HR to set the hour.
• The clock is in 12 hour format. The PM
indicator will appear for showing a PM
time.
3. Press MIN to set the minute.
4. Slide the ALARM OFF/ALARM ON/
ALARM SET/TIME SET switch to the
ALARM OFF to confirm and exit alarm
setting mode.
Turning on/off the alarm
1. Slide the ALARM OFF/ALARM ON/
ALARM SET/TIME SET switch to the
ALARM ON position. The
indicator
Ways to turn off alarm
•
•
To silence the wake function
momentarily, press SNOOZE/LIGHT.
The
indicator flashes to show snooze
function is activated. The alarm will be
on again when the snooze period (4
minutes) is over.
To disable the wake function
completely, slide the ALARM OFF/
ALARM ON/ALARM SET/TIME SET
switch to the ALARM OFF position.
The
indicator will turn off to show
that the alarm is off.
Light
Press SNOOZE/LIGHT to light up the display
for 3-5 seconds.
AUDIOVOX ACCESSORIES CORP. (the
Company) warrants to the original retail
purchaser of this product that should this
product or any part thereof, under normal
use and conditions, be proven defective in
material or workmanship within 12 months
from the date of original purchase, such
defect(s) will be repaired or replaced with
reconditioned product (at the Company’s
option) without charge for parts and
repair labor.
To obtain repair or replacement within the
terms of this Warranty, the product is to be
delivered with proof of warranty coverage
(e.g. dated bill of sale), specification of
defect(s), transportation prepaid, to the
Company at the address shown below.
This Warranty does not extend to the
elimination of externally generated static
or noise, to correction of antenna problems,
loss/interruptions of broafast or internet
service, to costs incurred for installation,
removal or reinstallation of product, to
corruptions caused by computer viruses,
spyware or other malware, to loss of media,
files, data or content, or to damage to
tapes, discs, removable memory devices
or cards, speakers, accessories, computers,
computer peripherals, other media players,
home networks or vehicle electrical systems.
This Warranty does not apply to any
product or part thereof which, in the
opinion of the Company, has suffered
Français
Warranty information
or been damaged through alteration,
improper installation, mishandling,
misuse, neglect, accident, or by removal
or defacement of the factory serial
number/bar code label(s). THE EXTENT OF
THE COMPANY’S LIABILITY UNDER THIS
WARRANTY IS LIMITED TO THE REPAIR OR
REPLACEMENT PROVIDED ABOVE AND,
IN NO EVENT, SHALL THE COMPANY’S
LIABILITY EXCEED THE PURCHASE PRICE
PAID BY PURCHASER FOR THE PRODUCT.
This Warranty is in lieu of all other express
warranties or liabilities. ANY IMPLIED
WARRANTIES, INCLUDING ANY IMPLIED
WARRANTY OF MERCHANTABILITY, SHALL
BE LIMITED TO THE DURATION OF THIS
WRITTEN WARRANTY. ANY ACTION FOR
BREACH OF ANY WARRANTY HEREUNDER
INCLUDING ANY IMPLIED WARRANTY OF
MERCHANTABILITY MUST BE BROUGHT
WITHIN A PERIOD OF 24 MONTHS FROM
DATE OF ORIGINAL PURCHASE. IN NO CASE
SHALL THE COMPANY BE LIABLE FOR ANY
CONSEQUENTIAL OR INCIDENTAL DAMAGES
FOR BREACH OF THIS OR ANY OTHER
WARRANTY. No person or representative
is authorized to assume for the Company
any liability other than expressed herein in
connection with the sale of this product.
Some states do not allow limitations on
how long an implied warranty lasts or
the exclusion or limitation of incidental
or consequential damage so the above
limitations or exclusions may not apply to
you. This Warranty gives you specific legal
rights and you may also have other rights
which vary from state to state.
Recommendations before returning
your product for a warranty claim:
• Properly pack your unit. Include
any remotes, memory cards, cables,
etc. which were originally provided
with the product. However DO NOT
return any removable batteries, even
if batteries were included with the
original purchase. We recommend
using the original carton and packing
materials. Ship to the address shown
below.
• Note that product will be returned
with factory default settings. Consumer
will be responsible to restore any
personal preference settings.
Audiovox Electronics Corp.
Attn: Service Department.
150 Marcus Blvd.
Hauppauge N.Y. 11788
1-800-645-4994
For Canada Customers, please ship to:
Audiovox Return Centre
c/o Genco
6685 Kennedy Road,
Unit#3, Door 16,
Mississuaga, Ontario
L5T 3A5
Il est possible que certain
ci-dessous ne s’appliquen
appareil. Cependant, il fa
certaines précautions qua
utilise tout appareil élect
• Lisez ces instructions.
• Conservez ces instruc
• Portez attention à to
avertissements.
• Observez toutes les i
• N’utilisez pas cet app
• Nettoyez avec un chi
• N’obstruez pas les ou
ventilation. Exécutez
les instructions du fa
• N’installez pas près d
chaleur tel que radia
chauffage, poêle ou
(incluant les amplific
produisent de la cha
• Confiez l’entretien à
compétent. Les répar