1
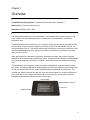
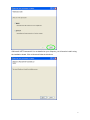
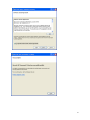
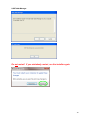
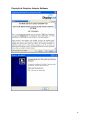
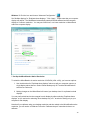
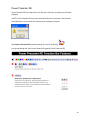
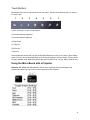
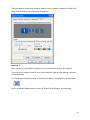
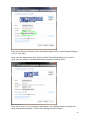
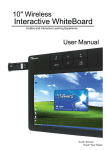
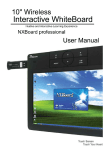
 User’s Guide
Optoma MirrorBoard
Q300 Index
Chapter 1
3. Overview
Chapter 2
4. Setting-Up the MirrorBoard
5. Install the Software Drivers
6. Microsoft .NET Framework 2.0 “Windows XP only”
9. Wireless USB WinDrivers
10. USB Tablet Manager
11. Power Presenter RE
12. DisplayLink Graphics Adapter Software
13. Connect MirrorBoard to the computer for the first time
15. Calibrate the pen
Chapter 3
16. Using MirrorBoard
i. General Use
ii. Charging
iii. Display Setting
17. Using the Pen
18. Power Presenter RE
21. Touch Buttons
21. Using the MirrorBoard with a Projector
Chapter 4
24. Troubleshooting & FAQ’s
25. Appendix
26. Precautions
2 Chapter 1
Overview
Compatible Operating Systems: Windows XP, Windows Vista or Windows 7
Battery Life: 2.5 hours of continuous use
Resolution: WSVGA (1024 x 600)
The Optoma MirrorBoard gives you the flexibility to control digital content from anywhere in the
room, whether you are projecting a lesson in a classroom or a presentation in a corporate
conference room.
The MirrorBoard connects wirelessly to your computer so that you can interact with digital content
from anywhere in the room (with a range of up to about 30 feet). The MirrorBoard “mirrors” your
computer desktop on a 10.1-inch active matrix screen of the device, and lets you control the cursor
with the included battery-free pen, giving you the same control that you would have if you were
sitting in front of the PC.
When the computer is connected to a projector, presenters then have easy control of images,
applications and content being projected on a screen. Using the included software, the MirrorBoard
can control any application or content. In addition, users have access to annotation and learning
tools.
The MirrorBoard, which integrates a non-slip surface, is designed for ergonomics and a slender
form factor. The display integrates an electromagnetic surface only recognizes the pen as an input,
so that you can naturally rest your hand on MirrorBoard without affecting its performance. The
included pen, which is tethered to avoid loss, does not require batteries. A wireless USB point-topoint connection to your computer eliminates lag time, security risks, connectivity issues and
bandwidth loads common with other wireless technologies.
Touch Buttons
Tethered Battery-Free Pen
Battery Indicator
10.1-Inch Display
and Pen Surface
Power LED
3 USB Charging port
Power Adapter Port
On/Off Button
USB Port for Accessories (e.g.,
mouse, keyboard)
Upper/Lower
Rocker Switch
Chapter 2
Setting-Up the MirrorBoard
There are several tasks that you should perform prior to your first use of the MirrorBoard:
1) Charge MirrorBoard
2) Install Software Drivers
3) Connect MirrorBoard to the Computer for the First Time
4) Calibrate the Pen
Charge MirrorBoard
Charge the MirrorBoard with the included AC adapter for at least four hours prior to first use.
During charging, the battery indicator will be amber. The indicator turns green once the
MirrorBoard is fully charged.
4 Install the Software Drivers
1. Insert the included MirrorBoard CD into your computer disk drive. If the menu does not
automatically open, locate the CD-ROM drive on your PC and double click on “Autorun.exe.”
2. On the MirrorBoard CD Menu, choose the appropriate drivers for your operating system
(Windows XP or Windows 7 / Vista).
3. You will see the following menu:
5 Once you click on Next, the installation of several drivers will commence, one at a time. Windows
may request a restart. Select cancel and do not restart the computer until all drivers are installed.
Accept all the default values throughout the installations. Drivers include:
a) Microsoft .NET Framework 2.0 (XP only, cancel if already installed)
b) Wireless USB WinDrivers
c) USB Tablet Manager
d) Power Presenter RE
e) DisplayLink Graphics Adapter Software
Choose your desired installation folder:
Microsoft .NET Framework 2.0
Windows XP only:
If Microsoft .NET Framework 2.0 is already installed on your computer, you will see the following
window. Cancel setup. Ignore any error messages.
6 If Microsoft .NET Framework 2.0 is not installed on your computer, you will need to install it using
the installation wizard. Click on Next and follow the directions:
7 8 Wireless USB WinDrivers
Installation will start automatically.
9 USB Tablet Manager
Do not restart! If you mistakenly restart, run the installer again.
10 Power Presenter RE
Optional installation: Power Presenter RE is a simple tool that lets you use the pen to markup or
annotate any displayed document.
11 DisplayLink Graphics Adapter Software
12 After installation of all software, the MirrorBoard Setup Wizard will request that you restart your PC.
Click on Restart to comply. A gray icon
will appear in the Windows system tray (lower right of
the desktop). In Windows 7, you may have to click on the up arrow to show all icons.
Connect MirrorBoard to the computer for the first time
Plug the included wireless USB dongle into the computer.
The drivers will install automatically and the gray icon will turn red.
If requested, restart
Windows. Turn on the MirrorBoard by holding the green button on the top left end of the unit for
one second and then releasing it. The green LED on MirrorBoard will blink a few times and, after a
few seconds, the icon in the computer taskbar icon
will turn green. Your computer screen will
be flashing during initial installation.
6. Set MirrorBoard to Mirror Desktop Mode
Windows XP / Vista: Click this icon to set the mode to “Mirror”.
Mirror mode will show the same desktop image on both the MirrorBoard and the computer’s main
display. Please note that your computer display may adjust. MirrorBoard automatically sets both
MirrorBoard and the computer display to a shared common resolution. You may see “black bars”
on MirrorBoard and/or the computer display.
13 Windows 7: Click the icon and choose “Advanced Configuration.”
Set “Multiple displays” to “Duplicate these displays.” Click “Apply.” Please note that your computer
display may adjust. The MirrorBoard automatically sets both the MirrorBoard and the computer
display to a common resolution. You may see “black bars” or a lower resolution on MirrorBoard
and/or the computer display.
7. Set Up the MirrorBoard’s Native Resolution
To switch the MirrorBoard to its native resolution of WSVGA (1024 x 600), you have two options:
1. Use the directions for “Duplicate these displays” above to split your computer output to a
single display rather than two. Select “Show desktop only on 2” and the MirrorBoard will
switch to its native size.
2. Making changes on the MirrorBoard will control your desktop since it’s replicated on both
displays.
You can easily switch back to the computer’s main display by either selecting “Duplicate these
displays” so you see both or selecting “Show desktop only on 1” to switch to seeing only to your
computer’s main display.
Note that if you calibrate using your desktop resolution and then switch to the MirrorBoard’s native
resolution, you will need to re-calibrate. Follow the “Calibrate the pen” instructions below to recalibrate.
14 Calibrate the Pen
The pen must be calibrated prior to first use. Click the Pen Pad icon and choose “Calibration”.
Follow the instructions.
Set other pen properties according to your preference.
Your MirrorBoard is now ready for first use.
15 Chapter 3
Using MirrorBoard
•
•
•
•
•
General Use
Using the Pen
Power Presenter RE
Touch Buttons
Using the MirrorBoard with a Projector
General Use
On/Off
Turn on the MirrorBoard by holding the green button on the top left end of the unit for one second
and then releasing it. After a few seconds, the icon in the computer taskbar icon will turn green.
If you get a pop up notice “For Help with wireless audio click here,” ignore the notice. The
MirrorBoard does not have audio capabilities.
Turn off the MirrorBoard by holding the green button on top for two seconds and releasing it.
Charging
Fully charging the MirrorBoard using the included AC power adapter takes about four hours.
A full charge allows for 2.5 hours of use.
When connected to power, the Battery LED to the left of the display will turn amber to indicate that
the unit is charging. Once fully charged, the Battery LED to the left of the display will turn green.
The Battery LED blinking red during use indicates that the MirrorBoard battery is low on power and
must be recharged.
It is possible to charge MirrorBoard through the USB mini port on top of the unit. However, due to
the long charging time required for this, the AC adapter is the preferred charging method.
Display Setting
Set MirrorBoard to Mirror Mode.
Windows XP / Vista: Click this icon to set the mode to “Mirror”.
Mirror mode will show the same image on MirrorBoard and computer main display. Please note
that your computer display may adjust. MirrorBoard automatically sets both MirrorBoard and the
computer display to a common resolution. You may see “black bars” on MirrorBoard and/or the
computer display.
16 Windows 7: Click the icon and choose “Advanced Configuration” or right click on the Desktop and
select “Screen resolution”.
Set “multiple displays” to “Duplicate these displays.” Click “Apply.” Please note that your computer
display may adjust. The MirrorBoard automatically sets both MirrorBoard and the computer display
to a common resolution. You may see “black bars” or a lower resolution on MirrorBoard and/or the
computer display.
Using the Pen
Pen settings can be customized by clicking the Tablet Properties icon in the task bar.
17 Power Presenter RE
Power Presenter RE is a simple tool to use the pen to markup or annotate any document
displayed.
NOTE: Power Presenter RE only works when MirrorBoard is connected to the computer.
If MirrorBoard is not connected, the following error message will appear:
Start Power Presenter RE by double clicking the icon on the desktop
or by going through the “Start” menu (Start>All Programs>Power Presenter RE).
18 19 For additional information, refer to the Power Presenter RE Manual:
Start>Program Files> Power Presenter RE> Manual
20 Touch Buttons
MirrorBoard has seven touch buttons on the front panel. Activate these buttons with your fingers –
Do not the pen.
1
2
3
4
5
6
7
1) ESC: Allows you to exit current function
2) Decrease display brightness
3) Increase display brightness
4) Page Down
5) Page Up
6) Zoom Out
7) Zoom In
Note: Brightness controls are only active when MirrorBoard is running on AC power. When battery
power is in use, the unit automatically dims to the lowest setting to conserve power. Zoom controls
are only available when applications that support this function are in use (e.g. Adobe Acrobat, etc.)
Using the MirrorBoard with a Projector
Windows XP / Vista: With MirrorBoard in Mirror mode, duplicate (clone) the display to the
projector the same way you would connect a projector to the computer.
21 If MirrorBoard does not show the complete desktop, set the computer’s resolution to 800 by 600.
(Right click on desktop, select Properties, Settings tab).
Windows 7:
Make sure that your MirrorBoard is powered on and connected wirelessly to the computer.
Then plug in your projector to the PC as you would normally. Right click the Desktop, and select
Screen Resolution.
You should see three displays shown in the window. If display 1 is duplicated to another screen,
then in the Multiple Displays section, choose to "Extend These Displays", and click Apply.
22 Next, click on Screen 2 (Projector), and in the Multiple Displays section, select "Duplicate Displays
2 and 3". Click Apply.
Next, select the display that says 2|3. Check the "Make This My Main Display" box, and click
Apply. Now, the displays on the MirrorBoard and the projector should be visible.
Next, click on screen 1 (or the computer's main display). In the Multiple displays drop down box,
select "Disconnect that display". Close all of the Display properties windows.
23 Chapter 4
Troubleshooting & FAQ’s
MirrorBoard is showing the desktop background, but not the icons or Start Menu:
MirrorBoard has to be set to “Mirror” mode to show the desktop.
Select the DisplayLink icon in your system tray, and select “Mirror” from the list. Your
display may flash once or twice and then MirrorBoard should display the desktop.
MirrorBoard is showing only part of the desktop:
Make sure MirrorBoard is in “Mirror” mode (see above). Set the resolution of your
computer to 800 by 600.
(Right click on desktop, select Properties, Settings tab).
The Pen is not working properly:
Repeat calibration. Click the Pen Pad icon in the taskbar to start.
How do I type with MirrorBoard?
If your MirrorBoard came with WizTeach educational software, use the virtual keyboard that is
included in the software. If not, consider installing third party virtual keyboard software.
24 Appendix
Optoma Global Offices
For service or support please contact your local office.
USA
3178 Laurelview Ct. 888-289-6786
Fremont, CA 94538, USA 510-897-8601
www.optomausa.com [email protected]
Canada
2420 Meadowpine Blvd., Suite #105 888-289-6786
Mississauga, ON, L5N 6S2, Canada 510-897-8601
www.optoma.ca [email protected]
Europe
42 Caxton Way, The Watford Business Park
Watford, Hertfordshire,
WD18 8QZ, UK +44 (0) 1923 691 800
www.optoma.eu +44 (0) 1923 691 888
Service Tel : +44 (0)1923 691865 [email protected]
FCC Notice
This device has been tested and found to comply with the limits for a Class B digital device
pursuant to Part 15 of the FCC rules. These limits are designed to provide reasonable protection
against harmful interference in a residential installation. This device generates, uses and can
radiate radio frequency energy and, if not installed and used in accordance with the instructions,
may cause harmful interference to radio communications. However, there is no guarantee that
interference will not occur in a particular installation. If this device does cause harmful interference
to radio or television reception, which can be determined by turning the device off and on, the user
is encouraged to try to correct the interference by one or more of the following measures:
• Reorient or relocate the receiving antenna.
• Increase the separation between the device and receiver.
• Connect the device into an outlet on a circuit different from that to which the receiver is
connected.
• Consult the dealer or an experienced radio/television technician for help.
25 Precautions
Do not use MirrorBoard near water or moisture. To reduce the risk of fire and/or electric shock, do
not expose the product to rain or moisture.
Clean only with dry cloth.
Only use attachments/accessories specified by the manufacturer.
If the MirrorBoard becomes excessively warm or emits an unusual smell while the battery is
charging, immediately disconnect the charging cable from the product and turn off MirrorBoard.
When regulations require that wireless devices are turned off, for example, on commercial aircraft,
ensure that the MirrorBoard is turned off and cannot be turned on accidentally.
Do not use MirrorBoard in a facility control system or any other environment that requires
extremely high reliability, or where the use of a wireless device can cause interference. Where use
is prohibited, turn off the product to prevent the possibility of it interfering with or causing other
electronic devices to malfunction. Optoma does not accept any liability for direct or consequential
damages.
______________________________________________________________________________________
Microsoft and Windows are registered trademarks of the Microsoft Corporation in the U.S. and other
countries.
All other company/product names described in this manual are trademarks or registered trademarks of their
respective companies.
26