1
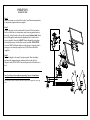
PSD-TS/CS
FLOOR STAND
Step 1
Place the monitor on a soft and flat surface. Install the mounting bracket
to the plasma using the hardware supplied.
Step 2
Choose the place were the stand would be located. Place the stand on
the floor. Install the two chrome tubes on the receiving points found on
the stand. Secure the tubes with an allen wrench. Optional shelf: Insert
the shelf through the tubes adjust the height and lock it with the allen
screws (supplied). Insert the ADAPP Bracket through the tubs adjust
the height and secure with the allen wrench. Installthe PDB-UWFB
Universal Wall Flat Bracket (make sure that the arrow from the plate is
facing up) to the stand by using the four (4) M10 Slotted Hex Bolts
(supplied).
Step 3
Mount the display to the stand (2 people required). Raise the display
and insert the openings from the mounting bracket to the slip lock
flanges from the PDB-UWFB. Once insert push to the left and down to
lock.
Note: For ceiling or floor/ mobile carts mounting, The two (2) 6mmx12mm
slotted jam screws may be used for additional security. The mounting hole
is located in the back of the plate and allows the pressure against the receiving
tabs.
The wall should be capable of supporting a weight of at least five (5) times the
plasma displays. If not, the ceiling must be reinforced. Proper installation
procedure by qualified personnel as outlined in the installation instructions
must be adhered to. Failure to do so could result in serious personal injury.
A.
B.
C.
D.
E.
F.
G.
H.
I.
Description
2” chrome tubes
PDB-UWFB universal Flat Mount
Plasma Hardware
Plasma Display Bracket
Plasma Display
ADAPP- Adapter
Floor Stand TS/CS
(Optional) Shelf
M10 Bolts
For further information or ordering assistance
contact us at the address shown on the front of
this page.