Transcript
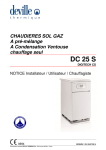
PP-TL
PP-TL INSTALLATION INSTRUCTIONS
WARNING: For added safety and ease of installation, use a qualified professional to properly install the
correct mounting accessories. The mounting surface being used must hold the weight
requirements indicated on your TV mount instruction sheet. If monitor size is greater than 27”,
model PVUM must be used for added stability.
The lag bolts and washers are used to mount the bracket to the stud through the holes in the back
NOTE:
of the ceiling plate. It may be easier to mount the plate first, before assembling the entire
product. Use an 1/8” drill bit to drill pilot holes 1-½” deep.
1. Set the coupler assembly in place in the center of the ceiling plate.
2. Slide the ½” x 3 ½” bolt through the holes in both parts and secure with the ½”-13 Nylock nut.
3. Insert the two (2) M8 x 16mm screw and the two (2) ¾” flat washers through the adjusting slots on either
side of the bracket and then screw them into the holes in the coupler assembly.
4. Tighten the screws after determining the proper angle for the coupler.
5. Use the M6 x 12mm set screw to secure the connecting pipe.
6. Use a pipe wrench to secure all the connections.
Solid Structure
Mounting
Points
Wood Stud
Mounting
Points
M8 x 16mm
Screw and Star
Washer
M8 x 16mm
Screw and Star
Washer
½” x 13 Nylock
Nut
M6 x 12mm Set
Screw
Figure 1. PP-TL Assembly
IN-PPTL.R2
Page - 1 -
Installation Instructions