1
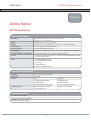
MT7570
Vehicle Mount Terminal
with optional external keyboard
User’s Guide
Effective date: February 2008
Table of Contents
Introduction
1
Notational Conventions
Warranty and Service
1-1
1-1
Getting Started
2
MT7570 Specifications
Configurations
Unpacking the MT7570
Accessories
2-1
2-3
2-4
2-4
Installation
Mounting Hardware Configurations
Bottom Mount Orientation
Top Mount Orientation
Connecting Power
Optional Keyboard Mounting
Connecting the optional keyboard
Connecting a Barcode Scanner
Getting to Know the MT7570
Rear Access Panel
i)
How to Remove
ii)
Main Power Switch
iii) I/O Ports
iv) Audio Connections
Terminal ON/OFF Switch
i)
Performing a Warm Boot
ii)
Performing a Cold Boot
Using the Touchscreen
The MT7570 with Linux Operating System
The User Interface
Home Desktop Overview
i)
Quick Access Panel
ii)
MT7570 Menu
iii) Show Desktop Icon
iv) On-Screen Keyboard
v)
Calculator
vi) Adjust Speaker Volume
vii) Power Down Icon
viii) Application Folders
(1)
Active Tasks Folder
(2)
Internet Folder
(3)
Accessories Folder
Table of Contents
3
3-1
3-2
3-2
3-3
3-3
3-4
3-5
4
4-1
4-1
4-2
4-2
4-3
4-4
4-4
4-4
4-4
5
5-1
5-2
5-3
5-3
5-3
5-3
5-4
5-4
5-4
5-4
5-4
5-4
5-4
Table of Contents
ix)
AML
AML
i)
ii)
(cont’d)
(4)
System Settings Folder
Application Icons
Mini Client Connect (MiniCC)
Client Connect (AMLcc)
Defining Connections
Creating and Editing Connections
(1)
General Tab & Protocol Information
(2)
Terminal Tab
(3)
Display Tab
(4)
Web Browsers
MT7570 Settings Applications (Linux ®)
Audio Mixer
Bluetooth®
Embedded Servers
i)
Telnet, FTP, WWW
User Interface
Radio Settings
On-Screen Keyboard
RS-232 Monitor
Security Mode
AMLcc
Software Version Update
Set Time and Date
Touchscreen Calibration
Linux Shell
Internal 802.11 b/g Radio
Overview
Setting up the 802.11b/g Radio
i)
Wireless Status
ii)
Link Quality Status
iii) Network Configuration
iv) Wireless Settings
v)
Restart Interface
vi) View Details
The MT7570 with Windows ® Xpe
The User Interface
Home Desktop Overview
i)
Windows Task Bar
ii)
Windows Notification Area
iii) Shortcut to On-Screen Keyboard
iv) Shortcut to Calculator
v)
Windows Start Menu
Table of Contents
5-4
5-4
5-5
5-5
5-6
5-7
5-7
5-9
5-10
5-12
6
6-2
6-2
6-5
6-5
6-5
6-5
6-5
6-7
6-7
6-8
6-8
6-8
6-9
6-9
7
7-1
7-2
7-3
7-3
7-3
7-4
7-6
7-7
8
8-1
8-2
8-3
8-3
8-3
8-3
8-3
Table of Contents
(cont’d)
vi) Log Off System
vii) Shutting down and rebooting the system
viii) Start Menu Programs
MT7570 System Settings
i)
Console
ii)
My Current Connections
iii) Embedded Server Configuration
iv) IE Settings
v)
Look for new Software Updates
vi) My Computer
vii) Network Configuration
viii) On-Screen Keyboard
ix) Reboot and Protect Compact Flash
x)
Reboot and Unprotect Compact Flash
xi) RS-232 Configuration
xii) Sound Settings
xiii) Task Manager
xiv) Time and Date
xv) Touchscreen Calibration
xvi) Wireless Configuration
xvii) BlueSoleil (Bluetooth option)
Configuring the MT7570 for your work-site
To Open a folder
Changing the Screen Saver
Setting My Computer to map network drives
Changing Environment Variables
Running MFC and “Win32” Applications
Running .NET Applications
Running Wscript VB and Jscript applications
Running company Intranet Web Pages in kiosk mode
Connecting to legacy servers
Connecting to remote RDP servers using Remote Desktop
Connecting to Skype and other VOIP services
Configuring the Embedded Web / FTP server
Temporarily mapping a network drive
Persistently mapping a network drive
Deleting a mapped drive
Running an application on system startup
Adding & removing exclusions with File Based Write Filter
Table of Contents
8-3
8-3
8-3
8-5
8-6
8-6
8-6
8-6
8-7
8-7
8-8
8-9
8-9
8-9
8-10
8-10
8-11
8-11
8-12
8-13
8-14
9
9-2
9-2
9-2
9-2
9-2
9-2
9-3
9-3
9-3
9-4
9-4
9-4
9-5
9-5
9-5
9-5
9-5
GETTING STARTED
MT7570 Vehicle Mount Terminal
Chapter 1
Introducing the MT7570
The MT7570 vehicle mount terminal is an ultra-versatile, high-performance, compact vehicle
mounted terminal. It is rugged, requires a limited amount of space, and is easy-to-use. The high
resolution graphical touch screen display is capable of presenting a multitude of fonts and
images.
The MT7570 is available with either a Linux or Windows operating system. The Linux operating
system is well known for its stability, speed and conservative memory usage. The Windows
operating system makes the MT7570 compatible with the world’s most common programs.
The MT7570 is easy to use and configure. The integrated touch screen and full SVGA display work
much like the common computer used throughout the industry today. The optional keyboard and mouse
pad complete the package, making the MT7570 a powerful industrial computer system.
Warranty
A one-year warranty against material defects and workmanship from the date of shipment is
guaranteed by American Microsystems, Ltd. Products are sold on the basis of specifications
applicable at the time of manufacture. American Microsystems, Ltd. shall have no obligation to
modify or update products once sold. At our option, we will repair or replace, at no charge, any
unit that proves to be defective providing the appropriate steps are taken to procure an RMA
(Return Materials Authorization) number and shipping instructions from American Microsystems,
Ltd.
General Conventions
Before you begin to use the MT7570 vehicle mount terminal, it’s important that you understand
key conventions and terms used in this manual.
Keys
SMALL CAPS
[KEY]
Bold
Italic
Italic/Bold
Select
Description
Refers to a specific menu selection contained in the MT7570 in
order to continue or complete a task.
The square brackets indicate a specific key on the MT7570’s
touch screen or optional keypad.
Words you type – for example when you are instructed to type
A:\setup. Bold also refers to existing filenames.
¤Notes
Warning! And section references.
Select means that after you select the menu item or action, you
should press ENTER.
1-1
USER’S GUIDE
MT7570 Vehicle Mount Terminal
Chapter 2
Getting Started
MT7570 Specifications
General Specifications
Dimensions
Weight
Display
Touch Screen
External Keyboard
Power Supply
Internal UPS Battery (if equipped)
IO Ports
Audio
With Mounting Arm: 44cm L x 40 cm W x 6.55 cm D
(15.625” L x 12.75” W x 2.63” D)
With Mounting Arm: 6.45 kg (14.3 lbs)
Industrial 12.1 inch SVGA 800x600, 18-bit Color - Liquid Crystal Display
12.1 inch Resistive Touch panel overlay
Optional USB Industrial Keyboard
Accepts 9V to 36VDC input or 36V to 75VDC input, depending on configuration.
12.6 V Lithium-Polymer (~30 minutes of runtime) (Optional)
2 x USB 2.0 High Speed Host Ports (1 x USB 2.0 with optional Bluetooth module)
1 x RS-232C with 5V Pin 9
1 x Amplified Headphone jack
1 x Non-amplified Line-out jack
1 x Line Input
1 x Microphone jack
2 x Internal Amplified speakers
Performance Specifications
Processor
Architecture
Memory
Operating System
AMD Geode GX533 @ 400 MHz
32-bit x86
Linux
128 MB SDRAM Standard
256 MB Optional
512 MB Internal Flash Standard
AML Debian/GNU 4.0 Platform
Linux® Kernel 2.6.18
Optional Bluetooth™
v1.2 and v1.1 compliant
Range up to 160 feet (50 meters)
Transfer rate up to 2.1 Mbps
2-1
Windows
256 MB Standard
384 MB Optional
1 GB Internal Flash Standard
Windows XP Embedded
USER’S GUIDE
MT7570 Vehicle Mount Terminal
Radio Specifications
Radio
Frequency
Bitrates
Output Power
Security
IEEE 802.11b/g
2.4 GHz Range
802.11b: 11, 5.5, 2, 1 Mbps
802.11g: 54, 48, 36, 24, 18, 12, 9, 6 Mbps (auto-fallback)
15 dBm (±3 dB) @ 54 Mbps
19 dBm (±3 dB) @ 11 Mbps
None
64/128 Bit WEP
WPA/WPA2 Personal (PSK)
WPA/WPA2 Enterprise (EAP)
802.1X Supplicants
Standard Applications
Terminal Emulations
Modern Service Protocols
Web Browsers
Utilities
VoIP
VT100/102, VT220, TN5250, TN3270
RDP (Microsoft Windows® Terminal Services)
VNC (Virtual Network Computing)
Linux
Windows XPe
Mozilla® Firefox
Internet Explorer
Links2
AML Mini-browser
Calculator, Text Editor, Virtual Keyboard
Skype® Client
Environmental Specifications
Operating Temperature
Storage Temperature
Humidity
Sealing
-4° to 122° F / -20° to 50° C
-22° to 140° F / -30° to 60° C
5% to 95% RH non-condensing
Meets IP65 standards for protection against dust and water sprayed
from any direction
This product is covered under U.S. Patent Nos. 5,400,338 and 6,480,497
2-2
USER’S GUIDE
MT7570 Vehicle Mount Terminal
Available Configurations
MT7570 Configurations
Part Number
MT7570-0000-00
MT7570-0001-00
MT7570-0100-00
MT7570-0101-00
MT7570-0000-01
MT7570-0001-01
MT7570-0100-01
MT7570-0101-01
MT7570-0000-11
MT7570-0001-11
MT7570-0100-11
MT7570-0101-11
MT7570-0000-12
MT7570-0001-12
MT7570-0100-12
MT7570-0101-12
Description
VMT, 802.11g, Linux, 128MB, 9-36VDC
VMT, 802.11g, Linux, 128MB, 9-36VDC, Backup Battery
VMT, 802.11g, Linux, 128MB, 36-75VDC
VMT, 802.11g, Linux, 128MB, 36-75VDC, Backup Battery
VMT, 802.11g, Linux, 256MB, 9-36VDC
VMT, 802.11g, Linux, 256MB, 9-36VDC, Backup Battery
VMT, 802.11g, Linux, 256MB, 36-75VDC
VMT, 802.11g, Linux, 256MB, 36-75VDC, Backup Battery
VMT, 802.11g, Windows XPe, 256MB,9-36VDC
VMT, 802.11g, Windows XPe, 256MB,9-36VDC, Backup Battery
VMT, 802.11g, Windows XPe, 256MB,36-75VDC
VMT, 802.11g, Windows XPe, 256MB,36-75VDC, Backup Battery
VMT, 802.11g, Windows XPe, 384MB,9-36VDC
VMT, 802.11g, Windows XPe, 384MB,9-36VDC, Backup Battery
VMT, 802.11g, Windows XPe, 384MB,36-75VDC
VMT, 802.11g, Windows XPe, 384MB,36-75VDC, Backup Battery
2-3
USER’S GUIDE
MT7570 Vehicle Mount Terminal
Unpacking the MT7570
MT7570 Packaged
Accessories
MT7570 Optional Keyboard
2-4
USER’S GUIDE
MT7570 Vehicle Mount Terminal
Chapter 3
Installation
Mounting Hardware Configurations
The mounting hardware can be used in a variety of ways depending on the operator preference
and what type of forklift mounting is available.
MT7570 Mounting Configurations
3-1
USER’S GUIDE
MT7570 Vehicle Mount Terminal
Bottom Mounting
MT7570 Bottom Mounting
The MT7570 has a fully adjustable bracket that can be mounted in a variety of positions. Once the
terminal is in position it can be locked into place by using the two Nord-Lock locking rings which are
supplied under the locking knobs. These rings have teeth which lock the parts into position once the
knobs are securely tightened.
Top Mounting
MT7570 Top Mounting
3-2
USER’S GUIDE
MT7570 Vehicle Mount Terminal
Connecting Power
The MT7570 is shipped with a standard DC Accessory Plug which can plug directly into a standard
12VDC Accessory socket found on many mobile vehicles. This plug contains a 5AMP slow blow fuse
which can protect the device from short circuits. If this plug is removed, it is recommended that the input
be protected with a 5AMP slow blow fuse.
The MT7570 is designed to accept a wide range of voltage inputs and still work correctly. The standard
model accepts voltages from 9VDC up to 36VDC with a 50VDC surge rating. The optional model will
accept voltages from 36VDC up to 75VDC with a 100VDC surge rating. The MT7570 is fully protected
internally from short circuits or over current conditions. The MT7570 terminal contains self-resetting
internal breakers; the power and the short circuit must be removed for these breakers to reset.
Description of the Power Cord (Black Cable from bottom of terminal)
1.
White Wire / 9 to 36VDC or 36 to 75VDC / 3 Amps maximum draw from vehicle
Note: This line must be fused (5 Amp Max) DO NOT wire directly to the battery.
2.
Black Wire / GND
Optional Keyboard Mounting
MT7570 Keyboard Mounting
with optional keyboard
3-3
USER’S GUIDE
MT7570 Vehicle Mount Terminal
MT7570 USB Keyboard Installation (Optional)
MT7570 Optional Keyboard
MT7570 USB Keyboard Installation (Optional)
Peel the adhesive cover from one side of each Velcro pad.
Apply a Velcro strip (adhesive side down) to each of the four bottom corners of keyboard.
Remove the adhesive cover from the exposed side of each Velcro pad.
Then, carefully align the keyboard foot pegs with the holes in the metal tray.
Firmly seat the keyboard in the metal tray.
Attach metal tray to MT7570 terminal by removing both mounting knobs.
Use side alignment holes to keep keyboard from rotating during use.
Tighten side mounting knobs securely using locking washers.
Plug USB plug into either USB port on terminal (no software required).
3-4
USER’S GUIDE
MT7570 Vehicle Mount Terminal
Connecting the optional keyboard
MT7570 Access Panel
USB Ports
Connecting the Optional Keyboard
The MT7570 can support an optional keyboard. This keyboard is connected to the terminal through
either of the USB ports located on the bottom/back of the MT7570. Remove the two thumbscrews
holding the access cover and rotate it off. Connect the keyboard’s cable to one of the USB ports, and
replace the cover.
3-5
USER’S GUIDE
MT7570 Vehicle Mount Terminal
Connecting a Barcode Scanner
MT7570 Access Panel
USB and Serial Ports
Connecting a Barcode Scanner
The MT7570 can support an optional handheld tethered scanner. This scanner is attached through the
serial port or USB port located on the bottom/back of the MT7570 unit. Remove the 2 thumbscrews
holding the access cover and rotate it off. The rubber seals cover the communication ports from outside
contamination.
In order to install the Optional Tethered Scanner for the MT7570 you must follow these steps.
1.
2.
3.
4.
The scanner type must be a decoded serial keyboard wedge or USB type.
The scanner must have a DB-9 female or USB connector.
The scanner must have its own external power supply or draw its power from pin 9 on the
MT7570 DB-9 connector (5VDC - 1 amp max. load) or from the USB port.
See the MT7570 setup to program the serial port or USB Barcode Scanner.
3-6
USER’S GUIDE
MT7570 Vehicle Mount Terminal
Chapter 4
Getting to Know the MT7570
Rear Access Panel
To gain entry to the rear access panel remove the 2 thumbscrews holding on the back of the
MT7570 and rotate off the Access Cover. The rubber seals cover the communication ports from
outside contamination.
MT7570 Access Panel
4-1
USER’S GUIDE
MT7570 Vehicle Mount Terminal
MT7570 Access Panel
Main Power Switch
Power Cord
Main Power Switch
The Main Power Switch when turned “OFF”, removes all EXTERNAL power to the MT7570 terminal.
I/O Ports
MT7570 Access Panel
USB and Serial Ports
Audio Ports
4-2
USER’S GUIDE
MT7570 Vehicle Mount Terminal
The Description of the Interface Ports
Description of the RS-232 Port (DB-9 Male under wire seal on bottom)
1.
DCD
2.
RxD (in to terminal)
3.
TxD (out from terminal)
4.
DTR (out from terminal)
5.
GND
6.
DSR (in to terminal)
7.
RTS (out from terminal)
8.
CTS (in to terminal)
9.
Scanner Power (out from terminal) 5VDC – 1 Amp Max.
Description of the USB Ports
1.
5 VDC
2.
Data 3.
Data +
4.
GND
Description of the Audio Ports
1.
Headphone Jack (disables speakers when inserted)
2.
Audio Out
3.
Audio In
4.
Microphone In
4-3
USER’S GUIDE
MT7570 Vehicle Mount Terminal
MT7570 Control Push Button
Terminal On/Off
Push Button
Description of the Terminal On/Off Push Button
The terminal will start with a single push of the push button. Be sure the Main Power Switch on the back
of the unit is turned on in order to start the terminal.
The Terminal On/Off Push Button is the main control to turn on and off the terminal. When this button is
pressed once, the terminal will perform an orderly shutdown. Holding the button down for four seconds
forces an instant power off.
Using the MT7570 Touchscreen
The AML MT7570 vehicle mount terminal uses a 12.1 inch 800x600 Liquid Crystal Display (LCD) with a
resistive touch panel overlay. Tapping the display at any given point will generate a "mouse click" at that
location.
The MT7570 unit is designed with the touch panel being the primary (and possibly only) user input
device.
**NOTE: "Double-Clicking" is a Windows convention and is not necessary on the MT7570 running Linux.
Double-clicking with the Linux OS may possibly activate the desired function twice. When running Linux,
all functions of the terminal use a single tap.
For information on calibrating the touchscreen, see Settings Applications - Touchscreen.
4-4
USER’S GUIDE
MT7570 Vehicle Mount Terminal
Chapter 5
The MT7570 with Linux Operating System
The User Interface
The user interface of the MT7570 was designed with the user in mind. With a touchscreen as the sole
input device, using a desktop PC style interface would be nearly impossible. Resizing and manipulating
windows through a touchscreen would require very accurate taps on the display, and would quickly
become frustrating. The MT7570 uses a simple method of controlling applications and windows. At any
given time, the user is only able to interface with a single application, and, when necessary, an applications window will fill the entire screen to alleviate the need to resize the window.
Like many desktop PCs, the MT7570 uses a system of icons on a desktop for easy access to applications. The standard application set, along with the system settings applets are grouped into a series of
folders, each accessible by tapping on the desired icon.
5-1
USER’S GUIDE
MT7570 Vehicle Mount Terminal
MT7570 Home Desktop Overview
MT7570 Quick Access Panel
Access the MT7570 Menu
Minimize all windows and show the MT7570 Desktop
Display / Hide the On Screen Keyboard
Display / Hide the MT7570 Calculator
Adjust the speaker volume
Power off, Reboot, or enter administrative mode (if applicable)
Application Folders
Application Icon
5-2
USER’S GUIDE
MT7570 Vehicle Mount Terminal
MT7570 Quick Access Panel
The bottom of the main display contains the MT7570 Quick Access Panel, giving the user easy access
to applications, as well as other system functions such as powering off the unit.
MT7570 Menu
The left-most icon on the MT7570 Panel gives the user access to all allowable functions of the device.
The menu exactly mimics the folders and icons accessible from the home desktop.
Show Desktop Icon
The second icon on the Panel, when activated by a tap on the touch screen, will minimize all applications
visible to the user and show the Desktop on the screen. All applications can be maximized again by
entering the Active Tasks folder and selecting the desired application.
MT7570 On-Screen Keyboard – xvkbd
If the MT7570 is not equipped with an external keyboard, the X Virtual Keyboard (xvkbd) can be used to
emulate keyboard input.
The on-screen keyboard can be started by tapping the keyboard icon on the MT7570 quick access
panel. Tapping the icon a second time, will hide the keyboard. Unlike other applications on the
MT7570, the on-screen keyboard will not maximize and can be moved around the screen by pressing
and dragging the title bar of the applet.
Multiple keyboard layouts, the ability to modify the keyboards width and height, and other options can
be set in the On-Screen Keyboard settings applet. For information on the keyboard setup utility, see
Settings Applications – On-Screen Keyboard.
5-3
USER’S GUIDE
MT7570 Vehicle Mount Terminal
MT7570 Calculator
A simple calculator can be shown on the display by tapping the Calculator icon on the panel. This utility
can be hidden by tapping the same icon again.
Adjust Speaker Volume
By tapping the speaker icon on the panel, a small pop-up will appear allowing the user to increase or
decrease the speaker volume level.
Power Down Icon
The power down function of the Quick Access panel allows the user to cleanly power off the device or
reboot the system. Furthermore, if the MT7570 is set in a secure access mode (See Settings Applications – Security Mode), a third option, “Admin”, will be available.
Application Folders
From the Home Desktop, the user can access all of the applications available through application folders. These folders are used to segregate the programs into identifiable groups.
Active Tasks Folder - The Active Tasks folder gives the user access to all running applications on the
device. When an application is running, but is not the currently displayed program (i.e. minimized), its
icon will be displayed within this folder. To show the application on the screen (i.e. maximize), the user
can enter the Active Tasks folder, and tap the desired program icon.
Internet Folder - The Internet folder contains the standard Internet and networking applications of the
MT7570. Access to Web Browsers, E-mail Clients (if installed), Voice-Over-IP utilities (if installed), and
others is here.
Accessories Folder - The Accessories folder contains simple applications for everyday use such as a
text editor and calculator.
System Settings Folder - The System Settings folder contains all of the MT7570 settings applets, giving
the user control over the entire system. Please see the Settings Applications section for more information.
Application Icons
Applications can be run by tapping on the application icon.
5-4
USER’S GUIDE
MT7570 Vehicle Mount Terminal
AML Client Connect (AMLcc) & AML Mini Client Connect (MiniCC)
AML Client Connect (AMLcc) is a simple graphical front end for a variety of terminal emulators and
network client applications. It supports many commonly used client protocols including NEC
VT100/102/220, Microsoft Windows Remote Desktop Protocol, IBM 3270 over telnet (TN3270), IBM
5250 over telnet (TN5250), Virtual Network Computing (VNC), Hypertext Transfer Protocol (HTTP), and
custom application launching.
AMLcc was designed to give the end user simple control over each terminal specific setting, while still
attempting to allow for nearly every possible network host setup. Please contact [email protected]
for feature requests.
MiniCC, or AML Mini Client Connect, is a small front end for launching previously defined connections.
The pairing of the two applications allows an administrator to define all functions of the connections, and
gives the end user a much more simple interface for connecting.
Connecting using MiniCC
To connect to a previously defined connection using MiniCC, activate the Mini Client Connect icon on
the Home Desktop.
The user can select the desired connection either by tapping the icon in MiniCC or by using the arrow
buttons on the right of the window. Tapping “Connect” will start the connection, while pressing “Cancel”
will exit MiniCC.
5-5
USER’S GUIDE
MT7570 Vehicle Mount Terminal
Defining Connections in AMLcc
To access AML Client Connect, enter the System Settings folder and select the “Setup Clients” icon.
AMLcc's main window will appear.
Connection Status Window – Displays all errors and warnings after testing the connection to allow
the user to diagnose problems.
Host Connection Selection – Allows the selection of an existing connection
Test Button – Initiates the connection for testing
Help Button – Displays the AMLcc Help
Edit Button – Allows editing of the currently selected connection
Delete Button – Deletes the currently selected connection
New Button – Create a new connection
Quit Button – Exit AML Client Connect
5-6
USER’S GUIDE
MT7570 Vehicle Mount Terminal
Editing and Creating Connections
Select an existing host connection and tap the “Edit” button or press the “New” button to bring up the
Edit Connections window.
Editing and Creating Connections – General Tab
Connection Name – The name of the connection can be any combination of alpha-numeric
characters and is displayed in MiniCC
Host Server – Host server or address to connect to
Protocol – Protocol / Terminal Emulation to use for the connection
NOTE: See Protocol Information for more information
Username – User name to use for the connection's login (if applicable)
Password – Password to use for the connection's login (if applicable)
Command – Command to run on the device when using a custom protocol
Protocol Information
VT100 (VT102)
The VT100 was a video terminal made by Digital Equipment Corporation (DEC) which became the de
facto standard used by terminal emulators.
AML Client Connects uses a customized version of the standard UNIX/Linux terminal emulator, xterm.
All standard xterm features have been retained.
5-7
USER’S GUIDE
MT7570 Vehicle Mount Terminal
VT220
The VT220 was a terminal produced by Digital Equipment Corporation from 1983 to 1987. It was similar
to the earlier VT100 series of terminals, but added support for the Multinational Character Set and came
with a redesigned keyboard, much smaller physical packaging, full support for 8-bit downloadable
character sets, and a much faster microprocessor.
As with the VT100 emulation, AMLcc uses a custom xterm version for VT220 emulation.
IBM 5250
IBM 5250, originally, was a particular model of a terminal device sold with the IBM System/34 minicomputer system. Similar to the IBM 3270, it is a block-oriented terminal protocol, yet is incompatible with
the 3270 standard. The term "5250" now refers to the content of the data stream itself; few physical
5250 terminals still exist, although they are still used to provide a "connection of last resort," hard-wired
to the host computer. As ethernet grew, 5250 via the telnet protocol (TN5250) was developed for use
over modern day networks.
5250 is almost exclusively used to communicate with IBM AS/400 and iSeries machines. AMLcc uses a
customized version of the open source project tn5250 for 5250 emulation. tn5250 can be found at
http://tn5250.sourceforge.net.
IBM 3270
Like IBM 5250, the 3270 terminals were closely tied to the mainframes that they were directly connected
to. 3270, however, gave much more control of the presentation and user input to the terminal itself. In
fact, 3270 is more akin to modern web browsers than telnet clients. Just like 5250, as telnet grew to be
the mainstream low level protocol, TN3270 was developed to use 3270 emulation over telnet.
AMLcc uses the x3270 for 3270 emulation. Many options for x3270 are available through it's own menu
system.
RDP - Remote Desktop Protocol
Remote Desktop Protocol (RDP) is a multi-channel protocol that allows a user to connect to a computer
running Microsoft Terminal Services. Based on the ITU T.share protocol (also known as T.128), the first
version of RDP (called version 4.0) was introduced with Terminal Services in Windows NT 4.0 Server,
Terminal Server Edition. It is now a mainstay of Microsoft Windows Professional and Server additions.
Rdesktop provides AMLcc with RDP connectivity. The current version supports up to RDP Version 5.
VNC - Virtual Network Computing
Virtual Network Computing (VNC) is a desktop sharing system which uses the RFB (Remote FrameBuffer) protocol to remotely control another computer. It transmits the keyboard presses and mouse clicks
from one computer to another relaying the screen updates back in the other direction, over a network.
VNC is not used commonly in production environments because of it's high bandwidth usage, and due
to the high quality of newer protocols such as RDP. However, it is very easy to setup one-to-one connections and does not usually require expensive server implementations like RDP.
5-8
USER’S GUIDE
MT7570 Vehicle Mount Terminal
Editing and Creating Connections – Terminal Tab
**NOTE: Not all protocols have all options
Custom Terminal Name – Disregards the standard definition of terminal name (i.e. VT100 for a
VT100 connection) and will send the server this string as the terminal id
Custom ENQ Answer Back – String to reply with when the server sends an ENQ
Login String Searching Password String Searching Command String Searching – String searching tells the terminal emulator to automatically send
some arbitrary data when the client receives a certain search string.
An example would be to enter “Username:” in the Login Search box and “MyLogin” in the reply. When
the server sends the prompt for “Username:” the client will automatically send back “MyLogin”
5-9
USER’S GUIDE
MT7570 Vehicle Mount Terminal
Editing and Creating Connections – Display Tab
**NOTE: Not all protocols have all options
Cursor and Colors – Sets the default colors for the text terminals and allows enabling
the blinking cursor.
Terminal Display Size – Allows custom definitions of the width and height in characters that
should be shown on the display. Standard emulation is 24x80. The Offset allows the user to
move the location of the text.
**NOTE: The client will always use the largest font available for the requested size. Tap the “Test” button
to see what the current setup will look like, and tap the “Reset” button to reset the offset and size to
24x80 centered on the screen.
5-10
USER’S GUIDE
MT7570 Vehicle Mount Terminal
Resolution reduction – Force the graphical server connection to reduce the screen size form
800x600 to 640x480. The MT7570's largest resolution is 800x600.
Force color depth reduction – Tell the graphical server connection to only send 8-bit coloring
information. This can save on bandwidth of the connection.
Start in full-screen mode – Display the connection full screen (do not decorate as a window and
hide the Quick Access Panel)
**NOTE: The connection will fill the ENTIRE display of the MT7570. If the server-side implementation has
no way of allowing the user to disconnect, then the user will not be able to exit the connection. If an
external keyboard is connected and the protocol is RDP, then <Ctrl><Alt><Enter> will switch between
window mode and full-screen mode.
Desktop Sharing Mode – The default for VNC is to disconnect any previous connections to the
server before allowing a new connection. This allows multiple connections to one VNC server.
5-11
USER’S GUIDE
MT7570 Vehicle Mount Terminal
Editing and Creating Connections – Web Browsers
Select Browser – For HTTP/WWW connections, the user can select different web browsers with
varying capabilities.
Description – The description of the current selection will be shown.
Web Browser Descriptions
Mozilla Firefox
The full desktop version of Firefox.
Firefox is the most advanced of the web browsers on the device. It is a completely full featured, modern
browser that will handle almost anything thrown at it. However, there is a major trade-off in speed while
using Firefox as opposed to any of the other browsers. Firefox should only be used for situations where
a modern desktop browser is necessary.
5-12
USER’S GUIDE
MT7570 Vehicle Mount Terminal
Web Browser Descriptions (cont’d)
Links2
Links2 is a flexible browser with very decent rendering.
Links2 is the same web browser that is available for the AML M7100 family. This browser has a minimalistic user interface (menus are accessed by hitting <ESC> on the keyboard) and can handle most websites very well. Links2 is very robust, but uses a completely different graphical rendering system than the
other browsers. This may give different coloring and rendering of the web pages than expected.
AML Mini-browser
Great rendering for the speed
The Mini-browser combines most of the capabilities of Firefox with many of the speed advantages of the
lighter browsers. It will render web pages as expected using a modern day browser; however it does
not have the ability to handle some website embedded controls.
5-13
USER’S GUIDE
MT7570 Vehicle Mount Terminal
Chapter 6
MT7570 Settings Applications (Linux®)
Audio Mixer
Bluetooth Setup
Embedded Server Control
User Interface Settings
802.11b/g Radio Settings
On-Screen Keyboard Settings
RS-232 Monitor Setup
Security Mode Settings
AMLcc
Software Version Check
Set Time and Date
Touchscreen Calibration
Linux Shell (xterm)
6-1
USER’S GUIDE
MT7570 Vehicle Mount Terminal
Settings Applications – Audio Mixer
Allows the adjustment of the system speaker volume and the gain on the microphone input.
Settings Applications – Bluetooth® Setup
The MT7570 can be equipped with an optional Bluetooth module to allow short range wireless connectivity with other Bluetooth enable devices. The MT7570 with the Linux operating system supports both
HID and standard RFCOMM Bluetooth profiles in either master or slave modes. The selection of the
mode depends on the style of operation desired.
Example: Connecting a Bluetooth hand held barcode reader to the MT7570
1.) Select the Bluetooth Setup icon from the Settings Screen. The Bluetooth Control application will
start and present the user with the basic Bluetooth options, along with a list of currently trusted devices.
6-2
USER’S GUIDE
MT7570 Vehicle Mount Terminal
Settings Applications – Bluetooth® Setup (cont’d)
2.) Select the "Add" button. The MT7570 will scan for all nearby devices and present a list of the
respondents. Select the device to add and tap "Select". If the necessary device is not in the list (i.e.
was out of range or turned off during the scan), then select the "Custom" option.
6-3
USER’S GUIDE
MT7570 Vehicle Mount Terminal
Settings Applications – Bluetooth® Setup (cont’d)
3.) The "Edit Device" dialog will appear. In this example, a barcode scanner that can emulate a Bluetooth keyboard (HID Bluetooth) is being connected. The "Connection" type is set to "HID Incomming",
meaning that the scanner will initiate the HID connection. Channel is set to 1 (very rarely will this ever
need to be changed, as the Bluetooth devices will automatically negotiate which channel to use). Verify
that the address is correct (i.e. "00:00:00:00:00:00") and press "OK".
4.) Exit the Bluetooth Control application by pressing "OK". The Bluetooth subsystem of the MT7570
will be restarted. The scanner can now be connected to the MT7570 (see the 3rd party device's manual
for connection instructions). If the MT7570's connection was set to "Outgoing/Master", the connection
would be created immediately.
6-4
USER’S GUIDE
MT7570 Vehicle Mount Terminal
Settings Applications – Embedded Servers
Gives control over the embedded Telnet, FTP, and WWW servers. The MT7570 must be restarted to
commit any changes made to these settings.
**NOTE: For FTP and Telnet access, the username is “aml” and the password is “aml”. The home
directory is /home/aml.
Settings Applications – User Interface
Allows the user to change the screensaver timeout and modify touchscreen settings.
Settings Applications – Radio Settings
Allows the user to setup the internal 802.11b/g radio on the MT7570. See the 802.11b/g Radio Setup
section for more information.
Settings Applications – On-Screen Keyboard
Allows modifications to the on-screen keyboard (xvkbd). The user can modify the size of the keyboard
as well as the layout and function key definitions.
6-5
USER’S GUIDE
MT7570 Vehicle Mount Terminal
Modify the width and height of the keyboard
Select the keyboard layout
1. PC Keyboard – Standard PC keyboard layout
2. Numeric Keypad – Standard PC keypad
3. Simple Numbers – Numbers, Space, Backspace, Return, and Arrow keys
4. Horizontal Numbers – Simple Numbers layout in a horizontal row format
Show the Function Keys on the keyboard
Lock Shift when pressed (i.e. pseudo CAPS LOCK)
Show the keypad with the PC keyboard layout
Lock Control and Alt keys when pressed
Function key remapping
When using the PC Keyboard layout and displaying the Function keys, the user can redefine the keys as
follows:
\\r – defines a carriage return
\\e – defines an Escape
\\t – defines a Tab character
\\ - defines the '\' character
6-6
USER’S GUIDE
MT7570 Vehicle Mount Terminal
Settings Applications – RS-232 Monitor
AML recommends the use of USB barcode scanners and data input devices on the MT7570; However,
as legacy RS-232 equipment is still widely available, the RS-232 Monitor settings allow the modification
of the RS-232 port settings. The settings must match the external RS-232 barcode scanner's settings
exactly.
**NOTE: To facilitate the use of powered barcode scanners, the MT7570 RS-232 port has a 5 Volt
output on pin 9.
Settings Applications – Security Mode
The AML MT7570 allows three different user security modes, each with a varying degree of restrictions.
Minimal: The user has access to all system settings including network settings. The user can set and
change passwords and has complete control over the system. This is NOT recommended for everyday
use.
Medium: The user is locked out of all system settings. AML Mini Client Connect will be used to make
connections to a host server (this removes the ability to edit and modify host connections). The user will
still have complete access to any non-setting specific applications. To enter the Administration Mode of
Minimal Security, tap the shutdown icon in the bottom left of the screen and select "Admin".
Maximum: The user will be locked out of all applications except for AML Mini Client Connect, the OnScreen Keyboard, and the Calculator. To enter the Administration Mode of Minimal Security, tap the
shutdown icon in the bottom left of the screen and select "Admin".
6-7
USER’S GUIDE
MT7570 Vehicle Mount Terminal
Settings Applications – AMLcc
See the AMLcc section.
Settings Applications – Software Version Update
The AML MT7570 includes an update feature that allows upgrading to the latest MT7570 software
release through the Internet. Make sure the device has access to the Internet before running the software update.
Settings Applications – Set Time and Date
Allows the user to set the MT7570 system clock. The MT7570, as with many computers, stores it's
system time in Coordinated Universal Time (UTC). After setting the system time and date, set the UTC
hour offset (the hour difference between standard UTC/GMT and the timezone the MT7570 is operating
in).
Using UTC allows the system to synchronize its clock to other computers via the Network Time Protocol
(NTP). By enabling the "NTP on Startup" option, the MT7570 will connect to the NTP server and adjust
it's clock to match during the boot-up sequence.
6-8
USER’S GUIDE
MT7570 Vehicle Mount Terminal
Settings Applications – Touchscreen Calibration
Settings Applications – Linux Shell – xterm
Gives the user access to a standard Linux shell as the “aml” user.
6-9
USER’S GUIDE
MT7570 Vehicle Mount Terminal
Chapter 7
Internal 802.11 b/g Radio (Linux®)
The M7570 vehicle mount terminal comes standard with an 802.11b/g radio and internal antenna. This
radio is specifically designed to communicate with any 802.11b or 802.11g Access Point. The range of
the radio depends greatly on the quality of the Access Point and the RF communications characteristic
of the environment where the device is used. The typical range for an 802.11 radio is 500 feet through
free air. Additional Access Points must be added to improve coverage in a larger area, or in electrically
noisy RF environments.
802.11 Fallback
Wireless LAN technology is designed to make maintaining a connection between two devices as reliable
and consistent as possible. Since the speed of the connection between wireless devices will vary as
range and signal quality varies, the wireless devices will intentionally sacrifice throughput (data rate or
connection speed as measured in bits per second) in exchange for maintaining a reliable connection. In
other words, a reliable connection at a lower speed is preferred over an unreliable connection at a higher
speed (i.e., it is easier to maintain the connection if the data rate is deliberately reduced, or put another
way, lower data rates will tolerate a higher range and/or worse signal quality). This characteristic is
known as fallback. For example, an 802.11b system will fallback from 11 Mbps to 5.5 Mbps as range
increases or signal quality decreases. Subsequent fallbacks from 5.5 Mbps to 2 Mbps and 1 Mbps are
also supported.
Interference and Coexistence
802.11 operates in a range of radio frequencies known as an "unlicensed" band (i.e. the FCC does NOT
require the use of a license in order to operate a radio transmitter in this range). This means that commercially available radio devices other than wireless LAN devices are permitted to use the same
frequency band as 802.11. Consequently, these co-existing radio devices can interfere or "jam" the
wireless LAN (and vice versa). The most troublesome devices are cordless telephones and microwave
ovens.
Fortunately, higher quality cordless phones tend to "listen" for a clear channel before becoming active
and will thus avoid interfering with a wireless LAN (i.e., the cordless phone seeks a clear channel for itself
so naturally avoids being interfered with or being a source of interference). Jamming from microwave
ovens is more severe but is usually restricted to the upper frequency range for 802.11 (it should be
noted that 802.11b/g divides the available frequency band into 11 channels [US]. The higher numbered
channels are most susceptible to microwave oven interference).
In each instance, jamming occurs only when the cordless telephone or microwave oven is active.
7-1
USER’S GUIDE
MT7570 Vehicle Mount Terminal
Security Issues
Much has been publicized in the mass media recently about security problems with wireless LANs.
Although it cannot be denied that some encryption algorithms currently used in 802.11 are flawed, the
fact is that security breaches of a wireless LAN require a deliberate attempt to access the network by an
intruder.
The primary issue is that many current users of wireless LAN have opted NOT to turn on security
features. If users were to enable the security features currently available (including only allowing known
systems access to the network and enabling WEP [Wired Equivalent Privacy] or WPA [Wifi Protected
Access]) on even the most basic access points, the intruder's work is much harder. Much as a burglar
will stray away from a house whose doors and windows are securely locked, so too will an attacker tend
to move past a wireless network when even the simplest security measures are enabled.
Encryption and Authoriztion Algorithm Overview
Before setting up any kind of wireless infrastructure or installing new devices within an existing site, it is a
good idea to fully understand the technology. Please refer to the Encryption & Algorithm Overview at
the end of this manual for a brief explanation of wireless security terms and how they relate to the
MT7570 and other AML products.
Setting up the MT7570 802.11b/g Radio
To enter the network settings control application, from the Home Desktop, tap the “System Settings”
folder and select the “Network Configuration” icon. The current network status will be shown.
7-2
USER’S GUIDE
MT7570 Vehicle Mount Terminal
Wireless Status
The wireless status frame displays the current access point association, network SSID, IP Address, the
MAC Address of the MT7570 radio, and the currently used encryption algorithm.
Link Quality Status
The Link Quality status bars graphically display the quality of the current association.
**NOTE: Signal Level and Noise Level are absolute values determined by the incoming access point
beacons. Link Quality, however, is a relative value that is determined by taking into account both the
Signal Level and Noise Level, along with other minor variables. These values should NOT be used to
determine access point placement or even network integrity. Even if the MT7570 is associated to the
access point and has a high Link Quality, the ability to actually transmit and receive data packets over
the wireless link may be flawed. The reverse is also true, even if the Link Quality is abnormally low, the
transmission of data may be working fine. These are presented as a reference point for the MT7570
only and cannot be compared to any other device.
Network Configuration
By tapping the “Network Configuration” button, the IP address assignment window will appear. The
MT7570 can be configured one of two possible ways:
Static Assignment:
All IP and routing settings should be entered in their appropriate box. These values will be network and
device dependent.
IP Address: The IP address that the MT7570 should use. This MUST be a unique IP address or
network problems will result.
Subnet Mask: The networks mask. This is dependent on the network implementation.
Gateway Address: The gateway server that the MT7570 should route packets to.
DNS Name Servers: The Domain Name Servers that the MT7570 should use for hostname
resolution.
DHCP (Dynamic Host Configuration Protocol):
In DHCP (Automatic) mode, the MT7570 will broadcast a request for network settings during its boot. A
DHCP server can respond with all necessary information and the MT7570 will be automatically configured.
7-3
USER’S GUIDE
MT7570 Vehicle Mount Terminal
Wireless Settings
To configure the MT7570's internal wireless radio, tap the “Wireless Settings” button. The 802.11 control
window will appear.
Network SSID/ESSID (Extended Service Set ID):
Each wireless network will have a unique ESSID that should be entered here. The ESSID consists of a
maximum of 32 alphanumeric characters and must be entered exactly the same way on each access
point and client device. If left blank, the MT7570 will attempt to connect to any wireless network available.
Security:
The following security modes are available on the MT7570:
No Security
WEP Open System
WEP Shared Key
WPA Personal (PSK)
WPA Enterprise (EAP)
For more information on these security types, see the Encryption and Authorization Overview section.
7-4
USER’S GUIDE
MT7570 Vehicle Mount Terminal
Encryption:
When using a WPA security mode, it may be possible to select the encryption algorithm between TKIP
(WPA) and AES-CCMP (WPA2/802.11i).
EAP Type:
When using WPA/WPA2 Enterprise (EAP), the user can select the EAP type. The following EAP types
are supported:
PEAP
LEAP
TLS
TTLS
For more information on these security types, see the Encryption and Authorization Overview section.
Client certificate directory:
When using EAP-TLS, a client (MT7570) side certification must be used. These certifications should be
stored in a local directory on the MT7570 such as /home/aml/certs. The directory location should be
entered here.
WEP Key Type:
When using WEP encryption, the WEP encryption keys can be entered in two different formats, either
hexadecimal or as a phrase.
Depending on the type of WEP, the following length guide must be used:
64 bit ASCII WEP code has 5 characters
64 bit HEX WEP code has 10 characters
128 bit ASCII WEP code has 13 characters
128 bit HEX WEP code has 26 characters
Hexadecimal – The entire key is entered as the hexadecimal value (i.e. 414D4C3132)
ASCII Phrases – Often the use of hexadecimal keys is cumbersome. It is possible to use phrases that
represent the actual key. The same WEP key mention above in its ASCII phrase form would be
“AML12”.
7-5
USER’S GUIDE
MT7570 Vehicle Mount Terminal
**NOTE: Using ASCII phrases is less secure than hexadecimal codes. When using hexadecimal, each
byte has 255 possibilities (00h – Ffh), however, when using ASCII, there are some byte combinations
that cannot be represented as text, and therefore cannot be entered from a standard keyboard. Because of this, a 40-bit WEP key that uses phrases becomes only 21-bits strong, giving a much smaller
number of key possibilites.
2^21 versus 2^40
(2097152 possibilities versus 1099511627776 possible combinations)
WEP Keys:
The MT7570 allows for multiple WEP keys to be entered at once, even though only a single key will be
used at any given time. Select the default key to use by tapping the radio button to the left of the
desired key number and enter the WEP keys.
Username / Identity:
Password / Passphrase:
In the WPA modes, often a username, password, passphrase, or a combination of these will be needed
to authenticate the client when associating to the access point. They should be entered here exactly.
Restart Interface
After modifying the network settings or to force a re-association to the network, the interface must be
restarted.
**NOTE: The MT7570 will NOT automatically restart the network interface if the settings are changed.
This must be done manually by selecting the “Restart Interface” button after all options have been configured correctly.
7-6
USER’S GUIDE
MT7570 Vehicle Mount Terminal
View Details
Selecting “View Details” will show the user all available information about the 802.11b/g radio.
Interface: Displays the standard interface configuration (“ifconfig”)
Wireless: Displays the wireless information (“iwconfig”)
Security: Displays the encryption status (“wpa_cli status”)
Quit
Exit the network configuration.
7-7
USER’S GUIDE
MT7570 Vehicle Mount Terminal
Chapter 8
The MT7570 with Windows® Xpe
The User Interface
The user interface of the MT7570 was designed with the user in mind. With a touchscreen as the sole
input device, using a desktop PC style interface would be nearly impossible. Resizing and manipulating
windows through a touchscreen would require very accurate taps on the display, and would quickly
become frustrating. The MT7570 uses a simple method of controlling applications and windows. At any
given time, the user is only able to interface with a single application, and, when necessary, an applications window will fill the entire screen to alleviate the need to resize the window.
Like many desktop PCs, the MT7570 uses a system of icons on a desktop for easy access to applications. The standard application set, along with the system settings applets are grouped into a series of
folders, each accessible by tapping on the desired icon.
8-1
USER’S GUIDE
MT7570 Vehicle Mount Terminal
MT7570 Home Desktop Overview
WIndows Task Bar
Windows Notification Area
Shortcut to On-Screen Keyboard
Shortcut to the Calculator
Windows Start Menu
Log Off System
Shutting Down and Rebooting the System
Start Menu Programs
8-2
USER’S GUIDE
MT7570 Vehicle Mount Terminal
Windows Task Bar
The task bar gives the user quick access to currently running programs. Minimized windows can be
restores by clicking on the Window's title in the task bar.
Windows Notification Area
Contains the current system date and time. Some applications only interface with the user with a small
icon they display in this area. Most will pop up a configuration screen if the user double clicks on the icon.
Shortcut to On-Screen Keyboard
Double-clicking this shortcut brings up the On-Screen Keyboard. The On-Screen Keyboard is also accessible by selecting START, PROGRAMS, ACCESSORIES, ACCESSIBILITY,ON-SCREEN KEYBOARD
Shortcut to the Calculator
Double-clicking this shortcut brings up the Windows Calculator. The Windows Calculator is also accessible by selecting START, PROGRAMS, ACCESSORIES, CALCULATOR.
The calculator can be switched between Standard and Scientific Modes under the View Menu.
Windows Start Menu
The user can quickly access additional programs to run or the buttons necessary to shutdown the
system, unless of course the user is in Internet Explorer's kiosk mode.
Log Off System
Unless you know the Administrator password or have an account on the system, you won't need to log
off. If you have logged off and don't have the passwords, reboot the system to auto-login as the default
user.
Shutting Down and Rebooting the System
When you click on Shutdown, you will be asked if you want to log off, shutdown, restart, or stand by.
Hitting the silver button on top of your MT7570 will start a Shutdown of the system. Holding the button
will force the MT7570 to power off.
Start Menu Programs
Most applications including the On-Screen Keyboard are quickly accessible through the Start Menu.
It is standard for Programs installed in Windows to add themselves to the Start Menu so the user
8-3
USER’S GUIDE
MT7570 Vehicle Mount Terminal
Start Menu Programs (cont’d)
doesn't have to hunt for the program. If you do not want an application to be in the start menu, right
click on the item in the start menu and select delete. This will delete the shortcut in the start menu. If
you want to add a program to the start menu, right-click on the start button and select Explore. Navigate to the folder name you want the application accessed from and create a shortcut to your application by right clicking and selecting NEW, SHORTCUT.
8-4
USER’S GUIDE
MT7570 Vehicle Mount Terminal
MT7570 System Settings
16
17
Console
My Current Connection
Embedded Server Configuration
IE Settings
Look for new Software Updates
My Computer
Network Configurations
On-Screen Keyboard
Reboot and Protect Compact Flash
Reboot and Unprotect Compact Flash
RS-232 Configuration
Sound Settings
Task Manager
Time and Date
Touch Screen Calibration
Wireless Configuration
BlueSoleil (if bluetooth option)
8-5
USER’S GUIDE
MT7570 Vehicle Mount Terminal
Console
Open a Windows Command Console.
My Current Connections
The first time you run My Current Connection, My Current Connection Setup screen will come up. Here
you can create connection profile and assign one to your My Current Connection icon. Once configured
(while the file based write filter is OFF if you want it to persist past the next reboot), users can simply
double click on this icon to make the connection to your Web application, Remote Desktop (so long as no
office tools are used), or legacy host using telnet, Tera Term Pro, TN5250, wc3270, or FTP clients.
Embedded Server Configuration
Simply the URL for the local Embedded Server Administration. Admin pages are not accessible by default.
See Configuring the Embedded Web / FTP server details for more information. If the site is already configured then user will be prompted for username and password before viewing the server's admin pages.
IE Settings
Configure the IE homepage or whether or not to dial an Internet connection whenever an application
attempts to access the network.
8-6
USER’S GUIDE
MT7570 Vehicle Mount Terminal
IE Settings (cont’d)
Look for new Software Updates
This shortcut should be set to a URL for users to acquire a vendor, reseller, or software system
provider's software update site.
My Computer
Open My Computer to view storage devices connected to the computer.
8-7
USER’S GUIDE
MT7570 Vehicle Mount Terminal
Network Configuration
Standard Windows Network Configuration screen. From this screen you can create new dialup and/or
VPN network configurations, setup the local network, and change the firewall settings for each connection.
8-8
USER’S GUIDE
MT7570 Vehicle Mount Terminal
On-Screen Keyboard
Starts the Microsoft On-Screen Keyboard
Reboot and Protect Compact Flash
Stop the operating system from writing unnecessarily to the Compact Flash card. All file writes on the C
drive are actually writes to virtual files in memory when the filter is turned on. Requires and enforces a
reboot to take effect. See page 9.1 for more info.
Reboot and Unprotect Compact Flash
Stop the protecting the Compact Flash card from the operating system. All file writes on the C drive
actually write to the CF card. New application installations or configuration of default settings should be
done in this mode, so long as the Terminal is immediately put back to “Reboot and Protect Compact
Flash”. Requires and enforces a reboot to take effect. See page 9.1 for more info.
8-9
USER’S GUIDE
MT7570 Vehicle Mount Terminal
RS-232 Configuration
Open Softcom32 configuration to modify COM2 port settings or stop running SoftCom32 or COM2.
SoftCom32 converts data coming in on COM2 into keyboard input. This is typically used for serial
barcode scanners. (Note: if connecting a modem on COM2, SoftCom32 will need to be disabled.)
Sound Settings
Open the windows default sound configuration.
8-10
USER’S GUIDE
MT7570 Vehicle Mount Terminal
Task Manager
Shortcut to the standard Windows Task Manager that doesn't require CTRL-ALT-DEL to be entered into
a keyboard.
Time and Date
Open the windows default time and date configuration panel.
8-11
USER’S GUIDE
MT7570 Vehicle Mount Terminal
Touchscreen Calibration
Open the Touchscreen Configuration Utility to update Touchscreen calibration or modify right-button processing.
8-12
USER’S GUIDE
MT7570 Vehicle Mount Terminal
Wireless Configuration
Configure your Wireless Network Profiles and Security Settings for WPA/WPA2 (EAP-TLS,EAPTTLS,PEAP/EAP-GTC, PEAP/EAP-MSCHAP V2,LEAP,EAP-FAST), WPA/WPA2 Passphrase, 802.1x
(EAP-TLS,EAP-TTLS,PEAP/EAP-GTC, PEAP/EAP-MSCHAP V2,LEAP,EAP-FAST, Host Based EAP),
Preshared Key.
8-13
USER’S GUIDE
MT7570 Vehicle Mount Terminal
BlueSoleil (Bluetooth option)
Configure the Bluetooth option. First, setup your device from Tools, My Bluetooth device....
Then, if you are connecting to a device with a preset PIN, goto My Bluetooth, Security, set Default PIN. Then go
to My Bluetooth, Bluetooth Device Discovery and pair with your device. For all other situations, see your other
devices manual for how to set it up properly. Be patient. Getting Bluetooth up and running the first time can be
frustrating. Once your device is paired (while the File Based Write Filter is OFF), the pairing will be remembered in
the future.
8-14
USER’S GUIDE
MT7570 Vehicle Mount Terminal
Chapter 9
Configuring the MT7570 for your work-site
!!!IMPORTANT!!!
Your MT7570 comes with a file based write filter which is on by default. The file based write filter sits
between the Windows Operating System and the Compact Flash card where all the information is actually being stored.
What does this mean to you?
1. The only directories you can really write files to while the file based write filter is active are:
• C:\UserData\
• The default user desktop at “C:\Documents and Settings \MT7570\Desktop\”
2. Files in all other directories are actually virtual copies of the file in memory. The file will revert or be
lost on the next reboot.
3. You can turn this filter on and off to install the programs that you need, but it needs to be turned on
during regular use. Failure to keep the file based write filter turned on will seriously shorten the lifespan
of the Compact Flash card where your files and operating system reside.
4. You can add more file or directory exclusions than the ones listed above if you need to (such as a
applications program directory to save settings).
!!!MICROSOFT LICENSE ALERT!!!
The MT7570 was designed, targeted, and licensed for use as a vehicle mount terminal, not as a general
purpose User Desktop. Please do not install any “Office” applications in a way that they are generally
accessible by the user.
!!!QUICK START ESSENTIAL!!!
To quickly turn the file based write filter on and off to install applications written for your company:
Open the System Settings shortcut your desktop (or type “C:\System Settings” in the Start-> Run box)
1. Double click on “Reboot and Unprotect Compact Flash” to reboot and bring up the MT7570 with the
write filter disabled.
2. Install your applications. Installations requiring a DVD-ROM or CD-ROM drive will need to access the
disk over the network on another PCs DVD or CD-ROM or via a USB DVD or CD-ROM.
3. When you have finished making all of your changes, Double click on “Reboot and Protect Compact
Flash” to reboot and bring up the MT7570 with the write filter disabled.
9-1
USER’S GUIDE
MT7570 Vehicle Mount Terminal
To Open a folder:
Hit Start and select Run. Enter the name of the folder you wish to run in the Open box. Or, right-click
and create a shortcut on the desktop targetting the folder. Double click on the shortcut icon.
Changing the images used by the screen saver:
The first way is to Reboot and Unprotect the Compact Flash under System Settings, right-click on the
desktop, select Screen Saver, select options, select a new directory that already contains the intended
images, then Reboot and Protect the Compact Flash again under System Settings.
The second way is to Reboot and Unprotect the Compact Flash under System Settings, add or delete
image files in the C:\Windows\Screen Saver Images directory, then Reboot and Protect the Compact
Flash again under System Settings.
Getting at My Computer to map network drives:
Open System Settings. Right click on the My Computer shortcut.
Changing environment variables:
Hit the Start Button and select Control Panel, then select System. The System Properties panel should
pop up. Select the Advanced tab. Select the Environment Variables button near the bottom. Here you
can add, remove, and modify environment variables which you would have set in Win95's or Win98's
autoexec.bat.
Running MFC and other Standard “Win32” applications:
The MT7570 can run most WIN32 and MFC executables as is. If a program has no install, simply copy
the program to the device and run it. Otherwise, running the standard Windows XP installation will work
in most cases.
To persist a program on your Terminal beyond the next reboot: Reboot and Unprotect the Compact
Flash under System Settings, run the Program's Install and configure any settings you want to be the
default, then Reboot and Protect the Compact Flash again under System Settings.
Running .NET applications:
The MT7570 comes with .NET 2.0 framework already installed. Simply install your .NET 2.0 windows
applications as you would any other XP compatible application.
To persist a program on your Terminal beyond the next reboot: Reboot and Unprotect the Compact
Flash under System Settings, run the Install, then Reboot and Protect the Compact Flash again under
System Settings.
9-2
USER’S GUIDE
MT7570 Vehicle Mount Terminal
Running Wscript VB and Jscript applications:
VB and Jscript script applications can be run by creating a shortcut to:
c:\Windows\system32\wscript.exe.<path>\<filename>.<extension>
where <extension> is “.vb” or “.js”.
For example: a file, tellme.js, on the desktop, containing:
//tellme.js
WScript.Echo(“Tell Me About It”); //Capital WS and Capital E
Would be run by a shortcut targeting:
C:\Windows\System32\WScript.exe “C:\Documents and Settings\MT7570W\Desktop\tellme.js”
Running Company Intranet Web Pages in kiosk mode:
You can run Internet Explorer in kiosk mode to access programs written on your company's web site.
To open your site with Internet Explorer in kiosk mode, create a shortcut to:
“c:\Program Files\Internet Explorer\iexplore.exe" -nohome -k http://www.mywebsite.com
If didn't purchase the attachable keyboard, you may need to write or purchase a separate program, or
provide a keyboard on the web page to ensure that the on-screen keyboard is always available. The
user can close the default On-Screen keyboard at any time, but will not have any way to get it back
besides rebooting the device.
Also, any website targeted for use in kiosk mode should include navigation buttons. The typical back,
home, and refresh buttons will not be displayed while in kiosk mode.
To open a web site normally you can create a shortcut to:
“c:\Program Files\Internet Explorer\iexplore.exe" -nohome http://www.mywebsite.com
To open the default homepage, just create a shortcut targeting:
“c:\Program Files\Internet Explorer\iexplore.exe"
Connecting to legacy servers:
The MT7570 comes with several applications to help your users connect to older terminal based
systems, beyond the Window's defaults.
1. TELNET (Default XP telnet client) – connect to terminals supporting VT52, VT100, ANSI, and VTNT
type terminals. Can be used in targeted shortcuts as:
“C:\Windows\System32\telnet.exe” hostNameOrIPaddress[:port] where [:port] is optional and
hostNameOrIPaddress is the name or IP address of the server.
2. TeraTerm – connect to terminals supporting VT, VT101, VT102, VT282, VT320, VT283 or connect
directly to a serial port. Typical automations of TeraTerm would have you connect to the server you
intend to connect to, setup and configuration, save the configuration profile and then run the configuration as:
“C:\Program Files\TTERMPRO\ttermpro.exe” /F=file_based_on_terarterm.ini
9-3
USER’S GUIDE
MT7570 Vehicle Mount Terminal
3. TN5250 – connect to IBM terminals with emulations such as IBM-3477-FC, IBM-3477FG, IBM3180-2, IBM-3179-2, IBM-3196-A1, IBM-5292-2, IBM-5291-1, and IBM-5251-11. Can be targeted in a
shortcut as like:
“C:\Program Files\TN5250\TN5250.exe” -env.TERM=IBM-5251-11
-env.DEVNAME=%USERNAME%S1
4. wc3270 – connect to IBM 3270 type terminals. New profiles can be setup by running "C:\Program
Files\wc3270\wc3270wiz.exe"
5. Hyperterm – Intended for connecting to BBS's and other serial line devices over a modem, Hyperterm can be targetted in a shortcut as:
“C:\Program Files\Windows NT\hypertrm.exe”
6. FTP (Default XP ftp client) – FTP batch transactions can be scripted with a shortcut targeting:
“C:\Windows\System32\FTP.exe -s:”scriptfile” hostNameOrIPaddress
Connecting to remote RDP servers using Remote Desktop:
To connect to a Windows Server running Terminal Services, select the START button, then select
PROGRAMS,ACCESSORIES,COMMUNICATIONS,REMOTE DESKTOP CONNECTION. If you need to
run remote desktop from a shortcut, script or batch file, you can run it as:
“C:\Windows\System32\mstsc.exe” /v:\\computername /f
Replacing \\computername with the real computer name or IP address.
Connecting to Skype and other VOIP services:
Connecting to Skype and getting VOIP working on your MT7570 Terminal requires three things.
A VOIP client
A VOIP account to connect to
A microphone plugged into the microphone slot on the back of your terminal
Once you have acquired a microphone and tested it using the Sound Settings, Reboot and Unprotect the
Compact Flash under System Settings. Now Open the Start Menu and click on PROGRAMS, OTHER
INSTALLATIONS, CONFIGURE AND INSTALL SKYPECLIENT. After generating a new Skype account
and installing the client, run Reboot and Protect the Compact Flash again under System Settings.
Configuring the Embedded Web / FTP server:
The MT7570 comes with the Xitami Web and FTP Server already installed under “C:\Program
Files\Xitami”. If you wish to run your Terminal as a web kiosk but have no network connection, you can
set up your own local website under “C:\Program Files\Xitami\webpages”.
To access this website creating a shortcut targetting: "c:\Program Files\Internet
Explorer\iexplore.exe" -nohome http://localhost. For more information on using Xitami, including
adding user pages that require a password, see the Xitami documentation on your Terminal or at
http://www.xitami.com.
9-4
USER’S GUIDE
MT7570 Vehicle Mount Terminal
The Server's Admin account is turned off by default. To enable the admin web-user you will need to modify
“C:\Program Files\Xitami\xitami.aut”. Once enabled, you can configure the Web and FTP server by connecting to http://localhost/Admin. To remove the Xitami web and ftp server, terminate the running Xitami server
(by double clicking the (X) icon in the notification area of the task bar. Uncheck “Auto-run at login”, and click
terminate), then delete all files under C:\Program Files\Xitami. You may also want to remove the original zip
file found in C:\Windows\OEM. After that, you can close the HTTP and FTP ports in the windows firewall.
Temporarily mapping a network drive:
Open Console from System Settings. Where Z is the drive letter you want to map to, Enter:
NET USE Z: \\computername\sharename password /USER:domainname\username /PERSIST:NO
Persistently mapping a network drive:
Open Console from System Settings. Where Z is the drive letter you want to map to, Enter:
NET USE Z: \\computername\sharename password /USER:domainname\username /PERSIST:YES
Deleting a mapped drive:
Open Console from System Settings. Where Z is the mapped drive letter you want to remove, Enter:
NET USE Z: /DELETE
Running an application on system startup.
The easiest way to run an application on windows startup is to add a shortcut to your application with all
of it's correct parameters in the target to the “C:\Documents and Settings\MT7570\Start
Menu\Programs\Startup” directory.
Adding and removing exclusions with the File Based Write Filter.
If the default directory exclusions aren't enough for you, or you don't wan't anything actually saved to the
Compact Flash, then you will need to use fbwfmgr.exe to modify the current filter settings. Typing
fbwfmgr.exe at the Console will show you the current settings.
To add an exclusion: fbwfmgr /addexclusion C: “\Program Files\MyApp”
On the next reboot applications and users will be able to write persistent data to that directory.
NOTE: there is a space between “C:” and “\Program Files\MyApp”. The directory must be the full directory from the root, not including the drive letter.
To remove an exclusion: fbwfmgr /removeexclusion C: “\Documents and Settings\MT7570W\Desktop”
After rebooting the Terminal, Applications and Users can create or modify files on the desktop, but a reboot
will undo it all.
NOTE: there is a space between “C:” and “\Program Files\MyApp”. The directory must be the full directory from the root, not including the drive letter.
9-5
USER’S GUIDE
MT7570 Vehicle Mount Terminal
Encryption and Authorization Algorithm Overview
Before setting up any kind of wireless infrastructure or installing new devices within an existing site, it is a
good idea to fully understand the technology. The following is a brief explanation of wireless security
terms and how they relate to the MT7570 and other AML products.
WEP
Wired Equivalent
Privacy
WEP was initially intended to provide a level of confidentiality on a wireless
network that was comparable to a wired infrastructure. WEP does not allow for
any true authorization (only encryption) and does not protect users or devices
from each other on the network. There are two main WEP types: WEP Open
System (Standard WEP) – All data transmissions are encrypted with the WEP
key. No attempt is made to authorize the client device. WEP Shared Key – In
Shared Key, a very insecure attempt to authorize the device is attempted. The
actual WEP encryption key is sent to the host (usually the access point) to verify
the identity of the device. This exposes the enciphering key to the network, and
should not be used. In a WEP enabled environment, each client holds the
common network encryption keys which can be either a 40-bit key for 64-bit
encryption or a 104-bit key for 128-bit encryption. These keys are common to all
devices on the network and are used to encrypt all data transmissions. Because
each network packet is encrypted with the same key, and because of flaws in the
actual cipher, WEP is no longer considered secure, and an attacker, depending
on network traffic, could determine the network encryption keys by eavesdropping on the transmissions. It has been demonstrated in a controlled environment
that these attacks can take as little as 10 minutes to determine a 40-bit key.
WPA
Wifi Protected Access
WPA was created in response to the weaknesses of WEP, and while it implements the majority of the IEEE 802.11i standard, it is not considered to be fully
compliant. WPA was only intended as a temporary measure to be used in place
of WEP while the final 802.11i standard was being drafted.
WPA was designed to work on all existing 802.11 hardware to provide a considerable amount of protection compared to WEP.
WPA was designed for use with an 802.1x (commonly referred to as RADIUS)
server to provide authentication and to distribute encryption keys to the clients. It
is possible, however, to use WPA in “Personal” Pre-shared key (PSK) mode
which allows the benefits of WPA without the need of the external 802.1x server,
but this is considered to be less secure. Each client in a PSK environment holds
a common passphrase that is used to generate the keys. Weak passphrases are
major concerns when using PSK. One major improvement in WPA over WEP is
the Temporal Key Integrity Protocol (TKIP), which dynamically changes keys as
the system is used. The more often that the encryption key changes, the less
data a potential attacker can get on the key; even if they were to determine the
current key, once a new key was rotated in, they would be de-authenticated
again. WPA also defined the use of EAP for authentication of users, however it
does not define all of the EAP types that are employed in WPA2.
WPA2
Wifi Protected Access
Version 2
WPA2 contains the following components: 802.1x for authentication (entailing the
use of EAP and an authentication server), RSN (Robust Security Network) for
keeping track of associations, and AES-based CCMP encryption to provide
confidentiality, integrity and origin authentication.
Encryption & Algorithm Overview
USER’S GUIDE
MT7570 Vehicle Mount Terminal
WPA2
(cont’d)
Wifi Protected Access
Version 2 (cont’d)
The CCMP algorithm is the heart of WPA2 and is what sets it apart from WPA.
CCMP was designed to replace both TKIP and WEP, and handles message integrity, encryption, and authentication. Most, if not all of the capabilities of WPA can
be implemented in WPA2 with CCMP, which is considered state of the art.
802.11i
IEEE 802.11i Standard
The IEEE standard. Commonly called WPA2.
TKIP
Temporal Key Integrity
Protocol
Dynamic key rotation algorithm often used in WPA environments.
CCMP
(AES)
Counter Mode with
Cipher Block Chaining
Message Authentication Code Protocol
Encipherment algorithm designed to replace TKIP and WEP in WPA2/802.11i.
CCMP is considered state of the art.
EAP
Extensible
Authentication Protocol
EAP is a general authentication method that can be used in many technologies, but
it is most commonly found in wireless LANs. A large amount of documentation
refers to WPA-EAP as “WPA Enterprise” even though it is an ambiguous term.
There are many subtypes of EAP, but only five have been described as standard.
The MT7570 supports the following EAP types for authentication.EAP-TLS – EAP
Transport Layer Security is the original standard wireless LAN EAP authentication
protocol. Although it is rarely deployed, it is still considered one of the most secure
EAP standards available and is universally supported by all manufacturers of
wireless LAN hardware and software. The requirement for a client-side certificate,
however unpopular it may be, is what gives EAP-TLS its authentication strength
and illustrates the classic convenience vs. security trade-off. EAP-TTLS - Tunneled
Transport Layer Security was co-developed by Funk Software and Certicom and is
widely supported across platforms. It was never fully ratified, only drafted (the draft
which has since expired), but is still common due to its decent level of security and
easy setup.
EAP-PEAP - Protected Extensible Authentication Protocol is widely available in
products, and provides very decent authentication security. Its method is similar in
design to EAP-TTLS but requires only a server-side certificate to create a secure
tunnel to protect user authentication. PEAPv0/EAP-MSCHAPv2 is what most are
referring to when the term “PEAP” is used. Behind EAP-TLS, PEAPv0/EAPMSCHAPv2 is the second most widely supported EAP standard in the world.
EAP-LEAP - The Lightweight Extensible Authentication Protocol (LEAP) is a proprietary EAP method developed by Cisco Systems, Inc. It is considered less secure
than other EAP types, even by Cisco, and is not recommended in new installations.
PSK
Pre-shared Key
Often called “WPA/WPA2 Personal”, PSK allows the use of common passphrases
for authentication. PSK is often used in smaller networks that wish to use the high
security of WPA/WPA2 but do not wish to employ an 802.1x authentication server.
802.1x
IEEE 802.1x
IEEE Standard for authentication. Often in wireless documentation, references to
“802.1x” are really meaning 802.1x Authentication server or RADIUS server that
provides authentication and encryption keys to the clients.
RADIUS
Remote Authentication
Dial In User Service
Often, administrators will call the 802.1x server the “RADIUS” server. RADIUS is an
authentication, authorization, and accounting protocol for applications such as
network access or IP mobility. In the wireless LAN environment, RADIUS is commonly used to implement the 802.1x standard.
Encryption & Algorithm Overview