1
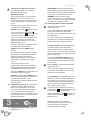
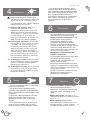
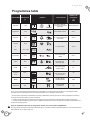
e n g l i s h
Instruction Manual
This appliance, which is intended exclusively for domestic use, has been designed for washing
dishes.
Very important: Read all of this manual before installing and using the dishwasher. You will find the
documentation and accessories inside.
This manual is designed so that the text matches the corresponding drawing.
0
If the appliance is to form part of a row of
kitchen fittings, fit the kitchen skirting and
if opening the door interferes with it, trim the
end until the door can open properly.
Identification
If you need to fit a piece of wood to the
front, follow the instructions that come with
the appliance documentation.
Identify your dishwasher model (“a”, “b”, “c”,
“d” or “e”) by comparing the control panel with
the illustrations.
1
Installation
1.1 Connection to the water supply (1.1.1)
The hose should run between the wall
and the bottom of the dishwasher (1.1.2),
making sure that the pipes are not twisted
or pulled too tight (1.1.3).
The water supply pressure should be
between 0.05 and 1 Mpa (0.5 to 10
kg/cm2)
If your dishwasher has a hot water intake,
you can connect the pipe to the hot water
tap. In this case, the maximum
temperature should not exceed 60ºC.
For column mounting, take the height of
the drain into account (1.2.2)
2
2.1 Open the door and switch on the
dishwasher by pressing the
button
(2.1).
2.2 Hard water. Water contains lime and its
hardness increases in direct proportion
to the quantity found.
Before using the dishwasher, you
should find out the hardness level of
the water by consulting the water
company, consulting the Technical
Support Service or using the Aquadur
strip included in the accessories bag.
1.2 Drain. Fit the elbow supplied and
observe the levels in the drawing (1.2.1).
Dip the stick in a glass of water for one
second. Shake it and wait for one
minute. The strip will tell you the water
hardness level according to the following
table:
1.3 Connection to the mains electricity
supply. Take the information on the
nameplate (1.3) into account and never
attempt to remove it.
As this is a built-in appliance, the
electrical plug must be accessible after
installation.
1.4 For fitting the dishwasher under a
worktop, first take into account the
dimensions shown in the diagram (1.4.1).
loosen and remove the leg supports
(1.4.2). Then place the dishwasher in
front of the worktop and use a
screwdriver to raise the rear leg from the
front (1.4.3), leaving a space of approx. 3
mm from the worktop.
Insert the dishwasher and ensure that the
pipes and cable do not get trapped
behind the skirting. Adjust it to the
worktop by turning the front legs (1.4.4)
and rear leg (1.4.3) until the top of the
appliance is just touching the worktop.
Initial settings
Hardness
Dial
position
Test
result
Scale
Scale
level (DH) level (HF)
Man
Elec
No salt
needed
L0
Standard
Pos. 1
L1
1 red strip
8-21 DH 14-38 HF
Medium
Pos. 2
L2
2 red strips
22-28 DH 39-50 HF
Hard
Pos. 3
L3
3 red strips
29-35 DH 51-63 HF
Very hard
Pos. 4
L4
4 red strips
Soft
Green
0-13 DH 0-13 HF
>35 DH
>63 HF
HF: Water hardness (French system) DH: Water hardness (German system)
This simple adjustment of the
dishwasher is vital for correct operation.
Please ensure that you do it.
Otherwise your appliance could be
seriously affected.
19
e n g l i s h
If the level is 0, DO NOT use salt. If
you have any questions, consult the
technical support service.
Electronic setting.
If your model is type A, hold down the
Opc button (2.2.1) for more than 3
seconds. The current value will appear
on the display when you release it L2
(2.2.2)
Press the same key several times until
you reach the required value.
Validate by pressing
button (2.2.3).
If your model has a Time Delay
(2.2.4) or Duo Zone
(2.2.5) or 1/2
Load (2.2.6) button, hold this button
down for at least 3 seconds. When you
release it, the current L2 value will
appear on the display (2.2.2), or pilot
lights will flash (2.2.7).
Press the same key several times until
you reach the required value.
Validate by pressing PROG button
(2.2.8).
For all other models (models “e” without
Option buttons), hold down the PROG
button for at least 5 seconds. On
releasing the button the current value
will be shown by flashing pilot lights
(2.2.7).
If the model has less than 5
programmes, level 0 will be shown by
the pilot lights switching off (except for
the steady END/STOP light) (2.2.9).
Press the PROG button repeatedly until
the desired value is reached.
Validate by releasing the PROG button
and not pressing it again for at least 10
seconds. After this time, it will
automatically store the value and exit to
the main menu.
2.3 Preliminary cleaning. You should run a
preliminary wash (without detergent,
dishes or rinse aid). First of all, if you
need to, load the dishwasher with salt
(2.3.1) without completely filling the
compartment. Fill it up with water (2.3.2)
and stir with a spoon. Close the lid and
start the programme.
3
Use
3.1 Regulating the top basket. Types of
regulation (3.1.1)
20
SUPER EASY: hold the basket by the
side handles and pull upwards with both
hands at the same time (both to raise and
lower it)(3.1.2). Ensure that it is level.
NORMAL: with the basket empty,
remove the stops (3.1.3); take the basket
out (3.1.4); insert it at the required height
and fit the stop back into place.
3.2 Putting the dishes into the machine.
Ensure that the dishes are
dishwasher-safe.
It is not advisable to put items made of
wood, silver, aluminium, decorated
porcelain or non heat-resistant plastic into
the dishwasher.
For correct washing, it is essential that
the dishes are positioned suitably in the
baskets without touching each other.
The lower basket is for the dirtiest items:
casserole dishes, bowls and plates.
Start to fill the basket from the outside
(3.2.1). Put the casserole dishes in facing
down, the soup dishes on the left and the
plates on the right.
If you have dropdown supports, you
can use them in their horizontal position
for large items such as casserole dishes
(3.2.2 - 3.2.3).
Put the cutlery in with the handle facing
downwards (3.2.4)
Knives and other sharp utensils should
be placed in the basket with their points
downwards or horizontally.
The top basket is for delicate items: cups,
glasses, porcelain, crystal and standard
size plates (3.2.5). There is an area for
long utensils and dropdown supports that
can be used for wine glasses when put
into vertical position (3.2.6).
For the Express programme or the Top
Load function
, all of the dishes should
be placed in the Top Basket (3.2.7).
And for the Bottom Load
function, the
dishes will be placed only in the Bottom
Basket (3.2.3).
Ensure that there is no obstacle
preventing the sprinklers from turning
around (3.2.8) or the detergent
compartment from opening.
e n g l i s h
Top/bottom load (duo-zone)
3.3 Detergent. You can use tablets, powder
or liquid. The amount to be used is
detailed in the progammes table. Pour
the required dose into the compartment
located inside the door (3.3.1) and close
the lid. In programmes that require an
additional dose, place it on top of the lid
(3.3.2).
3.4 Switching on (with the door open)
.
Uses half of the dishwasher capacity. Top
basket
, Bottom basket
, or both.
Half Load (1/2)
This is the same as Top Load (only the top
basket is used)
.
3.5. Checking salt and rinse aid levels.
Salt. If the pilot light
is lit up, you
have to fill the compartment. You should
not use salt if you do not need it (note
in section 2.2). If you do need it, follow
the steps explained in section 2.3, but fill
the compartment completely with salt.
If your appliance does not have a
warning light, you should fill the salt
compartment up after every 20 washes
for medium-hard water.
Any change of programme will deactivate
options that are not compatible.
3.8 Delay Timer
Allows you to delay the Dishwashing start
time. Press the key several times until you
see the delay required on the screen (3.8.1)
or pilot (3.8.2).
If you want to cancel the delay, press
.
3.9 Start-up
Rinse aid. If the pilot
is lit or the
indicator light (3.5.1) inside the door is a
light colour, always refill until the
compartment is completely full (3.5.2).
For A type models, press the
button
(2.2.6) and close the door. For other
models, simply close the door.
On display models (type B), the selected
programme will appear (P1, P2, etc.)
After the programme has started, if you wish
to change the programme or option, open
the door carefully (there is a risk of
splashes) and restart the dishwasher
.
3.6 Programme Selection. Programme
selection using the PROG button (2.2.10)
3.7 Selecting options.
All in 1 detergent
only)
(A type models
Hold down the
and OPC buttons
simultaneously for more than 3 seconds
(3.7.1).
If you use ALL-IN-ONE detergents, the
washing or drying results (and the times)
may be negatively affected, mainly in the
case of short and/or low temperature
programmes.
It is important to read the instructions on
the packet (3.3.3).
If in doubt, consult the detergent
manufacturer.
Time reduction
Shortens washing and drying times. This
can be used for the Intensive, Normal or
Automatic, Hygienizer and Economy
Programmes
For all models, when you close the door a
programme start beeper will sound.
3.10 Dishwashing process.
If there is a power cut during the
programme, once the power has been
restored, the dishwasher will continue to
operate normally from the same point at
which it stopped.
It is not advisable to open the dishwasher
door while it is in the process of washing.
Results could be affected. If you do, watch
out for hot water splashing out.
3.11 End of programme. When the programme
ends, the appliance will emit a beep and the
END (STOP) pilot light will come on, if your
model has one..
Switch off the machine
to energy saving.
. It will contribute
3.12 Warnings about use.
Avoid having the door open to avoid
accidents (3.12.1).
21
4
e n g l i s h
Maintenance
Leave the dishwasher slightly open if
you are going to be away for some time
so that the air can circulate inside it.
It is advisable to carry out the following
maintenance every month:
4.1 Cleaning the washing filter. It is
under the lower basket of the
dishwasher. Remove the basket and
extract the filter by turning it counter
clockwise(4.1.1). Take it out and wash
it under tap (4.1.2). Fit it again by
turning it clockwise(4.1.3). Ensure it is
fitted correctly by pulling it upwards.
4.2 Cleaning the sprinklers. Remove the
top sprinkler (if it has one) by pressing
it upwards and unscrewing it (4.2.1).
Unscrew the middle sprinkler (4.2.2).
Remove the lower one by turning the
lever counter clockwise and lifting it
upwards (4.2.3). Wash them under the
tap with a soft sponge that does not
leave scratches. Make sure that none
of the holes are blocked.
4.3 Cleaning the inside. Clean the inside
of your dishwasher using a dishwasher
cleaner or specific cleaning product
following the instructions.
4.4 Cleaning the outside. We recommend
using a damp cloth with soapy water.
Do not use abrasive products or those
that leave scratches.
5
Safety
• Do not use extension leads or adapters to
connect the dishwasher.
• The electricity supply should be at the
maximum power indicated on the nameplate
and the plug should have the regulatory earth
connection.
• If the power cable is damaged, it must be
replaced by the after-sales service or by
qualified personnel in order to avoid any
danger.
• Do not attempt to touch the inside of it. In
the event of any problem that you cannot
solve, contact the technical support service.
22
• Any people (including children) whose
physical, sensorial or mental limitations or
lack of experience and knowledge prevents
them from using the appliance safely, must
NOT use this appliance without the
supervision or instructions of a responsible
adult. Children should be supervised to
ensure that they do not play with the
appliance.
6
Environment
7
Diagnoses
This dishwasher has been designed with
environmental conservation in mind.
Please respect the environment. Load
the dishwasher to the maximum
recommended capacity for each
programme, positioning the dishes
correctly, and choose the appropriate
programme and options; this will save you
water and energy. Whenever you can,
avoid using the pre-wash programme. Do
not use too much detergent.
Management of old electrical and
electronic appliances.
Do not discard appliances by mixing them
with general household waste.
Hand over your old dishwasher to a
special collection centre.
Recycling household appliances avoids
negative consequences for health and the
environment and leads to the saving of the
energy and resources.
For more information, contact your local
authority or the store where you
purchased your dishwasher.
7.1 Technical problems or malfunctions.
When the dishwasher detects a
malfunction, it will advise you with alarm
and visual signals, depending on the
model:
Models with screen. The letter "F" is
displayed, followed by a number as well as
beeps (7.1.1)
Models without screen. It emits
continuous series of beeps from 1 to 10.
Example: 4 beeps - pause - 4 beeps - ... is
the same as F4.es lo mismo que F4.
e n g l i s h
The operation of the dishwasher could be occasionally affected by the spillage of dirt. Therefore, to avoid
problems, check the following aspects depending on the fault detected. As a first option, switch the
machine off and on again (Reset)
MODELS WITH
SCREEN
MODELS
WITHOUT
SCREEN
No. OF BEEPS
FAULT TYPE:
Door
F1
1
F2
2
Water inlet
F3
3
Drain
F4
4
Overflow
F5
5
Temperatura
F6
6
Temperature
F7
7
F8
8
Operating Pressure
F9
9
Water Distribution
F0
10
Communication
Comments
Aspects to be reviewed: User
Is the dishwasher door shut?
Is there water in the system?, Is the water supply on?, Is the filter of the input
electrovalve clean?, Is the water inlet hose lying straight and not twisted between
the wall and the dishwasher?, Is the drain at a higher level than the dishwasher
compartment?
Is the drain hose free from blockages?, Is the hose straight?, Are filters clean?,
Has the selected programme really ended?
Are the filters clean and free from dirt, puree, mash, etc.?
Run a programme with dishwasher cleaner… It may be due to the accumulation of
dirt and lime scale deposits in the heating system.
Run a programme with dishwasher cleaner… It may be due to the accumulation of
dirt and lime scale deposits in the heating system.
Temperature Detection Switch off the machine and start a new programme
Switch off the machine and start a new programme
Run a programme with dishwasher cleaner. It may be due to deposits that
have formed
If the fault persists, contact your technical support service.
If the fault persists, contact your technical support service.
Before calling, check the fault code. Remember that if you switch the machine off
cancel the malfunction signals.
you will
When you open the door, the beeper is deactivated. If you want to hear the beeps again, press
the
button (on A type models) or the PROG button (on other models)
Solving inefficiency problems:
Machine does not wash. Wrong programme? Consult the programmes table; Has the machine been
loaded correctly? See section 3.2; Are the sprinklers turning freely and/or are the holes blocked? See
sections 3.2 - 4.2; Is the filter fitted correctly? See section 4.1; Are you using the right detergent?
Make sure that it is appropriate for use in the dishwasher and it has not been damaged by keeping it
stored for a long time.
Machine does not dry. Wrong programme? In short programmes, drying efficiency is reduced; is the
correct amount of rinse aid being used? See section 3.5; If I use an All-in-1 tablet, can I do without
rinse aid? The use of rinse aid considerably improves drying efficiency; are the dishes loaded
correctly? See section 3.2; Are the items to be dried appropriate? For example, Tupperware (plastic)
items are not suitable for drying; when do you remove the items from the dishwasher? It is advisable
to wait 15 or 20 minutes after the programme ends.
The dishwasher does not switch on. Check the electricity supply, the power connection, whether fuse
has blown or whether you have pressed the on switch correctly
.
The programme does not start. Check whether the door is open or whether you have pressed the start
button correctly
(A type models only).
23
e n g l i s h
Programmes table
PROGRAMME TEMPERATURE
(°C)
SYMBOLS
TYPE OF DISHES
QUANTITY OF
DETERGENT
(gr)
***
Pre-wash
Cold
For dishes that are
not going to be washed
right away
Hygienizer
75ºC
For bacteria removal
25+5
Intensive
70ºC
For very dirty dishes and
casseroles
25+15
Normal
65ºC
For dirty dishes
25+15
25+5
or
Auto
Without detergent
55ºC - 65ºC
Economic*
50ºC
For not very dirty
dishes
Quick
55ºC
For dishes that
are hardly dirty
25
OptiA
60ºC
For not very dirty
dishes. 60min
25
Express **
40ºC
For dishes that are
hardly dirty only placed
in the top basket
20
50ºC
For dirty dishes
that are delicate
25+5
45ºC
Special crystal
programme
25
15 min.
Mixed
Delicates**
25 gr. of non-concentrated powdered detergent is equivalent to one and half level spoonfuls or one detergent tablet.
For tablet and liquid detergents follow the recommendations of the detergent manufacturer.
* The economic programme, standardised according to EN-50242, lasts longer than the other programmes; however, it
uses less energy and is better for the environment.
** The Express programme and Delicates programme should use powdered or liquid detergent which dissolve best.
*** If using combined washing products (All-in-1 tablets) be aware that they can modify the consumption parameters and
duration of the programmes.
Keep the additional information on programme duration and consumption. CONSERVE IT.
The programme information is laboratory-obtained data in accordance with the EN 50242 Standard. It is random data and
may therefore vary on day-to-day use.
24
I
II
0
1
1.1.1
1.1
1.1.2
1.1.
2
1.1.3
1.1.
3
Model
min. 25cm
max.
100 cm
a
min.
2 cm
25
1.2.1
1.2
1.
2
Serial Number
1.2
2.2
1.2.2
1.3
b
57
ES
MANUAL DE INSTRUCCIONES
FR
MANUEL D’UTILISATION
PT
MANUAL DE INSTRUÇÕES
GB
INSTRUCTION MANUAL
DE
BEDIENUNGSANLEITUNG
NL
INSTRUCTIEHANDLEIDING
CZ
NÁVOD K OBSLUZE A INSTALACI PRAâKY
HU
HASZNÁLATI ÚTMUTATÓ
SK
NÁVOD NA IN·TALÁCIU A OBSLUHU PRÁâKY
IT
MANUALE DI ISTRUZIONI
GA
MANUAL DE INSTRUCIÓNS
CA
MANUAL D’INSTRUCCIONS
EU
ERABILERA-ESKULIBURUA
Mix
70º
65º
50º
55º
70º
65º
50º
55º
PROG
PR
OG
820 mm
600 m
mm
m
0m
STOP
ST
OP
50º
1.4.1
1.
4.1
1.4
1.
4
1.4.2
1.
4.2
1.4.3
1.
4.3
1.4.4
1.4.
4
c
Mix
PROG
PR
OG
STOP
ST
OP
50º
d
2
2.1
2.2
2.2.1
2.
2.1
2.2.2
2.2.2
Mix
70º
Mix
70º
0
04/11
03/10
4/1
43
3/1
/110
05/11
DW3M00141
D
DW3
DW3M00050
M00141
M00050
0
DW3M00180
65º
50º
55º
PROG
PR
OG
65º
6
50º
55º
50º
L0
L1
L2
L3
L4
STOP
ST
OP
50º
e
2.2.3
2.
23
2.
2.2.4
2.2.4
2.2.5
2.2.
5
2.2.
2.2.6
6
2.2.
2.2.7
7
III
PROG
Mix
PROG
65º
50º
fin
7
55º
STOP
L0
L1
L2
L3
L4
50º
2.2.8
2.2.9
2.3
2.3.1
2.3.2
3.5
3.5.1
3.5.2
3.5.1
3.7.1
3.7
3
3.1.1
3.1
3.1.2
3.1.3
3.8
3.8.2
3.8.1
3.12.1
3.12
4
3.1.4
3.2.4
3.2.1
3.2
3.2.5
3.2.2
3.2.6
3.2.3
3.2.7
3.2.8
4.1
4.2
6
3.3
3.3.1
3.3.2
V
IV
3.3.3
4.2.1
4.1.1
4.1.2
4.2.2
4.1.3
4.2.3
7.1.1
7.1
Español
1
0DJ\DU
Français
7
6ORYHQVN\
Português
13
Italiano
55
English
19
Galego
61
Deutsch
25
Català
67
Nederlands
31
(XVNDUD
āHVN\
IV