1
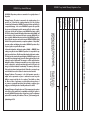
item #2273 Mini Stepper Master™ User’s Manual Mini Stepper Master™ by Wagan Tech User’s Manual—Read before using this equipment Dear Valued Customer, Thank you for purchasing Wagan Tech Mini Stepper fitness equipment! We know you will be more than satisfied with our products. This user manual contains instructions on how to properly operate and care for your new Mini Stepper. If you have any questions with regards to the assembly or operation of this product, please call us at 1-800-231-5806 extension 101 or email us at [email protected]. Please take note that any specifications, diagrams and/or functions described in this instruction manual may have changed since its printing, and we will not be able to provide separate notice of any changes and/or improvements made to the product. Note: It is important to adhere strictly to the instructions that are outlined in this manual for correct operation and maintenance of the equipment. We will not be held liable for any bodily injury or property damage resulting from misuse of the equipment. Assembly Handle bar (7) LCD Meter (6) Power Cable (1) 4x Long Bolts (8) 4x Washers (8) Connecting Tube (5) 4x Short Bolts (4) 4x Lock Washers (4) 4x Washers (4) Stand Tube (2) 1. Run the Power Cable (1) through the Stand Tube (2). 2.Connect the Stand Tube (2) to the main frame (3) with supplied short bolts and washers (4). 4x Short Bolts (4) 4x Lock Washers (4) 4x Washers (4) 3.Run the Power Cable (1) through the Connecting Tube (5). Main Frame (3) 4.Connect the Connecting Tube (5) to the Stand Tube (2) with supplied short bolts and washers (4). 5.Connect the Power Cable (1) to the underside of the LCD Meter (6) and then proceed to install the LCD meter (6) onto the very top of the Connecting Tube (5). 6.Connect the two Handle Bars (7) to either side of the Connecting Tube (5) with supplied long bolts and washers (8). 1 www.wagan.com © 2010 Wagan Corporation All Rights Reserved Wagan and wagan.com are trademarks used by Wagan Corporation 2 Mini Stepper Master™ by Wagan Tech User’s Manual—Read before using this equipment Tension Adjustment Maintenance 1. Locate the tension key, which looks like a screw with a triangular cap (Figure 1). • Inspect the Mini Stepper at regular intervals to check to see whether there are loose joints and/or parts that have been damaged or worn. 2.Locate the threaded hole on the opposite side on the stepper (Figure 2). • Put lubricating oil or grease on hydraulic components of the Mini Stepper and any of its moving parts at 3-month intervals. Applying lubricating grease may help to minimize noise and to fix uneven or rough movements of the pedals, should these occur. 3.Twist the tension key slowly into the threaded hole on the backside of the main frame (2). 4.One side of the stepper will be automatically lifted up as the tension key is screwed into the main frame (2). As the tension key is fastened into the main frame, the amount of force required to screw the key in increases (Figure 3). Hint: Lift up one of the stepper pedals manually before inserting the tension key. 5.Once the tension key has been properly adjusted, please test out the stepper by stepping on each pedal in an alternating fashion. • Store the Mini Stepper in a cool and dry environment. Figure 1 • Inspect the unit thoroughly before beginning exercise on it. Make sure that there are no issues with the machine such as loose joints, loose hydraulic parts, or wobbling pedals. • This product is designed only for use by individuals with a weight not exceeding 225 lbs. Figure 2 7. Adjust the tension key according to how firm you would prefer the steps to be. 9. If the tension key is loosened so that it is barely screwed in, the pedals have been adjusted to provide the least demanding workout available. 3 www.wagan.com Using the Mini Stepper We recommend that you utilize your Mini Stepper on a daily basis, for half an hour at a time. We believe you will feel its marvelous cardio-training effects after one month of use. The Mini Stepper is excellent whether used at home or in the office. For example, even exercising during a break at work would produce great results. Rather than feeling fatigued or exhausted, you will feel refreshed and energized with the Mini Stepper! 6.If the tension key has been properly installed, one pedal will be up while the other will be down as you put pressure on either of the pedals. 8.If the tension key is all the way in, the pedals have been adjusted to provide the most intense workout available. • Don’t clean the surface of the Mini Stepper with organic solvents (i.e. gasoline, benzene, etc.) or its surfaces may become damaged. Figure 3 • Persons with hypertension, obesity, and heart disease should not perform strenuous exercise using the Mini Stepper. • We do not recommend that you exercise when feeling exhausted or tired. • We suggest that you keep a healthy daily diet; it is strongly encouraged that you consume sufficient amounts of nutrients in each category of the food pyramid that is outlined on the U.S. Department of Agriculture’s website. © 2010 Wagan Corporation All Rights Reserved Wagan and wagan.com are trademarks used by Wagan Corporation 4 Mini Stepper Master™ by Wagan Tech • Perform some warm-up exercises prior to your exercise routine so as to decrease the risk for injury. For example, stretch your arms, legs, and back. • Please note that it is also important to coordinate both arm and leg workouts during an exercise. It might be a good idea to add hand weights while exercising with the Mini Stepper to achieve a better workout. • Pacing yourself is extremely important. Exercise on the Mini Stepper should be done in a regular, smooth fashion; sudden bursts of speed are not recommended because they may increase the risk of physical injury. User’s Manual—Read before using this equipment Reps/Min: 1. Press the MODE key until the pointer advances to REPS/MIN. 2.When the speed sensor receives a signal input, it starts to count. 3.Estimated repetitions per minute begins recording when exercise has begun. Count: Displays steps accumulated since start of exercise. Calories: 1. Press the MODE key until the pointer changes to CALORIE. 2.When the speed sensor receives a signal input, it starts to count. Meter Function 3.Total calories expended begins recording when exercise has begun. Mode (red button): Scan: • This key allows you to select and lock on to a particular function you desire. • Hold this key for 3–4 seconds to have all function values reset (this is a total reset). Automatic display of the following functions in the order shown: TIME CALORIES SPEED (REPETITIONS/MIN) Time Read-Out Specification Operation Procedures TIME 00:00-59:59 Min Auto On/Off: REPS/MIN 0-9999 Reps/Min COUNT 0-9999 Times CALORIES 0-9999 Cal • The system turns on when any key is pressed or when it senses an input from the speed sensor (i.e. when you begin exercising on it). • The monitor will automatically shut off if there has been inactivity for 4 to 5 minutes. Time: 1. Press the MODE key until the pointer advances to TIME. 2.When the speed sensor receives a signal input, it starts to count. Battery • The LCD display meter operates on one AAA battery. • The battery will need to be replaced when an incorrect display appears on the LCD meter. 3.Total workout time begins recording when exercise has begun. 5 www.wagan.com © 2010 Wagan Corporation All Rights Reserved Wagan and wagan.com are trademarks used by Wagan Corporation 6 WAGAN Corp. Limited Warranty WAGAN Corp. Limited Warranty Registration Form Name Mailing address City State, Zip code E-mail address Item purchased Store name Please activate my limited warranty for WAGAN Corp. Item no. Updated August 2008 Date Warranty Performance: During the above one (1) Year warranty period, a product with a defect will be replaced with a comparable model when the product is returned to WAGAN Corporation with an original store receipt. The replacement product will be in warranty for the balance of the one (1) Year warranty period. Date of purchase Warranty Disclaimers: This warranty is in lieu of all warranties expressed or implied and no representative or person is authorized to assume any other liability in connection with the sale of our products. There shall be no claims for defects or failure of performance or product failure under any theory of tort, contract or commercial law including, but not limited to negligence, gross negligence, strict liability, breach of warranty and breach of contract. Attn: Customer Service WAGAN Corporation 31088 San Clemente St. Hayward, CA 94544 A Returned Merchandise Authorization number (RMA#) is REQUIRED when sending in any defective item. WAGAN Corporation is not responsible for any item(s) returned without an official Returned Merchandise Authorization number. The item(s) must be returned with prepaid shipping. WAGAN Corporation is not responsible for any shipping charges incurred in returning the item(s) back to the company for repair or replacement. This warranty is void if the product has been damaged by accident, in shipment, unreasonable use, misuse, neglect, improper service, commercial use, repairs by unauthorized personnel or other causes not arising out of defects in materials or workmanship. This warranty is effective only if the product is purchased and operated in the USA and does not extend to any units which have been used in violation of written instructions furnished. All WAGAN Corporation Products must be registered within (30) days of purchase to activate this warranty. Mail the complete registration form, along with a copy of the original sales receipt to: Warranty Duration: This product is warranted to the original purchaser for a period of one (1) Year from the original purchase date, to be free of defects in material and workmanship. WAGAN Corporation disclaims any liability for consequential damages. In no event will WAGAN Corporation be responsible for any amount of damages beyond the amount paid for the product at retail. In the event of a defective item, please contact WAGAN Corporation at (800) 231-5806 to obtain a Returned Merchandise Authorization number (RMA#), and return instructions. Each item returned will require a separate RMA#. After you have received the RMA# and the return instructions from WAGAN Corporation, please follow the instructions and send the item with PREPAID SHIPPING, along with all of the required documentation, a complete explanation of the problem, your name, address and daytime phone number. WAGAN Corporation will, at its option, replace or repair the defective part. Signature All WAGAN Corporation products are warranted to the original purchaser of this product. www.wagan.com [email protected] Toll Free: 1.800.231.5806 31088 San Clemente Street Hayward, CA 94544 U.S.A. ©2010 Wagan Corporation All Rights Reserved Wagan and wagan.com are trademarks used by Wagan Corporation Rev20100817