1
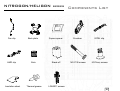
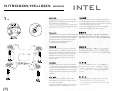
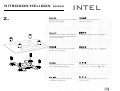
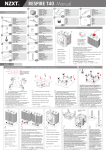
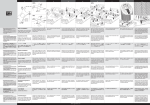
NITROGON
HELIGON SERIES
Manual
NITROGON/HELIGON
SERIES
The following manual and guides were carefully prepared by the SilverStone
engineering team to help you maximize the potential of your SilverStone product.
A copy of this manual can also be downloaded from our website at:
http://www.silverstonetek.com
Components List
P.2
INTEL
P.3
AMD
P.9
FAN Mounting
P.15
1
NITROGON/HELIGON
SERIES
Fan clip
Back plate
Square spacer
AMD clip
Nuts
Stand-off
Insulation sheet
Thermal grease
Components List
Crossbar
M3.5*30 screws
INTEL clip
M3*6mm screws
LGA2011 screws
2
NITROGON/HELIGON
1.
SERIES
INTEL
Please check the holes of motherboard before
installation and insert the screws M3.5*30 into
the correct holes of back-board.
*Please insert the square spacer into the centric
hole of back-board with LGA775 installation only.
Перед установкой кулера проверьте и выберите
соответсвующие отверстия на материнской плате
и проведите винты типа м3.5*30 к соответсвующим
отверстиям монтажной пластины.
*Установите квадратный вкладыш по середине
монтажной пластины (для INTEL только).
Uberprufen Sie die Lochfuhrungen des Mainboards 確定背板正確的使用面,將螺柱依CPU平臺類型插入
vor der Installation und setzen Sie die Schrauben 背板對應的孔位;安裝LGA775主板時,須先將方形墊
板壓入背板中心孔,LGA1155/1156/1366主板則不需要。
M3.5*30 korrekt von unten durch die Backplate.
*Setzen Sie bitte nur bei dem Sockel 775 die
Schraubbegrenzungen zentrisch auf die
Lochfuhrungen der Backplate.
3
Repérer les trous de fixation de la carte mère
avant l'installation, puis insérer les vis M3.5*30
dans les trous de fixation correspondant sur la
plaque arrière. *Seulement dans le cas d'une
installation pour Socket LGA 775, veiller à
disposer le carré de mousse au centre de la
plaque arrière.
确定背板正确的使用面,将螺柱依CPU平台类型插入
背板对应的孔位;安装LGA775主板时,须先将方形垫
板压入背板中心孔,LGA1155/1156/1366主板则不需要。
Por favor, seleccione los agujeros adecuados
de la placa base, antes de realizar la instalación,
e inserte los tronillos M3.5*30 en el lugar correcto.
*Utilice el espaciador cuadrado en el centro del
anclaje, únicamente cuando se trate de socket
LGA775.
インストールの前にマザーボードの穴を確認して、
M3.5*30ネジをバックプレートの穴に正しく差して
ください。*LGA775のインストールにのみ、角型ス
ペーサーをバックプレートの中心の穴に装着して
ください。
Controllare i fori della scheda madre prima
dell'installazione ed inserire le viti M3.5x30 nei
fori corretti della piastra.
*Inserire il distanziale quadrato nel foro centrale
della piastra solo con l'installazione LGA775.
설치 전에 메인보드의 구멍을 확인하고 M3.5*30
나사를 백보드의 올바른 구멍에 끼우십시오.
*사각 스페이서를 LGA775만 설치된 백보드의 중심
구멍에 끼우십시오.
NITROGON/HELIGON
2.
SERIES
INTEL
Install the back-board set onto the motherboard
and slip on the standoff.
Закрепите монтажную пластину
к материнской плате.
Installieren Sie die Backplate auf der Mainboard
Unterseite und ziehen Sie die Abstandshalter von
oben uber die Schrauben.
將背板組件裝入主板孔位,套入4pcs圓柱固定。
Installer la plaque arrière sous la carte mère
et y apposer les entretoises.
将背板组件装入主板孔位,套入4pcs圆柱固定。
Coloque la sujeción por detrás de la placa
base y deslícela sobre los tornillos.
マザーボードにバックプレートセットをインス
トールして、スペーサーの上に設置します。
Installare la piastra sulla scheda madre
ed installare il distanziatore.
백보드 세트를 메인보드에 설치하고 스탠드오프
위에서 미십시오.
4
NITROGON/HELIGON
3.
5
SERIES
INTEL
Mount LGA2011 and INTEL clips and
tighten the nuts.
Установите интеловские зажимы и
закрепите винты.
Setzen Sie die LGA2011 und Intel Clips auf
die Schrauben und verschrauben Sie diese
mit den Schraubmuttern.
裝入INTEL扣具,將4顆螺絲順時針擰緊固定。
裝入LGA2011螺絲及INTEL扣具,將4顆螺絲
順時針擰緊固定。
Monter les plaque de fixation pour processeur
LGA2011 et INTEL, et serrer les écrous.
装入INTEL扣具,将4颗螺丝顺时针拧紧固定。
装入LGA2011螺丝及INTEL扣具,将4颗螺丝
顺时针拧紧固定。
Monte los clips de LGA2011, INTEL y
ajuste las tuercas.
LGA2011とINTELクリップを取り付けて、
ナットを締めます。
Installare i dispositivi di fissaggio LGA2011
ed INTEL e stringere i dadi.
LGA2011과 INTEL 클립을 장착하고 너트를
조이십시오.
NITROGON/HELIGON
4.
SERIES
INTEL
Please clean the surface of CPU before
applying the thermal grease and then apply
the Thermal grease evenly on CPU.
На очищенную поверхность процессора
равномерно нанесите термапасту.
Reinigen Sie bitte die Oberfläche der CPU bevor
Sie die Wärmeleitpaste gleichmäßig auftragen.
將導熱膏均勻塗在CPU表面。
Nettoyer la surface du CPU avant d'appliquer
la pâte thermique, puis appliquer la pate
uniformément sur le CPU.
将导热膏均匀涂在CPU表面。
Por favor, limpie la superficie del microprocesador
antes de aplicar la pasta termica. Una vez limpio,
apliquela de manera uniforme sobre la CPU.
サーマルグリスを塗る前に、CPUの表面を清潔に
して、CPU上にサーマルグリスを均一に塗ります。
Pulire la superficie della CPU prima di applicare
la pasta termica e quindi applicare pasta termica
in modo uniforme sulla CPU.
써멀 그리스를 바르기 전에 CPU 표면을 청소한
후 써멀 그리스를 CPU에 고르게 바르십시오.
6
NITROGON/HELIGON
5.
SERIES
INTEL
Take off the film of CPU surface and
place heat-sink on CPU.
Снимите защитную пластинку с нижней части
радиатора и установите кулер на процессор.
Ziehen Sie die Schutzfolie des Kühlers ab
und setzen Sie diesen auf die CPU.
撕掉散熱器底部保護貼紙,再將散熱器放置CPU中間。
Retirer le film plastique du coté CPU du
refroidisseur et le disposer sur le CPU.
撕掉散热器底部保护贴纸,再将散热器放置CPU中间。
Quite el adhesivo protector de la base
del disipador y coloquelo sobre la CPU.
CPU表面のフィルムを剥がして、ヒートシンクを
CPU上に設置します。
Togliere la pellicola dalla superficie della CPU
e collocare il dispersore di calore sulla CPU.
CPU 표면의 필름을 벗겨내고 방열판을 CPU
위에 놓으십시오.
Please remove
before install
7
NITROGON/HELIGON
6.
SERIES
INTEL
Install the crossbar through heat-sink and
tighten the screws on the both of clips.
Проведите планки через основу радиатора
и закрепите винтами к зажимам.
Nehmen Sie den Querstrebe und setzen Sie
diesen wie im Bild angezeigt auf die Oberseite
des Kühlers und verschrauben Sie ihn fest auf
beiden Clips.
將壓杆橫穿過散熱器,並使其定位於散熱器
中間位置,將兩邊彈簧螺絲鎖緊到位。
Utiliser la barre transversale au milieu du
dissipateur et serrer les vis des deux cotés
of clips.
将压杆横穿过散热器,并使其定位于散热器
中间位置,将两边弹簧螺丝锁紧到位。
Colocado el clip de montaje, atornille las roscas
en forma de T en los tornillos estriados.
ヒートシンク上にクロスバーをインストール
してから、両方のクリップのネジを締めます。
Installare la traversa attraverso il dissipatore
e stringere le viti su entrambi i dispositivi di
fissaggio.
크로스바를 방열판을 관통하여 설치한 후
나사를 두 클립에 조이십시오.
8
NITROGON/HELIGON
1.
9
SERIES
AMD
Please check the holes of motherboard before
installation then insert the square spacer into
the centric hole of back-board and attach the
insulation sheets on the back-board. Insert
M3.5*60 screws into the correct holes of back-board.
Перед установкой кулера проверьте и выберите
соответсвующие отверстия на материнской плате,
затем установите квадратный вкладыш по середине
монтажной пластины и приложите изоляционные
вкладыши. Пpоведите винты типа м3.5*30 к
соответсвующим отверстиям монтажной пластины.
Überprüfen Sie die Lochführungen des Mainboards
vor der Installation und kleben Sie das rechteckige
Isolations pad zentrisch über der rechteckigen
Aussparung der Backplate. Setzen Sie die M3.5*30
Schrauben in die korrekten Lochführungen der
Backplate wie abgebildet.
確定背板正確的使用面,壓入方形墊板,將4片絕緣
貼片貼於相應位置,再將螺杆插入其對應的孔位。
Repérer les trous de fixation de la carte mère
avant l'installation, puis insérer les vis M3.5*30
dans les trous de fixation correspondant sur la
plaque arrière.
确定背板正确的使用面,压入方形垫板,将4片绝缘
贴片贴于相应位置,再将螺杆插入其对应的孔位。
Por favor, seleccione los agujeros adecuados
de la placa base, antes de realizar la instalación,
y coloque el espaciador cuadrado en el agujero
del centro de la sujeción. Pegue los adhesivos
de aislamiento en las esquinas de la sujeción
insertando los tornillos M3.5*30 por su parte trasera.
インストールの前にマザーボードの穴を確認して、
角型スペーサーをバックプレート中心の穴に装着し、
バックプレート上に絶縁シートを確実に取り付けます。
M3.5*60ネジをバックプレートの穴に正しく差してく
ださい。
Controllare i fori della scheda madre prima
dell'installazione, quindi inserire il distanziale
quadrato nel foro centrale della piastra e collegare
i fogli isolanti sulla piastra. Inserire le viti M3.5x60
nei fori corretti della piastra.
설치 전에 메인보드의 구멍을 확인하고 사각
스페이서를 백보드의 중심 구멍에 끼운 후 절연
시트를 백보드에 부착하십시오. M3.5*60 나사를
백보드의 올바른 구멍에 끼우십시오.
NITROGON/HELIGON
2.
SERIES
AMD
Install the back-board set to the motherboard
and slip the pillars.
(Remove the original AMD back-board)
Закрепите монтажную пластину к материнской
плате.
(Удалите оригинльную монтажную пластину AMD)
Installieren Sie die Backplate auf der Mainboard
Unterseite und ziehen Sie die Abstandshalter von
oben über die Schrauben.
(Entfernen Sie die Original AMD Backplate)
再將背板組件裝入主板孔位(若主板載有原扣具則需取掉),
套入4pcs圓柱固定。
Installer la plaque arrière sous la carte mère et
y apposer les entretoises.
(Retirer le cadre de fixation AMD d'origine)
再将背板组件装入主板孔位(若主板载有原扣具则需取掉),
套入4pcs圆柱固定。
Coloque la sujeción por detrás de la placa base
y deslícela sobre los tornillos.
(Retire la sujeción original de AMD)
マザーボードにバックプレートセットをインストー
ルして、スペーサーの上に設置します。
(元のAMDバックプレートは取り外してください)
Installare la piastra sulla scheda madre ed
installare i sostegni.
(Rimuovere la piastra AMD originale)
백보드 세트를 메인보드에 설치하고 기둥을 미십시오.
(원래의 AMD 백보드를 제거)
10
NITROGON/HELIGON
3.
11
SERIES
AMD
Combine the AMD and INTEL clips with
M3*6 screws then insert the clip set onto
the back-board and tighten the nuts.
Совместите комбинацию зажимов Intel и АMD
с винтами и закрепите на монтажной пластине.
Verschrauben Sie die AMD und Intel Clips mit
den M3*6 Schrauben, setzen Sie diese dann
auf die Abstandshalter wie auf abgebildet und
ziehen Sie die Muttern fest an.
將AMD扣具與INTEL扣具鎖合後套進螺杆,
將4顆螺母擰緊固定。
Combiner les clips de fixation AMD et INTEL
avec les vis M3*6. Puis insérer les clips dans
les vis de la plaque arrière et serrer le tout avec
les écrous.
将AMD扣具与INTEL扣具锁合后套进螺杆,
将4颗螺母拧紧固定。
Combine los clips de AMD y los de INTEL con
los tornillos M3*6, después inserte el conjunto
en la sujeción y fíjelo con las tuercas.
AMDおよびINTELクリップを、M3*6ネジで結合し、
バックプレート上にクリップセットを装着してか
ら、ナットを締めます。
Unire i dispositivi di fissaggio AMD ed INTEL
usando viti M3x6, quindi inserire i dispositivi
di fissaggio sulla piastra e serrare i dadi.
AMD 클립과 INTEL 클립을 M3*6 나사로 결합한 후
클립 세트를 백보드 위에 끼운 후 너트로 조이십시오.
NITROGON/HELIGON
4.
SERIES
AMD
Please clean the surface of CPU before applying
the thermal grease, then apply the Thermal grease
evenly on CPU.
На очищенную поверхность процессора
равномерно нанесите термапасту.
Reinigen Sie bitte die Oberfläche der CPU
bevor Sie die Wärmeleitpaste gleichmäßig
auftragen.
將導熱膏均勻塗在CPU表面。
Nettoyer la surface du CPU avant d'appliquer
la pâte thermique, puis appliquer la pate
uniformément sur le CPU.
将导热膏均匀涂在CPU表面。
Por favor, limpie la superficie del microprocesador
antes de aplicar la pasta térmica. Una vez limpio,
aplíquela de manera uniforme sobre la CPU.
サーマルグリスを塗る前に、CPUの表面を清潔に
して、CPU上にサーマルグリスを均一に塗ります。
Pulire la superficie della CPU prima di applicare
la pasta termica e quindi applicare pasta termica
in modo uniforme sulla CPU.
써멀 그리스를 바르기 전에 CPU 표면을 청소한
후 써멀 그리스를 CPU에 고르게 바르십시오.
12
NITROGON/HELIGON
5.
SERIES
AMD
Take off the film of CPU surface and
placeheat-sink on CPU.
Снимите защитную пластинку с нижней части
радиатора и установите кулер на процессор.
Ziehen Sie die Schutzfolie des Kühlers
ab und setzen Sie diesen auf die CPU.
撕掉散熱器底部保護貼紙,再將散熱器放置CPU中間。
Retirer le film plastique du coté CPU du
refroidisseur et le disposer sur le CPU.
撕掉散热器底部保护贴纸,再将散热器放置CPU中间。
Quite el adhesivo protector de la base
del disipador y colóquelo sobre la CPU.
CPU表面のフィルムを剥がして、ヒートシンクを
CPU上に設置します。
Togliere la pellicola dalla superficie della CPU
e collocare il dispersore di calore sulla CPU.
CPU 표면의 필름을 벗겨내고 방열판을 CPU
위에 놓으십시오.
Please remove
before install
13
NITROGON/HELIGON
6.
SERIES
AMD
Install the crossbar through heat-sink and
tighten the screws on the both of clips.
Проведите планки через основу радиатора
и закрепите винтами к зажимам.
Nehmen Sie den Querstrebe und setzen
Sie diesen wie im Bild angezeigt auf die
Oberseite des Kühlers und verschrauben
Sie ihn fest auf beiden Clips.
將壓杆橫穿過散熱器,並使其定位於散熱器中間位置,
將兩邊彈簧螺絲鎖緊到位。
Utiliser la barre transversale au milieu du
dissipateur et serrer les vis des deux cotés.
将压杆横穿过散热器,并使其定位于散热器中间位置,
将两边弹簧螺丝锁紧到位。
Colocado el clip de montaje, atornille las roscas
en forma de T en los tornillos estriados.
ヒートシンク上にクロスバーをインストール
してから、両方のクリップのネジを締めます。
Installare la traversa attraverso il dissipatore e
stringere le viti su entrambi i dispositivi di fissaggio.
크로스바를 방열판을 관통하여 설치한 후 나사를
두 클립에 조이십시오.
14
NITROGON/HELIGON
1.
15
SERIES
FAN Mounting
Insert the fan clips into the holes of fan and
hook the fan set into the groove on the heat-sink.
Вставьте крепления для монтажа вентилятора
в отверстия, имеющиеся в нем, и установите
блок вентилятора в пазе радиатора.
Schieben Sie die Lüfterclips in die entsprechenden
Öffnungen und setzen Sie den Lüfter in die
Vertiefung des Kühlkörpers ein.
將金屬線扣兩端扣入風扇孔內,再將線扣掛入
散熱片線扣溝槽內。
Insérez les crochets du ventilateur dans les
orifices de ce dernier, et accrochez l’ensemble
dans la rainure prévue à cet effet sur le dissipateur
thermique.
将金属线扣两端扣入风扇孔内,再将线扣挂入
散热片线扣沟槽内。
Inserte los enganches del ventilador en los
agujeros del ventilador e inserte el conjunto
del ventilador en el receptáculo del disipador.
ファン・クリップをファンの穴に装着し、ヒー
トシンク上の溝にファンセットを引っかけます。
Inserire i dispositivi di fissaggio della ventola
nei fori della ventola ed agganciare la ventola
nella scanalatura del dissipatore di calore.
팬 클립을 팬의 구멍에 끼운 후 팬 세트를
방열판의 홈에 끼우십시오.
NITROGON/HELIGON
SERIES
Twin tower heatsink with unbelievable cooling power
2.
FAN Mounting
Connect the fan connector with the
motherboard. Installation completed.
Подключите венитлятор к материнской плате.
Устанока завершена.
Verbinden Sie den Lüfteranschluss mit
dem Mainboard. Die Installation ist fertig.
將風扇端子插入主板相應介面位置,完成安裝。
Connecter la prise du ventilateur sur la carte
mère Mission accomplie, installation terminée.
将风扇端子插入主板相应接口位置,完成安装。
Conecte el ventilador a la placa base y la
instalación se habrá completado.
ファンコネクタをマザーボードに接続します。
これでインストールは完了です。
Collegare il connettore della ventola alla
scheda madre. L'installazione è completata.
팬 커넥터를 메인보드와 연결하십시오.
설치가 완료되었습니다.
16
Warranty Information
This product has a limited 1 year warranty in North America, Europe, and Australia.
For information on warranty periods in other regions, please contact your reseller or SilverStone authorized distributor.
Warranty terms & conditions
1. Product component defects or damages resulted from defective production is covered under warranty.
Defects or damages with the following conditions will be fixed or replaced under SilverStone Technology’s jurisdiction.
a) Usage in accordance with instructions provided in this manual, with no misuse, overuse, or other inappropriate actions.
b) Damage not caused by natural disaster (thunder, fire, earthquake, flood, salt, wind, insect, animals, etc…)
c) Product is not disassembled, modified, or fixed. Components not disassembled or replaced.
d) Warranty mark/stickers are not removed or broken.
Loss or damages resulted from conditions other than ones listed above are not covered under warranty.
2. Under warranty, SilverStone Technology’s maximum liability is limited to the current market value for the product (depreciated value, excluding
shipping, handling, and other fees). SilverStone Technology is not responsible for other damages or loss associated with the use of product.
3. Under warranty, SilverStone Technology is obligated to repair or replace its defective products. Under no circumstances will SilverStone
Technology be liable for damages in connection with the sale, purchase, or use including but not limited to loss of data, loss of business, loss of
profits, loss of use of the product or incidental or consequential damage whether or not foreseeable and whether or not based on breach of warranty,
contract or negligence, even if SilverStone Technology has been advised of the possibility of such damages.
4. Warranty covers only the original purchaser through authorized SilverStone distributors and resellers and is not transferable to a second hand
purchaser.
5. You must provide sales receipt or invoice with clear indication of purchase date to determine warranty eligibility.
6. If a problem develops during the warranty period, please contact your retailer/reseller/SilverStone authorized distributors or SilverStone
http://www.silverstonetek.com.
Please note that: (i) You must provide proof of original purchase of the product by a dated itemized receipt; (ii) You shall bear the cost of shipping
(or otherwise transporting) the product to SilverStone authorized distributors. SilverStone authorized distributors will bear the cost of shipping
(or otherwise transporting) the product back to you after completing the warranty service; (iii) Before you send the product, you must be issued a
Return Merchandise Authorization (“RMA”) number from SilverStone. Updated warranty information will be posted on SilverStone’s official website.
Please visit http://www.silverstonetek.com for the latest updates.
17
Additional info & contacts
For North America ([email protected])
SilverStone Technology in North America may repair or replace defective product with refurbished product that is not new but has been functionally tested.
Replacement product will be warranted for remainder of the warranty period or thirty days, whichever is longer. All power supplies should be sent
back to the place of purchase if it is within 30 days of purchase, after 30 days, customers need to initiate RMA procedure with SilverStone Technology
in USA by first downloading the “USA RMA form for end-users” form from the below link and follow its instructions.
http://silverstonetek.com/contactus.php
For Australia only ([email protected])
Our goods come with guarantees that cannot be excluded under the Australian Consumer Law.
You are entitled to a replacement or refund for a major failure and for compensation for any other reasonably foreseeable loss or damage.
You are also entitled to have the goods repaired or replaced if the goods fail to be of acceptable quality and the failure does not amount to a major failure.
Please refer to above “Warranty terms & conditions” for further warranty details.
SilverStone Technology Co., Ltd. 12F No. 168 Jiankang Rd., Zhonghe Dist., New Taipei City 235 Taiwan R.O.C. + 886-2-8228-1238
(standard international call charges apply)
For Europe ([email protected])
For all other regions ([email protected])
18
lssue date: June, 2012
NO. G11216070