1
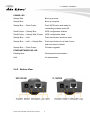
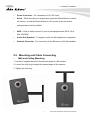
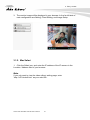
.
AirCam WN-150CAM/
IP-150CAM
Wireless N 150Mbps Dual
Stream IP Camera /
Fast Ethernet Dual Stream
IP Camera
User’s Manual
Copyright & Disclaimer
Copyright
Copyright ©2010/2011 by this company. All rights reserved. No part of this
publication may be reproduced, transmitted, transcribed, stored in a retrieval
system, or translated into any language or computer language, in any form or
by any means, electronic, mechanical, magnetic, optical, chemical, manual or
otherwise, without the prior written permission of this company
This company makes no representations or warranties, either expressed or
implied, with respect to the contents hereof and specifically disclaims any
warranties, merchantability or fitness for any particular purpose. Any software
described in this manual is sold or licensed "as is". Should the programs prove
defective following their purchase, the buyer (and not this company, its
distributor, or its dealer) assumes the entire cost of all necessary servicing,
repair, and any incidental or consequential damages resulting from any defect
in the software. Further, this company reserves the right to revise this
publication and to make changes from time to time in the contents thereof
without obligation to notify any person of such revision or changes.
1
AirCam WN-150CAM/IP-150CAM User’s Manual
Copyright & Disclaimer
Europe – EU Declaration of Conformity
These devices compile with the essential requirements of the R&TTE Directive
1999/5/EC. The following test methods have been applied in order to prove
presumption of conformity with the essential requirements of the R&TTE
Directive 1999/5/EC: This device is a 2.4 GHz wideband transmission system
(transceiver), intended for use in all EU member states and EFTA countries,
except in France and Italy where restrictive use applies.
In Italy the end-user should apply for a license at the national spectrum
authorities in order to obtain authorization to use the device for setting up
outdoor radio links and/or for supplying public access to telecommunications
and/or network services. This device may not be used for setting up outdoor
radio links in France and in some areas the RF output power may be limited to
10mW EIRP in the frequency range of 2454 – 2483.5 MHz. For detailed
information the end-user should contact the national spectrum authority in
France.
Federal Communication Commission Interference Statement
This equipment has been tested and found to comply with the limits for a Class
B digital device, pursuant to Part 15 of the FCC Rules. These limits are
designed to provide reasonable protection against harmful interference in a
residential installation. This equipment generates uses and can radiate radio
frequency energy and, if not installed and used in accordance with the
instructions, may cause harmful interference to radio communications.
However, there is no guarantee that interference will not occur in a particular
installation. If this equipment does cause harmful interference to radio or
television reception, which can be determined by turning the equipment off and
on, the user is encouraged to try to correct the interference by one of the
following measures:
y
y
y
y
Reorient or relocate the receiving antenna.
Increase the separation between the equipment and receiver.
Connect the equipment into an outlet on a circuit different from that to
which the receiver is connected.
Consult the dealer or an experienced radio/TV technician for help.
AirCam WN-150CAM/IP-150CAM User’s Manual
2
Copyright & Disclaimer
This device complies with Part 15 of the FCC Rules. Operation is subject to the
following two conditions:
(1) This device may not cause harmful interference, and
(2) This device must accept any interference received, including interference
that may cause undesired operation.
FCC Caution:
Any changes or modifications not expressly approved by the party responsible
for compliance could void the user's authority to operate this equipment.
IEEE 802.11b or 802.11g operation of this product in the U.S.A. is
firmware-limited to channels 1 through 11.
IMPORTANT NOTE
FCC Radiation Exposure Statement
This equipment complies with FCC radiation exposure limits set forth for an
uncontrolled environment. This equipment should be installed and operated
with minimum distance 20cm between the radiator & your body. This
transmitter must not be co-located or operating in conjunction with any other
antenna or transmitter.
3
AirCam WN-150CAM/IP-150CAM User’s Manual
Table of Contents
Table of Contents
1.
Product Overview .................................................................................... 1
1.1.
Introduction................................................................................................1
1.2.
Basic Connection .......................................................................................3
1.3.
Application.................................................................................................4
2.
Hardware Installation............................................................................... 1
2.1.
Safety Instruction .......................................................................................1
2.2.
Minimum System Requirement .................................................................3
2.3.
Package Contents .......................................................................................4
2.4.
Physical Description ..................................................................................5
2.4.1.
Front View .....................................................................................5
2.4.2.
Bottom View..................................................................................6
2.5.
Mounting and Cable Connecting ...............................................................7
3.
Easy Access............................................................................................. 9
3.1.
Web Browsers ............................................................................................9
3.1.1.
Windows Web Browsers ................................................................9
3.1.2.
Mac Safari....................................................................................10
3.2.
Mobile Phone Viewing ............................................................................13
3.2.1.
Using IP Camera via iPhone ........................................................13
3.2.2.
3G Mobile Phone Streaming........................................................14
3.2.3.
2.5G Mobile Phone WAP.............................................................14
3.2.4.
2.5G Mobile Phone Browser........................................................15
3.3.
Windows Live Messenger........................................................................15
4.
Live View ................................................................................................ 18
4.1.
Live View Control Panel..........................................................................18
4.2.
Setting ......................................................................................................19
4.3.
Client Setting ...........................................................................................21
4.4.
Image Setup .............................................................................................22
5.
Setting .................................................................................................... 23
5.1.
System......................................................................................................23
5.1.1.
Information ..................................................................................23
5.1.2.
Date/Time.....................................................................................23
5.1.3.
Account ........................................................................................25
5.1.4.
System Log ..................................................................................26
5.1.5.
Initialize .......................................................................................27
5.2.
Camera .....................................................................................................28
i
AirCam WN-150CAM/IP-150CAM User’s Manual
Table of Contents
5.2.1.
General.........................................................................................28
5.2.2.
MPEG4 ........................................................................................29
5.2.3.
MJPEG.........................................................................................33
5.3.
Network....................................................................................................34
5.3.1.
Information ..................................................................................34
5.3.2.
PPPoE ..........................................................................................35
5.3.3.
DDNS...........................................................................................36
5.3.4.
UpnP ............................................................................................38
5.3.5.
IP Notification..............................................................................39
5.3.6.
WPS .............................................................................................40
5.3.7.
Wireless........................................................................................41
5.3.8.
Messenger ....................................................................................43
5.4.
Events.......................................................................................................44
5.4.1.
FTP Client ....................................................................................44
5.4.2.
SMTP ...........................................................................................49
5.4.3.
Network Storage ..........................................................................53
5.4.4.
Motion Detection .........................................................................58
5.4.5.
Schedule.......................................................................................59
5.5.
Help..........................................................................................................60
6.
Appendix ................................................................................................ 62
Appendix A. - Frame Rate and Bitrate Table.......................................................62
Appendix B. - Storage Requirement Table ..........................................................64
AirCam WN-150CAM/IP-150CAM User’s Manual
ii
1. Product Overview
1
1. Product Overview
1.1. Introduction
The IP-150CAM/WN-150CAM is an ultra-compact IP Camera equipped with a
high sensitivity progressive scan CMOS sensor, achieving high image quality
and superior low-light performance. WN-150CAM also supports 802.11b/g/n
wireless connection with WPS.
y
Key Features:
- Maximum Resolution 640x480 (VGA)
- DDNS Supported
- Simultaneous MPEG-4 and Motion JPEG video stream
- up to flexible 30 fps in all resolution
- Wireless (IEEE 802.11g/b/n with WPS) Networks Connection
(WN-150CAM Only)
1
AirCam WN-150CAM/IP-150CAM User’s Manual
1. Product Overview
- Two-way Audio with Built-In Microphone
- Support Mac OS
- Support iPhone
- Support Live Video Viewing on Windows Live Messenger
- Mobile Phone Streaming Live Video through 3GPP / ISMA / RTSP
- Mobile Phone Live Image through 2.5 WAP
- Multi-level Password Protection for Restricting Camera Access
- ·Built-In Multi-Window Motion Detection (3 detection areas)
- Video Buffer makes the Streaming Smoother
- Support UPnP
- Free Bundled Web-based 9 Channel Surveillance Software (CamPro
Express 64)
AirCam WN-150CAM/IP-150CAM User’s Manual
2
1. Product Overview
1.2. Basic Connection
y
Wired Connection
1. Connect the power adaptor to IP Camera.
2. Connect IP Camera’ Ethernet port to your Hub / Switch / Router.
y
Wireless Connection (Only WN-150CAM)
1. Connect the power adaptor to IP Camera.
2. Connect to Wi-Fi.
3
AirCam WN-150CAM/IP-150CAM User’s Manual
1. Product Overview
1.3. Application
AirCam WN-150CAM/IP-150CAM User’s Manual
4
2. Hardware Installation
2
2. Hardware Installation
2.1. Safety Instruction
y
Before you use this product
This product has been designed with safety in mind. However, the electrical
products can cause fires which may lead to serious body injury if not used
properly. To avoid such accidents, be sure to heed the following.
y
Legal Caution
Video and audio surveillance can be forbidden by laws that vary from country
to country. Check the laws in your local region before using this product for
surveillance purposes.
y
Don't open the housing of the product
Don't try to open the housing or remove the covers which may expose you to
dangerous voltage or other hazards.
y
Don't use the accessories not recommend by the
manufacturer
y
Heed the safety precautions
Be sure to follow the general safety precautions and the “Operation Notice.”
1
AirCam WN-150CAM/IP-150CAM User’s Manual
2. Hardware Installation
y
Operation Notice - Operating or storage location
Avoid operating or storing the camera in the following locations:
- Extremely hot or cold places
(Operating temperature: 0 °C to + 50 °C [32 °F to 122°F] )
- Exposed to direct sunlight for a long time, or close to heating equipment
(e.g., near heaters)
- Close to water (e.g., near a bathtub, kitchen sink, laundry tub)
- Close to sources of strong magnetism
- Close to sources of powerful electromagnetic radiation, such as radios or
TV transmitters
- Locations subject to strong vibration or shock
y
In case of a breakdown
In case of system breakdown, discontinue use and contact your authorized
dealer.
y
In case of abnormal operation
If the unit emits smoke or an unusual smell, if water or other foreign objects
enter the cabinet, or if you drop the unit or damage the cabinet:
1. Disconnect the cable and the connecting cables.
2. Contact your authorized dealer or the store where you purchased the
product.
y
Transportation
When transporting the camera, repack it as originally packed at the factory or
in materials of equal quality.
AirCam WN-150CAM/IP-150CAM User’s Manual
2
2. Hardware Installation
y
Ventilation
To prevent heat buildup, do not block air circulation around the device.
y
Cleaning
Use a soft, dry cloth to clean the external surfaces of the device. Stubborn
stains can be removed using a soft cloth dampened with a small quantity of
detergent solution, then wipe dry.
Do not use volatile solvents such as alcohol, benzene or thinners as they
may damage the surface
2.2. Minimum System Requirement
Item
Requirements
CPU
Pentium 4 1600MHz (or equivalent AMD)
Graphic Card
64 MB RAM graphic cards(or equivalent on-board graphic cards)
RAM
512 MB
Operating System
Windows 98, Windows ME (Please see Note)
Windows2000, 2003, XP, Vista, Windows 7, Mac OS X Leopard
Web Browser
Internet Explore 6 or later
Note
1. If you are using Windows 98 or Windows ME, please install IP Installer
before using WEB UI to ensure the system runs normally.
2. If you can't view the record video file, please install Xvid codec while
installing Intelligent IP Installer. (For Windows 98, ME or 2000 server, the
codec might not work properly. You’ll need to download Xvid codec 1.0 from
the internet.
3
AirCam WN-150CAM/IP-150CAM User’s Manual
2. Hardware Installation
3. Please always update the latest Windows component. (Net Framework,
Windows Media Player, Enhance ActiveX Security)
2.3. Package Contents
y
Camera – IP-150CAM / WN-150CAM Network Camera
y
Quick Installation Guide - To provide brief product information and quick
installation and wireless setting.
y
Software CD – Free bundled web-based 9 channels IP Surveillance
Software, CamPro Express 64 wizard, User Manual and Quick Installation
Guide.
y
Ethernet cable – Assist to setup your IP Camera.
y
Mounting Bracket – There are three components including lock ring,
brace, and base plate to compose a bracket and three applied screws to
fix the base plate to a flat surface. (Horizontal or vertical)
y
Adaptor - 12V DC, max 12W
AirCam WN-150CAM/IP-150CAM User’s Manual
4
2. Hardware Installation
2.4. Physical Description
2.4.1. Front View
y
Focus Adjustment Ring - Adjust focus manually to achieve the best
image quality.
y
Power LED indicator - Power LED will light up after the IP Camera
completed the boot process.
y
Network LED indicator - Network LED will light up after the IP Camera
connected with network.
y
Built-In Microphone - Built-In Microphone for Two- way Audio.
5
AirCam WN-150CAM/IP-150CAM User’s Manual
2. Hardware Installation
POWER LEDD
Steady Red
Boot up process
Steady Blue
Boot up complete
Steady Blue → Flash Purple
Push WPS button and ready for
connecting wireless router/AP
Flash Purple → Steady Blue
WPS configuration finished
Flash Purple → Steady Red 30 secs
WPS configuration failed
Steady Blue → Unlit
Push reset button and then reset
Steady Blue → Unlit → Steady Blue
Push reset button for at least 5 secs
and then reset to default
Steady Blue → Flash Purple
Firmware upgrade
ETHERNET/WIRELESS LED
Flashing blue
Wired packets transmission
Unlit
No transmission
2.4.2. Bottom View
AirCam WN-150CAM/IP-150CAM User’s Manual
6
2. Hardware Installation
y
Power Connector - For connection of 12V DC input.
y
Reset – When the device is empowered, press the Reset Button to reboot
the device, or hold the Reset Button for 10 seconds to set the device
settings back to factory default.
y
WPS – Click to easily connect to your router equipped with WPS. (Only
WN-150CAM)
y
Audio Out (Speaker) - To support audio out with earphones or speakers
y
Network Connector - For connection to the Ethernet via RJ-45 standard.
2.5. Mounting and Cable Connecting
y
Wall and Ceiling Mounting
1. Use the 3 supplied screws to fix the base plate to a flat surface.
2. Loosen the lock ring to adjust the desired angle of the camera.
3. Tighten the lock ring.
7
AirCam WN-150CAM/IP-150CAM User’s Manual
2. Hardware Installation
y
Power and Ethernet Connecting
1. Use a standard RJ-45 network cable to connect the IP Camera to the
Network connection
2. Connect power adaptor to the IP Camera.
AirCam WN-150CAM/IP-150CAM User’s Manual
8
3. Easy Access
3
3. Easy Access
3.1. Web Browsers
3.1.1. Windows Web Browsers
1. Start your web browser, and enter the IP address or host name of the IP
camera in the Location / Address field of your browser.
Note
If you only want to view the video without setting page, enter
“http://<IP>/index2.htm” as your web URL.
2. Use the default user name “admin” and default password “airlive”.
Note
The default user name is “admin” and the default password is “airlive.”
9
AirCam WN-150CAM/IP-150CAM User’s Manual
3. Easy Access
3. The monitor image will be displayed in your browser. In the far left side of
main configuration are Setting, Client Setting, and Image Setup.
3.1.2. Mac Safari
1. Click the Safari icon, and enter the IP address of the IP camera in the
Location / Address field of your browser.
Note
If you only want to view the video without setting page, enter
“http://<IP>/index2.htm” as your web URL.
AirCam WN-150CAM/IP-150CAM User’s Manual
10
3. Easy Access
2. Use the default login name “admin” and default password “airlive”.
Note
The default user name “admin” and the password are set at the factory for the
administrator
11
AirCam WN-150CAM/IP-150CAM User’s Manual
3. Easy Access
4. The monitor image will be displayed in your browser. In the far left side of
main configuration are Setting, Client Setting, and Image Setup.
AirCam WN-150CAM/IP-150CAM User’s Manual
12
3. Easy Access
3.2. Mobile Phone Viewing
3.2.1. Using IP Camera via iPhone
You can use AirLive Web User Interface via iPhone. Please follow the setting
process below. Then, you can use AirLive web UI via iPhone.
a. Select Safari function
b. Type IP address in your web link.
c. Type name and password. Default
d. The AirLive User Interface and live
value is admin / airlive, then click
image will show up in the middle of
login.
screen.
13
AirCam WN-150CAM/IP-150CAM User’s Manual
3. Easy Access
3.2.2. 3G Mobile Phone Streaming
For 3G mobile phone viewing, type “rtsp://<IP>:<PORT>/video.3gp” into your
3G Streaming Link. <IP> is the Public IP address of your IP camera; <PORT>
is the RTSP port of your IP camera (Default value is 554.) Example:
rtsp://100.10.10.1:554/video.3gp
Note
You can also use RTSP clients (RealPlayer, VLC, QuickTime Player…etc.) to
view RTSP streaming, just type in “rtsp://<IP>:<PORT>/video.3gp” as the
Player URL
3.2.3. 2.5G Mobile Phone WAP
For 2.5G mobile phone viewing, type “http://<IP>/mobile.wml ” into your 2.5G
WAP Browser. <IP> is the Public IP address of your IP camera.
AirCam WN-150CAM/IP-150CAM User’s Manual
14
3. Easy Access
3.2.4. 2.5G Mobile Phone Browser
For 2.5G mobile phone viewing, type “http://<IP>/mobile.wml ” into your 2.5G WAP
Browser. <IP> is the Public IP address of your IP camera.
3.3. Windows Live Messenger
1. Apply for a new MSN account for your Device
2. Type login account and password
3.
Set the following settings
15
AirCam WN-150CAM/IP-150CAM User’s Manual
3. Easy Access
4. You will get IP information automatically
5. Click
to live viewing by Windows Live Messenger
6. Click Action button and choose Start control panel
AirCam WN-150CAM/IP-150CAM User’s Manual
16
3. Easy Access
7. Click icons to snapshot or optimize image
17
AirCam WN-150CAM/IP-150CAM User’s Manual
4. Live View
4
4.1.
4. Live View
Live View Control Panel
AirCam WN-150CAM/IP-150CAM User’s Manual
18
4. Live View
4.2. Setting
This function is only for the Administrator. Click this button to get into the
setting page.
There are four sub-folders including System, Camera, Network, and Events
and a Question mark inside.
Click question mark will pop-up a new window and you can get answers online
without user manual.
19
AirCam WN-150CAM/IP-150CAM User’s Manual
4. Live View
HELP is an online help and support. It provides solutions immediately.
AirCam WN-150CAM/IP-150CAM User’s Manual
20
4. Live View
4.3. Client Setting
This function is only for the administrator and client.
y
Mode
Click the pull-down box to choose between MPEG-4 MJPEG, and JPEG video
compression mode. MJPEG streaming is unavailable if RTSP mode is “On.”
y
Video Size
Select the desired display image resolution to 640X480 or 320X240.
y
Video Buffer
Turn the Video Buffer function ON / OFF. The Video Buffer function makes the
streaming more smoothly in unsteady network environment, but might cause a
little delay in live viewing.
21
AirCam WN-150CAM/IP-150CAM User’s Manual
4. Live View
4.4. Image Setup
y
Brightness
The higher value the brightness is, the brighter the image is.
y
Contrast
The contrast is a measure of a display system, defined as the ratio of white to
black that the system is capable of producing. The higher value the contrast is,
the more delicate of color you can have.
y
Saturation
The saturation of a color is determined by a combination of light intensity and
how much it is distributed across the spectrum of different wavelengths. The
higher value the saturation is, the more colorful the image will be.
y
Hue
Hue is one of the three main attributes of perceived color, affected by different
wavelength of color. With higher value of hue, color will be much more vivid.
y
Default
After the adjustment of all setting, you can still click Default to make the setting
back to the original setting.
AirCam WN-150CAM/IP-150CAM User’s Manual
22
5. Setting
5
5. Setting
5.1. System
5.1.1. Information
The Information page provides the product factory information which includes
Product Name, Firmware Version and Web Version.
5.1.2. Date/Time
23
AirCam WN-150CAM/IP-150CAM User’s Manual
5. Setting
y
Current date / time
Display the current date and time of this IP Camera.
y
PC clock
Display the date and time of the monitoring PC clock.
y
Date / Time format
Pull down box to select different time display formats.
y
Adjust
- Keep current setting
Keep the current date and time of this IP Camera.
- Synchronize with PC
Keep the date and time the same PC.
- Manual setting
Adjust manually the date and time of this IP Camera.
- Synchronize with NTP
Specify the NTP server name and the Refresh Interval to synchronize.
y
Time Zone
You can select the Time Zone.
y
Daylight Saving Time
There are two modes to choose for setting up daylight saving time.
- By Date
Set the start and end time by select month, day, hour, and minute.
- By Week Number
Set the start and end time by select month, week, hour, and minute.
AirCam WN-150CAM/IP-150CAM User’s Manual
24
5. Setting
5.1.3. Account
The device fault account and password setting is “admin / admin”. That means
everyone who knows IP address can access the device including all
configuration. It is necessary to assign a password if the device is intended to
be accessed by others.
y
User name
Set a user name between 4-16 characters.
y
Password
Set a password between 4-16 characters.
y
Re-type Password
Re-type the password to confirm.
y
Viewer Mode
Set the user mode among Admin, Operator, and Viewer. Different viewer
mode has different limits of authority.
- Admin mode
Has all authority of configuration.
25
AirCam WN-150CAM/IP-150CAM User’s Manual
5. Setting
- Operator mode
View the Live View and Use Control Panel.
- Viewer mode
View the Live View only.
y
Viewer Authentication
Allows any viewer direct access to Live View.
5.1.4. System Log
The System Log function allows users to review any changes and events
happened. The system starts logging automatically after started.
y
Enable remote log
Enables user to send the log data to a specified log server.
AirCam WN-150CAM/IP-150CAM User’s Manual
26
5. Setting
5.1.5. Initialize
y
Reboot
Reboot this IP Camera and it takes two minutes to reboot this IP Camera.
y
Factory Default
Reset this IP Camera to the factory default setting. Don't turn off this IP
Camera until the device reboots.
y
Backup Setting
Backup the setting data of this IP Camera.
y
Restore Setting
Click “Browse” to restore setting and then restart automatically.
y
Firmware Update
Click “Browse” to upgrade firmware.
y
Upload Language Pack
Upgrade the device language pack.
Note
Use only upgrade files that are special for this IP Camera. Otherwise problems
may occur. Don't turn off the IP Camera power or disconnect the network until
the upgrading is completed.
27
AirCam WN-150CAM/IP-150CAM User’s Manual
5. Setting
5.2. Camera
5.2.1. General
y
RTSP
Switch RTSP “On” or “Off.” The default value is 554.
y
Image Rotate
You can mirror or flip the display screen.
y
Audio Codec
If this option is selected On, the microphone will start sound reception.
y
Night Mode
You can choose Auto / Off. If you choose Auto option, the camera will adjust
automatically to perform well when the environment is dark.
y
Exposure Mode
You can choose the environment among 50 Hz, 60 Hz, and Outdoor.
AirCam WN-150CAM/IP-150CAM User’s Manual
28
5. Setting
y
White Balance
You can choose the white balance to Auto, Florescent, Incandescent and
Black & White.
y
LED Indicator
Turn on/off the LED indicator.
y
Overlay
- Text Overlay
You can see some information on the display screen which includes Date
/ Time and user-defined text. Also, you can change the background color.
- Privacy Mask
You can cover a specific area of the video image.
Note
RTSP (Real Time Streaming Protocol) is a protocol for use in streaming media
system which allows clients to remotely control a streaming video server.
RTSP is supports by most of the media clients such as Real Player, QuickTime
and VLC...etc.
5.2.2. MPEG4
5.2.2.1. Computer View
If RTSP is ON, the option of Viewer Authentication & Multicast Streaming will
appear.
29
AirCam WN-150CAM/IP-150CAM User’s Manual
5. Setting
y
Viewer Authentication
If the viewer authentication is On, the users will be requested to key-in
username and password when viewing through RTSP.
y
Multicast Streaming (If it’s on)
- Multicast Address
Specify the multicast server address.
- Video / Audio Port
Specify the transmission port number of the video data.
- Time to Live
Set the maximum TTL that multicast can pass through.
y
Image Size
Specify the image size when the network camera transmits.
y
Frame Rate
Set the frame rate of the MPEG4 image.
AirCam WN-150CAM/IP-150CAM User’s Manual
30
5. Setting
y
Quality
- Auto
The quality and bitrate will be adjusted automatically according to the
frame rate.
- Fixed Quality
You can select the value of quality.
- Fixed Bitrate
Set the bitrate of MPEG4 image transmission for a line.
Note
Concerning how to select the suitable image quality for Fixed Quality or Fixed
Bitrate, please refer to APPENDIX / A. Frame- rate & Bitrate Table.
5.2.2.2. Mobile View
If RTSP is ON, the option of Viewer Authentication & Multicast Streaming will
appear.
31
AirCam WN-150CAM/IP-150CAM User’s Manual
5. Setting
y
Viewer Authentication
If the viewer authentication is On, the users will be requested to key-in
username and password when viewing through RTSP.
y
Multicast Streaming (If it’s on)
- Multicast Address
Specify the multicast server address.
- Video / Audio Port
Specify the transmission port number of the video data.
- Time to Live
Set the maximum TTL that multicast can pass through.
y
Image Size
Specify the image size when the network camera transmits
y
Frame Rate
Set the frame rate of the MPEG4 image.
y
Quality
- Auto
The quality and bitrate will be adjusted automatically according to the
frame rate.
- Fixed Quality
You can select the value of quality.
- Fixed Bitrate
Set the bitrate of MPEG4 image transmission for a line.
Note
Concerning how to select the suitable image quality for Fixed Quality or Fixed
Bitrate, please refer to APPENDIX / A. Frame-rate & Bitrate Table.
AirCam WN-150CAM/IP-150CAM User’s Manual
32
5. Setting
5.2.3. MJPEG
If RTSP is OFF, the option of Image Size & Frame Rate & Quality will appear.
y
Image Size
Specify the image size when the network camera transmits
y
Frame Rate
Set the frame rate of the MJPEG image.
y
Quality
- Auto
The quality and bitrate will be adjusted automatically according to the
frame rate.
- Fixed Quality
You can select the value of quality.
- Fixed Bitrate
Set the bitrate of MPEG4 image transmission for a line.
Note
Concerning how to select the suitable image quality for Fixed Quality or Fixed
Bitrate, please refer to APPENDIX / A. Frame-rate & Bitrate Table.
33
AirCam WN-150CAM/IP-150CAM User’s Manual
5. Setting
5.3. Network
5.3.1. Information
Display the MAC address of the device.
y
Obtain an IP address automatically (DHCP)
Select this while the IP address is assigned by the DHCP server.
y
Obtain DNS server address automatically
Select this to obtain the address of DNS server automatically.
y
Use the following IP address
Select this when the fixed IP address is set.
- IP address
Enter the IP address of the device.
- Subnet mask
Enter the subnet mask.
AirCam WN-150CAM/IP-150CAM User’s Manual
34
5. Setting
- Default gateway
Enter the default gateway.
y
Use the following DNS server address
Select this when you set the fixed address as the IP address of DNS server.
- Primary DNS server
Enter the IP address of the primary DNS server.
- Secondary DNS server
Enter the IP address of the secondary DNS server, if necessary.
y
HTTP port number
Select 80 (recommend) or enter a port number between 1024 and 65535.
5.3.2. PPPoE
If your ISP provides Dynamic IP with authentication by username and
password, type all PPPoE information in this part. When you use the PPPoE
function, you need to turn on the DDNS or IP Notification function at same
time.
35
AirCam WN-150CAM/IP-150CAM User’s Manual
5. Setting
Note
1. The IP Camera needs to be rebooted after it finishes changing the network
completely.
2. The IP Camera with Intelligent IP Installer can’t be founded after turning on
the PPPoE and reboot.
y
IP Address
The IP address obtained at the PPPoE connecting with network.
y
User ID
Enter the user ID for authentication necessary for PPPoE connections.
y
Password
Enter the password for authentication necessary for PPPoE connections.
y
Re-type Password
Re-type the password to confirm.
y
Obtain DNS server address automatically
Select this to obtain the address of DNS server automatically.
y
Use the following DNS server address
Select this when you set the fixed address as the IP address of DNS server.
- Primary DNS server
Enter the IP address of the primary DNS server.
- Secondary DNS server
Enter the IP address of the secondary DNS server.
5.3.3. DDNS
DDNS is a system which allows the domain name data held in a name server
to be updated in real time. The most common use for DDNS is allowing an
internet domain name to be assigned to a computer with a varying / dynamic
IP Address. This makes it possible for other sites on the internet to establish
connection to the machine without needing to track the IP Address
themselves.
AirCam WN-150CAM/IP-150CAM User’s Manual
36
5. Setting
y
Server name
Choose the DDNS Server from the list.
y
User ID
Enter the user ID for authentication necessary for DDNS connections. Type it
up to 64 characters.
y
Password
Enter the password for authentication necessary for DDNS connections. Type
it up to 32 characters.
y
Re-type password
Re-type the password to confirm.
y
Host name
Enter the host name that is registered to the DDNS server.
37
AirCam WN-150CAM/IP-150CAM User’s Manual
5. Setting
5.3.4. UpnP
You can select UPnP function “On” or “Off”. If a ROUTER is used to access to
internet and it supports UPnP IGD function, please turn on the UPnP Port
Forwarding function.
y
HTTP port
The default HTTP port is 80. Or the port number can be entered, ranged from
1024 to 65535.
y
SSL port
The default SSL port is 443. Or the port number can be entered, ranged from
1024 to 65535.
y
MPEG4 RTSP port
The default MPEG-4 RTSP Port is 554. Or the port number can be entered,
ranged from 1024 to 65535.
AirCam WN-150CAM/IP-150CAM User’s Manual
38
5. Setting
5.3.5. IP Notification
When network notify type is set to “ON”, you can send an e-mail notification of
the completion of the network setting.
y
Notify Type
Select the notify type
y
SMTP Server Name
Type the SMTP server name or the IP address
y
SMTP Server Port
Set port number of your mail server. The default value is 25. Tick SSL box if
the mail server you use has security restriction.
y
Authentication
Required when you send an email.
39
AirCam WN-150CAM/IP-150CAM User’s Manual
5. Setting
y
SMTP
Select if SMTP authentication is necessary when an e-mail is sent.
y
POP before SMTP
Select if POP before SMTP authentication is necessary when an e-mail is
sent.
- POP server name
Type the POP server name of the user.
- User name, Password
Type the user name and Password of the user.
y
Recipient e-mail address
Type up to 3 recipient e-Mail addresses.
y
Administrator e-mail address
This address is used for reply mail and sending system messages from the
SMTP server.
y
Subject
Type the subject/title of the e-Mail.
y
Message
Type the text of the E-mail. Default provides network information including IP,
Port, MAC, Model, Firmware Version and Web Version.
Note
If you use g-mail as your mail server, you should set 587 as your port number
and tick SSL box.
5.3.6. WPS
WPS (Wi-Fi Protected Setup) also known as a standard for easy and secure
establishment of a wireless home network.
AirCam WN-150CAM/IP-150CAM User’s Manual
40
5. Setting
y
WPS
Enable/disable the WPS function.
y
Configure via Push button
Click “Start.”
y
Configure via Pin code
Password for this msn account.
5.3.7. Wireless
The wireless network has to be set up by using cable network connection.
After setting the camera correctly, the wireless function can work without cable
network connection. Please follow the setting process below step by step:
41
AirCam WN-150CAM/IP-150CAM User’s Manual
5. Setting
1. See the wireless setting page. Then click “Refresh”. All access points (AP)
around you will show up.
2. Select the AP you wish to connect.
3.
Enter password at active transmit key if you need. If you don't know the
setting of the wireless AP, please ask your network administrator.
4. Choose the option of Obtain an IP address automatically (DHCP).
5. Choose the option of Obtain DNS server address automatically.
y
Use the following IP address
Select this when the fixed IP address is set.
- IP address: Enter the IP address of the device.
- Subnet mask: Enter the subnet mask.
- Default gateway: Enter the default gateway.
y
Use the following DNS server address
Select this when you set the fixed address as the IP address of DNS server.
- Primary DNS server: Enter the IP address of the primary DNS server.
- Secondary DNS server: Enter the IP address of the secondary DNS
server, if necessary.
AirCam WN-150CAM/IP-150CAM User’s Manual
42
5. Setting
6.
Connect to the IP camera with wireless IP address, and then you can
remove the Ethernet connection.
5.3.8. Messenger
If Messenger option is selected On, you can set out the setting of MSN
account. Messenger function provide an easy-connect feature. User can easy
to know what camera’s private and public IP address is.
y
Protocol
Support MSN only.
y
Login Account
Camera will use this account to login MSN server.
y
Password
Password for this msn account.
y
Re-type password
Re-type password to double confirm.
43
AirCam WN-150CAM/IP-150CAM User’s Manual
5. Setting
y
Alias
This alias will display on MSN nickname.
y
Port range
Select one port range for video transmission.
y
IP Notification
Switch the IP notification On / Off. If this feature switches On, camera will send
IP notification to the users who are allowed.
y
Privacy
Switch privacy On / Off. When privacy turns on, only those users in allowed list
can access the camera.
y
User
Input to this blank to edit allow list.
y
Allow list
When privacy turns on, only those users in allow list can access the camera.
5.4. Events
5.4.1. FTP Client
5.4.1.1. General
Use this menu to set up for capturing and sending images to an FTP server. By
using FTP client function, you can send the image file which has been shot
and recorded linked with the built-in motion detection function to FTP server.
FTP client setting menu is composed of two tabs, General, Alarm sending
and Periodical sending.
AirCam WN-150CAM/IP-150CAM User’s Manual
44
5. Setting
y
FTP server name
Type the FTP server name to upload still images up to 64 characters, or the IP
address of the FTP server.
y
User name
Type the user name for the FTP server.
y
Password
Type the password for the FTP server.
y
Retype password
To confirm the password, type the same characters as you typed in the
Password box.
y
Passive mode
Set whether you use the passive mode of FTP server or not when connecting
to FTP server. Select On to connect to FTP server using the passive mode.
Note
The frame rate and operability on the main viewer may decrease while a file is
being transmitted by the FTP client function.
45
AirCam WN-150CAM/IP-150CAM User’s Manual
5. Setting
5.4.1.2. Alarm sending
Set to forward the image file to the specified FTP server linked with the alarm
detection by the built-in motion detection function. Select On to send the image
file to FTP server linked with the alarm detection.
y
Remote Path
Type the path to the destination in FTP.
y
Image File Name
Type the file name you want to assign to the images when sending to the FTP
server.
Note
1. You can set motion detection at motion detection page.
2. You can set schedule function at schedule page.
y
Suffix
Select a suffix to add to the file name.
- Date & time
The date & time suffix is added to the Image file name.
AirCam WN-150CAM/IP-150CAM User’s Manual
46
5. Setting
- Sequence number
The sequence number is added to the Image file name.
- Sequence number clear
Click Clear and the suffix of the sequence number returns to 1.
y
Alarm
- Motion Detection
Click it on for using Motion Detection function as a sensor.
y
Effective period
Set the period when the periodical sending is effective.
- Always
The periodical sending is always effective.
- Schedule
You can specify the period when the periodical sending is effective in the
Schedule setting in the other section.
5.4.1.3. Periodical Sending
You can set to send an image file to FTP server periodically by selecting On to
send the image file to FTP server linked with setting period.
47
AirCam WN-150CAM/IP-150CAM User’s Manual
5. Setting
y
Remote Path
Type the path to the destination in FTP.
y
Image File Name
Type the file name you want to assign to the images when sending to the FTP
server.
Note
You can set schedule function at schedule page.
y
Suffix
Select a suffix to be added to the file name sent by SMTP.
- None
The name of the sent file will be the Image file name.
- Date & time
The date & time suffix is added to the Image file name.
- Sequence number
The sequence number is added to the Image file name.
- Sequence number clear
Click Clear and the suffix of the sequence number returns to 1.
y
Interval
Set the periodical sending is effective interval.
y
Effective period
Set the period when the periodical sending is effective.
- Always
The periodical sending is always effective.
- Schedule
You can specify the period when the periodical sending is effective in the
Schedule setting in the other section.
AirCam WN-150CAM/IP-150CAM User’s Manual
48
5. Setting
5.4.2. SMTP
5.4.2.1. General
You can send a mail with attached image file which shot by external sensor
input and motion detections or shot periodically.
y
SMTP Server Name
Type the SMTP server name or the IP address
y
SMTP Server Port
Set port number of your mail server. The default value is 25. Tick SSL box if
the mail server you use has security restriction.
y
Authentication
Required when you send an email.
y
SMTP
Select if SMTP authentication is necessary when an e-mail is sent.
49
AirCam WN-150CAM/IP-150CAM User’s Manual
5. Setting
y
POP before SMTP
Select if POP before SMTP authentication is necessary when an e-mail is
sent.
- POP server name
Type the POP server name of the user.
- User name, Password
Type the user name and Password of the user.
y
Recipient e-mail address
Type up to 3 recipient e-Mail addresses.
y
Administrator e-mail address
This address is used for reply mail and sending system messages from the
SMTP server.
y
Subject
Type the subject/title of the e-Mail.
y
Message
Type the text of the E-mail.
Note
If you use g-mail as your mail server, you should set 587 as your port number
and tick SSL box.
5.4.2.2. Alarm Sending
Set to send the mail with connection to the alarm detection by the built-in
motion detection function. Select On to send the image file to SMTP server
linked with the alarm detection.
AirCam WN-150CAM/IP-150CAM User’s Manual
50
5. Setting
y
File attachment
Set whether an image file is attached to the mail sent or not.
y
Image File Name
Type the file name you want to assign to the images when sending to the FTP
server.
Note
1. You can set motion detection at motion detection page.
2. You can set schedule function at schedule page.
y
Suffix
Select a suffix to add to the file name.
- Date & time
The date & time suffix is added to the Image file name.
- Sequence number
The sequence number is added to the Image file name.
- Sequence number clear
Click Clear and the suffix of the sequence number returns to 1.
y
Alarm
- Motion Detection
Click it on for using Motion Detection function as a sensor.
51
AirCam WN-150CAM/IP-150CAM User’s Manual
5. Setting
y
Effective period
Set the period when the periodical sending is effective.
- Always
The periodical sending is always effective.
- Schedule
You can specify the period when the periodical sending is effective in the
Schedule setting in the other section.
5.4.2.3. Periodical Sending
You can set to send an image file by SMTP server periodically by selecting On
to send the image file by SMTP server linked with setting period.
y
Image file name
Type the file name of the image sent by SMTP up to 10 alphanumeric
characters, - (hyphen) and _ (under score).
Note
You can set schedule function at schedule page.
AirCam WN-150CAM/IP-150CAM User’s Manual
52
5. Setting
y
Suffix
Select a suffix to be added to the file name sent by SMTP.
- None
The name of the sent file will be the Image file name.
- Date & time
The date & time suffix is added to the Image file name.
- Sequence number
The sequence number is added to the Image file name.
- Sequence number clear
Click Clear and the suffix of the sequence number returns to 1.
y
Interval
Set the periodical sending is effective interval.
y
Effective period
Set the period when the periodical sending is effective.
- Always
The periodical sending is always effective.
- Schedule
You can specify the period when the periodical sending is effective in the
schedule setting in the other section.
5.4.3. Network Storage
5.4.3.1. General
Select On if you would like to use the network storage function. Then choose
one protocol between Windows network (SMB/CIFS) and Unix network (NFS).
53
AirCam WN-150CAM/IP-150CAM User’s Manual
5. Setting
y
Protocol - Windows Network (SMB/CIFS):
- Network Storage Location
Type the IP or name of specified computer and folder. For example,
//IP/folder name or // my_nas/folder name.
- Workgroup
Type the name of workgroup which the operating computer belongs.
- User Name & Password
Type the name and password for workgroup.
- Attached File Type
You can choose snapshot or video clip for alarm sending. Select
“Snapshot,” one snapshot will be transmitted to the specified network
storage location while motion detection / audio detection / alarm input
triggered. Select “Video clip,” one video clip which can be selected from 5
seconds to 60 seconds will be transmitted.
- Test
After setting the network storage location information, you can tick the test
key to test if the connection between IP CAM and network storage
location works.
y
Protocol- Unix network (NFS):
- Network Storage Location
Type the IP or name of specified computer and folder. For example,
//IP/folder name or my_nas:/folder name.
AirCam WN-150CAM/IP-150CAM User’s Manual
54
5. Setting
- Test
After setting the network storage location information, you can tick the test
key to test if the connection between IP CAM and network storage
location works.
5.4.3.2. Alarm Sending
Set to transmit the snapshot or video clip file with connection to the alarm
detection. Select On to send the file to network storage location linked with the
alarm detection.
y
Image File Name
Type the file name you want to assign to the images when sending to the FTP
server.
Note
1. You can set motion detection at motion detection page.
2. You can set schedule function at schedule page.
55
AirCam WN-150CAM/IP-150CAM User’s Manual
5. Setting
y
Suffix
Select a suffix to add to the file name.
- Date & time
The date & time suffix is added to the Image file name.
- Sequence number
The sequence number is added to the Image file name.
- Sequence number clear
Click Clear and the suffix of the sequence number returns to 1.
y
Alarm
- Motion Detection
Click for using Motion Detection function as a sensor.
y
Recording Time
Select recording time from 5 to 60 minutes.
y
Effective period
Set the period when the periodical sending is effective.
- Always
The periodical sending is always effective.
- Schedule
You can specify the period when the periodical sending is effective in the
Schedule setting in the other section.
5.4.3.3. Periodical Sending
You can set to send an image file by SMTP server periodically by selecting On
to send the image file by SMTP server linked with setting period.
AirCam WN-150CAM/IP-150CAM User’s Manual
56
5. Setting
y
Image file name
Type the file name of the image sent by SMTP up to 10 alphanumeric
characters, - (hyphen) and _ (under score).
y
Suffix
Select a suffix to be added to the file name sent by SMTP.
- Date & time
The date & time suffix is added to the Image file name.
- Sequence number
The sequence number is added to the Image file name.
- Sequence number clear
Click Clear and the suffix of the sequence number returns to 1.
y
File Size
The file size of image or video clip transmitted to the network storage location
can’t over 50MB.
y
Cyclic Time
The total amount of files transmitted to the network storage location has to be
in the range from 100 to 1024000MB.
57
AirCam WN-150CAM/IP-150CAM User’s Manual
5. Setting
y
Recording Time
Set the period when the periodical sending is effective.
- Always
The periodical sending is always effective.
- Schedule
You can specify the period when the periodical sending is effective in the
Schedule setting in the other section.
Note
You can set schedule function at schedule page.
5.4.4. Motion Detection
There are three Motion Detection functions as sensors to set for different
detecting zones. Each one has Threshold and Sensitivity inputs which you can
adjust to specific zone sequentially. Motion Detection function can support to
FTP, SMTP and HTTP for capturing and sending images.
AirCam WN-150CAM/IP-150CAM User’s Manual
58
5. Setting
y
Threshold
It means the extent which the alarm will be triggered.
y
Sensitivity
It means that how often the sensor will scan the image different. The higher
sensitivity it is and the more frequently it scans.
y
Motion Detection 1, 2 and 3
Click it on for using Motion Detection 1, 2 and 3 function as a sensor. You
can adjust and move the detecting zone by using mouse.
5.4.5. Schedule
This is the same menu as the setting menu which is displayed when you click
Schedule to set Effective period and Schedule in FTP client setting menu and
e-Mail (SMTP) setting menu.
y
Schedule Selection
Select the list box to specify the schedule you want to set.
- FTP -Alarm
- FTP - Periodical
59
AirCam WN-150CAM/IP-150CAM User’s Manual
5. Setting
- e-Mail (SMTP) -Alarm
- e-Mail (SMTP) -Periodical
y
Mon (Monday) to Sun (Sunday)
The time period on the right of the checked day is the effective period of the
schedule.
- Start time, End time
Specify the Start time and the End time.
- Use the same time schedule every day
When this is checked, the Start time and End time set to Mon (Monday)
are applied to all days. In this case, the Start time and End time of the
other days than Mon (Monday) cannot be input.
5.5. Help
HELP is an online help and support. It provides solutions immediately.
AirCam WN-150CAM/IP-150CAM User’s Manual
60
5. Setting
61
AirCam WN-150CAM/IP-150CAM User’s Manual
6. Appendix
6
y
6. Appendix
Frame Rate and Bitrate Table
MPEG4 @ 30fps / Kbps
MPEG4 / Kbps, fps
MJPEG @ 15fps / Kbps
MJPEG / Kbps, fps
y
Storage Requirement Table
MPEG4 Storage Requirement GB / channel / day @ 30fps
MPEG4 Storage Requirement GB / channel / day @ 15fps
MPEG4 Storage Requirement GB / channel / day
MJPEG Storage Requirement GB / channel / day @ 15fps
MJPEG Storage Requirement GB / channel / day
Appendix A. - Frame Rate and Bitrate Table
y
MPEG4 @ 30fps / Kbps
Quality
Excellent
Detailed
Good
Standard
Medium
640*480
1000
400
300
250
250
AirCam WN-150CAM/IP-150CAM User’s Manual
320*240
300
150
100
70
55
62
160*120
90
50
30
25
20
6. Appendix
y
MPEG4 / Kbps, fps
Image-Size Bitrate Setting Frame-Rate
640*480
2048
30
640*480
2048
15
640*480
1536
30
640*480
1536
15
640*480
1024
30
640*480
1024
15
640*480
512
30
640*480
512
15
320*240
1536
30
320*240
1536
15
320*240
1024
30
320*240
1024
15
320*240
512
30
320*240
512
15
160*120
1024
30
160*120
1024
15
160*120
512
30
160*120
512
15
160*120
128
30
160*120
128
15
y
Current
1800
2200
1500
1700
1000
1000
500
600
1500
1600
1000
1000
550
600
950
750
500
50
130
140
Current
26
16
30
16
30
16
30
16
30
16
30
16
30
16
30
16
30
16
30
16
MJPEG @ 15fps / Kbps
Quality
Excellent
Detailed
Good
Standard
Medium
640*480
4000
2400
1600
1300
900
320*240
1500
900
650
500
350
63
160*120
600
400
300
240
170
AirCam WN-150CAM/IP-150CAM User’s Manual
6. Appendix
y
MJPEG / Kbps, fps
Image-Size Quality Setting Frame-Rate
640*480
Excellent
15
640*480
Excellent
5
640*480
Good
15
640*480
Good
5
640*480
Medium
15
640*480
Medium
5
320*240
Excellent
15
320*240
Excellent
5
320*240
Good
15
320*240
Good
5
320*240
Medium
15
160*120
Medium
5
160*120
Excellent
15
160*120
Excellent
5
160*120
Good
15
160*120
Good
5
160*120
Medium
15
160*120
Medium
5
Current
4000
1600
1600
650
900
360
1500
550
650
260
350
130
600
230
300
115
170
65
Current Frame-Rate
13
5
13
5
14
5
13
5
13
5
13
5
13
5
13
5
13
5
Appendix B. - Storage Requirement Table
y
MPEG4 Storage Requirement GB / channel / day @ 30fps
Quality
Excellent
Detailed
Good
Standard
Medium
640*480
10.5
4.2
3.2
2.6
2.6
AirCam WN-150CAM/IP-150CAM User’s Manual
320*240
3.2
1.6
1.1
0.7
0.6
64
160*120
0.9
0.5
0.3
0.3
0.2
6. Appendix
y
MPEG4 Storage Requirement GB / channel / day @ 15fps
Quality
Excellent
Detailed
Good
Standard
Medium
y
640*480
5.3
2.1
1.6
1.3
1.3
320*240
1.6
0.8
0.6
0.4
0.3
160*120
0.4
0.3
0.2
0.1
0.1
MPEG4 Storage Requirement GB / channel / day
Image-Size
640*480
640*480
640*480
640*480
640*480
640*480
640*480
640*480
320*240
320*240
320*240
320*240
320*240
320*240
160*120
160*120
160*120
160*120
160*120
160*120
Bitrate Setting
2048
2048
1536
1536
1024
1024
512
512
1536
1536
1024
1024
512
512
1024
1024
512
512
128
128
Frame-Rate Setting
30
15
30
15
30
15
30
15
30
15
30
15
30
15
30
15
30
15
30
15
65
Current Bitrate
23.0
22.2
18.5
17.9
10.5
10.5
5.3
6.3
15.8
16.9
10.5
10.5
5.8
6.3
10.0
7.9
5.3
0.5
1.4
1.5
AirCam WN-150CAM/IP-150CAM User’s Manual
6. Appendix
y
MJPEG Storage Requirement GB / channel / day @ 15fps
Quality
Excellent
Detailed
Good
Standard
Medium
y
640*480
42.2
25.3
16.9
13.7
9.5
320*240
15.8
9.5
6.9
5.3
3.7
160*120
6.3
4.2
3.2
2.5
1.8
MJPEG Storage Requirement GB / channel / day
Image-Size
Image-Size
640*480
640*480
640*480
640*480
640*480
640*480
320*240
320*240
320*240
320*240
320*240
160*120
160*120
160*120
160*120
160*120
160*120
160*120
Bitrate Setting Frame-Rate
Quality Setting Frame-Rate Setting
Excellent
15
Excellent
5
Good
15
Good
5
Medium
15
Medium
5
Excellent
15
Excellent
5
Good
15
Good
5
Medium
15
Medium
5
Excellent
15
Excellent
5
Good
15
Good
5
Medium
15
Medium
5
AirCam WN-150CAM/IP-150CAM User’s Manual
66
Current Bitrate
Current Bitrate
42.2
16.9
16.9
6.9
9.5
3.8
15.8
5.8
6.9
2.7
3.7
1.4
6.3
2.4
3.2
1.2
1.8
0.7